QuickBooks error code 6010 is a common error that users often face due to access to the network being denied. If your anti-virus or firewall blocks QuickBooks from connecting to the network, this error can appear on your computer’s screen. This error can also be occur while re-installing the QuickBooks desktop software. In this article, we will explain the causes and possible troubleshooting methods to fix this error.
You will see the following error message on your desktop screen when such error occurs:
Warning:
An error occurred. Your QuickBooks installation may have been modified. Reinstall QuickBooks and then try again. If the problem persists, contact Intuit Technical Support and provide them with the following error codes: (-6010, -100).
If you have received the warning message as mentioned above, we recommend you that continue reading this article till the end. You should carry out the troubleshooting methods provided in this article ahead. Try one solution and see if the issue is fixed. Move on to the next if the error persists. Alternatively, you can also call our support number i.e. 1-800-761-1787, and directly speak to our QuickBooks desktop support team for quick and precise solutions to any accounting-related issues.
What does QuickBooks Error 6010, 100 means?
Error Code 6010, -100 generally means that QuickBooks can't access the company file due to network or installation-related issues. It is often related to damaged .ND files, firewall restrictions, or hosting misconfiguration. Another situation when this error occurs is when for some reason, QuickBooks is reinstalled. These, however, are just two of the various reasons that lead to this error. Further in this post, we will tell you the other common causes that trigger this error and solutions that have been tested by our experts.
What Causes QuickBooks Error 6010, 100?
There might be various reasons that can causes this error. Below are some of the common reasons behind to the QuickBooks error code 6010, -100, that will help in finding the right solutions.
If the .ND files are disconnected from the files that end with .QBW and TLG.
Firewall or antivirus programs is not allowing QuickBooks desktop to access the network.
The system’s framework may require cleaning.
The QuickBooks related registry files are removed by any registry-optimizing applications in the system.
The user is not able to access QuickBooks as some blockage is caused by anti-virus programs like ESET NOD32.
When a 3rd party app downloaded on Windows that deletes the important registry files, it directly results in the Error 6010.
Having gone through these causes, it's now time that we jump to the next section, wherein we will brief you about the various signs and symptoms associated with the error.
What are the Signs and Symptoms of QuickBooks Error 6010?
Below can be the basic signs of the error, using which one can spot the error.
One of the major sign can be a message displaying the issue on the screen itself.
If you aren’t able to access the company file.
Or if the company file is operational in the host system.
Rectification of QuickBooks Error Code 6010 100
In order to resolve QuickBooks error code 6010 follow the below-given solution methods. If any method is not working for you then you need to skip it and try the next method.
Solution 1: Repair the Company File
The very first method is to repair the company file. Many times, if the company file is corrupted or damaged, you might face such an error. You can repair the company file by carrying out the steps below:
At first, you need to open the folder that stores the company file.
Look for the file which has the .QBW extension.
After that, you should select the Copy option by right-clicking on the file.
The next step is to click on Paste option and press the Ctrl key in order to open the QuickBooks application.
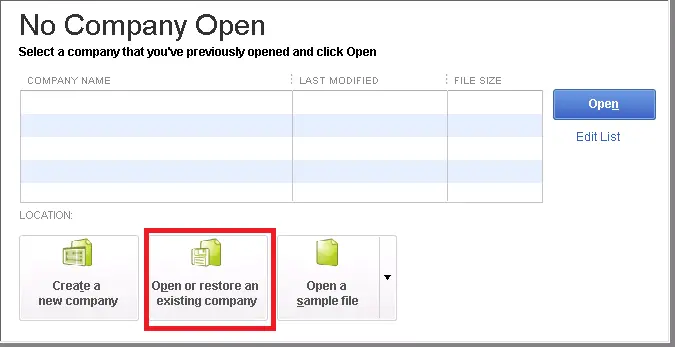
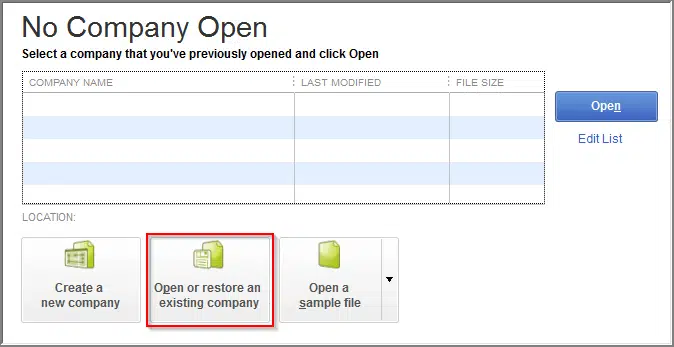
After this, you will come across the option No Company Open.
The next step requires you to click on Open or restore an existing company.
Last step is to launch the company file and check if still the error 6010 is there or not.
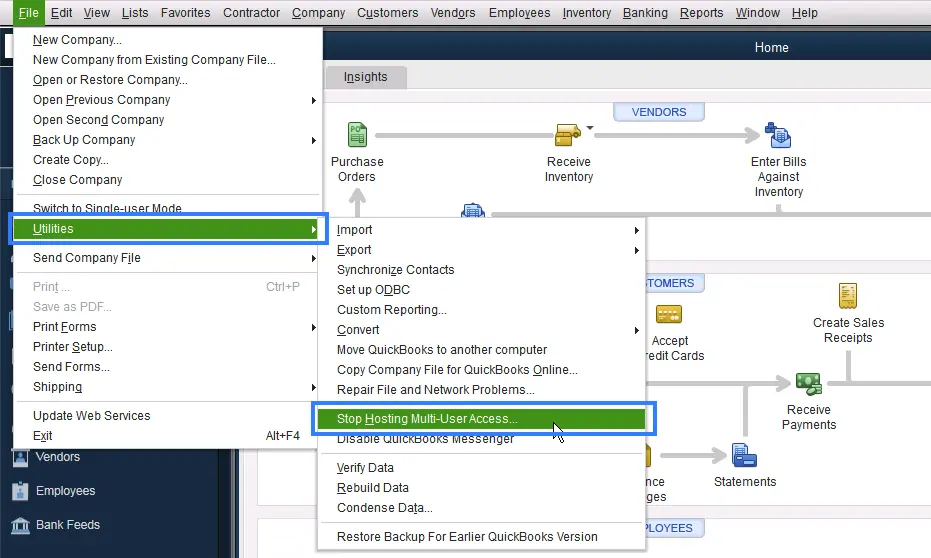
Solution 2: Terminate the Processes and set QuickBooks to Single User Mode
Another solution is to close the processes and then set the QuickBooks software to single user mode. The steps involved in this procedure are as follows:
Use the Administrator credentials and log into the PC.
Now press the Ctrl + Shift +Esc keys and launch Task Manager.
Choose the Users option.
Highlight all QuickBooks processes like qbupdate.exe, EXE,and QBDBM.exe.
Now hit a click on End Task in multi-user mode.
To check if the error 6010 has been resolved or not, launch the company file.
After that, find out the downloaded file named as QuickBooksToolsHub.exe and double click it to run the setup.
Next, hit a click to Allow this app to make changes on your PC.
Now click on Next option to install this tool on your system.
Next, click on Next tab to Accept the license agreement and click on Install.
Note: This will take a few seconds to install on your computer system. Once the procedure done, you need to click on Finish button to complete the installation.
Once the QuickBooks Tools Hub is successfully installed on your computer, click on the Icon to launch it.
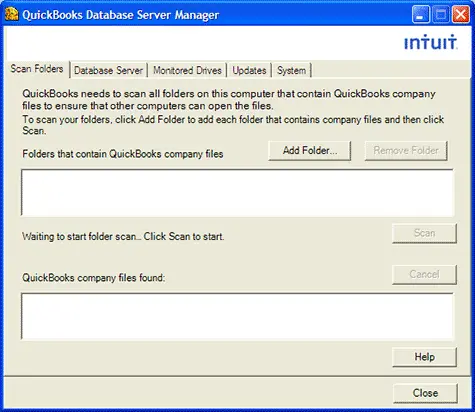
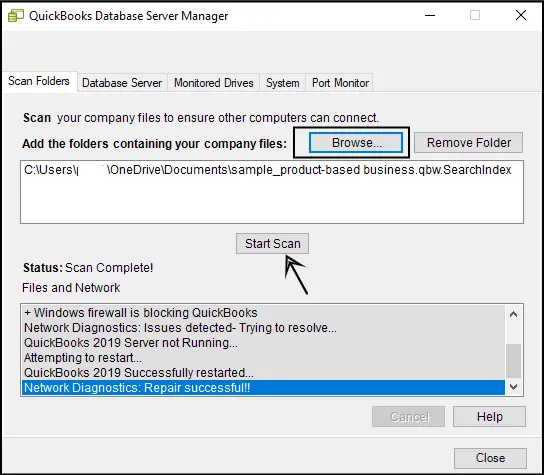
Now on the tools hub, go to the Network issues and click on QuickBooks database server manager option.
Scan the Company file location and then click on the Scan Folders tab.
Next, browse and choose the Folder and files that store your company file (.QBW)
Now click on OK and then click on Start Scan option.
Once done with that, you can now log into your company files.
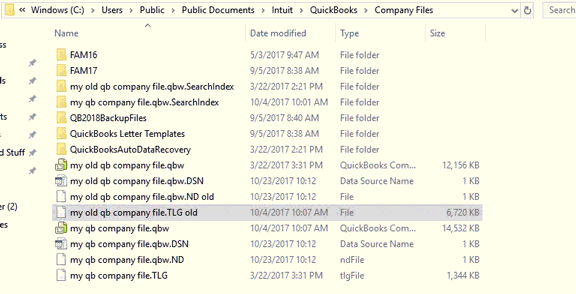
Solution 4: Give a new name to the .ND extension
Giving a new name to the .ND extension can also be a great solution to this error. The steps to be followed for this are as follows:
Open the Company file which has the .ND extension.
Also, access the company file where the error code 6010 is occurring.
Right-click on the file, once you have found it.
From the drop-down menu, select Rename option.
While renaming, you need to add ‘Old’ as an extension (for example My company.qbw.ND.old).
This article is created after consulting our experts. We hope you find it helpful in removing the QuickBooks error code 6010. If the problem persists, repairs or you have any other issues with your QuickBooks software, please contact our QuickBooks error technical support number, i.e. 1(800)-761-1787, and one of our well-trained and certified experts will help you. To assist you with your queries or accounting problems, our experts are available 24 hours a day. You can reach us out via email, Live chat option, or over phone call.
When the cache amount is not set properly, it can affect the performance of QuickBooks and may lead to slow loading, freezing, or unexpected errors. Correcting the cache amount ensures smoother performance and prevents data access issues.
All your need to know about Correcting Cache Amount for QuickBooks Enterprise (QuickBooks Memory Leak)
Crashing into errors every now and then it is pretty much common with QuickBooks software, as it involves tons of algorithms and features. Intuit’s QuickBooks Enterprise solutions is a powerful software that assists in managing finances, payroll details, inventory lists, and more. That's why today most of the medium and small-sized businesses across the globe heavily rely on this accounting software. However, this amazing software isn’t immune to technical glitches or errors. One such error that we are going to discuss upon in this piece of writing is incorrect cache amount for QuickBooks Enterprise.
Cache memory is an important part of QuickBooks which is used by the information manager. At times, the cache amount gets incorrect or non-default, and this leads to slow running of your computer. This segment elaborates a comprehensive guide on how you can correct the cache amount for QuickBooks enterprise. Get a good hold of this cache amount error by simply scrolling through the segment. Else, connect with our dedicated personnel using our QuickBooks error support helpline i.e. 1-800-761-1787. This would definitely resolve the issue for you.
When to correct cache amount for QuickBooks desktop enterprise?
You need to correct the cache amount for QuickBooks enterprise solutions under the following conditions:
When you try to shift to the newest version of Windows.
When you are upgrading to the newest version of QuickBooks Desktop.
QuickBooks Enterprise updated with the new launch.
If the server restarts repeatedly.
Before correcting the cache amount for QuickBooks Enterprise, check if the application is updated to the newest version or not. If your QuickBooks is not up to date, then there are 2 methods to update your QuickBooks desktop:
Manual Update
Automatic Update
Solutions to Correct/Clear the Cache Amount for QuickBooks Enterprise
In the below section, we have provided a complete procedure to correct the cache amount for the QuickBooks desktop enterprise so that you can prevent QuickBooks memory leak problem. So, follow the steps as they are mentioned:
Solution 1: Operate QBW.ini File to correct memory cache amount
Open your system and navigate to the location where the QBW.ini file is located.
Now look for the trial C:\Program Data\ Intuit to launch the QBW.ini file.
You are required to open QBW.ini file and then add a DBSERVEROPTIONS section with the help of the chosen values.
InitialCache= 256 ('None')
MaxCache= 512 ('Unlimited')
You have to choose the sound unit server choices with important values. The 2 choices square measure are mentioned below:
Initial Cache: You have to use the initial cache till the time the primary file is opened. It should be set to none or zero and it will not have any effect on the performance. [InitialCache=16384]
Max Cache: It is the cache that boosts the performance of the system. You will have to use the QuickBooks database server Manager in order to communicate with the company file setting through the most memory standing. [MaxCache=0]
You are required to Save the file.
Now, press the Enter key to take effect for the .ini file settings.
Once done, turn off and switch it on to avoid wasting the file.
In case you have Server only install, then the steps below can be carried out:
From the CMD, type: Net stop QuickBooksDBXX
From CMD, type: Net stop QBCFMonitorService and then start QBCFMonitorService
Solution 2: Amend the settings of the cache to Server only Install
There are two methods to change the settings of the cache for the server only Install:
Step 1: Sign-in to Windows to check the cache setting
At first, go to HKLM\SYSTEM\CurrentControlSet\Services\QuickBooksdb25\Parameter
You might get a message as:
-n QB_SERVER_NAME-qs-qd ALL -qk all -GP 4096 -gu all -ch 256M -c 128M.
-n QB_DELL_20 -qs -gd ALL -gk all -gp 4096 -gu all -ch 1024M -c 512M -x tcpip(BroadcastListener=NO;port=55348) -ti 0 -ec simple -qi -qw -tl 120 -oe C:\PROGRA~3\Intuit\QUICKB~1\DBSTAR~1.LOG
Now keep a record of the amount once -ch and -c
ch 1024M -c 512M
-c 16384M -cl 4096M
-c 8192
Ensure that you have spelt each of message in the correct way and thus the PC will host the multi-user for only QuickBooks Desktop.
Step 2: Amend Settings within the written account
Once you have saved your work, sign out from QuickBooks.
Now restrict the information service of QuickBooks and enter the internet stop QuickBooks DB25.
Note that all the sound unit connections might stop, and you may be unable to get back to the cursed work.
The corrections can be easily created within the Windows written account.
Location of the key: HKEY_LOCAL_MACHINE\SYSTEM\CurrentControlSet\Services\QuickBooks.
The Value can be the same as -n QB_SERVER_NAME-qs -gdALL -gk all -GP 4096 -gu all -ch 256M -c 128M.
Change -c 128M to -c 256M
Change -ch 256M to -ch512M
Now save all the changes that you created.
You also need to open the prompt again to enter: Internet begin QuickBooks DB25.
Now reboot QuickBooks and see if the error still persists or not.
Before selecting any options, you are required to ensure that QuickBooks desktop Enterprise 14.0 or 15.0 is up to date to the latest version.
What are the steps to clear cache in QuickBooks enterprise?
QuickBooks uses browser cache and cookies for running online faster. There are hardly any situations when cache and cookies let little problems. We will be checking out the cache related problems that you might face.
QuickBooks continuously asks you to sign in even after signing in several times.
You might not see the form, or suddenly the browser is taking an unusually long time to download the form.
If you are facing any issues in exporting data.
Step 1: You can clear Intuit-specific cookies from the browser
At times, the browser’s cache stores the computer’s files for quicker response to users on their next visit. It also gets clogged with old files which can create minor issues. It is always recommended to practice clear cache on a timely basis.
Step 2: Clear Intuit specific cookies from browser
For Google Chrome:
Start off with opening the Google Chrome browser, and then select the Menu tab.
Visit the Settings tab.
And go for the Advanced and look for the site setting under the Privacy and security tab.
Following that, hit a click on Cookies and then select Site data.
Now look for all Cookies and site data.
And then type Intuit to find Intuit cookies.
Go for the Remove option.
And lastly reboot the browser for the changes to take effect.
For Mozilla Firefox
If you are a Mozilla Firefox user, then you need to visit the Open menu.
After that select Preferences and look for Privacy security.
Now click on Manage data under the opt Cookies and Site data.
Then enter in Intuit and then select Enter to view intuit cookies.
Now pick Remove all option and click on Save changes.
Restart the browser.
On Safari browser
You can launch safari and select the safari near the apple icon.
After that, select Preferences option.
Followed by moving to Privacy and select Manage website data.
Now insert "Intuit" in search bar to discover Intuit cookies.
Also select Remove all and then click on Remove now.
Once done with that, select Done.
Last but not the least, restart the browser for the changes to take effect.
For Microsoft Edge:
Microsoft edge doesn’t permit you to delete site-specific cookies. In case of any issue, you can contact our QuickBooks professionals.
Cache in QuickBooks Enterprise is temporary memory used to store frequently accessed data. It helps in improving speed and performance while opening or working on large company files.
Where can I find the cache settings in QuickBooks Enterprise?
The cache settings are found inside the QBW.ini file, located at: C:\Users[Your User Name]\AppData\Local\Intuit\QuickBooks [Version].
What is the recommended cache size for QuickBooks Enterprise?
Generally, a cache size between 512MB to 1024MB works best. However, the value may vary depending on your system capacity and company file size.
Will correcting cache amount improve QuickBooks performance?
Yes, setting the right cache amount helps QuickBooks Enterprise run faster, reduces lag, and prevents freezing issues while working on large files.
Summing up!
The above mentioned ways will easily correct the cache amount for QuickBooks desktop. However, if you face any error or get stuck while performing the steps, then our QuickBooks enterprise support team is always there for your assistance. We are available 24/7 to help you and save your precious time and efforts. You can reach out to our professionals using our support helpline i.e. 1(800)761-1787 and our well trained and experienced experts will guide you in all the facets of your accounting software. Thus, feel free to call us anytime, we will be happy to help you.
QuickBooks accounting software has taken an upper hand in the market, but the fact that it is prone to certain errors can’t be denied. However, with these errors, solutions come hand in hand, as Intuit, the developer of QuickBooks offers countless tools that help us to get rid of the errors as quickly as they are encountered. The list of tools offered by Intuit is huge, which includes:
Being true to its name, QuickBooks Tool hub program is a one stop solution for all the errors, as it is a collection of all QuickBooks tools in one application. This tool can fix all the accounting errors such as technical, functional, installation, data transfer and data migration errors. There are multiple facts related to QuickBooks tool hub, which we will be discussing later in this article. Thus, to know more, make sure to stay tuned with this article till the end.
You can also reach out to our accounting experts using our dedicated customer support line i.e., 1-800-761-1787, and our certified team will provide you with the relevant information. Thus, call us anytime and we will be happy to help you.
What is QuickBooks tool hub program?
QuickBooks Tool hub is recently introduced by Intuit. It is a multi-functional asset, where users can avail the features of tools like File Doctor, QuickBooks Refresher, Condense Data tool, PDF and print repair tool, Install diagnostic tool, connection diagnostic tool, and a lot more.
In simple words, QuickBooks Tool Hub is a compilation of all tools that are used by users to get rid of various minor and major QuickBooks related issues. Earlier, users encountered a plenty of issues in downloading multiple tools to fix different-different errors in QuickBooks, but now this tool will resolve all their issues. So, the need for downloading and installing multiple tools has been vanished with the introduction of this program. It is basically not a tool, rather you need to pay to subscribe to it. You will have to download it from the official website of Intuit. The tool hub will fix all the common errors, to use it you need to have windows 10 (64 bit) on the PC. For this:
After that, you should open the QuickBooksToolHub.exe file from the downloaded folder.
Now you are then required to run and agree to all the terms and conditions by following the on-screen prompts.
After the tool gets installed, you will naturally find an icon of the same.
List of errors that can be fixed by using the QuickBooks Tool Hub
QuickBooks Tools Hub program practically solves all major and minor issues that are faced by the QB users. You are simply required to download this tool and let it do the rest of the work. Let us see what all errors can be fixed with the help of this tool hub.
At the time of company file errors, you can choose the Company files issues tab. This tool will open the QuickBooks file doctor and repair the company file. Also, you need to follow the instructions given on the screen, when you work on this tool.
Connection and networking troubles:
At times when you encounters connectivity issues on a specific network, then you can click on Network issues tab, which will help you in resolving the network error H202.
Performance problems:
In case QuickBooks starts lagging and you are unable to face issues, then you need to click on Program Problems tab. And then it will help you in resolving the error 6123 in QuickBooks desktop.
Apart from the issues discussed above, you can try fixing the common QuickBooks errors, which are listed below:
In a nutshell, it can be said that QuickBooks tools hub is capable of tackling all possible QB related error codes.
System requirements to run the QuickBooks Tools Hub
It should be noted that there are two basic requirements, in order to download and install QuickBooks Tool Hub. Let us check out each of them one by one:
.NET Framework
It is essential for users to have the .Net Framework on the system to install the QuickBooks Tool hub.
Microsoft Visual C++ Redistributable Package
This is another system requirement, which you must look into, in order to avoid any kind of error in running Tool hub.
Steps to Download and Install QuickBooks Tool Hub program
The QuickBooks Tool Hub can be downloaded from official Intuit website. The steps involved in this process are as follows:
You can download the tool directly from Intuit and save the file to an accessible location.
And then launch QuickBooksToolHub.exe file to start with the installation process.
After that, hit a click on Next option.
You will then be asked to Accept and agree with Intuit’s license agreement, to which you will have to click on Yes.
The next step is to select the QuickBooks tool hub install Destination folder and then click on Next.
After that, you will have to click on the Install option, in order to begin with the installation.
Now you are required to click on the Finish tab, and the QuickBooks Tool hub will open up after that.
Important Note: You should be noted that the Tool Hub program automatically download it in the desktop background. This can take 2 to 3 minutes to complete. The tool might not run if you try to close out of the installation process.
What makes QuickBooks Tool hub worth the hype?
QuickBooks tool hub is known for some great features and a couple of benefits, Let us have a look:
Simplistic Interface: QB Tool hub has a plain and simplistic interface. It might not be flashy or full of eye pleasing things, but is intuitive enough that even system novices will have no issues operating it.
Great for fixing company file issues: The tool hub program is a great tool for company file issues. You can make use of this tool to repair common issues that prevent the software from opening the company file.
Network issues can also be dealt: If you are facing network issues, then the tool hub will help you out.
QuickBooks tool hub is free: This tool is absolutely free and has no associated fees associated with its usage, which makes it one of the best tools for QB users.
Login issues: If you have missed out on the QuickBooks password, then you can click on Password reset tab and follow the instructions given on screen. This will help you in resetting the password successfully.
Now that you have installed and opened up the QuickBooks tool hub program, you will see a few components of this program on the screen, which include:
Home
The home screen gives us essential information related to the QuickBooks tool hub and also the way in which one can use it effectively. This screen also specifies the components that are to be used for specific problems.
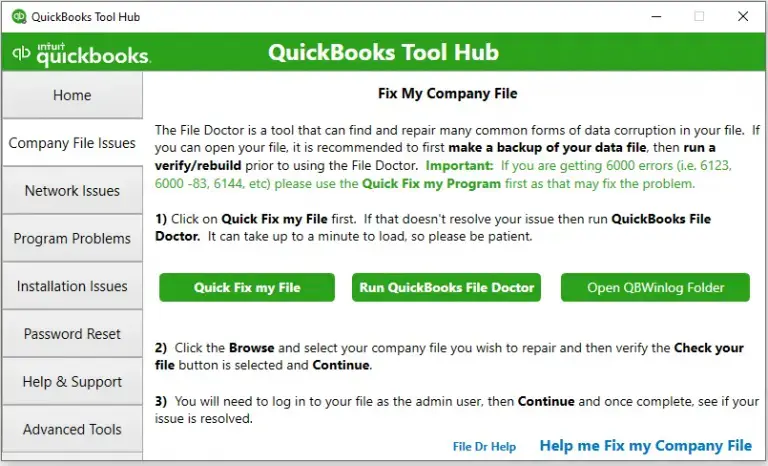
Company File issues
Option 1: Quick Fix my program
You need to use Quick Fix my File option first. To use it, hit a click on Quick Fix my File tab and follow the on-screen instructions. If the tool didn't rectify the issue then go Run QuickBooks file doctor tool.
Option 2: Run QuickBooks File Doctor
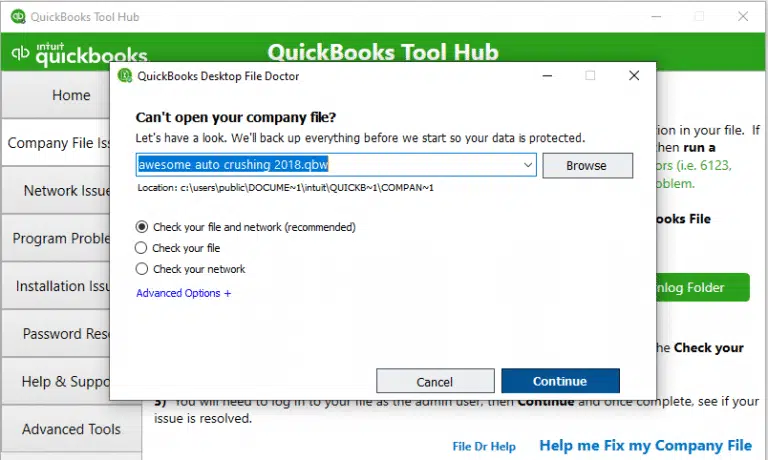
The second component is the company file issues option that can be selected by you in case of company file related problems. You will have to select the second tab and run QuickBooks file doctor. You can run the file doctor tool by using the below steps:
To start off with, click on Run QuickBooks file doctor green tab.
And then, wait for it to load. This might take around one minute.
Further, click on Browse tab and select the Company file that is to be repaired.
Now, verify that the Check your file option is selected.
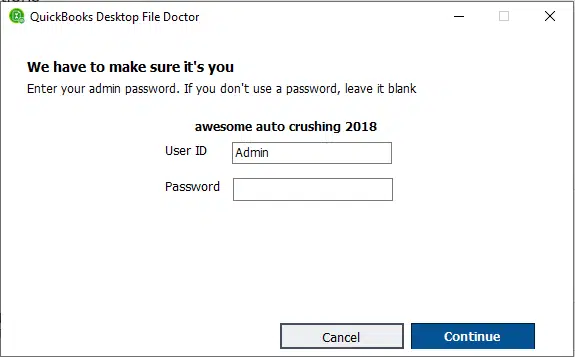
Log in to the file as the Admin user.
The last step is to click on Continue tab.
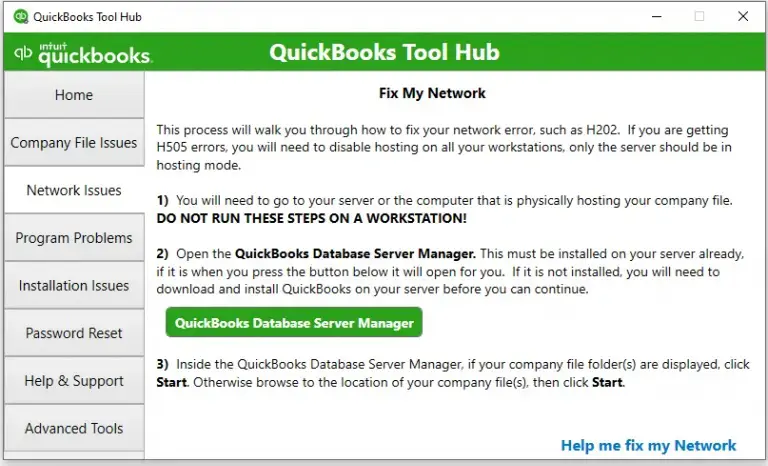
Network Issues
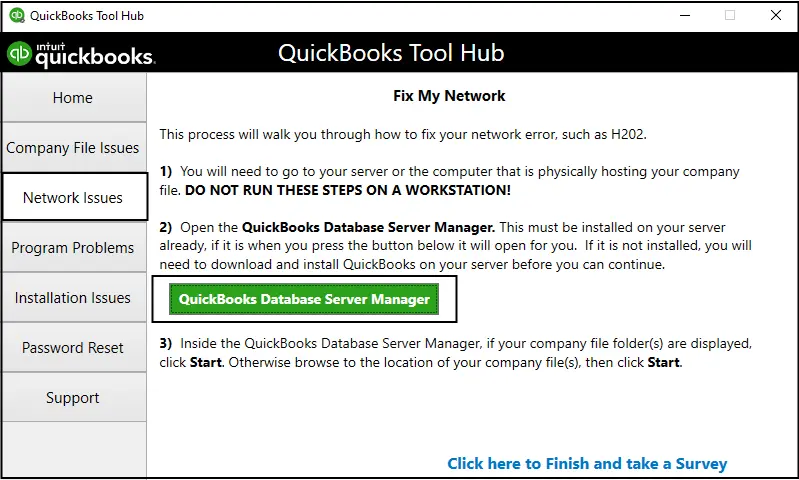
In case of any kind of network-related problem, you can opt for the third component Network Issues. You will also have the option to use the QuickBooks database server manager.
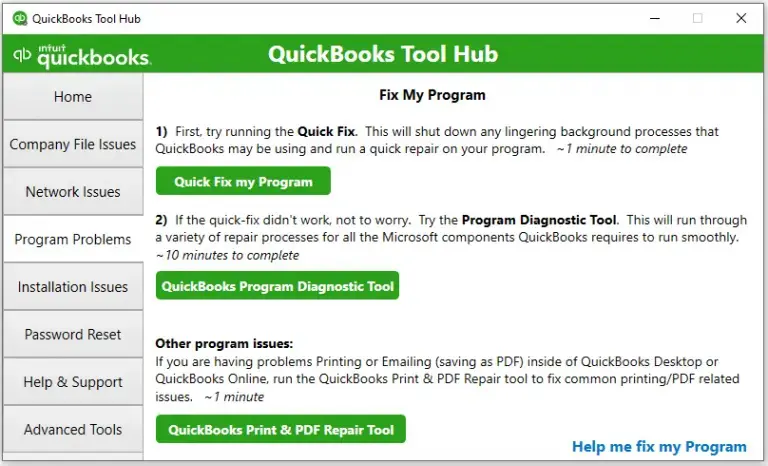
Then comes the program problems tab, which can be selected for any kind of error. In this tab you will get a variety of options, which includes Quick fix my program, QuickBooks program diagnostic tool, and QuickBooks Print & PDF repair tool. In program problems, you will find three tools as stated above:
Quick Fix My Program:
In case you choose this option, then it will terminate all the background processes from the QuickBooks and run a quick repair on the program. This is a swift process, that takes around a couple of minutes to complete, and is very much helpful in fixing program problems.
QuickBooks Program Diagnostic Tool:
Another tool that is present in program problems, is QuickBooks program diagnostic tool. This tool will go through various repair processes and works with every Microsoft component used by QuickBooks to run effectively. This scan might take longer time than other tool, you might take around 10 minutes or more to complete.
QuickBooks Print and PDF Repair Tool:
This tool comes to assistance when one is facing printing or emailing issues within QuickBooks desktop or online. This method is automated and take around a minute to complete.
Installation Issues
You can resolve any type of common errors while installing or uninstalling QuickBooks desktop. You need to select the Installation issues option. In this option, you will be getting QuickBooks Install diagnostic tool and QuickBooks clean install tool. Opting for any of the two can help us to get rid of installation issues. You can also fix the 3371 errors.
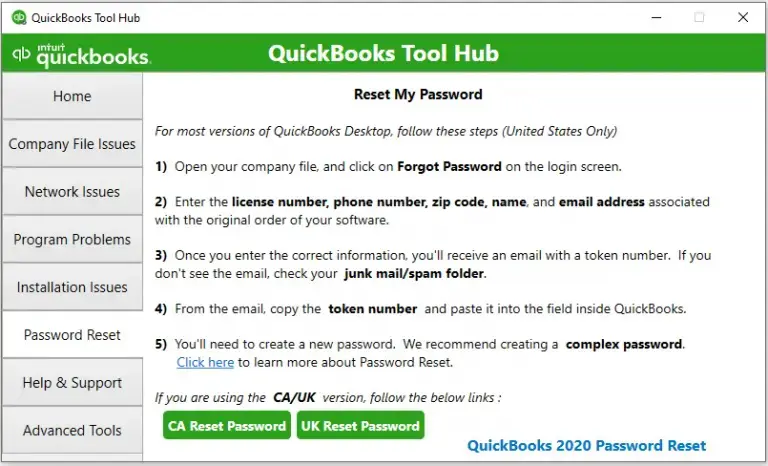
Password Reset
After installation issue, we comes the Password reset tab, where you can select Password Reset tab, and reset the QuickBooks desktop admin password without any kind of issue.
Help & Support
The last component is Help and Support. You will witness the different ways of availing of the QuickBooks support. This includes options such as message us, smart-look session, and visiting the site. You can contact the direct support team to get help if the tool hub program fails.
Advanced Tools
In case you are facing some of the very common issues or errors, you can fix these issues using this tab. The common issues include 6000 error series, QuickBooks crashing, General issues that suddenly appear while working, etc.
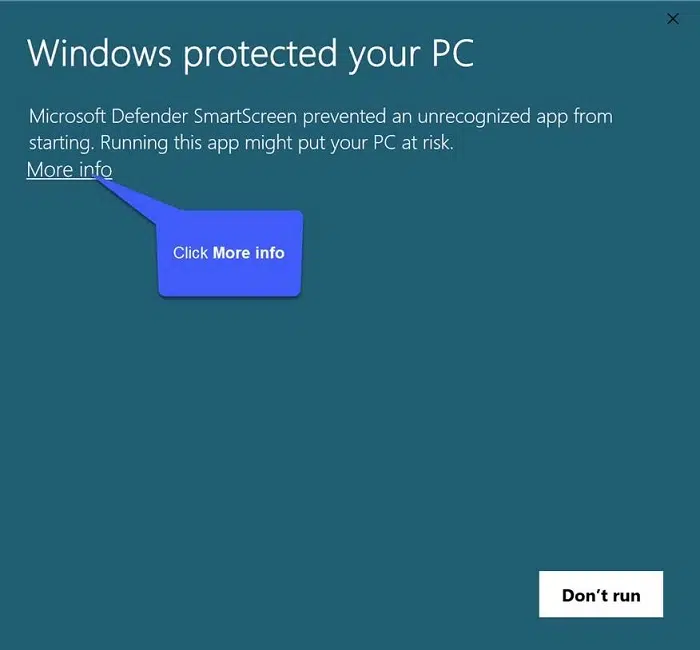
What to do if the QuickBooksToolHub.exe has been blocked for download?
If you get any message pop-up on your screen while installing the tool hub program, it means QuickBooksToolHub.exe file has been blocked by the Windows because it can harm your system. You can try to download this program using a different web browser.
You may get the following message from Microsoft Defender.
You need to click on More Info tab.
After then click on Run anyway option to install the Tool Hub program.
It will take some time to download the file on your computer.
Once the file downloads successful, install it by tapping twice on the file.
Winding up!
The Tool Hub program is a one stop solution for all your QuickBooks related issues. So, if you are tired of using multiple tools for every QB issue, then it’s high time to get your hands on the QuickBooks Tool hub program. Download and install this magical tool today from Intuit that too without any additional charges. In case of any query, you can ask it directly to our experts by dialing the support number i.e., 1-800-761-1787, and our QuickBooks desktop support experts and certified accounting professionals will be there to assist you in a single call.
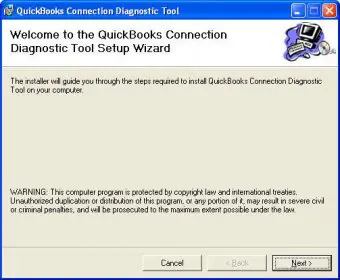
Here is everything you should know about how to download and use QuickBooks Connection Diagnostic Tool
QuickBooks Connection Diagnostic Tool is a useful tool that helps QuickBooks desktop users to fix an assortment of issues related to multiple network and company file corruptions. This robust tool finds and fixes connection errors between QuickBooks, company files and the database manager. There are multiple other uses of this diagnostic tool as well such as many common networking and multi-user errors that include H series errors, 6000 series errors and others that show up while opening a company file.
This article consists of all the useful details you should know the QuickBooks connection diagnostic tool. We recommend you to read it till the end to get a better understanding of it. In case you have any more queries, you can contact our QuickBooks support team. Our experts boast years of experience in QuickBooks and various other accounting software's and can be reached round-the-clock 24X7X365.
What is QuickBooks connection diagnostic tool?
Tens of thousands of QuickBooks users around the globe trust QuickBooks connection diagnostic tool for diagnosing and fixing a wide variety of complex errors that appear when multiple users try to work on a company file at the same time. This tool is also capable of troubleshooting a vast array of network, multi-user errors and many other errors that encountered while using or attempting to use a QuickBooks company file. QuickBooks desktop uses core Microsoft components and if any component is missing or not functioning, the situation may trigger errors. The connection diagnostic tool is compatible only with Microsoft Windows 7, Windows Vista, or Windows XP with QuickBooks 2008 and later versions.
Points to remember
If you are using QuickBooks Desktop 2016, you may receive reminders and prompts to use QuickBooks File Doctor. There, we recommend you to use the version of QuickBooks as mentioned in this article. The version mentioned herein is the latest and most updated as well as has the maximum probability of fixing the issue.
File Doctor works solely for QuickBooks Desktop for Windows. Wherein, QuickBooks Connection Diagnostic Toolworks for QuickBooks for Mac with the same ease.
It is recommended for you to use QuickBooks 2008 or a later version on MS Windows 7, Vista or XP for the connection diagnostic tool to work properly.
The tool can be downloaded from Intuit’s official website to fix error texts that show up while installing QB Desktop. These error texts may be related to office tools and thus termed as NetDiagTool.exe, QBServerUtilityMgr.exe, and others. The most popular version of the software, however it is 4.0. Many major antivirus software have scanned it and pronounced it free from viruses.
What issues QuickBooks connection diagnostic tool fix?
Some of the most common issues that QuickBooks connection diagnostic tool can fix:
QuickBooks Database Access Denied
Inappropriately configured Windows firewall
Blank vendor and customer list in your accounting software.
Entries are missing from the Employees List.
Damaged/corrupted QuickBooks company files
Missing or compromised company files
When to run QuickBooks connection diagnostic tool?
There are certain situations when you can make use of this tool. Let us check out the situations below:
When you run into issues related to the QuickBooks database, this database related error may show up.
In case of errors related to the Windows firewall.
Unexpected errors in QuickBooks like those in the 6000 series.
When any sort of virus affects the QuickBooks functions.
The QuickBooks connection diagnostic tool can be used to fix issues, where the employees make certain entries that do not get updated on QuickBooks.
In case of damaged or corrupted QuickBooks files.
If there are multi-user errors, which usually fall in the category of H series errors in QuickBooks.
Steps to employ QuickBooks connection diagnostic tool
In order to employ this tool, the below steps could be performed:
The first step is to click on the QuickBooks icon.
And then, do not open the corrupted file.
Next, hit a click on the Utilities tab and then Repair the file option.
Now hit a click on Network Problems tab.
And also, hit Yes on the message, to collect the personal information related to QuickBooks and its data.
If any sort of message doesn't appear on the screen, then the permission might be provided in advance.
After that, visit the folder where you have stored the company files and then look for the one which is corrupted and then click on the Open option.
Next, hit a click on the Show Advanced settings and then a list of items in a drop down will appear on the screen.
Now choose the issue that relates with the current issue.
Enter the QuickBooks login ID and password, and then ensure to the use of right credentials.
Finally, choose the connection diagnostic tool.
How to use the QuickBooks connection diagnostic tool?
Open the QuickBooks connection diagnostic tool on your screen and follow the instructions given below.
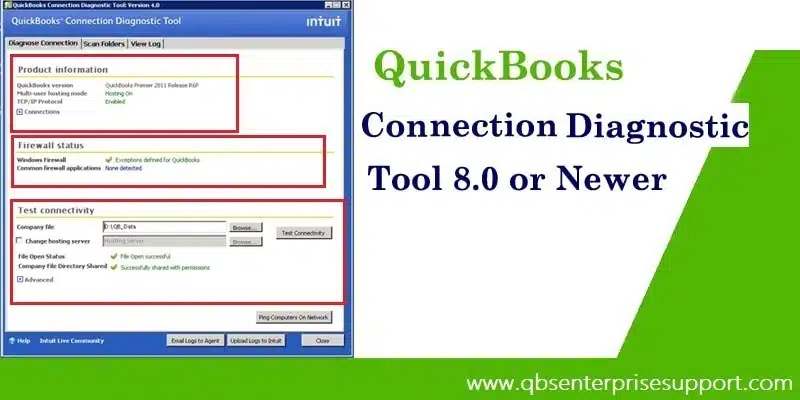
Step 1: Check the Connection Tab
It lets you check the system set up and to be sure that the company file can be used from any system whether you work on single-user mode or multi-user mode. If you don’t have the proper permission or the ports or system firewall is blocked, you may receive errors.
Step 2: Check the status of your Firewall
This tab informs you about the basic instructions of the system firewall.
Step 3: Test Connectivity
This tab offers you access to examining and scanning the connectivity of your computer system.
At first, click on button near the Company File field to search your company file.
Make sure you are using a Linux system when the network setup is available in Alternate mode. You can also choose to select the Change Hosting Server checkbox.
Every status must appear as “Not Applicable” in blue before you instigate the Connectivity test.
Once the test is run, status should appear in green which denotes that no threats are found or red denoting threats found.
Next, press the Test Connectivity.
If the file open status appeared in Red, the test has failed and you would see the Advanced section showing section that was checked.
For clarification, you can hit a click on “What do these mean?”
After the relevant status is fixed, rerun the diagnostic tool to find out if there are any more issues.
When you receive a message denoting the success of the process, repeat the steps mentioned above to all computers that have QuickBooks.
Wait while the tool is doing it's work. This diagnostic may take a while to complete and fix any possible issues. This process heavily depends on your network speed and the company file’s size.
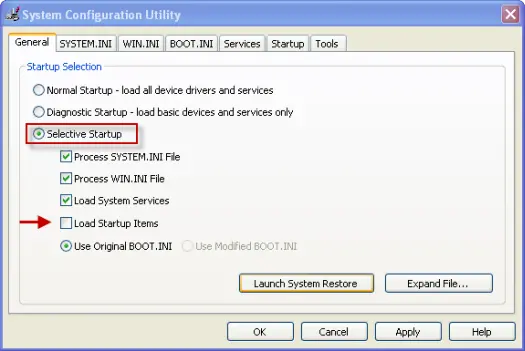
Please note that the QuickBooks connection diagnostic tool itself detects and resolves issues with .Net Framework, C++ and MSXML. You can also use Windows Updates and install the latest or missing updates related to .Net Framework, MSXML and C++. Issues appearing while opening the QuickBooks company file may also be fixed manually. You can as well install QuickBooks in Selective Startup to avoid some issues likely to occur.
Note: The most efficient version of the connection diagnostic tool is the 4.0 version, which is easily available on Intuit’s website. This is a more advanced and powerful tool to fix a wide range of QuickBooks issues.
Fixing update issues with QuickBooks connection diagnostic tool
QuickBooks connection diagnostic tool is capable of automatically identify and fix issues with the components like Microsoft .NET framework, C++, MSXML, etc.
Updating the windows to install the missing updates related to the .NET framework, C++, and MSXML
Manually fix the issues related to Microsoft components.
We hope you find this post helpful. We usually posts such informative posts on our website so that you can learn to use many other QuickBooks related tools like this one. In case you have any queries or you require any assistance in regards to QuickBooks connection diagnostic tool – please feel free to contact our 24*7 QuickBooks enterprise support team using our dedicated support line i.e., 1-800-761-1787. Help is available 24X7.
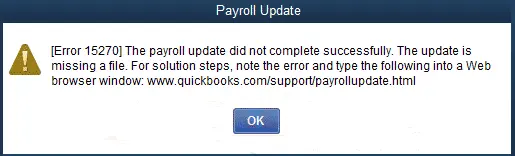
Get latest DIY ways to troubleshoot QuickBooks update error 15270: Payroll update didn’t not complete successfully:
While downloading QuickBooks payroll updates, are you constantly being encountered by the error 15270? Well, this error is usually caused by incomplete payroll update downloads, permission conflicts, or system settings interfering with the update process. In this blog post, we are going to discuss about QuickBooks error code 15270, which is an update error. We encourage you to perform the steps provided further in this article or, if you can’t do it on your own, then feel free to call our QuickBooks error support line at 1-800-761-1787 (toll-free). Our accounting experts will help you in fixing this error on your behalf. Help is available round the clock.
What is QuickBooks Error Code 15270?
It is an update error that usually appears when you try to download the payroll updates or set up a file. Another situation that triggers this snag is when an Intuit product runs during the Windows start-up process or at the time of installing the Windows operating system. This error requires your immediate attention, or else it may get harder to fix. There are numerous facts associated with this error, which we'll be discuss further in this segment. When this error occurs, an error message will appear on your screen that states:
Error
Description
Payroll Update
[Error 15270] The payroll update did not complete successfully. The update is missing a file.
Error 15270:
When Downloading the Latest Payroll Update
What causes the QuickBooks error code 15270?
There might be too many reasons behind occurring the error code 15270 in QuickBooks. Few are as:
All the active programs crash that are running on the desktop window.
In some cases, the computer also crashes while running a similar program.
Before you start with the steps to fix the QuickBooks error 15270, you should get your hands into the possible ways in which this error can be avoided. Let us check out those pointers:
It should be noted that the update file can be downloaded easily and you will have to confirm it by clicking the update complete tab, at the time when the update process ends.
You can also start the QuickBooks software and then apply the necessary changes according to the requirements.
Or else, you can reboot the system and visit the QuickBooks update service window, and then click on the install later option to tackle with the payroll update file related errors.
Getting Rid of from QuickBooks Error 15270 (When Downloading the Payroll Updates)
Checkout the following steps in order to resolve the QuickBooks payroll update error 15270:
Method 1: Update QuickBooks Payroll manually
You are first required to restart your computer.
In QuickBooks Update Service, click on the Install Later option.
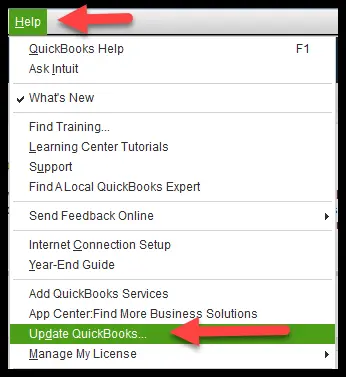
Go to the ‘Help’ icon and then, select Update QuickBooks option.
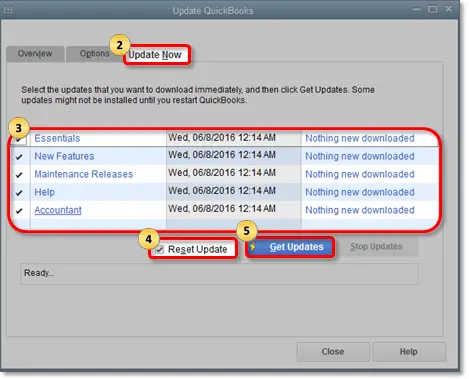
In the Update QuickBooks tab click on Update Now option.
Confirm the reset update by hitting OK.
Once the update completes, you will find that the ‘Get Updates’ button has been activated.
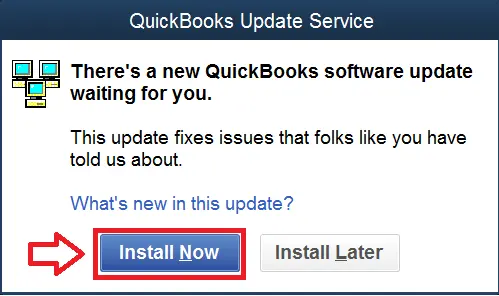
After this, a pop-up message will appear as ‘Update Complete’. Restart QuickBooks.
If the QuickBooks Update Service appears again, choose the Install Now option.
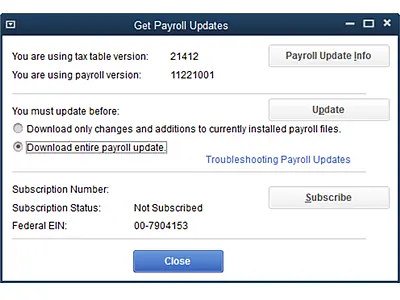
Search and select Employees tab, followed by hitting on Get Payroll Updates option.
Install Payroll updates again and select Download entire payroll update.
At last, select the Update icon.
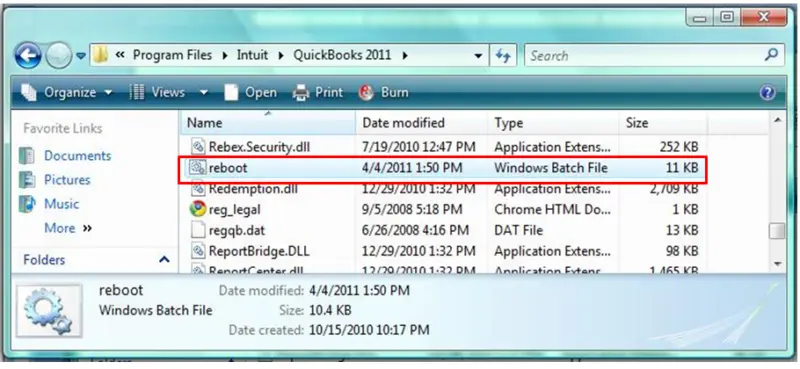
Method 2: Running the "Reboot.bat" file
When a user runs the reboot.bat files, then it re-registers the QuickBooks related .DLL and .OCX files in Microsoft Windows. Follow the steps below:
Firstly, you need to turn off QuickBooks Desktop.
After that, open the folder which has Reboot.bat file.
Right-click on the QuickBooks icon and select Properties.
Next step is to choose Open File Location.
Once done, right-click on Reboot.bat file and select Run as administrator.`
A window will appear with the file names. This window will close automatically once the reboot.bat file utility is completed.
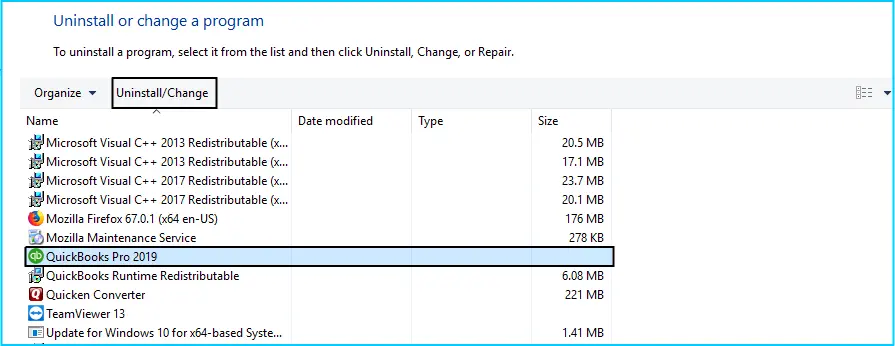
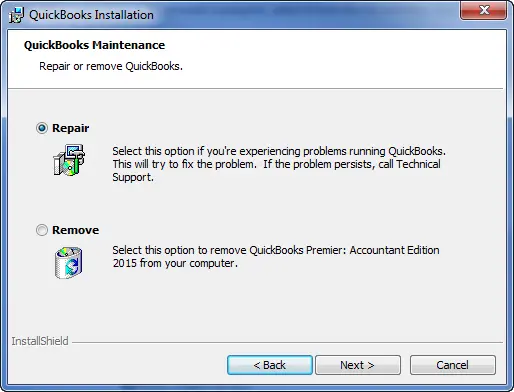
Method 3: Perform a clean install of QuickBooks Desktop
If none of the steps are able to resolve the QuickBooks error 15270, then go for a clean installation of the QuickBooks Desktop. You can use the clean install tool and fix the issue and then go with the clean installation process.
You are supposed to uninstall the QuickBooks software.
Error 15270 can occur is the identification number is incorrect. Ensure that you have put the right employee identification number (EIN). This can also happen if the social security number or service key has been filled incorrectly.
Method 5: Setting Internet Explorer as default web browser
Intuit recommends using Internet Explorer as the default browser to configure QuickBooks. If it has not been set as the default browser, then you may face some issues. A user can set it as default by following the steps below:
Steps for Windows 11, 10, and 8users:
In the search bar of Windows, find App Defaults.
Find Web Browser and set Internet Explorer as the Default app.
Steps for Windows 7users
Open the Internet Options menu.
After that, select the Programs tab.
Now under the Default Web Browser, hit a click on Make Internet Explorer the Default Browser button.
Method 6: Disabling/Turning off user account control (UAC)
For Windows 7 and Vista:
In this method, you will first have to press Windows + R keys, to open the run box.
After that, type in the Control panel in the run command and then hit OK option.
Once done with that, you will have to click on User accounts.
And then hit a click on the Change user account control settings.
Next step in the process is to move the slider to Never notify option and then click OK.
For Windows 10 and later
Hit a click on Windows start tab and then click to the Control panel.
After that, if it fails to select, then select the Classic view as located on the left-hand side.
Now, double-click on the User accounts.
And also, click on and Turn user account control ON or OFF.
The next step is to clear the User account control which helped protect the desktop as well as the software and in the end click on OK tab.
Once done with that, reboot the system.
In the last step, restart your QuickBooks software and reopen the company file.
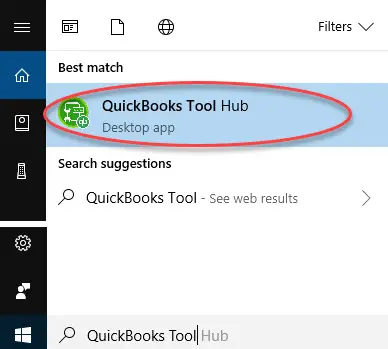
After that, you need to double-click QuickBooksToolsHub.exe.
And then, carry out the on-screen instructions, in order to install it.
Once done with that, you will have to open QuickBooks tools hubfrom the desktop.
Followed by moving to the Program problems tab and then clicking on Quick Fix my Program.
The process might take some time.
After the process completes, you need to restart the QuickBooks desktop software.
And then, if the QuickBooks update services message comes up, then in that case, click on Install Now option.
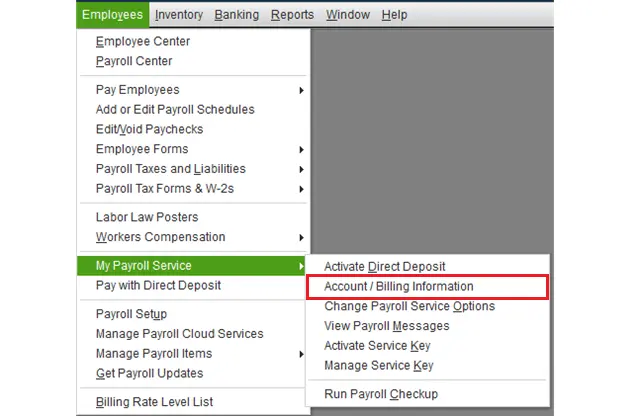
Method 8: Verify whether your subscription is active
For basic, standard or enhanced payroll, you first need to click on the Employees tab and then click on My Payroll Service followed by Account/Billing Information or Account Info/Preferences. After that, sign in to the Intuit Account using your credentials to see that the QuickBooks payroll account maintenance page and then check if the subscription is active.
On the other hand, for assisted payroll, you are required to click on Employees tab and then click on My Payroll Service followed by Account Billing Information or Account Info/Preferences. After the QuickBooks payroll account maintenance opens up, you should close the screen to verify the update immediately and then Verify the payroll service again.
Method 9: Install QuickBooks Desktop in Selective Startup
First of all, ensure that your QuickBooks subscription is active (if not verified in Method 8)
In Basic, Standard, or Enhanced Payroll application: Select Employees tab, followed by My Payroll Service.
After that, proceed to Account/Billing Information or Account Info/Preferences files.
Sign in to the Intuit Account, check the‘QuickBooks Payroll Account Maintenance’ page and subscription activity.
Now, make Internet Explorer as the default browser.
When you are using social security numbers instead of employer identification number, then such an error, or if you haven't registered a service key. You would have to verify these items on the QuickBooks desktop.
Final Words..!
So this brings us to the conclusion of this article. We hope that you find this article useful in fixing QuickBooks error code 15270. In case you have any queries or trouble while performing the troubleshooting steps provided in this post or if the error persists even after you tried all the solution provided in this article – please contact us immediately at our payroll dedicated support line i.e. 1(800)761-1787. We are a team of certified experts with years of experience in fixing accounting related issues. With our boast advanced tools and technology, we are able to fix a wide range of accounting errors within minutes so that you can resume your work.