Everything you need to know about the solution of QuickBooks Install Error Code 1904
Did you just encounter QuickBooks Install Error Code 1904 and aren’t sure why the installation keeps failing? You’ve come to the right place. Errors like these indicate that QuickBooks does not have the proper permissions to access or register key system components required for its operation. The root causes may include corrupted installation files, insufficient user permissions, or conflicts with antivirus and firewall settings. Here in this article, we are going to discuss all about error code 1904 that appears while installing QuickBooks desktop. It can rectify by following the methods provided further in this segment.
Along with explaining the methods to fix QuickBooks install error 1904 in easy to understand ways, we will also tell you what leads to this error and how you can identify it. However, in case you are unable to carry out the troubleshooting methods provided in this article on your own, you can call our toll-free QuickBooks error support at 1-800-761-1787. We are available 24/7 and take the least possible time to providing proven solutions to any accounting related issues.
You may have come across this error while installing a company file. Don’t worry, this error in most cases can be fixed and you don’t lose any data or anything because of it. Knowing the data you have in your systems and keeping them optimized is advised to keep from QuickBooks error code 1904 and various other similar issues. This error occurs when you install the QuickBooks desktop on your system and the system gets unstable or any important file of the company is missing from the database. When this error occurs, you may see the below-given error message on your screen:
Error
Description
Intuit QuickBooks Installer
Error 1904: [file path / name / extension] failed to register,
Warning
Error 1904: IcWrapper Dll Failed To Register
This error can be a serious problem, and we recommend it should be fixed by the users as soon as they notice the symptoms.
Points to be considered
To fix this error, users should take note of the following points.
Effective Methods to Fix QuickBooks Error Code 1904
As now we have already got a slight understanding as to what this error code actually is, let us have a look at some of the methods for fixing the QuickBooks error 1904. The methods which are mentioned further are to be followed in an orderly manner and hence should be attempted entirely without skipping. So, users should make sure that all the methods are followed in order to fix the error thoroughly.
Method 1: Adding QuickBooks to Bitdefender exclusion list
This method is only applicable, if you are using Bitdefender. You can't get rid of the error by simply disabling it. In such a case, you will have to add QB to the exclusion list of the Bitdefender.
For 32-bit Windows OS: Put C:\Program files\Common files in the exclusion list.
For 64-bit Windows OS: Put C:\Program Files\Intuit (C:\Program Files(x86)\Intuit) in the exclusion list.
This will fix the error, in case the error persists, make sure to move to the next method.
Method 2: Use QuickBooks Install Diagnostic tool from the Tool Hub program
An another method to fix this error involves using the QuickBooks install diagnostic tool from Tools hub program. Following are the steps given below might help you:
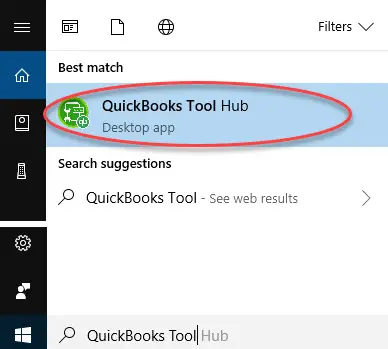
Step 1: Firstly, download and install the QuickBooks Tool Hub
In the first step, you need to download and install the QuickBooks Tool Hub file from Intuit’s website.
Once the download is complete, save the software on the desktop or any location where you can easily find it.
Once done, go to home screen where the new software’s icon is present and double-click on it to start the program.
Step 2: Now, run the QuickBooks install diagnostic tool
Now, in the Tools hub, look for the option of Installation Issues and select it.
After that, in the next window, select the QuickBooks Install Diagnostic Tool. This will initiate the tool, and the process will continue for about 20 minutes.
After the process is complete, simply reboot the computer and open QuickBooks Desktop.
Switch to the Windows Administrator account to change a few settings.
Under this method, click on Windows start button on the keyboard.
And then, enter CMD into the search bar. When you see the CMD run (command prompt app) icon in the options list, hit a right-click on it and click on Run as admin.
Followed by typing the "net user administrator/active:yes" in the command window and then click on Enter tab. When the command is completed, close the command window.
Now, move to the Windows start menu and click on Sign out.
The last step is to move to the Account that says administrator, and try to log in there. You might not require a password to sign in.
Moving to a built-in Admin account
You need to press Ctrl + Alt + Delete keys and opt for switch user Windows 8 users.
Hit Windows tab and go for the user icon on the upper right of the display.
Hit Ctrl + Alt + Delete keys at a time and go for Default admin account icon.
Reinstalling QuickBooks and signing out
You need to follow the given steps in case detailed instructions for installing QuickBooks desktop is required. It will not impact any existing company file data.
Initially, open Windows start menu and then sign out of Admin account.
In the next step, sign in to the usual user account.
Also, open the Windows start menu.
And also type CMD into the search bar. Right-click the CMD run icon and then select Run as admin.
And lastly, type Net user admin/ active:no in the command window and hit Enter key. If you are able to open QuickBooks with a regular account, the error is expected to be fixed.
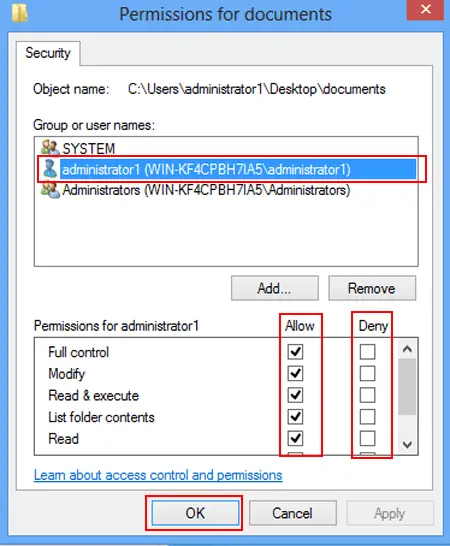
Changing the user permissions
The very first step is to open the Windows start menu.
And then, type in file explorer into the search and also open File Explorer.
After that, look for the C:\Program Files\Common Files.
Followed by right-clicking the Common files folder and then selecting the Properties tab.
Also, navigate to the Security tab and then choose Edit option.
Moving ahead, select Users in the group or User names section.
After that, turn on the following permissions in the permissions for users section: Modify, Read & execute, List folder contents, Read, Write.
After that, choose Apply and hit the OK button.
Go for QuickBooks installation
You need to install QuickBooks Desktop again.
After installing QuickBooks accounting software, switch to the original user log in.
Method 4: Manually Fix Damaged Windows Components
The last step of fixing error code 1904 in QuickBooks desktop is to repair some specific Windows components from the system itself. This step should only be attempted only if you are a confident windows user or have an IT professional’s assistance for the process. The two components that are required to be manually fixed are:
The .NET Framework and MSXML are Windows components needed for QuickBooks installation. If these components are damaged, you most likely won't be able to install the application.
Step 1: Repair the .NET Framework
From the list of installed programs, select .Net Framework
After that, visit the Programs and Features tab.
Now select Repair option to repair the .NET Framework.
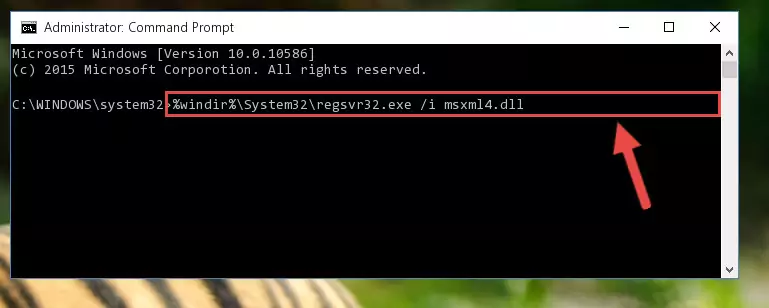
Step 2: Register the MSXML.dll
For 64 Bit OS
Click on Start button and type CMD into Search box.
After that, right-click on the CMD and select Run as Administrator.
Once the Command Prompt window opens, type cmd.
Next, press the keyboard shortcut CD windows/ syswow64 /.
When you've located the syswow64, type regsvr32 MSXML6.dll and hit on Enter key.
Lastly, try to re-install the QuickBooks to check if the issue persists.
For 32 Bit OS
Press the Win+R keys at the same time.
Followed by hit on Enter key.
Now type in cmd and enter regsvr32 MSXML6.dll.
Press the Enter key.
All you have to do is either repair these two files or uninstall them and download the latest version for them. Once they are repaired, the running error will be fixed completely.
This method is applicable, when the error message refers to QBversionTool.dll file. You are supposed to run QuickBooks install diagnostic tool and change the admin settings as mentioned above and then carry out the below steps:
Step 1: Test your permissions
First of all, open the Windows start menu.
And then, type in Notepad in the search field, and open it.
The next step is to type in QBTEST in the note.
Followed by moving to the File menu and then selecting Save as. You should save it to either "C:\Program Files\Common Files" or "C:\Program Files(x86)\Common Files".
In case you are unable to save the note to the folder, then you might be required to sign in and install QuickBooks as an admin.
Step 2: Installing QuickBooks as Admin
The next step demands the installation of QuickBooks as an administrator
In this, you first need to open the Windows start menu and then select Sign Out option.
The next step is to select the Account that says Admin and sign in. It should be noted the password shouldn't be there.
And then install QuickBooks as admin.
Method 5: Uninstall then re-install adobe flash player
First of all, open the Start menu.
After that, type Control Panel in the search box and open it.
The next step is to select Uninstall a program.
Followed by selecting Adobe Flash Player ActiveX from the list, along with that, select Uninstall.
Moving ahead, carry out on-screen instructions to uninstall.
The Error code 1904 on your system can be sorted out by updating the operating system.
For Windows 10
The steps to be followed by Windows 10 users for updating are as follows:
You need to click on Windows start button.
After that go to Update and security.
Next, you need to select the Update and Security tab and then select Windows Updates option.
Now click the Check for Updates button to start the update procedure.
If there is a new update, it will restore all choices.
Now choose all the required updates, then click on Update to start downloading them.
Once the updates have successfully downloaded on your system, reboot the system.
Additional Alternatives to Fix QuickBooks Installation Error 1904 (Failed to Register)
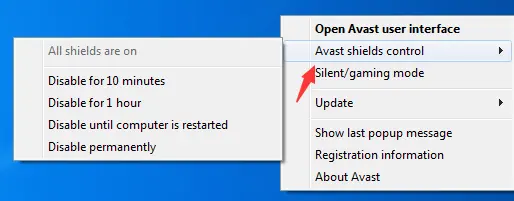
You are recommended to hibernate antivirus or the security software in order to fix this error,
Also, try to fine-tune the internet bandwidth to download the installation source accurately and proper installation of the updates to prevent this issue.
Also, in a multi-user setup, the shared updates option should be unchecked.
Additional Guidelines
In case you are working with the QuickBooks database server manager only, then in that case, the solutions mentioned wouldn't work, and you would be needed to install the actual exe.
This type of error can also be seen in Microsoft Windows, when the installation is not set as Run as admin.
Also, before installing Avalara Avatax, you are supposed to ensure that the exe is installed on the server.
Such an error can also be encountered, if you tries to install the connector on a server without QB.exe installed on it.
You are then recommended to click on OK on the error, and the installation must say that it was completed successfully.
Navigate to the AvaTax configuration (File > AvaTax > Configuration).
So, we hope you find this article helpful and the above provided methods help you to troubleshoot QuickBooks error code 1904 while installing the software or opening a company file. In case you have any more questions or have any doubts, or you want direct help from our team of experts, then feel free to reach us via our helpline i.e., 1-800-761-1787. Our QuickBooks enterprise support team consists of certified technicians who are able to provide you with precise solutions to all your accounting-related issues.
Learn the easiest ways to download, setup and update the QuickBooks Database Server Manager (QBDBMS)
All set to download, setup, or update QuickBooks Database Server Manager? But hang on! Do you know what all it takes to download, setup and update it? Need not to panic, we have got you covered. Database server manager is also named Intuit personal database manager tool. This effective tool makes it super easy to create network data files for each and every company file on the host system. For the ones who prefer using the multi-user mode, QBDBMS is a must-have tool.
Considering the importance of this amazing tool, we have crafted this piece of writing, where we are going to discuss the entire set of steps that can be followed to simply setup, download, and update QuickBooks Database Server Manager. All you need to do is to go through this write-up carefully, and you will be able to successfully perform the entire process. Whereas, if you are doubtful about implementing the steps on your own, then in that case, we can help you. Simply connect with our tech personnel at 1-800-761-1787, and we will be answering all your queries instantly.
What Does QuickBooks Database Server Manager Means?
QuickBooks database server manager (QBDBMS) is an remarkable utility feature rolled out by Intuit. This tool functions to organize the QuickBooks server folder for multi-user mode. It helps in making the most of multi-user mode, and also, without QBDBSM, it is not possible for you to access multi-user mode. The absence of QuickBooks Database Server Manager will restrict the software use and also will affect the performance. This tool is accountable for sharing the company files with other systems over the network.
QuickBooks Database Server Manager (QBDBMS) enables smooth multi-user access by managing company files on a shared network.
Facts about QuickBooks database server manager
There are certain facts related to QuickBooks database server manager, it includes:
The database server manager creates .nd files (known as network data files) on the host system.
Database server manager is compulsory in the case of multiple versions of QuickBooks desktop. In case you wish to use the multiple version of QuickBooks, then you are recommended to install the QuickBooks database server manager.
The QBDBSM has multiple versions. It can offer multiple versions of processes, but it can not provide multiple versions of the software.
Various QB versions add a user during the installation of the database server manager.
Steps to Download QuickBooks Database Server Manager
Now that you have decided to download the QuickBooks database server manager, but before downloading the database server manager, it is important for you to know the exact process that you are supposed to follow, in order to avoid any kind of mess. The database server manager can be downloaded without any issue, as it doesn’t involve a very complex process. However, as per the developers of Intuit and as per observation, this effective tool is part of QuickBooks accounting software. In case you are not having it, then it can be easily downloaded from the official website of Intuit.
Alternative method
In case you found the first option of downloading QuickBooks database server manager a bit confusing, then simply carry out the steps enumerated below:
Start off with Downloading QuickBooks Tools hub from Intuit’s website and then move to the downloads by pressing Ctrl + J keys together.
After that click on the QuickBooksToolsHub.exe file.
Important facts and easy steps to download QuickBooks Database Server Manager for smooth multi-user access.
Followed by clicking on Yes in order to allow the app to make changes.
Now click on Next to install it, and click on Yes to Accept the license agreement.
Move ahead by clicking on Next and Install options respectively. It should be noted that the process might take some time, which demands you to be a bit patient.
After the installation is complete, hit Finish option.
Official QuickBooks Tool Hub logo used for accessing QuickBooks repair, install, and diagnostic utilities.
Now, under the Network issues tab, click on the QuickBooks database server manager option.
QuickBooks Database Server Manager’s Fix My Network tool helps repair network issues and restores multi-user connectivity.
After the process completes, give all the Users permission to access the company folders. However, by default, the QBDBSM will create a unique user for each installation.
Steps to Configure QuickBooks Database Server Manager
In case you want to use the default setting, then skip this section. Or else can carry out the steps below:
Open the Windows start menu.
Type in Services into the search tab and then Open Services.
Choose and open QuickBooksDBXX.
Now move to the General tab and look for the service status section. In case started or running, you should select Stop tab.
Go for the Automatic option from the startup type drop-down menu.
Move to the Logon tab. Also, choose the Local System Account option.
Head to the Recovery tab. And also, opt for restarting the service from each of these drop-down menus: First failure, Second failure, and Subsequent failure.
Choose the General tab and also choose Start tab to restart the database server manager.
Steps to Set Up QuickBooks Database Server Manager
After downloading the QuickBooks database server manager, it is time for set up process to be performed. The steps to carried out in this process are as follows:
Permit QuickBooks database server manager to run on the server computer
Steps to Update QuickBooks Database Server Manager
Update your QuickBooks database server manager by following simple steps:
Infographic outlining the step-by-step process to update QuickBooks Database Server Manager for improved performance.
In general, QuickBooks database server manager gets updated along with the QuickBooks desktop, but in case you wish to manually update it, then the process involves the steps stated underneath:
The database server manager is one of the most effective features offered to QuickBooks Desktop users. Without this tool, accessing Multi-User Mode becomes impossible. However, many users often feel confused during the download, setup, and update process of the QuickBooks Database Server Manager (QBDBMS).
After reading this guide, you will gain a clear understanding of how QBDBMS works and how to make the best use of it. We hope this information helps you manage your QuickBooks environment smoothly and efficiently.
If you still have questions, or if you get stuck at any step, qbsenterprisesupport is always available to assist you. Our trained accounting professionals are just a call away. You can reach our support helpline at 1-800-761-1787 and speak directly with our QuickBooks Enterprise customer support team.
Our experts will provide reliable, step-by-step guidance to resolve your issues in the best possible way. So, don’t hesitate—contact us and let qbsenterprisesupporthandle the complexities while you focus on running your business.
Learn the best ways to resolve Error 1321: The installer has insufficient privileges to modify the file:
Did you just receive the following error? "Error 1321: The installer has insufficient privileges to modify the file." Well, this is a common error and usually arises when you don't have the permission to access any specific company file. Just updating the privileges and rights for access should, in most cases fix this QuickBooks error code 1321. But there might be other causes behind to this error, and you may require a different solution for them. We know that such errors can be annoying but don’t worry, it’s fixable. You simply need to implement some DIY steps and then you are good to go.
What is QuickBooks Install Error 1321?
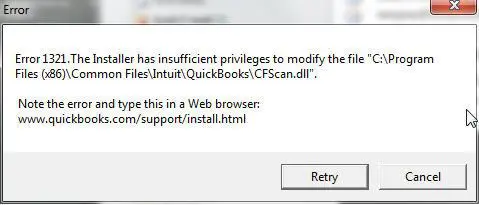
QuickBooks error 1321 generally appears when you try to installing or updating the software. This error prevents the software from completing the installation or update. When this error occurs, an error message appears on your screen that reads, ‘The installer has insufficient privileges to modify the company file.’ You may see one of the following error messages on your desktop screen:
Problem
Error Description
Warning:
Error 1321: The installer has insufficient privileges to modify the file
Error:
The installer has insufficient privileges to modify the file C:\Program Files\Intuit\QuickBooks\sdkeventl.DLL
Error:
The installer has insufficient privileges to modify the file C:\Program Files\Intuit\QuickBooks\CfScan.DLL
Error:
The installer has insufficient privileges to modify the file at C:\Program Files\Intuit\QuickBooks YEAR\QBONLI32.DLL
Error:
The installer has insufficient privileges to modify the file [2]
Error:
The installer has insufficient privileges to modify the file C:\Program Files\Intuit\QuickBooks Point of Sale X.0\dataimporter.exe
Note: When you click on the Retry button, you may see another error message on your screen, and your software installation or software update will be failed.
A few of users reported that they have encountered error message 1321, when the installer is unable to write any certain files due to a lack of permissions or other permission related issues. Also, the path that might appear in the error message might vary depending upon the installation.
What are the reasons of occurring QuickBooks error code 1321?
The following are some of the most common reasons behind the occurrence of such an error:
The File Copying process is slower than the file update process.
If case the installation of QuickBooks is incomplete or if an important QB files are missing in directory, it may lead to this error.
Another possible trigger can be if antivirus or firewall is blocking your QuickBooks.
Windows permission for the folder containing the file has been restricted.
The file is either damaged or in use.
Your computer wasn't shut down properly after the last use.
The file update procedure is faster than the file copy procedure.
If the UAC settings are set too high, then QuickBooks may not have the necessary permissions to install or update.
Signs and symptoms of QuickBooks error 1321
The following pointers can help you in identifying the install error 1321 in QuickBooks. Let us explore those signs one by one:
You might receive a message like “The installer has insufficient privileges to modify the file C:\Program Files\ Intuit\ QuickBooks\ CfScan.DLL” OR “The installer has insufficient privileges to modify the file at C:\Program Files\ Intuit\QuickBooks YEAR\QBONLI32.DLL“. This can be one major point to identify the error.
When the QuickBooks file gets damaged, it might indicate to this error.
The speed of the software lowers down or the software responds sluggishly.
The Windows restrictions on the folder can be another sign.
What are the Methods to Troubleshoot QuickBooks Error Code 1321?
Perform the below-given solutions in order to rectify the QuickBooks install error 1321:
Solution 1: Run QuickBooks install Diagnostic Tool
QuickBooks Tool Hub can help you to resolve common errors that come while using the software.
Start off with closing QuickBooks and all other running apps in background.
Note: Please note that disabling software while you are connected to the internet using a persistent connection like DSL or cable is NOT recommended. You should disconnect the system from the internet before disabling the antivirus software. Once you are done with the steps, then re-enable the antivirus software before re-connecting to the internet.
You should try to update QuickBooks once again. If the error still persists, then try disabling the antivirus and then again try the update process.
When the users encounter the error code, they are supposed to click on Retry tab and finish the update process.
If the issue persists, users need to hit the ignore/cancel icon and then click on Options tab.
Followed by disabling or turning off the antivirus on a temporary basis.
Last but not the least, try to install the QuickBooks desktop again in a proper manner.
Solution 6: Updating insufficient user privileges
Users might see an information dialog box with error codes and messages generated during the QuickBooks installation process. They can check the below messages. At the time of the installation process, the error might appear. Like the AcrobatConnect.cfg shoots the error message on the screen.
QB Error 1321. The Installer has insufficient privileges to modify the file.C:\Windows\system32\Macromed\Flash\FlashPlayerTrust\AcrobatConnect.cfg. Action ended 11:21:48: InstallValidate.
You need to put the privileges for the folder given in the error message, for eg: \Windows\system32\Macromed\Flash\FlashPlayerTrust\AcrobatConnect.cfg.
For Windows XP Professionals:
When started, you are supposed to view the concealed files/folders placed in the operating system which easily disables the file-sharing. You need to view the appearing hidden files and folders, simple file sharing on the Microsoft support website.
At first, click on Windows + E keys and then open Windows Explorer.
Navigate to the error message parent folder.
Next, hit a right-click the Parent folder.
From the drop-down menu, select the Properties tab and go for Security tab.
And finally, opt for the administrators for the Group or user names.
On Windows XP
If you are a Windows XP user, then carry out the steps below:
The Windows XP user needs to turn off the system and turn it on after a couple of seconds.
When the Windows logo shows up, click on F8 key.
Following that, visit the Safe mode with networking icon and hit Enter key.
In the windows XP professional, users needs to follow the prompted instructions to update the user privileges and later start the system and install QuickBooks.
Also, select the System icon from the group or user names tab.
Now choose Full control to allow system permission.
Once done, pick the Advanced icon.
Hit Replace permission entries on all child objects with entries here that apply to child objects.
Shut down the properties window and click on OK tab. And you are good to go.
To run the Windows System File Checker tool to scan for and repair any file system errors, you can follow these steps:
Press Windows key + R keys on your keyboard to open Run dialog box.
Type in cmd and press Enter key.
Hit a right-click on Command Prompt and select Run as administrator.
Now type sfc /scannow and press Enter key. This will start the scanning process. (Note: This will take some time to finish the scan process.)
Once done with it, you can see error messages on your screen, if there is any.
Lastly, find out the root causes of those errors and repair them.
FAQ's
How can I fix QuickBooks Error 1321 without uninstalling the software?
You can run QuickBooks as administrator, adjust folder permissions, and temporarily disable antivirus/firewall.
Can a corrupt Windows registry cause QuickBooks Error 1321?
Yes, invalid or corrupted registry entries can prevent QuickBooks from installing or updating correctly. The registry stores important system and program settings, and any corruption may block the installer from accessing necessary paths or files. Using a trusted registry cleaner or performing a system repair may sometimes help.
Does Error 1321 affect my company files?
No it doesn't affect your company files. Error 1321 usually impacts the installation or update process only. Your existing company files remain safe.
Will a clean install fix QuickBooks Error 1321 permanently?
Yes, performing a clean install removes all corrupted files and invalid registry entries related to QuickBooks. This often resolves the error permanently, ensuring a smooth installation or update.
Why does QuickBooks Error 1321 say “The file could not be installed”?
This usually happens when the folder or file location has restricted permissions, preventing QuickBooks from writing necessary files.
Final Words..!
Within this article, we have tried to include all the important information related to QuickBooks error code 1321 with the hope that you fix this error by your own. However, in case the issue persists even after you have performed all the above mentioned troubleshooting steps, we recommend you to contact our 24/7 QuickBooks enterprise support team using our dedicated tech support line i.e., 1-800-761-1787. Our experts have access to state-of-the-art tools and technology, and we can quickly help you fix this issue.
All about the issue QuickBooks unable to create Accountant’s Copy with the file transfer service:
ThoughQuickBooks Desktop software comes equipped with tools and features for managing cash flow, creating invoices, preparing taxes, inventory management, and more, it can sometimes encounter errors. A common issue many users face is quickbooks accountant copy failed. This error appears while preparing an accountant’s copy and may relate to the folder where the QuickBooks company file is stored or other causes.
This error can be frustrating and may cause you to miss deadlines for accounting tasks. If you want to how to fix accountant's copy file error in QuickBooks, keep reading this guide, as we have compiled a list of solutions to resolve accountant's copy file error in QuickBooks. You can also call our 24*7 QuickBooks error support team at 1-800-761-1787 for certified help. Speaking to our team will ensure to provide you with the best possible support services in fixing the accounting related bugs.
What Causes QuickBooks Unable to Create Accountant's Copy Issue?
In QuickBooks, the accountant’s copy is a version of the company file that allows accountants and clients to make changes simultaneously. When working on the QB Accountant Transfer file, changes can be imported back into the main company file.
Common reasons behind quickbooks accountant copy failed include:
QuickBooks Desktop requires an update.
The Company Data file is damaged
The internet connection of your computer might be slow or the firewall may be affecting the upload.
Getting a long dash in MS words and then copying it in the notes can cause this issue.
This QuickBooks error may also appear when you try sending the Accountant’s copy with the file transfer. In case you are sending the Accountant’s copy through the Accountant Copy’s File Transfer Service (ACTF), you might receive the following warning text:
Error: Problem in sending the file to the Intuit Server
Warning: There was a problem sending the changes to the accountant’s copy file transfer server. Try again later or save the file and send via email.
Message indicating that QuickBooks could not create the Accountant’s Copy due to an issue.
Common QuickBooks errors when creating or working on an accountant's copy
You may get one of the following errors and unexpected results on an Accountant’s copy (.QBX) or on a company file (.QBW) in QuickBooks Desktop:
Error: Failed or a big red "X" when working on Accountant's Copy
Error: Not able to create Accountant's Copy…
Warning: You are backing up an Accountant's Copy…
Error: Accountant's Copy Exist
Your reconciliation will roll back
Warning: This is an Accountant's copy of the company's data, when opening a QBA file
Error: "Specified database is invalid" or "Invalid database server command line" when opening an Accountant's Copy or Portable file
Error: 6xxx, xx when converting an Accountant's Transfer file
Solutions to Resolve QuickBooks Unable/Failed to Create Accountant’s Copy Issue
Here are the practical steps to how to fix accountant's copy file error in QuickBooks:
Solution 1: Verify your company filename for special characters
First steps is to check your company file name for any special characters.
Make sure there should be no comma in:
File name (QuickBooks Desktop 2017)
Company Name (QuickBooks Desktop 2017)
Removing special characters prevents quickbooks accountant copy failed errors.
Screenshot showing how to remove special characters from a file or folder name in QuickBooks.
Solution 2: Update QuickBooks to the latest version released
The accountant file transfer service works only with QuickBooks Desktop 2017 (R14), 2018 (R12), or 2019 (R9), and QuickBooks Desktop Enterprise 17 (R14), 18 (R12), or 19 (R9). Older versions may trigger accountant's copy file error in QuickBooks.
Screenshot showing how to update QuickBooks Desktop to the latest release version.
Look for the update now tab and also ensure to check mark the box for reset updates.
Click on get updates and also it will start the download process.
QuickBooks Desktop window displaying available updates and the Update Now option.
When the download process is complete, restart the QuickBooks software.
Pay heed to the on-screen prompts to install the new release.
Note: You should restart your computer and try again the steps, If you are having problems while sending or receiving Accountant Copy files after updating the software.
Solution 3: Reduce the size of the company file
In case the QuickBooks company file size is greater than 200 MB, you may face issues in sending the file to the Intuit server.
This can be done in two ways:
You can reduce the file size by creating a portable version of the company file, which is easy to move. It is basically a compact version of the company file that's easy to send. This can be done by moving to the company file and open it, followed by pressing F2 key on the keyboard, so as to open the product information window. If the file size is greater than 200,000 KB (200 MB), the file transfer service will display an error In such case you can try to the following steps:
Many times, QuickBooks file doctor tool becomes a savior to majority of users. This tool is designed and developed in a way to resolve all sorts of errors, especially the company file and network related issues. You can either download this tool from Intuit's website, or can access it through the QuickBooks Tool hub. This tool will resolve the company file damage issue up to a great extent.
Screenshot showing the QuickBooks File Doctor icon inside QuickBooks Tool Hub.
Solution 5: Grant full permissions to the files before creating accountant's copy
Go to the folder where QuickBooks is stored. And hit a right click on the file and select sharing and security option.
QuickBooks window displaying the Sharing and Security settings menu.
Select the sharing and security option, which will lead to a new dialog box. After that, you need to select permission.
Screenshot showing the Accountant’s Copy option in QuickBooks Desktop.
Choose add browse option, in order to find the current QB data service user. At times it changes with every updated version, so make sure to give the account change and read permissions before creating accountant's copy.
Summarize the process by making an attempt to create an accountant's copy. Ensure to avoid having the strange character in the file path.
This ensures quickbooks accountant copy failed issues don’t occur due to permissions.
Solution 6: Avoid using long dash in MS Word
If the file needs to be sent to the client and any changes need to be made to it, do the following:
You need to avoid the use of long dashes when entering the text in notes to the client.
It is important to open a new Text Editor (like Notepad), then paste the text in it. Make sure there is no use of long dashes.
After that, the doc file can be sent to the client as QBY file.
Solution 7: Test the company file for damage and repair it
Step 1: Test Company file for data damage
At first, you need to check if the problem is specific to the specific company file and not common to other files also. Do the following:
At first, hit a click on File and after that go for New Company.
And select Express Start or Start Setup.
Now make a new file and forward the accountants copy.
If there is no error in the newly created file, then go back to the company file to repair it.
Points to consider when creating the Accountant’s Copy
Once the Accountant’s copy is saved, QuickBooks displays on the screen of the computer ‘Accountant’s Changes Pending’ in the title bar and it will remain the same till the time you add the changes from the Accountant’s copy or remove the restrictions. In case, you remove the restrictions prior to the accountant sends back the changes, you will not be able to make any modification made by the accountant automatically in the application.
Limitations of QuickBooks desktop
There can be certain limitations on the things that can be adjusted with an Accountant's copy file. For example, users are unable to add, edit, void, or delete the payroll, estimates, sales orders, transfers of funds between accounts or inventory build assemblies.
Begin with creating the QuickBooks Accountant's copy
The accountant can tell the users to upload an accountant's copy or backup file but in majority of the cases, the accountant's copy will be the preferred option. You can create an accountant's copy in QuickBooks by following the steps we mentioned earlier in this post.
How to Remove Accountant’s Copy Restrictions in QuickBooks?
On QuickBooks Desktop when you remove the Accountant’s copy restrictions, it means that you are making the initial accountant’s copy invalid. This happens when your accountant asks for another accountant's copy or your company files needs to be fixed due to data damage. Before you remove the restrictions ensure that you have taken backup of your company file. Below are the steps to remove restrictions from the accountant's copy.
You need to go to file menu and then select Send Company File.
After that select Accountant’s copy.
Screenshot showing the option to remove Accountant’s Copy restrictions in QuickBooks.
Now go for client activities and click on Remove Restrictions.
Screenshot showing how to remove Accountant’s Copy restrictions in QuickBooks.
Go for Yes, I want to remove Accountant’s copy restrictions and then hit a click on OK button.
This guide was created after consulting QuickBooks experts. Following these steps can help resolve quickbooks accountant copy failed and other accountant's copy file error in QuickBooks issues. For further support, call QuickBooks enterprise support at 1-800-761-1787. Certified experts are available 24/7 to help with any QuickBooks company file errors.
Are you planning to access your company file in multi-user mode? Well, before that, it is important that you need to have QuickBooks Database Server Manager (QBDSM) installed on your system. The QuickBooks Database Server Manager is one key tool of this accounting software that recently has attracted a lot of attention in the accounting industry.
Database Server Manager is the one and only way to use multiple versions of QuickBooks Desktop over a network and enable multi-user access. This write-up is going to brief you about the installation, configuration, and updation process of using QBDSM.
If you aren’t prepared to manually perform the steps to install and use the QuickBooks Database Server Manager tool, you can simply get on a call with our tech geeks using our dedicated support line i.e., 1(800)-761-1787, and share your technical difficulties with our experts.
What is QuickBooks Database Server Manager?
QuickBooks Database Server Manager helps manage company files, enabling multi-user access and monitoring networked folders.
Intuit introduced the QuickBooks Database Server Manager to help users in organizing applications and files for multiple users. It also helps to share company files with other systems over the network. Nowadays, it has become an essential tool to use more than one version ofQuickBooks Desktop software.
More than one user can work on the same file with the help of this tool. Following are some other activities that the QBDSM allows users to perform:
Scanning the QuickBooks company file.
Checking the local storage device to detect the new company file.
Important: It should be noted that the QuickBooks desktop needs the optimum file performance on the network and so you can install and set the tool on the system in the location of the company files.
Important facts associated with QuickBooks database server manager
There are a few facts that you need to know regarding QuickBooks Database Server Manager. A few of which are stated below:
The Database Server Manager creates Network Data Files (.ND files) for all company files stored in the host workstation.
Installing this tool lets you use multiple QuickBooksDBXX (QuickBooks Database Server Manager service) processes. This shouldn’t be confused with multiple versions of QuickBooks software.
Make sure that you install Database Server Manager for each QuickBooks Desktop version installed in the system.
When installed, QuickBooks automatically creates a Windows user account (QBDataServiceUserXX) to manage network access securely.
Ensure that you have the latest version of QuickBooks Database Server Manager installed on your computer to avoid compatibility errors.
When using multiple versions of QuickBooks Desktop, always install the Database Server Manager in chronological order (oldest to newest).
Steps to Install QuickBooks Database Server Manager
In order to install QuickBooks database server manager on the server system, the steps to be followed are scribbled below.
Visual guide showing how to install QuickBooks Database Server Manager to enable multi-user access and manage company files
Before beginning, remember: if you are an accountant or someone who hosts multiple versions of QuickBooks Desktop on the network, install them in order — oldest version first, ending with the most recent.
Installation Steps:
Close all open programs on the server system, including QuickBooks.
The QuickBooks Database Server Manager tool is part of the QuickBooks Desktop file and therefore should already be available with your accounting software. If not, download QuickBooks Database Server Manager from Intuit’s official site.
Open the install file (look for Setup_QuickBooks.exe) and click on Start to launch the installation wizard.
After downloading the QuickBooks Tools Hub, install and run it. Once open, navigate to Network Issues → QuickBooks Database Server Manager.
If connected to the internet, click Next to download updates; otherwise, click No and then Next.
Close all programs and click Next.
Accept the Software License Agreement.
When prompted, select Custom or Network Options (avoid Express).
Choose the best option for Network Setup and click Next. Both options install the tool, and existing company data remains safe.
Select:
“I’ll be using QuickBooks Desktop on this computer, AND I’ll be storing company files here” — if using both on the same system.
Or, “I’ll not be using QuickBooks Desktop on this computer” — if using the system as a dedicated host.
Click Yes and allow access, then enter your license number and product number.
Follow on-screen steps and click Install.
Once installed, QuickBooks creates a new Windows service (QuickBooksDBXX) for each version of Database Server Manager — ensure it has folder access permissions.
The point to be noted here is that the QuickBooks software creates a new Windows user for each version of Database server manager. Thus, you need to give you permission to access the folders that have the company file.
How to configure the QuickBooks database server manager?
Now that you have installed the QBDSM, it is time to configure it. This process can be skipped, if you wishes to use the default settings. The steps involved in this method are as follows:
QuickBooks Database Server Manager service running on Windows to configure multi-user access and folder permissions.
If you only installed QuickBooks Database Server Manager:
Open the Windows Start menu, type Services, and open it.
Select and open QuickBooksDBXX (version-specific).
Go to General → Server Status, click Stop if running.
Set Startup type → Automatic.
Under Logon, choose Local System Account.
Go to Recovery tab → select Restart the Service in all dropdowns.
Return to General, then click Start to restart the service.
If you installed both QuickBooks Desktop and Database Server Manager:
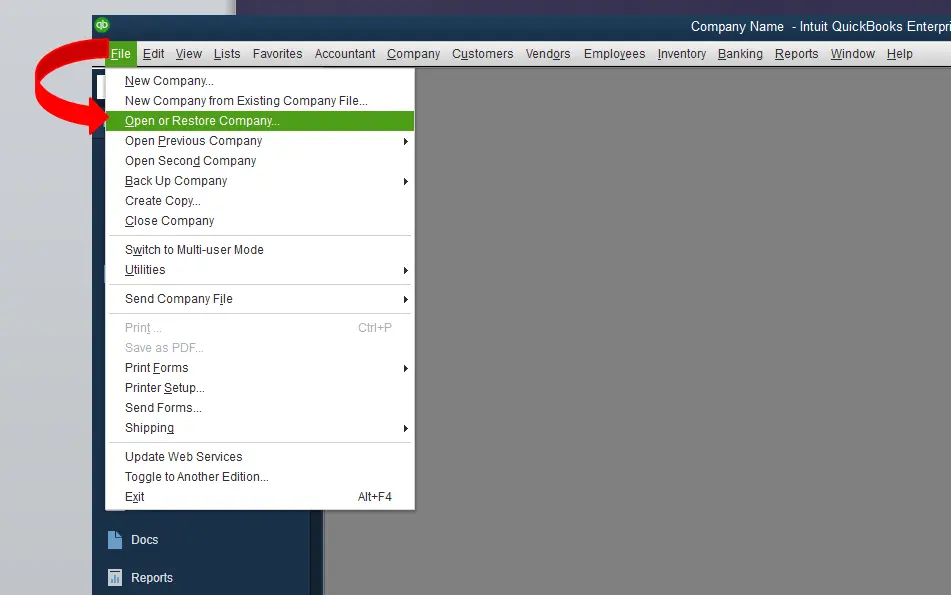
Open QuickBooks Desktop on the server computer.
Go to File → Open or Restore Company → Open a Company File → Next.
Check Open file in multi-user mode, then Open.
Log in to the company file.
Go to File → Close Company/Log Off.
Open Windows Start, type Database, and open QuickBooks Database Server Manager.
Verify if everything is running correctly.
Firewall Configuration Tip:
If Database Server Manager isn’t running, open Windows Defender Firewall → Allow app → ensure QuickBooks Database Server Manager (QBDBMgrN.exe) and QuickBooksDBXX are allowed for both Private and Public networks.In case you have installed QuickBooks desktop and database server manager:
Under this, you should first open QuickBooks desktop on the server computer.
And then, move to the File menu and also choose Open or Restore company.
Use the Open or Restore Company File option in QuickBooks Desktop to configure multi-user access with Database Server Manager.
Next step is to select Open a company file. And then look for and Open the company file. You are then required to select Next tab.
Select and open your company file in QuickBooks Desktop to enable multi-user access through Database Server Manager
Now choose the Open file in multi-user mode checkbox, and also opt for Open tab.
Once done with that, Log in to the company file.
In the next step, move to the File menu and choose Close company/log of. This will close the company file on the server.
Followed by opening the Windows Start menu.
Type Database into the search bar and then open the QuickBooks database server manager.
If all seems good, then you can move ahead without any issues.
How to use the QuickBooks Database Server Manager?
Database server manager lets you share and manage your company files with other PC's over your network. This tool also helps you to monitor your multi-user network. At the time you set-up a network, you need to have QBDBSM running so that users can access your company files.
After you have installed the database server manager, it is time to scan the company files. After scanning, you can access the company files from other system on the network. This will let you on the network work together in QuickBooks desktop from multiple systems. The steps involved in this process are as follows:
Step 1: Open the QuickBooks Database Server Manager
Now, double-click on downloaded file named as QuickBooksToolHub.exe.
Launch QuickBooks Tools Hub (QuickBooksToolHub.exe) to access Database Server Manager and manage multi-user company files.
Also, follow the on-screen commands to Install and Agree to the terms and conditions.
Once the installation finishes, hit double-click on the icon to launch the tool hub.
QuickBooks Tool Hub provides access to tools like Database Server Manager for multi-user setup and network management.
Now go to the Network Issues tab and choose QuickBooks Database Server Manager.
Access QuickBooks Database Server Manager from the Network Issues tab in Tools Hub to scan and manage company files for multi-user access.
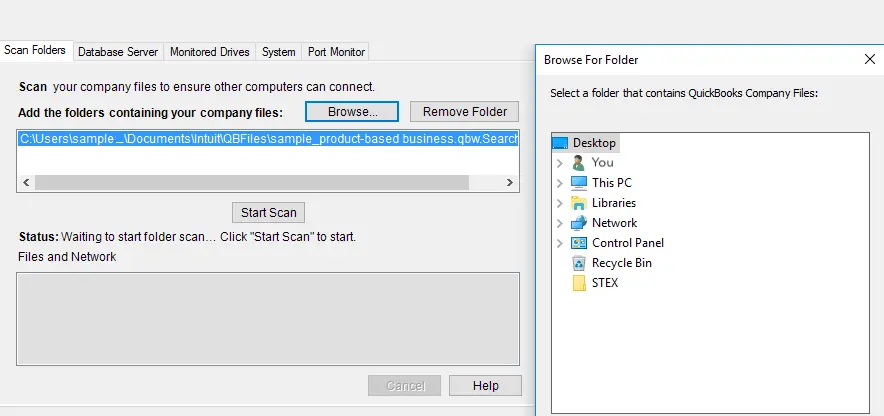
Step 2: Scan the folders
Before sharing the files, you need to scan the folders having them. You only need to scan them once.
First of all, open the windows Start menu on the server system.
After that, type Database into the Search and open QuickBooks database server manager.
Scan the folders containing QuickBooks company files using Database Server Manager to enable multi-user access.
The next step is to move to the scan folders tab. In case you are making use of database server manager 2019, then this process shares all of the folders. You might want to set the folder permissions so that you only gives access to specific users.
You should then required to select Browse option and then select the Folders that hold the company files.
After that, click on OK button.
Select the folders containing QuickBooks company files in Database Server Manager to set up multi-user access and manage folder permissions.
And then, select Start scan tab.
Once the scan finishes, the folders appear in the QuickBooks files found section. You can now access the company files in these folders.
Step3: Add folders
You should Add folders tab and then choose the Folder, where it is to be included.
The location of the folder under the folders which contain the QuickBooks company file.
Step 4: Remove folder
One can remove the folder by clicking the Folders having QuickBooks company file and then click on Remove folder.
Step 5: Clicking on Scan tab
Use the Scan tab in QuickBooks Database Server Manager to scan folders, view found company files, and manage added or removed folders.
Click on the Scan the folders tab that is listed under the folders that contain the QuickBooks company files.
After the scan finishes, you will see the List of company files found in that folder.
Step 6: Monitor your drives
After scanning the folders, the drives that hold them show up in the Monitored drives tab. You are required to choose the Drive to monitor these folders. This way, you won’t require re-scanning the folders, if you ever change or move the company files in them. The steps involved in this process are as follows:
First of all, go to the Monitored drives tab.
After that select the Check-boxes for the hard drives that hold the company files. The point to be noted is that you need to only add drives that hold the company files.
Select and monitor the drives containing QuickBooks company files to avoid re-scanning when files are moved or updated.
Now change or move the company files on the drive, then they won’t require to Rescan the folders.
Step 7: Manage database server manager
It should be noted that there are various other tabs in QuickBooks database server manager that keep everything in smooth condition, which includes:
The System tab notifies the location where the database server manager is installed on the system.
The System tab in QuickBooks Database Server Manager displays the installation location and system information for managing company files.
And the Database server tab gives you the real-time status of the tool and also the information regarding its connection.
The Database Server tab provides real-time status and connection information for QuickBooks Database Server Manager.
An important point to be noted here is that the QuickBooks desktop 2020 uses dynamic ports and specific port number for better performance. In case the database server manager isn’t running, you might need to change the firewall settings, so that it can run on the server.
Steps to update QuickBooks database server manager
After understanding all the above procedures, you should also know the process to update the QuickBooks database server manager. The steps involved are:
Visit the official website of Intuit and download update patch for QuickBooks database server manager.
Also, the server needs to be rebooted after update.
You will see a message "The company file needs to be updated to work with this version of QuickBooks desktop".
Now create a backup of the file once the server is ready to make specific changes.
Carry out the set of instructions displayed on the screen, and the file will be ready to open.
Concluding Words!
With this we come to the end of the blog post, where we hope that the information shared here will help you to install, use and update QuickBooks database server manager. However, if you are facing any difficulty in carrying out the process, or in case of any query, do not hesitate in talking to our QuickBooks support professionals. Simply connect with our tech geeks personally on our support number i.e., 1-800-761-1787, and our experts will be happy to assist you.
Why do you keep seeing “Network Diagnostics Failed” errors?
This is because of the following reasons: 1. Out-of-date Database Server Manager. 2. Network misconfiguration or permissions issues. 3. Windows Firewall blocking required ports. 4. Damaged or corrupted .ND or company files.
Can I use QuickBooks Database Server Manager with different QuickBooks versions?
Yes, you can use! but each version of QuickBooks desktop installs its own instance of the server manager, and you need to run and update each separately. Install older versions first, then newer ones. Make sure all are kept up to date for smooth compatibility.
How do I restart the Database Server Manager if it crashes?
You are required to follow the below given steps, if the database server manager stops working or crashes: 1. You need to open the Services app in Windows server. 2. Then find out the QuickBooksDBXX (where XX is your year/version, e.g. QuickBooksDB31 for 2021). 3. Now hit a right-click on it and select Restart. 4. If that doesn’t resolve things, restart the entire server and try again
This is because of the following reasons: 1. Out-of-date Database Server Manager. 2. Network misconfiguration or permissions issues. 3. Windows Firewall blocking required ports. 4. Damaged or corrupted .ND or company files.
Yes, you can use! but each version of QuickBooks desktop installs its own instance of the server manager, and you need to run and update each separately. Install older versions first, then newer ones. Make sure all are kept up to date for smooth compatibility.
You are required to follow the below given steps, if the database server manager stops working or crashes: 1. You need to open the Services app in Windows server. 2. Then find out the QuickBooksDBXX (where XX is your year/version, e.g. QuickBooksDB31 for 2021). 3. Now hit a right-click on it and select Restart. 4. If that doesn’t resolve things, restart the entire server and try again