Are you coming across some of the multi-user errors or other technical snags in QuickBooks desktop while trying to access your company file in multi-user mode? Well, these errors are pretty much common. One such error that we will be elaborating in this write up is 'Error Code H505'. This QuickBooks error is a multi-user hosting error code that generally occurs while trying to open a company file that is located on another server, but QuickBooks can't establish a proper connection. However, the good part is that, the error doesn’t damage your company files. It only prevents access until the network and hosting settings are corrected.
This error belongs to the H series errors and usually appears when you try to access the QuickBooks company file, which does not exist on that device or the network. Thus, to ensure that all you get the best experience of this software, here you will get everything in this article that will assist you in tackling the QuickBooks error code H505. However, if you are seeking for expert assistance, you can get that too, as we are a hub of tech-savvy people and who work round the clock services to provide the best possible assistance that too in a single call. So, do not feel any hesitation in speaking to our QuickBooks error support professionals using our dedicated support line, i.e., 1-800-761-1787.
What is QuickBooks Error Code H505?
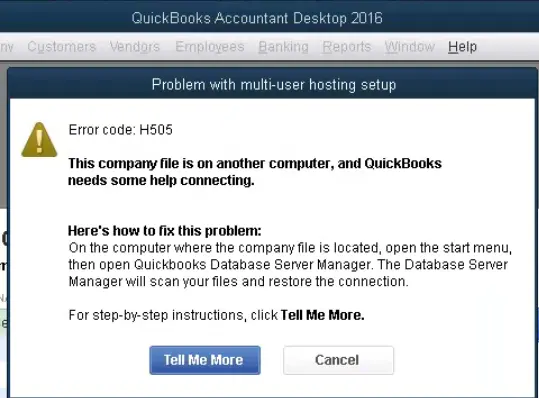
QuickBooks Error Code H505 usually occurs when you try to open a company file which is located on another computer, but is unable to create a connection with the server. This error code comes from the family of HXXX series error codes that are often accompanied by H101, H202, H303, etc. Also, this error can be seen when one you try to switch to multi-user mode. Instead of accessing the file, it restricts you from working in multi-user mode. The program shows up an error message on screen stating as:
- Warning: QuickBooks has faced a problem and needs to close. Sorry for any inconvenience caused.
- Problem with multi-user hosting setup: Error code H505: This company file is on another computer, and QuickBooks needs help connecting.
Important points to remember
- You need to check that QuickBooks software is installed on the system properly.
- Also, it is important to note that it can be a full QuickBooks desktop version with database or license manager hosting only.
- Check that QuickBooks software is installed on the system properly.
- Moreover, it is very important to install QuickBooks application on the server as without it, you will not be able to use multi-user mode.
- Visit to the QuickBooks official website to download QuickBooks.
You should follow the instructions for the server system and also run the file doctor. To run the QuickBooks file doctor tool it is recommended to sign in to host server as the system admin user.
What are the reasons behind QuickBooks error H505 occurrence?
As this error is one of the common ones, there may be multiple causes that can result in the occurrence of error message H505 in QuickBooks. Some of the most common causes are as mentioned below:
- The hosting configuration of the device is Incorrect.
- Presence of an incorrect or damaged .ND file, this results in the failure of QB company file being accessed by the entire network.
- This error can be caused because of DNS incorrect settings.
- It can happen when the QB Services such as QuickBooksDBXX/QBCF are not working.
- In case the database server manager is not able to find the IP address of the host computer or in case it is using several different IP addresses.
- Error H505 can happen if the system Firewall Settings is obstructing QuickBooks to get to the company file.
What are the symptoms of error H505?
The signs and symptoms of the QuickBooks multi-user error H505 are as follows:
- This error appears and crashes an active program window.
- The system often crashes when running the same program.
- If error code H505 itself appears on the screen.
- QuickBooks is unable to switch to multi-user mode.
- Another sign can be if the Windows function slowly.
- If you are unable to access the QuickBooks company file from a different computer or server.
- If your system or QuickBooks freezes or crashes periodically for many seconds.
- QuickBooks displays a slow response time while accessing the company file.
Steps to perform before fixing the Error code H505
It is important to ensure that all the factors that are mentioned below are taken care of. This will ensure that the further steps of rectifying the errors are dealt with without any damage to the data or files stored on the device.
- Ensure that the Company file has a backup.
- Update the QuickBooks Desktop to the latest version.
- Run the Quick fix my program option in the Tools Hub program.
- Initiate the QuickBooks Database Server Manager.
- Configure the firewall settings so that it will not obstruct the process while it is under work.
Methods to Rectify the QuickBooks Error Code H505
We are going through a bunch of DIY methods that can help you in rectification of QuickBooks error code H505. There are several of them as it will ensure that the error is completely fixed. So, make sure that you follow through all the methods in an orderly fashion:
Method #1: By using the QuickBooks File Doctor Tool
- For this, you will first have to check that the QB desktop is installed on your server computer and you have the access to the network.
- Once confirmed, Download QuickBooks File Doctor Tool and run the program on the server. File doctor can fix the multi-user errors and will free up the H-series errors completely (including error code H505).
Run QuickBooks File Doctor Tool using tool hub program
- Initially you need to download and install the QuickBooks Tools Hub program and save the downloaded file on your system.
- To install the tool, follow the on-screen commands.
- Once done with that, open QuickBooks Tool Hub program by double-tapping on the newly created icon.
- In Tool Hub, you need to click on Company File Issues.

- After that select Run QuickBooks File Doctor opt from the available options.
- In last, select the company file that you want to diagnose and repair.
Method #2: Create a New folder for the company file and access the company file

- Start the process with Creating a new folder in the hosting computer.
- Once the folder is created, ensure that the Windows can get Entry permissions to the company files.
- Now you will have to copy the .qbw file into the new folder.
- At last, go into Multi-user mode and open the company file to complete the process.
Read Also: How to Fix QuickBooks Won’t Open Portable Company File?
Method #3: Configure the firewall ports settings
This error can be fix by configuring the firewall and security settings for QuickBooks desktop.
- Start with opening a Run dialogue box which can be done by pressing the Windows + R keys combination on your keyboard.

- Once done, use the Run command to open Control panel.
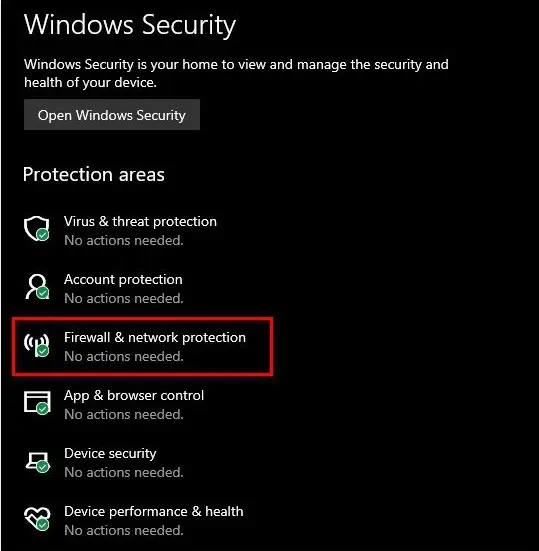
- Here you will have to select System and Security option after that open Windows Firewall and Network Protection.
- Now hit a click on the Advanced Settings opt and click on the Inbound rule. After that, choose New Rule.
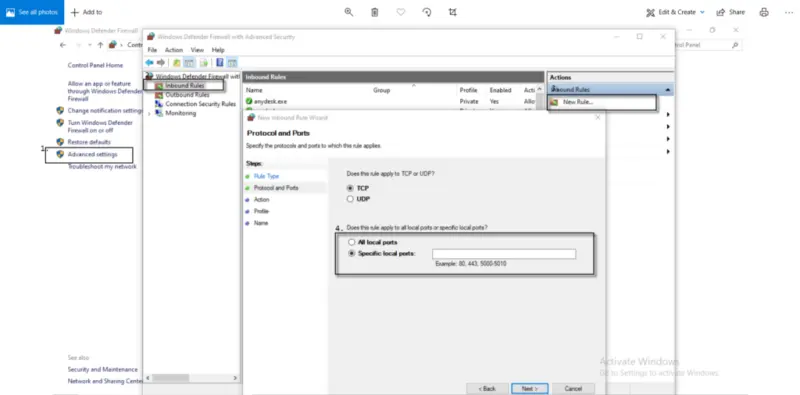
- Also, select a Port and hit a click on Next tab.
- Ascertain that the TCP you have chosen the Correct TCP Option.
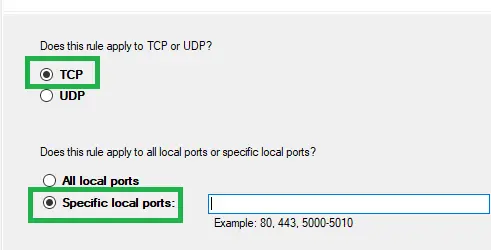
- Now enter the Port of QuickBooks desktop's year version.
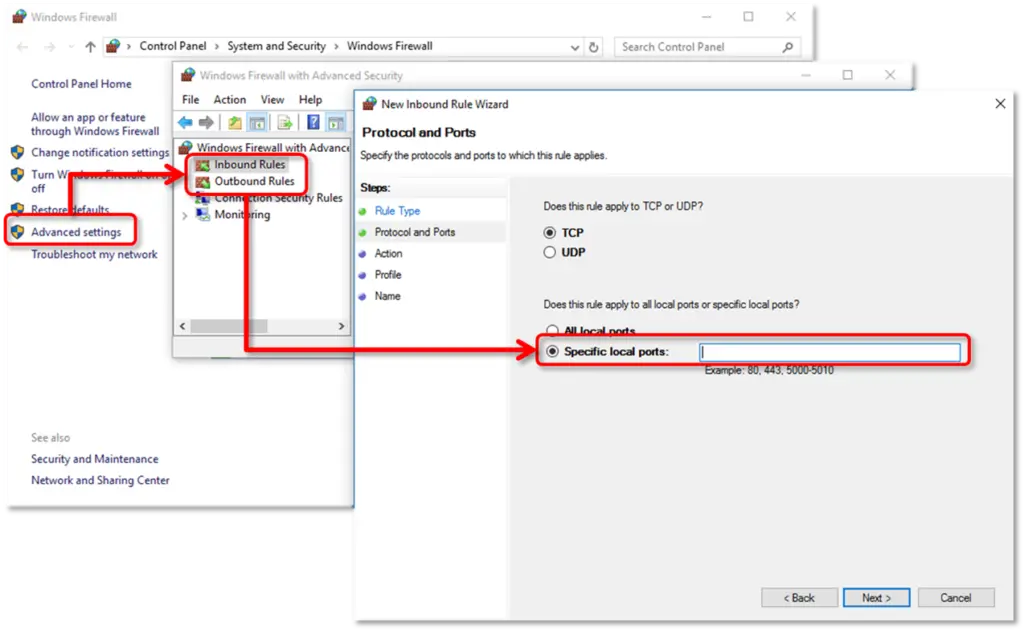
- Once the year code has been entered in the respective field, click on Next tab and restart QuickBooks desktop to complete the process.
Method #4: Change QuickBooks hosting settings
When none of the above methods worked, make sure to assess the QuickBooks hosting settings. The steps involved in this process are as follows:
Verify Hosting
- At the start, you need to restart the QuickBooks software on both servers.
- In this process, open the QuickBooks on both systems that are configured as multi-user.
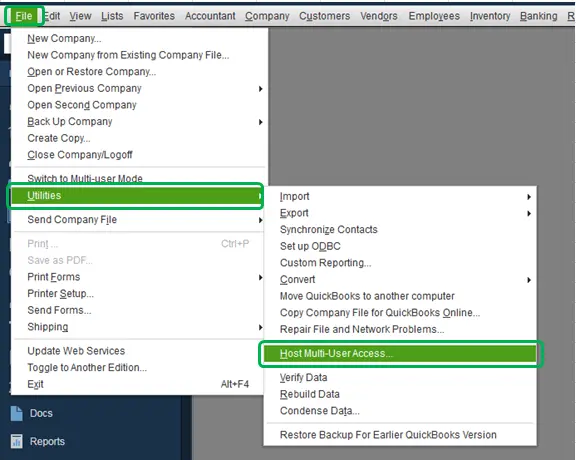
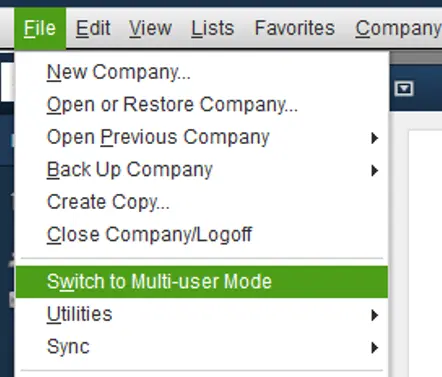
- Hit a click on the File menu and then select Utilities.
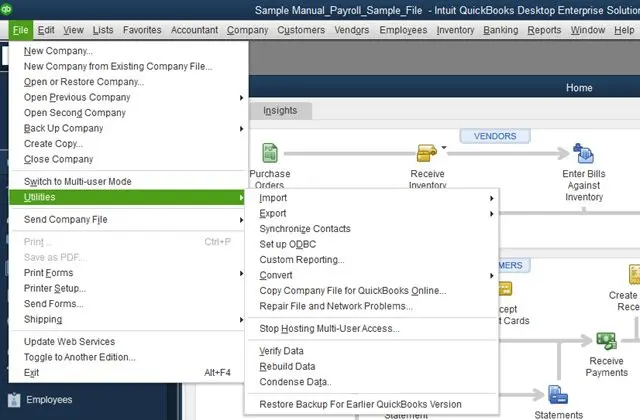
- Discontinue/stop hosting multi-user access configuration.
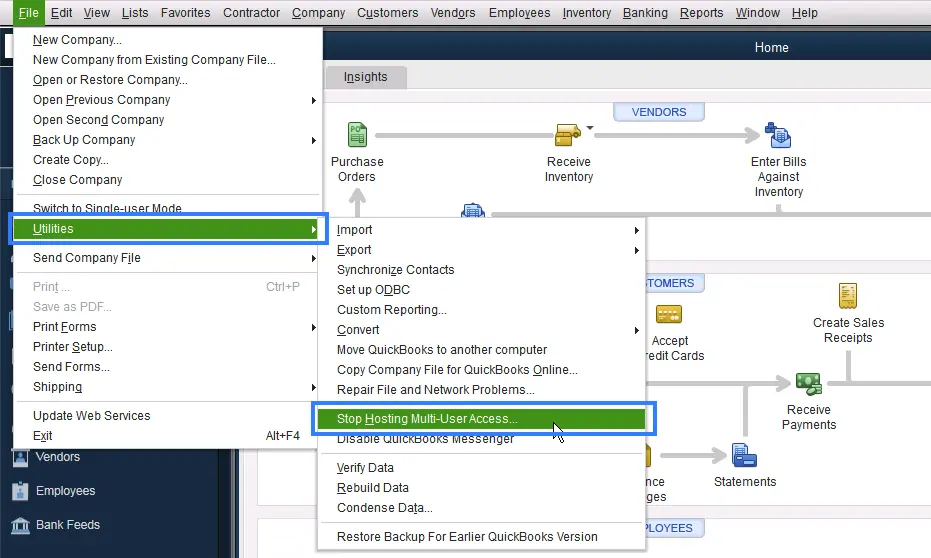
- Followed by, Host multi-user access or turning on hosting via file in one system, and click on Utilities option.
Verify QuickBooks services
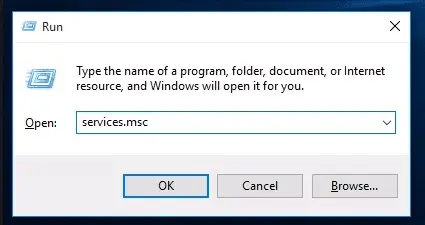
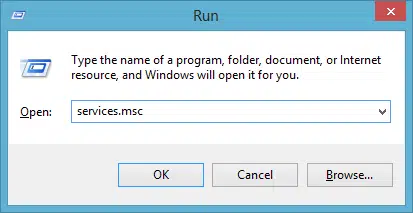
- Open the Run box and then press the Windows + R keys.
- Type in the MSC and hit Enter key. After that, you can look for Services.msc in the Windows search bar.
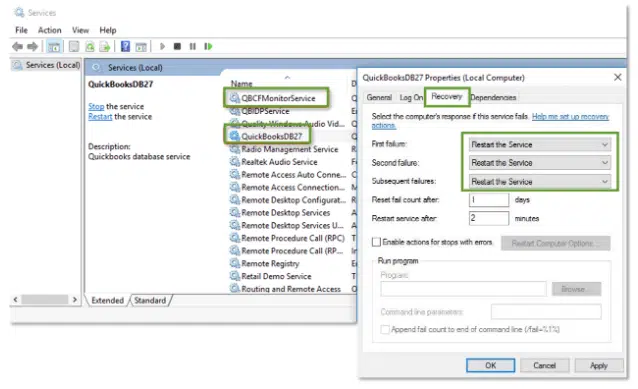
- Next, scroll down and look for the QuickBooksDBXX service in the services window.
- Also, double-click the QuickBooksDBXX service option and also make sure that the startup is opted as Automatic.

- Now you need to select Recovery tab.
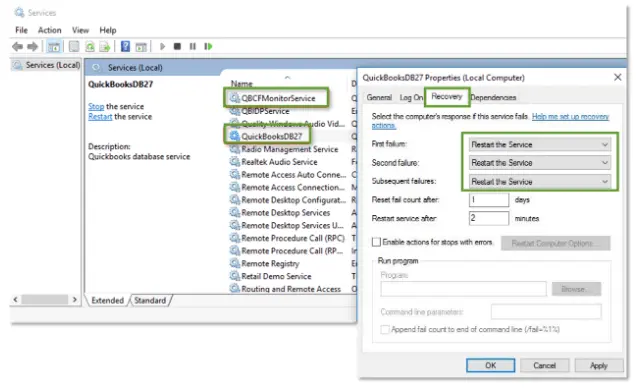
- Manually restart QuickBooksDBXX service, in case of a failure. Repeat the same if needed.
- Further, press OK to save changes.
- Now you need to repeat the steps for the QBCFMonitorService.
- Moving ahead, you need to open QuickBooks in a multi-user mode on each effected digital system.
- Last step is to look to form a QuickBooksDBXX service that is a member of the admin cluster and has acceptable permissions, in case of any problem.
Read Also: What are the Ways to Fix QuickBooks Unable to Sync License issue?
Method #5: Change the system’s firewall settings and create exceptions

- To begin with, hit a click on Windows key and then move to Control panel settings.
- Click on the Control panel along with that select the Firewall settings.
- Next step in the process is to choose Allow a program via the system’s firewall.
- Once done with that, hit a click on Add program opt, and then include the QuickBooks 20xx to the exception list.
- Reboot the system to Save the changes.
You need to add the following ports according to the version of your QuickBooks software:
- QuickBooks Desktop 2015: 8019, 56725, 55363,55367
- QuickBooks Desktop 2016: 8019, 56726, 55368, 55372
- QuickBooks Desktop 2017: 8019, 56727, 55373, 55377
- QuickBooks Desktop 2018: 8019, 56728, 55378, 55382
- QuickBooks Desktop 2019: 8091, XXXX
- QuickBooks Desktop 2020: 8091, XXXX
- QuickBooks Desktop 2021: 8091, XXXX
- QuickBooks Desktop 2022: 8091, XXXX
- QuickBooks Desktop 2023: 8091, XXXX
- QuickBooks Desktop 2024: 8091, XXXX
Method #6: Edit the Host file
In this solution, you have to first edit the host file. The steps involved in this process are as follows:
Step 1: Find IP address and computer name of the Server and Workstation
- In the first step, press Windows + R keys in order to open Run box.
- After that type CMD and then hit Enter key to open Command Prompt window.
- Type ipconfig/all and hit Enter to run the command.
- Find the Host Name in the Windows IP Configuration section. Your server name is on the right.
- The next step is to write the Host name and IP address somewhere. You need to repeat the process for all systems that have multi-user setup.

Now, go back to the workstation to test the server. Following given steps may get complex for you, so we recommend you to consult with your IT professional for help.
- Initially, navigate to Windows Start menu from a workstation.
- After that, type Run into search and open Run command.
- Now type CMD into the Run window, and then press Enter key.
- Next, type Ping [server name], and then press Enter key. Don’t include the brackets around your server name.

Step 2: Edit the Windows hosts file
Now after the above steps you need to edit the Windows hosts file:
- Initially, shut down the QuickBooks and then move to Start menu.
- After that, move to this PC option and then visit the address: C:\Windows\Systems32\Drivers\Etc or C:\Windows\Syswow64\Drivers\Etc.
- In case you are unable to find the Windows folder in the system. Then you can follow the steps to see the Hidden files and folders.
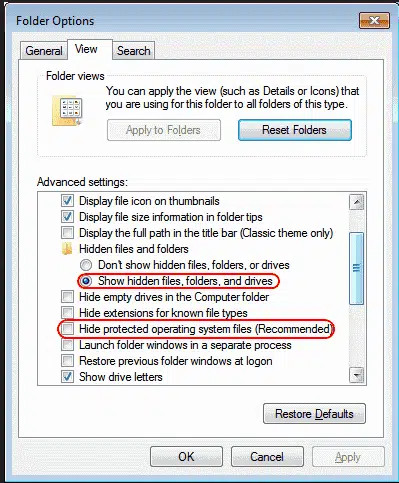
- Now you will have to click on the View tab and then click on Hidden items, after which the you can be able to see hidden files.
- After that, right click on View tab and click on Open with option, and open the same with notepad.
- Now fill in the IP Address and system name. When the details are entered, make sure to use the Tab key, instead of using Space bar to put spaces.

- And the last step is to Save the changes and then reopen the QuickBooks software in multi-user mode.
See Also: What is QuickBooks Error Code C=272 and How to Fix It?
Method #7: Run the QuickBooks database server manager on the server
If none of the methods worked in your favor, then try out this one. You can simply download and install the QuickBooks tools hub, by carrying out the steps below:
Step 1: Download and install the QuickBooks Tools Hub on the server
- The very first step is to close QuickBooks.
- And then, download the QuickBooks tools hub file. Followed by saving the file somewhere it can be found easily.
- After that, open the file downloaded earlier (QuickBooksToolHub.exe).
- Once done with that, you have to follow the on-screen prompt to install and agree to the terms and conditions.
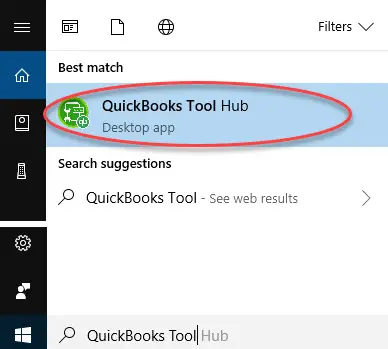
- After that, when the installation finishes, you need to double click on the icon to open the tool hub program.
The point to be noted here is that, if you are unable to spot the icon, then search it in Windows for QuickBooks tools hub and then select the program.
Step 2: Run QuickBooks Database server manager, from the tool hub program
From the Tools hub, run the database server manager. The steps to be followed are as follows:
- The first step is to choose the Network issues, from the QuickBooks tools hub.
- And then, select QuickBooks database server manager. In case QuickBooks isn’t installed on the server, you will be prompted to install it.

- Now select Start scan option, in case the company file folder. In case they aren't, you need to browse to the location of the company file and then click on Start scan option.
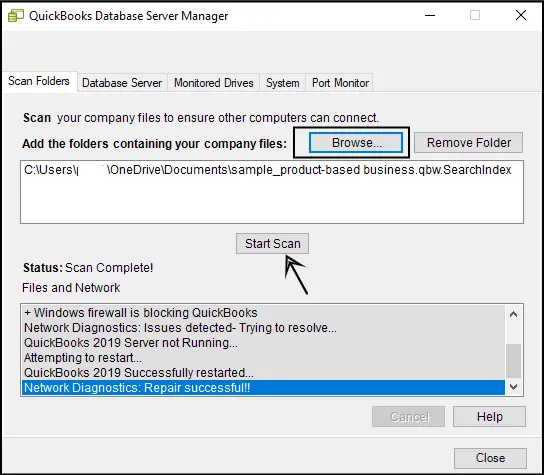
- The database server manager will repair the Firewall permissions automatically. Once the scanning process ends, make sure to select Close.
- Lastly, open QuickBooks on each of the workstation, where the error was seen. And then choose file option, along with that switch to multi-user mode. In case you detects any server system as a workstation, then make sure to check that too.
Method #8: Follow the steps depending upon how to host the company files
Step 1: Hosting your own Network
In case you are not already installed the QuickBooks database server manager, then it is recommended to install the database server manager on the server for each version of QuickBooks being used. The server is the system that hosts the company files. After you have installed the database server manager, it is recommended to continue to the sections below:
There can be two ways to set up QuickBooks database server manager:
- The full program option: You installs the full version of QuickBooks desktop and database server manager on the server system.
- The Server only option: You only install the database server manager on the server system.
Step 2: Host the network with Windows Server 2012 Essentials R2
You need to follow a certain steps to use the Windows server 2012 Essentials R2, for the hosting network.
Using QuickBooks Enterprise Hosting
In case you are making use of QuickBooks Enterprise hosting, then you need to contact professionals immediately.
Using Another Hosting Solution
In case you are making use of another solution or one of the affiliated Intuit hosting providers, then it is recommended to directly contact them for restarting the hosting environment.
Related article: How to Fix QuickBooks Error Code -6150, -1006?
Method #9: Open network ports that QuickBooks uses to transmit knowledge
Step 1: Configuring the firewall settings
- First of all, move to the Windows firewall settings and then hit right click on the Windows option to click on the Control panel.
- After that, type Firewall in the search bar and also hit Enter key. It is recommended to click on the Windows firewall and press Advanced settings tab.
- After that, move to the left and then right-click the Outbound rules and select New rule.
- Next, you have to press on Ports and hit Next.
- Now hit a click on TCP and in the specific local ports, enter the following ports:
- For QuickBooks desktop 2015: 8019,56725,55363-55367
- For QuickBooks desktop 2016: 8019,56726,55368-55372
- QuickBooks desktop 2017: 8019,56727,55373-55377
- For QuickBooks desktop 2018: 8019,56728,55378-55382
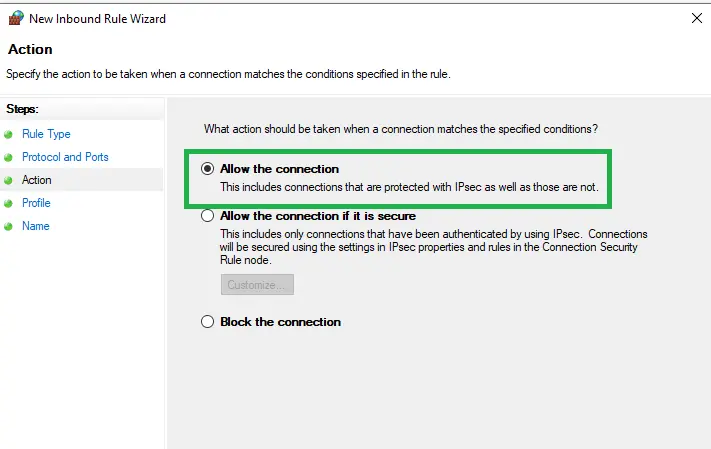
- You will then have to click on Next and select Allow the connection tab.
- After that, hit a click on Next to type in the name and also hit Finish.
- Also, repeat the steps 1-5 for inbound rules.
- The last step is to move to the Multi-user mode again and open QuickBooks.
Step 2: Turning on the network discovery
- At first, open the Control panel and then press on the System and security.
- And then, hit a click on Windows firewall.
- You will then have to click permit associate app/feature on the windows firewall.
- Also, press Modification option.
- Now you need to select Network discovery, and hit OK tab.
Step 3: Find out the name of the server
- You will have to open the Run command and press on the Windows key + R keys. And type the CMD and click on Enter key.
- Now, Enter config/all and also hit Enter key.
- Followed by looking for the Host name, in the IP configuration section.
- You will then be able to see the server name on the right.
- Now you can Save and move to the Next step.
Method #10: Checking the services on the server
You need to ensure that all QuickBooks services are running on the server system. The steps to check QuickBooksDBXX. Then repeat them for QBCFMonitorService.
- First step is to open Windows Start menu on the Server system.
- And then, type in Run and open Run tab.
- Next, type in Services.msc into the run window and then press the Enter tab.
- After that, look for and double click on the QuickBooksDBXX on the list. Where XX denotes the version of QuickBooks.
- Also, choose Automatic tab for the Startup type.

- Now ensure that the Service status is either running or started. If it is not, then choose Start tab.
- Followed by selecting the Recovery tab.
- And select restart the service from each of these drop down menu.
- First failure
- Second failure
- Subsequent failures
- After that select Apply tab and also hit OK tab to save the changes.
- And towards the end, repeat the steps for QBCFMonitorService.
Method #11: Turn on Network Discovery (On Server PC)
- Under this process, press Start menu on the Server computer.
- After that, search for "Network", and then open Network and sharing center.

- In the next step, tap on Change advanced sharing settings.
- Now move to the Network Discovery and File and Printer sharing section.
- At last, click on Turn on Network Discovery. That's it!
Winding up!
We hope that you've followed the above given methods correctly, and the QuickBooks Error code H505 is fixed successfully. In case the error is still present and pops up even after the completion of the steps, then we recommend you to immediately contact our QuickBooks enterprise technical support team. Feel free to connect with our U.S. based accounting experts using our helpline i.e. 1-800-761-1787. We will be happy to help!
FAQ’s
How do I check network connectivity and name resolution?
Test by pinging the server name from the workstation. If name resolution fails or is slow, fix DNS, try the server’s IP, or add server/workstation entries to the Windows hosts file.
Do firewall and antivirus settings matter?
Definitely. Security tools can block QuickBooks traffic. Add allow-list rules for QuickBooks executables/services and open required ports, then retry switching to multi-user mode.
Does Error H505 mean my company file is corrupted?
Not necessarily—H505 primarily indicates a network/hosting path issue. However, if network fixes don’t work, run Verify/Rebuild to rule out data damage before proceeding further.
Should I open the company file using a UNC path or mapped drive?
Prefer a UNC path like \ServerName\Share\Company.QBW for testing; if that works while a mapped drive fails, recreate the mapped drive with reconnect at sign‑in and proper credentials.
Which ports should be open for QuickBooks multi‑user?
Open version‑specific ports (e.g., 8019) and the dynamic ports configured by the Database Server Manager, plus required Windows file sharing ports; allow QuickBooks executables and services.
Should I flush DNS when H505 recurs daily?
It helps. Run ipconfig /flushdns on workstations, restart the DNS client service if needed, and ensure the server’s name resolves correctly to the right IP.
You might also like these topics:
How to fix QuickBooks error code 6123?
Methods to Host your QuickBooks Company Data in Multi-user Mode
Steps to Fix Error 3371: Could not initialize license properties
Fixation of QuickBooks already has a company file open error
How do I clear QuickBooks Error 81594, when paying subscription?