Are you planning to access your company file in multi-user mode? Well, before that, it is important that you need to have QuickBooks Database Server Manager (QBDSM) installed on your system. The QuickBooks Database Server Manager is one key tool of this accounting software that recently has attracted a lot of attention in the accounting industry.
Database Server Manager is the one and only way to use multiple versions of QuickBooks Desktop over a network and enable multi-user access. This write-up is going to brief you about the installation, configuration, and updation process of using QBDSM.
If you aren’t prepared to manually perform the steps to install and use the QuickBooks Database Server Manager tool, you can simply get on a call with our tech geeks using our dedicated support line i.e., 1(800)-761-1787, and share your technical difficulties with our experts.
What is QuickBooks Database Server Manager?

Intuit introduced the QuickBooks Database Server Manager to help users in organizing applications and files for multiple users. It also helps to share company files with other systems over the network. Nowadays, it has become an essential tool to use more than one version of QuickBooks Desktop software.
More than one user can work on the same file with the help of this tool. Following are some other activities that the QBDSM allows users to perform:
Scanning the QuickBooks company file.
Checking the local storage device to detect the new company file.
Important: It should be noted that the QuickBooks desktop needs the optimum file performance on the network and so you can install and set the tool on the system in the location of the company files.
Important facts associated with QuickBooks database server manager
There are a few facts that you need to know regarding QuickBooks Database Server Manager. A few of which are stated below:
-
The Database Server Manager creates Network Data Files (.ND files) for all company files stored in the host workstation.
-
If you are on multiple versions of QuickBooks Desktop, then you need to install QuickBooks Database Server Manager for each of them.
-
Installing this tool lets you use multiple QuickBooksDBXX (QuickBooks Database Server Manager service) processes. This shouldn’t be confused with multiple versions of QuickBooks software.
-
Make sure that you install Database Server Manager for each QuickBooks Desktop version installed in the system.
-
When installed, QuickBooks automatically creates a Windows user account (QBDataServiceUserXX) to manage network access securely.
-
Ensure that you have the latest version of QuickBooks Database Server Manager installed on your computer to avoid compatibility errors.
-
When using multiple versions of QuickBooks Desktop, always install the Database Server Manager in chronological order (oldest to newest).
Steps to Install QuickBooks Database Server Manager
In order to install QuickBooks database server manager on the server system, the steps to be followed are scribbled below.

Before beginning, remember: if you are an accountant or someone who hosts multiple versions of QuickBooks Desktop on the network, install them in order — oldest version first, ending with the most recent.
Installation Steps:
-
Close all open programs on the server system, including QuickBooks.
-
The QuickBooks Database Server Manager tool is part of the QuickBooks Desktop file and therefore should already be available with your accounting software. If not, download QuickBooks Database Server Manager from Intuit’s official site.
-
Open the install file (look for Setup_QuickBooks.exe) and click on Start to launch the installation wizard.
-
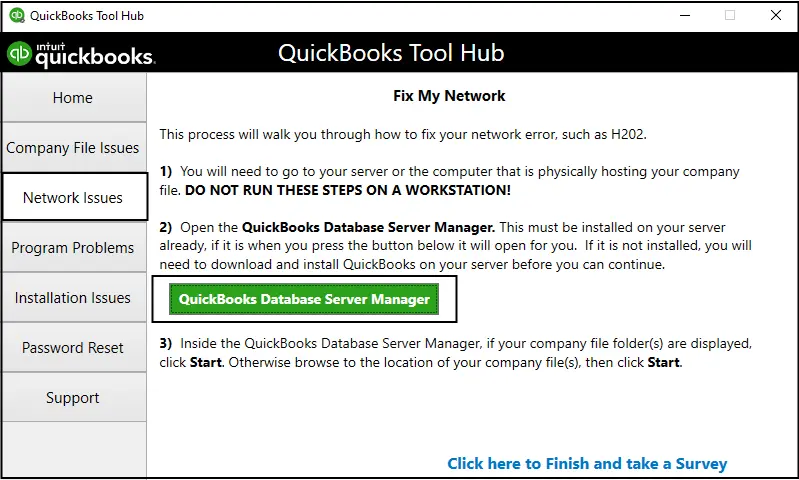
After downloading the QuickBooks Tools Hub, install and run it. Once open, navigate to Network Issues → QuickBooks Database Server Manager.
-
Follow the on-screen instructions to install QuickBooks Desktop on your system.
-
If connected to the internet, click Next to download updates; otherwise, click No and then Next.
-
Close all programs and click Next.
-
Accept the Software License Agreement.
-
When prompted, select Custom or Network Options (avoid Express).
-
Choose the best option for Network Setup and click Next. Both options install the tool, and existing company data remains safe.
-
Select:
-
“I’ll be using QuickBooks Desktop on this computer, AND I’ll be storing company files here” — if using both on the same system.
-
Or, “I’ll not be using QuickBooks Desktop on this computer” — if using the system as a dedicated host.
-
Click Yes and allow access, then enter your license number and product number.
-
Follow on-screen steps and click Install.
-
Once installed, QuickBooks creates a new Windows service (QuickBooksDBXX) for each version of Database Server Manager — ensure it has folder access permissions.
The point to be noted here is that the QuickBooks software creates a new Windows user for each version of Database server manager. Thus, you need to give you permission to access the folders that have the company file.
See Also: How to Fix QuickBooks Unexpected Error 5?
How to configure the QuickBooks database server manager?
Now that you have installed the QBDSM, it is time to configure it. This process can be skipped, if you wishes to use the default settings. The steps involved in this method are as follows:

If you only installed QuickBooks Database Server Manager:
-
Open the Windows Start menu, type Services, and open it.
-
Select and open QuickBooksDBXX (version-specific).
-
Go to General → Server Status, click Stop if running.
-
Set Startup type → Automatic.
-
Under Logon, choose Local System Account.
-
Go to Recovery tab → select Restart the Service in all dropdowns.
-
Return to General, then click Start to restart the service.
If you installed both QuickBooks Desktop and Database Server Manager:
-
Open QuickBooks Desktop on the server computer.
-
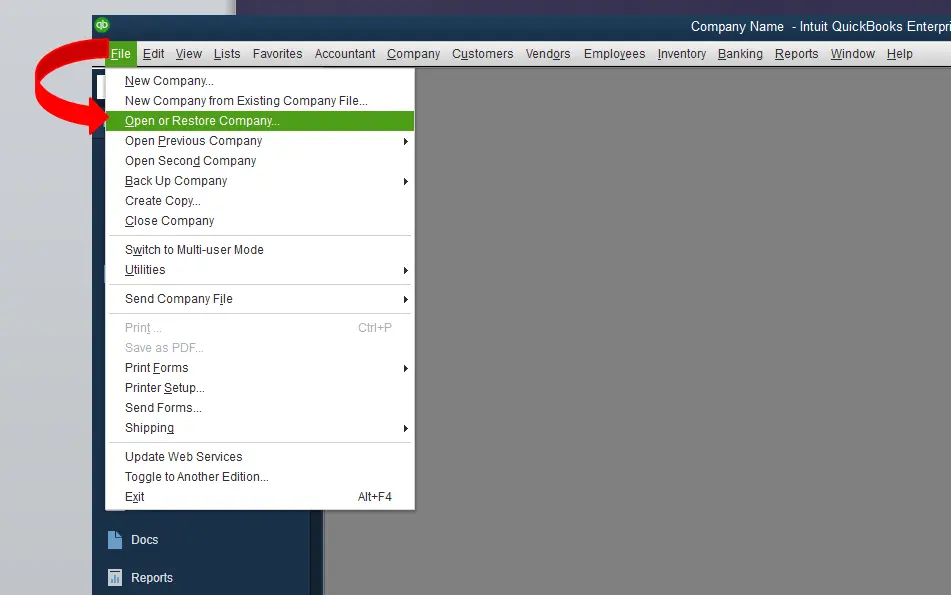
Go to File → Open or Restore Company → Open a Company File → Next.
-
Check Open file in multi-user mode, then Open.
-
Log in to the company file.
-
Go to File → Close Company/Log Off.
-
Open Windows Start, type Database, and open QuickBooks Database Server Manager.
-
Verify if everything is running correctly.
Firewall Configuration Tip:
If Database Server Manager isn’t running, open Windows Defender Firewall → Allow app → ensure QuickBooks Database Server Manager (QBDBMgrN.exe) and QuickBooksDBXX are allowed for both Private and Public networks.In case you have installed QuickBooks desktop and database server manager:
-
-
- Under this, you should first open QuickBooks desktop on the server computer.
-
- And then, move to the File menu and also choose Open or Restore company.
-
-
- Next step is to select Open a company file. And then look for and Open the company file. You are then required to select Next tab.

-
-
- Now choose the Open file in multi-user mode checkbox, and also opt for Open tab.
-
- Once done with that, Log in to the company file.
-
- In the next step, move to the File menu and choose Close company/log of. This will close the company file on the server.
-
- Followed by opening the Windows Start menu.
-
- Type Database into the search bar and then open the QuickBooks database server manager.
If all seems good, then you can move ahead without any issues.
You may also read: How to Resolve QuickBooks Error 1601, 1603 and 1642?
How to use the QuickBooks Database Server Manager?
Database server manager lets you share and manage your company files with other PC's over your network. This tool also helps you to monitor your multi-user network. At the time you set-up a network, you need to have QBDBSM running so that users can access your company files.
After you have installed the database server manager, it is time to scan the company files. After scanning, you can access the company files from other system on the network. This will let you on the network work together in QuickBooks desktop from multiple systems. The steps involved in this process are as follows:
Step 1: Open the QuickBooks Database Server Manager
-
-
- At first, close your QuickBooks desktop.
-
- After that download the QuickBooks Tools Hub.
-
- Now, double-click on downloaded file named as QuickBooksToolHub.exe.

-
-
- Also, follow the on-screen commands to Install and Agree to the terms and conditions.
-
- Once the installation finishes, hit double-click on the icon to launch the tool hub.
-
-
- Now go to the Network Issues tab and choose QuickBooks Database Server Manager.
Step 2: Scan the folders
Before sharing the files, you need to scan the folders having them. You only need to scan them once.
-
-
- First of all, open the windows Start menu on the server system.
-
- After that, type Database into the Search and open QuickBooks database server manager.

-
-
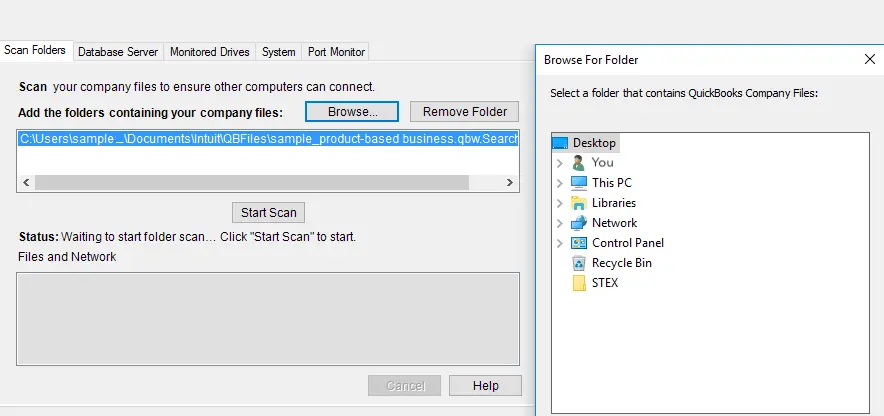
- The next step is to move to the scan folders tab. In case you are making use of database server manager 2019, then this process shares all of the folders. You might want to set the folder permissions so that you only gives access to specific users.
-
- You should then required to select Browse option and then select the Folders that hold the company files.
-
- After that, click on OK button.
-
-
- And then, select Start scan tab.
Once the scan finishes, the folders appear in the QuickBooks files found section. You can now access the company files in these folders.
Step 3: Add folders
-
-
- You should Add folders tab and then choose the Folder, where it is to be included.
-
- The location of the folder under the folders which contain the QuickBooks company file.
Step 4: Remove folder
-
-
- One can remove the folder by clicking the Folders having QuickBooks company file and then click on Remove folder.
Step 5: Clicking on Scan tab

-
-
- Click on the Scan the folders tab that is listed under the folders that contain the QuickBooks company files.
-
- After the scan finishes, you will see the List of company files found in that folder.
Step 6: Monitor your drives
After scanning the folders, the drives that hold them show up in the Monitored drives tab. You are required to choose the Drive to monitor these folders. This way, you won’t require re-scanning the folders, if you ever change or move the company files in them. The steps involved in this process are as follows:
-
-
- First of all, go to the Monitored drives tab.
-
- After that select the Check-boxes for the hard drives that hold the company files. The point to be noted is that you need to only add drives that hold the company files.

Now change or move the company files on the drive, then they won’t require to Rescan the folders.
Step 7: Manage database server manager
It should be noted that there are various other tabs in QuickBooks database server manager that keep everything in smooth condition, which includes:
-
-
- The System tab notifies the location where the database server manager is installed on the system.

-
-
- And the Database server tab gives you the real-time status of the tool and also the information regarding its connection.

An important point to be noted here is that the QuickBooks desktop 2020 uses dynamic ports and specific port number for better performance. In case the database server manager isn’t running, you might need to change the firewall settings, so that it can run on the server.
Read Also: QuickBooks Abort Error - How to Fix, Resolve It?
Steps to update QuickBooks database server manager
After understanding all the above procedures, you should also know the process to update the QuickBooks database server manager. The steps involved are:
-
-
- Visit the official website of Intuit and download update patch for QuickBooks database server manager.
-
- Also, the server needs to be rebooted after update.
-
- You will see a message "The company file needs to be updated to work with this version of QuickBooks desktop".
-
- Now create a backup of the file once the server is ready to make specific changes.
-
- Carry out the set of instructions displayed on the screen, and the file will be ready to open.
Concluding Words!
With this we come to the end of the blog post, where we hope that the information shared here will help you to install, use and update QuickBooks database server manager. However, if you are facing any difficulty in carrying out the process, or in case of any query, do not hesitate in talking to our QuickBooks support professionals. Simply connect with our tech geeks personally on our support number i.e., 1-800-761-1787, and our experts will be happy to assist you.
Other helpful articles:
FAQ’s about QuickBooks database server manager
Why do you keep seeing “Network Diagnostics Failed” errors?
This is because of the following reasons:
1. Out-of-date Database Server Manager.
2. Network misconfiguration or permissions issues.
3. Windows Firewall blocking required ports.
4. Damaged or corrupted .ND or company files.
Can I use QuickBooks Database Server Manager with different QuickBooks versions?
Yes, you can use! but each version of QuickBooks desktop installs its own instance of the server manager, and you need to run and update each separately. Install older versions first, then newer ones. Make sure all are kept up to date for smooth compatibility.
How do I restart the Database Server Manager if it crashes?
You are required to follow the below given steps, if the database server manager stops working or crashes:
1. You need to open the Services app in Windows server.
2. Then find out the QuickBooksDBXX (where XX is your year/version, e.g. QuickBooksDB31 for 2021).
3. Now hit a right-click on it and select Restart.
4. If that doesn’t resolve things, restart the entire server and try again
This is because of the following reasons:
1. Out-of-date Database Server Manager.
2. Network misconfiguration or permissions issues.
3. Windows Firewall blocking required ports.
4. Damaged or corrupted .ND or company files.
Yes, you can use! but each version of QuickBooks desktop installs its own instance of the server manager, and you need to run and update each separately. Install older versions first, then newer ones. Make sure all are kept up to date for smooth compatibility.
You are required to follow the below given steps, if the database server manager stops working or crashes:
1. You need to open the Services app in Windows server.
2. Then find out the QuickBooksDBXX (where XX is your year/version, e.g. QuickBooksDB31 for 2021).
3. Now hit a right-click on it and select Restart.
4. If that doesn’t resolve things, restart the entire server and try again