Downloading and Installing the QuickBooks Install Diagnostic Tool like a Pro
For more than a decade, QuickBooks is considered one of the best accounting and bookkeeping software. QuickBooks brings in a large number of benefits, due to which medium-sized and small business largely depend upon this application. From handling the finances to generating invoices to managing inventory, this software has many powerful features. There is no doubt that QuickBooks is a great software for business organizations, but as it involves numerous codes and algorithms, you might face few errors or technical challenges. Such errors are known to affect the business operations and that’s why they need to be fixed at the earliest. This is the time, when the QuickBooks Install Diagnostic Tool comes to your rescue.
This QuickBooks install diagnostic tool has been designed by Intuit to manage and fix all installation related errors. This tool basically helps in fixing any errors while performing the installation or when you are trying to open QuickBooks desktop post the installation. Today's article will endow you with all the aspects related to QuickBooks Install Diagnostic tool. So, make sure to read the article carefully till the end.
Related article: What File types and extensions used by QuickBooks?
What is QuickBooks Install Diagnostic Tool?
The QuickBooks Install Diagnostic Tool has been designed to manage issues that come up during the installation of QuickBooks desktop. It also deals with issues that can happen due to .NET Framework, the MSXML and C++. Many Microsoft core components are required for proper functioning of QuickBooks software, which is why this diagnostic tool becomes a requirement to tackle with issues related to these components. The best thing about this tool is that it resolves the errors automatically. Downloading and running QBInstall tool can fix a lot of issues that can be experienced while installing the accounting software.

Benefits of using QuickBooks Install Diagnostic Tool
Once the diagnostic tool is installed in the system, it will automatically resolve all installation issues that existed. The benefits of using QuickBooks Install Diagnostic tool are as follows:
- It is very proficient tool.
- QB install tool automatically detects the errors.
- Least human intervention is required to troubleshoot various errors with QuickBooks install tool.
It is also very beneficial in fixing errors like:
Read Also: How to Create and Open Portable Company Files in QuickBooks Desktop?
Steps to Download, Install and Use QuickBooks Install Diagnostic Tool
Important points to remember:
It is supposed to keep in mind certain pointers while using install diagnostic tool. The steps to be followed are:
- Close all other running programs and only click on the File to run the tool once you will install the tool on the desktop.
- It will automatically find and fix the error. But in certain cases, you might have to restart the system.
- Another thing is that, if you receive an error message stating "No errors were detected", then this will indicate the issue being unresolved.
Follow the below given steps in order to download, install and use the QuickBooks Install Diagnostic tool:
- Firstly, you have to go to the Intuit website to download QuickBooks Diagnostic Tool.
- Once the prompt appears, you will have to save the QuickBooks install tool file to desktop.
- Close all open programs on the PC and proceed further.
- Now move to download location and look for the QBinstall _tool_v2.exe file of QuickBooks install tool.
- Once you have found the QBinstall _tool_v2. .exe file double click on the start installation wizard.
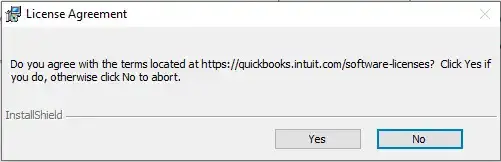
- When a License agreement appears on the window, hit a click on Yes button.
- Moving ahead, hit a click on Proceed button, to start with Scan process.
- Once the scan is done, restart your system.
- Open tool, you might have to register again your QuickBooks ID or activate it once more.
- Also, you need to keep your Windows operating system up to date.
- Lastly, restart your system to save all the required changes.
Steps to Use QuickBooks Install Diagnostic tool
Well, QuickBooks install diagnostic tool can be used with much ease, by simply carrying out the steps discussed below. A few common issues like network troubles, data file bugs, etc. can be easily fixed with these steps. So, let us check out what those steps are:
Step 1: Make use of connection tab, for checking the general compatibility:
In order to check the system and evaluate it for QuickBooks compatibility, you can feel free to use the connection tab. You can also use it for configuring a new QuickBooks company data file.
Step 2: Authenticating Firewall status:
The QBInstall diagnostic tool will help you in spotting the firewall associated bugs, by simply endowing you will the required information regarding the system firewall. You can also make use of it for fixing the issues that might be seen while installing QuickBooks.
Step 3: Viewing the network connectivity:
This tool is also used to explore the system connectivity. In case any issue is detected in the connectivity, the installation might stop in between.
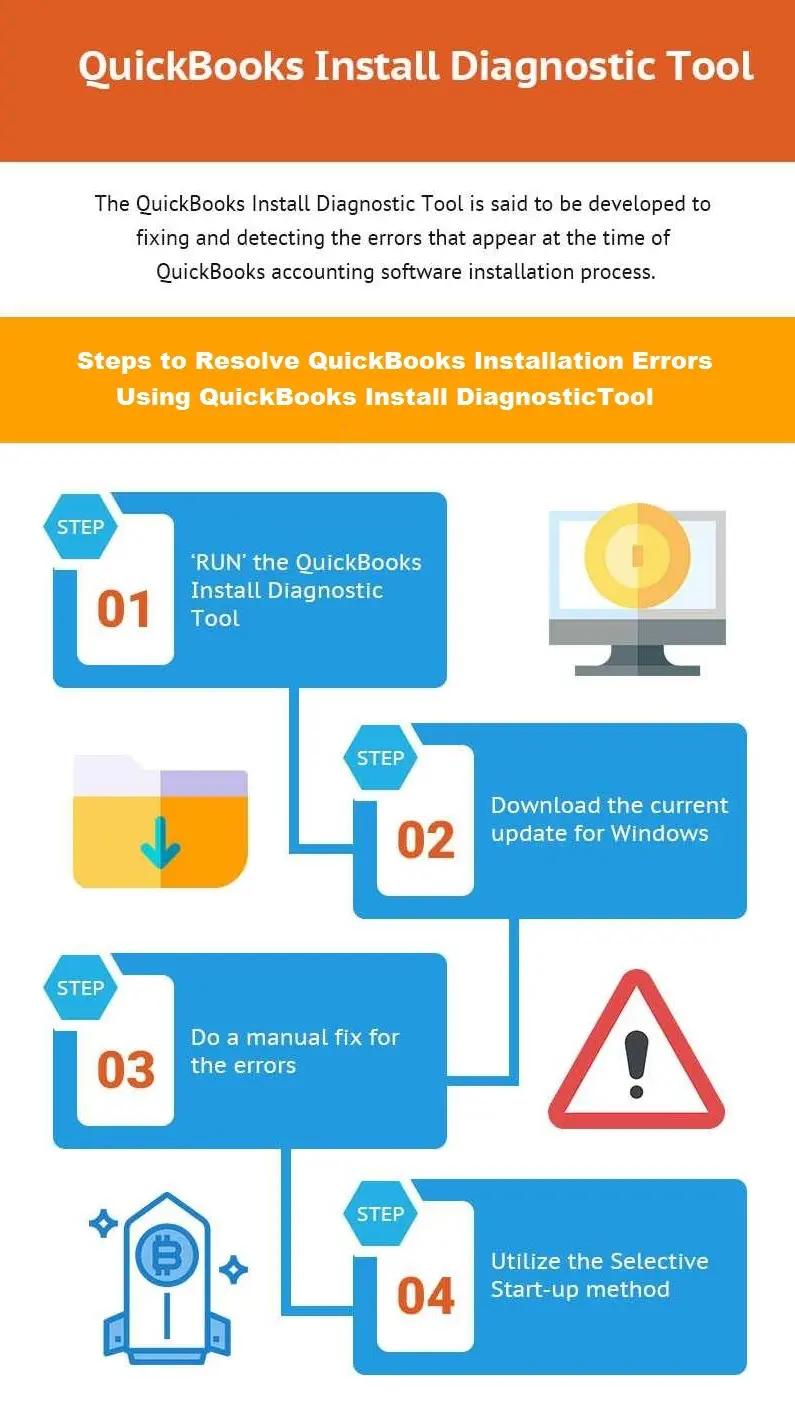
Steps to Fix Installation Errors using QBInstall Diagnostic tool
Install diagnostic tool in QuickBooks is a most useful tool that can troubleshoot various installation errors. You can use this tool to handle multiple errors and get an error free and smooth QuickBooks installation. There are certain ways or look at the below given Info-graphic image to understand how the diagnostic tool resolves install errors of QuickBooks Desktop:
Follow the given steps to troubleshoot common installation errors of QuickBooks:
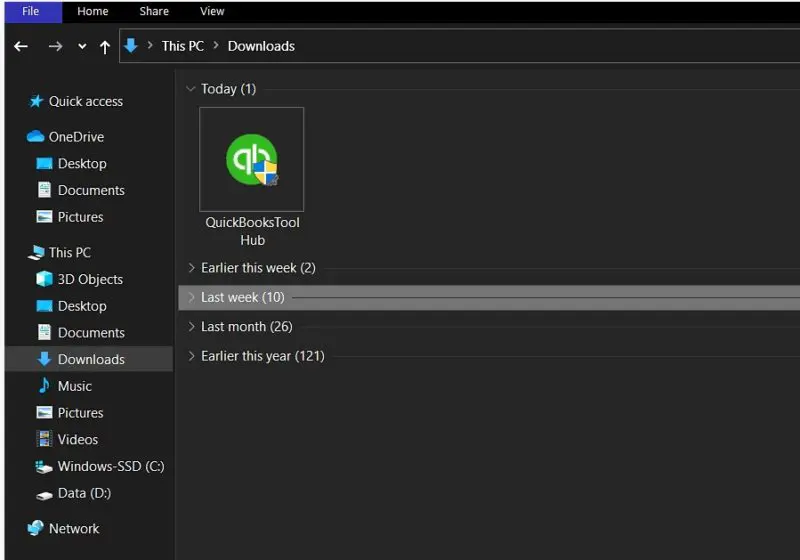
Step 1: Download the QuickBooks Tool Hub Program
This QuickBooks Tool Hub helps to resolve all the common installation errors.
- Firstly you need to shut your QuickBooks desktop.
- And then download the latest version of QuickBooks Tool Hub file from Intuit website.
- Save this file on your computer where you can easily find it.

- Once the file successfully downloaded open it.
Note: The file extension will be as (QuickBooksToolHub.exe)
- You need to follow the on-screen commands to install it.
- Agree to the terms and conditions by hitting a click on Next button.
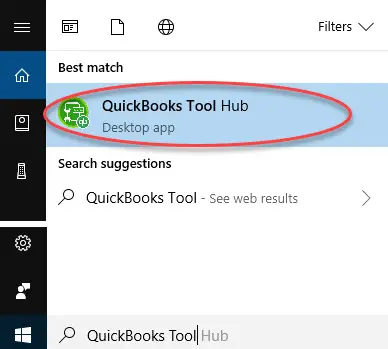
- Once the installation of QuickBooks Tool Hub finishes, open the tool hub by clicking twice on the icon.
Important: If you are unable to find out the icon from your desktop menu then search QuickBooks Tool Hub from the start menu and choose the program.
You may also read: How to Fix QuickBooks Error Code 6144 82?
Step 2: Run QuickBooks Install Diagnostic Tool using QB Tool Hub
- Open the Tool Hub program from desktop icon or do a search from Windows search.
- In the QuickBooks tool hub, you are required to choose Installation Issues from the list.
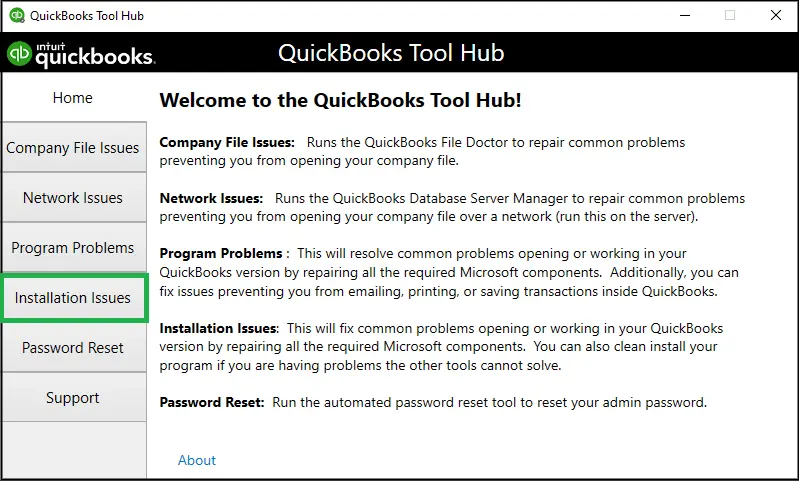
- Now choose QuickBooks Install Diagnostic Tool option.

- Once you click on QBInstall tool it will start automatically.
- Now let the tool run.
Note: The whole process may take up to 20 minutes or more as per the system performance.
- Once the process finishes, reboot your computer.
Step 3: Run Quick Fix my program
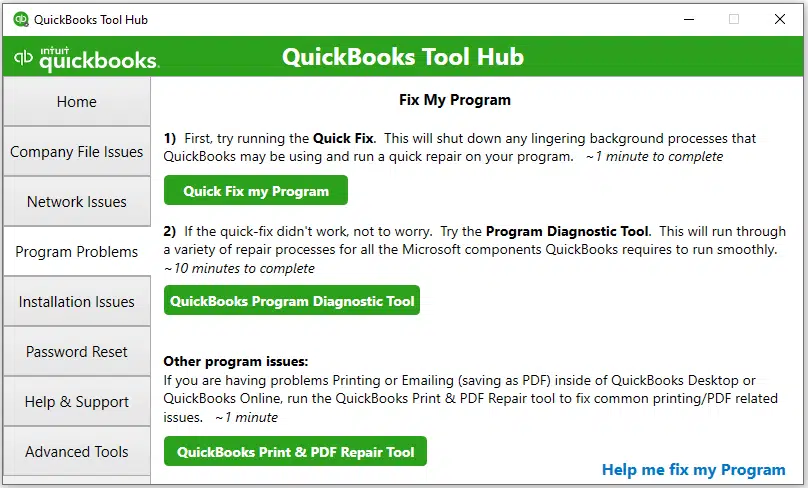
Another helpful tool in QuickBooks tools hub program is Quick Fix my program. It closes all the background running processes that the software uses. It will run a quick repair on your program.
- Open the tool hub and move to the Programs Problems.
- Here you need to select Quick Fix my Program option.
- Now wait for a while and then start your QuickBooks desktop and try to open your data file.
Move to the next step, if the error continues to bother you.
Read this Also: How to Use Alternate Vendors in QuickBooks Enterprise Solutions?
Step 4: Update your Windows to latest release
- You need to Update the latest version of Windows.
- Press the Windows or Start key on your keyboard, and type Settings and click on it.
- After that go to the Windows Update option.
- Now select Check for updates and wait for a while.
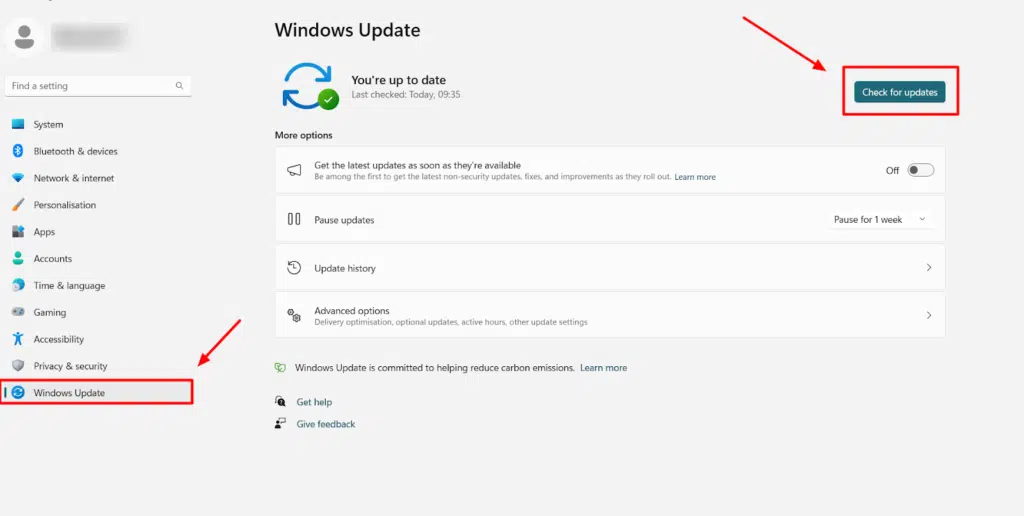
- Once done, Windows will connect to the server and search for the latest updates.
- Once the update process ends, make sure to restart the system.
Important:
- In case QuickBooks start along with any error, then you are recommended to open the company file and start the work.
- However, if the QB installation is not completed properly, then make sure to install QuickBooks desktop once again.
Move on to step 4, if you can't install and open QuickBooks.
Step 5: Fixing Windows components manually
When none of the steps work, it is recommended to go for fixing windows components manually.
Repairing or reinstalling Microsoft .Net Framework
Steps for Windows 10, 8.1, and 8
- To begin with, you need to close all the open programs.
- And then open the Windows start menu.
- Moving ahead, you need to type Control Panel in to the search bar and click on the same.
- Now move to Programs and Features option.
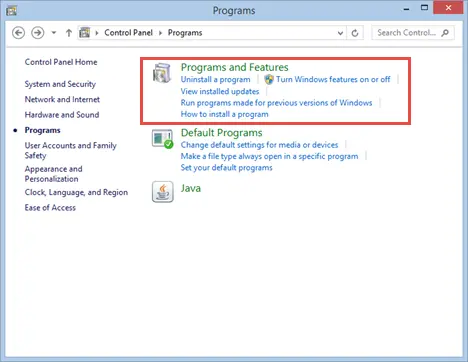
- The next step is to hit a click on Uninstall a Program option.

- Next, hit a click on Turn Windows features on or off options.

- And the last step is to find enabled .Net Framework 3.5 with a on the list and you are good to go.

Repair Microsoft MSXML- Register the MSXML DLL files
64-Bit operating system:
- You need to press Windows start menu and then type Cmd.
- After that right click on Cmd and then choose Run as Administrator opt.

- Heading forward, you need to enter cd\windows\syswow64 at the C: prompt.
- Also, type regsvr32 MSXML6.dll and then press Enter key.

- Now you need to install the QuickBooks desktop.
You may also read: How to Fix the QuickBooks Error Code 12152?
Step 6: Using Selective Startup to install QuickBooks Desktop
To install QuickBooks desktop using selective startup mode, you need to carry out the steps below:
- Prepare the data.
- Open the system in Selective startup mode.
- Uninstall or install QuickBooks.
- Lastly, switch back to Normal startup mode.
Steps to start system in selective startup mode
- Under this process, open MSConfig in the window, by looking it in the search programs and files field. You can also press Windows + R keys simultaneously from the keyboard to launch the MSConfig.
- After that choose the Selective startup and load system services tab from the General tab.
- Now you need to select the Services tab and also pick the Hide all Microsoft services tab.
- In the next step, hit a click on Disable all tab.
- And also, uncheck the Hide all Microsoft services checkbox and also ensure to select the Windows installer checkbox.

- Finally hit a click on OK tab and restart the system configuration window.
Steps to reinstall QuickBooks in selective startup mode
- In order to reinstall QuickBooks in selective startup mode, you can press Ctrl + R keys to run the control.
- After that type MSconfig on the keyboard to press OK tab.

- Now, hit a click on Selective startup option in the general tab.
- Followed by selecting the System services as well as startup items.
- In the next step, choose Hide all MS and after that click on Disable all option.

- Once done with that, hit a click on the Listing of services and check that whether you are installer, simply tick mark if it is selected.
- In case not, then choose heading after clicking on OK tab.
- Now move to the start again into the System configuration and restart the system.
- Lastly reinstall with the help of a clean installation process.
Wrapping up!
We hope that, by carrying out the above provided steps might help you in making the best out of QuickBooks install diagnostic tool. However, if you still have any query related to this tool, then you can connect with our experts who provide 24X7 QuickBooks enterprise support services. We are a hub of tech-savvy professionals, who strive to provide the best possible support round the clock to our clients. You can speak to our executives by dialing or dedicated support line i.e., 1-800-761-1787. Our team will provide you with the best possible services in a single call. We will be more happy to help you in your all concerns!
You might also like these articles:
Resolve Error code -6209, 0 unable to open the company file