Are you in search of the process to set up and use class tracking in QuickBooks desktop? Well, your search ends with this post. If you are looking to go beyond standard account-based tracking in QuickBooks, then expanding into class tracking is one of the best options. This offers you a customizable way to track specific expenses, categorize shared expenses across multiple accounts, and also handle the accounting for one-off and occasional expenses that are not associated with any particular account type. Setting up class tracking becomes a lot easier with QuickBooks desktop, as it seeds up the process. One of the major benefits of class tracking is that it offers greater control over expense categorization, ultimately making sorting expenses much easier.
This article is entirely focused on the way to setup and use class tracking in QuickBooks in the best possible way. So, make sure that you stay in tune with the article till the end. Or we also have a quick solution for you i.e. give us a call at 1-800-761-1787. This will help you to reach out to our experts and certified professionals. Our technical support team will be more than happy to set up and brief you with class tracking in QuickBooks Desktop, so that you can make the best use out of it.
You might see also: How to Resolve QuickBooks Error Code 1317?
Brief into Class Tracking

Class tracking can be a new term for many QuickBooks users. So here is a brief introduction to make you familiar with this term, before directly jumping into the setting up process. Class tracking basically lets you to track account balances by department, business office or location, separate properties, or any other meaningful breakdown of the business. It also lets you to track segments that they want to have a close observation of. In QuickBooks, you can easily create classes assigned to the transactions. This lets you to track the account balance by department, business office or location, separate properties owned by the user, etc. This feature can be of great help to businesses with different departments, as it would help them to use classes to report account balanced for each department. Class tracking might seem to be a tedious process, by it pays off in the long run. The users get an amazing overview of the company expenses and can also see the way their money is being spent, which ultimately makes it easy for you to stay on top of the budget.
To understand it better, let us have an example: Suppose that your restaurant has 3 locations, in that case, you can create uptown, midtown, and downtown classes for tracking balanced by the location. However, if you are a farmer, then in that case, you can create a class for each enterprise i.e. corn, hogs, and soybeans. Towards the end of the accounting period, you can create separate reports for the restaurant and the farm considering the location and enterprise, respectively.
Steps to Set Up Class Tracking in QuickBooks
Now that you are well versed with the terms class tracking and also its humongous list of benefits, let us unleash the steps to set up class tracking in QuickBooks desktop. Make sure that you follow the steps with keen attention and careful implementation.
Step 1: Turning on class tracking
Before you have a look at the sub steps of turning on class tracking, there are certain pointers that you need to consider:
- You are only required to set up the withholding tax account and item once. Next time when you wish to charge off withholding tax, merely using the existing withholding tax item would work.
- Set up classes based on the type of reporting you wish to carry out and considering the way in which you desire to see the business segments on reports.
- Lastly, set up an “other” class in order to classify transactions that are miscellaneous i.e. transactions that do not fit anywhere.
Steps for Windows users:
The steps to turn on class tracking in Windows are as follows:
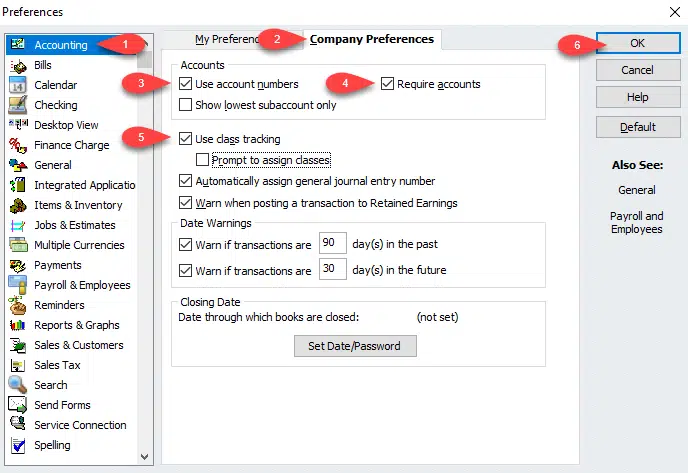
- The first thing is to open the company file.
- And then move to the edit menu, also opt for the preferences option.
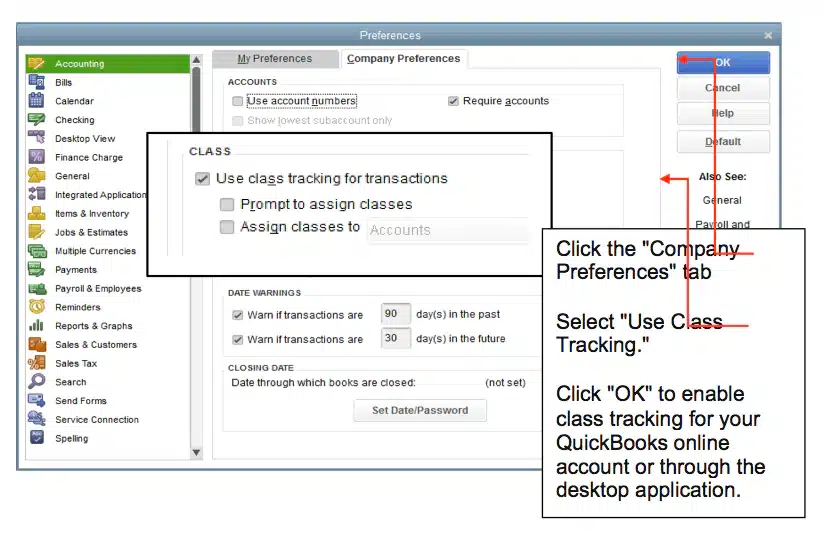
- Next step is to choose accounting and then move to the company preferences tab.
- Once done with that, check the use class tracking for transactions checkbox.

- And also, if you want a reminder, for the time if you missed assigning a class, then it is recommended to choose the prompt to assign classes checkbox.
- Last step is to hit OK tab.
Steps for Mac users:
The steps for Mac are quite different from that of Windows. So, let us check out the steps to set up class tracking in QuickBooks for Mac:
- If you are a QuickBooks for Mac user, then initially, you have to navigate to the QuickBooks menu and choose the preferences option.

- After that, choose the transactions in the workflow section.
- And then choose the use class tracking checkbox. And also, close the preferences page to save changes.
Step 2: Setting up class categories for expenses and accounts
Now comes the second step, where you need to set up class categories for expenses and accounts. The point to be noted here is to use classes for one category only. For example, if you make use of classes for department, then it is recommended to avoid using classes for store locations. The user can use the sample classes by industry as a guide.
For Windows users:
- The Windows users are required to navigate to the lists menu and then choose the class list.

- After that, select the new option from the class drop down menu.
- Next step is to enter the class name.
- And also, if it is a subclass, you need to opt for the subclass of checkbox and then look for the class it is under in.
- The last step is to hit OK to add it.
For Mac users:
- Now if you are a Mac user, the very first thing you need to do is to visit the lists menu and then choose classes.
- After that select the create option.
- Next step is to enter the class name.
- And also, if it is a subclass, make sure to select the subclass of checkbox and also find the class it is under in.
- The final step is to hit OK to add it.
Using class tracking
You can assign a class to a couple of transactions that we have listed below, let us have a look:
- Invoice
- Sales receipt
- Estimate
- Sales order
- Statement charges
- Refunds and credits
- Check
- Credit card charges
- Bill
- Purchase order
- Paycheck
Class tracking makes it easier for you to generate reports to the company on the balances across multiple classes, departments or locations, as it can be used in majority of transactions. This can be done by filter, sort or total reports by class.
Sample classes by industry
| Business type | Sample segments |
| Accounting firms | Partners or clients, Locations, if more than one location, Types of work, such as tax, audit, consulting work, and so on. |
| Advertising and public relations firm | Projects, Locations, if more than one location, Lines of business, if involves several main types of work such as advertising and public relations. |
| Architectural firms | Projects, Locations, if more than one location. |
| Construction companies or contractors | Construction divisions then subclass like Rough and Finish, Project supervisors, if more than one supervisors. |
| Consulting firms | Consultants, Locations, if more than one location. |
| Graphic design, writing, photography, and printing firms | Billing partners, Locations, if more than one location, Lines of business, if involves several main types of work such as printing and design. |
| Legal offices | Locations, if more than one location, Partners or associates, Area of specialization, such as real estate or corporate law, Fee methods, such as fixed fee, contingency, hourly, or a combination. |
| Medical offices | Partners, Locations, if more than one location. |
| Membership organizations or user groups | Special interest groups (SIG) |
| Real estate brokers | Locations, if more than one location, Areas of business, if involves several main types of work such as property sales and property management, Title company |
| Restaurant and bars | Billing partners, Locations, if more than one location, Lines of business if involves several main types of work such as printing and design. |
| Retail stores | Locations, if more than one location Profit centers, such as restaurants and bakeries. Types of business, such as restaurant and catering. |
| Wholesale | Distribution centers. Product lines or departments, such as garden, hardware, and tools. |
| Sales representative | Product lines, Manufacturers being represented. |
| Services (that bill weekly/monthly) | Services being offered, Partners, Locations, if more than one location. |
Also see: How to Import Bank Transactions Into QuickBooks Desktop?
Conclusion!
We end the post over here, considering that after reading it you might be able to set up and make the best use of class tracking in QuickBooks desktop. However, if you have any query, or if you feel that the process is too tiring for you, then simply ring up at +1-800-761-1787 and let our 24/7 QuickBooks enterprise support team handle it for you. Our professionals will be happy to help you.
Frequently Asked Questions (FAQs)
Class tracking assesses account balances.
Class tracking separates financial operations. It nullifies the requirement of unique QuickBooks Online accounts.
Class tracking can track “profit-loss accounts”. Location tracking can track both “balance sheet” and “profit-and-loss accounts”.
Read Also:
How to Fix the Error 6177, 0 in QuickBooks Desktop?
