Learn how to set your Windows firewall and security settings for QuickBooks Desktop:
Have you ever realized that a simple internet block for QuickBooks programs due to firewall might land you into some huge technical glitches. Well, that isn’t as tiny as it looks like. Firewall can be one major reason of causing different errors. Thus, working upon this issue can prevent you from experiencing major issues later on. These errors can be halted by either updating the firewall to the latest version or by configuring the firewall software. Not just that, you can also add some exceptions for QuickBooks firewall ports by simply carrying out some basic steps.
There can be certain other steps that you might require to implement, to get rid of various errors. This segment is drafted in a way that you are successfully able to configure firewall and security settings for QuickBooks desktop by the end of it. Thus, keep scrolling..!
NOTE! In case you need any professional guidance in setting up firewall and security settings, then you can get in touch with our QuickBooks enterprise support team at 1-800-761-1787, and your queries will be addressed shortly.
What is Firewall?
Before you explore theways to configure QuickBooks firewall ports, it is essential to first understand what a firewall actually is. Firewall is a must-have application that saves the system from various threats like malware, viruses, and unwanted programs. In certain cases, the firewall blocks the internet access required to run QuickBooks and the company file. This kind of issue is often encountered while using QB desktop in a multi-user environment. In such a case, you will have to update the firewall to the latest release, or manually configure the firewall. The process for configuring and updating the firewall will be mentioned later in this post.
Methods to set up QuickBooks desktop firewall ports and security settings
Configuring firewall and security settings involve some basic set of steps, which we have elaborated below. Checkout the following steps to configure firewall & internet security settings for QuickBooks desktop:
Method 1: Automatically Configure Firewall Ports
If you aren't very sure about the manual steps, then you can try to automatically configure firewall ports. And this is possible with QuickBooks File Doctor tool. You can try running the QuickBooks file doctor tool to resolve network-related errors. This tool usually open all the blocked ports and fix the network related errors. Also this tool can be used for configuring the Windows firewall.
Method 2: Manually Configure Exceptions for QuickBooks Firewall Ports
If the QuickBooks file doctor tool didn't help you, then try performing the manual steps.
Now find the QuickBooks Desktop 2018/2019/2020/2021 or 2022.
And write the Port Number and use it for QuickBooks Firewall Ports exceptions.
Step 1: Steps to Manually add QuickBooks firewall ports exceptions
In case you are using multiple versions of QuickBooks desktop on the same PC, follow the below-given steps for each QuickBooks version:
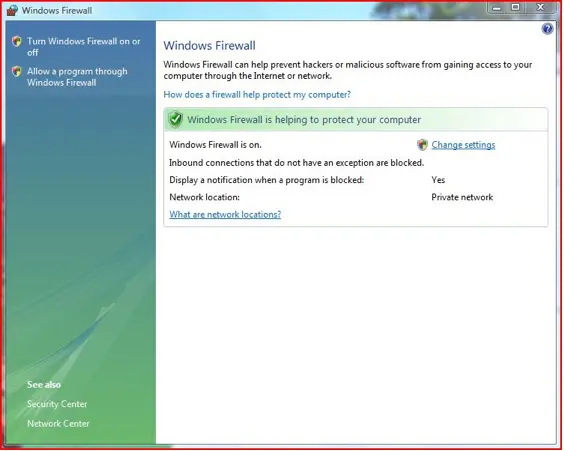
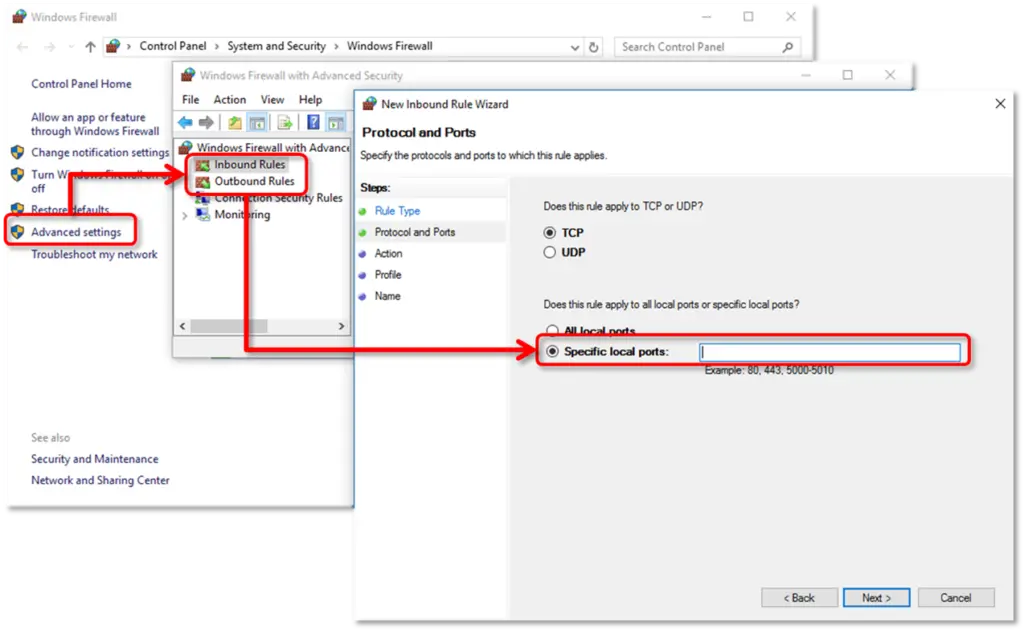
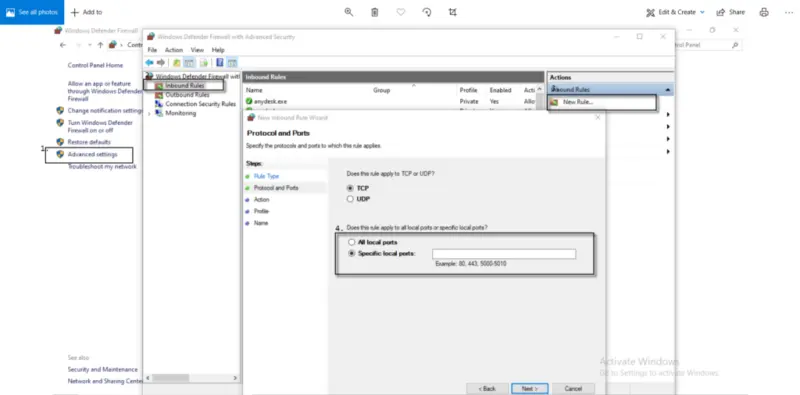
In order to add firewall port exceptions for QuickBooks, the initial step is to open Windows Start menu.
Type in Windows Firewall into the search option, followed by opening Windows Firewall.
Next step is to hit a click on Advanced Settings.
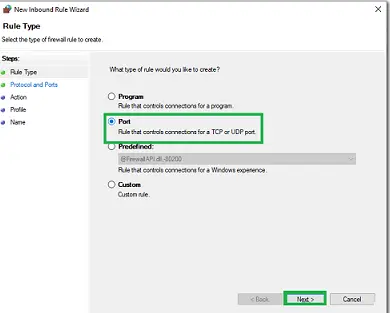
Right click on Inbound Rules, along with that select New Rule.
You now have to click on Port and click on Next.
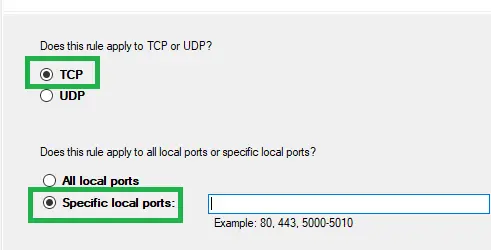
Make sure that TCP is selected.
Now enter the ports which you need for your QuickBooks year versions, in the Specific ports field.
The ports can be selected from below options:
QuickBooks Desktop 2023:8091, XXXXX
QuickBooks Desktop 2022:8019, XXXXX
QuickBooks Desktop 2021:8019, XXXXX
QuickBooks Desktop 2020:8019, XXXXX
QuickBooks Desktop 2019: 8019, XXXXX
QuickBooks Desktop 2018: 8019, 56278, 55378-55382
QuickBooks Desktop 2017: 8019, 56727, 55373-55377
QuickBooks Desktop 2016: 8019, 56726, 55368-55372
You will then have to Enter the port number and hit Next tab.
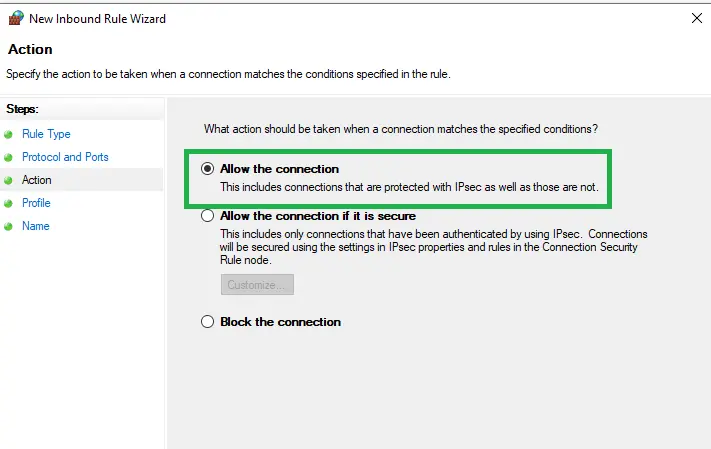
Once done with that, hit a click on Allow the Connection and then, click on Next.
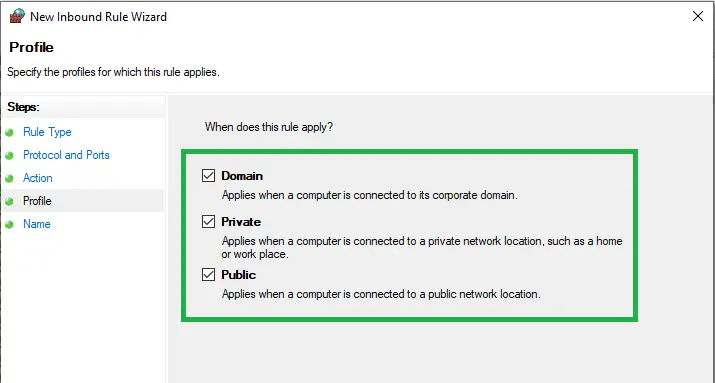
Moving ahead, you need to ensure all the files are marked, only if prompted.
Name the rules and click on Finish to end the process.
You will have to repeat these steps for Outbound Rules. The same steps are to be carried out, only instead of selecting inbound rules, select outbound rules and you are good to go. After these steps, open QuickBooks desktop again in QuickBooks multi-user mode and check if the problem has been resolved.
It should be noted that you are required to keep a note that QuickBooks Desktop 2021, 2020, and the versions to be introduced use dynamic ports. These ports are specific firewall ports assigned at the time of installation. With this, it is ensured that the QuickBooks software gets exclusive use of a given port. To get the dynamic port number, here are the steps that you can follow:
Begin with opening the Windows start tab.
Enter in QuickBooks Database Server Manager into the search box and also open the same.
Move to the Port monitor tab.
Now you need to check your QuickBooks version.
The last step is to take a note of the Port number used for firewall port exception.
After completing the steps, you will have to keep a note that the assigned port number can be changed by opting for the renew option. After that move to the scan folders tab and select scan now tab. The steps will reset the firewall permissions. And you can renew the ports only for the desktop 2019 and later versions.
Step 2: Make Firewall Exceptions for your QuickBooks Programs
There are some executable files which are used by QuickBooks. Find this list go through the selection below to configure the firewall or antivirus program. Follow the steps below for each file:
You are required to add an exclusion in Windows Defender or installed Antivirus program. The steps involved here are as follows:
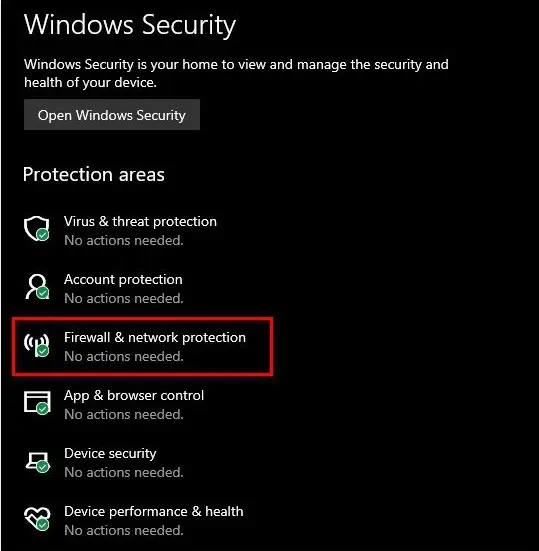
Open Windows Defender Security Center.
After that open the Virus and threat protection option.
Once done with that, hit a click on Add an exclusion and choose Folder.
Followed by adding Intuit Folder in C drive as exclusion.
Last step is to click on OK tab.
Step 4: Configure Firewall Programs
When a user uses a number of firewalls and the changing versions, then Intuit is unable to do the Additional configuration setups. Take help from the Software publisher’s website.
Intuit is not involved in supporting different internet security programs. Therefore, you would have to Add exceptions for QuickBooks firewall ports. In case the error still persists, then add the following directories to your anti-virus program.
Step 5: Add QuickBooks Firewall Port Extensions on your Antivirus or Firewall (3rd Party Configuration)
Ensure that the TCP is chosen. Enter all the ports which are required. In the manually configure QuickBooks firewall ports exceptions, see the port number suitable for your QuickBooks version. Add ports for each year in case you have used multiple year versions of QuickBooks Desktop.
Steps to Configure Firewall for QuickBooks Desktop Point of Sale (POS)
When the firewall blocks the connectivity between the server and the client workstations, point of sale configures the firewall automatically for you . At times, you might require to configure the firewall manually for QuickBooks desktop point of sale. When the security program blocks QuickBooks desktop point of sale ports, the below processes are interrupted:
Electronic Funds Transfer: The Intuit Merchant services credit card processing
Database server manager: Ability to connect and record transactions
Intuit Entitlement Service: The product license and user validation
Important Points
You need to have Windows Admin rights in order to perform the steps.
Also, in the case of the third-party security program, you need to ensure to add the firewall ports and executable files that QuickBooks desktop point of sale needs.
Firewall Configuration for QuickBooks Desktop Point of Sale (POS)
In order to configure the firewall for QuickBooks desktop point of sale, the below steps can be followed:
The initial step is to press Windows + R keys to open the Run command.
Type in the Control panel and also click on OK tab to open the control panel.
Next step is to Set the view to small icons and then opt for the Windows firewall.
Choose the Advanced settings and select Inbound.
After that, the New rule option is to be selected.
Followed by selecting port and then hitting Next.
Next step is to Enter the port numbers and then click on Next tab.
Choose Allow connection to select Next tab.
Name the firewall rule and click on the Finish tab.
* Conversion from previous version * Changing currently running database. * Startup * Detecting change to QBDatabases.ini * Help > Manage my license * Throughout operation
46203,
46204
* EFTSvr.exe * QBDBMgrN.exe * QBPOS.exe
* Throughout operation * Changing currently running database
8024, 8025
* QBPOS.exe * Setup.exe
* Web installation * License verification * Throughout operation
After following all the above steps now you are able to configure QuickBooks firewall ports and security settings and check that you are able to use your software correctly. However, if the problem still occurs then something is blocking QuickBooks and needs to be resolved. However, if the problem still occurs, then something is blocking QuickBooks and needs to be resolved. Do not hesitate in reaching our U.S. based account experts via our dedicated support line i.e. 1-800-761-1787. The QuickBooks desktop support team is available 24/7 and will give you instructions to resolve all your firewall problems.
FAQ's - Configure Firewall Ports for QuickBooks
Why do I need to configure firewall and security settings for QuickBooks?
The firewall and security programs need to be mandatorily configured to discard any chances of hindrances when QuickBooks connects to the server.
What firewall and security settings should I configure for QuickBooks Desktop?
A few important settings that need to be configured in the firewall are: 1. The user should allow for Inbound and outbound access for QuickBooks .exe files which include QBW32.exe, QBDBMgr.exe, QBUpdate.exe, etc. 2. Incorporating exceptions QuickBooks in the security programs, including the antivirus and the Firewall. 3. Turning on the network access and ports for QuickBooks in the firewall. 4. Allowing permissions for QuickBooks files and folders.
Are there any specific ports that I need to open in my firewall for QuickBooks?
Yes! These ports used by QuickBooks include: 1. Port 80 (HTTP) 2. Port 8019 (QuickBooks Desktop communication) 3. Port 56728 (QuickBooks Database Server Manager)
Learn the easy ways to troubleshoot QuickBooks validation code is Incorrect error while entering product and license numbers, or adding an activation code:
When using the countless inbuild functions of QuickBooks, it is important to assuring that the QuickBooks desktop has been correctly activated, as this will ensure the smooth functioning and task performance of the accounting software. There are times when the activation is not done properly and is caused by some common errors such as incorrect QuickBooks validation code and the product number. At that time, the user will face any one of the following errors stating as:
Error: The validation code is incorrect, or the service is temporarily unavailable when activating
Message: You cannot use online banking because QuickBooks is not registered
You must subscribe to the accountant’s copy file transfer service
The sync license data online option is grayed out
The validation code is incorrect
You have entered incorrect license/product numbers.
These errors could be seen due to an install file. This segment will help users through the ways ways to safely delete the file, so that they can refresh the registration and correct the ‘Incorrect QuickBooks Validation Code’ issue. Thus, make sure to read this post carefully, or the user can call us by means of our dedicated support helpline i.e. 1-800-761-1787. Contacting our QuickBooks error support team can help the users in fixing validation code issues and various other accounting related technical snags. Thus, do not hesitate to calling us anytime, our experts will more than happy to assist you.
Causes behind to the QuickBooks validation code is incorrect error
At times, while generating the QuickBooks validation code, users might encounter multiple issues, which includes QuickBooks validation code is incorrect, or the service is temporarily unavailable. The user might stumble upon these kinds of errors and may find it quite difficult to get them sorted out without creating any further mess. There can be several other things that can go wrong at the time of activation, and might end up in these kind of errors. The various causes behind this error message are enlisted as follows:
Case 1: Error- You have entered incorrect license/product numbers
The user needs to ensure that the license and the product number tally.
If the user purchased the QuickBooks desktop from the official Intuit website: In such a situation, look in the purchase confirmation email received.
In case the user bought QuickBooks from a retail store: Then, look for a sticker on the original CD envelope.
Case 2: Error- The validation code is incorrect or This service is temporarily unavailable
In case the above stated error message has been encountered while activating QuickBooks, the the users are recommended to carry out the solutions below:
What to check before troubleshooting?
If the user gets the error message stating "You have entered incorrect license/product numbers"
Before applying any solution to resolve the error, check if the following have been carried out properly:
Make sure that QuickBooks is working properly.
Check QuickBooks is activated, verify the License number and the product code.
To check the purchase confirmation email for the products which have been downloaded.
Check the bright-colored sticker on the original CD envelope, if the QuickBooks was bought on CD.
Also, verify that the license number and the product code tally the details provided on the QuickBooks product page.
Solutions to Fix Activation, License and Product Number Issues in QuickBooks Desktop
Check out the below given troubleshooting methods in order to resolve the validation code is incorrect or this service is temporarily unavailable error:
Solution 1: Check system details and time settings
First of all, users are supposed to close QuickBooks Desktop.
After that, right-click on the time display in Window task Bar and then hit a click on ‘Adjust Date/Time’.
Also, set the date for current and Apply it and Press OK button.
Now, open QuickBooks and select Help >> Activate QuickBooks >> Start Activation.
Finally, type the QuickBooks Validation Code and click on Next.
By processing these steps, the user should be able to activate your QuickBooks desktop. However, if still the issue persists, proceed to the next solution method.
Solution 2: Resetting the .ecml file
Learn and then recreate the damaged EntitlementDataStore.ecml file to amend license and registration-related problems. The user is required to enter the license number and product code in order to complete the installation process and also to validate the QuickBooks. A damaged file with damaged information hinders the software from opening and then displays the error message on the screen. In such a case, removing the entitlement file and then re-entering the license information can fix the issue. The steps involved in this process are as follows:
To begin with, shut down the QuickBooks software.
Ascertain that all QuickBooks processes are closed.
After that, press the Ctrl + Shift + Esc keys to open the Task Manager.
And then, hit a click on Process tab.
The user needs to sort the processes alphabetically by hitting on processor name header.
For all the examples of QBW32.EXE, the user is required to click on search and then end process.
Then open the entitlement data folder for the operating system and then the QuickBooks version.
The user is required to press the Windows + R keys to open Run command box.
Herein, enter the folder location: C: Program Data Intuit Entertainment clientversion 8 or 6.
Now right-click on the entitlementdatastore.ecml file and select delete.
It should be noted that in Windows 8, users are supposed to press the Window key and then type CMD. Followed by right-clicking and selecting run as admin tab.
When the user is at Command prompt, then enter cdwindowssyswow64.
Type ‘regsvr32MSXML 4.dll’ and press Enter key.
Then, type ‘regsvr32MSXML 6.dll’ and press Enter key.
For 32-bit operating system:
Open run window by and press Windows + R keys.
After that type ‘cmd’ and press Enter key.
Now type ‘regsvr32 MSXML 4.dll’ and press Enter key.
Also, type ‘regsvr32 MSXML 6.dll’ and press Enter key.
In case the user activates or opens QuickBooks, then the process is done. Else can continue with the troubleshooting.
Solution 4: Run the QuickBooks Install Diagnostic Tool
Solution 7: Using QuickBooks Refresher tool to close and refresh QuickBooks tasks
QuickBooks users can download the QuickBooks refresher tool and then save the file on the desktop for easy access.
In QuickBooks, make sure to finish all the open tasks and close it.
Double-click the QBRefresher.exe file to run the program.
Carry out the on-screen instructions.
Let the tool run and wait for some time. And open QuickBooks and check if the error is fixed.
Solution 8: Use Clean install QuickBooks Desktop
In case none of the above methods worked in your favor, we recommend users to go for a clean installation of QuickBooks desktop. This is a simple process, which can be done by carrying out the steps below:
When the QuickBooks desktop function gets damaged or when the software doesn't fix any issues, then the users are recommended to uninstall the software and rename the installation files back and reinstall the QuickBooks desktop. It is recommended to follow the entire process to restore QuickBooks desktop.
Miscellaneous solutions to fix QuickBooks validation code is incorrect issue
There are a couple of other solutions that one can opt for, if the above solutions do not work. Let us have a look at those solutions one by one:
Solution 1: Running 3371 Error fix from QuickBooks tools hub
Step 1: Download and install QuickBooks tool hub
For this close QuickBooks.
And then download the QuickBooks tool hub
The very first step is to open the file downloaded earlier
After that, follow the onscreen prompts to install and agree to the terms and conditions.
The last step is to double-click the icon on the Windows desktop to open the tool hub.
Step 2: Run Quick fix my program
In order to run this tool, users need to select installation issues in the Tools Hub program.
And then select quick fix my program or error 3371 fix and also hit ok.
Now, start QuickBooks and open the data file
Solution 2: Manually remove the entitlement file
The entitlement file tells QuickBooks that the product is valid and registered. Users can spot and delete the file, in order to re-enter the license info and resolve the issue.
The very first thing is to open the Windows start menu.
And then type run into the search and open run.
The next step is to type C:ProgramDataIntuitEntitlement Clientv8 and then hit on enter key. Or enter C:ProgramDataIntuitEntitlement Clientv8 instead.
Now, spot the entitlementdatastore.ecml and then right click the file and then choose delete. Also, select the yes option to confirm.
Followed by opening the QuickBooks and company file.
And lastly, follow the on-screen instructions to register QuickBooks.
With this, we come to the end of this post, and we hope that the information we have shared above might be of some help in getting rid of the license, validation, and registration errors in QuickBooks desktop. Moreover, if users face any difficulty in tackling these issues or in case of any query, then users can contact our technical experts at QuickBooks enterprise technical support number i.e. 1-800-761-1787. Our experts are available round the clock and will help users troubleshoot this error quickly as well as seamlessly. Thus, feel free to contact us anytime, we will be happy to help you!
All that you need to know about the QuickBooks Desktop backup
QuickBooks has never failed in assisting businesses in managing their finances, payroll, bookkeeping work, inventory management, and more. In fact, it is often said that QuickBooks have brought a great change in the accounting industry, making it hassle-free. QuickBooks stores many important data of the companies and the loss of these data can cause great loss. Keeping this data safe is very much essential, which makes taking backup or recording the data a must. Moreover, if you open QuickBooks on a regular basis then it becomes essential to take a backup so that you can restore it.
This is an in-depth guide about how to backup of the data files in QuickBooks desktop for your future use. Scrolling through the piece of writing till the end is highly recommended. However, you can also reach out to our 24X7 QuickBooks support team by means of our support number i.e. 1-800-761-1787. Talking with our experts and certified professionals will assist you and clear all your clouds of confusion.
Note: In case you don't need a complete backup and want to move the accounting data only, then you can create a portable company file. Also, if the backup copy is in a compressed file format, then make sure to use the restore wizard to bring the data back into QuickBooks. Also, do not use the copy command from Windows.
Steps for Creating a Backup of the Company File in QuickBooks Desktop
Backing up company files stores everything that is present in the company file at that particular moment. It saves accounting data, templates, letters, logos, images, and various other related files. It should be noted that it doesn't back up the payroll forms. In order to back up the data, you have two options either they can do it manually or automatically.
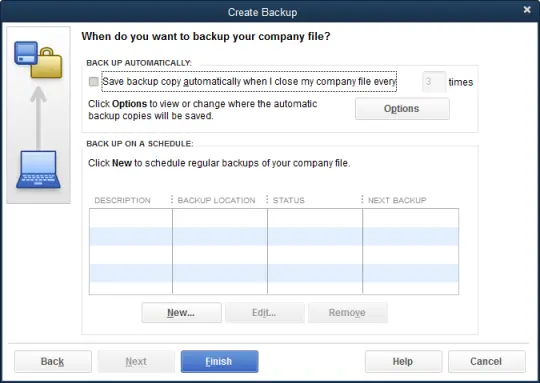
Step 1: Set up QuickBooks Automatic Backup
Below are the simple steps to take easy backup of your data in QuickBooks and get rid of the problem of QuickBooks Automatic Backup doesn’t work:
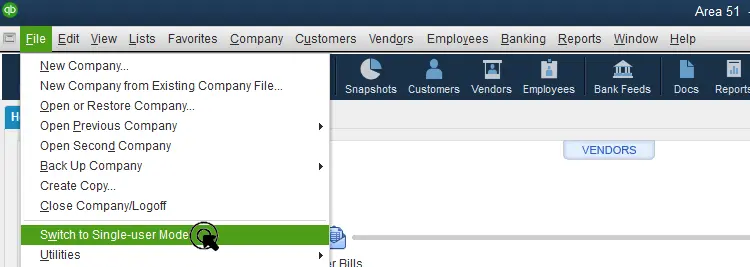
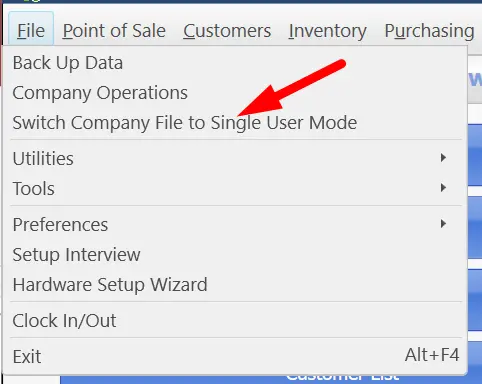
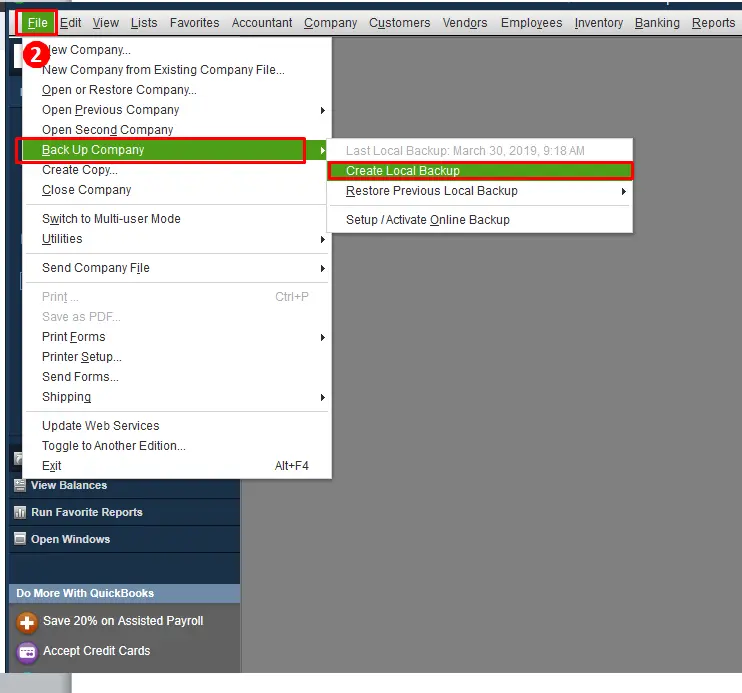
At first, open the File Menu and switch to single-user mode.
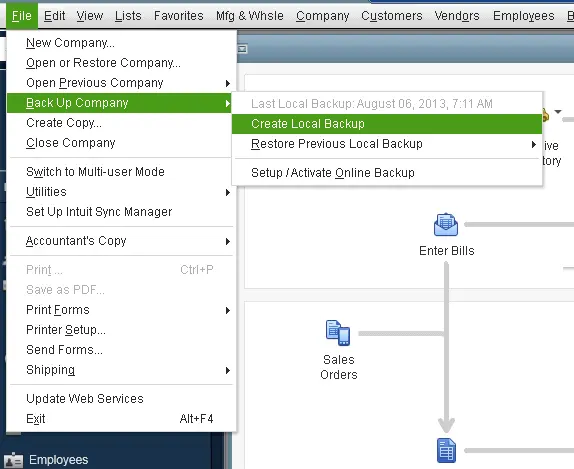
After that choose Save Copy or backup company and create a local backup.
Once you have chosen the backup copy and then click on Next.
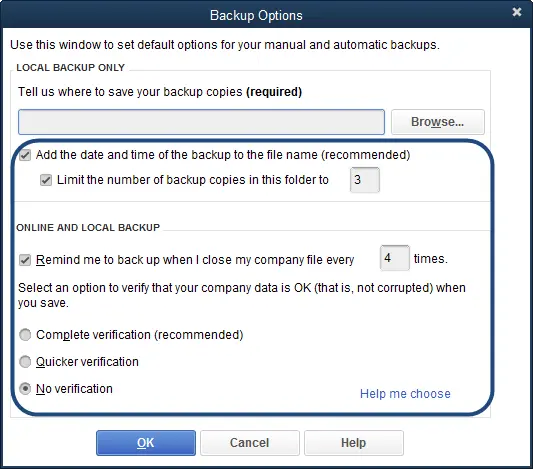
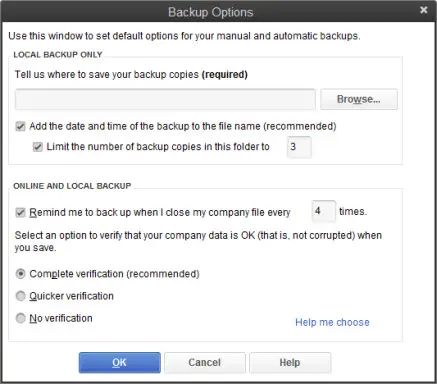
Select Options to set up the backup defaults, and then click on Next option.
You are supposed to look for and note the date and time of the file backups to determine the files. You can also use the checkbox to limit the number of backup copies and put a number to cap the number of backups created for every company.
Click on the checkbox remind me to backup when I close my company file every time, so as to receive reminders for creating backups, and set a frequency.
Always hit a click on options for verifying the data before saving the changes. Skip this step to make the process faster, but it is recommended to enable it so as to get the alert messages whenever damage in file is spotted. You will get the following options: Complete verification, Quicker verification, and No verification.
After the backup options window pops up on the screen, you are supposed to click on browse and then select a location to store the copy.
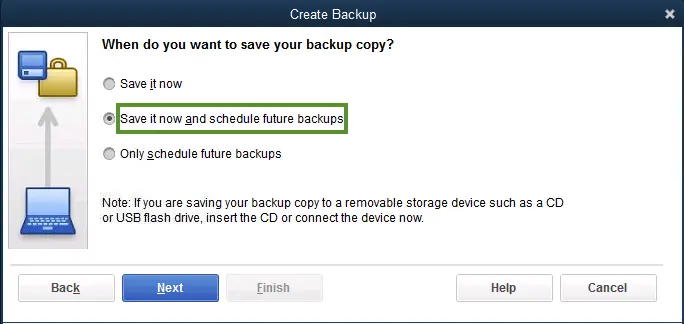
Select the opt to Change Location tab or Use this Location, followed by clicking on Next.
Now hit a click on the option Save it now and schedule future backups or only schedule future backups and then tap on Next.
Once it is done you now have to select the option Save backup copy automatically when I close my company file every time.
Now in the field, enter a number and click on Finish,
Step 2: Set Up QuickBooks Schedule Backups
You are now required to set up scheduled backups in QuickBooks, the process for which is listed below:
Open the file and click on Save Copy or Backup. Once done a backup wizard will open for you.
After that select the Backup copy option and click on the Next tab.
Also, go for Options so as to set backup defaults and then click on Next.
The next process will be clicking on Only Schedule future backups and then Next option.
Now go to the Backup on a schedule section and then click on it.
You have to provide a description for the Schedule backup that you are creating.
You also have to now look for folders where you want to Save your backup copies.
In the next step, hit a click on the Number of backup copies to keep the checkbox and then Enter a number.
Once done now, click on Store Passwords followed by Store Windows Passwords and then provide the Windows login details.
Now choose the Date, weekly frequency, etc., for the backup.
Due to your very busy schedule you might end up forgetting to take the backup of the data. And to save you from such a situation you can set backup reminders. Below are the ways to set up QuickBooks backup reminders.
At first, you need to go to the File menu and then choose Save Copy or backup.
After that select backup copy and then click on Next option.
Followed by clicking on Options.
Once done, you will come across the field. Tell us where to save your backup copies and browse through the directory where you want to Save the backup files.
After this you have to choose the Remind me to backup when closing data every time and then provide a number in the field as you might require.
Once done, select Add time and date of the backup to the file name box and hit on OK button.
Step 4: Backup your company file manually
In case you prefer, you can back up the company files anytime.
Move to the File menu and then select Switch to single-user mode.
Move to the File menu again and then hover over the Backup company. After that, Create local backup option should be selected.
Moving ahead, select Local backup and then click on Next tab.
In the local backup only section, select the Browse option and also choose the Location for saving the backup.
Now set the number of backups that you wish to keep. And also, keep a note that this step is not a compulsion.
It is recommended to Set backup reminders using the options in the Online and local backup section.
Run a test to ensure that the backup file is in good shape.
Now hit on OK button.
Ascertain to opt for the Save it now option and hit the Next button.
When you get the confirmation message, the process would end.
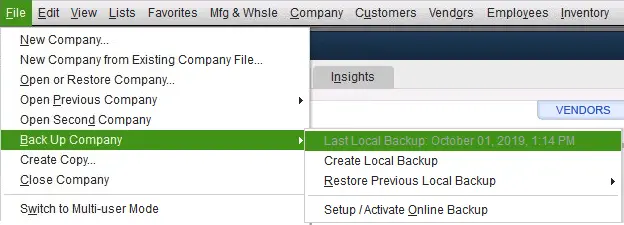
In order to see when you last backed up the company file, you will have to visit the file menu and then hover over the backup company. Then see the time and date at the top of the menu.
In order to make any changes to the backup preferences, carry out the steps below:
You need to choose the File menu first and hover over the Backup company.
Next, hit a click on Create local backup option.
The next step is to select Options.
Make required changes and hit OK button.
Finally you have a Backup company file that you can use to restore your QuickBooks company file. This file has a .qbb extension at the end of the file name.
In case you keep the backup company files on an external device or hosting service like Box, then you might have to remove them to the local hard drive first and then carry out the restore process.
An important point to be considered is that in case the QuickBooks finds the company file with the same name in folder, QuickBooks will ask whether to replace the existing file. In such a situation, you will have to avoid replacing else the existing file will be erased.
Step 6: Use Express start method
The procedure to use the Express start method involves the following steps:
Start Creating a company file and hit a click on Express start.
Enter the needed information in QuickBooks setup.
Later on, select Help me choose to see a description for every business type. You can also preset chart of accounts that QB will create as per industry.
Also, hit a click on Create company.
Now create a chart of accounts, customers, and services, once you create the company file. Such step can also be done later by choosing the Start working option.
Restoring backup settings in QuickBooks desktop
You are supposed to restore QuickBooks company file, after taking the backup of the company file. It should be noted that this file will have a .qbb extension at the end of the name. And, if you keep the backup company files on an external device or a hosting service like Box, then you will have to move them to the local hard drive first before restoring.
These are the simplest methods through which you can take automatic backup, schedule backups or set reminders to take backups of your QuickBooks desktop data. In case if you are having any questions regarding the same then you can connect with QuickBooks enterprise support team who are there 24/7 to offer you rapid assistance. You can reach out to our U.S. based accounting professionals using our support line i.e. 1-800-761-1787. We are a hub of technically sound accounting professionals, so do not hesitate in calling us anytime, you will find the most relevant answers to all your queries here!
Crashing into some of the technical difficulties while working in the QuickBooks software is quite common as the software involves complex huge algorithm and codes. Most of the time, these errors can be easily tackled by a simple reinstallation of the software. Whereas, in a couple of cases, you might have to perform the complete clean installation process. This is where the QuickBooks clean install tool comes into play. This piece of writing is going to brief you with the information related to the QuickBooks clean install tool for Windows, and also the right way to use it.
Thus, go through this segment carefully and get your QuickBooks issues sorted out by the use of the clean install tool. Whereas, if you don’t want to invest your time in performing the set of steps manually, then in that case, connect with our tech geeks using our support line i.e., 1-800-761-1787. Our QuickBooks desktop support team operates round the clock to assist you with all accounting related issues.
QuickBooks is a diverse software, and it creates a lot of files and cache memory on your computer. QuickBooks Clean Install tool helps you completely uninstall this program and saves you time. The tool, therefore, assists in fixing many errors that you may face while using the QuickBooks software. The following are some of the common instances when using this clean install tool becomes necessary and resume using QuickBooks:
At the time, QuickBooks keeps on showing Installation errors even after multiple installation attempts.
When there is an error pop-up while a user on the network tries to open more than one company file simultaneously.
When a simple re-install of QuickBooks Desktop software is not enough to clean all the errors and the previous ones keep on popping up.
Points to note before using the QuickBooks Clean Install Tool
Before using the tool, you need to know how the QuickBooks clean install tool functions. This tool completely cleans up files from the computers, and therefore it is necessary to create backups of the necessary files before running it. Also, the following list contains some of the important things that you should keep handy to ensure minimal data loss:
Back up your Company files:
Start by inserting a flash drive in the system for the backup.
Now, go to File and then click on the Backup Company option to Create a local backup.
You can choose between the option of Local Backup or Online Backup as per your preference. Regardless it is safe to save files on Flash drive as it is a quick way to transfer files back.
Once done, click on Next and follow the instructions which are mentioned on the screen to complete the backup.
Keep Product and License number in check:
Once the QuickBooks software gets uninstalled from the system, you must have the Product and license number handy in order to log back in the software. So, ensure it beforehand that you have them. For this, simply clear F2 key or Press CTRL+1 keys to open Product information.
Steps to Install and Use Clean Install Tool in QuickBooks for Windows
In order to successfully complete a re-installation of QuickBooks Desktop, there are 3 steps that a user needs to complete. These are:
Uninstalling QuickBooks Desktop
Using QuickBooks Clean Install Tool for Windows
Re-installing QuickBooks on your PC
Step 1: Uninstalling QuickBooks Desktop
The first step requires the uninstallation of the QuickBooks software. The steps for the same are given as under:
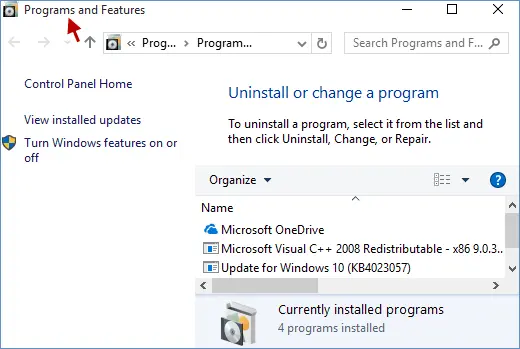
To begin with, you need to click Windows + R keys on the keyboard to open the RUN command and then type Control panel on the search bar, followed by clicking OK button.
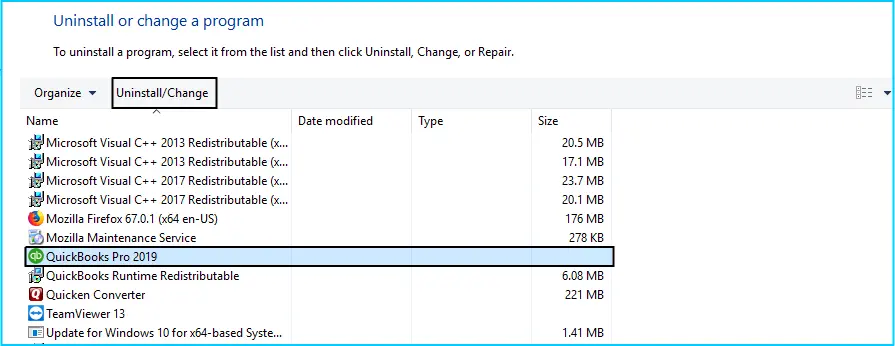
Now, go to Programs and Features and then click on Uninstall a Program option.
From the list of all the Software’s, click on QuickBooks Desktop and choose Uninstall, follow the procedure to complete this step.
Now follow the on-screen directions to complete the uninstall process.
Step 2: Using QuickBooks Clean Install Tool for Windows
In this step, you will have to rename the installation folders, which can be easily done with the help of the QuickBooks clean install tool. The steps involved in this process are as follows:
Followed by, moving to the file location where the download has been saved and install the program by following the on-screen installation.
Hit a click on ‘I Accept’ to complete the installation process and then open the QuickBooks Tool Hub from the desktop.
Here, click on Clean Install Tool after selecting the Installation Issues tab.
Go for the QuickBooks Desktop Version which was installed previously and click on Continue tab.
After a while, the following message will appear on the screen ‘Please Install your copy of QuickBooks to the default location’. Follow this by clicking on OK to complete this step.
In case you are unable to access QuickBooks at the time of renaming the folders, the steps can be followed are as follows:
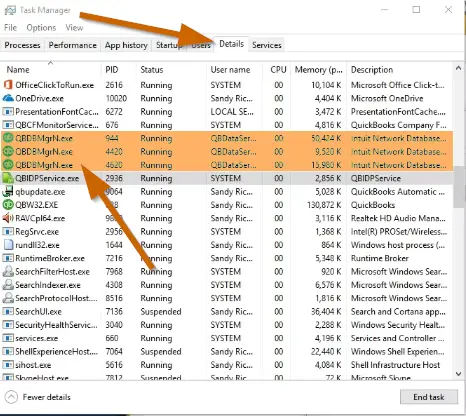
Launch the Windows taskbar and then move to the Task Manager.
Pick the Processes tab and click on the Image name column header.
Opt for Exe, QBDBMgern.exe, qbw32.exe, QBCFmonitorservice.exe, and then click on END.
The next step is to click on Yes when you will see any warning message on the screen.
Insert the CD of QuickBooks Desktop and follow the onscreen instructions.
Once the software is installed in the system, it will ask for the Product and license number. So, enter the credentials just as they were mentioned in the system earlier.
After entering the above information, follow the on-screen instructions to get the step completed.
Hit Next tab.
Go for the type of installation and select Next, followed by selecting the Install tab.
At the end of the process, you will be able to run QuickBooks.
Manually rename the QuickBooks Desktop Installation folders
The QuickBooks clean install tool is not compatible with Windows 2020. Thus, in such a case, you might have to follow the steps below to rename the folders manually:
Launch the Start menu and look for File Explorer and open it.
Look and open the Folder having the company files.
Reinstalling the QuickBooks software for Windows by using the QuickBooks Clean install tool becomes a cake walk, once you are well-versed with the measures listed in here. If the error persists or you experience any other technical issue after performing all the above-mentioned steps, contact our round-the-clock QuickBooks enterprise support team using our dedicated helpline i.e., 1-800-761-1787. With our certified professionals and cutting-edge tools, we offer quick and precise QuickBooks accounting solutions. Our team is available 24/7 to listen to all your concerns and to get them rectified quickly.
QuickBooks Clean Install Tool - FAQs
Why do I need to use the QB Clean Install Tool?
You need the Clean Install Tool if you come across unexpected technical errors in QuickBooks.
Will using the QuickBooks clean install tool delete my company data?
No! By using the this tool, the company files won't be deleted.
What should I do if I encounter errors while using the Clean Install Tool?
If you encounter technical errors when using clean install tool, try restarting the computer and, following that, run the tool once again.
Can I use the QuickBooks Clean Install Tool for Mac?
No! this Tool is only available for Windows. Performing a clean installation on Mac is only possible by following the manual process of uninstallation.
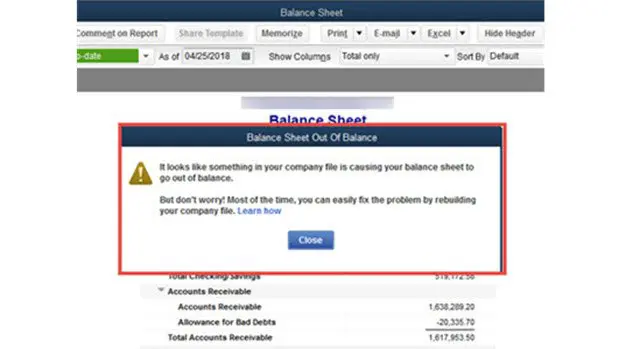
Learn how you can fix Balance Sheet when it’s out of balance in QuickBooks Desktop:
The reason why you are on this page is that perhaps you received the Balance Sheet out of Balance issue.
The process of balancing a balance sheet can be a hell lot annoying, especially when you aren’t able to spot what’s wrong with it. Balance sheet not tallying is one of the most commonly experienced error, and most annoying at the same time. You should always ensure the total number of assets and the amount of liability and equity in the QuickBooks balance sheet must always be the same. If the numbers are not in sync, you may receive the 'Balance Sheet out of Balance issue in QuickBooks'. Also, regardless of the changes in cash flow, on an accrual basis, QuickBooks records revenues and expenses as they happen, and in many cases, the reports may show variations in your balance sheet. But the good news is that there are some DIY solutions for you to fix this issue.
You can perform the solutions below, so as to chuck off QuickBooks balance sheet out of balance error with much ease.
Find out and fix transactions causing Balance Sheet out of Balance in QuickBooks.
However, if in case you don't want to manually rectify the balance sheet out of balance in QuickBooks problem, then in that case connecting with our tech personnel is highly recommended. You can get on a call with us using our helpline.
Balance sheet is a statement of business-related data that consists of total assets and total liabilities. It is imperative for balance of asset side and liability side should tally otherwise, the balance sheet out of balance error may show up and stall your work in progress. This error basically means a contrast between the aggregates of assets and liabilities. There may be various reasons, behind this error that will be discussed later in this post.
Know when the balance sheet went out of balance
At first, open your Reports and select Company and Financial.
Go to Balance Sheet Summary and select Customize Report
Now tap on the Display tab
Set the Report Basis to Cash
Make the changes in the columns as per the year/month/ week/day when the QuickBooks Balance Sheet out of Balance issue occurred.
If the QuickBooks trial balance out of balance issue still persists, please go with the article till the end and carry out the provided solutions in the right order. If you're short of time or not comfortable in performing the steps provided in this segment, contact our 24X7 QuickBooks error support team and our certified accounting professionals will be happy to offer the best level of possible technical assistance.
Common issues leading to Balance sheet out of balance
Check if any particular type of transaction is putting the Balance Sheet out of balance. A few of the transactions that you need to look are as follows:
An inventory return and discount on an invoice
Possible Scenario
Suggested Fix
Selling one or more inventory items
In this case, draft a new invoice for sale and the discount.
Customer returned one or more inventory items
This case requires drafting a credit memo for the inventory return.
A discount item
The discount item situation requires linking the credit memo to the invoice in receive payments.
Unconventional inventory transactions
Possible Scenario
Suggested Fix
1. Transaction that adversely affect inventory such as:
# Transaction that drive the Quantity on hand negative. # It change the Quantity on hand for previously entered assemblies and cause the assemblies to be marked pending. # Washing transactions with + and – units of the same item on the same price. # Transactions that use a damaged item, damaged customer, or vendor.
2. In case you are having a negative inventory that affects the Cash Basis Balance Sheet. You tired to do basic data damage troubleshooting on the company file. However, while entering inventory transactions again, the balance sheet becomes out of balance sheet becomes out of balance again.
1. Correct transactions causing the balance sheet to be out of balance. The point to be noted here is that this might affect the financial statements for previous periods.
# Reinstall the previous version. # After that, restore a backup created before upgrading. # Next, prepare the restored data file for upgrade. # Also, upgrade the data file again into the new version.
3. In case the transaction appears to be damaged, or is causing dis-balance without being one of the types of transactions that we have mentioned above, then in such a case you either needs to delete and recreate the transaction or else consult someone.
Another transaction can be any discount that is entered at the customer level and then applied at the job level
Possible Scenario
Suggested fix
* You are having a customer with several jobs. You completed all the jobs and invoiced the customer, which includes all the jobs on the invoice.
* A payment is received by you for the invoice, but the customer included a discount for Job A in the payment.
* User recorded the payment for the invoice and also entered the discount on the Discount/credit tab.
* In such cases, you are recommended to re-enter the payment and then split it among the various jobs, followed by entering the discount at the job level, in order to match it with the invoice.
Journal Entry linked to a credit memo
Possible Scenario
Suggested Fix
* You will have an open Credit Memo and then you entered an offsetting General Journal Entry (GJE), and then linked it to the Credit memo.
# In such a case, you will have to edit the Journal Entry.
# And then, move the A/R account to the source line, which is generally the first line of the GJE.
# You should save GJE and ensure that it is still linked to the Credit Memo.
In case you are working in a multi-user environment, this might cause damage to the company file, and the balance sheet might go out of balance. For resolving this, fix the data damage and use the main system from where the file is hosted.
Now ensure to verify, rebuild and check the QBWIN logs before proceeding.
Quick fixation steps for QuickBooks trial balance out of balance issue
Before you start with the detailed methods to resolve balance sheet out of balance in QuickBooks issues, we recommend you to check out these basic troubleshooting steps.
Modify the reported total by the year and then check if the balance sheet is back in balance.
You need to log out the QuickBooks file and then log back in. Moreover, check if the balance sheet is back in balance.
Along with that, back up the QuickBooks company file before carrying out any troubleshooting steps.
If you are working in a multi-user environment, then it might end up in damage to the company file and the balance sheet might go out of balance. You can fix the data damage and use the main system from where the file is being hosted.
You can verify and rebuild the QBWIN logs before proceeding.
Fixing your balance sheet when it’s out of balance in QuickBooks Desktop
The process to fix QuickBooks desktop trial balance out of balance involves multiple steps. Each of the steps carries its own significance. Thus, we will be discussing each of the steps in detail. Let us have a look:
Step 1: You can select the year by following the below-mentioned steps
Expand options in the drop-down and Select All.
Choose Year from the Display columns.
Select OK button.
Now compare the Total Assets and Total Liabilities to locate the year the balance sheet went out of balance.
You can select the month by following the below-mentioned steps:
Put in the year your QuickBooks balance sheet went out of balance in the Form and the Field.
Select the Right month from the display month and select the OK option.
In order to find the month when the issue occurred, compare the entries – the Total Assets and Total Liabilities.
You can select the day by following the below-mentioned steps:
Put in the week your QuickBooks balance sheet went out of balance in the Form and the Field.
Next, select the day from the Display columns and click on OK button.
To find the day on which the issue occurred, compare the Total Assets and Total Liabilities.
Step 2: Find the transaction responsible for QuickBooks Balance sheet out of balance
After you are aware of the date when the QuickBooks balance sheet out of balance issue occurred, move on to creating a Custom Transaction Detail Report to spot the transaction triggering the error.
At first, go to Reports menu and select Custom Transaction Detail Report.
After that, select Customize Report (in case the Modify Report window doesn’t pop up automatically).
Next step is to tap on the Display Tab.
And then go to Report Date Range and type in the date when the balance sheet was found out of balance issue occurred.
Now set the report basis to Accrual.
Under Columns section, uncheck the boxes before Account, Split, CLR, and Class.
Check on the box before Amount and hit a click on OK button.
This process will enable you spot the out of balance amount. That is the ending balance on this report.
Note: If you are unable to find the transaction that’s causing the error, you can run Customer Report, Vendor Report, Journal Report, and Other Transactions.
Filter by year
The first step is to choose all from the Date drop-down menu.
And then select the Year from the display columns and click OK tab.
Followed by comparing the Total assets and liabilities to find the month the balance sheet goes out of balance.
Filter by Month
You are is supposed to mention the year where the balance went out of balance, from the field.
And then choose Month from the display columns, and hit OK.
The final step is to compare the balance of Total liabilities and Total assets.
Now Filter by Week
Enter the month in which balance sheet went out of balance.
And then choose the week in the Display columns.
Followed by clicking on OK tab.
The final step is to compare the balance for finding the week where the balance sheet is mismatched.
Filter by Day
Initially, Enter the week that showed the wrong balance.
Select the Day from the display columns.
Followed by tapping on OK tab.
Now compare the balance of total assets and liabilities, to look for the day where the Balance sheet was out of balance.
Step 3: Check and manually fix specific data damage
Data damage causing balance sheet out of balance error may include the journal entries displaying amounts exclusive of the associated accounts, the balance sheet summary out of balance, difference in the column settings, and discrepancies in the cash and accrual balance sheets. These data issues can be fixed through manual troubleshooting.
Step 4: Re-date the transactions
Once it detects the transaction causing the trouble, you require to change the date on them. Also, note their Current dates. After that, edit the Date on each of the transactions to a day 20 years in the future.
Next step is to Save each of the transactions.
And refresh the report, in case you are able to spot the Correct transaction. The paid amount column will then be Zero.
Final step is to Locate the transactions that were dated into the future and then date them back to their actual date. It should be noted that the re-dating steps re-links the transactions and can easily repair them.
Step 5: Removing and re-entering the transactions
In case changing the dates on the transactions doesn't work, then you should Delete and Re-enter them.
We hope you find this article informative and helpful. Sometimes the QuickBooks balance sheet out of balance problem can be a little difficult and complicated, and you may not be able to fix it on your own. If that happens, contact our 24x7 QuickBooks support team using our technical line i.e., 1-800-761-1787. Our team of certified experts will solve the balance sheet out of balance issue at the earliest so that you can resume your work and meet your business goals.