QuickBooks accounting program has a proclivity of getting impugned by diversified technical issues. These errors most often pop up when users perform some specific operations in QuickBooks. The operations encompass updating of QuickBooks, opening of the company files, connecting with the Bank website, including a myriad of other operations.
Payroll Error 15263 is an update error which is typically experienced while updating the QuickBooks software to a newer version rolled out by Intuit inc. This error is one among the various error codes in the Error 15xxx series of error codes. This article encapsulates the different causes, signs and solutions to fix QuickBooks error 15263. Thus, keep reading ahead!
Some major causes of QuickBooks Error 15263
Below have been earmarked the most conspicuous causes that may trigger Error 15263 in QuickBooks.
- The QuickBooks installer is damaged or the files related to it are corrupted.
- The Windows operating system or the Windows registry got corrupted.
- Incorrect settings in Internet Explorer.
- Antivirus or the firewall settings may be preventing the update process.
- Important QuickBooks files got corrupted.
- Corruption in the Microsoft components like .NET Framework could be a major cause.
- Incorrect system date and time.
You may check also: How to Troubleshoot QuickBooks Error Code 1402?
Common Signs and Symptoms of QuickBooks Error 15263
Users may experience certain signs that indicate Error 15263. These include:
- Bumping into a message stating sch errors while proceeding with the update.
- Unable to download the tax tables.
- The computer experiences unprecedented crashes when updating QuickBooks.
Multiple Fixes for QuickBooks Payroll Error 15263
After traversing across the rudimentary information associated with QuickBooks Error code 15263, readers should carefully follow the guidelines provided in this section to fix this update error.
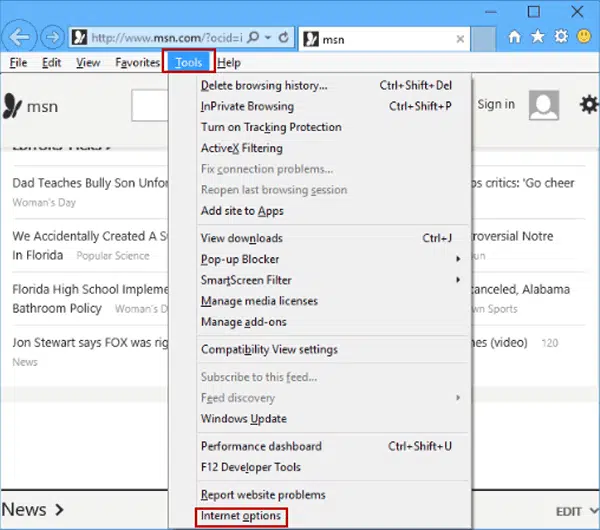
Fix 1: Configure Internet Explorer Settings
Step 1: Restore advanced settings
- To start with, run Internet Explorer.
- After that, advance to Tools.
- Now, proceed to the Internet Options.
- Herein, hit on Programs and choose the Make Default option.
- After that, click on Ok.
- Soon after, hit on the Advanced tab.
- And further, hit a click on Restore Advanced Settings.
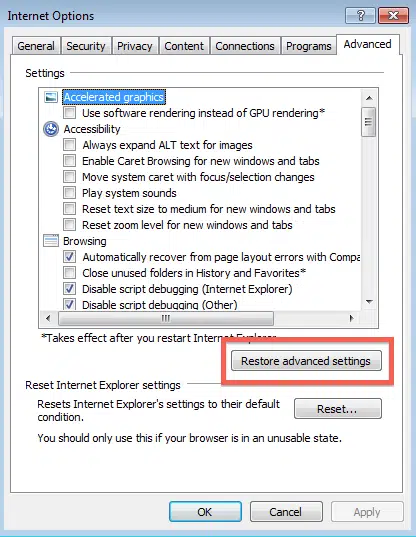
- Subsequently, click on Ok, followed by hitting on Done.
Step 2: Enable TLS 1.2
- Users should click on Settings follow up by navigating to the Security field.
- After that, clear the checkmark on “Do not save encrypted pages to disk” option.

- Moving ahead, checkmark the Use TLS 1.2 option.

- Once done with the foregoing steps, hit on Ok.
- Then, click on Done.
Step 3: Delete temporary Internet files
- Head to the General section and hit on the Delete tab.
- After that, choose the Temporary Internet data files.
- Subsequently, click on Delete.
Step 4: Enable SSL 2.0 and SSL 3.0
- Under this process, you need to click on the Connections tab.
- After that, tap on the LAN Settings.
- Subsequent to that, hit a click on the LAN setup option.
- Now, checkmark “Automatically Detect Settings”.

- Also, make sure to unmark the Proxy servers.
- Now, click on Ok.
- Checkmark the SSL 2.0 and the SSL 3.0 options.

- Also, make sure to unmark “Check for publisher’s certification”.

- Soon after, hit on Apply.
- Culminate the process by hitting on Ok.
Read Also: How to Fix QuickBooks Update Error 15215?
Fix 2: Make corrections to the Date and Time
Initially, check if the date and time on the system are correctly set. If you notice any mismatch or deviation from the correct date/time, follow the steps below:
- Start with, hit a right-click the Date and Time section on the Toolbar.
- And further, hit a click on Adjust date/time.

- Do the necessary corrections to the time and date.
- Also, opt for the correct time zone.
- Lastly, you need to tap on Ok and re-run QuickBooks to try the update process again.
Fix 3: Add QuickBooks as an exception
- The very first step is to click on the Windows Start menu.
- From here, visit the Windows Firewall.
- Upon opening the Windows Firewall, opt for Advanced Settings.
- Then, click on Inbound Rules.

- And further, right-click on it and hit on New Rule.
- Now, hit a click on Port and also click on Next tab.
- Make sure to opt for TCP.
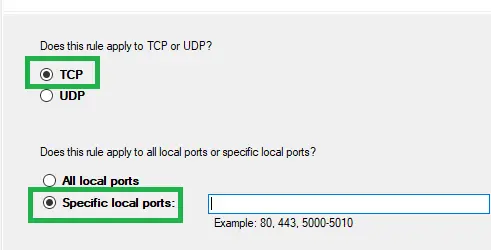
- Use the following ports:
- For QuickBooks Desktop 2020 and newer versions: 8019, XXXXX
- For QuickBooks Desktop 2019: 8019, XXXXX
- For QuickBooks Desktop 2018: 8019, 56728, 55378-55382
- For QuickBooks Desktop 207: 8019, 56727, 55373-55377
- In the next step, hit on Next and click on Allow Network Connection.

- Followed by hit on Next.
- After that hit a click on Create new rule and give this new rule a name.
- Finally, click on Finish.
- Repeat the set of steps for the Outbound rule as well.
Read Also: How to Identify, Prevent and Fix QuickBooks Corrupted File?
Fix 4: Reset QuickBooks Updates
- Run QuickBooks and click on the Help tab.
- Follow up by clicking on the Update QuickBooks Desktop option.
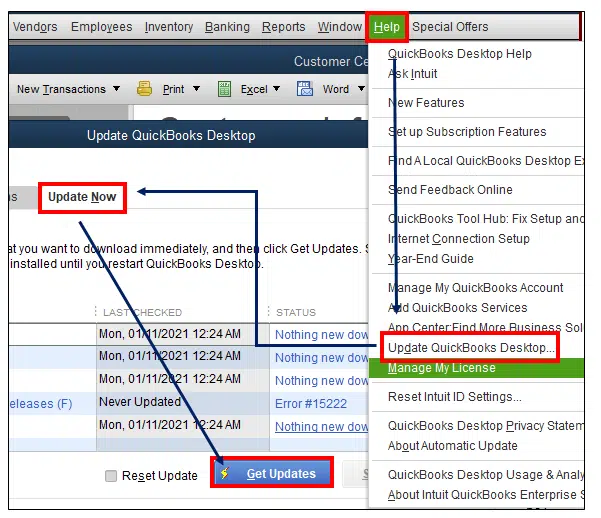
- Next, hit a click on the Update Now option and then hit on the Reset Update option.
- Then, hit on Get Updates.
- If the error still pope up while starting the updates, head to the next fix.
Fix 5: Install the digital signature certificate for Intuit
There may be a possibility that users do not have the latest digital signature certificate set up on the system, or the same is not updated to the latest. The steps for installing the same are discussed below:
- Proceed to the QuickBooks folder.
- To reach to the folder, right-click the QuickBooks icon.
- Now, click on Properties and opt for Open File Location.
- Herein, right-click the QBW32.exe file and hit on Properties.
- Now, click on Digital Signature and choose Intuit in the Signature list.
- After that, hit on Details.
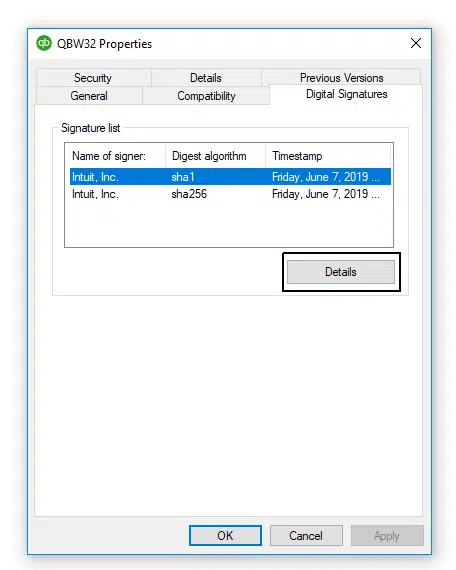
- In the next step, tap on the View Certificate option in the Digital Signature Details window.

- Head to the Certificate section and click on the Install Certificate option.

- Lastly, hit a click on Next and finally hit on Finish.
See Also: How to Install & Use QuickBooks Database Server Manager?
Fix 6: Run QuickBooks Install Diagnostic Tool
- At first, download the QuickBooks Tool Hub from the website of Intuit.
- Double-click the downloaded .exe file and install the tool.
- Now, run the tool and proceed to the Installation Issues tab.
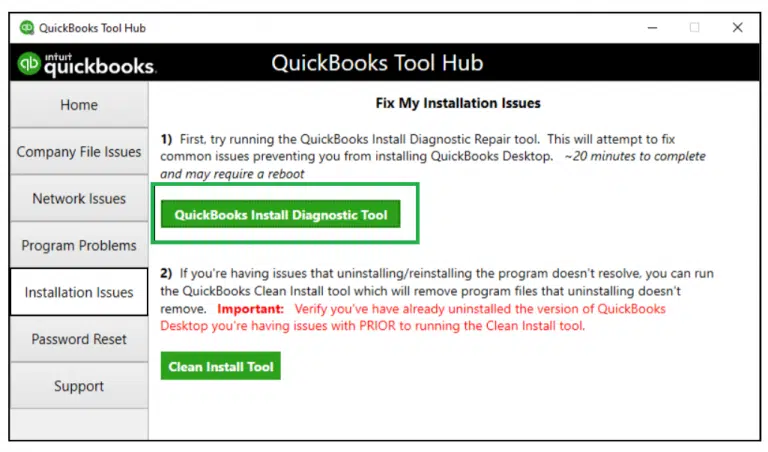
- Hit a click on QuickBooks Install Diagnostic Tool and hit on the Scan option.
- When the scan has finished, run QuickBooks and try the update process again.
Fix 7: Repair QuickBooks desktop
An effective measure to fix these irregularities is by repairing QuickBooks desktop in the control Panel.
- Initially, you need to open the Control Panel. Use the Start menu to access the same.
- After that, hit on Programs and Features tab.

- Now choose QuickBooks Desktop and following that, click on the Uninstall tab.
- After that, tap on Repair.
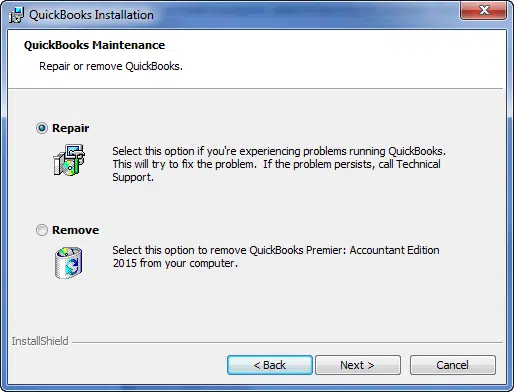
- Proceed as per the on-screen directions to finish the repair process.
- Once done, run QuickBooks and to update the software again.
Read Also: How to Access to the Intuit Account Linked to QuickBooks Company File?
Concluding!
This article unraveled different fixes for QuickBooks Error 15263. If any issue in QB is still troubling you, you can connect with our QuickBooks desktop payroll support experts at the helpline i.e., 1-800-761-1787.
Recent Posts:
How to Resolve Backup Issues In QuickBooks Desktop Company Files?