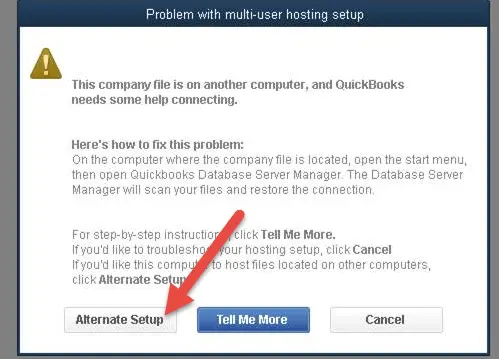
10 DIY solutions to Fix QuickBooks cannot switch to multi-user mode or QuickBooks multi-user mode not working problem:
QuickBooks multi-user mode allows multiple users to work on a QuickBooks company file simultaneously. But, switching from single-user mode to multi-user mode can cause technical issues sometimes. Users might not be able to use of the software at all in the multi-user mode, or errors like QuickBooks Error Code H202, -6000 series errors, etc. could show up on their computer screens. Not just that, such errors could also may be transferred to your server computer without showing up on your system. If that occurs, you might encounter the warning notice " QBDBMgrN was not running on this system." This issue relating to multi-user mode may slow down your productivity, keep you behind your business goals and cause monetary losses.
So, here question raise that what will you do while using your systems in multi-user mode and multi-user-related issues occur? Well, go through this article until the end to find the solutions to any QuickBooks multi-user mode issues that may pop up and stall your work. However, in case you are in a hurry, you can also call our 24x7 QuickBooks support team at our helpline, i.e., 1-800-761-1778, and sit back while we provide you with quick and precise solutions.
What is QuickBooks Multi-User Mode Not Working Error?
A compelling feature offered to QuickBooks users, multi-user mode allows more than one user to work on the same company file at the same time. In order to make use of this software, each user must have the QuickBooks license on the workstation. Some technical glitches and having problems with the multi user mode error at times may not allow users to access company files simultaneously in multi-user mode. This error generally occurs when users try to launch a company file that is stored on a server. Another common issue faced by users is that QuickBooks continues to work in a single-user mode.
Troubleshooting Steps for QuickBooks Multi-User Mode Not Working Error
It is the most frequently encountered error you will face when switching between single-user and multi-user modes, including H101, H202, H303, and H505. Here are 10 practical advanced steps recommended by our experts to assist you in getting rid of the QuickBooks multi-user mode not working issue.
Solution 1: Download and run QuickBooks tools hub program
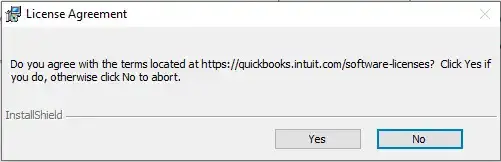
Open the downloaded file names with QuickBooksToolHub.exe.
Now follow the on-screen commands to install & agree the Terms and Conditions of the tool.
Once the installation done, you need to double-click the QuickBooks tool hub icon to open the tool hub program.
Step 1: Install and Run QuickBooks File Doctor tool
This is one of those steps that you can resort to upon receiving most of the QuickBooks issues. Once the tool hub program successfully installed and open, run the QuickBooks file doctor tool and see if the problem has been resolved.
Open the tool hub program and navigate to Company file issues.
After that choose Run QuickBooks File Doctor option form the listed options.
It will take some time to download and run on your system.
Note: You can directly download the QB File Doctor tool (if not integrated with your QuickBooks) from the official website of Intuit. It will help you analyze if your computer system is aptly set-up for using QuickBooks multi-user mode.
Step 2: Use the QuickBooks Database Server Manager
Open tool hub program and navigate to Network Issues tab.
After that select QuickBooks database server manager option.
In the next step, go to QuickBooks Database Server Manager on the server by typing the database in the Start menu.
If you cannot locate folder locations, use Browse to find the folder where company file/files reside.
Now tap on OK and select Start Scan button.
These steps should fix firewall permissions. Now, double-check if the multi-user mode not working issue resolved in QuickBooks.
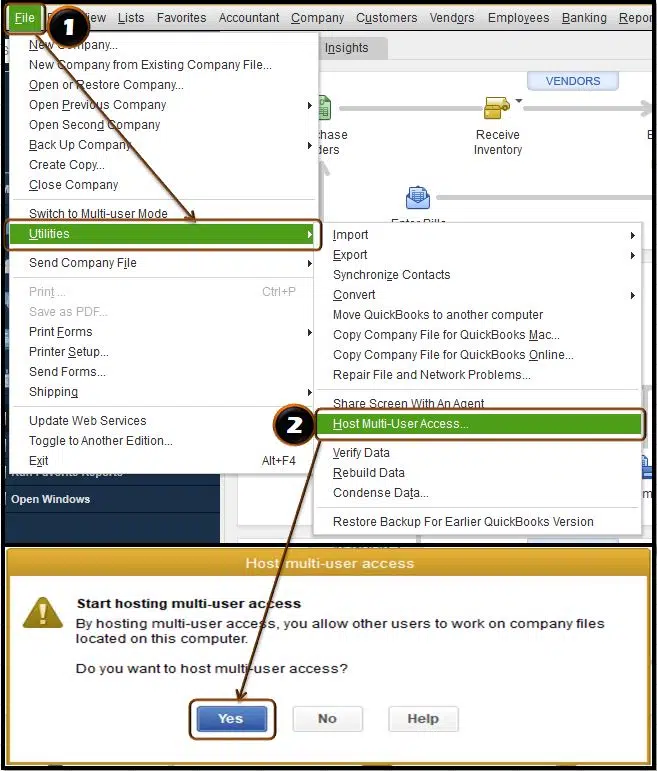
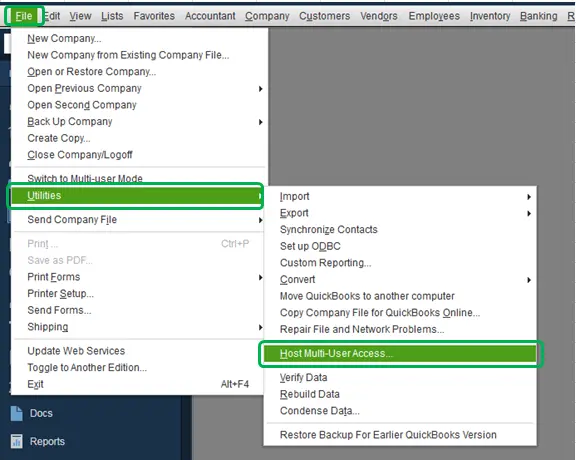
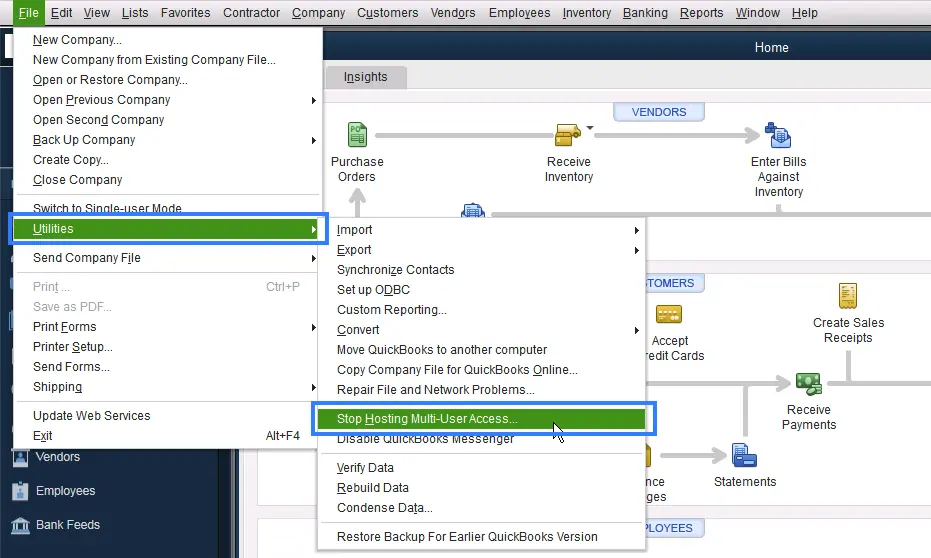
Solution 2: Verify host mode on all user computers
Open QuickBooks and go to QuickBooks File menu.
And then hover to Utilities. If you find Host Multi-User Access on the list, go to a different computer.
If you spot Stop Hosting Multi-User Access on the list, choose that and Disable hosting to enable QuickBooks single-user mode.
After it’s certain that the hosting mode is turned off on all user computers, check if the multi-user mode not working error has been fixed.
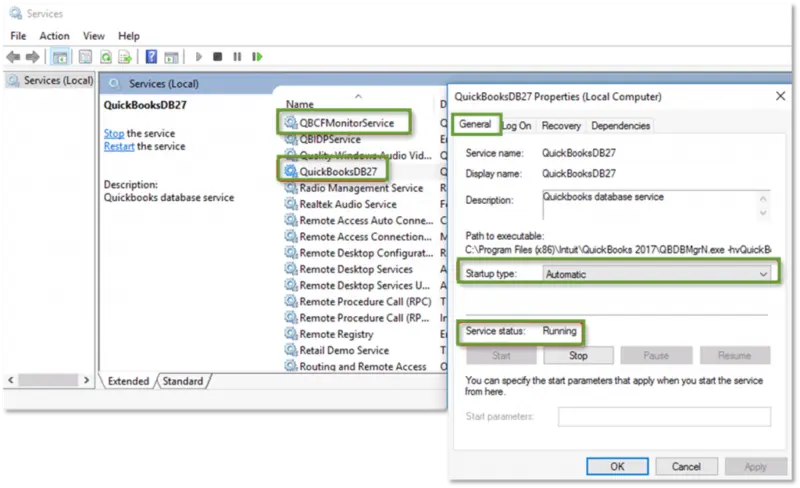
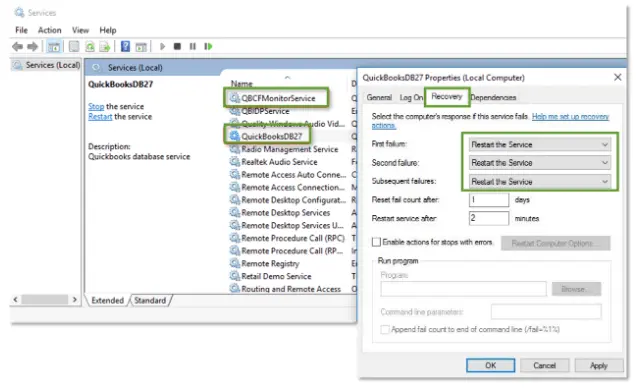
Solution 3: Ensure that the QuickBooks services are running properly
To utilize QuickBooks with multi-user mode, the services offered by the software, such as QuickBooksDBYY (YY is the year of QuickBooks) along with QBCFMonitorService, must have been running on the server computer.
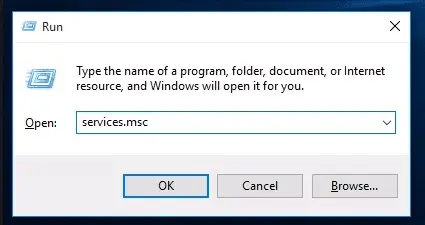
Under this methods, go to Windows search bar and search for Service. msc.
After that, check if QuickBooksDBXX service is in the Services window list. If the service is unavailable, follow these steps –
If you use the Database Server Manager, ensure that it is installed on the server. QuickBooks Desktop (for different years) installed on the computer- different corresponding Database Server Manager should be installed.
If the complete program is run on the system, hosting must be enabled on the server.
Next, double-click QuickBooksDBXX service, and the value should appear Automatic within the Startup type on the screen. Service started can be running or Start button.
Now select restart the QuickBooksDBXX service for the first, second, and following failures under the Recovery tab.
Perform the same steps from 1 to 4 for the QBCFMonitorService.
Now, you need to open your computer and launch QuickBooks with multi-user mode and then determine if QuickBooks multi-user mode is not working error is resolved. If the issue is still there, then check the QuickBooksDBXX service. It must be a part in the administrator group. Also, it must have to contain all the necessary permissions.
Solution 4: Check that QuickBooks must be able to send data
Perform the following two-steps solution to fix multi-user mode problem:
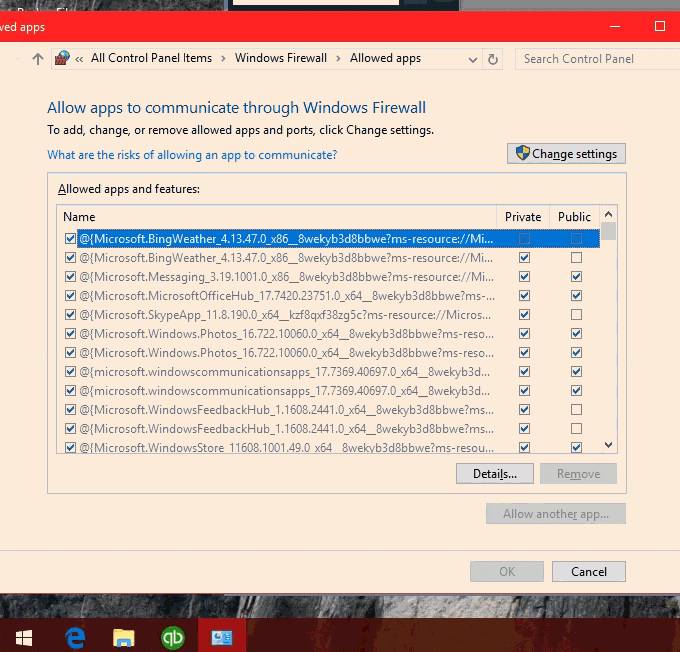
Step 1: Change the settings of firewall and antivirus
Firewall or antivirus may be the main cause of QuickBooks multi-user mode not working error. In case the issue is born out of firewall setting, you can set-up exceptions in the settings and allow QuickBooks for transmitting data. If your antivirus is causing the issue, configure it to fix the error.
Hit a click on Windows key and then move to Control panel.
Find and click on the Windows firewall option.
Next, click on the prompt to allow “An app through Windows firewall option.”
Now tap on Change settings and then click on checkbox under the public list for the QuickBooks application.
Next, press OK and click on Public for the application.
Finally, run the QuickBooks in the multi-user mode to check if the snag is fixed.
Step 2: Test path and ensure QuickBooks can communicate with the server
This step will require you to turn on Network Discovery.
Press the Windows button and R key (Windows +R keys) to open the Run command.
After this, type ping [servername] and hit on Enter key.
On your computer, use UNC (Universal Naming Convention) to reach the shared folder in the server.
Lastly, use UNC path to switch back to the company file of QuickBooks.
Step 3: Go to the company file following the UNC path
Step 4: Create a new company file folder
Herein, you are supposed to Create a new folder for the company file. Ascertain to make it on the Host system.
Then you need to Set up the folder and allow for Windows to access permissions for the new folder.
It should be kept in mind that the company files can be shared across systems.
You are now recommended to copy the .qbw file to the new folder and also check if the company file is in multi-user mode opening. If it opens up correctly, then the issue has now been resolved.
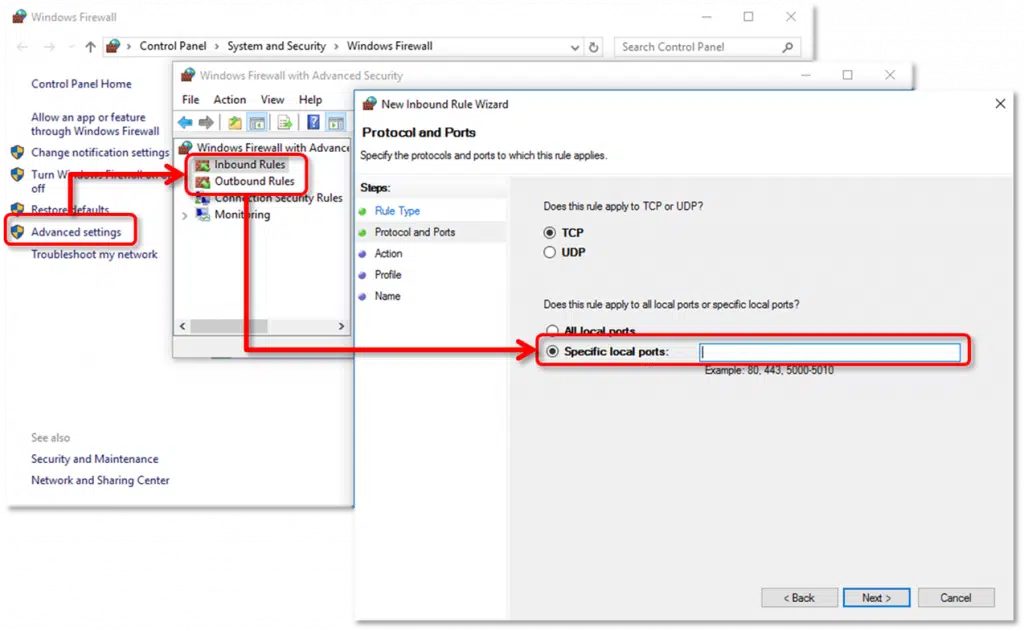
Final Step: Configure Firewall exception for QuickBooks Program and Port
Hit on Windows button and move to search box.
After that type Windows Firewall to open Windows firewall setting.
Now select the Firewall advanced options.
In the Advanced settings page you'll find the inbound and outbound rules.
Later on, select Inbound rule and then click on New Rule.
Then click on Port and select TCP.
Here you need to add the Port based on the version of QuickBooks you are using.
For QuickBooks Desktop 2019, enter 8019, XXXX.
For QuickBooks Desktop 2020, enter 8019, XXXX.
Type port Numbers 8019, 56728, and 55378–55382 for QuickBooks Desktop 2018.
Type port Numbers 8019, 56727, and 55373-55377 for QuickBooks Desktop 2017.
Add QuickBooks to the Firewall.
Now you need to opt for New Rule from the Advanced firewall configuration.
This time around, select the application, then move to the directory where the software's executable file is located.
Add each of the above-mentioned files to the Inbound Rules.
Following that, follow the same steps to apply the outbound Rules.
Solution 5: Rename .QBW, .TLG and .QBW.ND
In this method, you need to open the QuickBooks desktop company file.
And then, press the F2 key.
The product information window appears on the screen. And then, under the file information, you can spot the location of the company file. Also, the .TLG and .QBW.ND files can be located in the same folder.
For this method, press the Start button on the server and workstations encountering the error.
Now type in Network and then open Network and sharing center.
It is supposed to click on Change advanced sharing, and from there, you should Turn on network discovery and file and printer sharing.
The next step in the process is to get the name of the server.
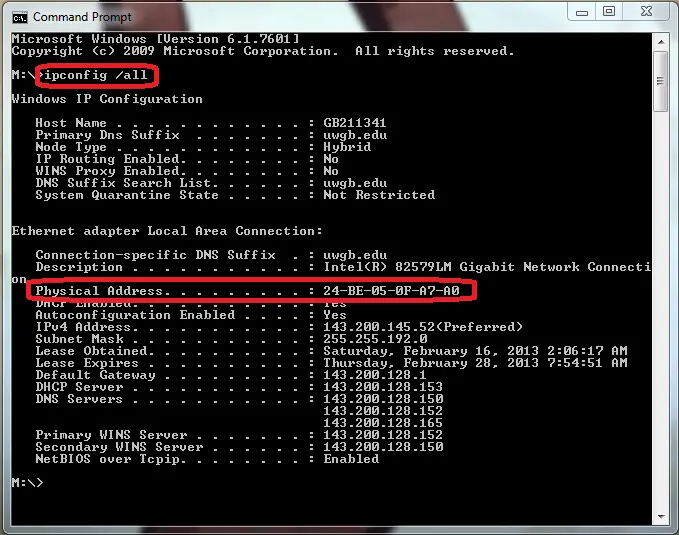
Moving ahead, type CMD in the Run window and then hit Enter key.
In the CMD window, you need to enter Ipconfig/all text and hit Enter key.
Now you will see the server name next to the Hostname on the screen.
Next step is to note down the Hostname and keep it safetly.
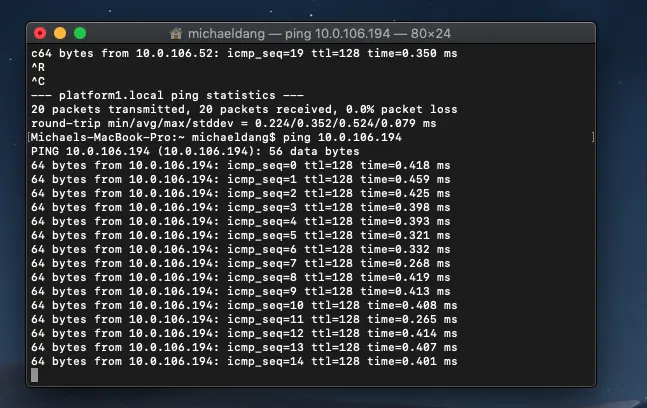
In order to test the server, you need to move to the workstations.
After that, click on Start menu and then open up the Run command window.
Followed by, typing in the CMD in the Run window.
Last step in the process is to type "ping_[your server name]" and then hit Enter key. And then type in the Server name without the brackets.
To store the company file, you must create a new folder on the hosting system. In addition, you'll need a folder and Windows access to share the company files. Now, you need to create an additional folder, then copy or transfer your .qbw file into the newly created location for storage. Try making use of QuickBooks in a multi-user to check if the issue has been solved.
Solution 9: Configuring the default setting
You can configure the default setting and can fix the issue. This will resolve the multi-user mode not working error. The steps to be followed over here are as follows:
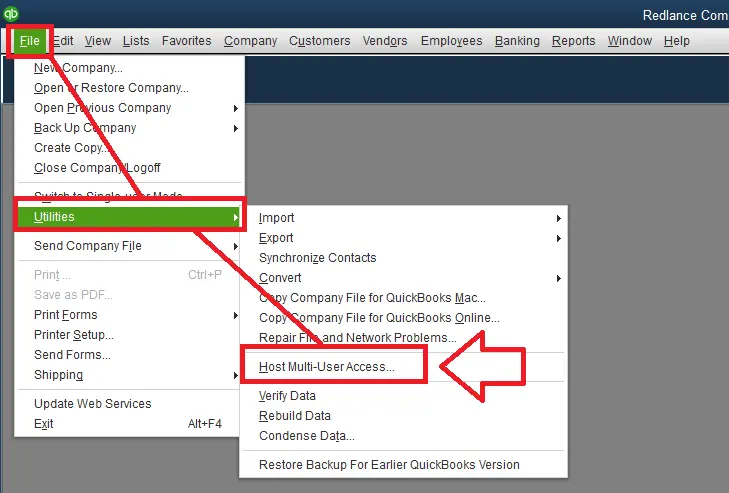
Initially, you need to open QuickBooks and click on File tab.
After that, click on Utilities and also select Host multi-user access option.
Now add the desired number of users with the company file.
Followed by clicking on Cancel, if in case the Multi-user mode is already enabled, then then you will be asked to disable it.
The final step is to create different login credentials for different users, and then then setup is complete to be used.
Solution 10: Reinstalling the QuickBooks software
You can reinstall QuickBooks software to fix the ongoing issue. The steps to be followed for this process are as follows:
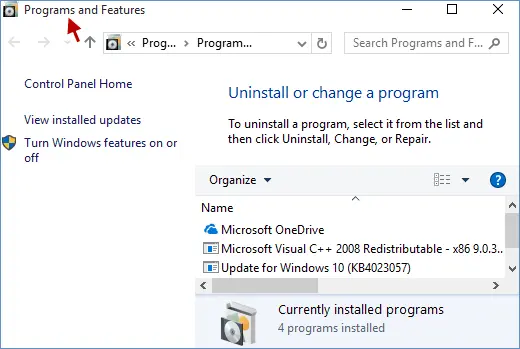
Firstly you should hit a click on the Start tab and then move to the Control panel.
After that, look for QuickBooks from Programs and features.
Now you are required to, hit a click on QuickBooks and carry out the un-installation process.
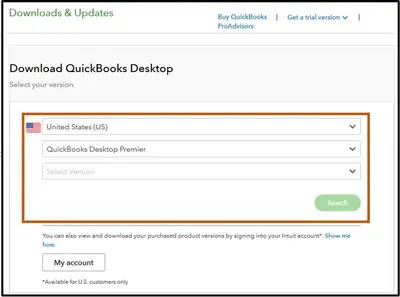
Once done with that, move to the official website of Intuit and then download the required version of QuickBooks.
Finally, hit a click on Multi-user mode hosting and switch to it.
We have written this article after consulting with our QuickBooks enterprise customer support team. Most of the procedures described herein are 10 DIY solutions, you should have no trouble performing them on your own. Nevertheless, if you require assistance with QuickBooks multi-user mode not working error, or the issue persists even after performing the troubleshooting instructions given above in this article, or the issue reoccurs repeatedly, then feel free to contact our 24x7 active assistance helpline via 1-800-761-1787. We'll happy to help you.
Understand the possible causes and ways to fix QuickBooks Web Connector Error QBWC1085 or Exception TypeError: Unknown name
QuickBooks, in the last couple of years, has gained immense popularity among small and medium-sized businesses. It is widely considered to the top accounting software with features like monitoring cash flow monitoring cash flow, preparing taxes, and tracking productivity that ensures smooth functioning of any sort of organization. But despite being and innovative and robust accounting application, QuickBooks still receives some inevitable technical errors. While certain issues can be fixed by simply following the prompts on the screen, some may be complex and require the intervention of an expert. We are committed to offer you some functional and foolproof solutions of the QuickBooks Web Connector Error QBWC1085 issue that you may not be able to fix on your own.
In this blog post, we are going to discuss QuickBooks error QBWC1085. This sort of error usually occurs when you launch your QuickBooks desktop. Apart from providing you with troubleshooting ways to fix this issue, we are also going to tell you about the causes and tips to avoid it. So, read this article till the end. However, if you have any queries, then you can discuss it with our professionals by calling us at 1-800-761-1787 (toll-free). Our enterprise support experts and certified professionals will fix the bug for you in no time.
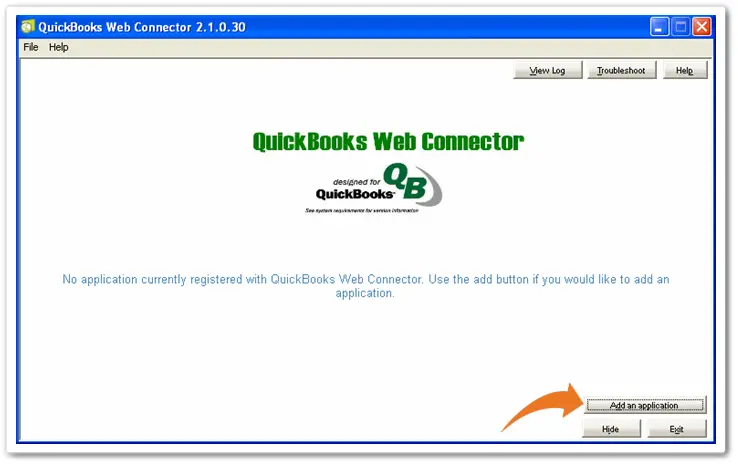
What is QuickBooks Web Connector?
We reckon that it will be ideal for you to learn a little about QuickBooks web connector before performing the troubleshooting steps for QuickBooks error QBWC1085. The Web Connector is basically an application developed by Microsoft that enables data sharing between QuickBooks desktop and QBO hosted on the web fast and seamless. The web connector, like any other software, can receive bugs and errors.
This web connector is a web-based application for Windows users that also allows web services to exchange data with QuickBooks desktop products. Web connector and QuickBooks desktop use the same local network, and qbXML and qbposXML are allowed to pass between QB financial software or QuickBooks point of sale (POS) and web-based application. This error usually occurs when the log file named QWCLOG.TXT gets corrupted or damaged.
How to add new web service with QuickBooks web connector?
Well, the process to add a new web service with QuickBooks web connector doesn't involve any rocket science. .QWC extension files open on their own with QBWC, and they are the XML files. It should be noted that the web connector works with all QB desktop software that is supported by the QuickBooks SDK or the QBPOS SDK.
U.S. editions of QuickBooks financial software
Enterprise solutions
Premier 2002 and later versions
Pro 2002 and later versions
QuickBooks point of sale
Canadian editions of QuickBooks pro, premier, and enterprise
Also, the UK editions of Pro and the accounting edition of QuickBooks
Why QuickBooks Web connector error QBWC1085 occurs
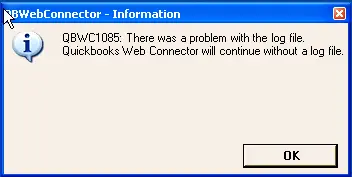
The QuickBooks web connector error QBWC1085 is one of the most common errors that is reported in QuickBooks community by the users. The error happens when the log file named QWCLOG.TXT gets damaged or is by chance corrupted. In our blog, we will in details discuss about the various causes and solutions to this error. The error code QBWX1085 comes up with error codes stating as:
Error
Description
QBWC1085:
QuickBooks was unable to write to the log file. QuickBooks will open without writing to log file.
QBWC1085:
There was a problem with the log file. QuickBooks Web Connector will continue without the log file.
Exception TypeError:
Unknown name
What may lead to QBWC1085 error in QuickBooks Desktop?
This error is mainly caused due the reasons that are mentioned below:
When the QBWCLOG.TXT file of the web connector gets damaged because of some reason.
When you are unable to access the QBWCLOG.TXT file of the web connector.
This kind of error can occur if QuickBooks is not able to write the web connector log file.
In case you didn’t connect to the third party programs with QuickBooks, then this kind of error could be seen.
Any kind of damages to the components of the QB web connector might end up in this kind of error.
Symptoms of QuickBooks Web Connector Error QBWC1085 or Exception TypeError: Unknown name
Users can encounter the below-listed signs and symptoms along with the QB Error QBWC1085.
If the functions of the web connector program are not working accordingly.
Ways to Resolve the QuickBooks Error QBWC1085 or Exception TypeError: Unknown name
Users often find it very difficult to resolve the QuickBooks Web Connector Error QBWC1085 or the Exception Type Error: Unknown Name. However, by following the below-mentioned methods, they can easily troubleshoot the issue very easily and if not, then our error support team is always available for help.
Solution 1: Make sure to connect the company file to the third party program
The manual process that one can opt for is to ensure to connect the company file to the third-party program. For this, the below steps would work:
The first thing to do is to click on the Windows + R keys simultaneously.
After that, Run window will pop up on the screen.
After this, type MSConfig and then hit the OK button.
Next, you have to hit a click on Startup tab.
Once done with that, now search and mark the Checkbox for QuickBooks web connector.
After that, click on the Apply option and then also tap on OK button.
The final step is to Restart the computer and also check out if the web connector error gets fixed or not.
Solution 2: Change the name of QWCLOG.TXT file
Another solution that you can opt for is to rename the QWCLOG.TXT file. The steps involved in this are as follows:
The first and foremost thing to do is to open the taskbar and then right-click on QuickBooks Web Connector icon.
After that, click on the Exit option followed by opening the Windows File Manager.
Once done, visit the C:\Program Data\Intuit\QBWebConnector\log folder.
Now hit a right-click on the QWCLOG.TXT file and then opt for the Rename option.
After this, change the name to QWCLOGOLD.TXT and hit on Save option.
Once you are done with that you have to reboot the we connector program.
The final step in this method is to reboot the computer and the reopen the software.
Solution 3: Remove web connector from the start-up menu
If you are not connected to QuickBooks to any 3rd Programs, then you can remove the Web Connector from the Start up menu. Below are the steps to do it.
The first thing to do is login on your computer as the Windows Administrator.
Once done, you have to navigate to following command C:\Progam Data\Microsoft \Windows\ Start Menu\ Program \ Start Up.
For Windows XP: You need to follow the path: Documents and Settings All Users/ Start Menu/ Program / Startup.
Now you have to delete the QuickBooks Web Connector File.
Once done, reboot your system and then open the QuickBooks program.
Solution 4: Manually Rename QWCLOG.TXT File
Use this step if your company data was connected with the third-party application through Web Connector.
Close QuickBooks accounting software ad Web Connector.
Go to the C://Program Data/Intuit and choose QBWebConnector on the next screen.
And then click on Log and rename the QWCLOG.TXT to QWCLOGOLD.TXT.
Also, reopen the Web Connector.
In the last step, restart your computer and check if the issue has been fixed.
We hope that you find the information provided in this post helpful. The above-mentioned 4 solutions can be easily performed by anyone for solving the QuickBooks Web Connector QBWC1085 error, even if one doesn't have sound knowledge of computers and QuickBooks program. In an unlikely chance, if the issue still persists after performing the solutions provided herein, then you should get in touch with QuickBooks enterprise support team.
Our experienced and well-trained experts can solve any QuickBooks related issues using their advanced tools and technology. Dial our 24x7 toll-free number i.e. 1-800-761-1787, and connect with our executives, who will assist you with your issues in the least possible time.
All that you need to know about the printing problems in QuickBooks desktop
QuickBooks is one of the most popular accounting software that is being used by small and medium-sized businesses. This application can be called a game changer in the field of accounting, as it has made workflow far easier. QuickBooks desktop is packed with many advanced features like inventory management, payments etc., and they also save a lot of productive time inducing business growth. However, as QuickBooks is a self-mended software, but few times you do face errors while running it on their system. In most cases the errors can be easily fixed, but at times expert guidance is required. One of the common problems is QuickBooks won't print, QuickBooks is not printing or Unable to Print Invoices from QuickBooks desktop, and these errors do affect the workflow.
In this article, we will discuss in detail all the printing errors of QuickBooks desktop and the ways to resolve it. So, stick to the article till the end and read it carefully. Also, if you want to save some time and effort while fixing these errors manually, or want experts to handle this error for you, then feel free to get in touch with our QuickBooks error support team. Our industry's best experts will be there to assist you in a single call.
Printing from QuickBooks desktop is one of the most essential and also one of the most admired features of QB software. At times, you might encounter printing issues in QuickBooks desktop, which could happen due to missing or corrupt components in QuickBooks. Or any kind of issue with the printer or system might also end up in QuickBooks unable to print invoices errors. There can be various types of printing issues, and also a plenty of causes behind every issue that are discussed later in this article.
Causes behind PDF and Print problems with QuickBooks Desktop
Printing via QuickBooks is generally used for several purposes. QuickBooks won't print or unable to print error hinders the smooth process, and the causes behind this can be many. Below we have listed a few of the most common causes of printing issues. Let us check them out:
QuickBooks is not connecting to the Microsoft XPS document writer
QuickBooks issues connecting to the printer
Missing XPS printer driver can also be another cause
QuickBooks doesn't save your form or reports as a .pdf due to damaged components.
QuickBooks software freezes while saving pdf for syncing issues or the software freezes due to unresponsive XPS port
In case the XPS printer driver is missing or if the QuickBooks software doesn't print to a printer and QuickBooks command routes to null.
Make sure that the printer is connected to the system, and it should also have the printing software.
Another factor to ensure is that the correct printer driver is installed and also make sure that there are no connectivity issues between the system and printer.
Check whether you are able to print outside QuickBooks.
Also check: Is your printer local or on a network?
Local: If your printer is local, then the issue might be within the system/printer setup itself. You need to authenticate whether there is a connection between the system and the printer. Also, refer to the printer manufacturer's troubleshooting for any assistance in the near future.
Network: In case the printer is on a network, then you need to verify the network settings are set-up in a proper manner. Also, consult the printer manufacturer for further help.
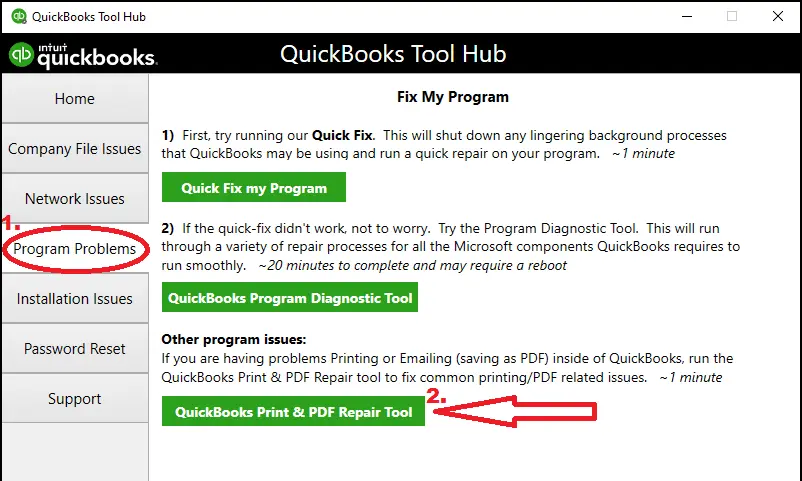
Method 4: Run QuickBooks PDF & Print Repair Tool from Tool Hub
Follow the below given steps in order to download and set up the tool hub program on your system. The tool can be used to fix various kinds of technical issues persisting in QuickBooks, including any printing issues.
Step 1: Download and install the QuickBooks Tool Hub
You can fix a bunch of QuickBooks errors with the help of QuickBooks Tool Hub program. The steps involved here are as follows:
Next, locate the QBPrint.qbp file on the system that is facing trouble with printing in QuickBooks.
Now rename the file manually by prefixing any word.
The file location on Windows 7, 8, 8.1, or 10 will be: C:\ProgramData\Intuit\QuickBooks 2XXX.
In case you are unable to locate the file, then it is important to ensure to unhide the Hidden files and folders.
Next step in the process is to right-click the QBPrint.qbp to Rename it.
Open QuickBooks and the company file, a new qbprint.qbp will be created on its own.
Moving ahead, you are supposed to open a transaction if you have a problem creating a PDF in QuickBooks or trouble printing with QuickBooks in order to check whether it works or not.
Lastly, try to print from the QuickBooks sample company file to confirm if it was a problem with the company file.
Method 5: Verify that the selected printer is the correct one
In QuickBooks accounting software, you need to choose File option and then select Printer Setup option.
You need to select the Form to be printed.
The next step in the process is to match the Printer name with the printer which is in use. In case it doesn't match, then make sure to correct the setup within the System's printer setup.
Now hit a click on Help in the area for detailed instructions.
Now you are required to make an attempt to print using a different printer in the Printer setup.
In QuickBooks, you need to choose File, and then click on Printer Setup.
Next step in the process is to select the Form to be printed.
Then choose a Different printer. You can also opt for Microsoft XP printer.
Now you need to select Help option for more detailed instructions.
Next, you need to print a different form or, in case you are using Customized forms or Memorized reports, then you need to make an attempt for the standard form or report.
In case you are trying to print a batch of forms in QuickBooks, then it is recommended to attempt to print a single form. If the last attempt turns out to be successful, then make sure to use resolve data damage on the company file to fix any data damage in the file and then attempt to print again.
Move to the Selective startup mode. In case the issue continues, make sure to carry out a reinstall QuickBooks for Windows with the help of the Clean install tool.
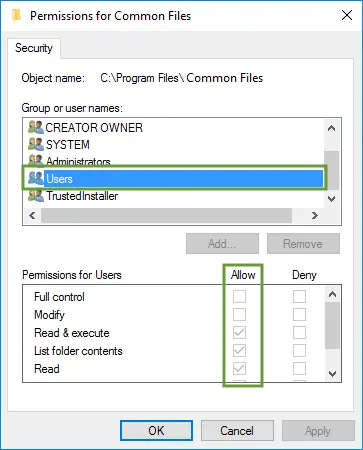
If you still get the print issues, then we recommend you reboot your computer system and try again to print the file. If it still fails, try to reset your temp folder permissions. Follow the below-given steps to check the folder permissions to the TEMP folder:
Press the Windows key + R keys to open the RUN command.
And then type %TEMP% on Run box and press Enter key on your keyboard.
Now hit a right-click on an empty area of the temp folder, select Properties opt and then choose Security tab.
Ensure that you have Full control of all usernames and groups showing on the Security tab.
Finally, you can save it as a PDF again within your QuickBooks once the permissions have been set to Full Control.
Method 7: Deleting or renaming the printer file
You can look for the files and spot them, and after that, you should rename them to something like qbprint.old and wpr.old, instead of deleting them.
Next step is to run QuickBooks and open Company file.
After that, select the File and Printer setup.
Now you need to choose any of the transactions in the form name, and after that, click on OK tab.
All these steps would Reset the printer settings in the software, and it is expected to resolve the issue.
I hope the above-mentioned steps can effectively resolve your all the printing issues in QuickBooks desktop. However, if the problem still persists, then you can seek assistance from the QuickBooks enterprise technical support team by dialing our dedicated support line i.e., 1-800-761-1787, who are available 24/7. Our support team will not only come up with a quick solution but also will guide you to avoid such issues in near future. So, without wasting much time, feel free to connect with us today!
Get to know all about the fixation of Error 80029c4a when opening QuickBooks desktop:
No matter how amazing the QuickBooks software is, some or the other technical snags are most probable to occur. Same theory works in the case of QuickBooks desktop. Even though it is a very powerful software known for its amazing features, it is not immune to error. A very common error about which we will be discussing in this article is QuickBooks error code 80029c4a error loading type library/DLL can’t load a dynamic link library, which occurs while opening the software. This error typically indicates issues with system or program files- making quick fixes and targeted diagnostic steps essential for uninterrupted workflow. The below listed can be the error messages as pops-up on the desktop screen, when error 80029c4a occurs:
Problem:
There was an unexpected error reported when trying to run QuickBooks with company file.
Error
Error Code 80029c4a
Description: Error loading type library/DLL.
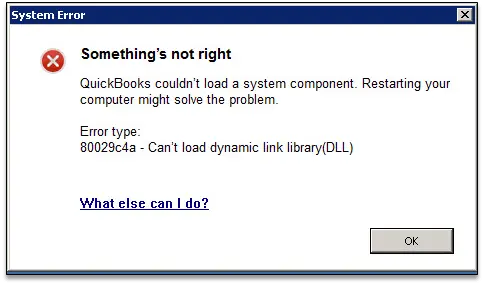
After this when we hit a click on the OK button the another error message pops up which says:
System Error
QuickBooks couldn’t load a system component. Restarting your computer might solve the problem. Error type: 80029c4a – Can’t load dynamic link library (DLL)
At times, few users can easily fix them by following the error guides available on the internet or the in-built feature in the software often fixes the errors too. But if the error is complex, you need to seek assistance from the experts by ringing us a call at 1-800-761-1787.
What is QuickBooks Error Code 80029c4a?
QuickBooks error code 80029c4a is one of the most common error that is reported by many of the users in the past times. QuickBooks .DLL files permit multiple programs to share the same functionality. Thus, DLL errors are pretty common while the system or the program is being set up or while using a specific with any program. This error code might freeze the system, which can be much annoying for us. DLL files are considered to be the main reason of this error. But there are other reasons behind to the issue with QuickBooks DLL.
If you wish to unleash various other facts to the QuickBooks error message 80029c4a, then stay connected to the space and continue to read it. At times, it happen that tackling an error becomes a daunting task, this is when our QuickBooks Enterprise support team will be there to rescue you. You can save your time and efforts by contacting our certified professionals. They will surely fix this issue for you in the least possible time. Let us check out the other relevant causes of this error.
Prompt Solutions to Fix QuickBooks Error 80029c4a (Update Methods)
We have created the following Infographic image to make you better understand about QuickBooks error code 80029c4a and it's quick troubleshooting methods.
In order to rectify QuickBooks error 80029c4a follow the below-mentioned tried and tested solutions.
Solution 1: Restart your computer
In case, you are in the habit of rarely rebooting your system and instead put it to ‘sleep’ then this might help. Rebooting actually helps in cleaning out the memory issues and gives your installed applications a fresh start.
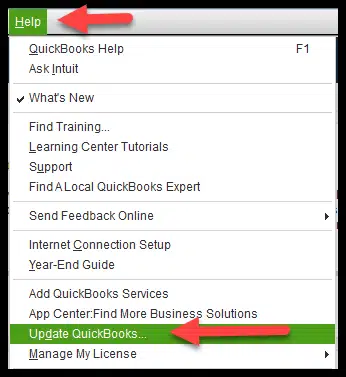
Solution 2: Update your QuickBooks desktop to latest release
During the life of the software, Intuit keeps on providing free QuickBooks updates, which can be installed automatically or can be done at your convenient time. The updates generally fix the application problems by fixing the internal issues and bugs which you might not be aware of. However, it is suggested that the updating of the QuickBooks software should be done carefully, especially if you are using network systems.
It has been noticed that in such situations when you are updating the application, you might end up initiating a forced update for all the users, as all systems present on the network will be using the same version of the software. Avoid updating during working hours as it might cause unnecessary delays. Steps to update QuickBooks software to the latest release:
Move to the File menu, and then click on Close company or logoff.
You would now have to click on the File, then hit Exit opt.
Ensure that you are using the System as Admin.
Verify that there is No company file open on the system.
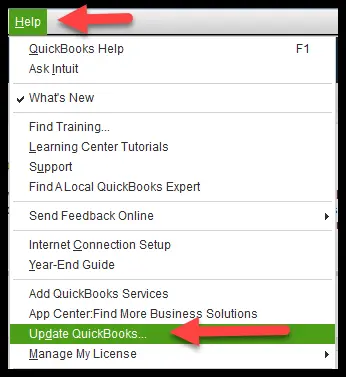
Now move to Help menu and then select Update QuickBooks option.
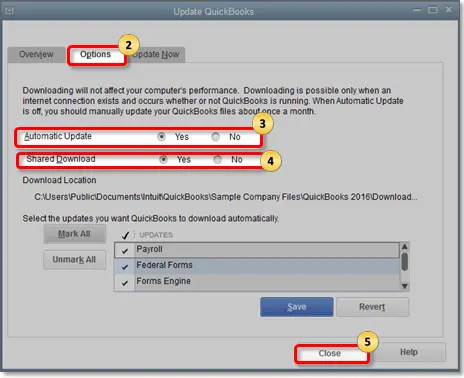
Next, you need to choose Options tab.
Followed by selecting Mark All opt and then click on Save button.
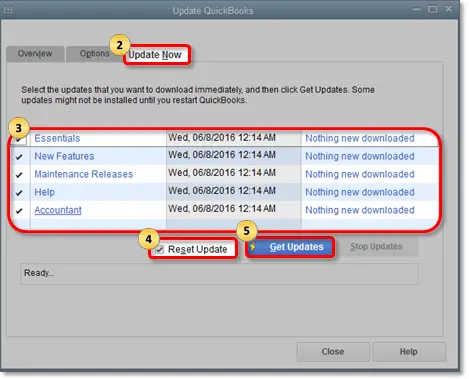
Next step is to hit a click on Update Now tab.
Then click on Reset update and then hit Get updates option.
Once the update process comes to an end, you will see a pop-up stating update successful.
Press Alt + F4 keys or Esc keys and close the QuickBooks software.
Open the QuickBooks desktop and hit Yes tab.
Lastly, reboot the system once and check whether the issue is gone or not.
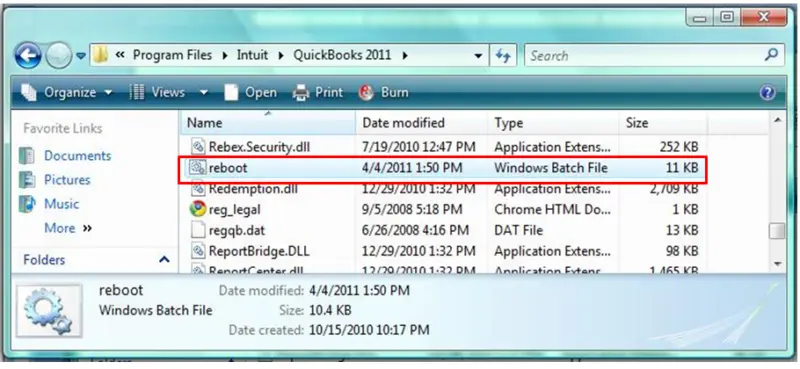
Solution 3: Run ‘Reboot.bat’ File
In the installation directory, a small batch file called reboot.bat is saved, when QuickBooks is installed. You will always be able to find this file, regardless of whatever version of the application you use. This batch file is responsible for resetting all system settings that QuickBooks makes over the course of its usage. The ‘Reboot.bat’ consists of a number of command line programs that reset the Windows registry settings for all of the components that QuickBooks uses. This file is basically seen as a clean-up utility that puts things in the right place if they ever get messed up.
So, before you run this file, make sure that no elements of QuickBooks are running in the background. This is applied to the network system too. For this, you also need to log on to Windows as an administrator to run the file. When the file has been executed it will restart the system, but if it doesn’t then you should not force to restart it.
Solution 4: Re-install or repair your QuickBooks desktop
When nothing works, a great way to refresh the software is by uninstalling it and then reinstalling it. In case you are using this application only on one computer, then this will be a very smoother way out. On networked systems, you need to follow the same cautionary measures that you used while updating QuickBooks. Follow the below-mentioned steps to fix the QuickBooks installation:
First, look for a system that is not on the network.
Head towards the Control Panel and then go to the list of Installed programs.
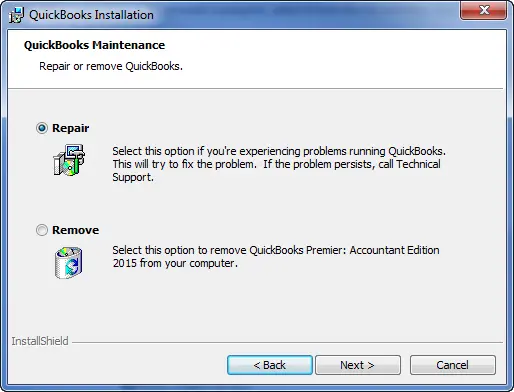
Search for QuickBooks in the list and then select it and then click on Uninstall.
In the uninstall dialogue box, choose the option Repair and then click on Next tab.
If QuickBooks installation gets repaired, then it's good, But if should you face any error, then in that case, go to the QuickBooks products update website and check the current release for your product and compare it with the information you have gathered.
Ensure that the information matches, and after that, go to QuickBooks Support Download Site and then look for your QuickBooks version, download and then install it.
Solution 5: Update Security Software
You are required to update the antivirus or security software to the latest release and then add the program/component exceptions. The steps to be followed are as follows:
First of all, update the Antivirus or security software to the latest version or release.
Add the Program/component exceptions as per your manual.
Now you need to re-open QuickBooks again.
Solution 6: Authenticate the Antivirus Settings
At times, it might happen that the antivirus programs accidentally block QuickBooks from loading essential files. You need to check the area of the program that lists blocked files (sometimes called your "quarantine"). Refer to the antivirus program for how to set the permissions, or use these links if you're a Norton or McAfee user.
In case you spots of the programs listed below in the quarantine, then you will have to give permission to go through the firewall.
AutoBackupExe.exe
Dbmlsync.exe
DBManagerExe.exe
FileManagement.exe
FileMovementExe.exe
QuickBooksMessaging.exe
QBW32.exe
QBDBMgrN.exe
QBGDSPlugin.exe
QBServerUtilityMgr.exe
QBCFMonitorService.exe
QBLaunch.exe
QBUpdate.exe
IntuitSyncManager.exe
OnlineBackup.exe
The point to be noted here is that most of these files are located in C:\Program Files\Intuit\QuickBooks (year). Also, the files with (x86) in the location are 64-bit versions.
Solution 7: Perform a Clean Install QuickBooks Desktop
At times, a simple re-installation might not work in fixing the errors. Thus, it is recommended to opt for the clean install of QuickBooks desktop. The steps involved in this process are as follows:
You are supposed to gather all the QuickBooks product information.
You will have the License number, which can be spotted on the original packaging or in the purchase confirmation email, if the software is bought digitally.
Note down the Product year and version.
Uninstall your QuickBooks desktop.
Open the Windows start menu, and then look for the Control panel and open it.
Pick the Programs and Features option or Uninstall a program option.
Now select the Version of QuickBooks from the list.
Followed by selecting Uninstall/change and then remove options. Also, select Next and carry out the on-screen prompts.
And once you are done with all the above steps, reinstall QuickBooks desktop, and you are good to go.
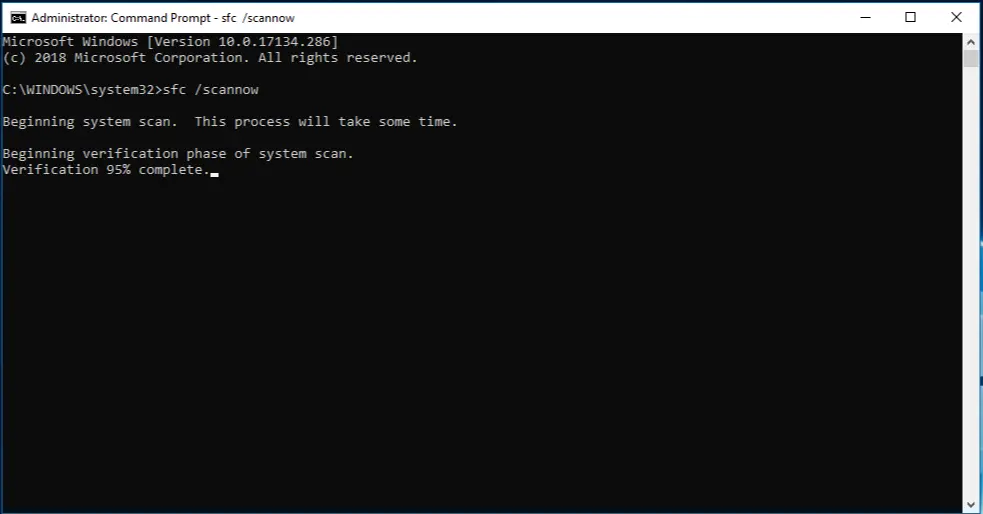
Solution 8: Running Windows System File Checker
The second last method to resolve the issue can be to run the Windows system file checker. The steps to be followed over here are:
Hit a click on Start tab and then type Command in the search bar.
Press and hold Ctrl + Shift tabs and also hit Enter key.
After that, hit a click on Yes, when the permission dialog box appears on the screen.
Moving ahead, you need to enter SFC/scannow and hit Enter key.
Wait till the System file checker completes the scanning for error code 80029c4a.
The last step is to follow the on-screen prompts, and the error will be resolved.
Solution 9: Scan the System for Possible Malware or Virus Attack
Another method that one can opt for is to scan the system for possible malware or virus attack. The steps to be followed are:
This process involves two steps, in which you to use the Windows virus and threat protection for the possible virus, and malware attacks.
You can opt for an externally installed anti-virus software for spotting and resolving the possible trojan attacks.
Solution 10: Updating the Avast Program and virus definition
You would first have to perform an Avast virus definition and make all the programs as updated.
Just in case you are using another antivirus program then you would have to update the antivirus.
Right-click on the Avast icon. And choose Update tab.
Now hit click on Program tab and pay heed to prompts to Upgrade the Avast program.
Perform the steps again and choose the Engine and virus option.
Winding up!
In case, the above-mentioned solution doesn’t fix the QuickBooks error code 80029c4a, then you need to take help from the QuickBooks desktop support team by dialing our support number i.e., 1-800-761-1787. Our well-trained and experienced experts are available 24/7 to listen to your problems and then provide instant solutions and also share tips to avoid errors in the future.
FAQ's
What Triggers QuickBooks Error 80029c4a?
This error comes up on the screen due to a majority of factors. Few are as follows: 1. Few of the QuickBooks desktop system files could be corrupted or they cannot be found. 2. The QuickBooks desktop download might be corrupted or it was not correctly installed. 3. There can be a corrupted Windows registry entry from a recent software change like install/uninstall. 4. A virus or malware might have corrupted the Windows file system or any of the QuickBooks related program files. 5. Another program might have been maliciously or by mistake deleted software files. 6. If the antivirus defender has incorrectly marked file as being infected with trojans. 7. In case the QuickBooks components doesn't start properly or the DLL files are missing. 8. In case the error itself takes place while Windows startup or shutdown, or during installation of Windows operating system.
What are the Signs and Symptoms of QuickBooks Error Code 80029c4a?
It becomes a little easy to spot the error when you the signs and symptoms on your tips. So, here are some of the common signs to QuickBooks error 80029c4a. Check them out: 1. You can identify the error, in case the active program window crashes or If the error code itself appears on the screen. 2. System runs slowly or sluggishly responds to keyboard inputs. 3. System freezes frequently. 4. The error code 80029c4a appears throughout the program installation.
Can outdated QuickBooks versions cause this error?
Yes, if you are running an outdated or incompatible version of QuickBooks desktop, then it can trigger to error 80029c4a, especially if necessary updates and security patches are missing.
All that users need to know about QuickBooks Auto Data Recovery Tool
QuickBooks is an accounting program from Intuit that has been gaining immense popularity in the last few years. Since it comes with powerful tools for managing the finances of a business, raising invoices and managing payments, storage of crucial accounting data, and many more small and medium companies have begun to rely heavily on QuickBooks. As a software program, this application isn't invulnerable to errors or technical issues. Many times, users encounter problems that slow down their operations.
One of the most frequent issues that users encounter is losing their data. If you are using this software, you may discover an extra folder that has new folders. The folder is called the QuickBooks Auto Data Recovery folder, which basically creates a back-up of your company's files. If you lose all your data, this tool can assist you to retrieve all of your crucial data. Thus, In this article, we will discuss in detail how QuickBooks Auto Data Recovery works.
What is Auto Data Recovery function in QuickBooks and How it works?
ADR is a very important tool that helps in taking backup of your data. The loss of your data can severely affect your business operations, and that’s when this tool comes to your rescue. The Auto Data Recovery feature uses your current Transaction Log file and a copy of your company file to restore back all the lost transaction except the ones done in the last few hours. This recovery tool can offer a couple of benefits to QB users, which are listed below:
Restoring the lost transactions using the current Transaction log file and a copy of the company file.
Also, restoring all but the last few hours of transactions with a copy of both the company file and the transaction log file.
There are many other details related to QuickBooks Auto data recovery. If you are eager to unleash those facts, be sure to go through this post to the end. You can easily connect via the QuickBooks support team by calling 800-761-1787. Our representatives will connect you to our experts in the shortest possible time, and your queries will be addressed within a few seconds.
Why is the password reset tool needed?
Well, one of the major reasons why password reset tool is required is to address the security concerns. The cybersecurity concerns have given rise to the QuickBooks password retrieval process. Earlier, it was notices that many people could obtain the QuickBooks company file, authorizing them to retrieve and steal the important data and information.
However, if you facing any kind of issue in resetting the password for your QuickBooks software, then the automated password reset tool can be a solution for that. This tool can help you in resetting the password with much ease. It can be helpful for you, if you have lost or forgotten:
15- Digit license number
Contact name
Phone number
Email address
Postcode
Points to remember before using QuickBooks Auto Data Recovery Tool
If you have QuickBooks Pro, Premier, or Enterprise Solutions for Windows, then only you can use the Auto Data Recovery tool.
The QuickBooks Auto Data Recovery Tool (ADR) is not available in Accountants Edition.
You can take backup of maximum file size of 1.5 Gigabytes. In case, the file size is more that 1.5 Gigabytes, then QuickBooks will not be able to create the Auto Data Recovery file.
Steps to Recover Lost Data with QuickBooks Auto Data Recovery Tool
The processes to reset passwords with the QuickBooks auto data recovery tool vary according to the version of the QuickBooks software. The below mentioned steps will help you in recovering your lost data by using the ADR Tool:
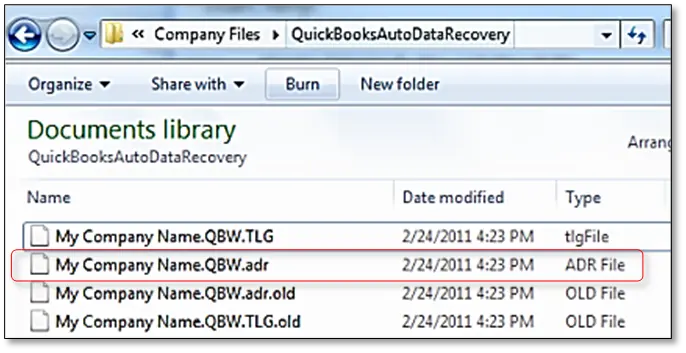
Step 1: Recover lost data using the original .TLG file with .QBW.adr.file
The original Transaction Log file and the current version of ADR can be used to recover the recent transactions that you have lost. Follow the below steps for the same:
Create a new folder on your desktop and name it QBTest.
Open the folder where you have saved the company file. You will find the company file location on the Product Information screen and No Company Open Window. (Note: To open the Product information Press F2 or Ctrl+1 keys on your keyboard).
Search for the .tlg file on your company file’s folder. The company file that you are looking for will have the same name as your company file.
Just in case, you aren’t able to identify the .tlf file then you have the follow the below mentioned steps to Show File Extension:
At first click on Windows +E keys to open File Explorer.
Select Organize option and then choose Folder to search for options (Windows 10,8.1 and 8) to move further.
Select View option to choose the File Name Extension.
Next, select the Hide Extensions for Known file types option.
Once you have selected the promoted opt, click on Apply and then on OK button.
Once you have found the .tlg file, copy and paste it in the QBTest folder that you had created earlier on your desktop.
Open QuickBooksAutoRecovery folder. You will find it in the same location where your company file is stored.
Now open QBTest folder and right click on .QBW.adr file and the select on Rename option.
Choose the .adr option which is located at the end of the file name and delete it.
In QuickBooks, open the company file that you have stored in the QBTest folder.
Check and confirm of All transactions are there in the file by using the account register.
Follow the given series of action to make sure the data integrity:
File >> Utilities >> Verify Data.
You can now move the damaged file to some other location and replace it with the copied file that you saved in QBTest folder to the original location.
Step 2: Recover recent transactions using the .QBW. adr and .TLG.adr files
The .QBW and .TLG files for this solution will both be present in the ADR format. Do note that this method of QuickBooks Auto Recovery can take up to 12 hours to recover the lost data:
Firstly create a new folder on your desktop and name it QBTest.
It is recommended to check the location of the company file on the product information screen, by pressing F2 keys or Ctrl + 1 keys and No company open window.
Access the .TLG.adr and .adr files. These files have the same name as your company file. Show file extensions. In case, you are unable to identify the .TLG.adr and .QBW.adr files, then these steps should be performed to show the file extensions.
Initially open File Explorer by pressing Windows + E keys on your keyboard.
Choose Organize and then choose the Folder and search options.
Now select View and then choose File name extension.
Choose Hide extensions for known file types and finally choose Apply, then OK button.
Copy the .TLG.adr and .QBW.adr files and also paste them to QBTest folder.
Opt for the two files and paste them in the QBTest folder and then delete .adr
You will have then have to open QuickBooks.
Open the company file saved on the QBTest folder. It is recommended to use the account register to verify the transactions.
Follow the listed series of actions to verify if the integrity of data is intact-
File >> Utilities >> Verify Data.
If the recovered data is not damaged in any way then you can copy it from the QBTest folder and paste it in the original QuickBooks company file folder.
With the help of QuickBooks Auto Data Recovery Tool you can easily get back your lost data. In case, you aren’t able to restore them or have any queries regarding this tool then you can always take help from QuickBooks enterprise support team who are available all through the day to help you out. So dial hassle free on our helpline i.e. 1-800-761-1787 and get in touch with our experts today!


![type ping [servername] - Screenshot](https://qbsenterprisesupport.com/wp-content/uploads/2020/01/type-ping-servername-Screenshot.jpg.webp)