QuickBooks Error code 1723 is an installation error that usually appears when the users try to installing or uninstalling QuickBooks software. This installation error is quite common and usually points to a problem with your system’s Windows Installer package. This particular error is usually seen when working with the software. Error code 1723 can be seen with an error message that states, “There is a problem with this Windows installer package. A DLL required for this install to complete could not be run.”

You might face this issue if the Windows installer is damaged. However, this type of errors needs to be fixed at the earliest to avoid any further issues. To get more information related to this installation problem, make sure to read this article ahead, or contact our tech support team at 1-800-761-1787 for further assistance.
What leads to QuickBooks error code 1723?
You might come across the QuickBooks error message 1723 due to the following reasons:
- A damaged installer package
- Damaged QuickBooks setup file.
- If the temp folder permissions are not configured in a proper manner.
- In case of the QuickBooks files in the installer are missing
- You can also get stuck in such an error if the system configuration is not met by QuickBooks.
Methods to follow to fix the installation error 1723 in QuickBooks desktop
You can perform the below methods and learn how to resolve the error 1723 while installing or uninstalling QuickBooks desktop. Let us have a look:
Method 1: Use the System File Checker tool

The first method that you can go for is to use the system file checker tool. The steps to be followed herein are as follows:
- Hit a click on to the Start tab.
- After that, type in Command prompt in the Search bar.
- The next step is to right-click on Command prompt.
- Select Run as admin, as the admin, in case required to Enter the password.
- Type in SFC/scannow in the command prompt window and hit Enter key.
- The system file checker tool will scan and repair the corrupted files.
- Lastly check if the error is resolved or not.
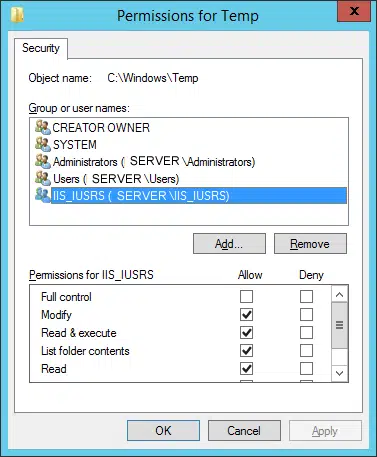
Method 2: Change the permissions of the Windows %temp% folder
- In this method, you need to press Windows key.
- Type in '%temp%' in the search bar and hit on Enter key.
- Next step is to open up the Windows temp folder on the screen:
- Now head to Properties.
- In case you are making use of Microsoft Windows 11, 10, or 8 then you need to navigate to the Home menu in the menu bar of the Windows temp folder and click on Properties tab.
- For the Windows 7 users, it is suggested to navigate to the Organize drop-down and click on Properties tab.
- Now look for the Security tab.
- Click on the same and hit Edit tab
- Now look for the Windows username and highlight it.
- Ensure to put a checkmark against Full Control in the Allow column.
- Click on OK tab twice.
- Lastly ensure to reinstall the QuickBooks desktop
Read also: How to Download Bank Feed Transactions in QuickBooks Desktop?
Method 3: Run the QuickBooks install diagnostic tool from the tools hub program
The QuickBooks Tools Hub helps to fix common errors in the QuickBooks. QuickBooks needs to be closed to use the tool hub.
Step 1: Download & install the QuickBooks Tools Hub program
- Initially, close your QuickBooks desktop.
- After that, Download the most recent version (1.5.0.0) of the QuickBooks tools hub.
- Save the Downloaded file where you can easily find it.
- Now open the downloaded file named QuickBooksToolHub.exe.
- You need to follow the on-screen instructions to Install and agree to the terms and conditions.
- Once the installation gets finish, double-click the icon on your Windows desktop to open the tool hub program.
Step 2: Use QuickBooks install diagnostic tool
Another method can be to use QuickBooks install diagnostic tool. This involves the following steps:
Latest method
- Launch tool hub program on your system.
- After that move to Installation Issues tab.

- Here you need to select QuickBooks install diagnostic tool from the options.
- It will take some time to scan the damaged file and fix the issue shortly.
Old method

- In this process, you need to download the install diagnostic tool from the Intuit website.
- Save the QBInstall file that would be a .exe file on the desktop.
- If there are any opened programs, the you would have to close them.
- Run the downloaded QBinstall.exe file. This might take some time upon the internet speed and pc’s performance.
- After the tool is installed, you will have to reboot the system and ensure that the components have been updated.
- Last step is to check if the error is fixed or not.
Method 4: Run QuickBooks component repair tool

In case you are unable to fix the error even after following the steps above, then you need to run QuickBooks component repair tool. This can be done as follows:
- In this method, Rebuild the .NET framework.
- And also reconstruct the Microsoft msxml manually.
- The last step is to try the tasks with the help or under the guidance of the IT professionals.
See also: How to Fix Web connect import issues in QuickBooks desktop?
Method 5: Allow admin privileges to user account
The steps to allow admin privileges to your user account are given as follows:
- Under this method, press Start tab and go to Control Panel.
- After that select the User Account.

- Then select Computer Administrative from Change the Account Type.
- Now Change Account Type and restart your system.
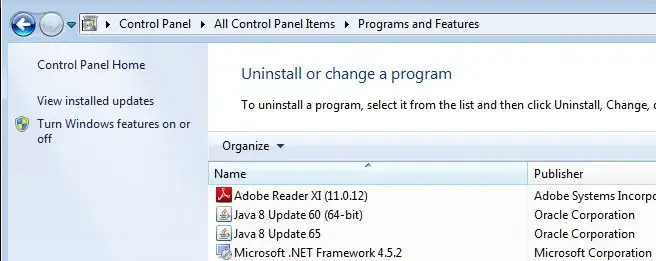
Method 6: Reinstall Java program
- Go to Control Panel and select Programs and Features.
- Find Java in the list of programs and select Uninstall.
- Follow the on-screen instructions to complete the uninstallation process.
- Download and install the latest version of Java from the official Java website.
- Restart your computer and try to install or update QuickBooks again. That's it!
Check Also: How to Fix Issues When Deactivating Bank Feeds in QuickBooks?
Expert’s assistance!
It is believed that following the methods entailed by this article helped you in fixing the QuickBooks error 1723 - Windows installer package problem. However, in case of any queries, then it is recommended to contact our QuickBooks installation error support professionals at 1-800-761-1787. Our team will ensure to provide you with immediate accounting-related assistance.
Few FAQs related to Error 1723
What is error code 1723 in QuickBooks desktop?
Error 1723 is an installation error in QuickBooks that occurs when the Windows Installer package or system permissions are damaged. It usually pops up during installation, update, or uninstallation of QuickBooks desktop.
Does install and uninstall a program can fix Error 1723?
Yes, installing and uninstalling a program can fix this error in some cases.
What is QuickBooks Install Diagnostic Tool?
QuickBooks install diagnostic tool is an inbuilt feature within the QuickBooks tools hub. This tool can diagnose a vast array of installation-related error codes.
How does QuickBooks Error 1723 appears?
This error generally appears in the form of the following message “There is a problem with this Windows installer package. A DLL required for this install to complete could not be run.”
Does repairing Microsoft components help in fixing this error?
Yes. since QuickBooks depends on .NET Framework, MSXML, and Visual C++, repairing or reinstalling these components can often resolve installation errors like 1723.
Is Error 1723 a permanent issue?
No. It is an installation-related issue and can be fixed by correcting system settings, repairing components, and reinstalling QuickBooks properly.
Suggested Reads:
How to Bulk Import, Export and Delete Data into QuickBooks?
Fix portable company file issues in QuickBooks Desktop