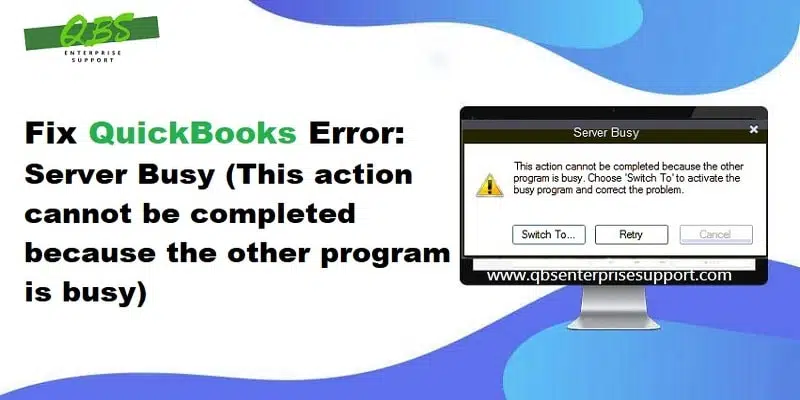
The latest QuickBooks desktop rolls in various features that work in a collective environment to reduce the time and resources spent in managing the books. But if there are too many programs running in the background, the QuickBooks software might end up with technical glitches. In recent times, many users have reported QuickBooks server busy error, which appears on screen as 'Server Busy: This action cannot be completed because another program is busy'. This error usually appears when the QuickBooks is unable to communicate properly with background Windows components or other running applications.
When this error encounters, your QuickBooks may become unresponsive, freezes or blocks users from doing any tasks. This error message might restrict the workflow and create further mess. We recommend users to fix this error at the earliest to avoid further technical complexities. In this article, we are going to discuss the various ways of tackling QuickBooks server busy error. However, if users need any technical assistance from our expert guide, they should not feel any reluctance to reach us out. Our experts will be there to answer all the associate queries instantly.
What is QuickBooks Server Busy Error?
Before you dig and explore the causes and fixes to the QuickBooks error: server busy, let us find out what the QuickBooks server busy error indicates? The server busy message might appear in case QuickBooks is unable to complete the data exchange process. In multi-user mode, if users get a server busy error in QuickBooks, it indicated that the company file is use by another user. This error may also occur when the system is unable to communicate with the application server or if there is damaged QuickBooks Windows components that creating communication issues. This error comes up with the following error messages stating as:
| Server busy | "This action cannot be completed because the other program is busy." Choose ‘Switch To' to activate the busy program and correct the problem. "Switch To the busy program and correct the problem.” "QuickBooks is waiting for another application to complete an OLE action." |

What Causes QuickBooks Server Busy Error?
There can be a couple of triggers to QuickBooks error: server busy. We have jotted down some of the most common triggers, let us check them out:
- When another program that QuickBooks is trying to work with is waiting for a response from the user.
- If there are too many applications running in the background, it can lead to this error.
- If the network does not have sufficient resources to run the QuickBooks software, this error may show up.
- QuickBooks update manager or other programs having conflict with each other.
- When the Windows update is running in the background.
- In case the QuickBooks desktop is unable to shut down properly.
- Any conflict with Intuit ProSeries or profile might also cause this issue.
- Intuit Pro-Series or Profile can also create conflict.
- One such reason can be another program that is trying to work on QuickBooks desktop is waiting for the particular feedback.
You might see also: How to Fix QuickBooks Update Error 15217?
Steps to Troubleshoot the Server Busy Error in QuickBooks Desktop
Now that we know the causes and various other facts about the server busy error, it is the right time to find out the solutions to this error. So, let's know how to fix QuickBooks error: server busy: 'This action cannot be completed because the other program is busy':
Method 1: Closing all open program’s
- Close all the open program and ensure that there is no dialog box open in that program, as it could lead to server busy error.
- Also, programs like Norton, Google Desktop, Windows defender, vista security, or pivot software control need to be closed as they can end up in this error.
- Users are also required to configure the firewall and antivirus.
- Temporarily disable the spy sweeper or run it in gamer mode while using the QuickBooks.
- Furthermore, in case the user is making use of the selective startup in Windows, then they should stop Intuit FCS.
Method 2: Go for Windows Update
Another method is to look for any available Windows updates and install them if needed. Installing the Windows update can resolve the issue to a great extent.
- First, click on Start menu and then Choose Windows Update from the left panel.
- Choose Check for Updates.

- Windows will automatically search for available updates.
- If updates are available, hit a click on Download & Install.
- Wait for the update process to complete.
- Restart the computer if prompted.
Read Also: Steps to Fix QuickBooks failed to create accountant's copy
Method 3: Use Quick Fix My Program Feature from QuickBooks Tool Hub
users are required to make use of the Quick Fix My program, as it will shut down any open background processes that QuickBooks might be using. It will also run a quick repair on the QuickBooks software. The steps to be performed are as follows:
Step 1: First of all, download and install QuickBooks tool hub
- At first close your QuickBooks.
- Then Download the QuickBooks tool hub file, and save the file somewhere where it can be easily spotted in the future.
- Open the File downloaded earlier by double-clicking on it.
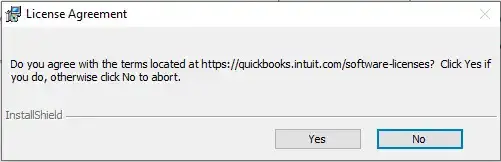
- Now follow the onscreen steps to Install and agree to the Terms and conditions.
- After the installation completes, make sure to double-click the Tool Hub icon on the desktop to open the QuickBooks tool hub.
Step 2: Run the Quick Fix My Program
- It is now required to select Program problems in the tools hub program.
- And then choose the Quick Fix My program.
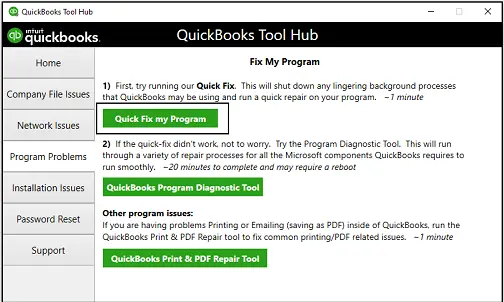
- The final step is to open the QuickBooks desktop and access the company file.
Fix 4: Close all QuickBooks components

- Initially, users are required to Close the data file and then exit from the QuickBooks desktop.
- After that, right-click the Windows Taskbar and also select the Task Manager.
- The next step is to hit click on the Processes tab.
- And also, end any QB-related processes that show up in the list of processes.
- The last step is to launch the QuickBooks desktop and also open the company file.
Read Also: How to Verify and Rebuild Data in QuickBooks Desktop?
Method 5: Disable automatic update in QuickBooks
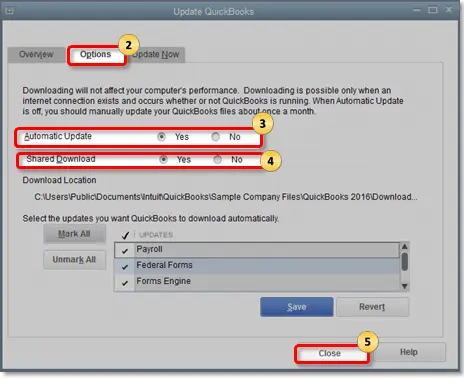
In case the QuickBooks update or other program is running in the background, it is supposed to be turn it off off. For disabling the QuickBooks automatic update, the below steps can be followed:
- The very first step is to press Ctrl + Alt + Delete keys.
- And then, choose Task Manager and Startup tab.
- Next step is to select the QuickBooks automatic update and then select Disable.
- No, turn off the shared updates in the QuickBooks desktop.
- For this, visit to the Help menu and select Update QuickBooks tab.
- Choose the Options tab.
- Then select NO for the Share download option.
- Finally select Close tab.
Method 6: Clean install the QuickBooks Desktop
Users are supposed to completely uninstall QuickBooks, or in the case of Intuit ProSeries installed on the system, they need to rename it. This can be done as follows:
- It is recommended to ensure that the Clean install is the right option.
- And then gather the information and back up the data.
- Now uninstall QuickBooks desktop and download the QuickBooks tool hub.
- Launch the QuickBooks clean install tool.

- And finally, reinstall QuickBooks desktop.
In case the Intuit Pro series is already installed on the system
- It is supposed to check the Windows task manager for qbpsevntXXr.exe (XX refers to the year of the executable).
- And then open Windows Explorer.
- Also locate and open the Intuit ProSeries folder for that year. It can be C:\ProWinXX.
- Now open the 32-bit folder.
- Then locate the qbpsevntXXr.exe right-click, and hit on Rename.
- Now add '.old' extension to the end of the file name.
- And then close Windows Explorer.
You may also read: How to fix QuickBooks unable to connect to remote server issue?
Method 7: Run the Reboot.bat file
- Close the QuickBooks desktop.
- And then right-click on QuickBooks desktop icon. Also select the Properties tab then select open file location option.
- The next step is to choose Shortcut option from the Properties menu and then right-click the Reboot.bat file. Also, opt Run as administrator.
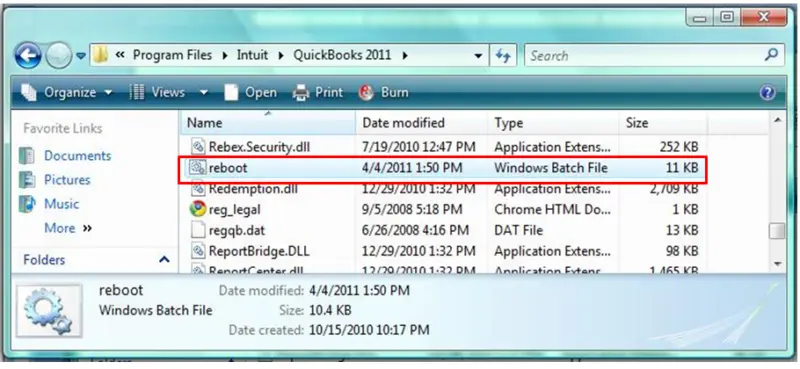
- Users will then see a command window with rapidly scrolling names. They should avoid manually closing the window, as the window will close automatically when the Reboot.bat file utility is complete.
Method 8: Closing QuickBooks update agent displaying the server busy message
- Users are supposed to open Start menu and choose All Programs after opting for the Startup option.
- QuickBooks users are then supposed to right-click on the QuickBooks update agent and also opt for Delete and click on Delete shortcut.
- Turn off shared updates in QuickBooks. This can be done by:
- Moving to Help menu and pressing the Update QuickBooks.
- Users are then supposed to move to the Options window.
- Followed by heading to the Share download option and go for No and close options, respectively.
Also Read: Intuit Data Protect Backup Failed: Firewall or connection issue
Miscellaneous Methods to Troubleshoot the QuickBooks Server Busy Error
Method 1: Use the Safe Mode option
In case the above methods failed to work in your favour, then make sure that users carry out the steps below:
- Move to Safe mode from Windows, with networking, and then open QuickBooks. And then reboot the Windows in Normal mode. This would probably resolve the error up to great extent.

- Also run QuickBooks desktop and carry out necessary actions in Windows selective startup, followed by Windows safe mode.
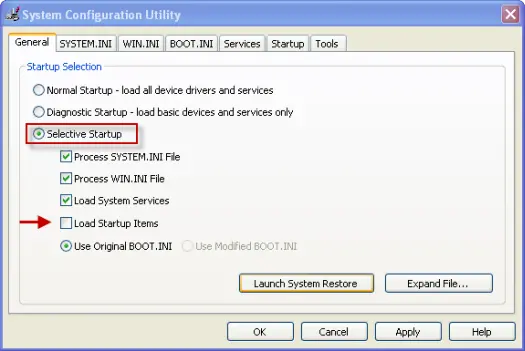
- Also reboot the system and then reconnect it to all the mapped drives.
- Opt for an alternate method by identifying if the backup or mirroring software is running on the network server. If yes, then it might actively scan the hard drive and also block access to the QuickBooks files.
- The user will have to disable the software and check if the issue continues.
- In case of any security software installed on the system, there may be a possibility that the program is scanning new updated files in the background, hence locking the template file. Users will have to disable the security software or add .doc files to the exception list.
Method 2: Repair QuickBooks desktop software
Repairing QuickBooks can be another effective option to follow:
- At first, users need to Backup the company file.
- Reboot the system.
- This will terminate all the running programs, and No programs will get affected.
- Head to the Windows start menu and look for the search bar and type Control panel, and click on it.
- Head to the Programs and Features tab, hit a click on Uninstall a program.

- On the list of programs, choose QuickBooks and hit on the Uninstall/change button.
- Hit on Continue tab and hit Next.
- After that click on Repair and hit Next.
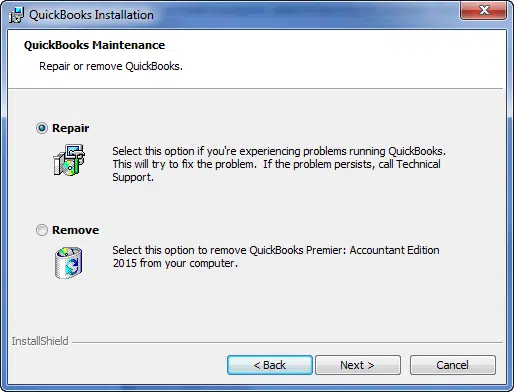
- Furthermore, click on Finish tab.
- Lastly, Update QuickBooks one more time. This will ensure to have latest fixes and security updates.
Read this Also: How to Fix QuickBooks Cannot Create PDF File?
Conclusion!
We end this post over here with the hope that the information shared above might work in resolving QuickBooks server busy error. However, if users are still facing the same issue and it is still troubling them, then they should make sure to consult a professional with renowned experience. QuickBooks users can also give us a call at 1-800-761-1787. Our 24/7 QuickBooks error support experts work round the clock to provide the best possible assistance to all users across the globe. So, what is the wait for? Ring us a call and get unmatched assistance from our experts.
FAQs
Why QuickBooks Server Busy Error occurs?
This issue occurs due to network issues or when the Update Manager is not up to date.
Can QuickBooks Repair resolve QuickBooks Server Busy Error?
Yes! QuickBooks Repair in the Control Panel can troubleshoot this error.
What is Reboot.bat in QuickBooks?
Reboot.bat is a batch file in the QuickBooks folder.
What are the signs and symptoms of QuickBooks server busy error?
Below are some common symptoms of this issue:
1. QuickBooks freezes while opening or working on a company file.
2. The system becomes unusually slow.
3. Error message repeatedly appears on the screen.
4. Users are unable to switch between QuickBooks windows.
5. QuickBooks stops responding during printing or emailing tasks.
Suggested Reads:
Solutions to Fix QuickBooks Crashing Error When Sending Emails
How to Troubleshoot Multi-user Issues in QuickBooks for MAC?