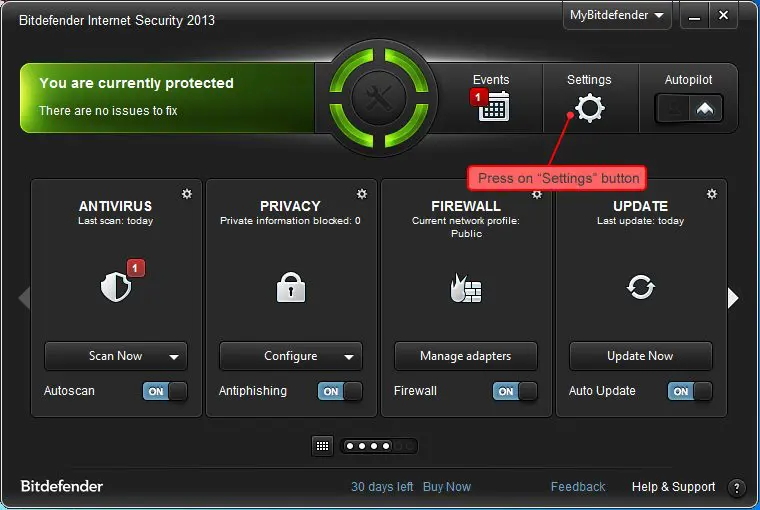
Learn the possible ways to Resolve error 12029 when downloading payroll or QuickBooks Desktop updates:
Are you tired of running into technical snags and glitches while using QuickBooks ? QuickBooks error code 12029 is one such update error that often interrupts your workflow. It is basically a network time-out error, which means the accounting software is not able to get an IP address, and the servers are connected through a weak connection. This error occurs when the backend servers are unable to revert to QuickBooks within the allotted time interval.
Another common situation when this error pops-up on the screen is when you try to update QuickBooks desktop or payroll. To get a better grip on this error, it is highly recommended to scroll through the segment carefully. However, fixing errors isn’t a cake walk, and so you can get on a call with our tech personnel using the support line, i.e., 1(800)761-1787. Our QuickBooks payroll experts and certified professionals are available round the clock to help you fix any accounting-related errors.
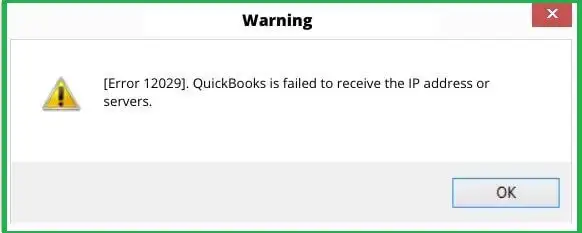
Error description: “QuickBooks is failed to receive the IP address or servers”
Software: QuickBooks
Quick Fix: Update QuickBooks Software to latest
What drags you to QuickBooks error code 12029?
Now that we have explored the basic information regarding the QuickBooks error code 12029, it is now time to find out what leads to this error code. It should be noted that there are internal as well as external factors that might lead to such type of error. Let us have a look at both of the causes one by one.
External causes
First external cause of Error code 12029 is downloading the QuickBooks payroll update.
Your firewall or internet security blocking QuickBooks from accessing the server.
If the default browser is not set a Internet explorer.
In case your internet plans have expired, then get ready to face this issue.
Incorrect SSL settings.
Internal causes
QuickBooks software itself fails to connect to the internet.
Updated Methods to fix the QuickBooks error code 12029
You can try performing the below set of steps to successfully get rid of the QuickBooks error code 12029.
Method 1: Testing connectivity and settings
It should be noted that the Internet explorer is used by QuickBooks software to access the internet, which makes it important for you to set the internet explorer as the default browser. So, you need to carry out the steps below:
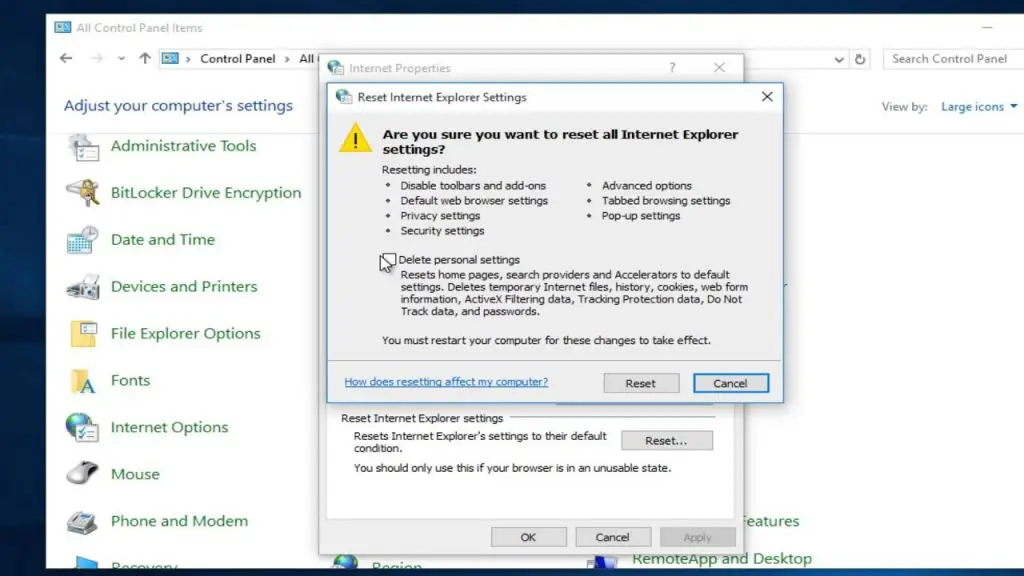
Initially, close the QuickBooks software and then open the Microsoft IE.
After that, visit the Tools tab or press Alt Key.
Next, open the Internet options and spot the Security tab.
Look for the Globe symbol and then tap on the same in the Security tab window.
Ascertain that the Security level is set to Medium-high.
Now look for the Connections tab.
If the dial-up node is not used, select the Never dial a connection. Or if you uses the dial up node, then choose Correct internet service provider.
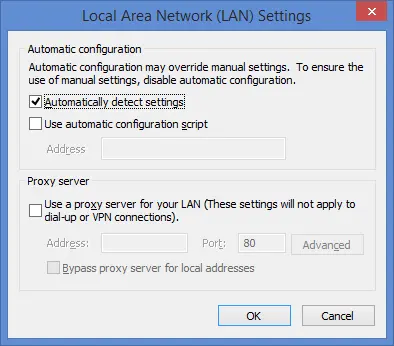
Tap on OK and then move to the LAN settings.
Look for the Automatically detect settings tab.
Now search for the Proxy server checkbox.
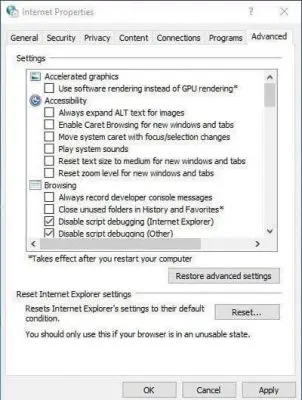
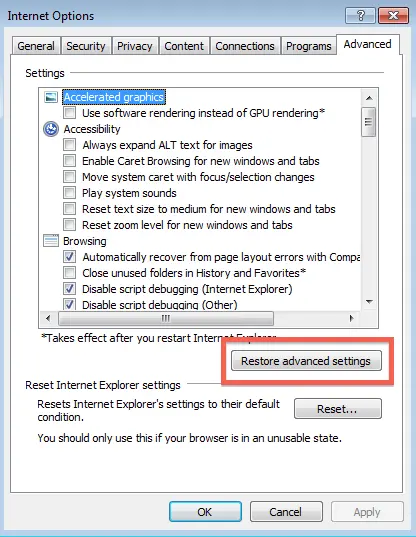
And then, hit on OK and then move to Advanced tab.
Go for the Restore advanced settings.
Pick TLS 1.2 and hit on OK button.
End the process by closing internet explorer and rebooting the system.
Download and run the TLS 1.2 utility.
Find out whether the is set as the Default browser or not.
The point to be noted here is that, if you are unable to access a secure website outside QuickBooks, then you might be needed to consult a computer or IT expert.
Method 2: Check the security settings of the Antivirus and Firewall
In case the above method fails to work, it is recommended to determine whether some another security software is preventing the download process or not. This issue might occur due to the antivirus or the firewall settings. As sometimes, the security software blocks the software from connecting to the server. In such a case, you are required to check and fix the settings, so that you can favor the payroll update process in QuickBooks. The steps involved in this process are as follows:
Method 5: Open Windows in Safe Mode and the Update
It should be noted that starting Windows in safe mode can help the QuickBooks users in fixing the QuickBooks error 12029. The steps involved in this process are as follows:
Press the Windows + I keys on your keyboard.
Move to the Update and security and then click on the same.
The next step is to hit a click on Recovery option, followed by moving on to the Advanced startup.
Now make sure to carry out the instructions carefully and then select appropriately to reboot the system.
During restarting the system, press the F8 key repeatedly to witness an option to open the system in Safe mode with networking.
Check if the error still persists.
Method 6: Re-configure QuickBooks payroll and Reboot the updates
You can reconfigure QuickBooks payroll and reboot the updates, if none of the other methods worked. The steps involved in here are:
Unplug the Wireless router or the Internet switch and wait for around 10 seconds.
Turn on the Wireless router or internet switch and check the Internet latency now.
Now open the QuickBooks and then the company file.
Once done with that press Ctrl + K keys from the keyboard.
Followed by clicking on Edit option.
Un-check the open Payroll setup.
You will have to wait till the process ends, and the payroll updates will continue on their own.
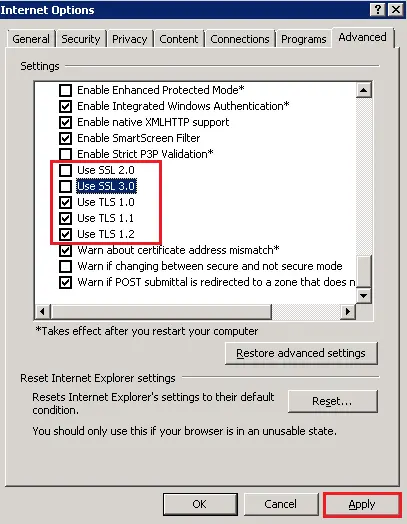
Method 7: Configure SSL settings for internet explorer in QuickBooks
In case you are unable to update payroll, you can start QuickBooks and move to the Help menu and select Internet connection settings. And then, ensure that QuickBooks uses the Internet connection of the system. Also, click onNext and then the Advanced connection setting.
You need to check internet properties and then click on the advanced tab:
Firstly you need to verify that the Use SSL 2.0 and use SSL 3.0 are verified.
Choose the Connect tab and then the OK tab.
Now close the QuickBooks software and restart it.
At last, hit a click on Help menu and Update Now tab.
Configure SSL settings internet explorer outside of QuickBooks
Initially, open Microsoft Internet Explorer browser.
Move to the Tools and select Internet options.
Next, tap on the Advanced tab.
After that select the SSL 2.0 and SSL 3.0 checkboxes that can be found in the security.
Click on Apply and OK to close the current window.
Method 8: Rectify system time and date
Hit a right-click on the time in the bottom right corner of the taskbar.
After that click on Adjust Date/Time.
Check the Time zone is correct. If not, then click on Change Time zone.
Now choose your time zone and hit Enter key.
Also, check if the Time and date are correct. If they need adjustment, then click on Change date and time option and set the correct time and date and press the Enter key.
Now, re-open QuickBooks and check if the error code 12029 got fixed.
Alternate solutions you can try to resolve QuickBooks error 12029
Reset the QuickBooks updates and attempt to Download and install the QuickBooks update, after restarting the system. Also, ensure to open the company file in single-user mode.
So this brings us to the end of this article. We hope you find it informative and carrying out the troubleshooting steps that we have enlisted here helps you fix the issue. However, if the QuickBooks error message 12029 still exists or reappears by any chance, you can contact our QuickBooks error support team. We boast a team of certified tech-savvy professionals, who work round the clock to provide our customers with the best possible solutions through their years of expertise and training. You can contact us using our dedicated support line i.e., 1-800-761-1787, and we will be happy to help you.
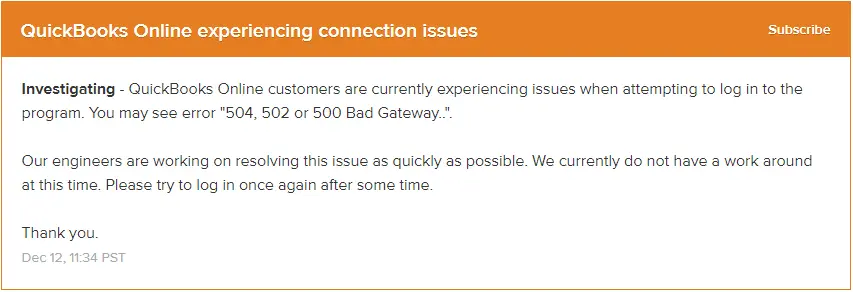
Learn the possible ways to resolve 502 Bad Gateway error in QuickBooks
It is quite common to encounter some technical errors in QuickBooks accounting software. One of those technical glitches about, which we will be discussing in this segment is QuickBooks error code 502 Bad Gateway issue. This error usually occurs when you try to sign in to QuickBooks Online or connect to the Intuit server but the request is blocked or interrupted. This particular technical glitch not only impacts the software but also lays a negative impact on the web applications running on Google Chrome. You might come across to these type of issues due to invalid responses from the server or when the cache memory of the browser gets full and it exhausted.
Going through this segment will brief you with the right set of steps that you can perform to rectify the bad gateway error. On the contrary, if you aren't in favor of performing the set of steps manually, then get on a call with our QuickBooks error support team using our dedicated support line.
Basically, QuickBooks error 502 bad gateway indicates that the HTTP status code server gets an invalid response from another server on the internet. Whenever you visit a web page, the browser itself saves some data from the page in the cache memory, in order to load it swiftly the next time the same page is visited. When this cache memory is filled, the browser fails to store any data, and this leads to error code 502 bad gateway. This error can be easily removed by clearing the cache file of the web browser. There can be various other causes as well as fixes that would discussed later on in this article.
Symptoms of QuickBooks error 502 bad gateway
Identification of the error becomes easy, once you are thorough with the signs and symptoms of the issue. So, here are the signs and symptoms of the QuickBooks error 502 bad gateway. Let us check out the signs, one by one:
If you are trying to log in to the online app or updating QuickBooks to the latest version.
In case the browser is having the viewed or downloaded forums, it can also be a symptom of the issue.
What triggers error 502 Bad Gateway in QuickBooks?
Now that you know the basics of the error, along with the signs and symptoms. It is very important for you to find the causes of the error 502 bad gateway. Let us check out the causes listed below:
One of the most common causes of QuickBooks bad gateway error 502 is if you haven't cleared the browsing history for a long period of time.
In case of a virus or malware attack.
If users hasn’t added the Intuit’s website as a trusted site in the browser.
Another cause for the same can be if the cache memory of the browser gets full.
If the cache memory of the QB application is full then the QuickBooks error 502 can also be seen.
If the active scripting is turned off in the browser’s settings.
Rectification Steps to Resolve QuickBooks Error 502 Bad Gateway
Now that you have learned the symptoms and causes of the QuickBooks error code 502, it is time to explore the rectification steps. There can be a plenty of methods to fix the issue, out of which a few of the most effective ones are listed below:
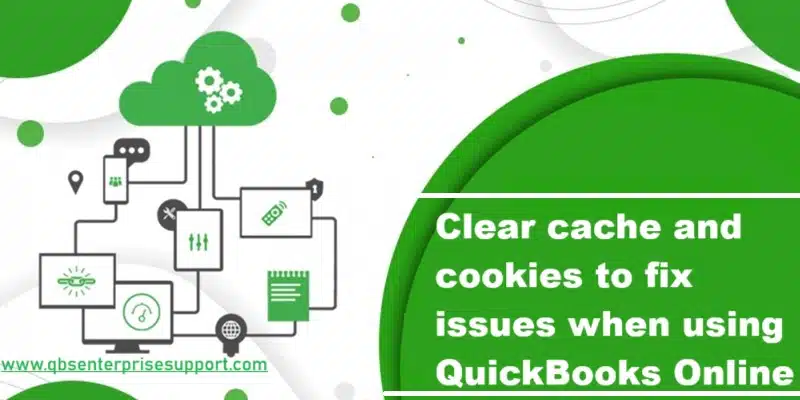
Process 1: Clear cookies and cache of the browser
In order to fix the error code 502, you can opt for clearing the cookies and cache of the browser. The steps involved in this process are different for each web browser. Below we have discussed the steps for Firefox, internet explorer, and Chrome browser. We will be exploring each of the steps one by one:
For Firefox:
Start off with selecting the 3 bars present at the top.
After that go for Options tab and then select the Privacy and Security tab, followed by marking the Cookies and site data, also the Cached web content.
Lastly, select Clear option.
On Internet Explorer
Herein, you need to launch Internet Explorer and then move to Tools options.
And then hit a click on the Internet options.
Now choose the Delete tab in the general tab.
Followed by, go for the Box having the temporary internet files.
End the procedure by clicking on Delete option.
For Google Chrome
For Google Chrome, launch Chrome browser and then select the Three dots.
Head to More Tools option and then selecting the Clear browsing data.
Ensure that all time has been selected in the time range list.
Mark the Cookies, other site data, cached images and files, and browsing boxes.
Toward the end, select the Clear Data option.
Process 2: Clear cache of QuickBooks
Another method is to clear the cache in QuickBooks, as this would resolve the issue up to a certain extent. The steps involved to clear cache amount of data are as follows:
Start off with launching QuickBooks.
Launch the application, followed by selecting the Reset app data in the help tab.
Process 3: Add Intuit website as trusted website in the browser’s settings
In case the above two methods didn't work in your favor, then you can simply add Intuit website as trusted website in the browser's settings. Let us check out the steps involved for Safari on MAC and for Internet Explorer.
For Safari on MAC
Launch the Safari browser and then Write com in the address field.
Hit Enter key.
Followed by selecting the Bookmarks and add bookmarks option.
Select the Top sites from the Add this page drop-down list.
Then go for Add option.
End the process by checking whether the error is fixed.
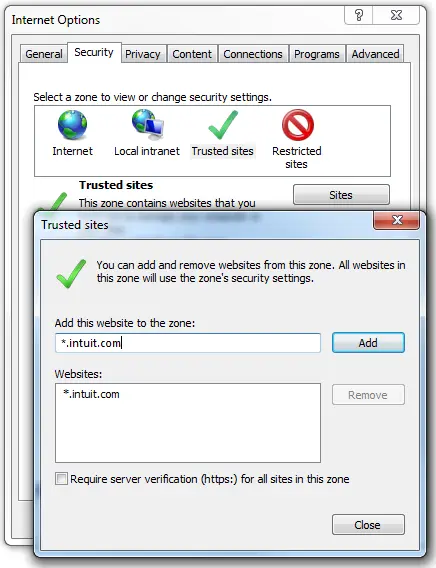
For internet explorer
Internet Explorer users are required to select the Internet options on the Tools menu.
Click on the Add option and then press the Close and OK tabs.
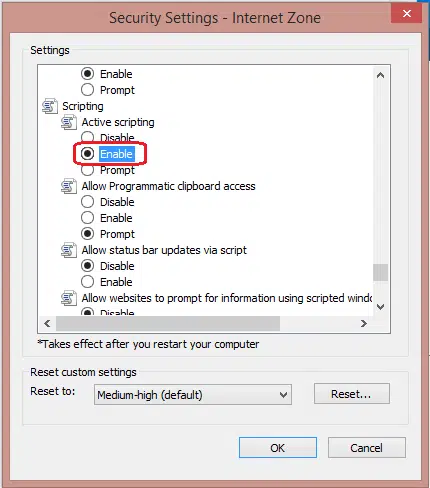
Process 4: Verifying the settings of Active scripting in the internet explorer
Checking the settings of active scripting in the internet explorer is another option one can opt for. The steps to be performed in this process are as follows:
First, restart the browser.
Followed by clearing the browser's cache.
Launch Internet Explorer and select the Internet option, from the Tools menu.
Now open the Security tab and then move to Internet icon.
Once done with that, you need to choose the Custom level and then hit a click on the Enable active scripting option.
The final step is to tap on OK option and end the process.
You will also have to reset the browser to its default settings. And note that this will change any customized settings that users having on the browser.
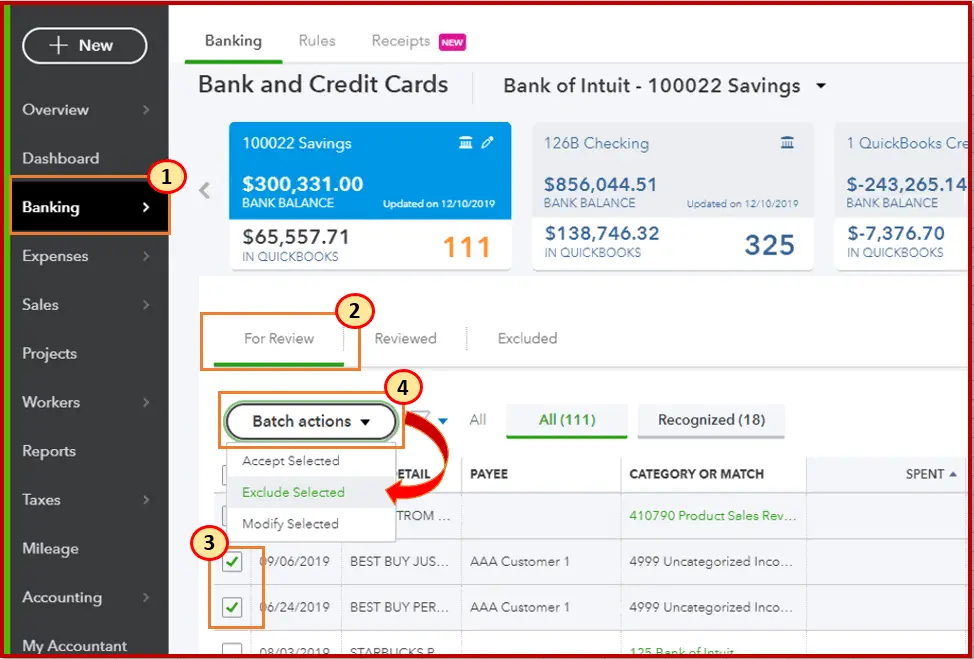
Process 5: Manually downloading the latest transactions
You can opt for manually downloading the latest transactions, in case the above methods failed. The steps involved here are as follows:
Move to the Banking menu.
Choose the Account that is to be updated.
Hit the Update tab.
If you face any duplicate entries, then it is possible that the bank sent them twice. This usually happens after a maintenance updates happens. You can exclude the transactions from the download transactions page. The steps involved are:
Move back to the Banking page.
Tap the Review tab and mark the Duplicate entry.
Hit a click on the Batch actions tab and then select Exclude selected.
In case any missing transactions are spotted, then they might not be posted yet.
Process 6: Accessing QuickBooks account via web browser
In case the issue continues even after carrying out the steps above, you can access QuickBooks account via web browser. The steps to be followed here are:
Visit the official site of Intuit.
Fill in the Credentials and hit a click on the Help icon.
You will have to click on Contact us.
Followed by entering 502 gateway in the what can we help you with? field.
Now you will then have to hit a click on Let's talk.
QuickBooks 502 bad gateway error can be extremely frustrating for you to deal with. However, implementing the above-stated methods one by one will ensure fixing the issue without much hassle. Are you still having trouble resolving the problem? If any of the queries remained unanswered, then hooking up with our QuickBooks online support executives is one of the best ways to get the error resolved. You can call us anytime via our support line i.e., 1-800-761-1787, and discuss your issue with our certified professionals and U.S. based accounting experts, who will definitely help you in getting rid of this error.
Learn how to troubleshoot the QuickBooks error code -6150, -1006 using 8 DIY methods:
QuickBooks is one of the finest accounting software that has marked its presence in the accounting industry. Though, QuickBooks is considered to be the best accounting software, but at the same time, the fact that it is prone to certain that errors can’t be denied. There are multiple error codes that can be encountered by the users worldwide, and one such error is QuickBooks error code 6150, -1006, which is accompanied by four digits i.e., -1006. If you are troubling with this error and unable to get out of it then need not to worry. We’re here to help you!
This error is a complicated error, and generally encounters by users at the time they try to access company file but unable to do so. It usually indicates issues with company file damage, incorrect file extension, or system-related problems. We understand the fact that it might be difficult for you to fix the QuickBooks error code 6150 issue, keeping this in mind, we have come up with this article, where we will be discussing the various facts associated with this error and also some quick fixes to get rid of this error.
What is QuickBooks Error 6150, -1006?
Error code 6150, -1006 in QuickBooks has been reported by a large number of users in the recent times. This error code pops-up on the screen with an error message stating:
Warning
We’re sorry. QuickBooks couldn’t open the company file.
We’ll try to fix the issue. Click start to begin. Click Start to begin.
If the problem continues, contact support for assistance and report error codes: (-6150, -1006)”.
As, said above, this error code is one of the most commonly seen errors that block the company file access. This error code can be seen when you try to establish, open or work on the company file of QuickBooks. This error code means that the company file could have certain issues that need to be fixed. QuickBooks Error code 6150, -1006 ends up in damaging or corrupting company file and hinder the smooth working of the software. There can be a plenty of reasons behind the occurrence of this error, a few of which will be discussed later in this article.
Such error can also be seen as a consequence, when you try to open a portable file (.qbm) without opening the software.
Also, if some important QuickBooks-related files got deleted accidentally.
Signs and Symptoms of QuickBooks error code 6150, -1006
Many times users are unable to identify, whether they have actually encountered any such error or not, in such a situation, you are required to take note of the below-mentioned signs and symptoms. Let us check out each of the signs and symptoms of QuickBooks error code 6150, 1006:
System crashes frequently, while running the same program.
Error 6150 gets displayed and also crashes the active program window.
This error code can also be expected, if the windows run sluggishly and do not respond to the keyboard and mouse inputs properly.
Another symptom ofthis error can be if the system freezes for a few seconds.
Quick steps to fix QuickBooks error 6150
If in case the QuickBooks error 6150 and 1006 error message is associated with a file extension of the company file, then you will have to think about replacing the file extension, and then you need to save the company file with the right extension.
You need to ensure and confirm that the QuickBooks company file is initiated on another system.
In case the file is not updated, then you should try to reinstall QuickBooks software.
Later on, you should save QuickBooks for Macintosh in the mac system and vice versa.
After that, update the system with a good antivirus before opening up the company file.
The steps discussed above might work to solve error code 6150 for you but if it doesn't, then go through the below-given methods.
8 Process to Get Rid of from QuickBooks Error Code 6150, 1006
Now that we have explored the various signs and symptoms of QuickBooks error code 6150, it is time to learn the various methods that can be implemented to fix the issue. So, let us unleash the various methods given below that can be used to fix this issue:
Process 1: Checking for CryptoWall
In certain cases, the CryptoWall virus and other malicious software might cause this error code, and can prevent you from opening the software. In such a situation, you are recommended to carry out the steps discussed below:
First of all, open Windows Start menu.
And then type in File explorer into the search bar, followed by opening File Explorer.
Also, search for the QuickBooks folder that can be found on C: drive.
Now, spot the files that have words like Decrypt or instructions.
If case you find out any files that fit this description, then in that case, make sure to reach out to your anti-virus provider.
Process 2: Craft a new QuickBooks company file from scratch
Start the process by opening QuickBooks Desktop.
And then move to the No company open window, along with that Create a new company.
The next step is to navigate to the QuickBooks setup window and then enter the required info.
The very first step is to navigate to QuickBooks, then hit a click on File option.
Next step is to select Open or restore company option.
Moving ahead, you need to select the Restore a backup copy and click on Next.
Now select Local backup option and once again hit Next option.
Later head towards, you need to opt for the location of the company file backup from the look-in drop-down menu.
And then, Go for the backup having .qbb extension.
Once done with that, you need to tap on Open option by hitting Next tab.
After that move to the save-in drop-down menu and then Browse for a preferred location to restore the backup file.
Later on, you need to type in Company filename in the file name field, and then ensure the file is saved in the .qbw format.
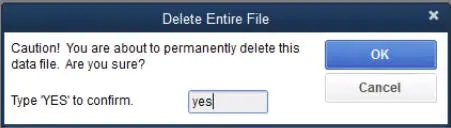
Now, hit Yes to confirm the overwrite process.
Finally, hit Yes to confirm to delete the entire file.
Process 4: Make use of the Auto Data Recovery (ADR)
When none of the above methods work in your favor, you are required to opt for the auto data recovery tool and fix QuickBooks company file error 6150. The steps involved in this process are as follows:
In this method, you need to create a new folder with the name of QBTest.
Locate the .tlg files in the company file folder.
Once done, you need to copy the .Tlg file from the company file folder and then paste it into the QBTest folder.
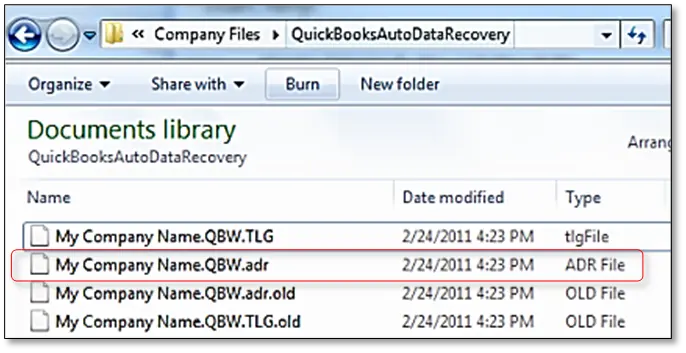
Next, open the QBAuto Data Recovery folder that can be seen inside the company data folder.
You are then required to copy .QBW.adr file from QuickBooks auto data recovery folder and then paste it into the QBTest folder.
Moving ahead, you need to remove the ".Adr" from the end of the filename and open QuickBooks software.
And further, open the company file from the QBTest folder.
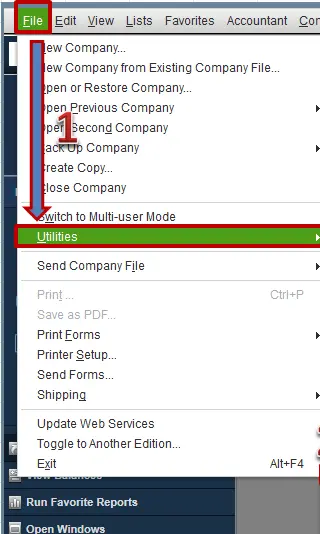
Now under the File tab, you need to hit click on Utilities option, and then select the Verify data option to check if the issue exists.
Next step is to replace the company file in QuickBooks data folder with the company file from QBTest folder.
Towards the end of the process, check whether the error is resolved or not.
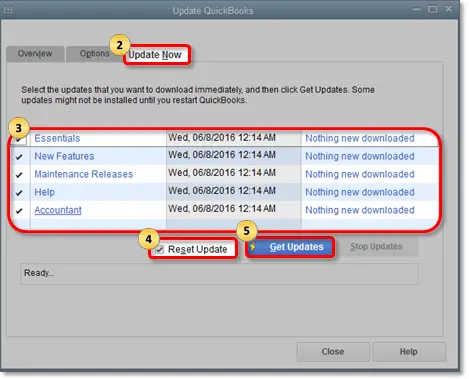
And then press F2 key on your keyboard to open Product Information window.
Here you need to check your current version of QuickBooks.
If your QuickBooks is up to dated, then then check the release version.
If your QuickBooks is not updated, then go with the below given steps:
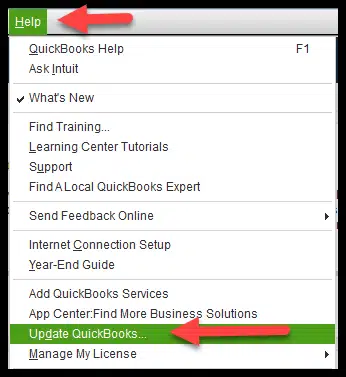
Now move to Help menu and select Update QuickBooks.
In the next step, select Update Now tab, and choose the required updates that are available.
Here you need click on Get Updates option.
Once done with that, you will get a pop-up stating a message that "Update is Complete"
Wrapping up!
Implementing any of the above methods can help in fixing the issue. However, if the QuickBooks error code 6150, -1006 continues to trouble you, then feel free to contact our QuickBooks error support team using our helpline, i.e., 1(800)761-1787. Our team of certified professionals will fix the error for you, and provide you with the best possible support services for all kinds of accounting-related issues.
Unleash the 10 DIY methods to rectify the QuickBooks Error 80070057 like a Professional:
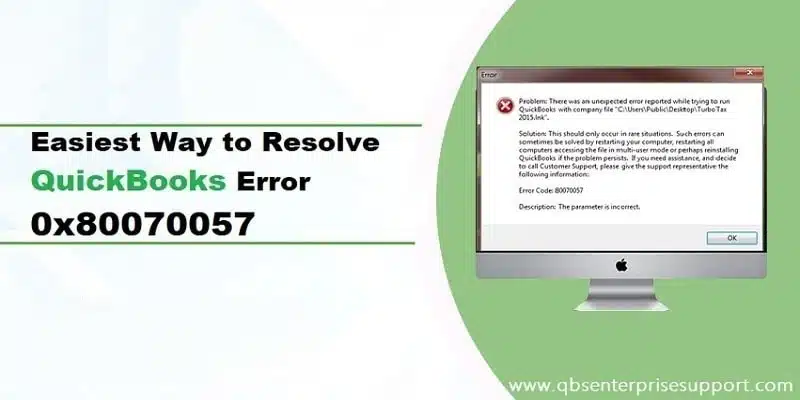
Do you find yourself stuck with Error 80070057 and having a difficult time to getting rid of it? Well, this situation is quite relatable for most users, since you may encounter “The parameter is incorrect”. It is a one of the most frequent issue that is reported in QuickBooks community. This error message indicates that QuickBooks can’t access the company file, either because of misconfigured settings, file corruption, or a communication issue between the company file and QuickBooks Desktop. Most of the time, it is possible to encounter this error while trying to open your company file. There are many facts associated to the QuickBooks error message 80070057 that we’ll be discussing in this segment. Thus, read along till the end. This error code is usually accompanied with an error message that reads:
Error
Message
Error 80070057:
“The parameter is incorrect” or “You do not have sufficient permissions”
Error 80070057:
There was an unexpected error reported while trying to run QuickBooks
Error Message 0x80070057:
“The parameter is incorrect”. There was an unexpected error reported while trying to run QuickBooks with company file [path and name].
Error 80070057:
“The Parameter is incorrect” when clicking on a QBB, QBM, QBW, ND, or TLG file from a Google Search Timeline.
Error 0x80070057:
“The parameter is incorrect” and You do not have sufficient permissions to delete files…
After analyzing various factors involved in the process, we have come to this segment in which we will be discussing all the facts related to QuickBooks error code 80070057. To unleash those facts, ensure that you go through this article until the end. Alternatively, you may contact the QuickBooks error support team at 1-800-761-1787 to get a quick assistance. We’ll make sure to offer the highest quality support within a short time.
Methods to Fix the QuickBooks Error Code 80070057
After you’ve looked at the causes and symptoms of QuickBooks error message 80070057, you are now ready to figure out how to fix this issue so that you can get back to working on QuickBooks software. Each of these options will be examined individually.
Method 1: Open up the company file properly
If you open the company file correctly, then this error code can be fixed. Thus, the very first method is to open the company file correctly. The steps involved in this process are as follows:
Start off with opening the QuickBooks desktop.
Next, choose the Company file.
Lastly, hit a click on the Open option.
Important: If the file is located on a remote system, then make sure to learn the process to access it correctly.
Method 2: Move the company file to default location
The next method is to relocate the company file to its default location. In case the company file is saved on a different location, then you must move it to the default location. The following are the steps involved in this process:
To begin with, close your QuickBooks desktop.
After that, browse to the Location of the company file.
After that hit a right click on the Company file, followed by selecting Copy option.
Now browse to the Default location, along with that, right-click and select Paste. The location to be selected is: C:/Users/Public/PublicDocuments/Intuit/QuickBooks/Company Files.
Once done with that, open QuickBooks desktop along with that, and select Find a company file.
Followed by select local drives and then spot the company file name.
At last, choose the Correct company files and then click on Open.
The point to be noted here is that, if you are using the multi-user mode, ensure to share the files after they are moved.
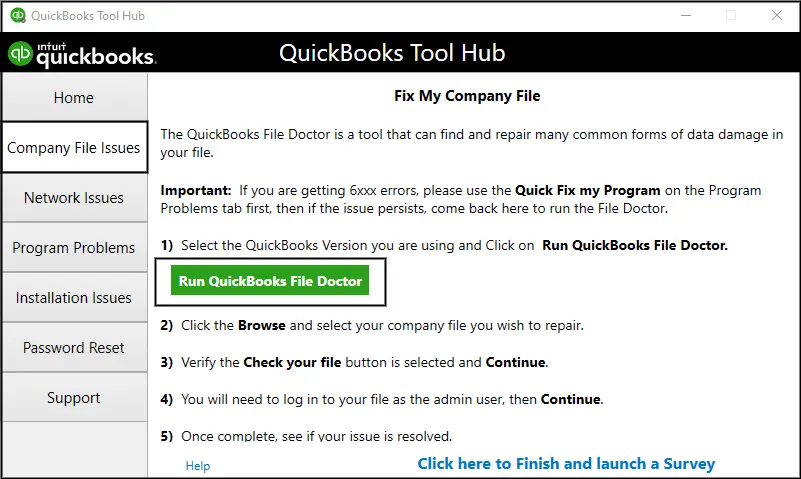
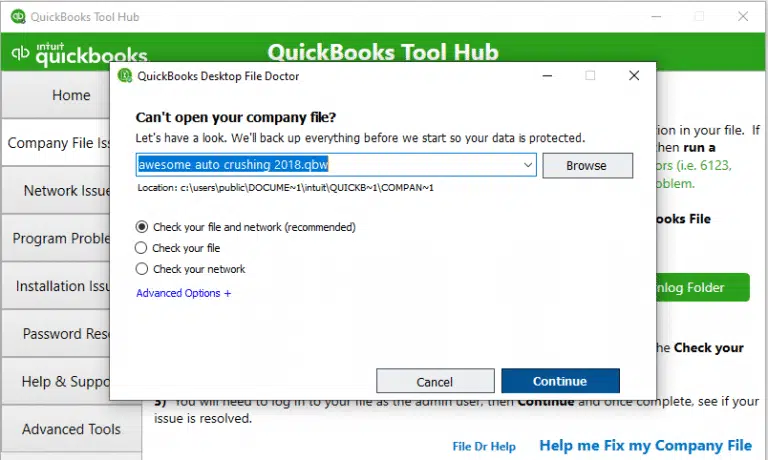
Method 3: Download and run QuickBooks file doctor tool
If the above two methods didn’t work for you, then in that case you can download and run the file doctor tool. The steps involved in this case are as follows:
First step in this process is to close your QuickBooks desktop.
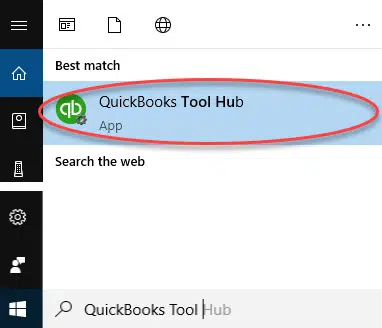
And then download QuickBooks Tool Hub file, and then save it to the system.
Next, you need to double-click the QuickBooksToolHub.exe file to open it. And follow the on-screen instructions to install and agree to the terms and conditions.
Now select the Company file from the drop-down menu, in File doctor.
If you are unable to locate the file, then select Browse and Search option to find your company file.
And further, select the Check your File option and then click on Continue.
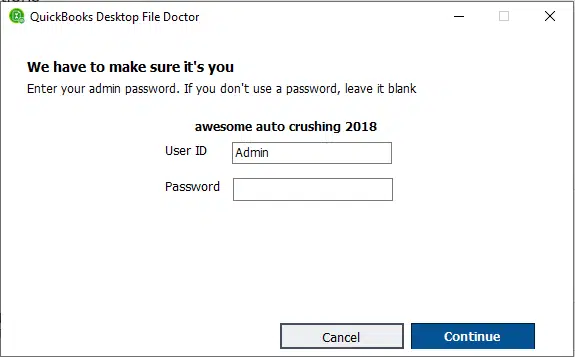
Moving ahead, now you need to enter QuickBooks Admin Password, followed by selecting the Next option.
The last step requires you to open QuickBooks software and then open the company file to check whether the error code 80070057 has been resolved.
Method 4: Updating QuickBooks desktop to latest release
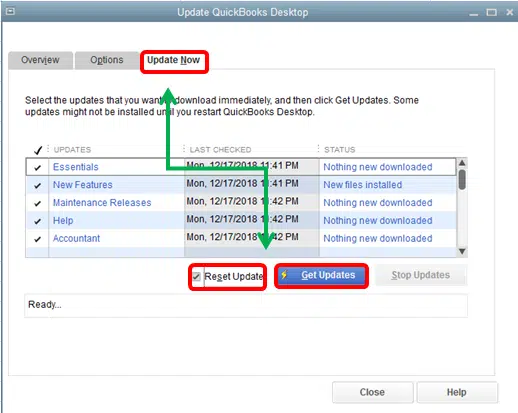
To fix the issue, you can also update the QuickBooks software to the latest release. Many times, the outdated version of the software might lead to such sort of errors. The steps involved in this process are as follows:
Start the process by moving ti Help menu and then click on Update QuickBooks desktop.
After that click on Update now tab.
Select the Reset updates option, only if you wishes to delete the earlier Update downloads.
Followed by selecting the Get updates option and then hit the Start QuickBooks again option.
Finally, you need to verify that the error is resolved or not.
Method 5: Verify the company file name extension
If all the above-mentioned methods failed for you till yet, then you can verify the company file name extension. Follow the below given steps carefully:
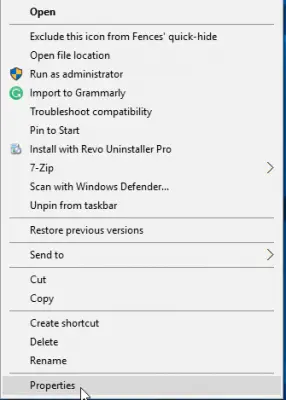
Initially, right-click on Company file and go to Properties tab.
After that click on QuickBooks tab.
Important: Please note that the file extension in the filename field and QuickBooks version in the last opened with a file.
At last, click on OK button.
Change the extension
In order to change the extension, Create a new folder.
After that, Copy the company file, along with that paste it to the new folder.
Next step is to right-click the New folder and then select the Rename icon.
Once done with that, you need to change the QB file extension with the .qbm
Now, hit a click anywhere on the screen to Save the changes.
You are then supposed to restore the portable file by opening the QuickBooks desktop.
In case you face any problem, don't forget to Rename the extension back to .qbb
Next, you are then required to open QuickBooks, followed by restore the backup.
Next step is to rename the extension to .qbx, if the file doesn’t open.
To end the process, open the QuickBooks convert to an accounting copy.
Copy the company file and then paste it to another folder in flash drive
You need to open the Windows Explorer by pressing the 'Windows+ E' short-key.
And then, open QuickBooks.
Now move to the File icon, along with that right-clicking and select the New folder icon.
Next step is to Copy the company file. QBW out of the flash drive, and paste it into a New folder.
Finally, open the QuickBooks Desktop and open new folder.
Method 6: Run QuickBooks Desktop as admin
You can also run QuickBooks desktop as a system administrator. This could resolve the QuickBooks error message 80070057 up to a certain extent. The steps to be followed here are as follows:
Firstly, you need to close QuickBooks desktop.
After that right-click the QuickBooks icon and select Run as administrator option.
After following these steps, if your company file does not open automatically, then select the company file, and select Open.
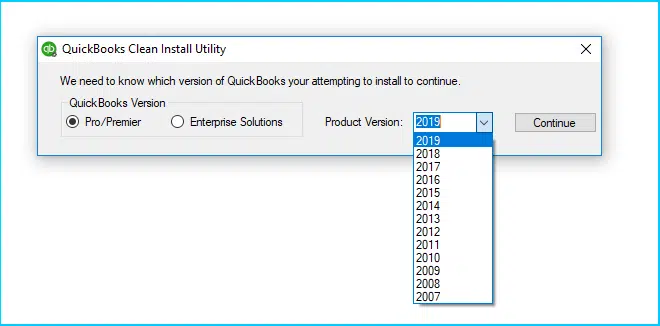
Method 7: Performing a clean installation of QuickBooks desktop
If none of the above given methods work for you, then you can choose to do a clean installation of QuickBooks. This method involves uninstalling and reinstalling of the software. This tool can help you solve technical problems and remove them completely up to great extent. You have two options: either you do a clean install, or you can use this clean-install tool.
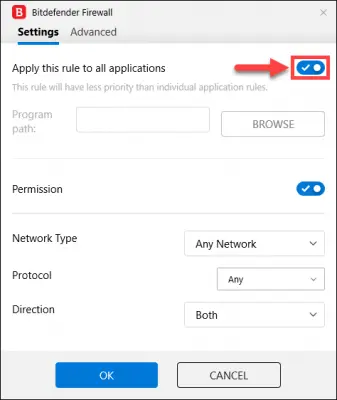
Method 8: Configuring the Bitdefender
The process to configure the BitDefender one is not mandatory, as not every user is having BitDefender. In case you are making use of the BitDefender, then it can work in fixing the issue. The steps you need to perform here are as follows:
If you have BitDefender installed on your PC, then:
Initially navigate to the BitDefender 10.0 menu and then select the Antivirus program.
Followed by, moving to the Custom level option and choose the Exclude path from the scan,
The next step is to select the Create new item option.
End the process by selecting the Mapped drive or UNC path used to browse the company file.
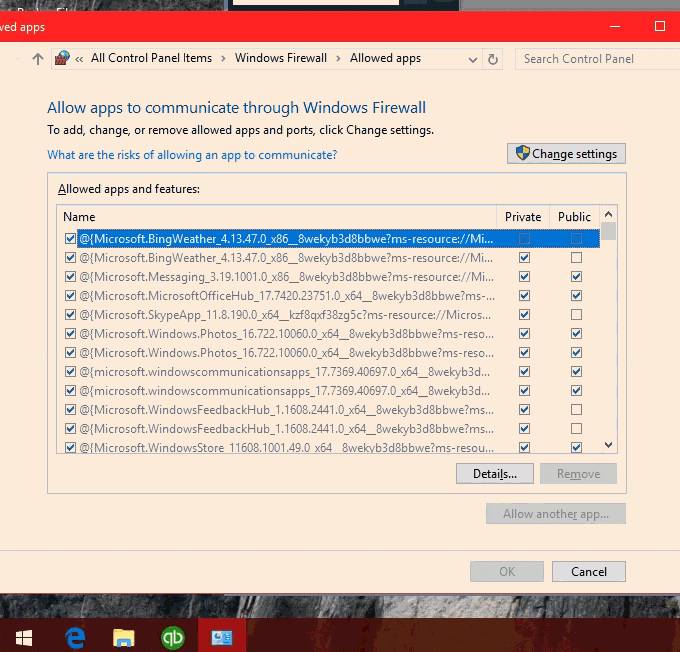
Method 9: Configure firewall settings
Many times, the firewall and other security services can become a hurdle in smooth working of the software. This demands configuring the firewall settings. You can carry out the steps below to configure firewall settings:
Add exceptions in the Firewall.
Pay heed to the on-screen or the firewall provider’s instructions for changing the Firewall settings. This allows you to send and receive the data.
The final step is to Uninstall and Reinstall the firewall and check if the issue persists.
In case none of the above methods worked in fixing the issue, we recommended you to try a few manual procedures to permanently resolve error 80070057 in QuickBooks. The steps involved in this process are as follows:
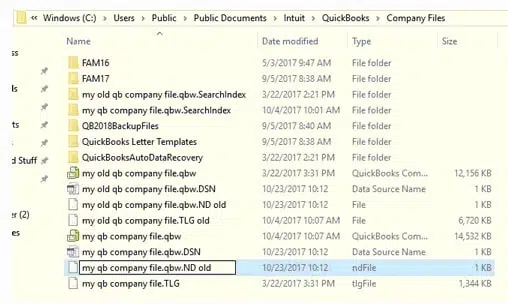
Step 1: Change the name of .ND files
In this step you need to Browse to the location of the company file.
After that, locate the corresponding .ND file (For example: MyCompanyFileName.qbw.nd)
Now hit a right-click on .ND file and then select Rename option.
Followed by typing in .OLD at the end of the file name.
Note: You can only proceed to the below steps, in case you are using QuickBooks in multi-user mode.
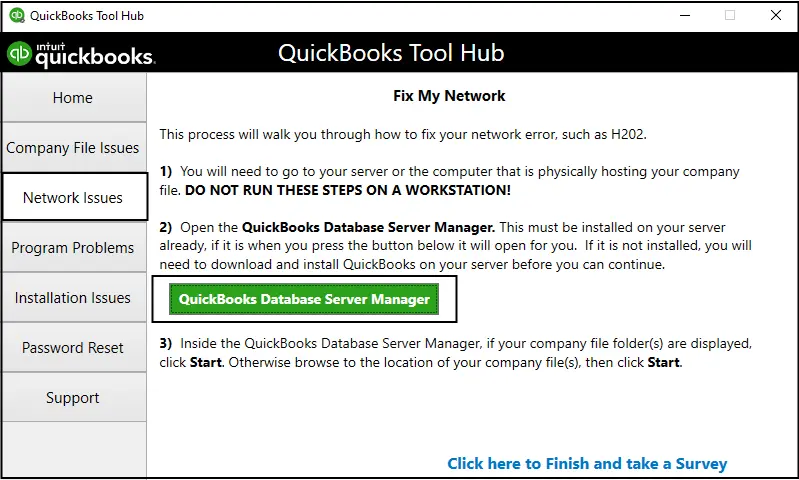
Step 2: Running QuickBooks database server manager on the server
Initiate the process by downloading and installing QuickBooks Tool hub and then, select the Network issues there in.
After that, you need to click on QuickBooks database server manager. If in case the QuickBooks is not installed on the server computer, then that case, you will be prompted to install it.
If the company file folder gets displayed, choose the Start Scan option which can be found inside the QuickBooks database server manager.
In case they aren’t, Browse to the location of the your company file and then click on Start Scan tab.
End the process by choosing Close option. That's it!
Wrapping it Up!
QuickBooks error code 80070057 can be extremely annoying for users to handle. But, following these above given strategies could assist you in resolving the issue quickly. If the problem still persists after applying all the steps or if you have further questions, don’t hesitate to ask them to our QuickBooks Enterprise support experts via our support line, i.e., 1-800-761-1787. Our team of U.S based accounting professionals and CPA’s will ensure to provide you the best possible support in fixing the error code 0x80070057 and various other accounting issues/problems.
FAQ's
What is QuickBooks error code 80070057 and why it occurs?
This is one of the most frequent and common error faced by users. It states that the parameter is incorrect, especially when the company file is opened up. This error code means that you don’t have enough permission to delete the files. This error can be fixed by following the steps mentioned in this segment later on. Thus, ensure to keep reading the entire article till the end.
What triggers QuickBooks Error message 80070057?
This error usually encounters when a user attempt to open a company file from a workstation which is located in another web server or host computer. Following are the potential causes that can leads this error: 1. Incorrect firewall and internet security settings can be one of the most common reasons. 2. The network '.ND' file got damaged for some reason. 3. You are trying to open the portable file without having QuickBooks open. 4. Damaged or corrupted QuickBooks files. 5. In case the company file extension has been changed, then this kind of issue could be seen. 6. If the file extensions are incorrect. 7. A third-party firewall not configured.
Does this error mean my company data is corrupted?
No! Error 80070057 does not directly indicated that your file is corrupted, but it can block your proper access. If this error remains unresolved, then it could delay critical accounting tasks or payroll.
What are the symptoms of QuickBooks Error 80070057: The Parameter is Incorrect?
Checkout the following symptoms you may see when error code 80070057 takes place: 1. The parameter is incorrect error message pop up appears on the screen. 2. Another symptom can be if the system freezes recurrently. 3. The program window crashes repeatedly or sluggish system response. 4. QuickBooks Desktop software crashes repeatedly. 5. System crashes often and you might not have permission to delete the company files.
Get attuned to the different approaches to fix QuickBooks Payroll Error Code 15215 when downloading payroll updates:
Have you come across QuickBooks error code 15215? Well, it’s a common error code that users encounter while updating QuickBooks to the latest version or when downloading payroll updates. It typically appears on the screen while performing payroll updates or during maintenance release. Upon receiving this error, the server error message may stop receiving, or you may only have limited access. When downloading payroll updates, users may see the following error message on their desktop screens:
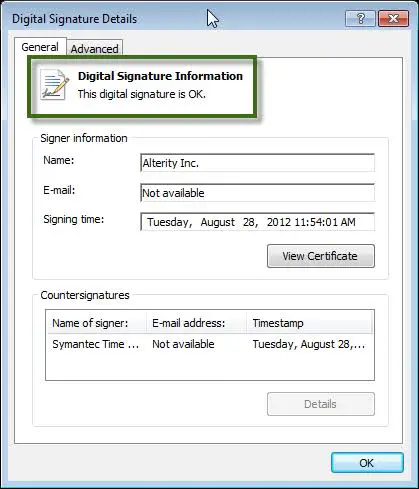
Server Not Responding: Problem Error 15215: QuickBooks could not verify the digital signature for the update file.
Error 15215: Unable to verify the digital signature.
We have created this informative segment to provide all the necessary information about QuickBooks payroll update error 15215, which includes its symptoms, reasons, and solutions. Thus, keep read on! However you can also get in touch with our QuickBooks payroll support team at 1-800-761-1787 and ask them to resolve this error for you. We own a team comprised U.S based certified accounting professionals who will surely resolve the payroll error codes and various other accounting related issues within least possible time.
What Does QuickBooks Error Code 15215 Means?
QuickBooks error 15215 can be seen while downloading payroll updates. It occurs due to any kind of conflict with another application running in the system, during the payroll upgrade process. The application or software running in the background application might be using excessive bandwidth, ending up in this error. This error is also triggered if the firewall setup blocks the software from connecting with the server. When this error encounters, the following error message and description can be noticed:
Problem
Description
Error number:
Error Code 15215
Description:
Error 15215: Unable to verify digital signature / Incorrect Configuration of Microsoft Internet Explorer
Developer:
Intuit QuickBooks Inc.
Applies to:
Windows XP, Vista 7, 8, 10 & 11
Possible Solution
Clean junk files using disk cleanup, uninstall and re-install QuickBooks.
There can be other aspects related to this error message 15215, which will be discussed later in this article.
Now that we have explored the symptoms and causes of the ongoing error, it is time to find out effective solutions. In order to troubleshoot QuickBooks error code 15215, you can follow any of the below given methods:
Method 1: Login as the system administrator
Start off with ensuring that your QuickBooks Desktop is closed.
Right-click on the QuickBooks desktop icon and select Run as Administrator.
Now, click on Yes upon receiving the message – "Do you want to allow this program to make changes to the computer?"
Method 2: Verify Use TLS 1.0 option in Settings
In this method you need to verify that TLS 1.0 is checked, and TLS 1.1 and TLS 1.2 are unchecked in the Internet Options window of Internet Explorer. Follow the given steps:
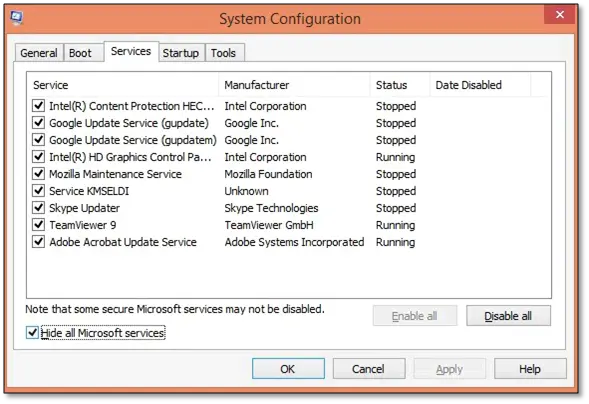
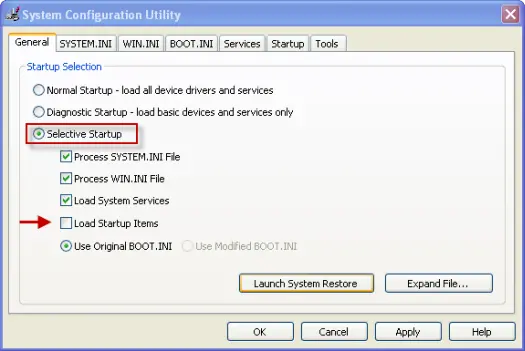
You need to reboot your systems in the Selective startup mode to rectify such errors.
At first, close your QuickBooks Desktop.
In the system, open Run Window.
For Windows XP: You need to click on Start and then Run icon
For Windows 7 and Vista: You are supposed to click on Start and All program tab. Also, click on Accessories and Run tab.
Further, for Windows 8 and 10, press the Windows + R keys together.
Open Run window (Windows+R keys) and type MSConfig. And hit OK button.
The System Configuration Utility opens. Just Allow the configuration window to open.
Choose Selective Startup and leave the box before Load Startup items unchecked.
Hit a click on Save and then the OK button.
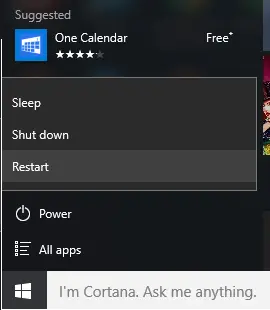
Now restart the computer.
Once the restart is successfully done, hit double-click on the QuickBooks icon to open it and download the current tax table.
Follow the previous steps (from 1 to 4) and then Open System Configuration Utility (Open Run Window and type MSCONFIG).
Check the Normal Startup box and tap on OK button.
End the process by restarting the computer for changes to take effect.
This action ensures that the system functions in a normal working environment. In case there are items that you want to remove permanently, then you might need to go to the Microsoft website and look for how to clean boot Windows.
In case you were successfully able to download the update by clearing the startup items, then this will indicate that one or more of the program in the startup items are conflicting with downloading the QuickBooks desktop payroll update.
Method 4: Restart the system
Another method that you can implement in order to get rid of error 15215 from QuickBooks can be to reboot the system. At times, restarting the system works in fixing a few of the bugs, especially the errors related to the internet, network, or printing.
However, if the method fails to fix the issue and you are still getting the same issue on a recurring basis, then make sure to stop all the background applications or jump to the next method.
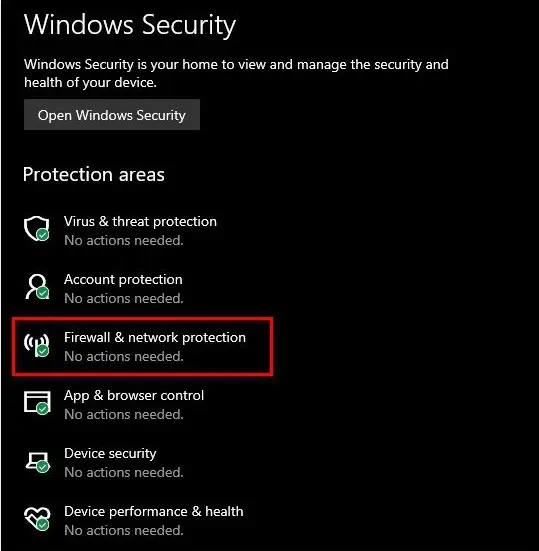
Method 5: Ensure that the firewall isn’t blocking QuickBooks
At times, the system firewall might block the QuickBooks software from accessing the server. So, it requires to be configured, and the steps involved in this process are as follows:
Start with clicking on Control Panel from the Start menu.
Further, click on the system security, followed by opting for Windows Firewall.
Select the view to Large or Small icons and then select Windows firewall instantly.
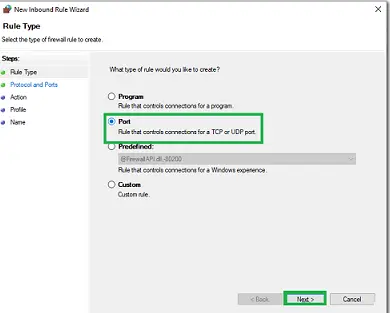
Choose the Advanced settings option, and then in the left section of the screen, highlight the Inbound rules.
Right-click the Inbound rules, and along with that, hit the New rule option.
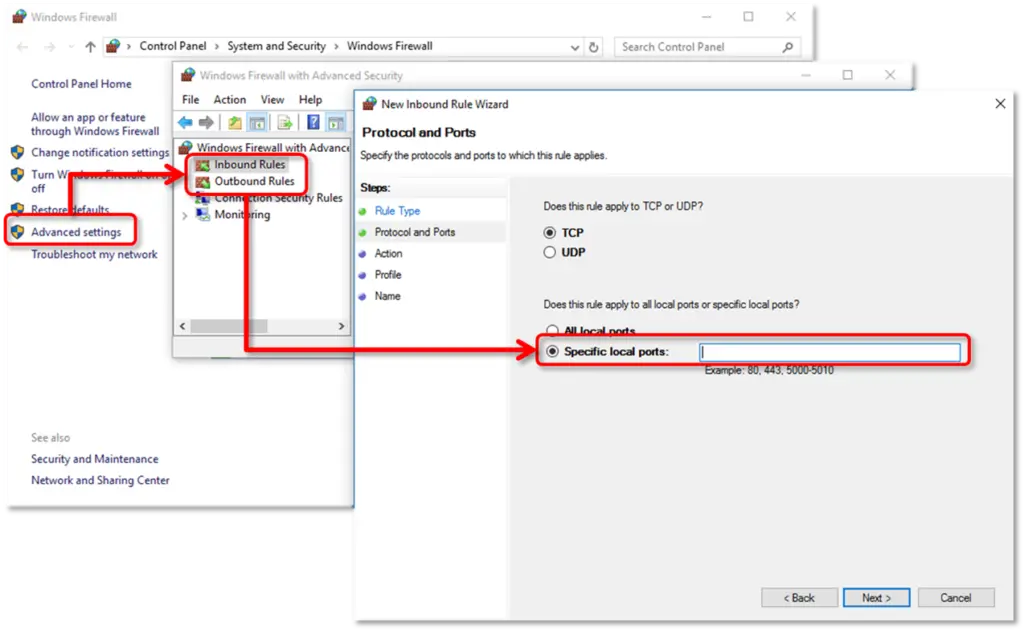
Once done with that, select Port from the Rule type section.
From the first set of radio buttons, click on Specific local ports.
Ensure to separate by a Comma and then click on Next once done.
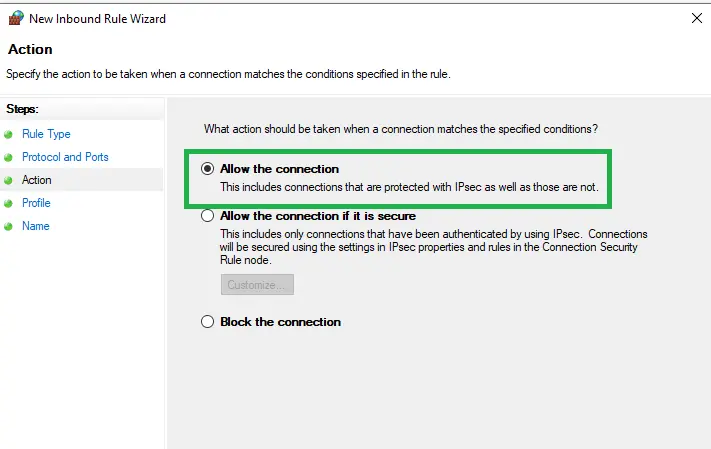
Then hit click on Next and then choose Allow the connection.
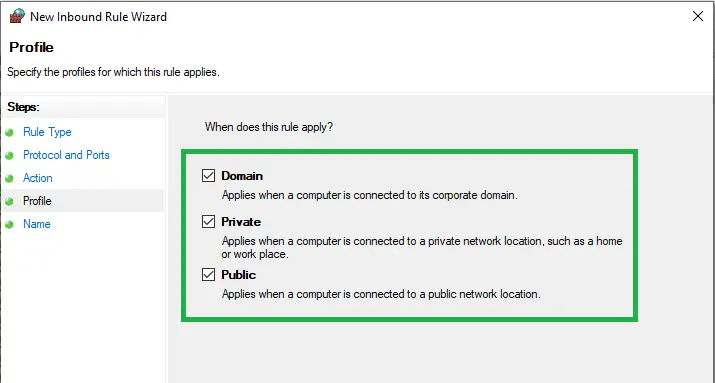
Also, select Network type, if this rule is to applied.
Now, make sure to keep all the options checked before clicking Next, especially when switching from one network connection to another quite often.
Ensure that you need to repeat the same steps for Outbound rules.
Method 6: Install updates manually
In case none of the above methods worked in your favor, then you can install the updates manually. The steps to be followed here are:
Hit click on the Change tab and then select the QuickBooks product.
Select the Update option and choose the location for the file to be saved.
Make sure to select the Save option.
Locate the file downloaded in the above step.
Double-click the Install the update tab and restart the Windows.
Open QuickBooks to check if the latest update has been downloaded or not.
Points to remember
The above steps are written in context to the system working in a normal mode. In case you are able to spot the items that you wish to remove permanently, then you can check out the process to clean boot Windows from the official Microsoft website.
In case you are successfully able to download the update by removing the startup items, then it indicates that the programs might be conflicting with the downloading of the QuickBooks payroll update.
The above listed solutions are among the most dependable ways to fix QuickBooks payroll error 15215. These methods are recommended by our experts to fix this error. In case the issue persists even after performing these solutions, and you are unable to fix it, you can immediately call our QuickBooks error support team, and we will be glad to offer you quick and precise solutions for this error. Call us now at the dedicated customer support line i.e. 1-800-761-1787, and avail instant support from our executives and certified professionals.
FAQ's
What are the major causes behind to QuickBooks Payroll Error 15215?
One or more of the following reasons may cause error code 15215 in QuickBooks Payroll: 1: You may be receiving this error due to an incorrect configuration of Microsoft IE. 2: QuickBooks desktop verifies the signature on company files. This error may occur if any file being downloaded during the update process is unable to verify. 3: This error may appear if QuickBooks Installation is incomplete or inappropriate. 4: Windows is virus or malware-infected. 5: Incorrect setup or damaged download of QuickBooks desktop.
Can I prevent Error 15215 from recurring?
Yes! you need to keep updated your Windows and QuickBooks. Also, avoid running too many programs simultaneously. Another method for prevent this error is regularly check your network and browser settings.
What are the signs and symptoms that come along with QuickBooks error 15215?
Check out the below given symptoms you may witness when error code 15215 strikes their system. 1: The occurrence of this error may crash the running Windows application. 2: A window will pop up on the screen reporting - 'Error 15215: Unable to verify digital signature'. 3: The computer may start freezing while in use. 4: Windows and its applications, as well as peripherals like mouse and keyboard, may start responding slowly. 5: The desktop gets corrupted with Error 15215when running the same program.
Will Error 15215 affect my company files or data?
No, this error is directly relates to payroll updates and digital signature verification. It doesn’t directly damage or delete your QuickBooks company files.