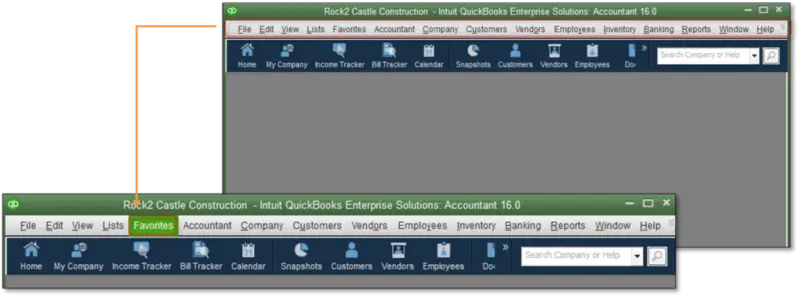
Complete guide to identify and fix the QuickBooks Abort Error
Getting stumbled upon errors in QuickBooks is pretty common as the software involves a lot of complex algorithms. One such error quite commonly encountered in the software is the "QuickBooks Abort error". This particular error indicates damaged QBWUSER.ini. As a result of this error, QuickBooks might crash unexpectedly. The best thing about QuickBooks software is that all the errors that appear can be resolved by a few sets of steps. And same applies to the abort error, as it can be resolved by performing the right procedures and steps listed in this article. To get a better grip on to such an error, read this segment carefully till the end.
However, if you are short of time, then an alternative for you is to consult a QuickBooks error technical support team and U.S. based accounting professionals, who can help you in resolving this connection has been lost or QuickBooks Abort Error within least possible time. You can simply connect with us using our helpline i.e. 1-800-761-1787, and we will be there to rectify the error for permanently.
Just like other common errors, QuickBooks desktop abort error or QuickBooks Connection has been Lost error can also impact the productivity of the businesses using it. The error is primarily caused because of a file that is damaged such as QBWUSER.INI. It can lead to system crashes etc. Another big problem that this error presents its users with is that it can corrupt files as it makes the frequent system crash while the files are being saved. Several other operations are delayed, and users have to face the lag in other to complete simple tasks.
When this error occurs, you may see the following error message on your desktop screen:
Error
Description
Connection Has Been Lost
The connection to the company files has been lost. QuickBooks must close immediately. Any unsaved data will need to be re-entered
Abort error in QuickBooks desktop has a handful of reasons for occurring. So, here is the list of one of the most common reasons behind this error:
The folder where the company file is saved needs additional permission.
Windows power management settings are activated in hibernation mode or sleep mode, hence causing the system to sleep at unexpected timings and, thus, the crashing of the software.
As mentioned earlier, the primary cause of this error is nothing but QBWUSER.INI being missing or damaged.
Your firewall is blocking access to the network.
It can happen in case the company file is present on a portable drive, another computer or on an entirely different network and the connection is interrupted due to the storage or bandwidth of the device.
Symptoms of the Abort Error Message in QuickBooks
It is essential for you to be able to determine the error when its symptoms appear on the device. So, here are some of the symptoms that you might encounter when your device is dealing with the issue of Abort Error:
This error causes the random crashing of the system.
You might experience frequent shutdowns, and that too without any error message.
In Windows 8, specifically, the QuickBooks Desktop gets terminated out of nowhere.
The software freezes regularly, and it shuts down the whole program automatically.
Quick Methods to troubleshoot the QuickBooks Abort Error
As we have now discussed the causes as well as the symptoms of this QuickBooks desktop abort error message, let us discuss some of the methods with which we can fix the error. QuickBooks desktop needs proper and regular network connection to the data file from the server. Thus, you need to ensure that the hosting status of QuickBooks on your system is right, in a multi-user environment. You need to perform the following steps:
This is equally important to configure windows firewall to work well with QuickBooks desktop. As firewall can block essential network access in turn blocking access to many QuickBooks programs. Continue with the measures ahead for fixing the error properly.
Method #1: Disable the Antivirus program and Windows defender
For Antivirus program
Implement the below-given instructions to temporarily turn off the antivirus program.
Users require access to the antivirus software, once logged in, visit the Settings of the program.
Here, search for the Option to disable the program and click on it.
Save the changes and restart the device.
For Windows Defender
If you have enabled the Windows Defender, you should get it disabled by performing the steps given as under:
Hit a click on the typing space beside the windows icon, and type Window Defender.
Click on the very First option that appears on the list.
Search for the option with which you can Disable the Windows Defender.
Once done, Save the changes and restart the device.
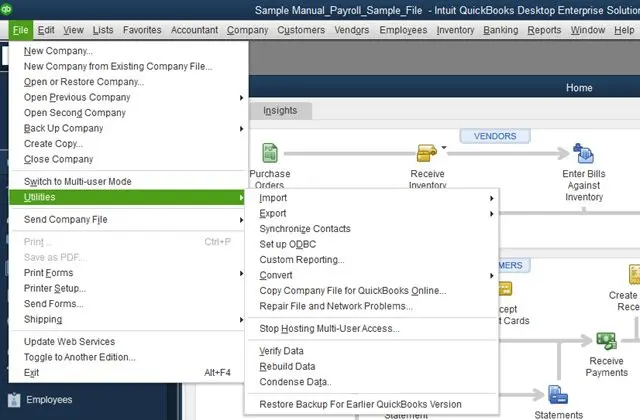
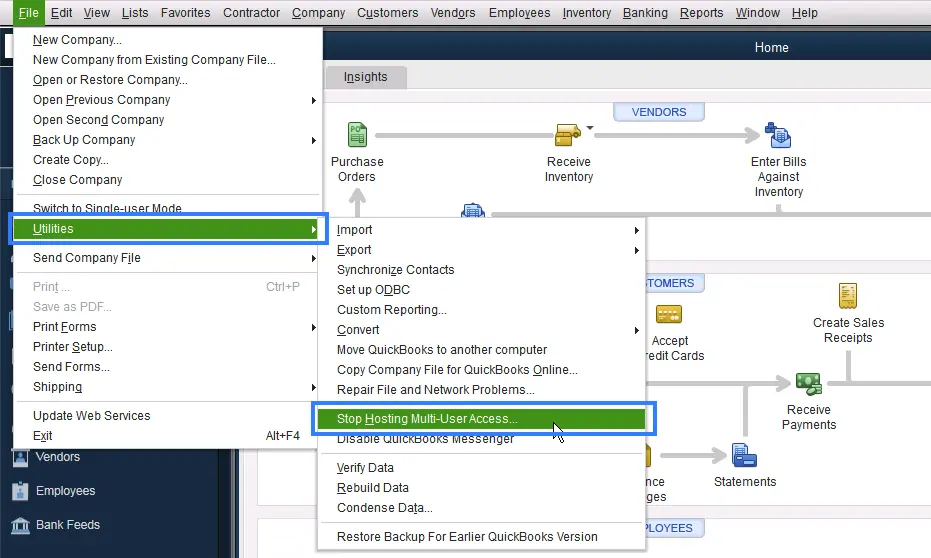
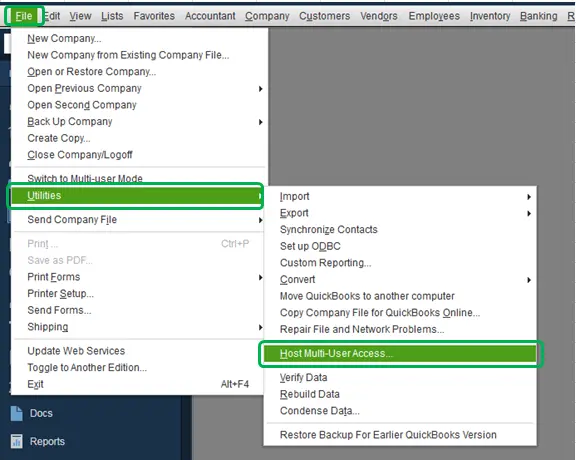
Method #2: Checking the hosting status of QuickBooks software
This next method requires that users check the hosting settings in QuickBooks, the steps for which are given below:
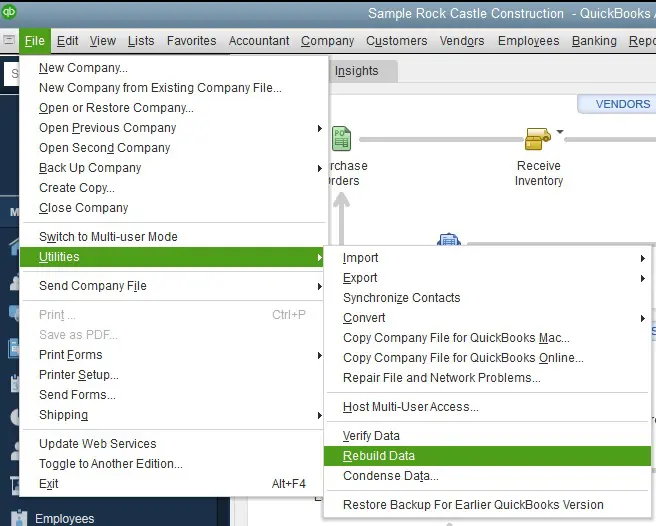
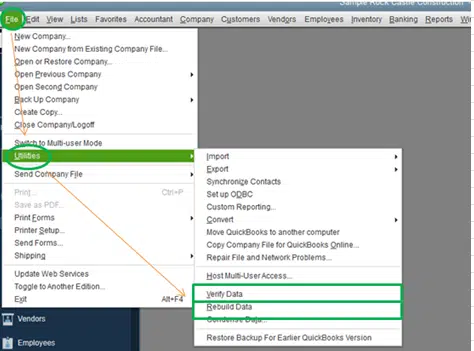
In this method, you need to visit the Files menu.
Click on the Utilities option.
After that, hit a click on Stop hosting to multi-user access.
Followed by opening the company file on the multi-user mode.
Lastly, look for the check-mark in box stating “Open file in multi-user mode” and you are good to go.
Once the QBinstall diagnostic tool successfully scanned and fixed the problem, reboot your computer.
Now launch the desktop version of QuickBooks to complete the process.
Method #4: Change the filename of ‘QBWUSER.INI’ file
Start with locating the folder where the ‘QBWUSER.INI’ file is saved.
In case the file is not located even after searching the storage, check whether the hidden files and folder option is disabled or not, if it is not disabled then disable the option and Apply the setting.
Now, once the file is located, right-click on the file and select Rename option.
Hit a click on the text box after the filename and add ‘.odd’
Once done, rename both the 'Entitlement data store' and ‘.ecml’ file'
After all the files are renamed, open the company file to complete the process.
File Doctor Tool is one important tool that is a use to fix a large number of issues within QuickBooks. The steps for using the tool are given as under:
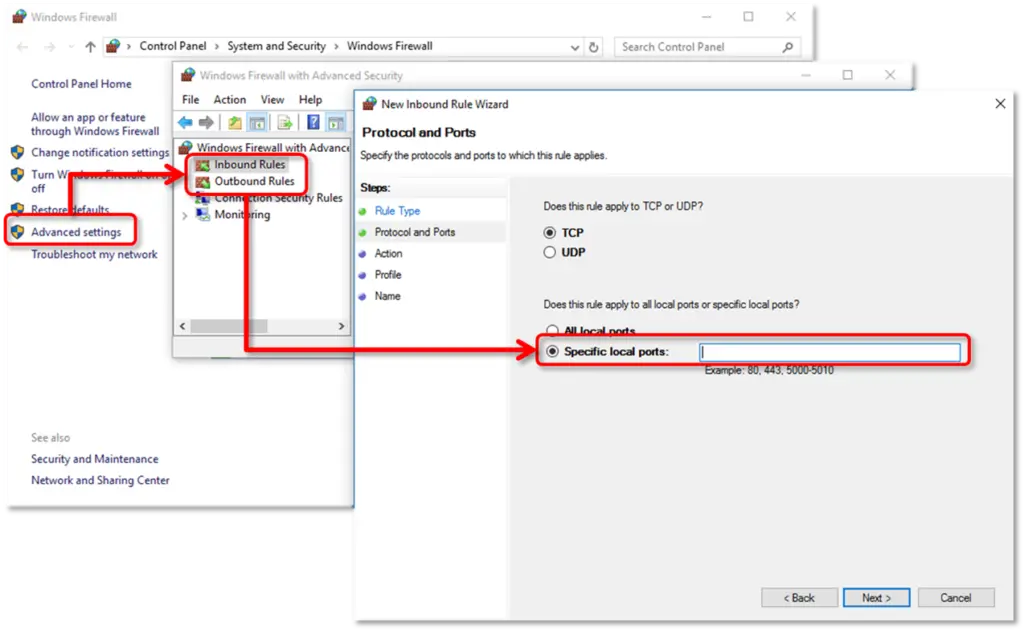
Followed by right clicking the Inbound rules and then choosing the New rule option.
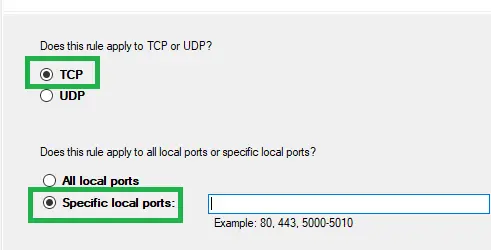
Now choose the Port and then hit Next. Now, ensure that TCP is selected.
After also, in the Specific local ports field, enter the Specific ports needed for QuickBooks.
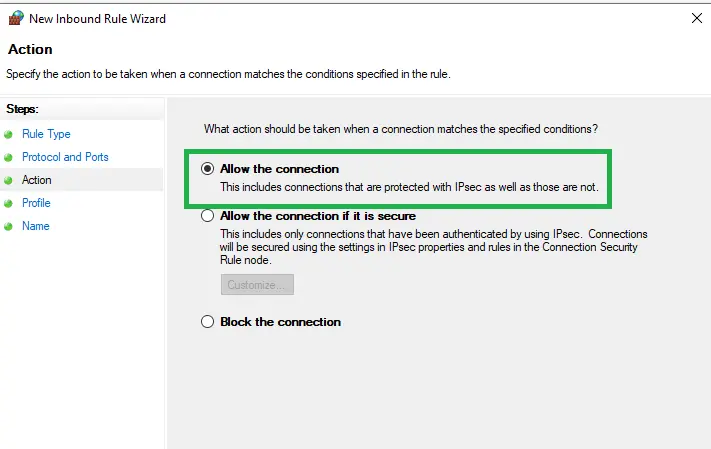
Choose Next and also, choose the Allow the connection and hit Next tab.
Ascertain that all the profiles are marked and then hit Next.
Now create a rule and also name it and end the process by hitting Finish tab.
Method#8: Resolve using the task manager
You can make use of the task manager to fix ABORT Problem - connection to the company file has been lost. The steps to be followed are as follows:
Starting off with closing QuickBooks and ending QuickBooks programs in the task manager.
Furthermore, highlight All applications that begin with QB, QuickBooks, and Intuit.
Hit a click on End Task tab.
Finish the process by running Repair QuickBooks desktop.
Method #9: Grant permissions for the QuickBooks Installation folder
Another resolution that can resolve this error involves granting the necessary permissions to the installation folder of QuickBooks. If you are unsure about the process, just pay heed to the below-given set of instructions:
Press the Windows + E keys together to open Windows File Explorer.
Navigate to the following location "C:/Program Files/Common Files."
Then modify the security settings for the common files folder.
Right-click on the folder and choose "Properties,"
After that move to "Security" tab and click on "Edit".
Now go to "Group or Usernames" tab and select "Users".
Here you need to move to Users tab and change and enable the write, read, read, and execute rights.
We hope that this article helped you to tackle QuickBooks keeps aborting message on your system. In case you are experiencing the same error message even after going through all the above-mentioned methods, you should immediately contact our QuickBooks Support team for quick and precise solutions. Our accounting professionals and CPAs have cutting-edge tools and technologies to provide the best services instantly. You can connect us using our helpline i.e. 1-800-761-1787, and our executives will be there to assist you in a single call.
In order to make the most of QuickBooks, you must keep it updated to the latest version. Well, QuickBooks update and upgrade are two different things. Upgrade adds valuable features to the software and can only be performed using a CD Rom. If you are planning to update your QuickBooks software, then you can read this quick guide and get the latest updated QuickBooks desktop from the internet directly. These updates are also known as maintenance release for “Patches.” The updates optimize the performance of QuickBooks and also fix various types known issues automatically. All these updates come at no extra cost for product releases. You can download these updates to enhance your company’s productivity.
Today, through this article we are going to explain the entire process of updating the QuickBooks Desktop to latest release version. However, in order to accelerate the process of updating, you can also contact our round-the-clock 24/7 QuickBooks support team. We are a hub of tech-savvy accounting professionals, who work the entire day and night to provide the best possible support services to the QB users. Thus, do not hesitate to contact our representatives, as our experts will get back to you with the best possible support services.
Important Note: Intuit has made some important changes to their terms and conditions for QuickBooks desktop enterprise Gold and Platinum editions. You can visit your camps.intuit.com account to review and consent for it.
Why to update the QuickBooks desktop to latest release version?
Updating the QuickBooks desktop version is different from upgrading the version of the software. Intuit frequently releases updates for its various versions of QuickBooks such as 2018, 2019, 2020, 2021, 2022, 2023, and 2024, whereas upgrades are major and often come with a cost. There are several benefits of updating QuickBooks Desktop to latest release:
New Security Patches
Security and privacy are the prime concern of every QuickBooks user. The security patches of the accounting data and to prevent any form of data breach, the new updates come along with security patches to address any bugs in the earlier versions. This makes the process of updating QuickBooks extremely important.
Improvements in the Performance
Updates are also important as they enhance the efficiency and operations of the program. Any type of version mismatch or compatibility problems with specific OS or 3rd apps are also dealt with the updates. New update also improve as well as optimize the software for faster performance and improved efficiency.
Advanced Features
QuickBooks keeps evolving and advancing with every update. Each update comes with new features to enhance user experience and streamline accounting operations.
Compliance
Intuit gives legal requirements a primary precedence. This is reflected in terms of the strict compliance to contemporary tax laws and regulations with their incorporation in QuickBooks.
How to Check your QuickBooks Desktop is Up-to-Date or Not?
Before you update QuickBooks Desktop, check your current version:
Open QuickBooks Desktop.
Press F2 or Ctrl+1 to open the Product Information window.
Steps to Update QuickBooks Desktop to Latest Release (Pro/Premier/Enterprise)
https://youtu.be/kxdEjW1JTBo
You can update your QuickBooks desktop automatically or manually. If you enable Automatic Updates, QuickBooks downloads and installs the most recent updates as soon as they are available on the web. You can use these 4 DIY methods to download the update from the internet. Each method would require you to have a fast and reliable internet connection.
Automatic update method (default setting)
On-demand (immediate) update method
Release download
Manual update
Once you download the updates, all the important company files will automatically be installed to the correct location on your computer. All the updates, post downloading the updates, would automatically be prompted. You would receive a notification to install the update the next time whenever you would start the accounting software. Sometimes, you shut down and restart QuickBooks for the update to take effect. If you have QB for multi-users, install the updates on all computers. You can also seek a professional’s advice or assistance if you use QuickBooks in multi-user mode.
Step 1: Automated QuickBooks Updates
This simple method checks Intuit services for new updates. The available updates are only downloaded when you are using your QuickBooks and the internet. To check if the software is running or not, this method itself downloads updates from the Intuit server. You, however, have the choice to disable the automatic update option in case you don't wish to update your software.
Download and Install Automatic Updates Now
First of all, you need to open the QuickBooks software and then move to Help menu.
After that select the Update QuickBooks tab.
Screenshot showing the ‘Update Now’ option in QuickBooks during the update process.
Once done with that, you need to click on Update Now tab, in the update QuickBooks screen.
In the next step, you have to delete all the previously downloaded updates and then tick mark on the Reset update box.
Now tap on Get updates icon.
Once done with this all, restart the QuickBooks application.
Instructions to enable or disable the automatic updates option in future:
At first, go to the Help menu and click on Update QuickBooks Desktop.
Screenshot showing the process to update QuickBooks Desktop 2024.
Next, hit a click on the Options tab in the Update QuickBooks window.
Screenshot showing how to update QuickBooks Desktop to the latest version.
After that, select the option of your choice. After that choose Yes to enable and No to disable the option for QuickBooks.
Select the update you wish to receive and take out the unnecessary updates from the Update section if for enabling automatic update option.
In case you disable the option, you will stop receiving all not notification even if there are notifications available on the Intuit server. This feature is just to remind you to check updates and doesn’t always mean that an update is available.
Lastly, hit a click on Save and then Close button to exit from the update window.
The above-mentioned steps are for enabling and disabling the QuickBooks update option, you can move on to the next step to Update your QuickBooks desktop.
Step 2: Immediate Update Method
This method lets you download the updates directly from the Intuit server. It doesn't require QuickBooks to be running in your system and can be used at any time. You can use this method to download updates even if you have enabled Automatic Update. It’s advisable to check for updates at least once a month.
How to check QuickBooks updates and set them?
At first, open your QuickBooks and navigate to Help menu.
After that navigate to the Update QuickBooks desktop option.
QuickBooks Desktop 2024 update window displaying new patches and improvements.
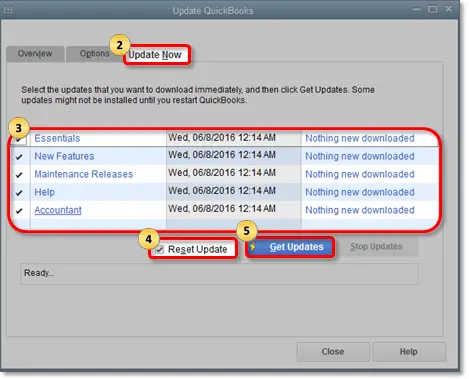
Now form the Overview tab, you need to navigate to the Update Now button.
QuickBooks window displaying the Overview section with update options.
The above step will bring you to Update now tab.
Now select the updates you want to download and tap on Get Updates option. Here, you can also learn what all is included in the update from the Update column.
Screenshot showing the Get Updates button in QuickBooks Desktop.
Once all of the updates completed successfully, the a Status Message will appears on the screen that say "Update Complete"
Screenshot showing the Update Complete message in QuickBooks.
Now tap on Maintenance Release link. A new page will show up with Changes/improvements in the update.
Moving ahead, you need to close your QuickBooks.
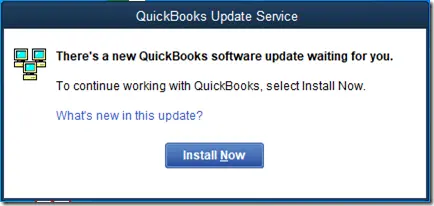
Next time when you will use your QuickBooks, you will receive a prompt to Install the update.
You can choose to Download it now or later. Restart your computer after the installation is complete.
Important: Consider re-installing the updates in the sequence is a good idea in order they are displayed in. If you do not follow the provided instructions in sequence, it may lead problems while opening the company file.
Step 3: Release Download
If you are encountering issues with the update feature or you wish to install updates through the update feature, you can continue to download and install available updates. It’s recommended to use the update feature for installing QuickBooks Updates. You must ensure to update all copies in case you use multiple copies of QuickBooks. Not doing this may lead to issues in opening the company file.
QuickBooks Pro and Premier: Updates for the multi-user mode
If you are a QB pro or premier user and use multi-user mode, make sure to install updates on every system. Connect your computers to the internet and download and install the updates. You can also download the update on one computer on the network and later share it.
Steps to share the updates
Initially, open the Shared company files.
Next, go to the Help menu and click on Update QuickBooks.
QuickBooks Desktop update window displaying available updates.
Go to the Options tab.
Then select Yes for the Share Download option.
QuickBooks window displaying the option to share downloaded updates.
Now, hit the Save button.
Once you apply all the mentioned steps, the updates that you have downloaded will be shared to all computers. The updates get downloaded at the location in QuickBooks where, after turning on the share option, your company files will be located. Now, you should install new release updates for your QuickBooks company file. Please note that the company files may not remain accessible using the earlier releases of the accounting software after being updated.
Tips for updating new QuickBooks desktop company file
First of all, hit a click on your New version of QB Desktop.
After that open File menu and select Open or restore the company.
QuickBooks window displaying the menu to open or restore a company file.
Select Company file and then click Next tab.
Highlight your company data file and click Open.
In case, you receive move company file window, perform the following steps:
Read the company data in the Update QuickBooks Company file for New Version. Click on the checkbox and then Update Now.
After that, from the Select Country drop-down list, click to select your Country.
And then from the Select Product drop down, you need to select the Product accordingly.
Once done with that, make sure to select the version from the Select Version drop-down.
QuickBooks window displaying the steps to open or restore a company file.
Next step is to select Search option.
Followed by clicking on Get the latest updatesoption.
You are now required to Save the downloaded file somewhere that's easy to spot.
Also, you need to select Update available then select Install now tab to install the update.
This process will be take sometime for the update to be installed.
Lastly, you need to open the QuickBooks program, once the update is installed.
Important Note: If in case you have a payroll subscription, then you must have to download the latest payroll tax table to process payroll through the QuickBooks software. Also keep this on mind that, your subscription for payroll is active.
Step 5: Ultralight Patch (ULIP) - Optional
Talking about the ULIP which stands for Ultra Light Patch, it is a characteristic in QuickBooks desktop, where minor critical fixes but essential repairs can be sent without any release limitation.
QuickBooks window where users can open or restore a company file.
It should be kept in mind that the patch release method can continue as it is. Make sure that the essential repairs option is selected before transferring the updates.
DIY steps for manually updating QuickBooks desktop:
You need to Download the latest version and later move all to the company files and QuickBooks.
And then Move to the Windows start menu and look for the QuickBooks desktop, on QuickBooks Desktop give a right click and select the Run as admin.
After that, on the No company screen, click on Help menu and click on Update QuickBooks desktop.
Followed by, clicking on Mark all and later select Save on the options tab.
Next step is to hit a click on the Update now tab and then click on Reset update checkbox.
The final step is to click on Get updates.
What to do if you are unable to install the update?
In many instances, users experience unusual errors when updating QuickBooks. To root out such errors, perform the following steps:
Step 1: Try downloading QuickBooks Update once again
The very first step is to run QuickBooks and proceed to the Help tab.
After that select Update QuickBooks Desktop.
QuickBooks window displaying the Open or Restore Company File menu.
Now, go to the Update Now tab, and checkmark on the Reset Updates box.
Screenshot showing the steps to update QuickBooks Desktop to the newest release.
Later on, hit a click on Get Updates option.
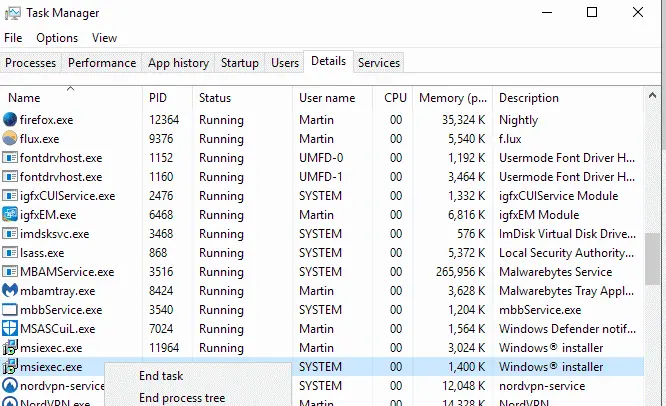
Step 2: End QuickBooks processes in the task manager
To start this process, you need to close QuickBooks.
After that press Ctrl + Shift + Delete keys together to open Open Task Manager.
Now you need to go to the Processes tab, and select the following processes related to QuickBooks:
QBCFMonitorService.exe
QBW32.exe or QBW.exe
QBDBMgr.exe or QBDBMgrN.exe
qbupdate.exe
QBMapi32.exe
Screenshot showing how to close the QBW32.exe process in Task Manager.
After choosing each of the processes, hit a click on End task button.
Once you are done with the above steps, close the Task Manager and try to update QuickBooks again (by repeating Step 1 discussed above).
Note: Please make sure to run QuickBooks desktop as admin before trying the updates again.
Steps to Update QuickBooks Desktop for MAC to Latest Release
For updating QuickBooks desktop for Mac, you can check out the steps below:
Check the version you have
Open your QuickBooks desktop for Mac and press Command + 1 keys on your keyboard to see the version and release.
Screenshot showing where to check the latest QuickBooks release on Mac.
In-Product Update
For in product update, you are supposed to hover over the drop-down menu and then click and select Check for QuickBooks updates.
If there is a new version available, then hit a click to Install and update.
In the next step, you might get an alert for selecting Install and relaunch.
QuickBooks window displaying options to open or restore a company file.
Once the update process ends, the QuickBooks for Mac will automatically launch.
Manual Update
For manual update, you will need to uninstall the older version and then reinstall the newer one.
After that, navigate to QuickBooks product updates to reinstall the latest version.
In the next step select the Desktop version and then download the installer file to the system.
Now double click on Downloaded .dmg file and drag the QuickBooks desktop icon to the Applications folder to install it.
What are the latest release numbers for each version of QuickBooks Desktop for Mac?
Following are the latest release versions in QuickBooks desktop for MAC.
QuickBooks Mac Plus 2024 R3
QuickBooks Mac Plus 2023 R6
QuickBooks Mac Plus 2023 R5
QuickBooks Mac Plus 2022 R10
QuickBooks Mac 2021 R13
QuickBooks Mac 2020 R14
QuickBooks Mac 2020 R17
How to Fix errors while updating QuickBooks Desktop for MAC?
You may face errors when updating QB Desktop on MAC. These issues can be resolved by implementing the following two steps:
Method 1: Re-Downloading the update
Go to the QuickBooks menu, and tap on Check for QuickBooks Updates.
Moving ahead, hit a click on Install and Relaunch option.
Steps to access the company file restore feature in QuickBooks.
You can also try the the 2nd method, if the release number of the current update is not advance.
What should I do if QuickBooks Desktop update fails?
If the update fails, try these quick fixes: 1. Check your internet connection. 2. Temporarily disable firewall/antivirus blocking the update. 3. Delete the old update files from the QuickBooks folder. 4. Run Quick Fix my Program using QuickBooks Tool Hub.ee
Do I need to pay extra for updating QuickBooks Desktop?
No, updating to the latest release version is free of cost for users with an active QuickBooks desktop license. However, if your subscription has expired, you may need to renew it first.
To Wrap it up!
Updating QuickBooks desktop regularly is the simplest way to avoid technical glitches and enjoy a smooth accounting experience. However, in case you receive any issues during the process or encounters any other issues, you can contact our QuickBooks error support team for quick and precise solutions. Make a quick call at our support number i.e. 1-800-761-1787, and our representatives will be there to assist you in a single call. So why to wait more? Get in touch with us today, and avail the most reliable support services
If the update fails, try these quick fixes: 1. Check your internet connection. 2. Temporarily disable firewall/antivirus blocking the update. 3. Delete the old update files from the QuickBooks folder. 4. Run Quick Fix my Program using QuickBooks Tool Hub.ee
No, updating to the latest release version is free of cost for users with an active QuickBooks desktop license. However, if your subscription has expired, you may need to renew it first.
Updating QuickBooks desktop regularly is the simplest way to avoid technical glitches and enjoy a smooth accounting experience. However, in case you receive any issues during the process or encounters any other issues, you can contact our QuickBooks error support team for quick and precise solutions. Make a quick call at our support number i.e. 1-800-761-1787, and our representatives will be there to assist you in a single call. So why to wait more? Get in touch with us today, and avail the most reliable support services
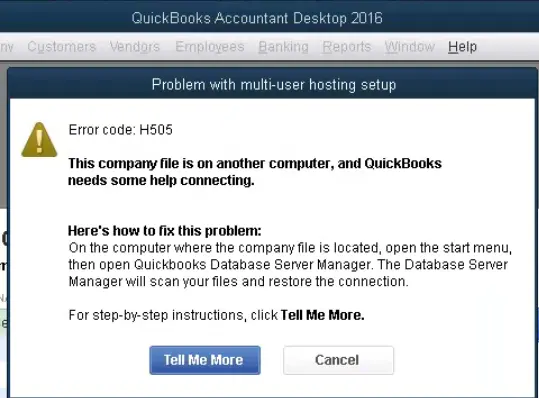
Are you coming across some of the multi-user errors or other technical snags in QuickBooks desktop while trying to access your company file in multi-user mode? Well, these errors are pretty much common. One such error that we will be elaborating in this write up is 'Error Code H505'. This QuickBooks error is a multi-user hosting error code that generally occurs while trying to open a company file that is located on another server, but QuickBooks can't establish a proper connection. However, the good part is that, the error doesn’t damage your company files. It only prevents access until the network and hosting settings are corrected.
This error belongs to the H series errors and usually appears when you try to access the QuickBooks company file, which does not exist on that device or the network. Thus, to ensure that all you get the best experience of this software, here you will get everything in this article that will assist you in tackling the QuickBooks error code H505. However, if you are seeking for expert assistance, you can get that too, as we are a hub of tech-savvy people and who work round the clock services to provide the best possible assistance that too in a single call. So, do not feel any hesitation in speaking to our QuickBooks error support professionals using our dedicated support line, i.e., 1-800-761-1787.
What is QuickBooks Error Code H505?
QuickBooks Error Code H505 usually occurs when you try to open a company file which is located on another computer, but is unable to create a connection with the server. This error code comes from the family of HXXX series error codes that are often accompanied by H101, H202, H303, etc. Also, this error can be seen when one you try to switch to multi-user mode. Instead of accessing the file, it restricts you from working in multi-user mode. The program shows up an error message on screen stating as:
Warning: QuickBooks has faced a problem and needs to close. Sorry for any inconvenience caused.
Problem with multi-user hosting setup: Error code H505: This company file is on another computer, and QuickBooks needs help connecting.
Important points to remember
You need to check that QuickBooks software is installed on the system properly.
Also, it is important to note that it can be a full QuickBooks desktop version with database or license manager hosting only.
Check that QuickBooks software is installed on the system properly.
Moreover, it is very important to install QuickBooks application on the server as without it, you will not be able to use multi-user mode.
You should follow the instructions for the server system and also run the file doctor. To run the QuickBooks file doctor tool it is recommended to sign in to host server as the system admin user.
What are the reasons behind QuickBooks error H505 occurrence?
As this error is one of the common ones, there may be multiple causes that can result in the occurrence of error message H505 in QuickBooks. Some of the most common causes are as mentioned below:
The hosting configuration of the device is Incorrect.
Presence of an incorrect or damaged .ND file, this results in the failure of QB company file being accessed by the entire network.
This error can be caused because of DNS incorrect settings.
It can happen when the QB Services such as QuickBooksDBXX/QBCF are not working.
In case the database server manager is not able to find the IP address of the host computer or in case it is using several different IP addresses.
Error H505 can happen if the system Firewall Settings is obstructing QuickBooks to get to the company file.
What are the symptoms of error H505?
The signs and symptoms of the QuickBooks multi-user error H505 are as follows:
This error appears and crashes an active program window.
The system often crashes when running the same program.
If error code H505 itself appears on the screen.
QuickBooks is unable to switch to multi-user mode.
Another sign can be if the Windows function slowly.
If you are unable to access the QuickBooks company file from a different computer or server.
QuickBooks displays a slow response time while accessing the company file.
Steps to perform before fixing the Error code H505
It is important to ensure that all the factors that are mentioned below are taken care of. This will ensure that the further steps of rectifying the errors are dealt with without any damage to the data or files stored on the device.
Run the Quick fix my program option in the Tools Hub program.
Initiate the QuickBooks Database Server Manager.
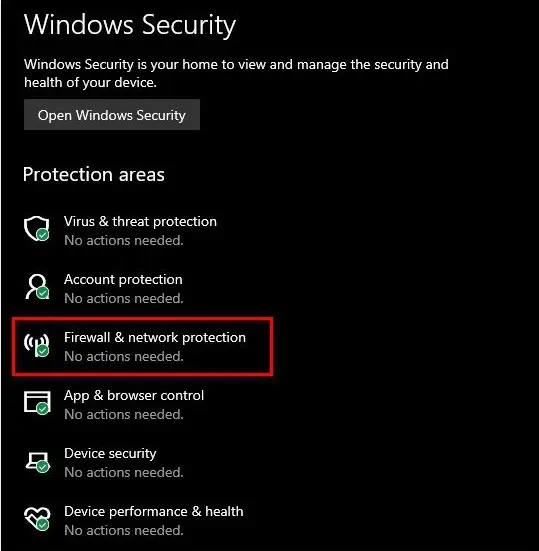
Configure the firewall settings so that it will not obstruct the process while it is under work.
Methods to Rectify the QuickBooks Error Code H505
We are going through a bunch of DIY methods that can help you in rectification of QuickBooks error code H505. There are several of them as it will ensure that the error is completely fixed. So, make sure that you follow through all the methods in an orderly fashion:
Method #1: By using the QuickBooks File Doctor Tool
For this, you will first have to check that the QB desktop is installed on your server computer and you have the access to the network.
In this solution, you have to first edit the host file. The steps involved in this process are as follows:
Step 1: Find IP address and computer name of the Server and Workstation
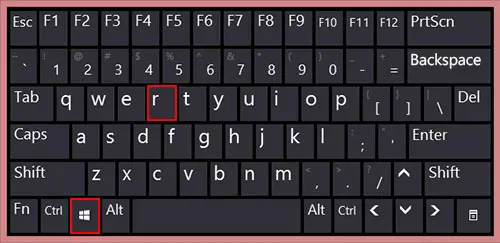
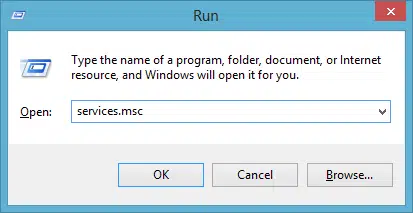
In the first step, press Windows + R keys in order to open Run box.
After that type CMD and then hit Enter key to open Command Prompt window.
Type ipconfig/all and hit Enter to run the command.
Find the Host Name in the Windows IP Configuration section. Your server name is on the right.
The next step is to write the Host name and IP address somewhere. You need to repeat the process for all systems that have multi-user setup.
Now, go back to the workstation to test the server. Following given steps may get complex for you, so we recommend you to consult with your IT professional for help.
Initially, navigate to Windows Start menu from a workstation.
After that, type Run into search and open Run command.
Now type CMD into the Run window, and then press Enter key.
Next, type Ping [server name], and then press Enter key. Don’t include the brackets around your server name.
Step 2: Edit the Windows hosts file
Now after the above steps you need to edit the Windows hosts file:
Initially, shut down the QuickBooks and then move to Start menu.
After that, move to this PC option and then visit the address: C:\Windows\Systems32\Drivers\Etc or C:\Windows\Syswow64\Drivers\Etc.
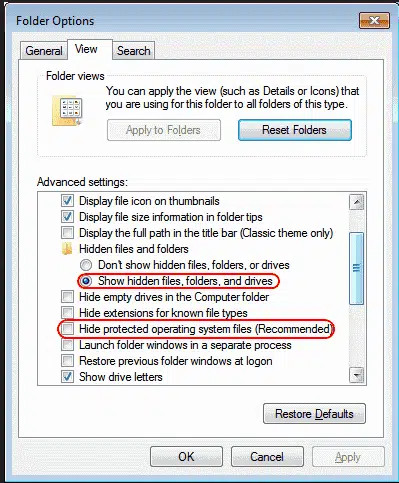
In case you are unable to find the Windows folder in the system. Then you can follow the steps to see the Hidden files and folders.
Now you will have to click on the View tab and then click on Hidden items, after which the you can be able to see hidden files.
After that, right click on View tab and click on Open with option, and open the same with notepad.
Now fill in the IP Address and system name. When the details are entered, make sure to use the Tab key, instead of using Space bar to put spaces.
And the last step is to Save the changes and thenreopen the QuickBooks software in multi-user mode.
After that, open the file downloaded earlier (QuickBooksToolHub.exe).
Once done with that, you have to follow the on-screen prompt to install and agree to the terms and conditions.
After that, when the installation finishes, you need to double click on the icon to open the tool hub program.
The point to be noted here is that, if you are unable to spot the icon, then search it in Windows for QuickBooks tools hub and then select the program.
Step 2: Run QuickBooks Database server manager, from the tool hub program
From the Tools hub, run the database server manager. The steps to be followed are as follows:
The first step is to choose the Network issues, from the QuickBooks tools hub.
And then, select QuickBooks database server manager. In case QuickBooks isn’t installed on the server, you will be prompted to install it.
Now select Start scan option, in case the company file folder. In case they aren't, you need to browse to the location of the company file and then click on Start scan option.
The database server manager will repair the Firewall permissions automatically. Once the scanning process ends, make sure to select Close.
Lastly, open QuickBooks on each of the workstation, where the error was seen. And then choose file option, along with that switch to multi-user mode. In case you detects any server system as a workstation, then make sure to check that too.
Method #8: Follow the steps depending upon how to host the company files
Step 1: Hosting your own Network
In case you are not already installed the QuickBooks database server manager, then it is recommended to install the database server manager on the server for each version of QuickBooks being used. The server is the system that hosts the company files. After you have installed the database server manager, it is recommended to continue to the sections below:
In case you are making use of QuickBooks Enterprise hosting, then you need to contact professionals immediately.
Using Another Hosting Solution
In case you are making use of another solution or one of the affiliated Intuit hosting providers, then it is recommended to directly contact them for restarting the hosting environment.
Method #9: Open network ports that QuickBooks uses to transmit knowledge
Step 1: Configuring the firewall settings
First of all, move to the Windows firewall settings and then hit right click on the Windows option to click on the Control panel.
After that, type Firewall in the search bar and also hit Enter key. It is recommended to click on the Windows firewall and press Advanced settings tab.
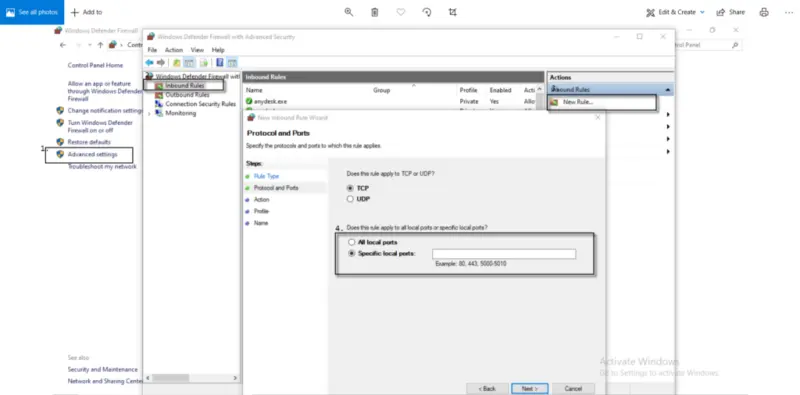
After that, move to the left and then right-click the Outbound rules and select New rule.
Next, you have to press on Ports and hit Next.
Now hit a click on TCP and in the specific local ports, enter the following ports:
For QuickBooks desktop 2015: 8019,56725,55363-55367
For QuickBooks desktop 2016: 8019,56726,55368-55372
QuickBooks desktop 2017: 8019,56727,55373-55377
For QuickBooks desktop 2018: 8019,56728,55378-55382
You will then have to click on Next and select Allow the connection tab.
After that, hit a click on Next to type in the name and also hit Finish.
Also, repeat the steps 1-5 for inbound rules.
The last step is to move to the Multi-user mode again and open QuickBooks.
Step 2: Turning on the network discovery
At first, open the Control panel and then press on the System and security.
And then, hit a click on Windows firewall.
You will then have to click permit associate app/feature on the windows firewall.
Also, press Modification option.
Now you need to select Network discovery, and hit OK tab.
Step 3: Find out the name of the server
You will have to open the Run command and press on the Windows key + R keys. And type the CMD and click on Enter key.
Now, Enter config/all and also hit Enter key.
Followed by looking for the Host name, in the IP configuration section.
You will then be able to see the server name on the right.
Now you can Save and move to the Next step.
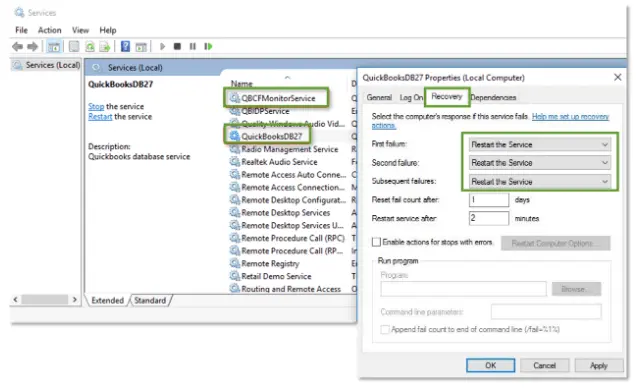
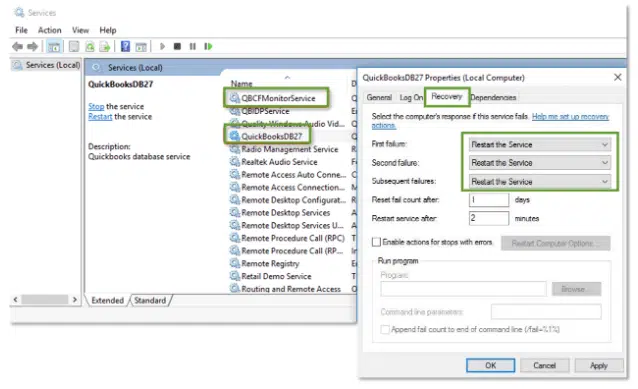
Method #10: Checking the services on the server
You need to ensure that all QuickBooks services are running on the server system. The steps to check QuickBooksDBXX. Then repeat them for QBCFMonitorService.
First step is to open Windows Start menu on the Server system.
And then, type in Run and open Run tab.
Next, type in Services.msc into the run window and then press the Enter tab.
After that, look for and double click on the QuickBooksDBXX on the list. Where XX denotes the version of QuickBooks.
Also, choose Automatic tab for the Startup type.
Now ensure that the Service status is either running or started. If it is not, then choose Start tab.
Followed by selecting the Recovery tab.
And select restart the service from each of these drop down menu.
First failure
Second failure
Subsequent failures
After that select Apply tab and also hit OK tab to save the changes.
And towards the end, repeat the steps for QBCFMonitorService.
Method #11: Turn on Network Discovery(On Server PC)
Under this process, press Start menu on the Server computer.
After that, search for "Network", and then open Network and sharing center.
In the next step, tap on Change advanced sharing settings.
Now move to the Network Discovery and File and Printer sharing section.
At last, click on Turn on Network Discovery. That's it!
We hope that you've followed the above given methods correctly, and the QuickBooks Error code H505 is fixed successfully. In case the error is still present and pops up even after the completion of the steps, then we recommend you to immediately contact our QuickBooks enterprise technical support team. Feel free to connect with our U.S. based accounting experts using our helpline i.e. 1-800-761-1787. We will be happy to help!
FAQ's
How do I check network connectivity and name resolution?
Test by pinging the server name from the workstation. If name resolution fails or is slow, fix DNS, try the server’s IP, or add server/workstation entries to the Windows hosts file.
Do firewall and antivirus settings matter?
Definitely. Security tools can block QuickBooks traffic. Add allow-list rules for QuickBooks executables/services and open required ports, then retry switching to multi-user mode.
Does Error H505 mean my company file is corrupted?
Not necessarily—H505 primarily indicates a network/hosting path issue. However, if network fixes don’t work, run Verify/Rebuild to rule out data damage before proceeding further.
Should I open the company file using a UNC path or mapped drive?
Prefer a UNC path like \ServerName\Share\Company.QBW for testing; if that works while a mapped drive fails, recreate the mapped drive with reconnect at sign‑in and proper credentials.
Which ports should be open for QuickBooks multi‑user?
Open version‑specific ports (e.g., 8019) and the dynamic ports configured by the Database Server Manager, plus required Windows file sharing ports; allow QuickBooks executables and services.
Should I flush DNS when H505 recurs daily?
It helps. Run ipconfig /flushdns on workstations, restart the DNS client service if needed, and ensure the server’s name resolves correctly to the right IP.
A QuickBooks Unrecoverable Error is a critical issue that forces the QuickBooks Desktop to shut down unexpectedly. When this happens, you will see an error message with a pop-up on your screen containing a 10-digit numeric error code in the format XXXXX XXXXX, such as 19740 43064. This error stops you from continuing your work and indicates a problem that needs to be fixed.
QuickBooks, being one of the world's leading accounting software, offers a whole lot of benefits to it's users. However, there are a handful of errors and bugs that keep popping-up from time to time and bother the users. The errors in the software can be caused due to a variety of factors, such as network issues and damaged files. Among these errors, one of the most common ones that a lot of users encounter is the Unrecoverable error in QuickBooks desktop. This article is going to talk about the error, its symptoms and ways to troubleshoot it.
However, an alternative to this can be to get in touch with our certified professionals and experts, who can help you in fixing the QuickBooks desktop unrecoverable issue with much ease. Connect with our technical support team using our dedicated helpline i.e. 1-800-761-1787, and our QuickBooks error support team will be there to assist you.
What is QuickBooks Unrecoverable Error XXXXX XXXXX?
When a user tries to open a QuickBooks file and the software cannot reach to the asked file, it displays an error message which reads, “QuickBooks has encountered a problem and needs to close”. Apart from the message, the error pops up carries anyone of the 50 unique numeric error codes which are 10 digits long in a "5 digits space 5-digits" sequence. The unrecoverable error in desktop version indicates that the accounting software has experienced the critical application fault. These error codes can be seen when you open the company file or while clicking on save, print, or ship icon, at the top of the transaction.
When unrecoverable error occurs, you may see 'critical application fault' message or following error message on your screen:
Note: XXXXX denotes one of the unrecoverable error code.
List of Common Unrecoverable Errors in QuickBooks
These are a few of the relevant factors that might lead to the QuickBooks desktop unrecoverable errors and also the codes that might be seen along with it. As a consequence of the random nature of the errors, the error codes or the number might differ from the actual ones. The list attached below is not inclusive, rather you might stumble upon some other errors as well, which might differ from the aforementioned scenarios.
13730 84631
19758 63847
02457 79428
20888 41171
00227 55008
00000 14775
15563 13890
13824 75582
00551 46274
00000 15204
20103 33023
31197 00540
14070 43851
12565 30728
16059 98709
14070 47688
00000 24128
19062 00238
In which condition QuickBooks unrecoverable errors generally occurs
Following are the circumstances when the unrecoverable error occurs in QuickBooks desktop:-
Unrecoverable error when opening a QuickBooks desktop file on a workstation.
While printing, emailing or saving as PDF out of QuickBooks Desktop.
While Saving a transaction or a record.
When Chaining target or running Rebuild utility unrecoverable error may occur.
When writing checks with QuickBooks Online Bill Pay or while importing accountant's changes.
What are the symptoms related to QuickBooks Unrecoverable error?
It is important that a user understands all the symptoms of unrecoverable errors in QuickBooks desktop. This will help them to identify quickly as well as come to a decent solution in time before the further loss in productivity happens. So, here are the symptoms that are related to this error:
QB desktop window gets crashed.
QuickBooks Desktop crashes as soon as opening it.
Update progress freezes up randomly or does not complete in hours.
User will be unable to save the transactions in the company file.
QuickBooks desktop will not get an update on the software.
The software will crash while doing some specific task.
User will be unable to find a saved transaction on the company file.
Methods to Fix QuickBooks Unrecoverable Error (XXXXX XXXXX) in Desktop
There are a handful of 8 DIY solutions that you can go through in order to fix QuickBooks desktop unrecoverable error XXXXX XXXXX swiftly. You will have to go through each of the processes in order to completely get rid of from the root of this error. So, make sure that you follow these methods in an orderly manner:
Solution 1: Stop QuickBooks Desktop from opening all Windows at the startup
For this, start by press the Alt key and double click on the QuickBooks icon.
Once the system shows up a dialogue box, release the alt key and type the password of the account which is logged in.
Now press OK button.
Once the application is launched tap on the ALT key again.
Lastly, leave the ALT key to complete the process.
Note: When the QuickBooks application launches, you need to close all the background apps, Windows by simply click on Close all Windows option from within the application.
Solution 2: Identify the number of users affected
You need to recognize the number of users that are influenced by using different login credentials, in order to open the similar company file. In case the error occurs in a specific user, that the credentials are damaged, in such a case, make sure to recreate the user. The steps involved in this process are as follows:
Condition 1: While regular individual user is damaged
You need to start with selecting the Set up users and passwords tab.
Followed by, selecting Set up users tab.
The next step is for the Enterprise Users: In the company menu, then select Users.
And then, hit a click on Set up customers and roles icon.
Next, select Add user icon, and then enter User name along with Password. And hit on Next.
Also, make sure to avoid using the Damaged user name.
Next step is to Customize the customer as required, followed by clicking on Finish icon.
In the File menu, select Close company/logoff.
The last step is to sign-in the QuickBooks company file using the new log-in credentials.
Condition 2: While admin user damaged
In this case, you need to download the QuickBooks tools hub and install it on your system.
Now open and run the program.
Note: The tool hub is a set of multiple tools of QuickBooks. It can help a user to resolve all the common errors. Ensure that your QuickBooks is closed before using the tool.
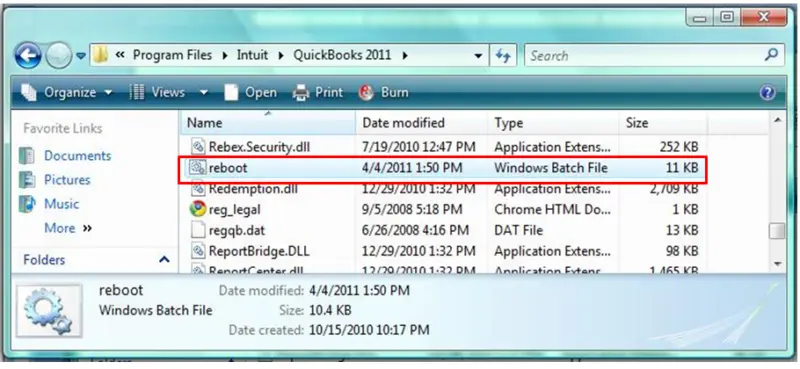
Start off with finding the Reboot.bat file under C:\Program Files(x86)\Intuit\QuickBooks xxx Ver 00.0 (xxx denotes the version of QuickBooks and 00.0 denotes the current version of QuickBooks)
Hit a right click on Reboot.bat file and then run the file as admin.
Head forward by opening the program to check if the QuickBooks desktop unrecoverable Error XXXXX XXXXX issuehas been resolved and if not, then reboot the system and try again.
Solution 5: Open a sample company file
According to the experts, when you open a sample company file, it helps in spotting if the unrecoverable issue is related to the company file or with QuickBooks itself. Thus, you can perform the below steps, so as to open a sample company file successfully.
It should be noted that if you are able to open the sample company file, then the company file might be damaged or the folder where the company file is saved might be damaged. In that case, we recommend you to try copying the file to some other location.
Another steps can be to use a recent backup or ADR to restore the file, if the error continues to trouble you. Moreover, you should carry out basic data damage fixing steps, if the backup or ADR isn't enough to get back on track.
Note that, if you are still facing similar warning message, then head to the steps ahead.
Steps to open a sample file
You can open the sample company file, from the No company open window by selecting the Open a sample file option.
Heading forward, go for any sample file on the list.
Steps to copy the company file to a different location
When you copy and open the company file from a different location, then it helps in spotting if the folder that has the company file is damaged or too deep, which means that it exceeds the file system path limitation. If in case you get the same issue even after moving the company file, then this indicates that either the company file or the QuickBooks installation is damaged.
In order to open the company file from different location, you are supposed to right click anywhere on the desktop and opt for New and folder options respectively.
You also need to name the folder QBTEST
Furthermore, right click the file and choose Copy option.
Along with that paste the company file in the QBTEST folder that was created earlier.
Towards the end, open the company file from the QBTEST folder.
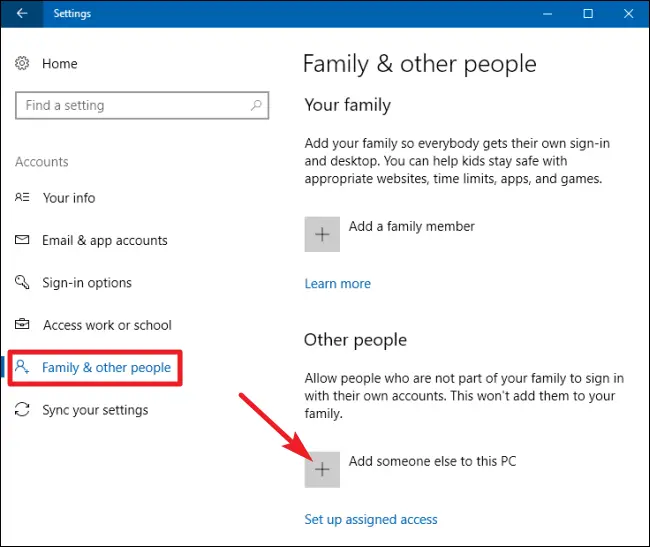
Firstly, hit a click on the Start menu, and then move to the Settings tab. Along wit that, opt for the Accounts tab, followed by clicking on the Family and other users tab.
After that, hit a click on the Add someone else to this computer icon, under the other users icon.
The next step in the process is to select I do not have this person's sign-in info icon. Also, hit a click on Add a user without Microsoft Account info.
Moving ahead, type-in the name of the New account, followed by selecting the Finish icon.
The point to be noted here is that, you need to Appoint a password to the new account in order to ensure security.
The next step is to select the Recently produced account, followed by selecting the Account type tab.
Once done with that, it is supposed to select the Administrator tab and then hit OK icon.
On Windows 8.1
For Windows 8.1, move to the Run window, and then press Windows + R key.
After that, type in Control panel and later select the OK option.
The next step in the process is to hit the User accounts tab, and then Manage another account tab, also hit Other accounts tab option, along with the Add an account tab.
Moving ahead, you need to sign in without a Microsoft account, followed by selecting the Local account tab.
After that, Enter the username, password, & password hint, also select the Next button.
You will then be redirected to the Manage other accounts window, and then you are supposed to choose the freshly built account, and then hit the Edit icon.
Coming to the end, select the Admin tab.
And lastly, hit OK icon.
Windows 8 as well as 7:
The first step is to press Windows + R keys, in order to open the Run window.
After that, enter the Control Panel, and select OK icon.
Followed by selecting the User accounts tab, and after that hit the Manage another account tab.
Next step is to select the Create new account tab, and then enter the name of the New account.
Moving ahead, you need to opt for Administrator tab, along with that hit the Create account tab.
Windows Servers
Windows Server 2012
The servers are maintained by the license system technician. You should follow the below steps:
Initially, you need to open the Database server manager.
Further, click on the Tools tab and select Computer management.
Later on, one needs to expand Local users and groups. Moreover, choose the Group's option.
Heading forward, one needs to double click on the Admin groups and then Open the admin properties Windows tab.
Moving ahead, you should click on Add option tab.
Now in the select Item users, computer systems, Service accounts and groups window.
Lastly, enter the account name which you wish to add into the local admin groups. Also, click on to OK tab.
Windows Small Business Server 2011 and 2008/R2
Under this process, you simply need to run the Windows SBS 2011/2008) console.
Furthermore, opt for Users and Groups.
Later on, choose Users tab.
Now go for Add a new user account to run the Add a New User Account wizard from the tasks pane.
You are now supposed to fill in the Details, and go for the Role for the new user.
Proceed with entering a Password for the new user. Also note that you will not be allowed to continue without entering a password. Moreover, the password should meet the complexity demands.
Choose Add user.
Pay heed to the instructions ahead and hit Finish tab.
Solution 7: Change the way you save the form
You can make use of either the Save and close tab or the save and new tab at the bottom of the form to save the transaction.
Next step is to avoid leaving the cursor on a blank line of the sales form. Or else leave the same on a line that has an item filled in
Now click on to be Printed before saving the transaction.
In order to print, Move to the file and print forms.
If you are receiving the QuickBooks desktop Unrecoverable error at the time of printing, make changes/edit the preferences.
You will have to firstly click on Preferences tab from the Edit menu.
And then hit a click on clear the Save transactions under the company preferences tab, before clicking the Printing checkbox.
The last step is to tap on OK to save changes.
Solution 8: Suppress the QuickBooks desktop
Step 1: To start with, suppress the desktop while starting QuickBooks
First of all you need to Press and hold the Ctrl key.
And then double tap the QuickBooks application icon.
After that, again press the Ctrl key, till the No company open window appears on the screen.
Step 2: Suppress the desktop while opening up a company file
Initially, you need to first choose the desired company file from the No company open window.
Once done with that, press and hold the Alt key, and also select Open icon.
Moving ahead, release the Alt key, if you are redirected to the Login details, and then type in the login credentials.
The point to be noted here is that, if you are not directed to the login page, then make sure to continue to press the Alt key.
And then, press the Alt key, followed by clicking the OK tab. You need to ensure that the Alt key is not released till the time the file opens up completely.
Fix QuickBooks Unrecoverable Error when performing a bank reconciliation or select a transaction for reconciliation
Well, it is highly recommended to fix the Adobe reader, in the event of QuickBooks desktop crashing with an QuickBooks unrecoverable error, when opening a PDF file or when reconciling with the help of an older version of Adobe Reader or Adobe Acrobat. The most important point to note here is that the error codes might vary. This particular error could be encountered when:
Adobe Reader 10.0, 9.0, or 8.0 is installed, along with that the preference for Display PDF in Browser is opted for.
Adobe 11.0 (XI) and later versions aren’t having the option for displaying the PDF in browser and display PDFs outside the browser by default, that might fix the issue later on.
Another important aspect to be taken into consideration is that if in case you have Adobe Acrobat 10.0, 9.0, 8.0, then you simply have to purchase a new version. The reason behind this is Acrobat being a paid program demands purchasing a new version, which means it isn’t free similar to that of Adobe reader. Just in case you don’t want to upgrade your version of Adobe Acrobat, you can skip the first solution.
Solution 1: Updating Adobe reader to the latest version
You need to head to the Adobe reader, and opt for the Help and About adobe reader options respectively.
If you are able to spot the versions like 8.0, 9.0, or 10.0, then you simply have to Upgrade to 11.0 by downloading the abode reader 11.0 from the official site.
Pay heed to the instructions to Install Adobe reader 11.0 and further reboot the system when finished with updating adobe reader to the latest release and also attempt to view the previous bank reconciliation report.
Solution 2: Changing the display PDF in browser preference
It should be noted that this method is only applicable and suitable for Adobe 10.0, 9.0, 8.0 only.
Under this process, you are supposed to opt for Programs/ All Programs from the Windows start menu, in order to view a list of installed programs.
You further have to pick the Adobe Reader/Acrobat.
It should be noted that the Adobe XI (11.0) and later do not display a PDF in the browser by default any longer. Thus, if you are using an older release, then only updating can resolve the issue.
Heading forward, you simply need to choose Edit and preferences tab respectively.
Coming to the Preferences window, you would have to choose Internet from the categories list.
Along with that click to Clear the display PDF in browser preference in the Web browser options section.
Chuck off QuickBooks Unrecoverable error when importing accountant's changes
Explore the procedures to be performed, when getting an unrecoverable error at the time of importing an accountant’s changes into a client ‘s company file. You might come across the following errors at the time of import. Do check out these quick methods in order to mend QuickBooks unrecoverable error while importing accountant's changes and exporting to excel once:
Unrecoverable Error 00000 16133
Unrecoverable Error 00000 41953
Unrecoverable Error 00000 42394
Unrecoverable Error 00000 43109
Unrecoverable Error 00000 16440
Unrecoverable Error 00000 42045
Unrecoverable Error 00000 40592
Unrecoverable Error 00000 41897
Unrecoverable Error 00000 42127
Unrecoverable Error 00000 31901
Unrecoverable Error 00000 41765
Unrecoverable Error 00000 95431
Unrecoverable Error 00000 37760
Unrecoverable Error 00000 31609
A worth considering fact here is that, the import process often mends itself from majority of such errors and finishes the process of import. Later on, you might see a report of the changes that couldn’t be imported and also the information related to what lead to such failure on QuickBooks. What should be noted here is that you can simply enter the unapplied changes manually to the client’s company file by performing any of the below steps and procedures.
Solution 1: Carry on with the import process
You simply have to pick the Send option whenever the issue appears.
Moreover, hit OK tab to resume the Import.
You might be able to spot a List, subject to changes that weren’t applied to the client’s file.
Not only this, you would be required to Enter the changes manually.
Solution 2: Verifying the data and recreating change file
For this, you simply have to restore any of the recent backup or the backup that has been created at the time of importing the accountant’s changes.
Can damaged company files cause Unrecoverable Error?
Yes, if the company file is corrupted or damaged, it may trigger an unrecoverable error while opening or working in QuickBooks. Running the Verify and Rebuild Data utility can help fix this issue.
How does the QuickBooks Tool Hub help in fixing Unrecoverable Error?
The QuickBooks Tool Hub provides multiple utilities like Quick Fix My Program and QuickBooks Program Diagnostic Tool, which help in repairing damaged program components causing unrecoverable errors.
What should I do if QuickBooks Unrecoverable Error keeps coming back?
If the error persists even after trying all solutions, you should contact our QuickBooks ProAdvisor. Experts can help repair installation files, recover data, and permanently fix the issue.
How can I identify an Unrecoverable Error in QuickBooks?
You can identify it when QuickBooks crashes and shows a pop-up with an error message containing a unique 10-digit numeric code in the format like XXXXX XXXXX.
Is reinstalling QuickBooks always required to fix this error?
Not always. In most cases, using Quick Fix My Program, suppressing QuickBooks, or repairing the company file can resolve the error. Reinstallation is needed only if program files are severely damaged.
Can damaged Windows components cause QuickBooks Unrecoverable Error?
Absolutely. Corrupted Microsoft components like .NET Framework, MSXML, or Visual C++ can interfere with QuickBooks functions and lead to unrecoverable errors. Repairing or reinstalling these components often fixes the issue.
Conclusion!
The above provided solutions in this article shall assist you in fixing the QuickBooks unrecoverable error in Windows that you are experiencing on your software. However, in case the issue still bothers you, even after trying all the solutions mentioned herein this post, then you can call our 24*7 QuickBooks enterprise support team. Our experts can be accessible through our dedicated helpline i.e. 1.800.761.1787.
QuickBooks is a brilliant accounting software that has create a buzz across businesses and accountancy sectors. But like any other computer software or application, this too isn’t completely free from errors and technical snags. While many common errors can be fixed by just following the on-screen prompts or with the help of a little troubleshooting, many may require a specialist for rectification. And in this post, we are going to discuss about a common accounting issue - QuickBooks crash com error – which is luckily fixable if you perform the right troubleshooting methods.
The "Crash Com Error" error is generally seen while you try to email an invoice to a client. This error suddenly appears in your computer screen. You should go through this segment carefully till the end to learn about the most credible ways to fix the QuickBooks crash com error. Alternatively, you can also get in touch with our support team and let them fix the error for you within the least possible time. Just dial our toll-free QuickBooks error support number i.e. 1-800-761-1787, and our experts will take over from there.
This post will familiarize you with the most effective methods to fix QuickBooks crash com error but before that, let us know more deeper about it. You should know that this error causes a lot of nuisance. Of course, it is quite annoying feeling to make all the changes in a receipt or invoice and not being able to send that to your client, right?. This error may be experienced after some changes or updates launched by Microsoft.
You may also lose the unsaved information or company data due to this error and we understand that it is a heavy-going feeling to lose the essential data. Please also note that encountering this error repeatedly might end up damaging the company file. So let’s now move on to know the causes responsible for this error code.
Valid Causes of QuickBooks Crash Com Error
QuickBooks crashing is a common error that may be triggered due to various type of reasons. Below, we have mentioned few causes behind to this error:
Synchronization fails with Windows or other components.
Methods to Deal with QuickBooks Crash Com Error (Unable to Mail Invoices)
Follow the below given methods in order to resolve the com crash in QuickBooks desktop:
Method 1: Toggle mail settings
The first step is to navigate to Control panel and then go to the User account.
After that, select the Mail option, followed by clicking on Microsoft Outlook.
Moving ahead, you need to select Show profile under the profile option.
Followed by selecting the Outlook option.
In case the Always use this profile option is selected, then make sure to select the Prompt for a profile to be used, and then hit Apply button.
After that, select Always use this profile option.
And lastly, you need to click on the Apply option, and then hit OK button.
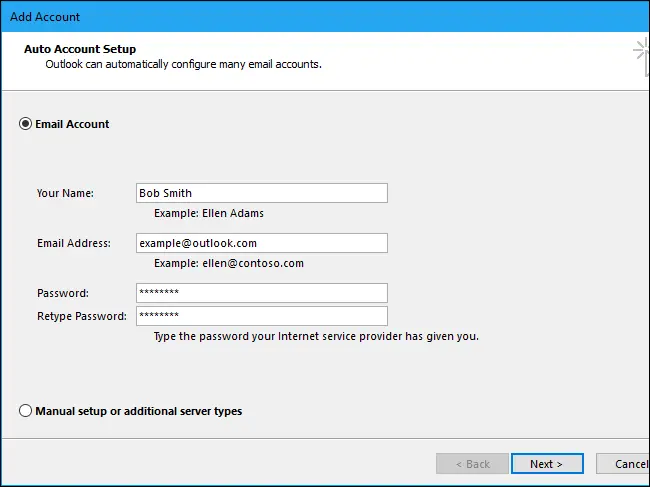
Method 2: Adding an Email Account to Microsoft Outlook
Under this method, go to the File menu in the Microsoft outlook.
After that select Info followed by adding account to begin with the setup process.
In the next step, enter the Email address that is to be added and then hit Next.
Now wait for Microsoft Outlook to select the server and then click Connect.
After that, enter the password and press OK button.
At last, select OK to complete the setup process.
If in case QuickBooks is unable to detect Microsoft Outlook, follow the steps provided below to see if it’s one of the email options:
First of all, open QuickBooks desktop.
After that, go to the Edit option and choose Preferences.
Next, select the Send Forms option.
At last, you need to select My Preferences option.
The point to be noted here is that if you are unable to find the Microsoft Outlook, then you might need to restart the system and repair QuickBooks desktop. You might also need to create a new Windows user profile.
Method 3: Creating a new Microsoft outlook email profile
First of all, close Microsoft Outlook, then go to the next step.
In the net step, move to the Control panel and then go to User account.
After that select the Mail option.
And hit a click on Show profiles in the mail setup window, followed by selecting Add option.
Later head towards, you need to enter your name, in the Profile name field.
Once done with that, you will have to press OK button.
After that, follow the on-screen prompts, in order to Add an email account.
The final process is to select Apply option and OK option respectively.
The point to be noted here is that, this doesn’t delete the existing Outlook profile.
Method 4: Setting up Microsoft Outlook as the default mail app
If the above provided solutions did not work and fail to resolve the problem, you can set Microsoft Outlook as your default mail app, which would help to rectify the QuickBooks crash com error to certain extent. The following are the steps involved in this procedure:
First of all move to Control Panel and then Programs.
After that select the Default programs.
And then, opt for Set your default programs option and then Mail option.
Now select Outlook, and Save the settings.
Move to the next method if the error keeps persist.
At the end of this method, you will have to open some other report or a form and then make an attempt to email it, to check if the crash com error continues to trouble you.
Method 11: QuickBooks desktop and company file fine-tuning
First of all, open and update QuickBooks to the latest version.
And then make an attempt to manually update QuickBooks, if any update errors can be seen.
After that, you will have to open and verify the QuickBooks company file, to verify the integrity of the company file data.
Followed by opening the item on which the crash com error was seen.
You are expected to open some other report or a form and then try to email it to check if the error continues.
We have tried to enlist 11 of the most useful methods to fix the crash com error in QuickBooks in this post. However, there are certainly some other ways to fix this error too. The methods provided in this article should usually work for you. In case the issue persists or reoccurs, you can also consult a professional. For which, you can dial our direct helpline number i.e. 1-800-761-1787 and discuss the issue with our QuickBooks enterprise technical support team. We are a hub of technocrats and strive to provide the best possible and highly customized solutions to our clients in the least possible time.