Landing upon errors in QuickBooks can be extremely frustrating, especially errors like QuickBooks error 15225. This is basically an update error that falls under the category of QuickBooks 15xxx errors. While the error appears when you download payroll update, fixing it is possible with the right steps and solutions. You can come across QuickBooks error code 15225 due to network connectivity issues, or misconfiguration of internet settings, also in case of outdated security certificates.
To help you understand the error, we have come up with this guide sharing the complete information related to the same. Keep reading to find out what actually can help you resolve such error. However, to get technical assistance related to this error, feel free to call us at our helpline. Our support team will help you in resolving all your queries.
What causes QuickBooks error 15225?
You might land into QuickBooks error message 15225, due to some of the common factors like:
Misconfiguration of Microsoft Internet Explorer leading to failed QuickBooks downloads.
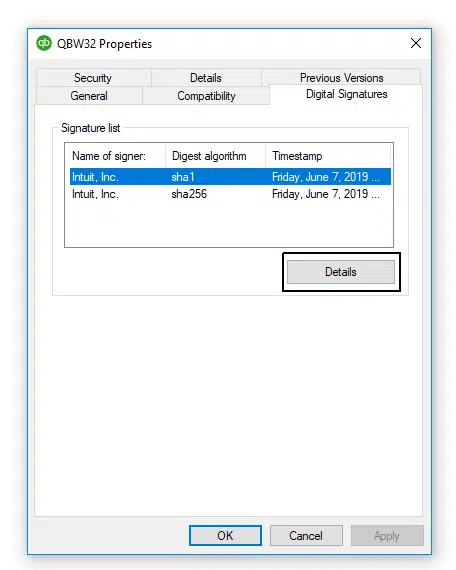
Another reason can be if the software fails to verify the digital signature of the files downloaded, and this could end up in error 15225.
If your internet settings are a bit wobbly, then you can definitely come across this particular error.
Fixing the error becomes easy, once you have the right methods in handy. Here we have tried to jot down the common solutions that you can try out to permanently get rid of QuickBooks error 15225.
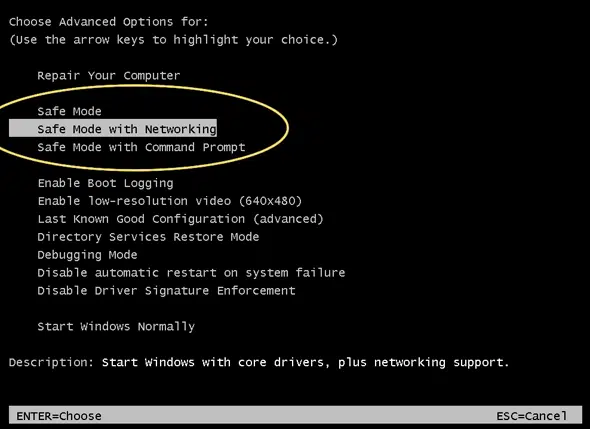
Method 1: Updating the QuickBooks desktop in safe mode
Clearing the SSL state is a troubleshooting step that can help resolve some SSL-related errors in QuickBooks. Here's how to clear the SSL state in Internet Explorer:
Under this methods, firstly open your Internet Explorer and click on Gear icon.
After then select Internet Options from dropdown menu.
Then click on Content tab.
Now under the Certificates section, hit a click on Clear SSL state button.
A confirmation window will appear. Click OK to clear the SSL state.
Lastly, close and reboot Internet Explorer.
After clearing the SSL state, try updating QuickBooks or downloading the payroll update again.
Conclusion!
Still experiencing QuickBooks error code 15225? Well, if that is the scenario, then connecting with our technical support professionals will help. You can dial our QuickBooks support toll-free 1-800-761-1787 and your queries will be addressed by the technicians. Our QuickBooks payroll error support team is well-versed with the solutions to fix all sorts of QuickBooks errors and would definitely help you in permanently fixing the glitches in QuickBooks.
FAQs related to this error
What is QuickBooks Error 15225?
It is an installation error in QuickBooks that appears when users install or update the software.
How to avoid QuickBooks errors?
Here are some tips to avoid QuickBooks errors: 1. Keep your QuickBooks software up to date. 2. Backup your company file regularly. 3. Use a strong and unique password to protect your QuickBooks account from unauthorized access.
What are DIY steps to fix this error?
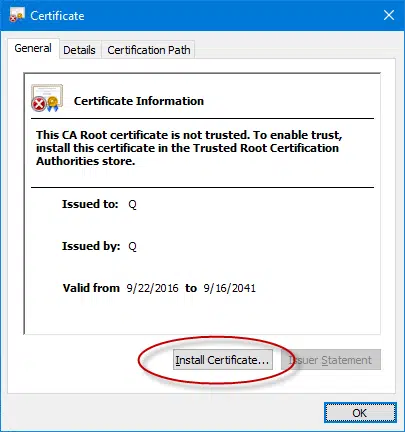
You can fix this error by performing following methods: 1: Update QuickBooks desktop 2: Add Intuit to the trusted sites list 3: Install Digital Signature Certificate
Confused what QuickBooks BEX error is all about? While the error seems to be a bit unique, fixing it involves some basic steps. QuickBooks BEX error usually appears indicating that QuickBooks has stopped working with problem event name: BEX. You can experience the BEX error in any of the Windows Operating System Version. And the error further can affect Microsoft Outlook, Mozilla Firefox, Internet Explorer, and other related applications.
To help you get a better understanding of this complicated error, here we are with this informative post sharing what the error is all about, its causes, and effective measures that you can perform to get rid of the QuickBooks BEX error permanently. Thus, stick to this segment till the end. For live technical support, feel no hesitation to reach out at the helplineat 1-800-761-1787.
BEX error is considered to be a buffer overflow exception error that shows up when the software tries to save information on a memory block. The QuickBooks BEX error is seen when the software crashes stating QuickBooks has stopped working. Furthermore, the same error is caused under the Fault Module Name that can be different depending upon the scenario.
What leads to QuickBooks BEX error?
You can come across QuickBooks BEX error due to the following factors:
One of the core reasons can be damaged Microsoft components such as .NET framework and Visual Basic C++
Another reason can be if the third-party applications on Windows is interrupting the smooth working of the software.
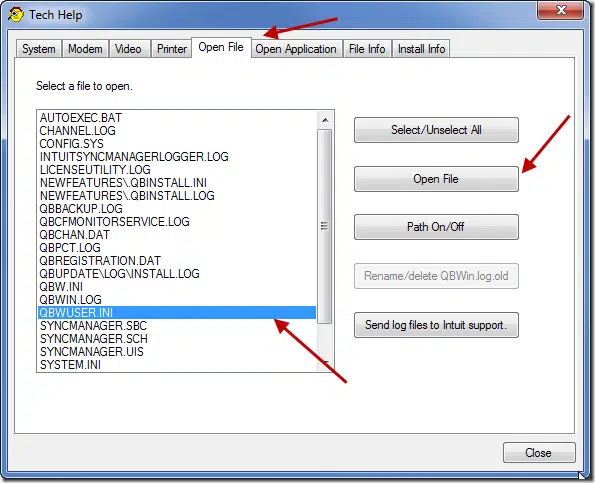
You can further end up in BEX error, if the QBWUSER.INI file is either damaged or missing.
Moreover, if hard drive is somehow corrupted, then you can land into BEX error in QuickBooks.
You can try resolving QuickBooks BEX error by implementing the set of steps below:
Method 1: Installing Windows updates
To fix this BEX error, you need to check if your Windows version is compatible with the software. If not, then you simply need to update your Windows operating system to the latest release.
To start the process, press the Start button and type Windows Update on search box.
After that select Check for Updates option.
Now Windows will connect to the server and check for any available updates.
If any updates available, click on Install now.
Lastly restart your system and let these updates install automatically.
Method 2: Download and Run QuickBooks Install Diagnostic tool
For older QuickBooks versions:
This process requires you to download QuickBooks install diagnostic tool.
Furthermore, you need to save the file on the desktop and further exit the application on Windows.
Followed by double clicking on QuickBooks install diagnostic tool from the desktop.
Now, wait for the process to complete. This might take some time.
You need to further restart the system and try re-running QuickBooks.
For newer QuickBooks versions:
You need to download the QuickBooks tool hub on your PC.
After that, install and run the tool hub program.
Once the tool hub program open up, go to Installation Issues tab.
Even though the QuickBooks BEX error is unique and a bit complicated, fixing it with the help of the above shared procedures becomes easy. However, if you aren’t pretty sure how this fixation works, then connecting with our QuickBooks error technical support professionals at 1-800-761-1787 would help. We have a dedicated support team ensuring that all the issues faced by users are fixed properly and you enjoy smooth QuickBooks software.
Frequently Asked Questions
What is QuickBooks BEX error?
QuickBooks BEX error is a technical error that pops up when users try to open QuickBooks.
Can a hardware issue cause BEX error?
Yes! Hardware-related issues in the system can potentially lead to BEX error.
What are the common causes of QuickBooks BEX error?
Corruption in system files, Windows compatibility issues are the most common causes behind to this QuickBooks BEX error.
Get familiar with 5 different ways to troubleshoot QuickBooks Error 6007
Dealing with errors in QuickBooks isn’t that difficult, especially when you know what actually can be done to resolve the error. Talking about Error 6007, it is basically a 6000 series error that is associated with the company file. And the core reason behind the occurrence of this error and similar issues can be if the company file gets damaged somehow. QuickBooks error code 6007 is termed as sync manager error and is a complicated issue that needs to be resolved as soon as possible. You might come across a warning message stating:
Error 6007: There was an error while connecting to your company file: QuickBooks is in single-user mode.
What is QuickBooks Error 6007?
Error 6007 in QuickBooks is a problem that happens when QuickBooks cannot open your company file. Also, this error is a result of some damaged files pertaining to the QuickBooks sync manager. Due to this error, users are unable to sync their data in QuickBooks. To help you get through the QuickBooks error 6007, here we are with this segment discussing the actual causes and fixes for this error. For immediate technical assistance, feel free to communicate with us at the helpline 1-800-761-1787.
What can cause QuickBooks error code 6007?
Ending into error message 6007 in QuickBooks is possible due to the following factors:
One of the core reasons behind sync manager error can be damaged company file.
Using an outdated QuickBooks sync manager can often lead you to QuickBooks error 6007. Here is how you can update QuickBooks sync manager and get rid of the error easily.
Begin with, you need to click on Help menu.
Followed by, select the Manage data sync.
Heading forward, you need to choose the Reset option and hit the OK tab.
Also, use admin credentials to log in to the system.
After you log in, the sync manager will start the sync process for you.
And now you need to access your QuickBooks and the company file to check if there are any errors.
Method 4: Update QuickBooks to the latest release
Updating QuickBooks can definitely help you resolve error message 6007 in QuickBooks. The steps to be performed here to update QuickBooks to the latest version are:
The very first step is to close QuickBooks, in case it is open.
Now, you will have to opt for start menu in the Search bar.
And then, enter QuickBooks.
You need to then, right-click to choose Run as admin.
This will open the No company open window.
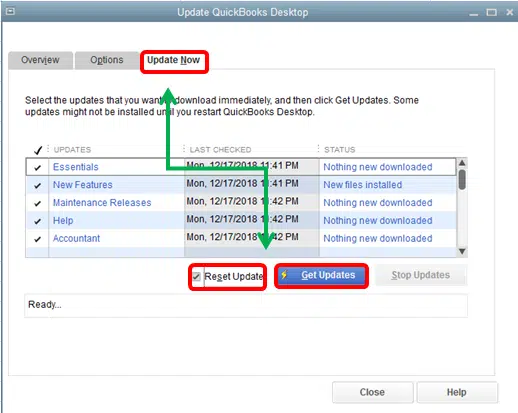
And further, click on the Help menu and go for the Update QuickBooks desktop option.
Select options and then click on Mark all.
Go for Save option.
And you must use the update now tab and further click on the Reset update checkbox.
Towards the end, you need to manually update QuickBooks and go for Get updates.
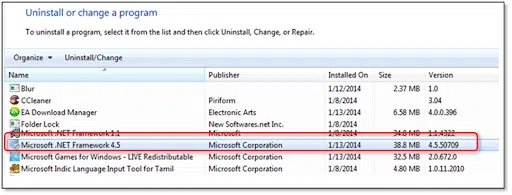
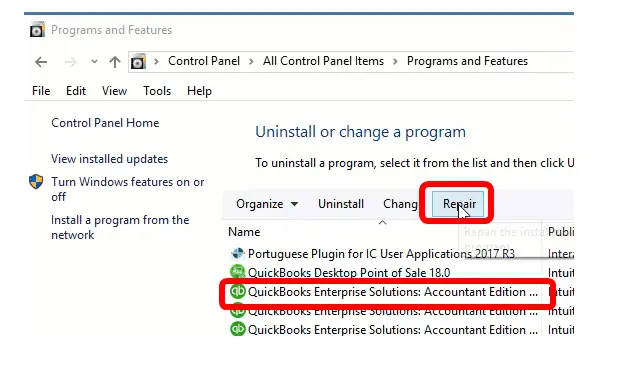
Press the Start button and type Control Panel on the search box.
After that click on Programs.
Now hit on Uninstall a program from Programs and Features.
Here search for QuickBooks from the list of installed programs.
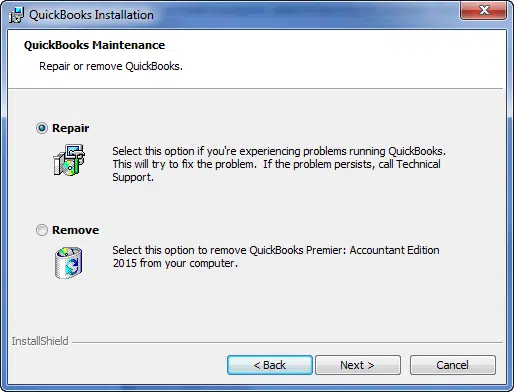
Once done, click on Uninstall/Change and then select Repair opt.
Follow the instructions that show up on the screen to complete the repair process.
Summing Up!
Were you able to fix the error code 6007 in QuickBooks using the steps and methods shared above? If not, then you definitely need some professional guidance. You can simply give us a call at 1-800-761-1787, and no matter what the error is, our QuickBooks enterprise technical support experts ensures that your issue is addressed immediately. With technical guidance, you will be able to use your QuickBooks software smoothly.
Frequently Asked Questions (Faq's)
What is QuickBooks sync tool?
The QuickBooks Sync tool is a feature rolled out by Intuit for creating and saving your important QuickBooks Desktop.
How can I access the Sync option in QuickBooks Online?
The procedure for accessing the Sync option is given below: 1. Login to your QuickBooks account. 2. Click on the User Preferences option. 3. Now hit on Integrations option. 4. Finally, click on QuickBooks Sync option.
What are the signs of Error 6007?
Following are the symptoms to identify this error: 1. You cannot open or access your company file. 2. QuickBooks shows an error message about single-user mode. 3. The sync manager fails to launch or crashes. 4. The program becomes slow or unresponsive when opening files
Will I lose my data because of Error 6007?
Generally, you will not lose your data, but you may not be able to access it until the error is fixed. It’s a good idea to back up your company file regularly to avoid data loss.
What are the requirements to rectify QuickBooks payroll Error PS038?
1. Make sure the company file is not open in single-user mode on another computer. 2. Install the latest updates for QuickBooks Desktop. 3. Go to the Help menu, find Sync Data Manager, and reset or update it. 4. Use the QuickBooks File Doctor tool to fix any file damage.
Convenient ways to go for fixation of QuickBooks Error code 9997
Did you see QuickBooks error code 9997? This particular error code shows up when QuickBooks Online software fails to connect with the bank to display the latest transactions. As analyzed by our experts, this error is a common scripting error that can be seen due to some sort of cache and cookies issue. While fixing the error involves some basic steps like updating bank feeds manually, or deleting the browser cache or the temporary files. However, before you find out the right fix to the error, it is crucial to understand what actually leads to QuickBooks error code 9997.
So, let us together find out what causes this error in QuickBooks and what methods can be performed to fix the issue permanently. However, if you feel any need for technical assistance, then, in that case, you can reach out to our technical support team directly via our helpline number i.e., 1-800-761-1787, which comprises certified experts with years of experience under their belt.
Updated Methods to get rid of QuickBooks Error Code 9997
While the factors causing the issue are clear in the above segment, here is how you can actually get rid of the QuickBooks error 9997. Let us evaluate the effective methods that you can opt for to get rid of the this error in QuickBooks successfully.
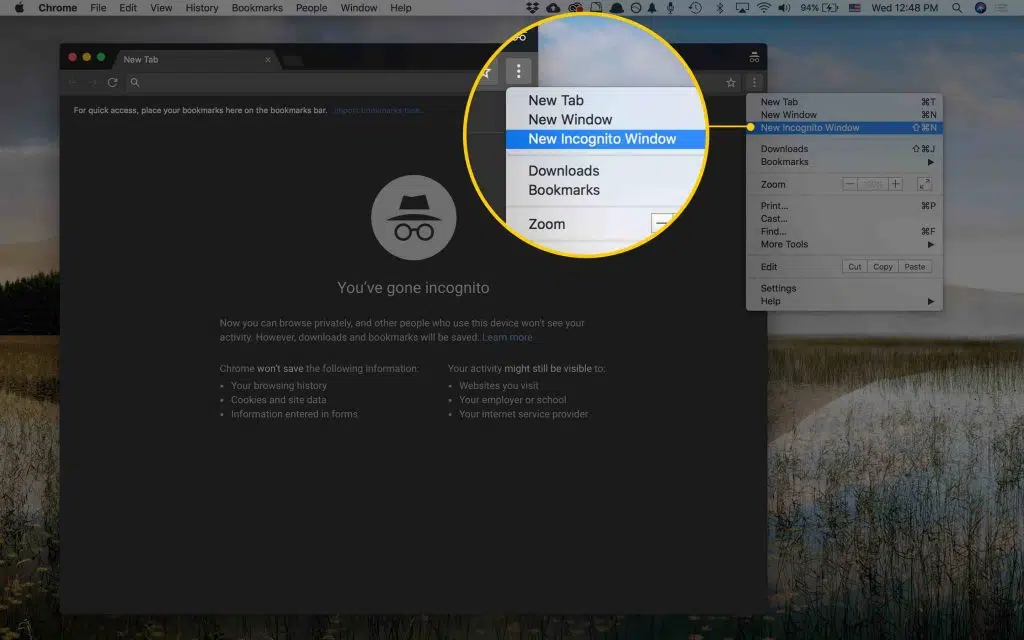
Method 1: Go for Incognito Browser
If none of the above steps helped you in fixing the error 9997, then all you need is to try using the incognito browser.
At first, you have to open the Incognito mode and login QuickBooks.
Once done with that, go for the Banking icon and then click on the Pencil option to Edit.
After that Edit sign-in info option to move to the next section.
The next step is to Edit the transaction in the Banking section.
You also have to Edit the transaction.
And then, click on Review tab to review the entire series and check if the issue gets resolved.
Method 2: Changing the file extension
Renaming the file extension can help you in resolving error 9997.
Begin with renaming the file extension.
And further, you need to open the file on another system and check if it works.
Once done with that, you need to reinstall QuickBooks file.
Furthermore, run an antivirus program.
Method 3: Updating Windows
Under this method, click on Start button and type ‘’Update’’ in search box.
And further, double-click on System update icon.
Now tap on Check for Updates button.
This process will connect to Windows server and check the latest updates for your system.
Choose all essential updates and tap on Install button.
Once the updates installed successfully, reboot your system.
Well, if the error shows up due to some lost transaction, then recreating it would surely help. You need to perform the steps for creating the transaction manually by the transaction log file. The steps involved in recreating a transaction are:
To start off with, you need to open the folder where the company file is saved.
Furthermore, click on the Settings tab.
Also, choose Audit and see what transaction isn’t present.
You further have to Re-enter transaction with the original date.
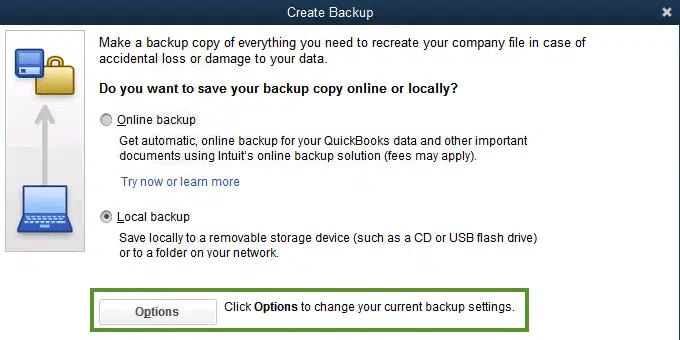
Method 5: Restoring backups
You need to restore the company file and this would help you in fixing such errors in QuickBooks.
To begin with, you need to launch QuickBooks.
Further, you need to Open the company file.
Followed by finding out an option Open and restore the company.
You also have to click on the Restore and backup copy option and select whether you wish to save it online or Local backup.
Then hit on Next tab.
Now go for the file in the QBB extension and then choose the destination.
Do not miss onto restoring the file in QBW format. And then click on enter to complete the process.
Lastly, enter "Yes" button and again "YES" to overwrite the process.
Method 6: Optimizing Windows Settings
You need to uninstall the security software apps that you might have installed recently.
Further change the Windows OS settings and also turn off the firewall.
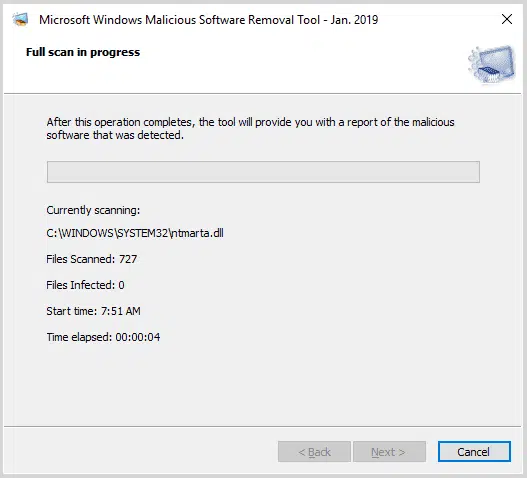
You should also check for any viruses within your system and remove them at the earliest. For this, you should go for a complete system scan from your antivirus software or Windows defender. After removing any virus-infected files, re-access your QuickBooks to check if the error code 9997 got sorted out.
Method 8: Perform system restore
Press Windows Start button and type Windows restore.
Hit on Enter key to open it.
Double tap on System Restore option now.
Now, you are required to opt for a restoration point and enter the Admin password.
Choose Restore and wait for the procedure to finish.
Restart your computer after you are finished, then access QuickBooks Online through your web browser to see if Error Code 9997 got fixed.
As you reach the concluding lines of this segment, you might be able to get rid of the error code 9997 permanently. If the above steps and solutions weren’t much helpful in fixing the QuickBooks error 9997, then you definitely need to connect with our technical support professionals. Our QuickBooks online error support experts are available at 1-800-761-1787, and you can directly speak to our technicians and let them fix the error on your behalf. Our professionals understand what it actually takes to resolve the issue permanently.
FAQs related to banking error 9997
What is online banking error in QuickBooks?
Online banking errors belongs to script errors that may appear when QuickBooks is unable to connect to the financial institution.
What causes Error 9997 or related errors in QuickBooks?
Some of the main causes behind such errors are: 1. Poor internet connectivity 2. Backend server maintenance is going on 3. Excessive of system junk and temporary files 4. A virus intrusion may also lead to this error
How to fix banking errors in QuickBooks?
These online banking errors can be fixed by conforming to the below-given methods: 1: Use the incognito browser mode 2: Restore the company file backup 3: Removal of system junk 4: Scan the system for viruses
Learn how to fix QuickBooks error code 1406 when there is an update from a firewall or any security program installed on your computer:
While updating or installing QuickBooks desktop, it might drag you into QuickBooks error code 1406. The error might show up out of nowhere and indicate some sort of issue with the registry key. It is an installation error that usually encounters when QuickBooks cannot write to certain files or registry keys during installation or updates. This stops the software from installing or updating properly.
This error is a common error and it becomes super easy to troubleshoot it, once you know the actual reason behind to it. We have tried to cover the core reasons, as well the solutions that you can try to fix this error in this segment. Thus, keep reading this piece of information till the end. However. if you are not that good in technical aspect, then in such case, reach our experts through our helpline i.e.,1-800-761-1787. Our technical support team will assist you in every possible way.
What is QuickBooks Error 1406?
QuickBooks install error 1406 usually encounters while trying to install the QuickBooks software. It is known as a common error and can be fixed by using some instructions. This error might also occur due to any damage caused to your Windows Registry. When this encounters, you might get the following error message on your screen:
Error 1406. Could not write a value to key. Verify that you have sufficient access to that key, or contact your support personnel.
Why does QuickBooks install error 1406 occurs?
There can some common reasons leading to QuickBooks error 1406. Few are as given below:
Windows installer can be a common reason.
You can further end up in this particular issue if another program (like antivirus or firewall) is blocking QuickBooks.
Or if your software itself is damaged or installed incorrectly. Well, there is a high probability of your software being corrupted in this scenario.
An outdated QuickBooks version can also drag you into this problem.
Multiple users are installing QuickBooks at the same time.
The Windows registry is damaged or you don’t have permission to change it.
Symptoms of QuickBooks Error 1406
Here are some sign and symptoms of error code 1406:
A pop-up or warning message will appear on the screen.
A sudden shutdown of your computer gives an indication of this error.
Updated Solutions to Fix QuickBooks Install Error 1406
While the list of solutions can be huge, but not every solution can be effective. So, here we have tried to jot down some tried and tested methods to fix QuickBooks error 1406. Let us apply each of the methods and find out the best suited one for you.
Solution 1: Repairing Windows Registry
To begin with, press Win + R keys to open Run Window.
After that type Regedit in run box and hit the Enter key.
It will open the registry editor window.
Now move to the following path within the registry:
Lastly confirm that all keys are assigned to Administrators group.
Solution 2: Turning off the windows defender temporarily
You need to turn Windows defender ON or OFF, this can be found from the search bar and under the Windows security app.
Later, choose the Manage settings option under the settings menu.
You will also have to turn off real time protection.
After you disable the software temporarily, try rerunning the QuickBooks and checking if the issue is resolved or not. Also you have to disable your antivirus.
Hit a right-click on Antivirus icon from the taskbar.
After that, select Turn off/disable the antivirus protection.
Now, restart your computer and launch the QuickBooks software to check the error got rectified or not. If still the error appears, move to next solution.
Solution 6: Allow enough permissions for 'data.dat' file
At first, you need to press Windows and E tabs to open Windows explorer .
After that, go to the Organize tab.
Then, select Folder and search options.
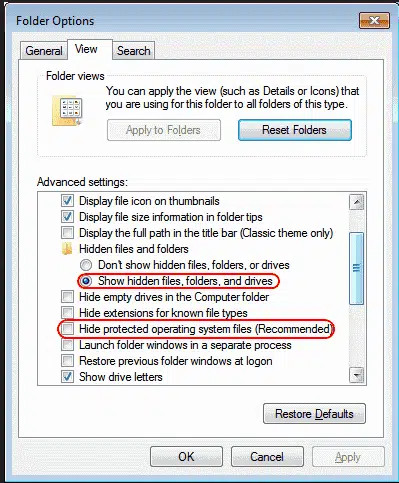
The next step is to click on View tab and then go for Show hidden files, folders, and drives.
Now uncheck Hide protected operating system files option and further click on OK tab.
You are then required to head to the directory using the path: C:/Users/All Users/Microsoft/Office/Data.
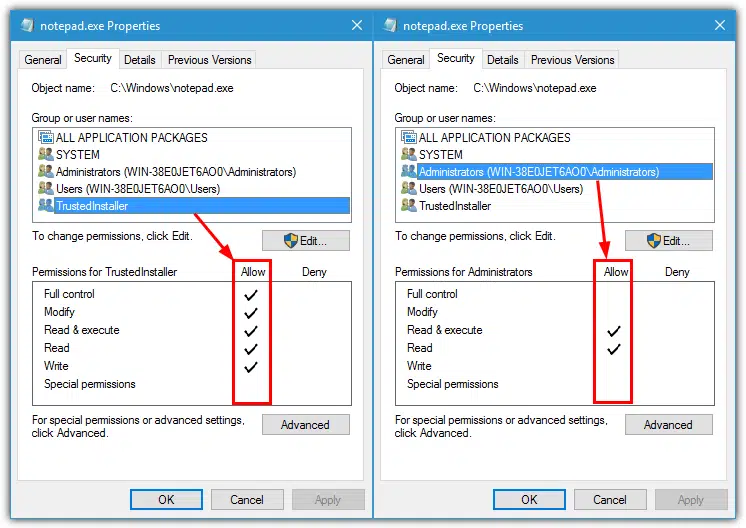
After this, right click on opa12.dat file or data.dat file.
Now, choose Properties tab.
Also, click on Security tab.
You further have to click on Advanced tab.
Followed by, click on Permissions tab and then go for Pencil icon.
Choose the list and hit on the Edit option.
You need to check the box for Full control and hit OK tab.
Conclusion!
Now that you have managed to reached the end of this informative article, getting rid of QuickBooks error 1406 might become easier for you. In case you continue to face the same error even after performing the steps discussed above, then you definitely need to contact our QuickBooks error support professionals and our certified ProAdvisors will ensure to answers your questions within no time. Our team is accessible 24/7 and is always available.
Sometimes, Yes. Security software can block QuickBooks from installing or updating. You need to turn off your antivirus temporarily first then install or update QuickBooks, and turn your antivirus back on.
Can Error 1406 damage my QuickBooks data?
No, this error usually occurs during installation or updates. Your existing company files and data are not affected, but you won’t be able to use QuickBooks until the error is fixed.
Does repairing the software can resolve this error?