Noticed QuickBooks error 15107 and can’t decide on to the right fix? Well, you might witness this particular error in QuickBooks at the time of updating or installing QuickBooks payroll updates. It is accompanied with a warning message stating: The update system cannot be initialized. While the error simply hinders the smooth installation process, fixing it immediately becomes essential to continue using the software. You might get the following error message on your desktop screen:
As it is a payroll update error, the solutions are almost similar to other related errors. However, we have jotted down the quick and effective solutions that you can implement, in order to get rid of the QuickBooks error 15107. Let us together evaluate this error in the segment below!
What actually leads to QuickBooks error code 15107?
A bunch of factors can trigger such errors in QuickBooks, let us understand the major reasons behind QuickBooks error 15107:
Just in case the payroll files are damaged, you can definitely end up in this particular issue.
Another cause can be if the registry files are corrupted due to some reason.
Not just that, but if the firewall is blocking the connection between servers and QuickBooks, then you can land into error 15107.
Also, in case you are using an outdated software and it is showing compatibility issues.
Unsuccessful installation of QuickBooks may lead to various type of technical errors in QuickBooks including this error.
QuickBooks Desktop might not be updated to the latest release, can be also a reason behind to such error.
While there can be endless methods to resolve the error, here we have discussed the ones that can definitely help in troubleshooting QuickBooks error 15107.
Method 7: Installing digital signature certificate
This process requires you to move to the path: C:\Program files (x86)\ Intuit\QuickBooksXX (XX means the QuickBooks version being used).
Followed by entering QBW.exe
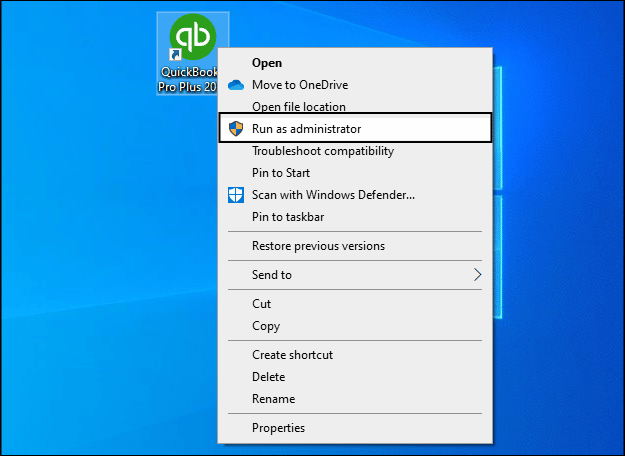
And then, right click qbw32.exe file.
The next step is to click on Properties tab.
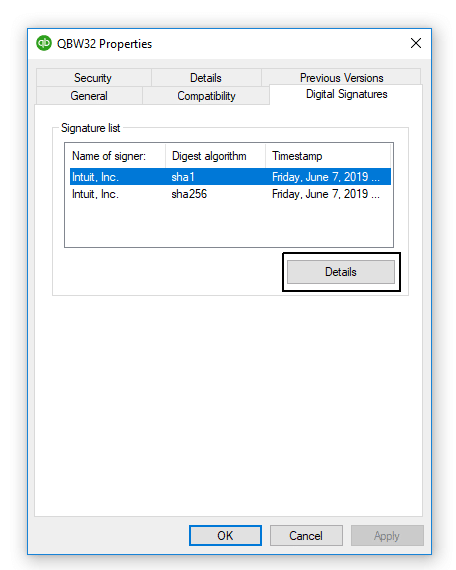
Look for the Digital signature.
Post that, choose Intuit from the list.
And then, click on Details tab.
Heading forward, you need to View certificate tab and choose Install certificate option.
Click on the Finish tab.
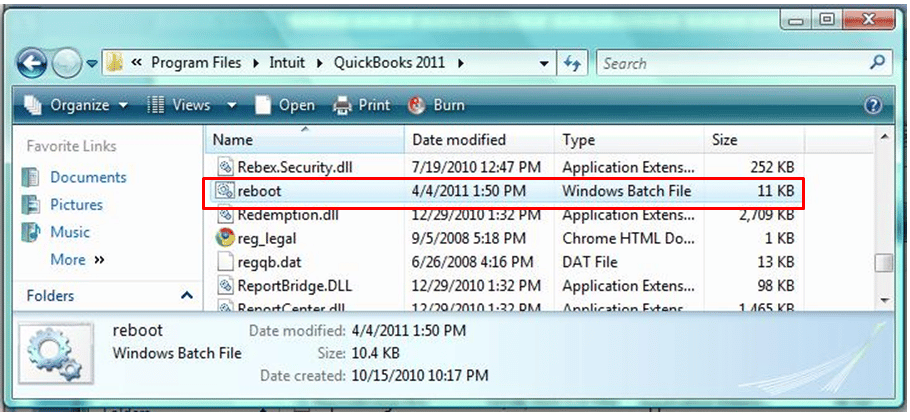
Followed by, opting for reboot the system.
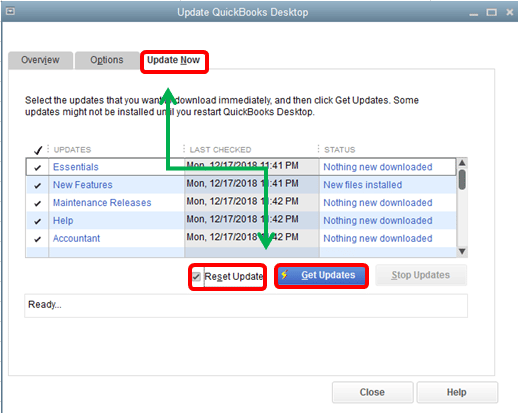
And lastly, download the update and check if the issue gets resolved.
Conclusion!
Technical errors like error 15107 can be a bit challenging for you to fix, but once you have a grip on to what actually resolves the error, it can get a bit easier. Hopefully, as you reach the end of this segment, you will be able to get rid of the QuickBooks error 15107, if not, then simply ring us up at 1-800-761-1787, and our 24/7 QuickBooks payroll error support professionals will ensure that you get the answers you are looking for. For more details, give us a call and let our professionals fix the issue for you.
FAQs
What is QuickBooks Error 15107?
Error 15107 is an update error in QuickBooks.
What is the main cause of QuickBooks Error 15107?
The primary cause of this update error is damaged installer, server timeout, poor internet connection and damaged Windows Registry.
A complete guide to use alternate vendors in QuickBooks enterprise solutions
When you are working with multiple vendors, it becomes essential to keep a track of things such as pricing or lead times and this can be tricky. Not just that, but this might vary from vendors to vendors. Thus, the option of using alternate vendors can be a quick and easy solution for this issue. Using alternate vendors makes it way easier for you to match your vendors items with the inventory. While purchase, you can simply compare and opt the vendor to purchase from at any given time.
In this segment, we have tried to help you with how to use alternate vendors in QuickBooks enterprise solutions. To get a better understanding about it, make sure that you keep scrolling the segment till the end. Or you can also get in touch with our professionals, and they will help you out in carrying out the process without any sort of error.
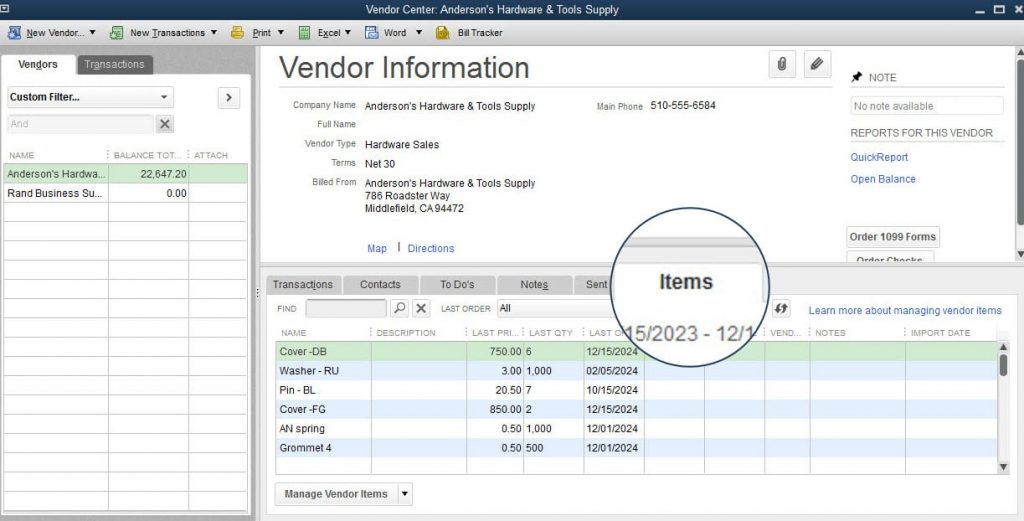
Steps to view vendor items
Well, the vendor item list carries the details of all inventory and non-inventory purchases from vendors in the last 12 months. This further includes the purchase date, price, as well as the quantity. All you have to do is to continue with the steps below:
You need to first go for Vendors.
Furthermore, select the Vendor center.
Now, go for the Vendor and then opt for the Items tab.
Steps to upload a vendor price list
In case you are working with a new vendor, then you can simply import their price list. This can include the item pricing, lead time, unit of measure, and also the part number.
Here, you need to choose Vendors.
Further, select the Vendor center.
Also, choose Items tab.
Now, go for Excel and later choose Import from excel.
Under this section, you should ne noted that you can assign up to 4 alternate vendors so as to display for an inventory item. And when you make a purchase order, it makes it simple to see the preferred vendors for specific items. You need to continue with the steps ahead for assigning alternate vendors for inventory.
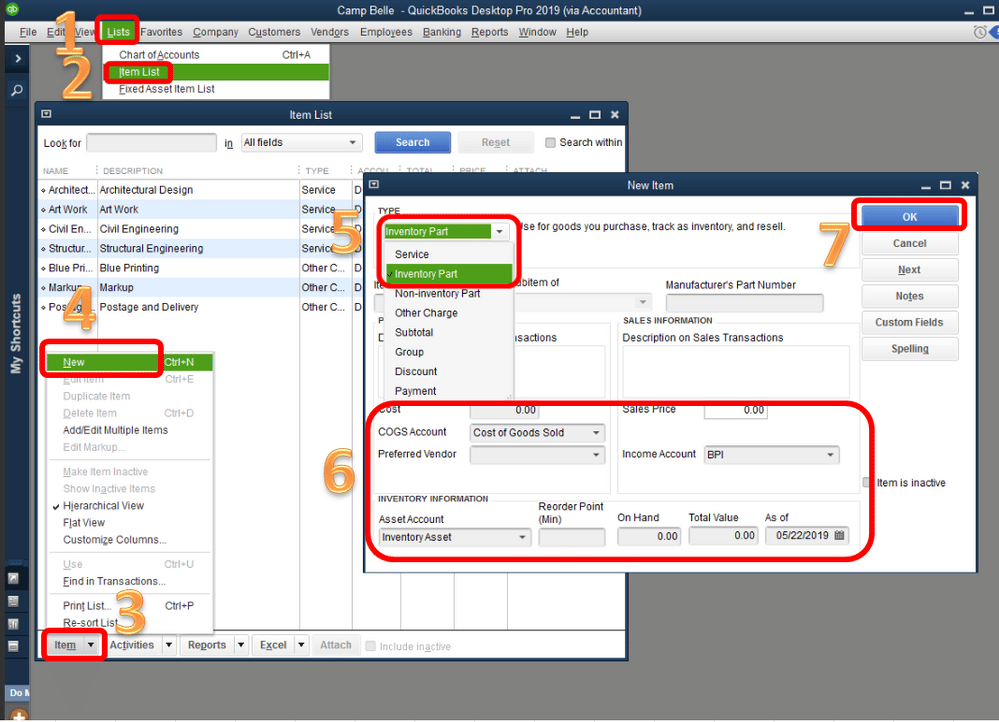
At first you need to go to the Lists.
Then, select Item list.
And then, go for Inventory item and then select the Edit item. (Double-click the item you want to edit.)
Also, choose Manage vendors and then assign the Vendors to inventory items.
In last, save your changes.
Steps to compare vendors
In the last step, you can simply compare alternate vendors with the preferred vendor at the time of inventory purchase. You need to continue with the steps ahead and begin the comparison:
Create a Purchase order and Add minimum two items.
Select an Inventory item and then choose Compare vendor icon.
This will show your vendor price lists and all vendors that you have purchased from in the last 12 months.
You now have to select a Vendor and then go for View vendor prices.
The next step is to choose View the amount associated with the last purchase order or the price you imported from the vendor.
Carry out the third step in order to see the total purchase order amount in case you used a different vendor.
As you reach the end of this particular segment, we expect that the above provided step-by-step process for using alternate vendors in QuickBooks Enterprise solutions become way easier. However, if you still have some doubts that are to be addressed, then reaching out to our technical experts at 1-800-761-1787 would definitely work for you. Our technicians would ensure to help you with your queries within no time. Do not hesitate in connecting with QuickBooks support team, as QuickBooks enterprise can be a technical software for you to handle.
FAQs
Why should I use Alternate Vendors?
1. Compare prices and lead times for the same item from different vendors. 2. Easily switch suppliers if your preferred vendor is out of stock or has higher prices. 3. Keep all vendor details organized in one place for each item. 4. Follow up by choosing the correct vendor from the list. 5. Make smarter purchasing decisions by seeing all options at a glance.
Can I track pricing and terms specific to alternate vendors in QuickBooks enterprise solutions?
Yes! You can track pricing and terms that are specific to alternate vendors in enterprise solutions.
Is it possible to run reports on purchases made from alternate vendors in QuickBooks Enterprise Solutions?
Yes! You can run reports on purchases made from alternate vendors in QBES.
How many alternate vendors can I add for each item?
You can assign one preferred vendor and up to four alternate vendors for each inventory item. This helps you have several backup options for purchasing the same item
Does this feature work for all item types?
No, the Alternate Vendors feature only works for inventory parts. It does not support services or other item types.
What if I don't see the Alternate Vendors option?
Make sure: 1. You are using a supported version of QuickBooks Enterprise (Platinum, Gold, or Diamond). 2. The Advanced Inventory feature is turned on. 3. You are working with inventory parts, not services or other item types.
Learn all about QuickBooks Desktop hosting: Host QuickBooks Company file in multi user mode:
Are you looking for a one-stop and easy step-by-step guide to host the company data in multi-user mode in QuickBooks desktop? If yes, then you have landed on the right page, as through this segment, we will be discussing the entire process to host the company data in multi-user mode in QuickBooks desktop.
Well, hosting the company file in multi-user mode can be pretty much beneficial, as it permits the user to access multiple users and work on single company file at the same time. To know more about multi-user mode hosting in QuickBooks desktop, make sure to read this article carefully. Or you can also speak to our professionals and ask them to carry out this process on your behalf.
Steps for Hosting your QuickBooks Company file data in Multi-user Mode
The following information will let you know the latest steps for hosting QuickBooks desktop company file in multi-user mode.
Hosting Defined
Hosting is said to describe the situation, where the system that is storing a company file permits the other systems to access the file. QuickBooks software uses a service to manage company file access:
QuickBooks 2024 uses QuickBooksDB34
QuickBooks 2023 uses QuickBooksDB33
QuickBooks 2022 uses QuickBooksDB32
QuickBooks 2021 uses QuickBooksDB31
QuickBooks 2020 uses QuickBooksDB30
QuickBooks 2019 uses QuickBooksDB29
QuickBooks 2018 uses QuickBooksDB28
You can find this service in user accounts, in the Windows control panel, under users for this system. You need to look for the service that corresponds to the version of QuickBooks desktop.
Here are the different modes to host QuickBooks Company file in Multi user Mode:
Dedicated hosting
Dedicated hosting allows one server computer to store the QuickBooks company file and provide secure multi-user access across the network.
Peer-to-peer hosting
In the peer-to-peer hosting method, one workstation hosts the QuickBooks company file and shares it with other connected users over the network.
Windows file permissions: The logged-on user should have the permissions to Full control in which you can look at, open, and Edit the document of file.
Enable Full Control permissions in Windows to allow multi-user access for your QuickBooks company file."
Database server mode: The database server opens the company file successfully.
QuickBooks user login: The users must have a valid QuickBooks login credential.
You will be able to access the company file once these 3 requirements are met.
It should be noted that the hosting mode is set for all QuickBooks versions and for all systems. However, it is not set for the company file or the QuickBooks desktop installation. In case multiple versions of QuickBooks desktop 2018 or later are being used, then the hosting mode settings for each version are independent. Three hosting modes involve the following:
In hosting local files only mode
The system in hosting local files only mode can host the files that are located on the host system.
The service keeps on running as long as the system is on.
With the help TCP/IP to communicate with QuickBooks, multi-user mode is supported.
In not hosting mode
The quickbooks multi user mode is not supported in not hosting mode, as this mode support the only QuickBooks user, who is running QuickBooks desktop on the local system can use a database server to access the file. The QuickBooks database server manager runs as a normal process, as a Windows user running QuickBooks desktop.
On hosting local and remote files mode
The QuickBooks database manager runs as a normal process, as the currently logged on Windows user. The process gets started after a user logs in to Windows and stops after you logs out from the Windows: And a system under the hosting local and remote files mode supports the quickbooks multi user mode by using TCP/IP to communicate with QuickBooks. Users can simply access the company file on remote using a database server. Also, a local system under this mode is able to host the files that are situated on remote systems and opened on the local systems.
How to Enable QuickBooks Multi-User Mode?
Enabling QuickBooks Multi-User Mode allows multiple users to work on the same QuickBooks company file at the same time. Here are the steps to enable Multi-User Mode:
First of all, the user need to open QuickBooks and log in as Administrator.
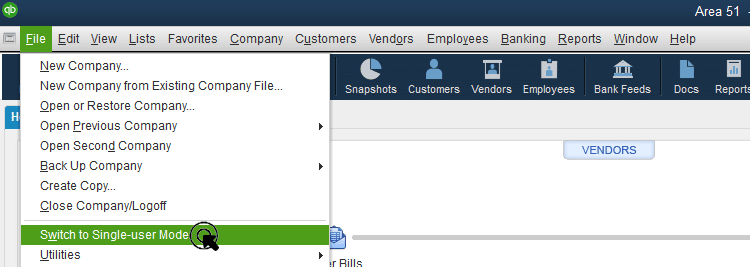
After that go to File menu and hit a click on "Switch to Multi-User Mode".
Use the File menu in QuickBooks Desktop to switch your company file to Multi-User Mode.
In the next step, again go to File menu and select Utilities tab.
And then select "Host Multi-User Access" option, followed by clicking on "Yes" to confirm that you want to enable Multi-User Mode.
Enable multi-user access in QuickBooks Desktop by selecting the Host Multi-User Access option from the Utilities menu.
Enabling Multi-User Mode in QuickBooks desktop is simple and allows multiple users to work on the same company file simultaneously. It saves a lot of time and increases productivity.
How QuickBooks desktop establishes the database server for communication?
The QuickBooks accounting software needs the .nd files which have the same name as the company file, but with .nd extension. This file is located in the same folder where the company file is stored. The folder also has the details needed to contact the server like IP address and Port.
The QuickBooks desktop software tells whether the .qbw file is in use or not. The software attempts to communicate with the server:
Towards the end, we believe that the procedure to host QuickBooks company data in multi-user mode, might be much easier after reading the entire post carefully. However, if you are required any sort of technical assistance, please connect with our QuickBooks enterprise desktop support team at 1-800-761-1787 to get the feasible solution. Our experts are equipped with the latest edge-cutting tools and technology to fix your problems utmost.
Want to learn the easy ways of moving customers, vendors, products, services, and accounts from QuickBooks Online to QuickBooks Desktop? Read this article, and clear all your doubts about how to move lists from QuickBooks Online to Desktop. In case you require to move lists from QuickBooks online to desktop desktop, then this article would be of significant assistance. We will be discussing the process to move your lists and balances to the new desktop file so that you don't spend less time on data entry. You can also learn the process to transfer the open balance of customers, vendors, and accounts to the desktop file. If you have already cancelled your QuickBooks online, then you can also access the data for a year many times to everything.
To know more about the thing, you can read this article ahead, or can also get in touch with the support team. We are a team of technically sound accounting professionals who work round the clock to provide the best possible support services. So, feel free to get in touch with us anytime.
Steps for Moving the Accounts, Customers, Vendors, and Opening Balances
Before you move ahead with the procedures, make sure to reach to your accountant. And also, ensure this change is right for you. Moreover, keep in mind that this won’t bring over transactions associated with the customers, vendors, or accounts. It will simply bring their current open balances in QuickBooks online. In order to move the transactions too, you will have to export the data.
Step 1: Exporting account, customer, and vendor list reports to Excel
Follow the below-given directions for exporting the various reports from QuickBooks to Excel.
You are first required to Sign in to QuickBooks online as an admin.
And then move to the Reports menu.
After that, you are supposed to look for and open the Account list, customer contact list, or vendor contact list.
Followed by selecting Customize on the report.
Once done with that, select Rows and columns and then change Columns.
The next step is to select and reorder Columns. Followed by checking the table below to learn what columns to select and their correct order.
Column order for each list report
Account List
Customer Contact List
Vendor Contact List
Customer
Vendor
Company Name
Company Name
Email
Email
Account
Phone Numbers
Phone Numbers
Type
Billing Street
Street
Detail Type
Billing City
City
Balance
Billing State
State
Billing ZIP
ZIP
Billing Country
Country
After you are done with the steps, make sure to select Run report tab. Then follow the steps to export the report and save it in a folder.
Step 2: Adding the customer and vendor open balances
The steps for incorporating the open balances corresponding to the customer and vendor are given as under:
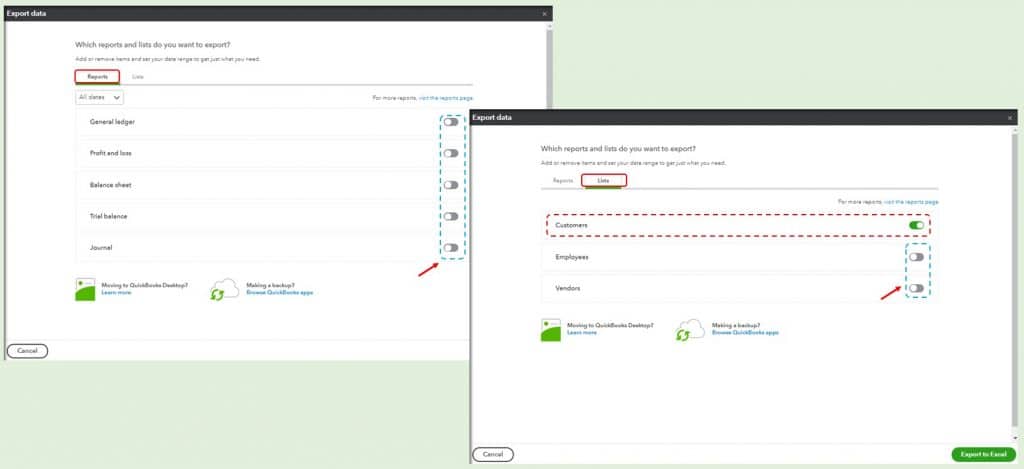
At first, it is required to move to the Sales menu and then choose the Customers tab. After that, move to the Expenses menu and choose the Vendors tab.
Now, select the Export to Excel icon. And also, save the Excel file in a folder you can access easily.
Next step is to get the Open balances and open the excel file saved. Also, copy the Open balance column.
Followed by, opening the Excel file of customers or vendors.
Now, you do not require the first 4 rows, so ensure to remove them from the worksheet.
And lastly, add the Open balance column that is copied and then save changes.
Step 3: Mapping QuickBooks fields and import
The third step is to map QuickBooks fields and import them with the help of the following:
At first, it is required to Sign in to the company file in QuickBooks as an Admin.
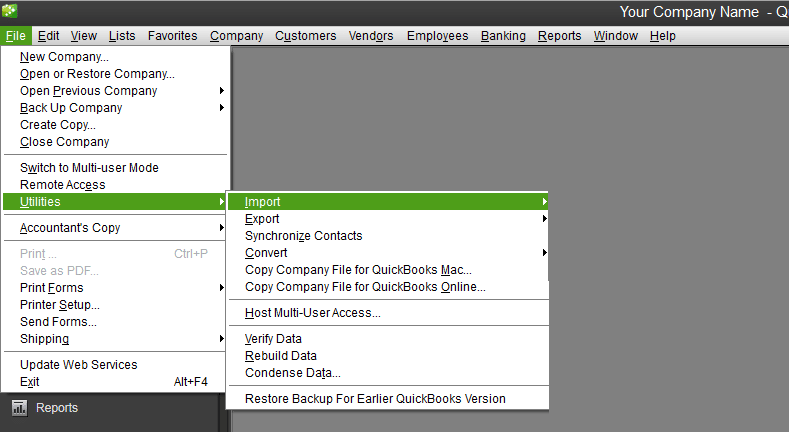
After that, select Utilities from the File menu and also choose Import.
Now, choose Excel files and opt for No on the window that appears.
Choose the Advanced Import tab afterward.
Also, choose Browse and move to the Excel file of account, customer, or vendor list you need to import.
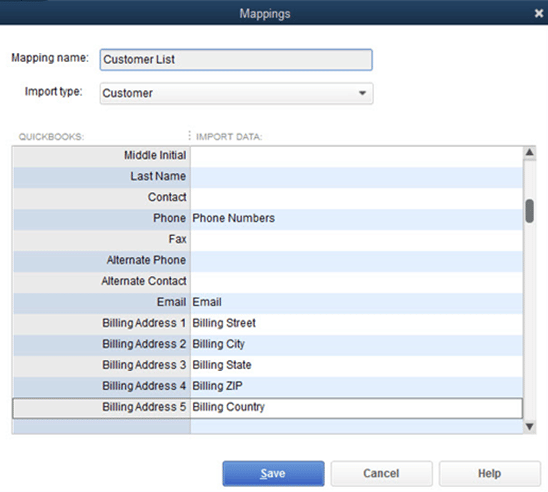
Once done with that, opt for Choose a mapping drop down and then Add new tab.
After that, add a Mapping name, based on the list being imported.
And also, select Import type and then start matching QuickBooks fields with the worksheet headers. Also, select Save after you are done.
It should be noted that for the customer list, check the mapping sample to map the billing address details correctly.
The next step is to pick Preview.
Followed by, selecting the Preferred option.
The last step is to hit the OK tab and choose the Import tab respectively.
Now hopefully, these steps helped you to easily move lists and balances from QuickBooks online to Desktop.
Steps to Move Products and Services in QuickBooks Online to Desktop
Below are the steps to move the products and services. Let us check out each of them one by one:
Step 1: Exporting the products and services report to Excel
You need to export the list of products and services to Excel. Then, you need to ensure that each item type has its own worksheet in the Excel file.
At first, sign in to QuickBooks online as an Admin.
And then move to Settings and opt for Product and services.
Now, hit the Export to excel icon. And save the excel file in a folder you can access quickly.
After that, browse to the Folder where you saved the file, and open it.
The next step is to move to the Type column header, and then filter it to only Services inventory or Non-inventory.
Also, Copy all of the data.
Now, add a new worksheet. And rename theWorksheet after the item type so it is easier to transfer them later.
Once done with that, paste the data you copied into the New worksheet
Check the column order for each item type table below and follow the correct column order for each item type.
And lastly, follow the steps for all item types. And Save changes.
Column order for each item type
Services
Inventory
Non-inventory
Product/Service Name
Sub Item of (Note: Add this if you have sub-items in QuickBooks Online)
Product/Service Name
Sales Description
Product/Service Name
Sub Item of (Note: Add this if you have sub-items in QuickBooks Online)
SKU
Sub Item of (Note: Add this if you have sub-items in QuickBooks Online)
Sales Description
Sales Price
Sales Description
Sales Price
Income Account
SKU
Income Account
Purchase Description
Sales Price/Rate
Purchase Description
Purchase Cost
Income Account
Purchase Cost
Expense Account
Purchase Description
Expense Account
Quantity On Hand
Purchase Cost
Inventory Asset Account
Expense Account
Quantity as-of Date
Reorder Points (if you set reorder points in QuickBooks Online)
Step 2: Adding the sub items
All the items, including the sub items and their parent items, are in the product/service name column. You need to use these steps if you also need to move the sub items to the desktop file.
You will have to add a Sub item of column right after the Product/service name column.
Product/Service Name
Sub Item of
Also, find the Sub items in the Product/servicename column. They will look like: Landscaping, trimming.
And arrange the Sub items. Also, ensure that the Sub items are under their parent items or categories to keep everything organized.
For this, you are supposed to Sign in to the company on QuickBooks desktop as an Admin.
Also, ensure that you are on Single user mode. From the File menu, choose Switch to single user mode. In case you see switch to multi-user, then you are already on a single user.
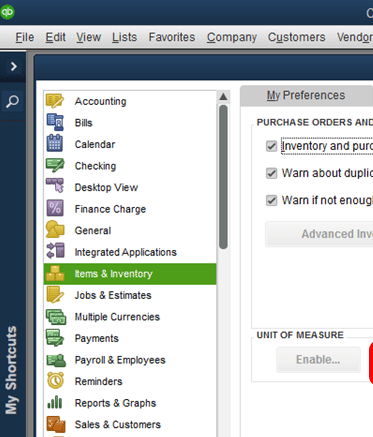
After that, move to the Edit menu and then choose Preferences.
Followed by picking Items inventory and then choosing Company preferences.
Also, turn-on inventory and purchase are active.
And lastly, pick the OK tab.
Step 4: Setting up inventory tracking accounts importing inventory
In case you haven’t already, you will have to set up inventory accounts in the desktop file. The steps to be followed are:
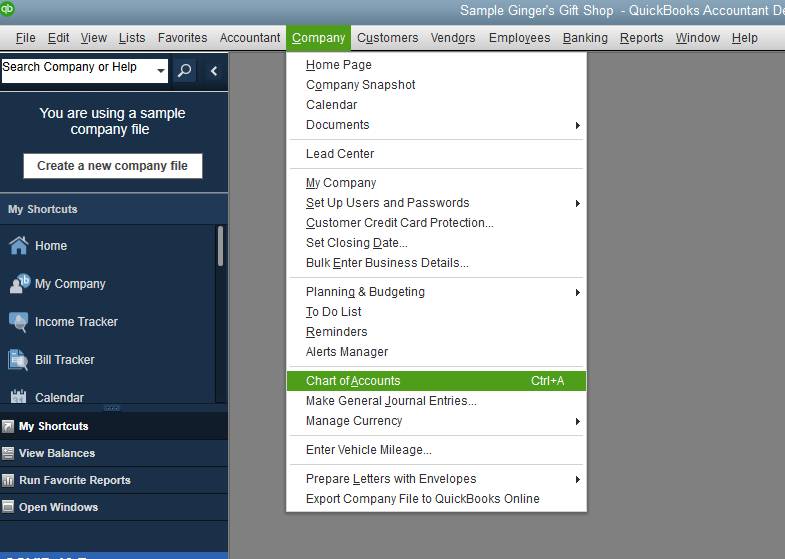
The first step is to pick the Chart of accounts from the Lists menu.
And then, right-click anywhere and also select New.
Now, choose an Account type. Also, ensure to create one account for each of the types.
Income account
Cost of goods sold
Inventory asset
Step 5: Importing inventory
For importing inventory, it is required to open Excel file of products and services that were prepared in step 1.
And then, follow the steps to Add multiple list items. You can also Customize the columns on the Add/edit list window. This would help in focusing on the columns you to work on.
Step 6: Adjusting the value and quantity of inventory items
After you are done importing inventory, it is recommended to add items current value and quantity. Once you are done with the above steps, make sure to start with your QuickBooks desktop.
At first, you are required to connect the Bank and Credit card to the desktop file. After that, it would be easy to download transactions.
And then, add Checks to record the checking activity.
Followed by creating and sending an invoice as soon as you finish a job. This winds up the process to move lists from QuickBooks Online to Desktop.
We conclude the article over here, with the hope that the information shared above might work to move lists and balances from QuickBooks Online to QuickBooks Desktop. However, in case of any query, or if you require any technical assistance, then feel free to give us a call right away at our helpline i.e., 1-800-761-1787. Our QuickBooks desktop support experts and certified professionals will assist.
FAQs
What are different lists in QuickBooks?
The different types of lists in QuickBooks include Vendor list, Customer list, Employee list, Item list, etc.
What are the various types of balances in QuickBooks?
Different types of balances include Account balance, Bank reconciliation, and Trial balance.
How do I export a balance sheet from QuickBooks Online?
The steps to export balance sheet from QBO are: 1. Head to Business Overview, and from there, move to Reports. 2. Choose the report, and in the top section of the report, choose Export. 3. Choose an easily accessible location to save the file.
Does Intuit offer any tool to move balances and lists from QBO to QuickBooks Desktop?
No! There is no specific tool to transfer lists and balances from QBO to QB Desktop.
Know the easy steps to delete a company file in QuickBooks
Do you wish to delete a QuickBooks desktop company file? Well, your query will be resolved once you will go through this segment. Deleting the file will be helpful to prevent it from showing in the list of company files. You can locate and delete it like other files on the system. Furthermore, you can type one of the following into the search bar in the start menu. Before you start with the procedure, it is very much essential for you to ensure to include the asterisk before the extension type so as to ensure the search works correctly.
*.qbw (Working Files)
*.qbb (Back Up Files)
*.qba (Accountants Copy Files)
*.qbx (Accountants Transfer Files)
*.qby (Accountants Change Files)
To get a better insight, make sure to read ahead!
Important Instructions to Note Before Deleting the Company File
There are certain instructions to follow before deleting the company file from your QuickBooks account. The instructions are as follows:
You would have to Sign in to your QuickBooks Account
Furthermore, head to the Charts of Accounts.
The next step is to look for the File menu.
You would have to click on the option of Close company.
You will further see a drop-down will appear, and you will have to choose the Edit tab.
Select the Company file you want to delete and put a checkmark next to it.
Steps to Locate the Company File in QuickBooks Desktop
Locating the company file in the QuickBooks version involves certain steps, which include the following:
Locate the company file in QuickBooks Windows (Pro, Premier, and Enterprise)
You need to first head to the QuickBooks software and locate the file which you wish to delete.
In order to open the company, choose the option to Open a company file and click on the Next tab.
Furthermore, select the File which you want to Delete and click on Open.
You can get the location of the file, to do that, click the F2 key, which shows the path of the file stored in your computer.
Lastly, close the QuickBooks and then click on the File and Exit tab
Locate the company file in QuickBooks Mac
For QuickBooks Mac, the following steps need to be performed to detect a company file.
Herein, you would have to double-click the QuickBooks software and the company file which is to be deleted.
Head to the top menu bar and click on the Help tab and select options Product information.
You will see a new screen opening, and head to the bottom and see the file location.
Follow the File path to Delete the file.
The path would be as follows: Files > Intuit > QuickBooks > Company files > File name.
Lastly, close the screen, and you are good to go.
Alternative Method to Delete QuickBooks Desktop Company File
There are different guidelines to follow for different kinds of accounts. Check out to find which one suits you the most.
Just in case your account is older than 60 days in activation
It should be noted that you cannot purge the company data, just in case it has been active for more than 60 days. Under this process, we will cancel the account and take a new subscription.
Cancelling the account
The steps for the cancellation of the account are given as under:
You would first have to Sign into the QuickBooks Online company file.
And then, head to the Gear icon and opt for it.
You would then have to Browse to the account.
And click on Update credit card.
Move to the Subscription status section and click on the Cancel Subscription link.
At last, carry out the prompts that appear on your screen and complete the cancellation process.
Start a new account
After the cancellation of the account, it is now time for you to set up a new account, the steps for which are given below:
For this, you would have to Sign in to QuickBooks on Intuit from your browser and then hit Enter tab.
Use the same old ID and password to login or use the new credentials.
Just in case your account is not older than 60 days in activation and you require to import the QuickBooks desktop company file.
Note that the QuickBooks online data, once deleted or replaced, cannot be restored.
You are supposed to Sign in first.
And head to the upper right corner of the screen and select the Gear icon.
Click on the Import desktop data option.
And further, go for the appropriate version and perform the on-screen instructions to import the data.
That was all you need to know in order to completely delete a company file in the QuickBooks desktop version. As always, if you have any queries, comments, or concerns, call us at 1-800-761-1787! We're a center of accounting experts who are tech-savvy and work all day and night to offer the best support possible in support of QB users. Therefore, do not hesitate to contact us, and our QuickBooks desktop support staff will contact you within a short time.
FAQ's
Is it possible to delete a QuickBooks Desktop company file directly from within the software?
No! The Company file cannot be directly deleted from within QuickBooks Desktop. You need to locate the file on your computer's hard drive or network location and subsequently delete it manually.
Can I recover a deleted company file in QuickBooks?
The deleted company files can only be recovered if they haven't been emptied from the recycle bin. However, if you used the "Ctrl + Shift + delete" short key to delete the file, or emptied the recycle bin, then the file cannot be recovered.
Is it possible to delete a QuickBooks Desktop company file if it is being used by another user?
It is advised not to delete a Company file if another user is using it, as deleting the file may cause data corruption and ancillary technical issues.
Can I archive or compress a QuickBooks Desktop company file?
Yes! You can go for the compression of the company file to reduce its size. However, it is pertinent to note that such compressed files won't be accessible through QuickBooks.