Landing upon errors in QuickBooks can be extremely frustrating, especially errors like QuickBooks error code 15225. This is basically an update error that falls under the category of QuickBooks 15xxx errors. While the error appears when you download payroll update, fixing it is possible with the right steps and solutions. You can come across QuickBooks payroll error 15225 due to network connectivity issues, or misconfiguration of internet settings, also in case of outdated security certificates.
What is QuickBooks Error 15225?
QuickBooks Error 15225 is an installation error that usually appears when QuickBooks fails to verify digital signatures while downloading updates. To help you understand the error, we have come up with this guide sharing the complete information related to the same. Keep reading to find out what actually can help you resolve such error. However, to get technical assistance related to this error, feel free to call us at our helpline. Our support team will help you in resolving all your queries.
What causes QuickBooks error message 15225?
You might land into QuickBooks error message 15225, due to some of the common factors like:
- Misconfiguration of Microsoft Internet Explorer leading to failed QuickBooks downloads.
- If the software fails to verify the digital signature of the files downloaded, and this could end up in error 15225.
- In case your internet settings are a bit wobbly, then you can definitely come across this particular error.
- The installation of QuickBooks may be incomplete.
- SSL settings not configured properly.
- The Window Registry may be corrupted, and this may, in turn, lead to such error.
Important
Create a backup before performing the solutions provided ahead.
- Open QuickBooks desktop and go to File menu.
- After that click on Back Up Company opt.
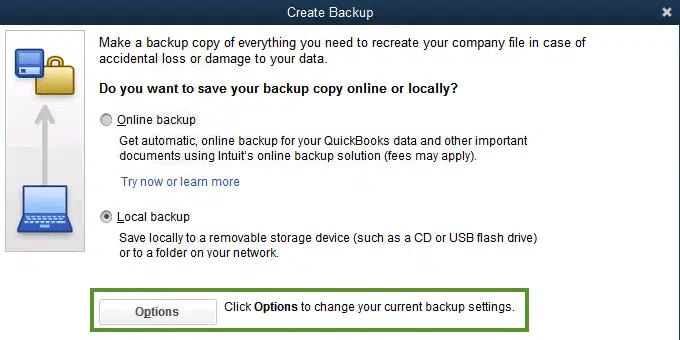
- Here you need to click on Local Backup option.
- Select Next and proceed with the below given solution methods.
You may like also: Fixation of QuickBooks Company File Not Found Error
Effective Methods to fix QuickBooks error 15225
Fixing the error becomes easy, once you have the right methods in handy. Here we have tried to jot down the common solutions that you can try out to permanently get rid of QuickBooks error 15225.
Method 1: Updating the QuickBooks desktop in safe mode
Updating the QuickBooks software is an effective method to fix various type of error codes in QuickBooks.
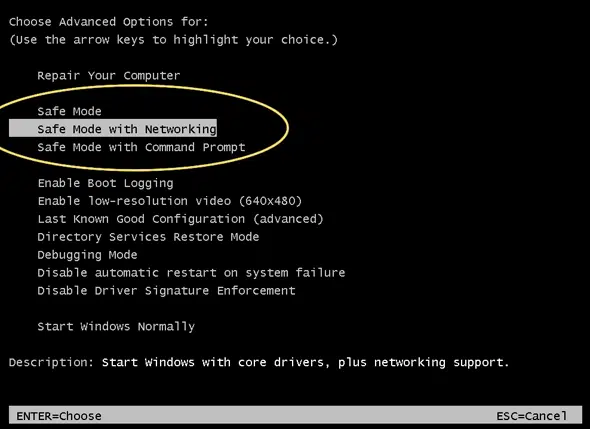
- Begin with rebooting your system and press the F2 key repeatedly.
- Once the Advanced Boot Option Window opens., select Safe Mode with Networking option.
- Hit the Enter key.
- Now open QuickBooks desktop and go to Help menu.
- Then select Update QuickBooks Desktop opt.
- In next step move to Update Now tab.

- You are then supposed to check-mark on Reset update and hit on Get Updates option.
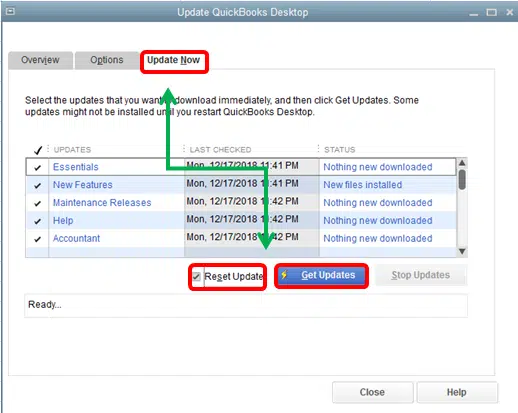
- Once the updates downloaded, click on Install now.
- Finally, hit on Close.
Method 2: Add Intuit as Trusted Site
One of the solutions can be if adding Intuit as the trusted website. The steps to add Intuit are as follows:
- Open Internet Explorer web browser.
- Followed by opting for Gear icon.
- You further have to click on Internet options.
- Heading forward, opt for the Security tab and then proceed to Trusted sites.

- Choose the site option to add the following domains.
- If you are using US version, you need to add *.quickbooks.com and *.intuit.com
- Whereas, for Canadian version use *.quickbooks.ca and *.intuit.ca
- Now click on Add option.
- Then select Close and click on Apply.
- The last step here is to click on OK tab.
Method 3: Install QuickBooks Digital Security Certificate
If none of the above steps worked for you, then simply try this last option of installing digital security certificate.
- To begin with, you need to search for QuickBooks.exe file.
- Then right click on the File.
- Now click on Properties tab.
- Search for the Digital signatures tab and then you will see the Intuit Inc.
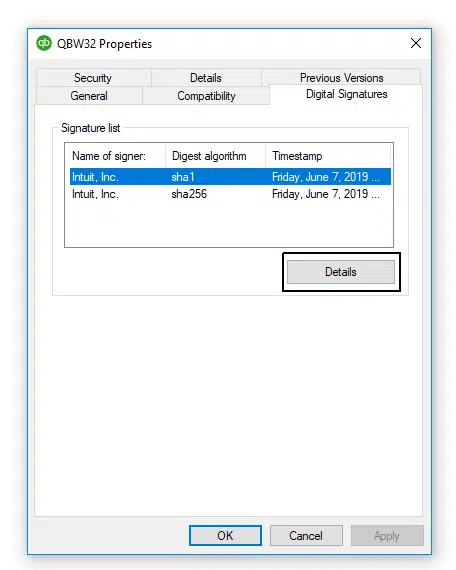
- Select the Details.
- And go for View certificate.
- You further have to head to the General tab and choose Install certificate option.
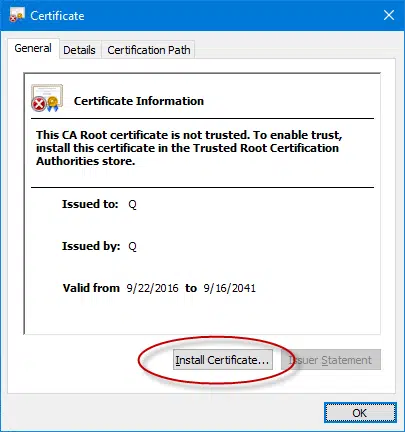
- Go for the Next tab and then Continue doing the same till you reach Finish tab.
- Now, reboot the system.
- And further open QuickBooks and try downloading the updates.
Method 4: Manually configure Windows firewall
- Under this process, hit the Start menu and further look for Windows firewall.
- Then head to the Advanced settings.
- Right click the Inbound rules.
- And then go for New rule.

- Opt for the port and then go for Next tab.
- You need to mark the TCP option.
- Followed by, entering the precise ports according to your QuickBooks year version.
- QuickBooks desktop 2020 and later: 8019, XXXXX
- QuickBooks desktop 2019: 8019, XXXXX
- QuickBooks desktop 2018: 8019, 56728, 55378- 55382
- QuickBooks desktop 2017: 8019, 56727, 55373-55377
Note that the versions of QuickBooks like the 2020 and above use dynamic ports. At the time of installation, these ports are assigned.
- After you enter the Port numbers, you need to click on Next tab.
- Followed by, opting for Allow the connection.

- Choose the Next tab and further mark all the profiles.
- You further have to click on Next tab.
- And then create a New rule.
- The next step is to assign a name to the New rule.
- And further, you need to click on Finish tab in order to complete the New rule.
Read Also: How to Install or Uninstall QuickBooks in Selective Startup?
Method 5: Perform a Clean Install QuickBooks
You need to clean install QuickBooks using to the steps ahead and this would resolve the issue up to certain extent.
- Press the Start button on your keyboard.
- Then type and enter Control panel in the search bar.
- Also click on Enter tab.
- This will show the Control panel window and further have to navigate to Programs and features tab.
- Use Uninstall a program option.
- Also, make use of the list of programs installed on the system and further highlight the QuickBooks version that is to be uninstalled.
- Opt for Uninstall/change option and further click on Remove.

- Followed by clicking on Next tab
- And lastly, you need to reinstall QuickBooks desktop.
Method 6: Repair the QuickBooks Desktop application
If none of the above solutions work out, it is recommended to repair your QuickBooks Desktop software.
- Press Start button and go to Control Panel.
- After that select Programs and Programs and Features option.
- Then select QuickBooks from the list of installed programs and select Uninstall/Change.
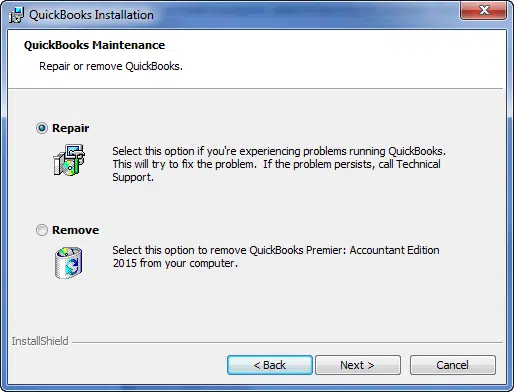
- Next click on Repair and then Next button to start repairing.
- Once the repair is complete, restart your system.
Read it also: Best Recommended Networks For QuickBooks Desktop to Run in 2022
Method 7: Clear the SSL state
Clearing the SSL state is a troubleshooting step that can help resolve some SSL-related errors in QuickBooks. Here's how to clear the SSL state in Internet Explorer:
- Firstly open your Internet Explorer and click on Gear icon.
- After then select Internet Options from dropdown menu.
- Then click on Content tab.
- Now under the Certificates section, hit a click on Clear SSL state button.

- A confirmation window will appear. Click OK to clear the SSL state.
- Lastly, close and reboot Internet Explorer.
- After clearing the SSL state, try updating QuickBooks or downloading the payroll update again.
Conclusion!
Still experiencing QuickBooks error code 15225? Well, if that is the scenario, then connecting with our technical support professionals will help. You can dial our QuickBooks support toll-free number and your queries will be addressed by the technicians. Our QuickBooks payroll error support team is well-versed with the solutions to fix all sorts of QuickBooks errors and would definitely help you in permanently fixing the glitches in QuickBooks.
FAQs related to this error
How to avoid QuickBooks errors?
Here are some tips to avoid QuickBooks errors:
1. Keep your QuickBooks software up to date.
2. Backup your company file regularly.
3. Use a strong and unique password to protect your QuickBooks account from unauthorized access.
What are DIY steps to fix this error?
You can fix this error by performing following methods:
1: Update QuickBooks desktop
2: Add Intuit to the trusted sites list
3: Install Digital Signature Certificate
Related Articles:
Steps to Fix QuickBooks Error 2147221164: Class not Registered
How to Resolve QuickBooks Error Code C=47?
Find your product number, license number, version, and release