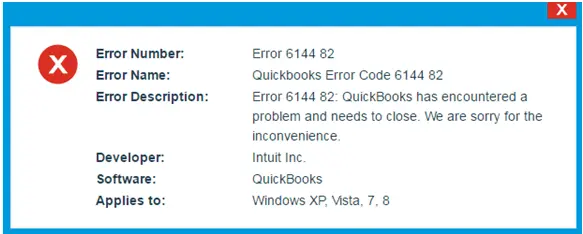
You might end up with QuickBooks error 6144, 301 or error 6144, 82 while accessing your company file. Well, you are not the only one facing this issue. Many QuickBooks users encounter these errors when the software fails to open or access the company file. It is one of the most common errors that are reported by users. This error is often encountered when you attempt to access your company file. When this error occurs, it stops you from performing any task through the main or other systems. Error 6144 in QuickBooks can be easily fixed, if the below-given steps are followed properly. Few time, you will need to close your QuickBooks desktop on all systems and disable the antivirus a few times.
For more information, we will discuss in detail about this error. Make sure to sail across the article and visit each section very carefully. For many users, this issue may seem to be difficult to deal with. If you are experiencing similar, don't be afraid to reach out to our support team by calling our dedicated helpline number i.e., 1-800-761-1787. Contacting our experts may provide great assistance in solving the problem. We will solve the issue for you in under an hour.
What is QuickBooks error code 6144? - A brief overview
Talking about the QuickBooks error 6144, 301 or Error 6144, 82 - it is one of the most common error that you might come across while accessing your company file, and it doesn’t let you to perform any task. These errors usually pop up with an error message saying:
- Error -6144, -301: QuickBooks is unable to open the company file.
- Error -6144, -82: This company file cannot be opened. Please verify your network settings.
Both these errors comes under the 6000 series QuickBooks errors which are directly linked with company file access, network configuration, or hosting issues. It can also crash the active program Window, which can be very much annoying for you to handle. However, a good news is that this error is fixable and you can easily resolve it by following a few simple steps. There can be certain causes to this error, which we will be discussing later in this article.
Important points to understand
Before you jump on to the causes or the process to fix the QuickBooks error 6144 issue, it is very important to consider the below stated pointers. Let us have a look at what those points actually are:
- Ensure to practice all the steps on the host i.e. the server system except the last step.
- Keep in mind that all the systems are properly shutdown including the host or other.
- Turn off the system security software.
What factors lead to Error code 6144 in QuickBooks?
Coming to the factors causing the issue, there can be many. We have jotted down some of the most common ones.
- Network issues on the server or the system in particular can cause this error.
- Corrupted Windows system files or QuickBooks related program files due to a virus or malware infection.
- Another factor leading to the QuickBooks error -6144 or -6144, -301 can be pernicious deletion of QuickBooks related files caused by any other program.
- A recent QuickBooks related change can also induce corruption in the Windows registry, ultimately leading to the error.
- Incomplete installation or damaged download of QuickBooks.
Signs and symptoms of the QuickBooks error message 6144
Now that you know what leads to QuickBooks error message 6144, you must also know the ways to identify the same. The below listed signs and symptoms can ease the process for you:
- The active program Window crashes or the system frequently crashes while running the same program.
- The Windows start running sluggishly and do not respond to the keyboard and mouse inputs.
- The computer experiences frequent freezing, or QuickBooks crashes immediately when opening the company files.
- If the error itself appears on the screen, but with a slight change in the error code i.e. 6144, 82.
Effective methods to rectify the QuickBooks error code 6144, 82 - When opening company file
Now that you have uncovered the causes and symptoms of this error, you can now learn the process to troubleshoot the QuickBooks error 6144 82 when opening a company file or restoring a backup. So, without wasting much time, let’s quickly go over each step so you can easily implement them.
Method 1: Start the QuickBooks service
- The initial step is to move to the Start icon and then hit a click on the Services tab in QuickBooks.
- Click the QBCFMonitoringservice icon that could be seen in the services list.
- Verify that the services have Started and also that they are setup in the Automatic mode.
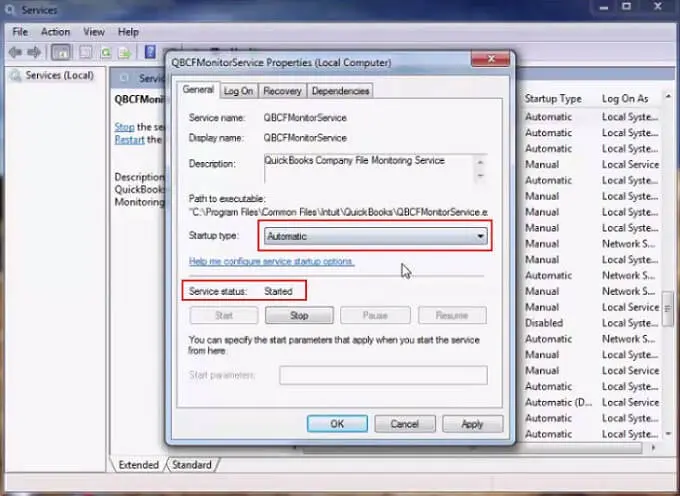
- In case the services are not in Automatic mode, then you need to Verify the radio tab and then hit Apply and OK options respectively.
Method 2: End the programs conflicting with QuickBooks desktop
- At firstly, press the Ctrl+Alt+Del keys to launch Task Manager.

- After that select the Processes tab.
- Search for any suspicious process that can be conflict with QuickBooks.
- If not found any, terminate all the process one by one.
- To terminate the process, click on the process and select End Process.
- Check the error status after terminating every process.
Read Also: How to Manually Fix Microsoft .NET Framework Errors when using QuickBooks?
Method 3: Change the account type
- At first, Change the account type, by clicking the Start icon.
- Go to the Control panel and selecting the User Account icon.
- Next, hit on the Add/remove user account tab.
- Also click the QBDserviceuser23 icon and modify the account type according to the requirement, which can be done by verifying the administrator user icon.

Method 4: Create folders in the C Drive
You are now required to create a new folder with the name QB in C drive. And later on, select read/write options for all the folders. The folders that you need to create are as follows:
- Administrator
- Add system
- QBDataServiceuser23
- Add user
- Everyone

You need to endow the permissions for the complete folder list. Also hit a click on share icon, in order to share all the folders to the systems.
You may also read: How To Resolve QuickBooks Payroll Error PS034?
Method 5: Copy the company file into the new folder
After creating the folder, copy the company file in the new folder. As per the observations, the file size might be a reason behind the corruption of the files, due to which the software doesn’t open up.
- Navigate to the Users option in the C drive. Follow it up by clicking on Public icon.
- Followed by selecting the Public documents tab and then hit a click on the Intuit icon.
- Next, click on the QuickBooks icon and also the company files.
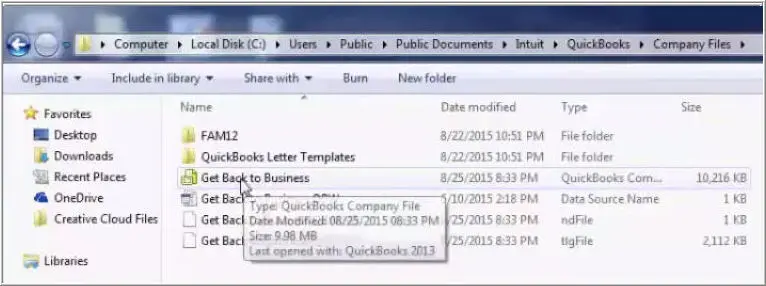
- Now, you will see the Default Company file location.
- You will have to Copy and Paste the QuickBooks file in the new folder. Also, avoid cut paste method to move the company file, as it may lead to corruption.
Method 6: Setup inbound and outbound firewall rules
- For this, select the Windows firewall option in the Firewall tab.
- Now in the Advanced settings tab, you need to visit the Inbound rules icon.
- And along with that move to the New rule and port icons respectively.
- After that, hit Next.

- You will have to Use port numbers depending upon the version of QuickBooks desktop.

To get the dynamic port number, follow the steps below:
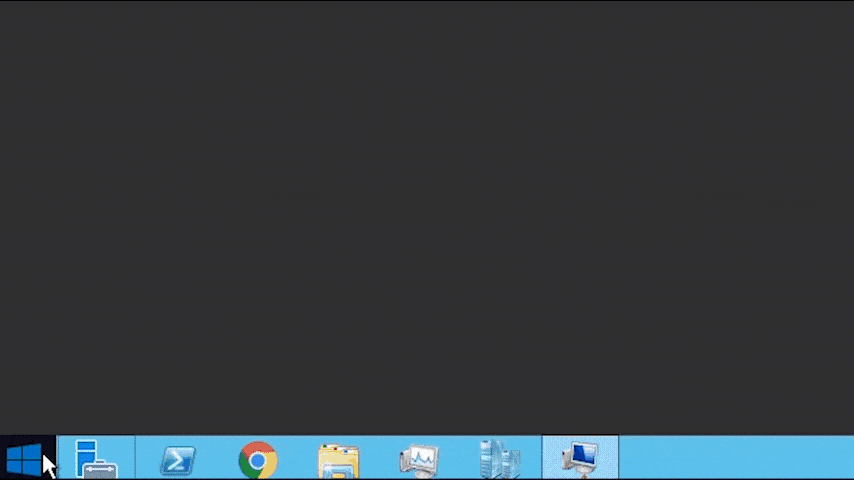
- Firstly, open the Windows Start menu.
- Enter QuickBooks Database Server Manager into the search bar.
- Double-click on the QuickBooks Database Server Manager icon to open it.
- Proceed to the Port Monitor tab.
- Find your QuickBooks version.
- Take note of the Port Number. You'll use this for your firewall port exception.
Also Read: Fix QuickBooks payroll update error 15106
Method 7: Running QuickBooks database server manager
- The initial step requires you to move to the Programs list and then click on the QuickBooks icon.
- Next, select the QuickBooks database server manager icon in the drop-down list. And then hit the Add folder tab.
- And then, hit on Add folder tab.
- After that, Search and add the QuickBooks folder in the system C drive and then minimize the tab.
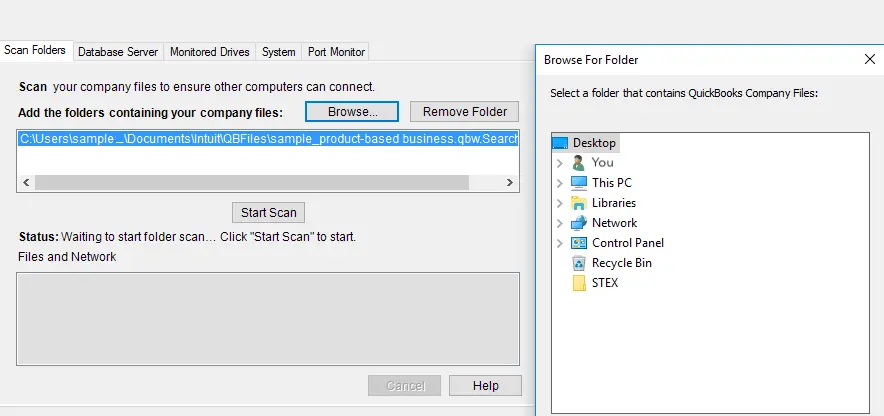
- The last step requires you to click on Start Scan tab. This would initiate the scanning process of the QuickBooks company file.

Method 8: Restoring the QuickBooks company file
- On the server system, open and access the QuickBooks in multi-user mode.
- Hit a click on the Open or restore company file.
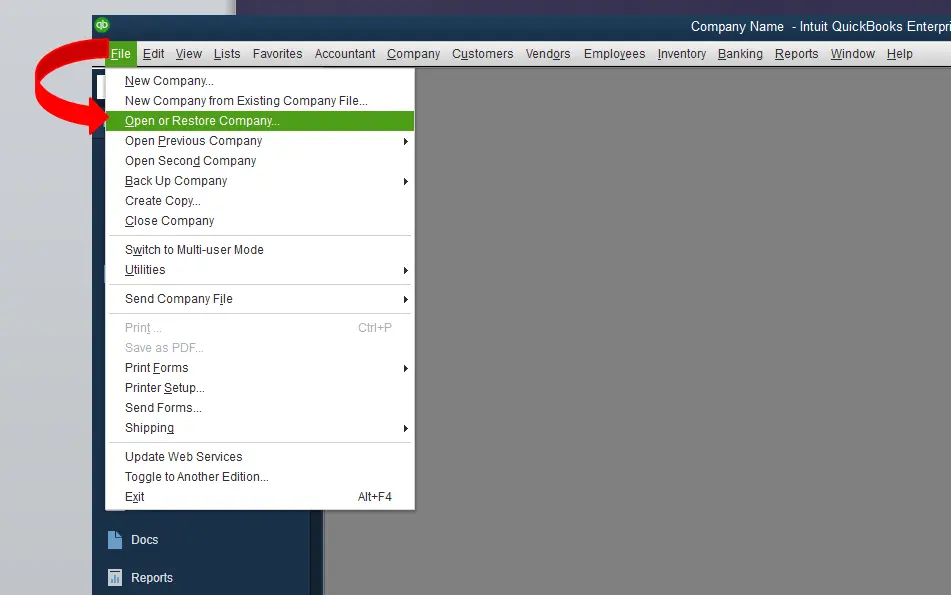
- Select your QuickBooks company file and then Get back to business.
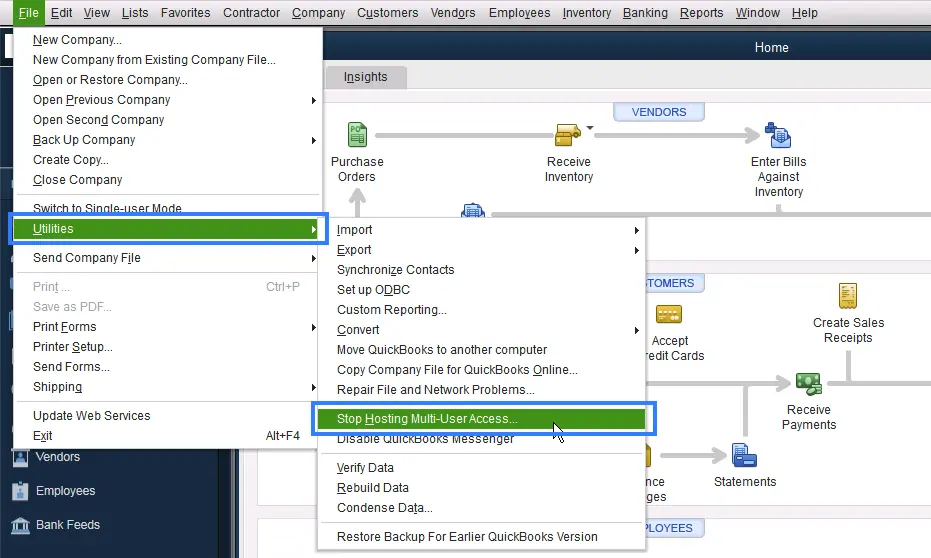
- Moving ahead, select open and access the files in multi-user mode.
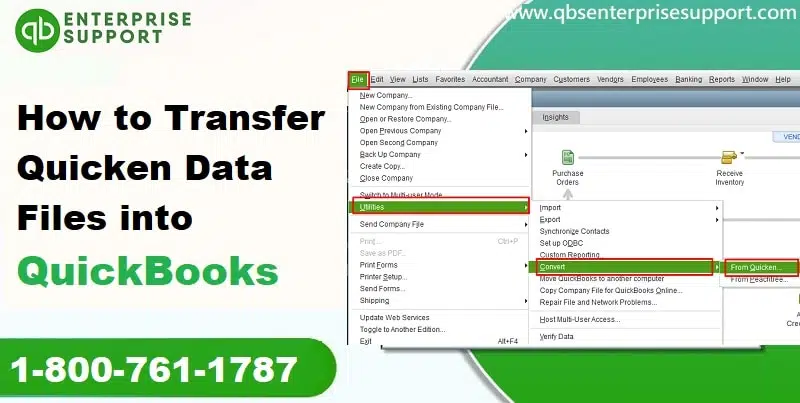
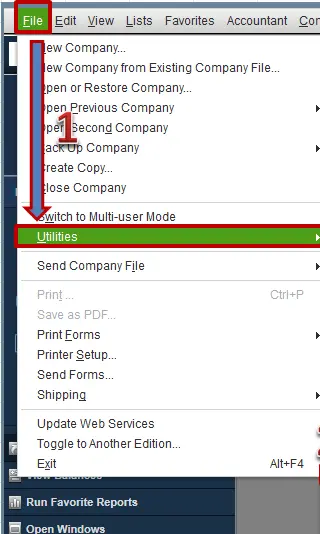
- Ensure that the hosting is enabled and also visit the File. After that, hit a click on Utilities icon.
- Now hit a click on the Stop multi-user access option. This will ensure that you are able to access the company files on the server system.
See Also: How to Prepare and File Federal 1099s with QuickBooks Desktop?
Other Quick Steps to Resolve QuickBooks Error 6144, -301 or Error 6144 , -82
In case the above method fails to fix the issue for you, it is recommended to check out the below mentioned processes once:
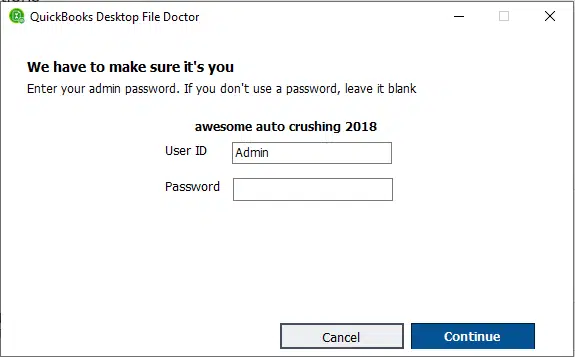
Step 1: Make use of the QuickBooks file doctor tool
Downloading and using the QuickBooks file doctor tool can help you in resolving the error automatically. This tool is designed and developed in a way that it has the capability to diagnose and fix the error by itself. You can simply need to download the tool from the QuickBooks tool hub program and then install it on to the system and then run it.
- Initially, close your QuickBooks program.
- After that download the latest version of QuickBooks Tool Hub from here.
- Next, you need to open the downloaded file (QuickBooksToolHub.exe)
- To install the tool hub software on your system, right click on QuickBooksToolHub.exe and tap on Run.
- In the next step you need to go through the on-screen steps to install and agree to the Terms and Conditions.
- Once the installation process complete, you need to double-click on the tool hub icon to open it.
- Now go to Company File Issues tab and choose Run QuickBooks File Doctor.

- This process may take one or more than one minute to open the file doctor.
- You need to select the Company file from the drop-down menu.
- And choose Browse and search to find your damaged company file.
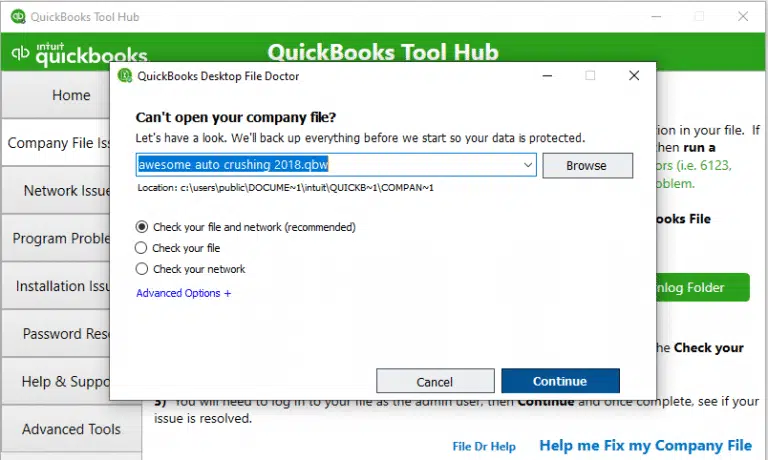
- Now select Check your file opt and click on Continue. Wait for few minutes to scan the file.

- Lastly, put your QuickBooks admin password and then select Next tab.
Step 2: Reinstalling the QuickBooks software
There can be a situation when the file doctor also fails to fix the issue, then in that case you can simply reinstall the QuickBooks software. It should be noted for performing this process, it is supposed to have the admin rights. Also, you should have the installation CD of QuickBooks.
For Windows Vista, 7, or 8
- Open run by pressing Windows and R tabs.
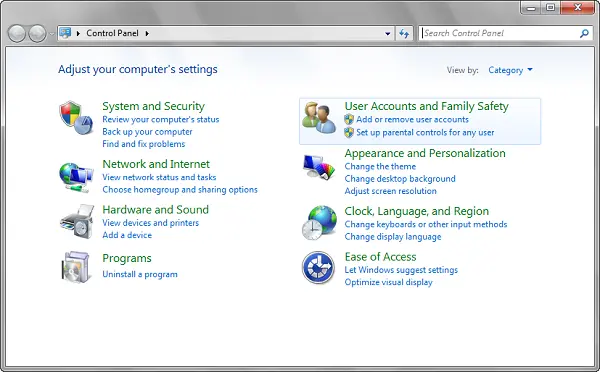
- Furthermore, open the Control panel and hitting Enter key.
- Under the User accounts and family safety options, select Add or remove user accounts.
- Followed by clicking on the particular qbdataserveruserxx which is similar to the version you are using:
- QuickBooks 2013: qbdataserviceuser23
- QuickBooks 2012: qbdataserviceuser22
- QuickBooks 2011: qbdataserviceuser21
- QuickBooks 2010: qbdataserviceuser20
- QuickBooks 2009: qbdataserviceuser19
- QuickBooks 2008: qbdataserviceuser18
- QuickBooks 2007: qbdataserviceuser17
- QuickBooks 2006: qbdataserviceuser16
- Hit a click on Delete the account option.
- Finally, reinstall the QuickBooks software.
For Windows XP
- Hit a click the Start tab and then choose the Control panel.
- Followed by double clicking the User accounts.
- Click the Specific qbdataserviceuserxx that is similar to the QuickBooks version you are using:
- QuickBooks 2013: qbdataserviceuser23
- QuickBooks 2012: qbdataserviceuser22
- QuickBooks 2011: qbdataserviceuser21
- QuickBooks 2010: qbdataserviceuser20
- QuickBooks 2009: qbdataserviceuser19
- QuickBooks 2008: qbdataserviceuser18
- QuickBooks 2007: qbdataserviceuser17
- QuickBooks 2006: qbdataserviceuser16
- Click on Delete the account option.
- Reinstall the QuickBooks software.
Related Article: Resolve Company file is missing or cannot be found issue in QuickBooks
Step 3: Renaming .TLG and .ND files
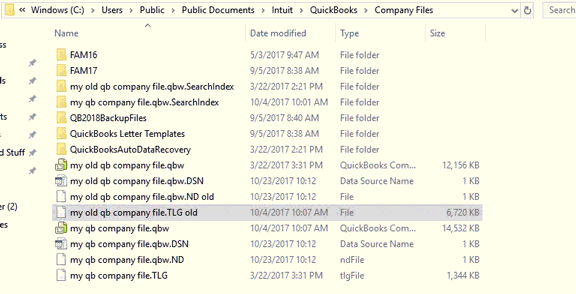
- Initially, access the QuickBooks folder and move to the company files location.
- Look for the TLG and ND files.
- Next, click on .TLG and .ND file and right-click on the file and select Rename.
- You need to rename the files by adding '.OLD' at the end of the file name.
- It will prevent QuickBooks from accessing this file. As a resort, the software will create new files when opened.
Frequently Asked Questions
What is Error code 6144 in QuickBooks?
This error belongs to 6xxx series of error codes that related to company file. It might appears on your screen when opening the company file and that has some corruption or data damage.
Does Error 6144, 301 damage my QuickBooks company file?
No. The error usually prevents QuickBooks from opening the file but does not directly corrupt the company data. However, improper troubleshooting may risk data loss, so it is recommended to take a backup before applying fixes.
Will repairing QuickBooks installation fix Error 6144, 301 permanently?
In most cases, Yes. If the error is caused by damaged installation files, repairing or reinstalling QuickBooks ensures that all missing or corrupted components are restored, eliminating the error permanently.
Do I need admin rights to fix these errors?
Yes. Without administrative rights, you may not be able to adjust hosting settings, firewall configurations, or perform QuickBooks repairs, which are necessary to fix these errors.
How can I prevent QuickBooks Error 6144, 301 in the future?
To avoid this error, always ensure that:
1. QuickBooks is updated to the latest release.
2. Hosting is enabled only on the server.
3. Firewall and antivirus settings allow QuickBooks connections.
4. Company files are stored in a secure and accessible location.
Winding up!
We have tried to scribble all possible solutions that you can implement by yourself in order to fix the QuickBooks error code 6144. In certain cases, you may end up in more trouble or you’re not able to properly incorporate the solutions, ending up in encountering the same error again. In such situations, contacting our support executives with the help of our dedicated support line i.e., +1-800-761-1787, can work amazingly for you.
You can discuss the issue directly with our QuickBooks desktop support team and ask our certified professionals to fix the error on your behalf. We are a hub of technocrats, who work round the clock to offer the best possible support services to you. Don’t think too much, Just ring us and let us do the rest. We are available to help you 24X7X365
More helpful resources:
Fix error 6073, -99001 when QuickBooks is unable to open this company file
Troubleshooting of Gmail Couldn’t Sign you in from QuickBooks Desktop Problem