Know the multiple avenues to fix common sales tax issues or unexpected results when managing in QuickBooks Desktop:
QuickBooks community has been reverberating multiple Sales Tax Issues. Users have faced various types of unresolved technical snags as they tried to file tax returns or do other tax-related operations on QB Desktop. These technical problems are large in number; but this article unravels all of them one by one. This article explains common Sales Tax issues in QuickBooks and their easy resolutions. So, keep reading!
You can also see: How to Rectify the QBWin.log Errors in QuickBooks Desktop?
Steps to Resolve Common Sales Tax Issues in QuickBooks
The common tax issues in QuickBooks Desktop are revealed as under with their possible solutions:
Error 1: Invoice prints 'T' even after the sales tax feature is being disabled
Primary Cause: Erroneous invoice template
Troubleshooting Method 1: Creation of a new template
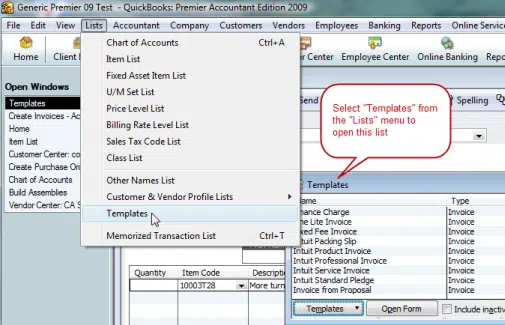
- To start off, choose the Templates option in the Lists menu.
- In the Templates box, pick New.
- After that, pick the Template Type.
- Click on Ok.
- Give the template some name and save the changes.
Troubleshooting Method 2: Making a Duplicate Template
- Click on the Lists tab.
- Herein, choose Templates.
- Within the Templates, choose the invoice template to highlight.
- Now, click on the Duplicate option in the Templates menu.
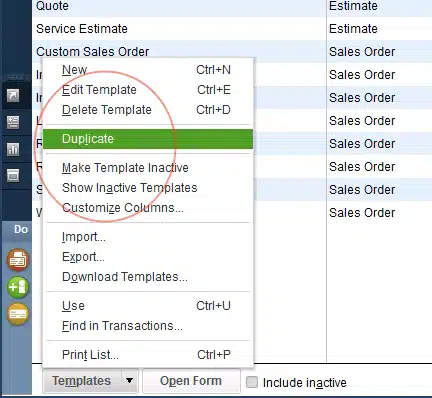
- Choose Invoice in the option to Select Template Type.
- Follow up by hitting on Ok tab.
Troubleshooting Method 3: Choose the Default option
- First, click on the Lists tab.
- Now, head to Templates.
- Double-click the Invoice template in the Templates pane.
- Head to basic customization section.
- Herein, click on the Additional Customization option.
- Choose the Default option and then click on Ok.
Issue 2: Sales Tax Payable is wrongly set in the Write Checks
Troubleshooting Method: Use the Client Data Review option
- Initially, the user should create a backup of the Company File.
- After that, check the Bank Register that was used to make the payments.
- Herein, the user should identify any improper sales tax payments.
- Retype the sales tax payments by following the directions given below:
- Choose the Sales Tax option in the Vendors menu.
- Click on the option to Pay Sales Tax.
- In case of multiple accounts, select the one to be used in the Pay From Account field.
- The user should have sufficient funds in the checking account to cover the sales tax payments. If the funds are insufficient, then the user should opt for a different account.
- After that, type the date of the sales tax payment in the Check Date area.
- Alter the date under "Show sales tax due through" to the end of the relevant payment term.
- In the Starting Check Number section, the user should type in the check number from the initial payment.
- Then, in the Pay column, check the boxes next to the items to pay for.
- Now, select the amount in the "Amount Paid" column and modify it if necessary for any of the products.
- The total should match the payment made originally. Once that is verified, click on Ok.
Delete the initial payment transactions from QuickBooks other sections
- In the Lists tab, choose Chart of Accounts.
- Enter the payment and double-click the saved bank account.
- To alter, scroll to the sales tax payment date.
- Take note that the entries should be close to one another because the dates on the original and the re-entered payment are same.
- The payment will be re-entered as a TAXPMT type. If the initial payment has already been received and cleared by the bank, check the TAXPMT entry and then choose Record.
- Make sure to change the check numbers in the register to correspond to the real check numbers if the sales tax payments are made to more than one tax agency and were not initially written in consecutive order. To do this, click on the Number area, enter the correct check number, and then choose Record.
- From the Edit menu, choose the Delete Check option after selecting the initial sales tax payment (CHK/CHK type).
Double-check whether the error is fixed
- Run a report on your sales tax liability for the most recent date, and contrast the results with the amount remaining in the sales tax payable account.
- Run the Vendor Balance Detail report to view the vendor balances corresponding to each tax agency.
- Check for duplicate payments by running the Transaction List by Vendor report.
Check Also: How to Fix QuickBooks Multi-User Mode Not Working Problem?
Issue 3: The user must specify vendor name for his/her sales tax account
Viable Tip: The user should enter a vendor name in the Customer: Job section while creating the journal entry.
Negative sales tax payable on the cash basis Balance Sheet report
Possible reason: If the users pays sales tax at the end of the month, they should have the option of doing so either in the month of producing the invoice (on an accrual basis) or in the month it is paid (cash basis). If the payment is made on the accrual basis and the report is run on a cash basis, the user will notice a negative amount for the Sales Tax Payable account.
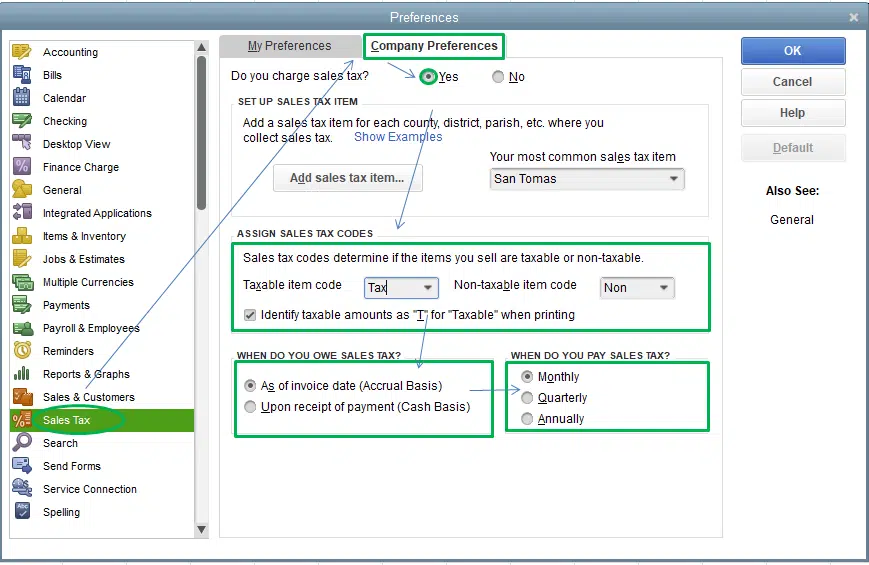
Steps for setting the Sales tax basis in QuickBooks:
- The first step is to log in as an administrator to the Company File.
- After that, click on the File tab and switch to the Single-user Mode option.

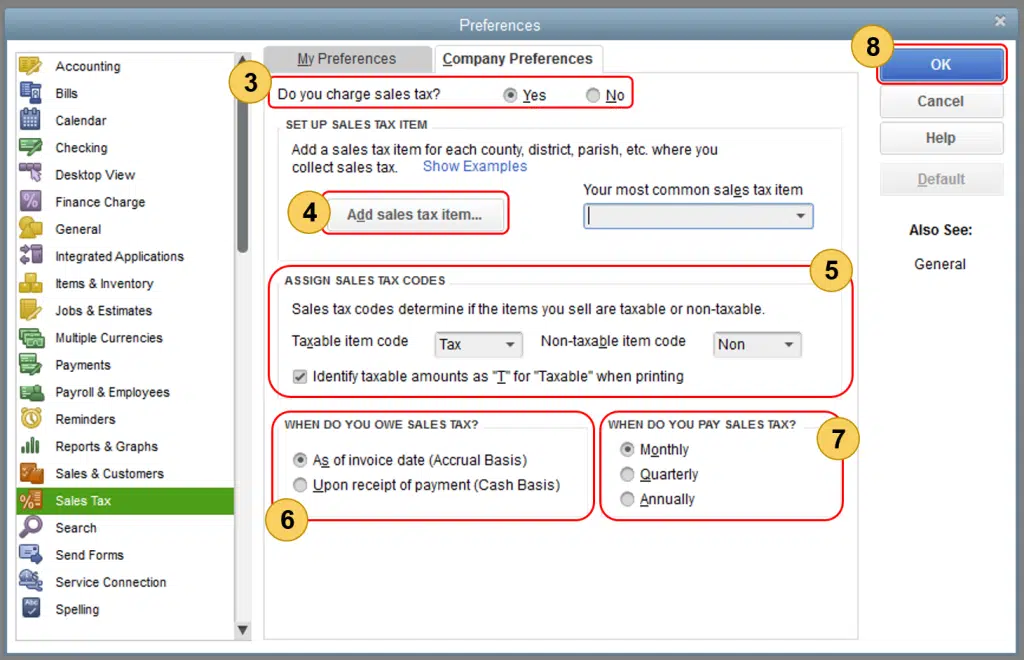
- Now, click on Edit and pick the Preferences option.
- Select Sales Tax in the Preferences window.
- After that, click on the Company Preferences tab.

- Pick the Appropriate basis corresponding to the company in the ‘’When do you owe sales tax?’’ section.
- Once that is done, hit on Ok.
Inactive Sales Tax Items also impact the Sales Tax Group
Quick Tip: When a Sales Tax Item is set to Inactive, the allocated Sales Tax Group does not have the item deleted. To effectively apply the active sales tax items, the inactive sales tax items must be cleared from the Sales Tax Group. The steps for the same are given as under:
- Click on the Lists tab.
- Herein, hit a click on the Item List.
- Now, double-click the corresponding Sales Tax Group.
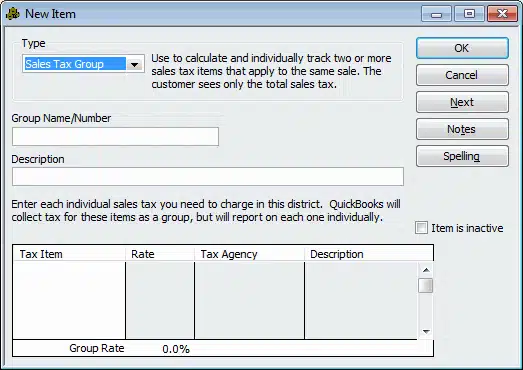
- Choose the sales tax item and then press the Ctrl and Delete keys together.
- Finally, hit on OK tab.
Issue 4: Error when users try to create a Credit Memo
Possible reason: The sales tax item on the invoice is included even if the sales tax setting in the company file is disabled.
Troubleshooting Method: Turn Sales Tax on in the company file
The steps for enabling the Sales Tax are discussed below:
- Click on the Edit tab.
- Herein, choose Preferences.
- Hit on Sales Tax and then choose the Company Preferences tab.
- Click on Yes under the "Do you charge sales tax?" option.
Issue 5: This item is used in a customer data and cannot be deleted
Possible Cause: The Additional Info tab of the Edit Customer page shows that at least one customer is allocated to the sales tax item that the user is trying to remove.
Steps for deleting the sales tax using Customer Contact List report
The easy steps for removing the sales tax by using the Customer Contact List report are as follows:
- Click on List and then choose the Customer Contact List option in the Reports option.
- Select the option to create a Custom Report.
- After that, choose the Tax Item option from the list of available columns.
- Now, sort the report and locate the corresponding customer that is linked with this item.
- After that, select the Tax Item option.
- Click on Ok.
- If the sales tax item is correct, select any client by double-clicking on his/her name.
- Now, click on the edit Customer option and then hit on the Sales Tax Settings.
- Remove the tax item to be deleted from the Tax Item section.
Issue 6: Sales tax line item is inaccessible while printing invoices
Quick Tip: There must be a description in the description column of the Sales Tax item in the Item List for it to print as a separate line item on the invoice.
Procedure for adding description to the Sales Tax Item
- Hit on the List tab and pick the Item List.
- Double-click on the Sales Tax item that does not appear on printed invoices.
- The users should now type the sales tax or the description of the sales tax item as they wants it to appear on the printed invoice.
- Once done, hit on Ok.
Read it Also: How to Prepare and File Federal 1099s with QuickBooks Desktop?
Issue 7: The existing credit with [Vendor Name] is sufficient to pay sales tax due
Primary causes:
- When applying the discount to the amount due in the Sales Tax window, it does not print a check but instead records the payment in the Sales Tax payable register for the full amount and does not apply the discount.
- A sales tax discount does not have the same vendor name as the sales tax item.
Troubleshooting Method:
- Hit on the Lists tab.
- Now, choose Chart of Accounts.

- Double-click the chosen Sales Tax Payable account to open its register.
- Locate and choose the payment for the sales tax just sent.
- Select the option to delete Sales Tax Payment from the Edit menu.
- Now, click on Ok.
- Make sure to keep the register for Sales Tax Payable open.
- Now, head to the Vendors tab and select the Sales Tax option, followed by the option to Pay Sales Tax.

- Check to make sure the discount is not from the same vendor as the sales tax item. On the sales tax item, take note of the seller name.
- To close the Pay Sales Tax window, click on Ok.
- Visit the Sales Tax Payable register once again.
- Locate the discount and modify the vendor name to correspond to the seller listed for the sales tax item.
- For the modifications to be saved, choose the Record option.
- Head again to the Vendors option.
- Click on Sales Tax option and the Pay Sales Tax option.
- To pick both the discount item and the sales tax item, place a check in the Pay column next to the appropriate items.
- To close the Pay Sales Tax window, click on OK tab.
Summing Up!
With that, we arrive at the conclusion of this illustrative article. In this thorough piece of writing, we have incorporated all the viable solutions that can aid QB users in the easy resolution of various common sales tax issues in QuickBooks desktop. If users have any other queries related to the accounting program which need urgent resolution, they can contact our QuickBooks payroll technical support ProAdvisors at the helpline i.e., +1-800-761-1787.
Frequently Asked Questions (FAQ’s)
How can I fix 'QuickBooks is not calculating sales tax correctly for some transactions' issue?
You need to cross check the sales tax codes that are assigned to your products or services. Also, you need to make sure that they're correctly set-up in your file and your customer tax settings are accurate.
What to do when I accidentally deleted a sales tax payment in QuickBooks?
Sorry to say, but once a sales tax payment is deleted from your QuickBooks, it can't be recuperate. You need to manually recreate the deleted payment first and reconcile it with your bank statement.
Similar Topics:
How to Reconcile Payroll Liabilities in QuickBooks?
Fix QuickBooks error 6000 82 when opening or accessing the company file
Steps to Fix Issues When Deactivating Bank Feeds in QuickBooks