Learn the process to Fix data damage on your QuickBooks Desktop company file:
QuickBooks transactions are one of the most essential parts of the desktop accounting software. It is the transactions that help the users in giving an idea of the financial dealings. You might often have an issue of damaged transactions, which ultimately poses threat to the company file data. The company file stores all the necessary information of the company, and can get easily damaged, due to damaged transactions.
Fixing the damaged transactions doesn’t require any technical knowledge, as some few simple steps can rectify them. In this post, we are going to discuss the causes contributing to damaged transactions and also the various fixes for damaged transactions in QuickBooks desktop. However, you can also contact our certified experts using our dedicated helpline, i.e.,1-800-761-1787. Our diligent team of certified professionals will be more than happy to fix this problem on your behalf.
What can lead to Damaged Transactions in QuickBooks?
There can be certain factors leading to damaged transactions in QuickBooks namely:
Sudden power surges can force the hard drives to accidentally overwrite the data, which affecting your company data.
Quitting QuickBooks desktop without exiting the company file.
Network glitches are caused while the QuickBooks software is being used over a network.
Over-sized company files can also end up in this issue.
Any sort of virus infection or malware attack can result in corruption of transactions.
In case you use journal entries instead of preferred data entry methods for accounts receivable or accounts payable etc., it might damage the transactions.
Using QuickBooks when the system is running low on resources.
Steps to Fix the Damaged Transactions in QuickBooks Desktop
You can simply fix the damaged transaction in QuickBooks Desktop by implementing the steps below:
Step 1: Launch the Rebuild and Verify Data utility
The next step requires to Repair the company file using the rebuild data tool.
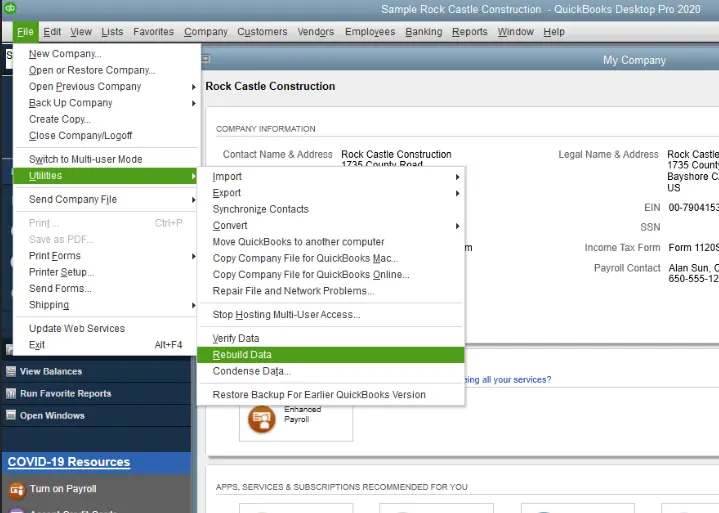
For this, navigate to the File menu and then move to the Utilities tab.
Now, choose the Rebuild data option.
The next step is to choose the OK opt on the information window, and then follow the on-screen instructions to Save the backup.
Next, let the tool to Repair the file. This might take some time, as QuickBooks may seem stuck, but as long as you could move the mouse, tool is working.
Once the process ends, click on OK tab.
Now move to the File menu and then hover over the Utilities option.
Finally, select the Verify data tab.
Allow the tool to check the file for any Data issues.
You can also go for the manual process to Run the rebuild and verify data utilities. The steps involved in this are as follows:
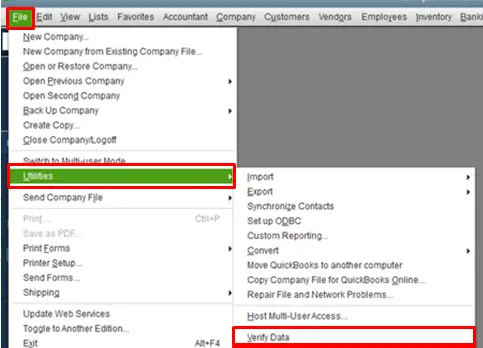
First step is to move to the File menu, and then hover over the Utilities tab.
And then select Verify data.
Moving ahead, let the tool starts checking the file for Data issues.
When the check is over, from the Verify results screen, and then choose the Expand all option to see the issues.
Now, choose the see online article to fix the error.
We have firm confidence that the above-illustrated steps worked for you and went a long way towards repairing the damaged transactions in QuickBooks desktop. However, if a situation arises when any of the steps doesn't work out, then in that case, you can contact our 24/7 QuickBooks error support team at 1-800-761-1787. Feel free to give us a call. Our dedicated accounting experts having profound experience in the field will help you fix the error on your behalf.
FAQs
Que. How to Fix data damage on QuickBooks company file?
Ans. Data damage on QuickBooks company file can be fixed by repairing the company file, with the help of the Rebuild data tool. This is a built-in tool that automatically fixes some minor company file data issues.
Que. How to fix QuickBooks desktop install errors?
Que. How to Fix beginning balance issues in QuickBooks desktop?
Ans. You might see the beginning balance as zero or incorrect when you open up the begin reconciliation window and then select the account to reconcile. This error can be fixed by recreating the opening balance. Whereas an incorrect balance issue can be resolved by correcting edited, deleted, or cleared transactions.
Learn how to get the newest payroll tax table update in QuickBooks Desktop Payroll
Are you hunting for an easy process to download, install, and verify QuickBooks payroll tax table update? Your search finally comes to a conclusion, check this segment to unleash the entire walkthrough to download, install, and verify QuickBooks payroll tax tables. Updating the software to the latest release is highly recommended, as every update comes up with the most current and accurate rates and calculations for supported state and federal tax tables, payroll tax forms, and e-file and pay options. You should update the tax table every time the employees are paid.
However, in order to update the tax table, you are required to have an active payroll subscription. The latest QuickBooks payroll update is 22212, released on June 23, 2022. Getting the latest payroll tax table updates involves easy-to-follow steps, which we will be discussing later in this post. So, make sure that you stay tuned to this post till the end. You can also get in touch with our 24/7 QuickBooks support directly at our dedicated support line i.e. 1-800-761-1787. We will be happy to help you.
Well, before you learn the process to download, install, and verify QuickBooks payroll tax tables, you need to first understand, it’s meaning. Payroll tax table, is basically a chart that characteristic different columns, assisting to spot the apt taxes to be suspended from the employee’s paycheck. The point to be noted here is that withholding taxes are generally affected by numerous factors such as, the income sum, marital status of the worker, and also the payment schedule, etc. There are various other facts related to the payroll tax table, which we will be discussing later in this article.
Points to note before updating the QuickBooks payroll tax table
Before you begin with the updating process of QuickBooks payroll tax table, make sure that you comply with the below points:
You are supposed to have an active payroll subscription, if you are planning to update the tax table.
An active internet connection should be present for updating the payroll tax table.
You are recommended to download the tax table at least within 45 days, or you can update the same each time a payment is made to their employees.
Moreover, you are supposed to turn on the automatic updates feature in QuickBooks Desktop, if you wish to receive the payroll tax table updates automatically, as soon as the updates release.
What rolls in with Payroll Update 22011 (April 23, 2020)?
Tax table update
This tax table comes in with a new tax tracking type to track employer liabilities for paid leave credits, as defined in the families first corona-virus response act (FFCRA).
Forms Update
This payroll update does bring in any forms update.
Federal: IRS Form 941, Form 941 for Reporting Agents, and Form 941X have all been updated to the June 2022 version.
Minnesota: Form UI QTD Report, Report to Complete UC Quarterly Tax Return, has been updated to the current version.
Nebraska: Form UI 11T, Combined Tax Report, has been updated to the current version.
E-file and pay update
There are no e-file and pay changes in this payroll update.
Nebraska: Automatic E-file for Nebraska State Unemployment Insurance, Unemployment Wage Report, has been removed. Businesses should use the "Create State E-file" process that was added with Tax Table update 22211 in May 2022.
It should be noted that in case you do not have auto-update enabled, then close or reopen QuickBooks after downloading the tax table updates, in order to complete the installation process.
Steps to check your current payroll update
In order to check your latest payroll update, make sure to carry out the steps below:
Navigate to the Employee’s tab and then choose the Get Payroll updates option.
Screenshot showing the QuickBooks Desktop Payroll Update window where users can download the latest payroll tax tables and updates.
Check the number Next to the Tax table version that you are using.
In order to spot whether the version is correct or not, see the Latest payroll news and updates.
You can also choose the Payroll update info, to find more details on the tax table version.
Downloading the Latest Tax Table in QuickBooks Desktop
In order to download the latest tax table in QuickBooks desktop, you can carry out the below steps:
To begin with you need to visit the Employees menu.
After that, choose the Get payroll updates opt.
Screenshot showing the QuickBooks Desktop payroll tax table update window where users can download and install the latest tax table version.
Choose the Download entire update checkbox.
Select Download latest update option.
Last but not the least, you will see a window appearing when the download gets complete.
In order to update the payroll tax table automatically, you are required to turn on automatic updates in QuickBooks desktop.
Facts related to current payroll tax table version and the process to check its presence
It should be noted that the current payroll version is:
11630003 (QuickBooks desktop 2022)- which was released on June 14, 2022, and is effective from July 1, 2022, till December 31, 2022.
In order to check the version being used, carry out the steps below:
For this, select the My Payroll service option from the Employees menu in QuickBooks. And after that, select the Tax table information.
Now, in the tax table version, the first three numbers will reflect the tax table version and should read 11230003. In case you updated the product earlier this year, you might have this version already. In order to Apply bug fixes and other relevant improvements, it is recommended to update the product.
It should be noted that, use the QuickBooks Desktop 2022 or QuickBooks desktop enterprise solutions 22.0 for downloading the tax table update.
In case you make use of the disk delivery service, the below steps should be implemented. You can also skip to another step, if you have already set up the service keys.
Step 1: Enter the service and disk delivery keys
In case you are not having the service key, then you can use the automated service and disk delivery key tool. You can also sign in with the Intuit account login. The steps involved in this process are as follows:
First of all, visit the Employees menu.
Select the Payroll tab.
Also, Enter the payroll service key.
Screenshot showing the QuickBooks Desktop window where users can enter or update the payroll service key to activate payroll services.
Choose the Add option present on the QuickBooks service sign up screen.
Enter the Service key and select Next option.
The final step is to Enter the desk delivery key and then hit Next.
Step 2: Install the update from your CD
After installing the new tax table, you will see a confirmation message on the screen:
In this step, you need to Insert the payroll update CD into the CD drive.
Move to the Employees menu.
Choose the Get payroll updates option.
Screenshot showing the Employees menu in QuickBooks Desktop where users can click on ‘Get Payroll Updates’ to download the latest payroll changes.
Select Install update from disk, and lastly, click on Install.
What are automatic updates?
Talking about the QuickBooks automatic updates, the software itself downloads payroll updates automatically, as soon as you are available over the internet. It should be noted that this is general information and is not intended to provide tax or legal advice.
Fixing Payroll update errors after updating tax tables
In case the TD1 amounts are not updated, even after installing the latest tax table update, it is important to have a check on below pointers:
You need to check whether it is on or after the tax table effective date? To make it easy to understand, let us take an example, in case you have downloaded the tax table version 112 on June 20, 2020, then you not see the updated amounts until the tax table becomes effective on July 1, 2020.
After the effective date i.e. July 1, 2020, after the product has been downloaded having the new tax tables, you will need to start a payroll or open and close QuickBooks desktop for TD1 amounts to update.
In case you had to manually adjust the TD1 amounts at any point of time in the past or after setting up the new employees, then in that case, the new tax table will not override the previously adjusted amounts. And you will have to manually update the TD1 amounts going forward.
Also check if any of the employees are set-up over the basic TD1 amounts. The QuickBooks software automatically updates the TD1 amounts only for the employees for the basic amounts for the previous tax tables.
Error: Payroll tax table is now out of date
When you open the payroll tax table on the system, you will see the payroll tax table is now out of date error appearing. Any payroll calculations generated using this tax table will become zero or the payroll calculations showing as $0.00. The reasons behind this are:
The first reason can be that the QuickBooks desktop is not updated to the latest payroll tax table release.
Another reason can be that not all of the versions of QuickBooks located within the network have been updated to the latest tax table.
Resolving the error becomes easy when you adhere to the steps below:
First of all, to check if the QuickBooks desktop is using the latest product update. You will have to check all the versions located on the network, in case of a multi-user network.
And then compare the product release number of the currently installed product update page while working in QuickBooks. You can also press the F2 key to check the release reference number.
Steps to Verify if the Tax Tables Update is Downloaded and Installed
Once you update the tax table, you might need to check if the update was downloaded and installed in QuickBooks desktop. QuickBooks desktop usually installs the tax table update, so you might not require to install it after a successful download. To verify if the tax table update is downloaded and installed properly, carry out the steps below:
For determining the most recent available tax table update, you will have to click on the link and navigate to the Payroll Support window. Scroll down to the summary for the latest payroll update, in the Intuit QuickBooks payroll news and updates pane.
Now, navigate to the Employees > Get payroll updates in QuickBooks and Check the tax table version.
The very first line in the Get payroll updates window will show you the version i.e. "You are using tax table version: ####". Also, click on Payroll and hit a click on Payroll update info to see the summary information and changes.
Screenshot of the QuickBooks Desktop window where users can download the latest payroll updates and tax table revisions.
Conclusion! Updating payroll tax table doesn’t involve any rocket science. Performing the above methods can work to Download, Install & Verify QuickBooks Payroll Tax Tables without any hassle. However, for any further information on this domain, you can get in touch with our QuickBooks payroll support experts and CPA's at our technical support number i.e., 1-800-761-1787 and ask them to update the payroll tax table on your behalf.
Do not hesitate in calling us anytime, our experts and certified professionals will be happy to help you. We consist of certified US-based professionals who have years of experience in the trade and are proficient in handling all accounting-related issues.
How can I verify if the payroll tax tables are installed correctly?
For the verification of the installation of QuickBooks payroll tax tables, you can perform the below-mentioned steps: 1. Start off by running QuickBooks and heading to the Employees menu. 2. After that, make a move to Get Payroll Updates option. 3. Now, proceed by clicking on the opt to Verify your Payroll Subscription. 4. QuickBooks will check the tax table version and display a message confirming if the tax tables are up to date.
Can I use QB payroll tax tables without an active payroll subscription?
No! QuickBooks tax tables cannot be used without an active payroll subscription.
For the verification of the installation of QuickBooks payroll tax tables, you can perform the below-mentioned steps: 1. Start off by running QuickBooks and heading to the Employees menu. 2. After that, make a move to Get Payroll Updates option. 3. Now, proceed by clicking on the opt to Verify your Payroll Subscription. 4. QuickBooks will check the tax table version and display a message confirming if the tax tables are up to date.
No! QuickBooks tax tables cannot be used without an active payroll subscription.
Learn how to set up a multi-user network on your QuickBooks desktop so you can access your company files:
As per the users and their feedbacks, QuickBooks is regarded to be one of the finest accounting software till date. It is highly productive and lets you to manage all the accounting activities in the smoothest possible way. It comes with countless features, one of which is multi-user mode, which not only intensifies the productivity and also QuickBooks experience. It lets multiple users to access and manage the same file at the same time that too in the same network. If you are interested in knowing how to set up multi-user network in QuickBooks desktop, then make sure to read this article ahead.
Moreover, you may also reach out to our accounting professionals and let them know your queries to set up multi user network in QuickBooks desktop. Consult our professionals by means of our support line i.e. 1-800-761-1787, and our QuickBooks desktop support team will be there as your assistance.
Before you learn the process to set up multi-user network in QuickBooks desktop, it is important to understand, what it is actually. Multi-user mode allows more than one person to work on a single company file at the same time. This feature saves a lot of time and makes things quick and easy. If you are having a huge firm having a large number of employees, then multi-user mode can be really beneficial for you. However, it should be noted that in order to set-up multi-user network in QuickBooks, you need to own a separate licensed copy of QuickBooks installed in the system.
Basic requirements to set up multi user network
It is advisable to installed up users for the company file before switching to multi-user network.
Examine the windows file permissions by logging in as an admin.
QuickBooks allows you to have accesses to the data file all over the network. However, each user will have to install the software separately. Different accounts are provided different access like:
Followed by installing the software by carrying out the respective steps.
Select Custom and network install for the install type.
And then, choose I'll be using QuickBooks desktop on this computer, AND I'll be storing...in case you want the full version of QuickBooks desktop on the server system. Or in case you want the server system to the host files, then another option should be opted.
Followed by carrying out the onscreen steps and complete the installation.
Also, don't forget to select the multi-user host installation.
Step 2: Switching to multi-user hosting
You are required to open the QuickBooks software.
And then update the QuickBooks company file to the newer version if needed.
Enabling multi-user hosting in QuickBooks Desktop through the Utilities menu.
Next step is to move to the file and hit a click on utilities option, along with clicking on the host multi-user access.
Enabling the “Host Multi-User Access” feature in QuickBooks Desktop for shared company file access.
Also if the previously hosted multi-user set up is present, then you are recommended to move to the next step.
Step 7: Start with a company file located on a remote computer
Initially, you need to visit the QuickBooks file menu and then select switch to multi-user mode.
Enabling multi-user mode in QuickBooks Desktop so multiple users can work on the company file simultaneously.
And then select Yes option in the multi-user setup hosting window.
Next step is to click on OK in the multi-user setup information window.
And end the process by adding expected users by visiting the company > set up users and passwords > set up users > add user respectively, and you are good to go.
Configuring user accounts and passwords in QuickBooks Desktop to manage multi-user access permissions.
Winding up!
Multi-user mode can be highly beneficial in making this smoother and efficient. In a nutshell, setting up QuickBooks multi-user network in QuickBooks becomes a necessity, especially if you are huge firm. We end the post here with the hope that the above stated information might help you in setting up multi-user mode with much ease.
However, in case of any query or if you are facing any sort of issue, then make sure to contact our QuickBooks enterprise technical support at 1-800-761-1787, and our experts will be there to assist you in a single call. Get in touch with our support team today!!
Can I set up a multi-user network in QuickBooks Desktop without a server computer?
Yes! You can set up a multi-user network without a server computer. It is possible by the use of a peer-to-peer network.
What are the system requirements for setting up a multi-user network in QuickBooks Desktop?
The system requirements to set up a multi-user network in QuickBooks profoundly depend on the QuickBooks version set up on the system. Users should have a dedicated server PC and a network adapter.
How many users can access QuickBooks Desktop in multi-user mode?
The number of users that can access QuickBooks Desktop in multi-user mode depends on the QuickBooks version. Notably, QuickBooks Pro and Premier versions of the accounting program can support up to a maximum of 3 users, while QuickBooks Enterprise can support 30 users.
Yes! You can set up a multi-user network without a server computer. It is possible by the use of a peer-to-peer network.
The system requirements to set up a multi-user network in QuickBooks profoundly depend on the QuickBooks version set up on the system. Users should have a dedicated server PC and a network adapter.
The number of users that can access QuickBooks Desktop in multi-user mode depends on the QuickBooks version. Notably, QuickBooks Pro and Premier versions of the accounting program can support up to a maximum of 3 users, while QuickBooks Enterprise can support 30 users.
Get the easy steps for Fixing Microsoft .NET framework errors manually:
If you are seeking for the process to troubleshoot Microsoft .Net framework errors when using QuickBooks desktop, then you have stopped by the correct place. This article will enlighten the manual process to fix the Microsoft .NET framework errors. QuickBooks uses the Microsoft programs to run the web based apps, which includes the Microsoft .Net framework and other components. In case .Net framework had an issue, QuickBooks desktop might come across certain issues. You need to Keep scrolling this post further to unleash the steps to rectify this issue.
Moreover, we recommend you to consult with a professional, if in case you are short of time. You can give us a call at i.e. 1-800-761-1787, and ask our professionals to rectify the issue on your behalf.
The .Net framework components assist in running interface programs properly. QuickBooks desktop pro use Microsoft .Net framework for many areas of the program. It should be noted that there is a different .Net framework available for each version of QuickBooks desktop. At times, .Net framework can become damaged and show certain errors including:
MSXML allows the application written in script, VBScript, and Microsoft development tools to create Windows native XML related application. With the set of services in Microsoft XML core services, one can organize information and can view data easily, but this applies only viewing data in a notepad or Windows browser not for apps to access them in the background.
MSXML being damaged or missing, certain errors might be encountered. In such case:
You need to ensure that the MSXML has been installed on the system properly.
Or if you are facing issue in accessing the registration file. Checking MSXML is installed correctly or not: C:\Documents and Settings\All Users\Application Data\COMMON FILES\Intuit\QuickBooks\QBRegistration.dat.
Solutions for Fixing Microsoft .NET Framework issues when using QuickBooks Desktop
The steps might vary according to the operating system. Let us explore it in detail:
For Windows 10, 8.1, and 8
Start off with closing all open programs.
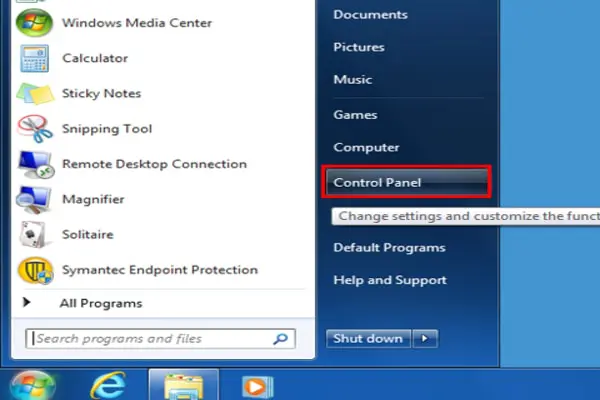
Open the Windows start menu.
Followed by typing Control panel in the search bar and open the Control panel.
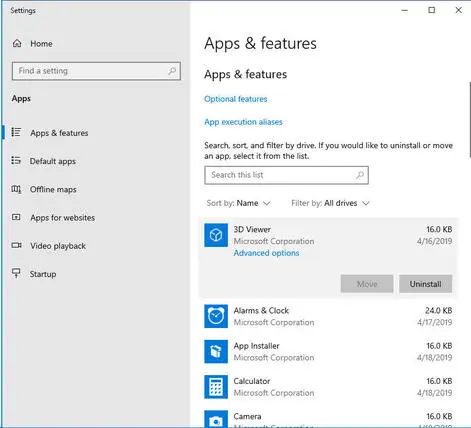
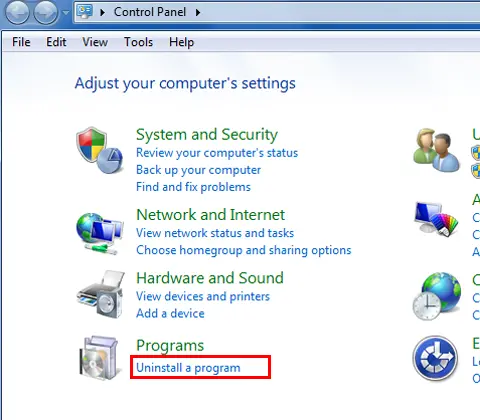
Next step is to visit the Apps and features tab.
After that choose the Uninstall a program.
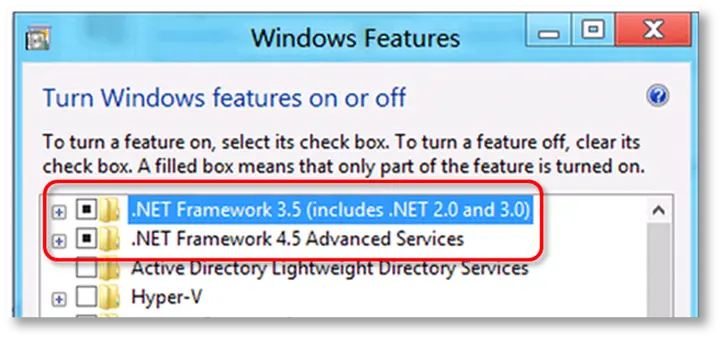
Now select Turn windows features on or off.
And lastly, you need to find .NET framework on the list.
Check the settings for both .Net framework 4.5 and .Net framework 3.5 SP1. It should be noted that the steps to fix .NET framework 4.5, 4.6, 4.7 and 4.8 are similar to each other.
Checking .NET framework 4.5 (or later)
In case the .NET framework checkbox 4.5 isn’t checked, the steps below are required:
The first step is to choose the checkbox to Turn on .Net framework 4.5.
After that choose OK to save changes.
Finally reboot the system.
In case the .NET framework 4.5 checkbox is already checked, the steps below are to be followed:
To begin with, choose the checkbox to Turn off .Net framework 4.5. Do not turn it back on.
Select OK to save changes.
Next step is to reboot the system.
And, when you are signed in back to the windows, follow the steps to turn on .NET framework 4.5 again.
Checking .NET Framework 3.5 SP1
In case the .NET framework 3.5 SP1 checkbox isn’t checked, the steps below are required:
Firstly choose the checkbox to Turn on the .NET framework 3.5 SP1.
Hit OK to save changes.
Reboot the system.
In case the .NET framework 3.5 SP1 checkbox is already checked, the steps below are to be followed:
At first, select the checkbox to Turn off .NET framework 3.5 SP1. You need to avoid turning it back on.
After that choose OK to save changes.
Reboot the system.
When you are signed in back into the windows, then you need to follow the steps to turn .NET framework 3.5 SP1 on again.
If in case you spot the error while turning .NET framework on or off, then consulting an IT professional is recommended. As the issue might be related to the operating system and not QuickBooks desktop.
For Windows 7, you need to close all open programs.
Open the Windows start menu.
Followed by typing in the Control panel and open the same.
Now select the Uninstall a program.
Also, choose Turn windows features on or off.
Lastly spot .Net framework on the list.
You need to check the settings for both .NET framework 3.5 SP1 and .NET framework 4.5 (or later)
Checking .NET Framework 3.5 SP1
For the Windows 7 users, the steps involved in this process are listed below. In case the .NET framework 3.5 SP1 checkbox isn’t checked, the steps below are to be followed:
For this, you need to check the .NET framework 3.5 SP1 checkbox.
After that choose OK to save changes.
Followed by rebooting the system.
Whereas, if the .NET framework 3.5 SP1 checkbox is checked already:
In such a situation, you need to choose the checkbox to Turn .NET framework 3.5 SP1 off and then avoid turning it on again.
After that go for OK and save changes.
Followed by rebooting the system.
After that, when you are signed in back to the windows, then follow the steps to turn it on.
Checking .NET framework 4.5 (or later)
In case the .NET framework 4.5 (or later) is not present on the list, you can carry out the steps from the Microsoft to install it.
Whereas if the .NET framework 4.5 (or later) is on the list, then follow the steps below:
For this, you need to first select the Microsoft .NET framework 4.5 (or later) in the programs and features window. Also, select the Uninstall/change tab.
After that choose the Repair tab and then hit Next tab.
Followed by carrying out the on-screen prompts.
Reboot the system, once done with the repair.
In case the repair turns out to be a success, then open QuickBooks and if it works properly, the error is fixed.
However, if the error is encountered during or after the repair, then you can:
Carry out the steps from the Microsoft to uninstall .NET framework.
Well this drives us towards the end of this post, where we hope that the information shared in above might be helpful in manuallyfixing the .NET framework errors. However, in case you experience an error during uninstalling or installing the .NET framework, then we recommend you to reach out to an IT professional immediately. Or you can contact our U.S based QuickBooks experts straight away i.e. 1-800-761-1787, and let our accounting professionals handle the issue for you. We are a group of QuickBooks support and have rich experience in tackling all the QuickBooks bugs for you across the globe. For seamless and error-free software, reach out to us today. We will be happy to assist you.
Learn how to resolve Installation errors of QuickBooks using component repair tool:
QuickBooks accounting software that is loaded with tons of features, rolls in with some basic technical snags. This particular software is prone to certain errors, and in order to chuck off these errors, Intuit the developer of QuickBooks desktop offers a couple of tools that can help the users to get rid of the QuickBooks desktop errors, one such tool is the QuickBooks component repair tool. The component repair tool uses some of the most basic Microsoft components such as Microsoft MSXML, Microsoft Visual, C++, Microsoft .NET, and Framework to resolve QuickBooks desktop install errors and other various errors.
If you are interested in knowing more about this tool and make the best out of it, then continue reading the article. Or if you want an immediate technical assistance, then call us using our tech support helpline i.e., 1-800-761-1787, and discuss the issue with our technical support team.
What is QuickBooks component repair tool?
Before you begin with all the other procedures, you need to first understand what actually is QuickBooks component repair tool. It is basically a tool that can be downloaded to fix the most common installation issues. It is basically designed and developed in a way to fix issues that are seen during the usage of .NET framework and other Windows components required to run QuickBooks. This tool can be useful in situations where QuickBooks is not functioning properly, or if you are experiencing several error messages or other issues with the software.
The best thing about this tool is that it doesn’t need any special configuration and it automatically scans the components. This tool can be utilized for fixing a couple of errors namely:
This tool can be downloaded without any additional charges and can be pretty helpful in fixing various QuickBooks errors, only if used properly. So, read ahead and learn various facts related to component repair tool.
Steps to download the QuickBooks component repair tool
Now that you know what QuickBooks component repair tool is, it is time to download it. As we mentioned above, this tool doesn’t require any additional computer set up, and can be downloaded by carrying out a few simple steps.
You can download this tool by closing all running programs initially.
And then downloading the QuickBooks component repair tool setup file.
Double-click the file and then carry out the on-screen instructions to complete with the installation procedure.
The last step is to, reboot the system and run the tool.
Steps to use QuickBooks component repair tool
You need to firstly reboot the system before running the tool.
Close all the running programs.
Download the QuickBooks component repair tool by the steps mentioned earlier and install the same.
You will itself diagnose and fix the issue.
Lastly, reboot the system.
Resolve Common QuickBooks Desktop Installation Errors
Follow the below-given steps in order to resolve the install errors of QuickBooks desktop:
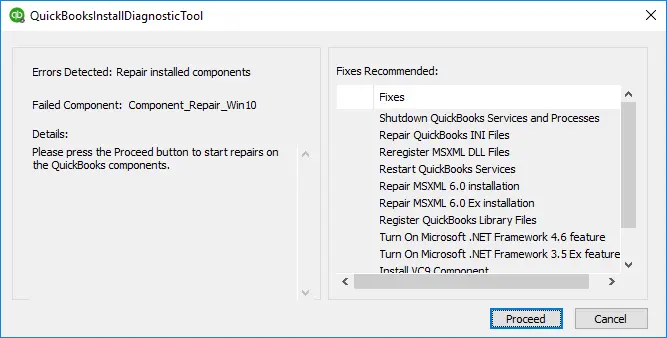
Methods to fix the installation errors using QuickBooks component repair tool
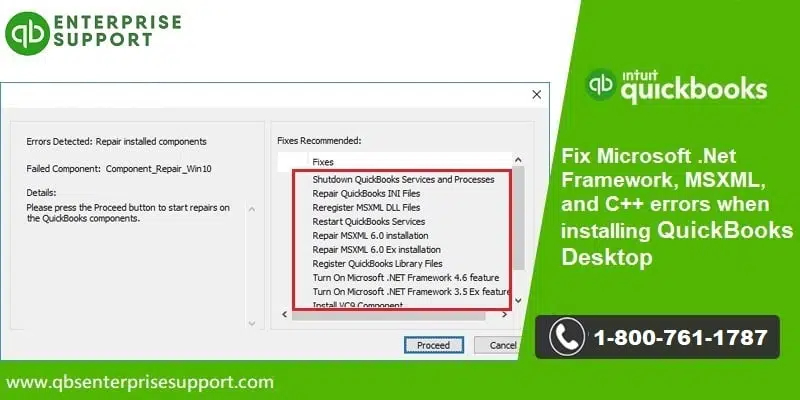
In case the install diagnostic tool fails to work, and the issue continues, then you will be required to manually fix the error related to the Microsoft components. This can be done by:
We will be exploring themethods to fix the QuickBooks desktop the installation errors with the help of the component repair tool. So, without further ado, let us get started:
Step 1: Fixing .Net Framework errors
QuickBooks desktop makes use of the .Net framework to connect the data with the applications that need an internet connection to be accessed. This is basically a component that is manufactured by Microsoft. If this component is damaged or corrupted, then you might experience some error codes such as Error 1603, Error 1722, Error 1903, and Error 1904. This component can be fixed by carrying out the steps below:
Download the QuickBooks component repair tool.
After it is downloaded, you need to save it on the local desktop.
Now it is then required to close all the applications running in the foreground, as well as the background and then start the QBInstall_Tool_v2.exe.
The process to diagnose the error will start automatically, in case the tool detects any issue, then you might need to restart the system.
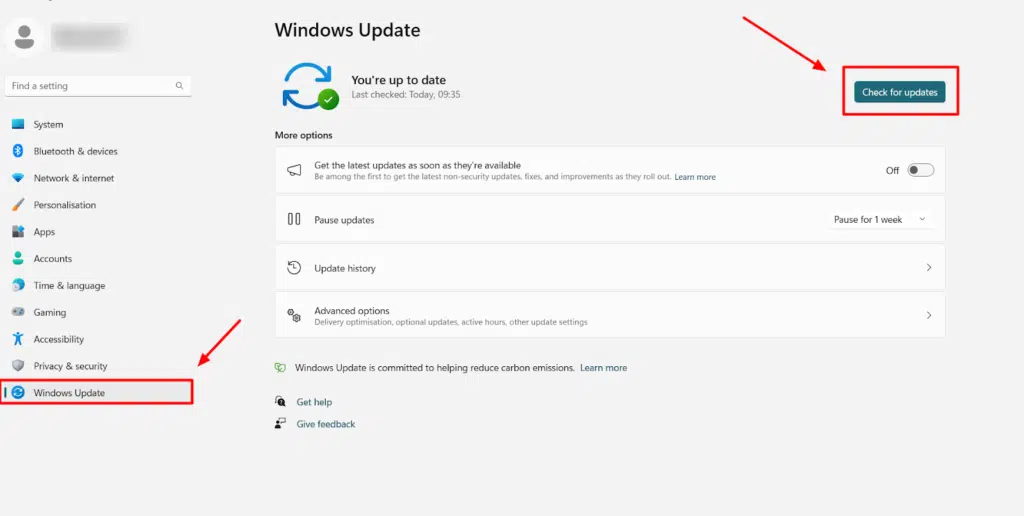
Running the component repair tool will resolve the error up to a great extent. However, if the error persists, then check if the Windows are updated or not.
Step 2: Reconstructing Microsoft MSXML
The QuickBooks installation process fails usually when the it comes across a damaged Microsoft MSXML component. In order to fix the issue, you need to follow the mentioned steps:
To begin with, register MSXML.dll file.
When the registration is complete, uninstall MSXML 6.0 and then reinstall it on the computer.
It is then required to uninstall MSXML 6.0 service Pack 1 and then re-install it.
After the above steps are performed, it is recommended to repair the MSXML 6.0 file with the help of QB component repair tool.
It should be noted that this tool may not be able to fix all the issues related to QuickBooks installation. You should use other troubleshooting steps to resolve the certain accounting issues.
Conclusion!
This drives us towards the end of this post, and we hope that the information we have shared in above might be of some help in making the best use of the QuickBooks component repair tool. However, if still something is bothering you, or you are getting any difficulty at any point of time, then get in touch with our U.S. based CPA's and accounting professionals/personnel at our dedicated support line i.e. 1-800-761-1787. Our QuickBooks desktop support team will be there to assist you in a single call. Feel free to call us anytime, we will be happy to help you.
FAQ's
Is the tool available for free?
Yes, you can download and use the QuickBooks component repair tool from Intuit at no cost.
How often should I use the Component Repair Tool?
You can only use this tool when you encounter installation related errors about damaged Windows components. You do not need to run this tool regularly.
What is the difference between this tool and the File Doctor tool?
The QuickBooks file doctor tool fixes company file and network related errors and the component repair tool repairs Windows components that are needed to install and run QuickBooks swiftly.