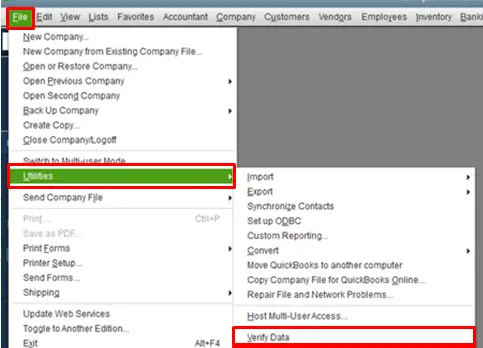
When it comes to the accounting software, QuickBooks is only a name that strikes into every accountant's mind. It is a one-stop solution to managing your accounting operations. But just like the other software, QuickBooks software has its positive and negative aspects and and one such negative of QuickBooks is that it is prone to certain errors. One such error that we will talk about today is the payroll errors which includes:
Payroll Error:
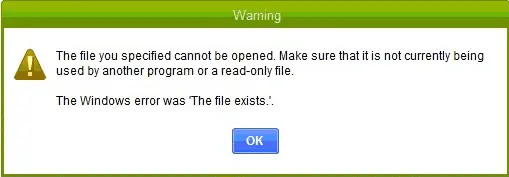
"The file you specified cannot be opened” It must not be already in use by another program or a read-only file.
Error:
"The Windows Error was The File Exists."
These error messages may pop up on the screen in a variety of circumstances. While downloading payroll, paying scheduled liabilities, and also while opening a federal or state form, you can stumble upon this sort of error. If you have encountered upon any one of them, then don’t worry, as we are here to assist you with the procedure to get the payroll back on track. This article will brief you with the various aspects associated with this error, along with the fixation steps for the same. Meanwhile, if you feel the need for technical help, you may reach us by ringing us a call at 1-800-761-1787.
A brief into the errors “The file you specified cannot be opened” and “The file exists”
Talking about the payroll errors: "The file you specified cannot be opened" and "The file exists", these errors can be faced while working on various accounting features like paying scheduled liabilities, opening a state/federal form, and also at the time of downloading the payroll update. You could see the error messages like "The file you specified cannot be opened. Make sure that it is not currently being used by another program or read-only file". Also, you could face an error message stating “The Windows error was the file exists”. There can be a bunch of factors causing the payroll errors, which we will be discussing in this post later on.
Causes of payroll errors "The file you specified cannot be opened" and "The file exists"
These payroll errors can be seen due to a couple of factors, out of which the most common ones are listed below:
These errors can be caused due to inactive/poor internet connectivity.
Improper and outdated firewall may also lead the error message ''the file you specified cannot be opened.''
Misconfigured internet security settings.
Any outdated QuickBooks desktop application file.
You might end up in the error if the QuickBooks is being interrupted by Windows user account control.
If you are not having admin rights, then this error message may show up.
Fixation methods for payroll errors: “The file you specified cannot be opened” and “The file exists”
There are a couple of steps that you can opt for in order to fix The file you specified cannot be opened and The file exists errors. We will be exploring each of the methods that can be implemented one by one, so let us have a look:
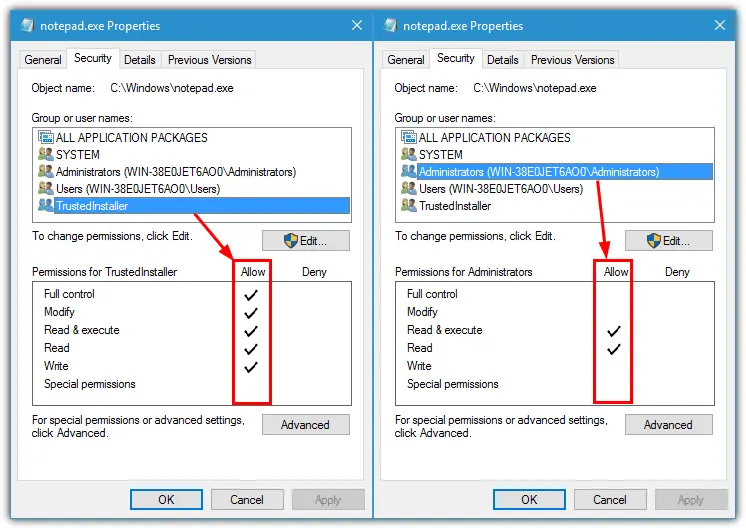
Solution 1: Updating Windows Permission
You can update the Windows permissions by opening the Windows Start menu.
And then, typing in File explorer and open the same from the Search bar.
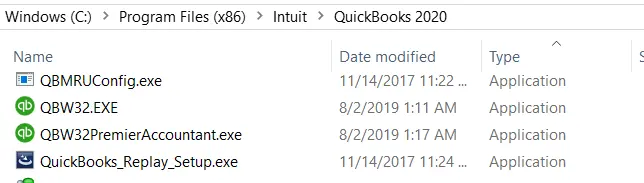
Next, spot the QuickBooks program file. It should look like this:
Processor Type
File Path for QBW32.EXE
32-bit
C:\program files\intuit\quickbooks (year)
64-bit
C:\program files x86\intuit\quickbooks (year)
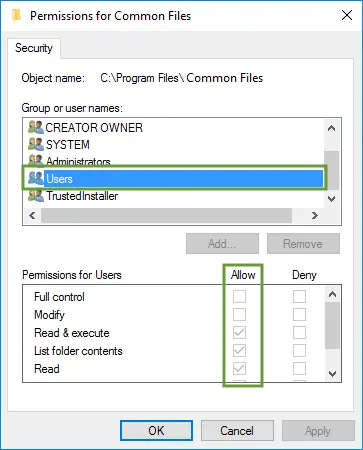
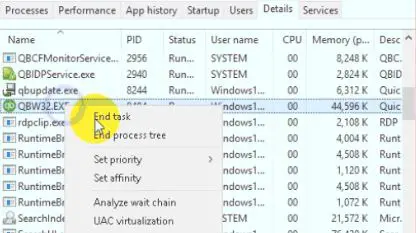
After this, hit a right-click on the QuickBooks program file and then click on Properties tab.
Once done with that, you need to opt for Security and Edit options.
Followed by selecting Add, and inthe Windows, type Everyone and hit OK button.
Now, choose the checkbox for Full control and then click on OK tab.
Also, choose Add again and type in users in the Windows type, and then select OK button.
The next step involves choosing the check box beside Full control in the security Window and hit OK tab.
To end the process select Apply and then choose OK to close the settings.
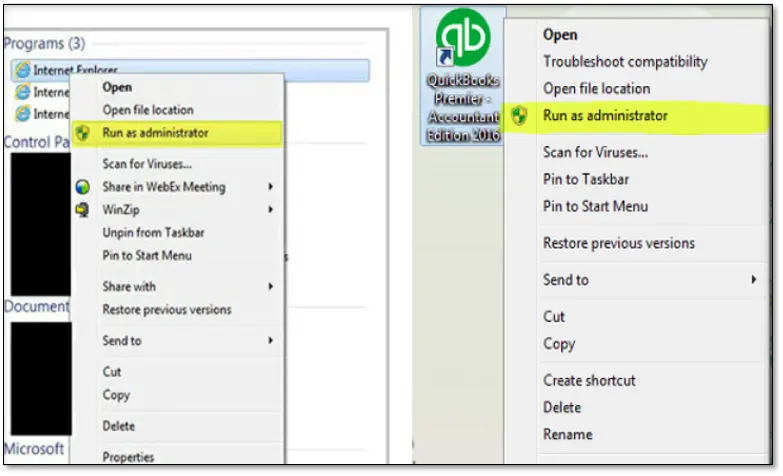
Solution 2: Running QuickBooks as a system administrator
Firstly, open the Windows Start menu.
After that, type in QuickBooks.
And look for the results listed in the search Window.
After that, hit a right-click on the QuickBooks version (and also the year) that you want to open.
Now, choose the Run as admin option from the drop-down menu.
Followed by running the Payroll updates.
The last step is to close QuickBooks and open it normally.
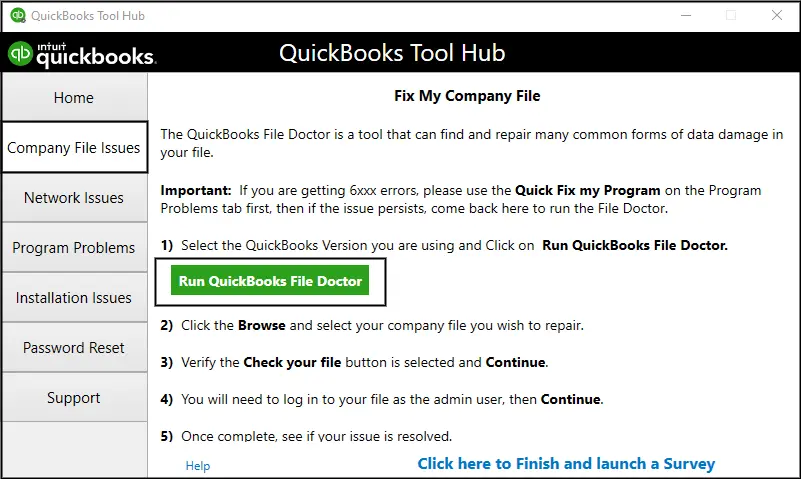
Now select Run QuickBooks File Doctoroption. Please note that it that the file doctor may take up to one minute to open.
Next step is to select your Company file from the drop-down menu.
Also, select Check your file and then click on Continue option.
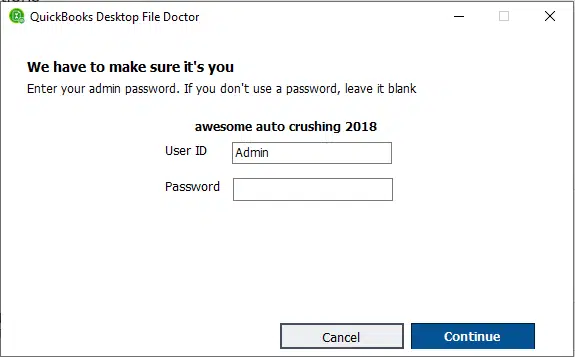
Now, finally, enter your Admin password and select Next tab.
Your file size will determine the scan time. It can take between 3 to 5 minutes in most cases. After the scan is complete, you can open QuickBooks and check your company file is repaired or not.
When asked, choose the desktop as the Default app location.
And then run once the download process ends.
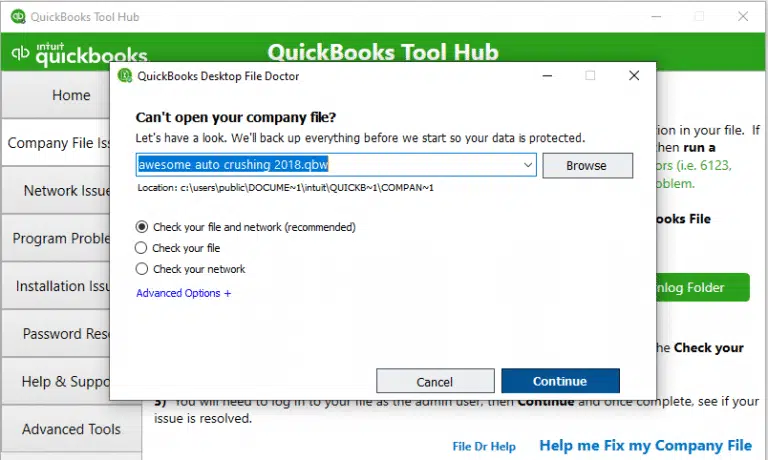
After the QuickBooks file doctor tool runs, you will be prompted to select for the error causing file, which will further lead to two options. You need to select for the one that suits the situation.
Running Quick fix my file
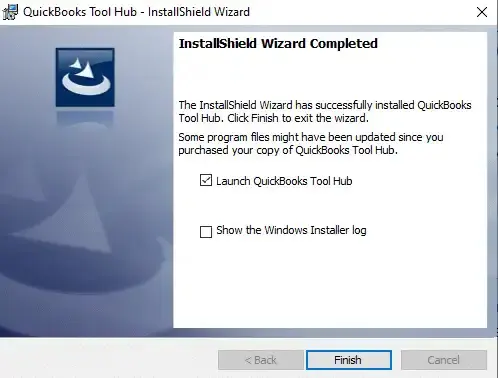
You should first have to launch QuickBooks tool hub.
And then, click on Company file issues tab.
Select Quick fix my file option. It will take some time to launch the program.
Once the repair process is complete click on OK tab.
Solution 4: Reinstalling QuickBooks Desktop
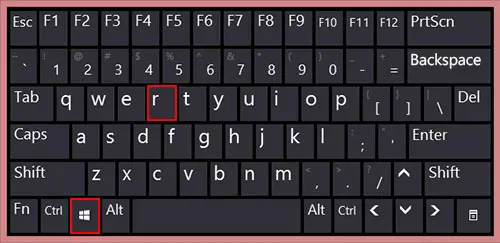
First of all, press Windows + R keys and open the Run tab.
In the run box, you will need to enter the text appwiz.cpl.
Followed by hitting Enter key.
And then, click on QuickBooks software twice and click on Uninstall option.
Solution 5: Re-register QuickBooks .DLL and .OCX file using reboot.bat file
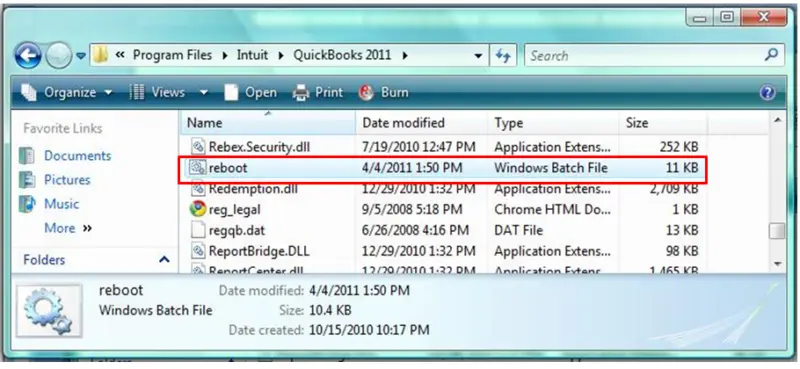
You should consider registering the DLL and OCX files of QuickBooks via the batch file named reboot.bat. The file can be located in the QuickBooks folder.
Firstly, make an exit from QuickBooks initially.
And then, right-click the QuickBooks icon and select Properties.
Open file location and then look for the Reboot.bat file.
And then right click the Reboot.bat file and select Run as admin.
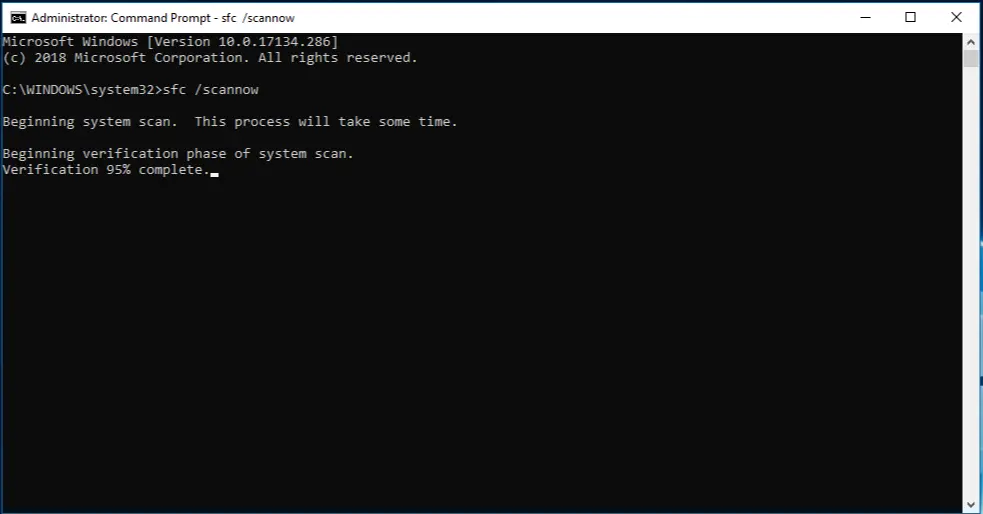
Now, wait for a few minutes until the Black command prompt scrolls all the files.
Finally, reboot the Windows and then check if the error.
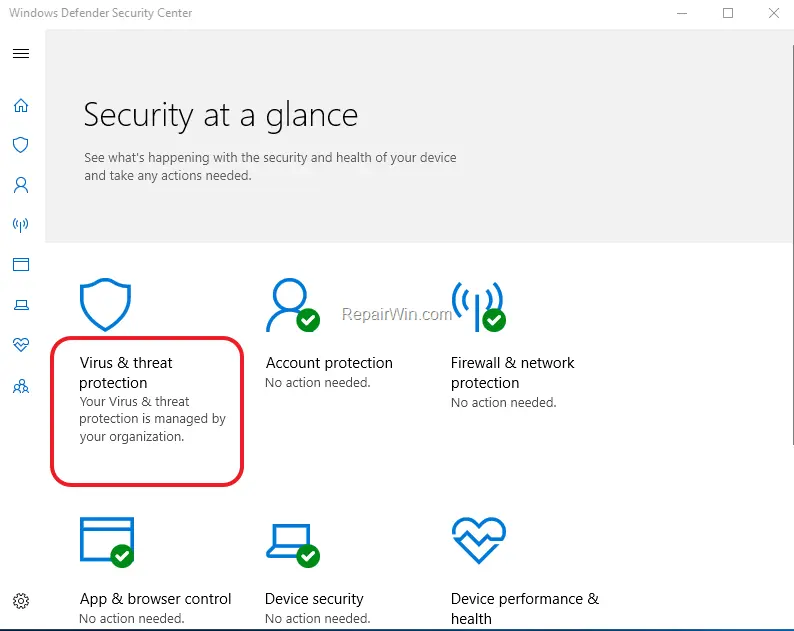
Solution 6: Turning off user account control (UAC) in Windows
This solutions requires disabling the UAC option in the control panel. To know more, follow the steps given as under:
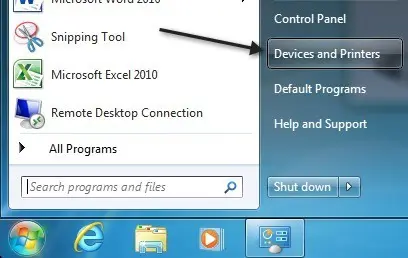
You need to first press the Windows + R keys and type Control panel.
Spot the User accounts from the Search bar.
Now, hit a click on Change user account control settings.
Click on Yes and then move the slider down to Never notify and then Turn off UAC.
After carrying out the steps stated above, you should be able to get rid of the payroll errors: "The file you specified cannot be opened" and "The file exists". However, if you ever feel the need of availing advice from our QuickBooks payroll support team, then you can connect with us through helpline i.e. 1-800-761-1787. Giving us a call will relieve you from all kind of stress related to QuickBooks. Help is available 24X7X365.. We are available to provide you with quality services and assistance for resolving all the QuickBooks intricacies.
Frequently Asked Questions
Q1: How can I resolve the "The File Exists" error in QuickBooks Payroll?
Ans. To address the "The File Exists" error, you can try the following steps: 1. Rename the file to some different name. 2. Check if the file has the same name as an existing file in the specified location. If that is the case, select a different file name. 3. Make sure that the file is not open or used by any another program. 4. Multiple users should not be trying to create the same file.
Q2: Can I encounter the "The File you Specified Cannot be Opened" error if the file is located on a network drive?
Ans.Yes! In case the network drive is inaccessible, users can encounter such errors.
Q3: I renamed the file, but I'm still encountering the "The File Exists" error. What should I do?
Ans. If renaming, the file doesn't fix the error, then, double-check the specified location to ensure that there are no other files with the same name. If that is the case, then select a different file name for preventing any conflicts.
Q4: Is it possible that the QuickBooks company file itself is causing these errors?
Ans.Technical errors in the company file or corruption in the same could lead to such errors. In such cases, it is recommended to use the tools like QuickBooks File Doctor Tool, Quick Fix My Program, Install Diagnostic Tool, etc.
Are you facing Error 1722 while installing or using the QuickBooks desktop? Don't worry, you are not alone. When downloading or installing payroll updates in QuickBooks, users might bump into QuickBooks error code 1722. The Installer error is caused due to the limitation where it accesses and the server gets failed to respond. As such, the software fails to connect with the server and stops responding. It is often seen with a warning message that states as:
Error
Description
Warning
Error 1722: There is a problem with this Windows Installer Package. A program run as part of the setup did not finish as expected.
Error
System Error Code: 1722. The RPC Server is unavailable
It is basically a runtime error that can be resolved by using Windows restore method. To know more, read ahead and explore this article carefully till the end. Here, we have crafted a comprehensive guide about the triggers of install error 1722 and the effective strategies that can be enforced to dump this bug. In spite of everything, if you wish to join hands with a team of technically sound accounting experts, then feel free in connecting with our U.S based professionals at 1-800-761-1787 and let them handle the situation for you.
What is QuickBooks error code 1722?
QuickBooks error code 1722 generally encounters during the installation or uninstallation of QuickBooks desktop. It points to a problem with damaged Microsoft components, corrupted system files, or incomplete installation of QuickBooks. The error message usually states: "Error 1722: There is a problem with this Windows Installer package." Moreover, when the Microsoft.net framework or any other component of Windows gets damaged, this type of error is most likely to occur. This error code makes the Windows run sluggishly and also freezes QuickBooks for some time.
Before you dive into the post to unleash the causes and fixes of this error, it is better to learn the basics about QuickBooks installation error message 1722. Well, this error indicates any sort of issue that occurred when structuring the software. It also indicates the operating system is taken back to the previous stage where QuickBooks worked properly.
Important steps to perform before troubleshooting
You can try performing the below set of steps related to repairing the system registry so as to rectify the error 1722 in QuickBooks, especially when you face this issue after updating your operating system.
Start off with repairing registry entries related to the error and run a complete scan of the system.
Furthermore, run disk clean up to eliminate all temporary files and folders from the system.
You are then supposed to update PC device drivers.
You are then suggested to install all the Windows updates available on the internet.
Run the Disk Clean up
Causes and Quick Fixes of QuickBooks Error Code 1722
Thefixation processes for QuickBooks error code 1722 might depend on the factor causing the issue. Let us explore each of the causes and their respective rectification method one by one:
Cause 1: Incomplete/damaged installation of QuickBooks
Solution 1: Clean installation of your QuickBooks software
Cause 4: Any other program deletes QuickBooks files maliciously
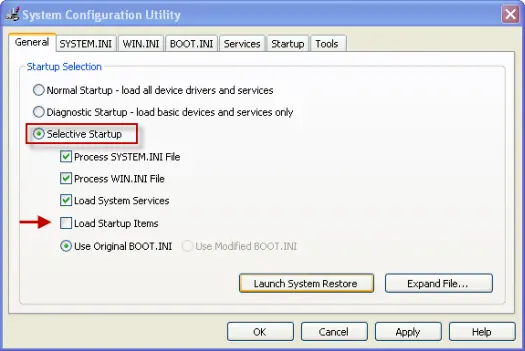
Solution: Restart system in selective startup
Restarting the system in selective startup mode would work when you face the QuickBooks error code 1722, when the QB related files are deleted maliciously.
Start off with pressing Windows + R keys, which would show the Run box on the screen.
Later type in MSCONFIG into the run box, where you will have to hit OK tab.
Head forward by selecting the Selective startup option in the General tab and also ensure that you have unchecked the Load startup items options.
Moreover, click on OK tab and choose the restart tab if asked.
End the process by uninstalling and reinstalling QuickBooks.
After reinstalling, ensure to get back to the normal mode, using the steps below:
Press Windows + R keys and open Run window.
Type MSCONFIG into the run box and hit OK tab.
Select Normal startup option and hit a click on Apply and OK tab.
Reboot the system and complete the process.
Cause 5: Windows is corrupted or incomplete QuickBooks software installation
Solution 1: Use QuickBooks repair tool
If you are facing the issue due to corrupted windows or incomplete QuickBooks software installation, then it can be resolved using QuickBooks repair tool. The steps to be performed in here are as follows:
Identify the location of QuickBooks file and click on the select File tab.
And then, click on the Search files option.
The scan file option should be picked to scan the selected file and click on the Company tab.
Now hit the Customer tab to see the customer-related information.
After that click on Vendor tab and tap on the Employees tab.
Also, hit a click on the Repair tab, and then you will see a save as dialog box.
Now click on Start tab.
After the message stating theprocess completed successfully appears on the screen, click on OK tab.
And close all tabs to complete the process.
Solution 2: Update Windows
Another method for the same cause is to update the windows. The steps to be performed in updating windows are as follows:
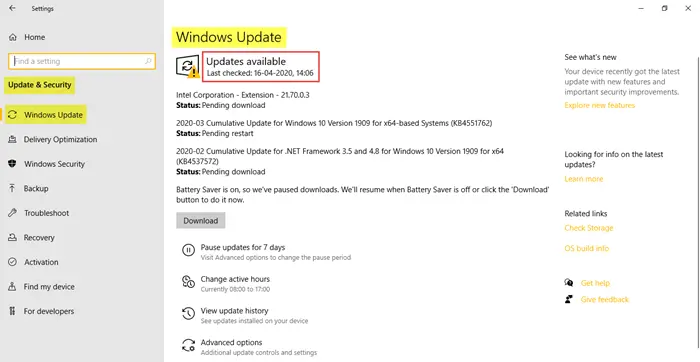
In order to Update Windows, you should first click on the Start tab.
Head towards the Settings tab.
Later click on the Update and security tab.
Tap on the Windows update section and click on Check for updates.
The updates will start installing automatically if available.
Without this piece of writing, the situation might get so daunting and unmanaged, but the above-discussed set of steps would make the process easier, and also it would make it easy for users to handle the error without much hassle. Despite that, if the QuickBooks error code 1722 prevails further, then the ideal solution for the error can only be achieved if you collaborate with a QuickBooks error support team that has the experience and expertise to dump the errors related to the QuickBooks accounting software. Connect with our accounting experts and CPAs right away using our support line i.e. 1-800-761-1787.
FAQ's related to installer error 1722
Is QuickBooks error 1722 is an Install Error?
Yes, error 1722 is an Install Error that occurs during the software installation process.
How do I fix a corrupted QuickBooks file?
You can try using the QuickBooks File Doctor tool or restoring a backup of the file. If those options don't work, you may need to use a third-party file repair tool or contact support for assistance.
What generally causes error 1722 in QuickBooks?
This error is usually caused by a damaged Windows installer file, a virus or malware infection, or conflicts with other installed software.
What error messages you can when error install error occurs in QuickBooks?
When an install error occurs in QuickBooks, you may see an error message such as: "Error 1722: The installer has encountered an unexpected error," "Error 1904: [file path / name] failed to register," or "MSI returned 1603: Fatal error during installation."
What are symptoms of QB Error code 1722?
Identifying the issue becomes possible with the below signs and symptoms. Let us have a look: 1. The active window crashes, along with the program. 2. The system crashes regularly when running the same program. 3. As a result of this error, the system might run sluggishly and might not respond to the keyboard inputs. 4. The system might freeze due to this error, and you might face the same error repeatedly.
While working with QuickBooks, did you try to connect an app to the accounting software using the web connector but suddenly encountered an error on the screen stating the following error message:
“QBWC1039: If the QuickBooks company data file is not open…”
“QBWC1039: This application does not have permission to access the QuickBooks company data file…”
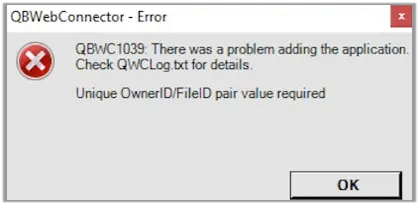
QBWC1039: Unique OwnerID/FileID pair value required
“QBWC1039: Unable to add FileID to company file for this Application”
“QBWC1039: There was a problem adding the application. Check QBWCLog.txt for details”
Well, these are one of the most common errors that have been facing and reporting by users in the recent times. The QuickBooks error code QBWC1039 is usually seen when you tries to add the same configuration file twice within the application. There can be multi-faceted reasons that can trigger to this error.
If you are also a victim of this error, then we are here to rescue you. You can read this article and this will help you shun off the QuickBooks error code QBWC1039. But if you feel that you need our technical support at any point of time, then do not hesitate in calling us at helpline i.e. 1-800-761-1787. We will be there to help you out and get you out of this annoying error.
Before you get your hands to the fixation of QuickBooks error QBWC1039, we recommend you to first get a brief of what this error is all about. There can be several instances of this error that you can encounter while using QuickBooks desktop. You might see a couple of error messages when this error appears on the screen. Let us check out the error messages one by one:
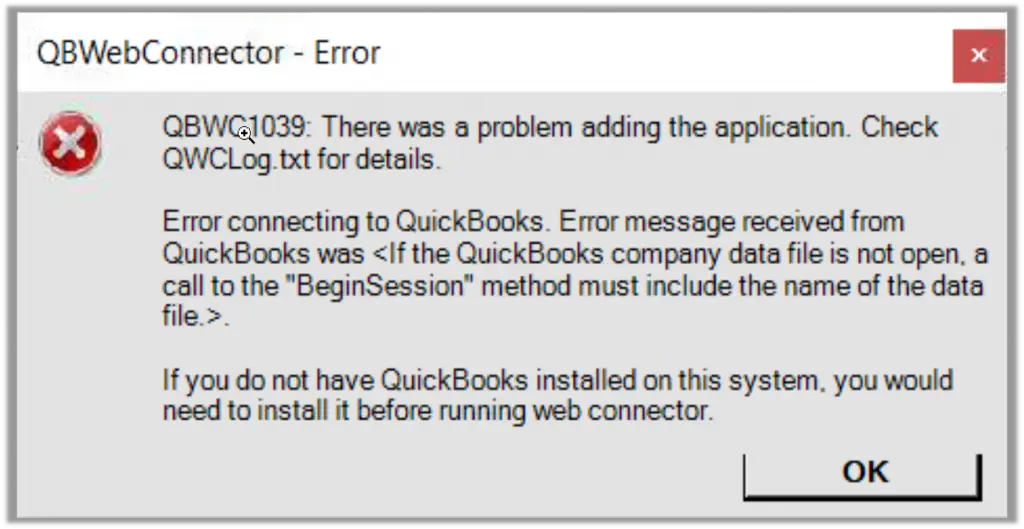
Error Message 1:
QBWC1039: There was a problem with adding the application. Check QWCLog.txt for details
“If the QuickBooks company data file is not open, a call to the Begin Session” method must include the name of the data file.
Error Message 2:
This application doesn’t have permission to access this QuickBooks company data file. The QuickBooks administrator can’t grant access permission through integrated application preferences.
Error Message 3:
Unable to add FileID to company file for this Application
There can be a couple of factors causing this issue, which we will be discussing in the later part of this post. So, users are encouraged to make sure that they scroll through the post carefully.
Why do users face QuickBooks error QBWC1039?
As we said above that there can be a couple of factors that can lead to such an annoying error. Let us explore the various possible factors one by one:
When a QuickBooks company file is moved or relocated from the original location, the error code appears on the screen.
When the user has already made several attempts to integrate the application, then this error is probable to happen..
The user could end up in a similar issue if the name of the company file is changed.
Compatibility issues between the company file with the application.
There can be a situation when the QuickBooks admin restricts the integration of the third-party application.
Faulty removal of the third-party application or warehouse manager can also promote the QuickBooks error QBWC1039.
Getting rid of repair QuickBooks error code QBWC1039
There are a couple of solutions that could help users in resolving the QuickBooks error code QBWC1039. We will be exploring each of the methods one by one, so let us begin:
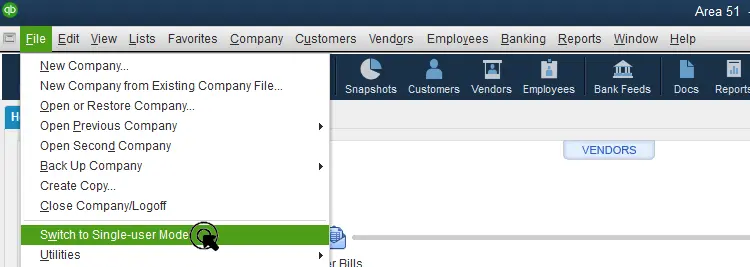
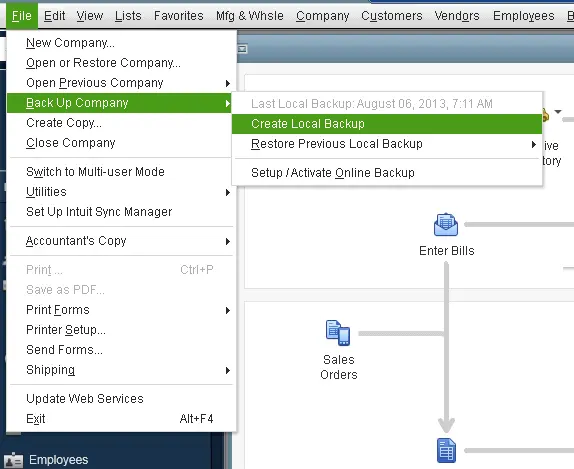
First of all, open the QuickBooks software and the file. Followed by switching to the single-user mode.
After that, the user is required to click on the file menu and then backup company option.
Next step is to select to create local backup option and then choose the local backup.
Followed by clicking on the options tab for opening the backup window and then select browse.
Now, the user needs to select the local hard drive location of the company backup file copy.
Also, hit a click on Ok and save it option after the backup is complete.
Method 2: Restoring the backup file to the previous location
In case the user has saved the file in USB or another external file, then they needs to move it to the local hard drive and then follow the steps to restore a file from the previous location. The steps to be followed are:
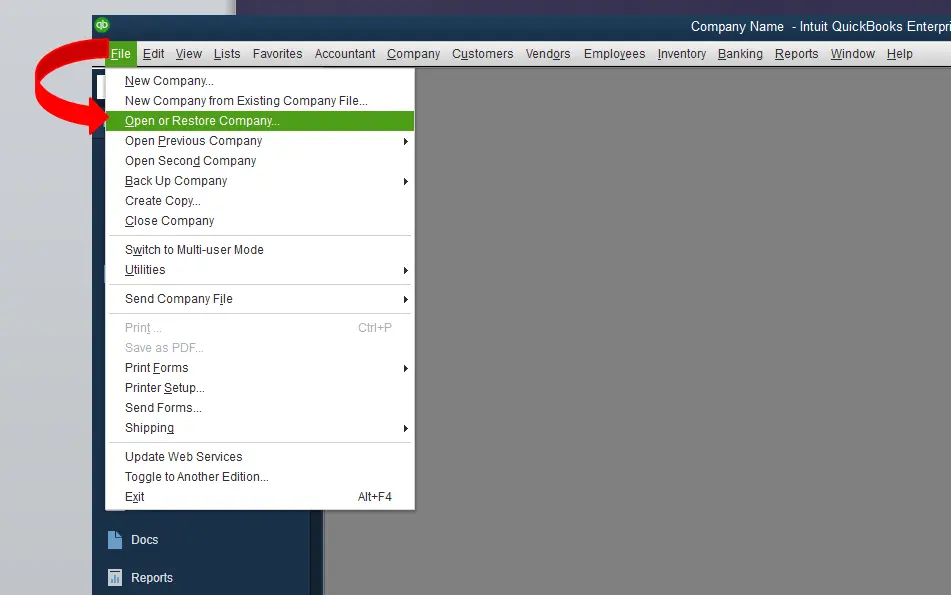
The first step is to click on file menu after launching QuickBooks desktop.
After that click on open or restore the company and select to restore a backup copy.
The next step is to click on the next option and then select the local backup tab.
After that hit a click on next and browser backup company file.
Now select a folder to save the restored file.
Also, the user need to save the file by a unique name and try not to overwrite the new company name.
Lastly, the user is required to open and save the restored company file.
Method 5: Troubleshoot permission issues in accessing QuickBooks company file
If you are using admin credentials, then carry out the below steps or you can also ask your admin to carry out the steps for you.
Initially, the user needs to sign in the QuickBooks as an admin.
And then, visit the file menu and switch to single-user mode, if QuickBooks is on multi-user mode.
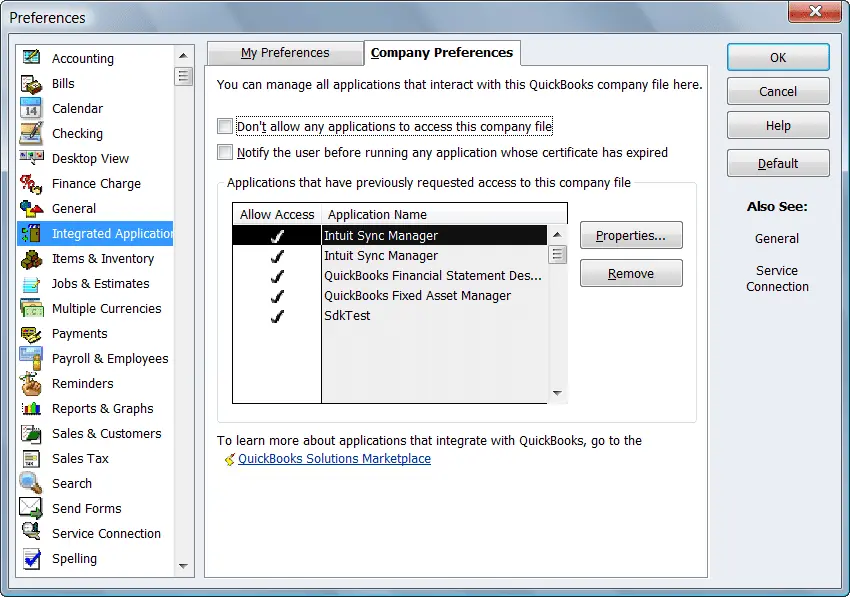
Also, from the edit menu, select preferences.
The next step is to choose the integrated application and then choose the company preferences tab.
After that, uncheck the box for don’t allow any application to access this company file.
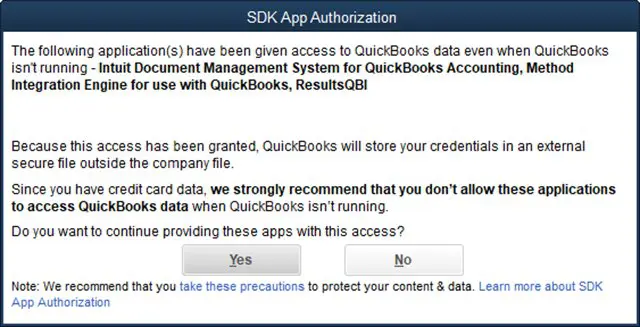
Also, in the SDK app authorization, the user needs to select Yes.
Along with that check the third-party application to allow access.
And then, end the process by clicking OK button.
Method 6: Configuring web connector to run when QuickBooks is closed
In case the user hasn't already configured the web connector, then they needs to configure the web connector to run when QuickBooks is closed. The steps involved in this process are:
For this, the user need to sign in to QuickBooks as the admin user.
And if the QuickBooks is on multi-user mode, then navigate to the file menu and then select the switch to single-user mode.
Also, from the edit menu, select preferences.
Followed by selecting the integrated application and then select the company preferences tab.
The next step is to choose the third-party app and choose properties.
Now the user needs to allow this application to log in automatically.
And in the authorization window, choose yes.
Also select the user to log in, and then hit the OK button.
Furthermore, save it to the default downloads folder.
Along with that, head to the downloaded file.
Now right-click the file and choose run as admin and perform the steps related to the installation wizard.
Hit a click on finish tab and reboot the system.
Start using the QuickBooks latest release software.
Summing up!
In the post above, we have tried to sum up all possible methods that could help users in solving the QuickBooks error code QBWC1039. However, if users are facing difficulty at any stage or if in case the user is doubtful of any step, they are encouraged to call our QuickBooks error support experts anytime. Make a call at our dedicated support line at 1-800-761-1787, and our certified experts will be happy to resolve the error on your behalf. Getting in touch with certified professionals cuts off the difficulty encountered while troubleshooting any technical snag.
FAQs
What is QBWC1039 error in QuickBooks?
Error QBWC1039 is usually occurs when using the Web Connector tool to connect QuickBooks to another application. It appears as “QBWC1039: If the QuickBooks company data file is not open…”
What is QuickBooks web Connector used for?
This tool is used for a seamless exchange of data between QuickBooks and other applications. QuickBooks 2017 and newer versions offer the advantage of accessing it through the File tab in "Update Web Services" option.
Why is my QuickBooks web Connector not working?
There can be many causes behind web connector error in QuickBooks. These include: 1. Insufficient privileges to use the tool 2. The files related to the Web connector tool are damaged 3. Firewall is preventing the Web connector operations 4. Web connector log file is damaged or missing.
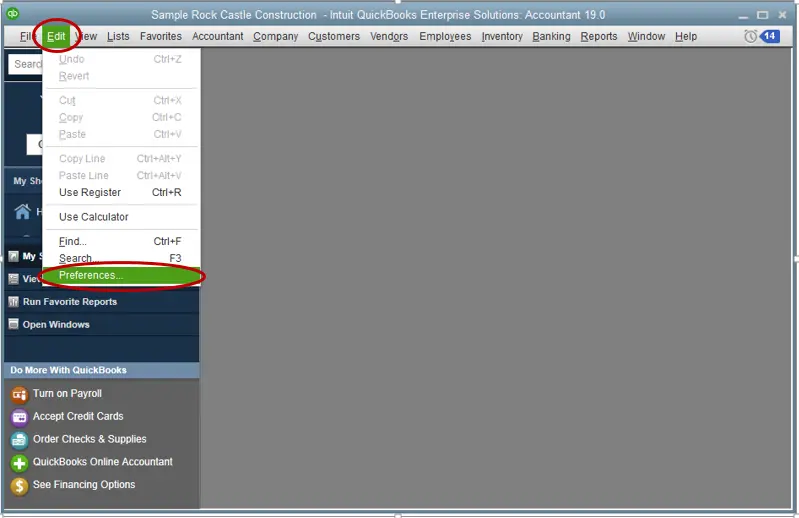
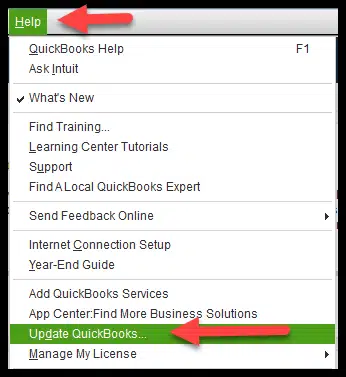
Learn the complete process to fix Error PS032, or PS077 while updating Payroll in QuickBooks Desktop:
In the process of using QuickBooks accounting software, users might eventually land upon some technical glitch. These technical snags might include the error PS077 or PS032 in QuickBooks. These errors are common among QuickBooks payroll users and usually show up when there is an issue with the payroll subscription validation or software update installation. Also, such errors indicates that the settings of the software are misconfigured or incorrect.
This error code, in certain situations, can be pretty much difficult to tackle. But the good news is that this error can be fixed with the right troubleshooting steps. QuickBooks throws an error message associated with this payroll error whenever the software has any issue in installing the payroll tax table update. This segment will provide you with a better insight into QuickBooks error code PS077 or PS032. Hence, stick around till the end and unleash the strategies to be implemented to shun off the bug easily. Or connect with our U.S based accounting experts at1-800-761-1787 today!
What is QuickBooks Payroll PS032 or PS077?
As we discussed earlier, QuickBooks Error PS077 or PS032 are payroll update errors and often encountered when downloading the payroll updates or when QuickBooks fails to install the latest payroll updates. Sometimes, incorrect billing information or outdated QuickBooks desktop versions may also lead to such issues. When this error encounters, it comes up with a warning message stating as:
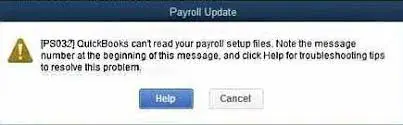
Payroll Update
[PS032] QuickBooks can not read your payroll setup files, Note the message number at the beginning of this message, and click Help for troubleshooting tips to resolve this problem.
When payroll error code PS077 occurs you may see the following error message on your desktop screen:
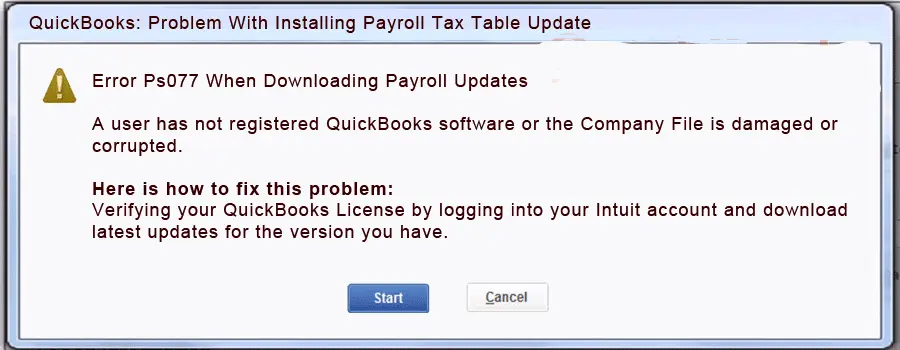
QuickBooks: Problem having trouble installation payroll tax table update.
Error PS077 When Downloading Payroll Updates
A user has not registered QuickBooks software or the Company file is damaged or corrupted.
Though you might be able to update the tax table after coming across such an error, but you wouldn’t be able to carry out the further tasks. Users should be aware of the fact that any error code with prefix PS in QuickBooks indicates such payroll error. One can easily spot or identify this error with the help of the below discussed signs and symptoms.
As a result of this error, you might not be able to download the payroll updates.
Another sign of PS032 or PS077 can be if the tax table fails to update or gets stuck in the middle of the process.
An error message popping up on the screen can be a clear indication of this error.
Also, system freezing up can be another easy indicator of these payroll errors.
What instigates QuickBooks error code PS032 or PS077?
You can end up with this problem if the tax table file is corrupted or if there is invalid in the components/payroll folder.
Moreover, if the QuickBooks company files are corrupted or damaged.
Another reason can be if you aren't registered in QuickBooks.
Or the billing details are out of the date and it might be corrupt.
Key points to consider
Before you dig in deep, it is very much important to take into consideration the key pointers that would influence your solution steps. Let us explore the pointers together:
Before heading to the solution steps, you will have to validate the QuickBooks payroll subscription.
Moreover, you will have to verify that the billing information entered in the payroll account is correct and appropriate.
Required Solutions for Error PS032, or PS077 While Updating Payroll in QuickBooks Along with Valid Causes
Often the solution to an error depends on what triggered the error. So, here is a detailed analysis of the causes and fixes of QuickBooks payroll error PS077 or PS032. Let us dive in together:
Cause 1: Damaged or corrupted tax table file
Note: This solution is applicable only when you are having one version of QuickBooks.
Solution: Downloading QuickBooks and latest payroll tax tables
Here under, you will have to remove the existing one and the additional installations.
You might come across with QuickBooks error PS077 or PS032 in case of damaged company files, or also due to some issue with the software itself. In such a situation, it is recommended to run for the repair of the software. You can carry out the necessary steps involved in running the repair and fixing the technical glitches of the software.
Cause 3: Billing details are out of date or incorrect
Solution: Note the billing information
Often entering incorrect billing details can trigger such an error, as a result of which, it is recommended to ensure that the billing information is correct and appropriate. Moreover, you should note down the QuickBooks license number, by:
Tapping onto the F2 key.
Keeping a note of the License number.
Closing the product information window by clicking on the OK tab.
Miscellaneous Solutions to Fix QuickBooks Error PS077 or PS032: When Updating or Downloading Payroll
The above-discussed solutions were segregated according to the respective causes, whereas below are a handful of solutions that can be integrated in case the error cause can’t be identified or if the above solutions failed to fix the issue.
Misc Solution 1: Turn off UAC:
The user account control (UAC), especially when using windows 7 or 8. And try updating the application with the UAC being disabled.
Misc Solution 2: Steps for only one version of QuickBooks being installed
Under such situation, you will have to take a backup of the company file.
Close all the running applications.
Open the run window.
Windows 8:
In case you are Windows 8 user, then you would have to move to the windows system section and open the start screen. Followed by right-clicking the background to All Apps. And clicking on the run tab.
Windows 7 and XP:
If you are currently using windows 7 or XP, then in that case, open the Windows start tab and select the Run tab. In case you haven’t logged in with admin rights, then hit the Start tab and opt for the all programs option. Moreover, select accessories and the run tab, respectively.
Windows Vista:
If you are using windows vista, then click on the vista logo and press Windows + R keys in order to open the run command. After that, continue with the steps below:
Here, you will have to open the control panel.
And then, navigate to the programs and features and also double-tap the same for adding or removing the programs in windows vista.
The ones who are having only one version, need not continue further.
The above steps would land you into QuickBooks Desktop installation wizard.
Whereas you will then have to click on Next.
Furthermore, selecting remove and hitting next is recommended. Also, you should continue with the process as per the requirement.
In order to complete the update, the error message must have the option to go online. To retrieve the update, you will have to click on the Yes tab and go online, only if asked to.
Or the error might have the option to click on ok tab to go online. Clicking on the ok tab will run the installation automatically, and it might display the same error message again.
You are suggested to close QuickBooks on all system if the data files are available on the server. And also run the payroll update from the server. In case the update succeeds on the server, then install it on all other versions of QuickBooks.
Misc Solution 6: Rename ‘QBWUSER.ini’ and ‘EntitlementDataStore.ecml’ Files
Locate the QBWUSER.ini file on your PC and open it.
Right-click on the file once you've found it.
Select Rename.
Add .old extension to the end of the existing name.
Then, rename the EntitlementDataStore.ecml
Now, open QuickBooks software and access your company file.
Make a duplicate copy of this file and save it to your computer's local folder.
After that, go to that folder and open your file.
Check if the file opens without any error.
Crux of the article!
Disposing of QuickBooks payroll error PS077 or PS032 might seem to be a brainteaser to the majority of the users. Nevertheless, we have tried to summarize the entire set of strategies that can be employed to dump this error in this piece of writing. Despite that, if you are unable to address the technical glitch, then in such a scenario, we would highly advise you to join hands with a QuickBooks payroll support team of professionals and let us take control of the situation. Do not be diffident about consulting our accounting experts and CPA’s using our dedicated support line i.e. 1-800-761-1787. We will surely assist you will the most viable troubleshooting alternatives there and then.
Frequently Asked Questions (FAQs)
What is payroll errors in QuickBooks?
These payroll errors belongs to the series of PSXXX errors encountered while updating the payroll or while setting up the tax tables in QuickBooks payroll.
How can I fix such error codes in QuickBooks?
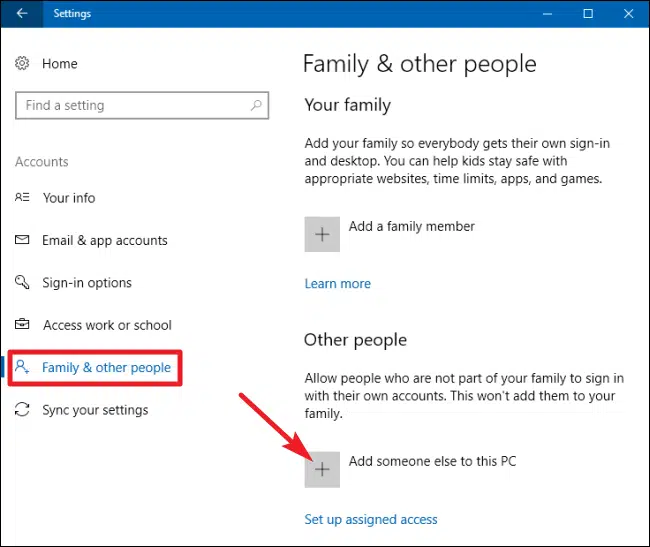
The multiple methods for fixing these error codes are: 1. Repair QuickBooks. 2. Turn off UAC. 3. Adding a new user account 4. Change the CPS folder name. 5. Rename the QBUSER.ini file.
What are the different QuickBooks payroll installation errors?
The various installation errors of QuickBooks payroll encompass Error PS077, Error PS032, QuickBooks code PS036, Error PS038, including other errors of the PSXXX family of error codes.
What if the error doesn’t resolve after trying all fixes?
If you still face PS077 or PS032, you may need to contact QuickBooks Payroll Support or a ProAdvisor to repair damaged installation files or verify subscription manually.
Can running QuickBooks in multi-user mode cause these payroll errors?
Yes. Payroll updates are best done in single-user mode. Running updates in multi-user mode can sometimes lead to interruptions.
Do I need an active subscription to avoid these errors?
Absolutely. An inactive or expired payroll subscription is one of the leading causes of PS077/PS032 errors. Renewing your subscription will fix this.
Can incorrect billing information cause QuickBooks PS077/PS032 errors?
Yes. If your billing details are outdated or incorrect, QuickBooks won’t be able to validate your payroll subscription, which triggers these errors.
Learn how to move QuickBooks to new computer or how to transfer QuickBooks to a new computer safely with this complete step-by-step guide.
Have you decided to change the current system you are currently working on? Hang on! What about your QuickBooks software? Well, shifting to a new system also requires transferring QuickBooks desktop to a new system. This can be a hectic process and very important one too. If it is the same situation that you are in, we are going to help you out.
Often it is found sensible to change the system every few years, in order to get your hands on some amazing functionalities and upgradations. Some of the reasons behind this decision can be better configuration, faster speed, more space, and many more. In such a situation, you might find transferring QuickBooks accounting software to be a brain teaser. This decision could be due to a better configuration, enhanced speed, higher storage, etc.
Once you have installed a newer or the same version of QuickBooks on the new computer using the steps that are discussed later in this piece of information, you can transfer a backup of the old system’s company file. And continue to track the scheduled payments to vendors, the rent, and the record of all business income and expenses after the process completes. This segment is written with the intent to provide a better insight into the process of how to transfer QuickBooks to a new computer. You should stay glued to this piece of article or connect with official QuickBooks support for assistance.
Requirements to Transfer QuickBooks to a New System
Transferring QuickBooks desktop to a new system doesn’t require a huge list of things, it just demands a few basic things, which we have enlisted below. Let us explore together:
You might have to register for the software after the installation and also ensure that the new system is connected to proper internet services.
The new system should have access to seamless internet services.
Uninstalling QuickBooks desktop from the old system is also required, but after creating a backup of the QuickBooks company files.
Keeping the QuickBooks software installation disk or the setup file stored on an external device is also required.
You will have to have a USB flash drive with enough free space to hold QuickBooks files. The tool will tell us the free space required. It can be approximately 15 to 250 MB.
Steps to Transfer QuickBooks Desktop from Old Computer to New Computer
Following are the quick steps to move your QuickBooks and its data from your old computer to a new computer:
Use Migrator Tool to transfer QuickBooks desktop
If you need to move QuickBooks to new computer or want to know how to transfer QuickBooks to a new computer, then the QuickBooks Migrator Tool can make the process simple and secure. You can also perform this manually if you prefer. The transfer process can be carried out in two parts, which we have elaborated on later in this write-up. Before you head further, make sure to have access to the admin user, as the steps can be performed only using admin credentials.
Important: To use the Migrator Tool, you’ll need to be the company Admin.
Basics of QuickBooks Migrator Tool (How the tool actually works?)
QuickBooks Migrator Tool helping users transfer accounting data easily.
Before you jump onto the process directly, get familiar with the basics of the migrator tool. This is how the tool works when you move QuickBooks to new computer:
You might first have to create a complex password for unlocking everything that is copied to the new system. The password is used once and only by the migrator tool. Also, you should make a note of the password to avoid losing it.
Later, the tool will copy up to the last 3 company files opened to a USB flash drive.
And you will have to use the flash drive for moving the files, and the rest of the technical work would be carried out by the migrator tool.
The tool will then download the right version of QuickBooks Desktop to the new system and will set it up with the files.
Keep a note of the fact that the tool wouldn’t reformat the drive or erase other files.
Steps for Setting up and using the Migrator Tool in QuickBooks
Now that you know the basics of the migrator tool and other important facts, it is the right time to unleash the steps for setting up and using migrator tool in QuickBooks. The steps can be segregated in two parts, i.e., for the old computer and the new computer. Let us check out each of the steps one by one to understand how to transfer QuickBooks to a new computer properly.
Step 1: On Old Computer
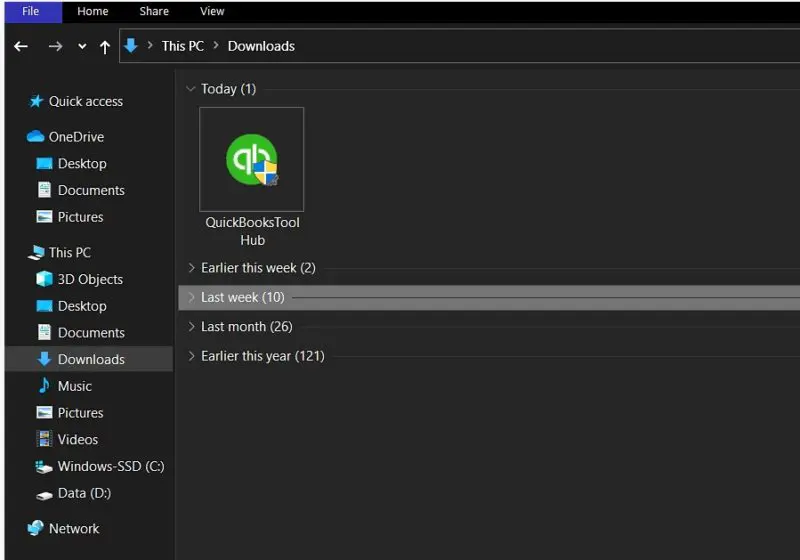
To kick start the process, you need to first download and save the QuickBooks Migrator Tool on a USB flash drive. Moreover, one can easily download it from the official Intuit website.
Open QuickBooks and head towards Files > Utilities > Move QuickBooks to another system and then pick the option stating “I’m Ready.”
Screenshot showing how to move QuickBooks to another computer.
Further, QuickBooks will ask you to create a complex password. It is used to secure company files in the USB flash drive. Keep in mind that this is a one-time password and you would require this password when you plug in the USB to the new system. You are strongly suggested to make a note of the password to avoid any further hassle.
Steps to move QuickBooks from one computer to another.
Pay heed to the on-screen instructions, which will start the process of copying files.
It might take time for this process to complete, which largely depends upon the size of the company files. The size of the company files usually falls between 150 to 250 MB.
Screenshot 3 showing the process to move QuickBooks to another computer.
Step 2: On new computer
When inserting the USB drive, the migrator tool will not run on its own due to the Windows security protocols and this is the reason that you need to run it manually.
To start with the migrator tool, you are suggested to open the flash drive and look for Move_QuickBooks.bat file and then run it.
Later, enter the One-time password that was created earlier and wait for the tool to complete the procedure.
The point that you should keep in mind is that the QuickBooks migrator tool file will be automatically deleted once the process is complete, but other data in USB will remain untouched. It is highly recommended to change the name of the files on the old system to avoid any mess.
Go to Help tab, then proceed to Register QuickBooks.
Steps to register QuickBooks Desktop and activate your product.
Enter the necessary details like Phone number, Postal code, and License key. These are important for successful registration.
Screenshot showing where to find the QuickBooks license number and product code.
Information that won’t move along with this process
There is certain information and data that you might have to move manually when you move QuickBooks to new computer. This information includes the following:
You might have to uninstall Intuit Data Protect on the old system and then sign in again on the new system.
The company files other than the 3 most recently opened won’t get copied automatically.
The QuickBooks Payroll and Payment Service data will have to be moved manually by logging into the new system.
Steps to Transfer QuickBooks Desktop from Old Computer to New Computer
Users can manually move QuickBooks to a new system, and this would move most of the QuickBooks data at once. The steps involved in these processes are as follows:
Step 1: Creating backup of the company files and QuickBooks license
Under this particular process, you are recommended to Create a backup of company files and QuickBooks product license to the external storage device.
Screenshot showing the Backup Company option in QuickBooks.
Screenshot showing how to restore a backup file in QuickBooks.
Once the data is successfully transferred, you can Uninstall the QuickBooks.
Screenshot showing how to uninstall and reinstall QuickBooks on a server computer.
Step 2: Restore the backup of the company files on the new system
Here, you are supposed to install QuickBooks on the new system.
Later insert the Storage device.
Heading forward, you are suggested to open QuickBooks and navigate to the File menu and also choose the Open and restore company option.
Screenshot showing the ‘Open or Restore a Company File’ option in QuickBooks.
Hit a click onto the Restore a backup copy and hit Next again.
In order to Restore the backup from the external device, you are suggested to click on the Local backup option and also head towards the backup file that has been created in the old system.
Screenshot showing Step 5 of restoring a backup in QuickBooks.
Now you will have to pick a location in the new system for saving the Backup file and then lastly clicking on Save tab.
By completing these steps, you will successfully finish the process of how to transfer QuickBooks to a new computer using a manual method.
Have you implied all of the above-stated steps for importing QuickBooks desktop to a new computer in the right manner? Well, if yes then you are good to go and start using your QuickBooks software on the new system. Whereas, if for some reason, you get stuck somewhere or in case your queries remained unanswered, then do not be hesitant in reach out to our QuickBooks technical support team using our dedicated support line at 1-800-761-1787. Our U.S. based CPA’s and accounting professionals, will ensure to answer all your queries ASAP!
1. Open Settings. 2. Then hit Export Data option. 3. Choose Reports tab or the List tab as per data to export. 4. Discard items to export using the ON/Off Slider. 5. Click on the All dates filter and select period. 6. Finally, Hit Export.
Can QuickBooks open through another computer?
Yes, QuickBooks can be used from a different PC. This requires mapping the server as a network drive.
What is the QuickBooks Desktop migration tool?
QuickBooks Migration Tool helps to migrate QuickBooks company files on different computers.
How much time QuickBooks migration takes?
The migration Tool takes about 30 minutes to complete. However, the time may vary depending on your internet speed, system configuration, and the size of the data to be migrated.
1. Open Settings. 2. Then hit Export Data option. 3. Choose Reports tab or the List tab as per data to export. 4. Discard items to export using the ON/Off Slider. 5. Click on the All dates filter and select period. 6. Finally, Hit Export.
Yes, QuickBooks can be used from a different PC. This requires mapping the server as a network drive.
QuickBooks Migration Tool helps to migrate QuickBooks company files on different computers.
The migration Tool takes about 30 minutes to complete. However, the time may vary depending on your internet speed, system configuration, and the size of the data to be migrated.