A Step-by-Step Guide to Installing and Uninstalling QuickBooks in Selective Startup Mode
Installing and uninstalling QuickBooks in selective startup mode is a quick fix to many QuickBooks install errors. Often when you find it difficult to install or uninstall QuickBooks on your computer, it is suggested that you switch to selective startup and try again. Switching to selective startup mode isn’t something difficult, you just need to perform some basic steps and you are good to go. This segment shares the complete set of steps that you can perform to install or uninstall QuickBooks in selective startup mode. So let us dive in for further details!
Steps for Installing or Uninstalling QuickBooks Desktop in Selective Startup Mode
This might seem to be a tedious task, but in actual it isn’t. All you need is a bunch of steps and you are done.
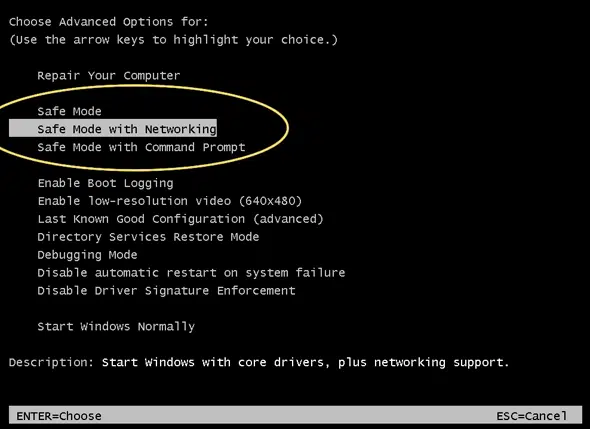
Step 1: Switch to selective startup mode
The key highlight here is selective startup mode, and here is how you can switch to it. Switching to selective startup ensures that no other apps get in your way and interrupt the installation or uninstallation of QuickBooks software. Here are the steps that you need to follow:
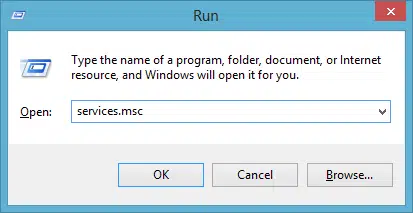
At first, you need to press Windows + R tabs to open the Run command.
Followed by, entering msconfig and hit OK tab.
You now have to select Selective startup in the General tab and further load system services.
The next step is to head to the Services tab and also choose Hide all Microsoft services.
After that, select Disable all.
And then, uncheck Hide all Microsoft services.
You now have to choose Windows installer from the list of services.
Once done with that, select OK tab.
And also, on the system configuration window, choose Reboot tab.
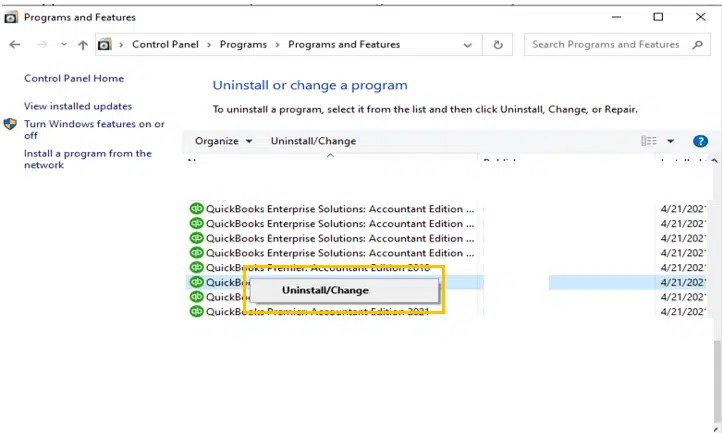
Step 2: Uninstall QuickBooks Desktop
Press the Windows Start menu.
Then go to Control Panel and select Programs and Features.
Here you need to select Uninstall a Program.
Also, select your version of QuickBooks Desktop from the list of programs.
Now that you have reached the end of this segment, it is time for you to install or uninstall QuickBooks in selective startup mode using the steps discussed in here. If you are unable to do so, or if you face any issue, then contacting our QuickBooks desktop support experts at 1-800-761-1787 is recommended. We have a team of certified ProAdvisors who will help you successfully install or uninstall QuickBooks in selective startup and various other issues associated with QuickBooks. Our will be more than happy to assist you.
FAQs
What is the Selective Startup mode in Windows?
In the Selective startup mode, only selected features and processes are important to run an OS.
What is msconfig?
Msconfig is the system configuration utility which allows switching between normal mode to Selective startup mode.
How can the Selective Startup feature be used for QuickBooks?
This feature can be used when the user is facing errors when installing QuickBooks updates, or other technical issues when opening QuickBooks.
How to open msconfig?
You can open the msconfig from the Startup menu. Simply search for "msconfig" and then hit the Enter key.
Get to know the effective measures to fix QuickBooks error 6129: Database Connection Verification Failure:
Though QuickBooks errors might be time consuming and pretty much annoying, but the positive aspect related to these errors is that they appear on the screen with all the related information, which makes it easy for you to deal with them. Often when you try to access your company file, you might end up in QuickBooks error 6129, 0, which is a database connection verification failure error. Another situation when such an error might be seen is if the software is looking to access the company files. You can experience this error with a warning message on your screen stating:
Error
Description
Warning message:
Database connection verification failure
QuickBooks is unable to open the company file.
Connection to the QuickBooks company file has been lost.
What is QuickBooks error 6129, 0?
QuickBooks error 6129 usually appears on the screen when there is database connection verification failure. This is basically a company file error that shows up when you try to access a company file but it failed to open. This error indicates an invalidated database connection of the server. The possibility of bumping into such an error code 'Database connection verification failure' increases when a user uses QuickBooks software to manage the company’s payroll and streamline the accounting management. A bunch of factors can trigger this particular error in QuickBooks, which we have tried to discuss in this segment, along with the right steps to eliminate it permanently. Interested readers can stay glued to this piece of writing or connect with our U.S based accounting experts.
QuickBooks Error 6129: Signs and Symptoms
You can easily identify the error code using the below-stated signs and symptoms. Come along to explore further!
This error code itself pops up on the screen and crashes the active window.
Running the same program leads to frequent system crashing again and again.
Windows functions slowly to the keyboard and mouse responses.
After that, right-click the same and select Run as admin.
In case you are working on a 64-bit operating system, then write cd\Windows\syswow64 in the space available in the C:prompt.
Type regsr32 MSXML6.dll in the C: prompt window to ensure that the files are fully registered.
Now hit a click on Enter tab and complete the process.
Towards the end, the error might be resolved up to a certain extent.
Solution 4: Make sure the systems work on one domain
You might come across error code 6129 in QuickBooks desktop in case the domain of the server and client doesn’t match. In such a scenario, you should get all the systems on the same domain and check if the issue persists. You can also contact a Network Administrator to assist you in connect with all the systems to one domain.
Often, users might encounter this error when they haven't logged in as admin. In such a situation, you will have to try logging in to Windows using admin credentials. If you don't have the admin login credentials, then you should find support for Windows or consult an IT professional.
Try to open the company file.
Log in as Windows Administrator by clicking on Run as Administrator opt and updating the company file.
If you are not able to log in as Windows Administrator, get in touch with Windows Support or an IT professional for help.
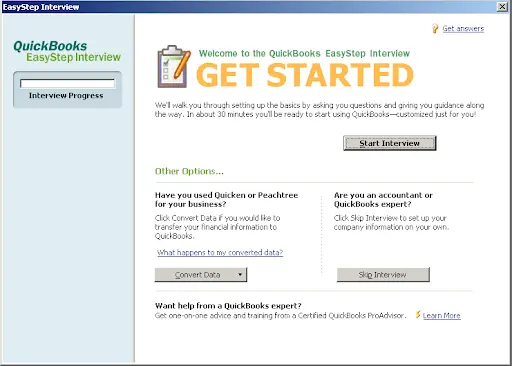
Solution 8: Taking assistance from the easy step interview
When none of the solutions worked, the below steps can be relied upon.
Under this solution, click on leave in Easy step interview.
When the message stating “Save the file?” appears on the screen, then hit on Yes tab.
Final step is to enter the file name and click on Save.
Fixing QuickBooks error code 6129, 0 becomes easy, once you implement the steps that are discussed in this segment. If in case you fail to fix the issue even after performing the steps we have shared, then feel free to connect with our technical support team at 1-800-761-1787, and they will address all your issues immediately. Our QuickBooks enterprise support exerts and certified ProAdvisors will help you to fix such QuickBooks errors permanently.
FAQs - QuickBooks Error 6129
Why QuickBooks Error 6129 occurs?
This error generally occurs due to a failed database connection verification.
How to know if Error 6129 occurred?
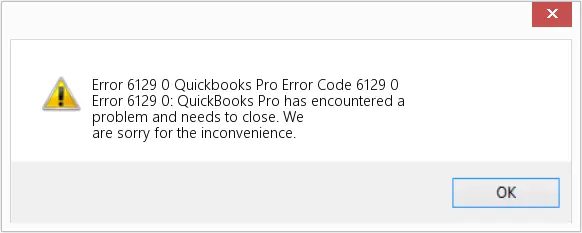
This error appears in the form of an error message stating as:
‘Error 6129: QuickBooks Pro has encountered a problem and needs to close. We are sorry for the inconvenience.’
How to Fix Error 6129 in QuickBooks?
Follow these quick hacks in order to rectify this error. 1: You can try to disable the antivirus to fix such an error. 2: Also, by renaming the .ND files, the error can be rectified. 3: Updating QuickBooks desktop to latest release can resolve various type of errors.
Trying to sync outlook contacts with QuickBooks desktop but don’t know how to do that? Well, we can help you with that. You can sync QuickBooks customers, jobs, and supplies with your Outlook contacts every easily, by simply performing some basic set of steps. This feature eliminates the hassle of re-entering contact info manually. QuickBooks contact sync for Outlook allows you to easily sync and match Outlook contacts with customers, jobs, suppliers, and other names in QuickBooks. To understand what steps are involved in this process, make sure to read this segment carefully. In this blog post, today we will explore the benefits and steps to sync Outlook contacts with QuickBooks Desktop. Thus, keep reading.!
Note: Before heading forward, note that contact sync works with Microsoft Outlook 2010 (32-bit).
Benefits of syncing outlook contacts with QuickBooks desktop
Synchronizing Outlook contacts with QuickBooks Desktop has many benefits. By syncing your contacts, you can:
Have all your contacts in one place and save time for other tasks.
Keep all your contacts up-to-date and be more organized.
Have all the relevant information at your fingertips and better manage your customer relationships.
Steps to sync Outlook contacts with QuickBooks Desktop
Syncing Outlook contacts with QuickBooks not just eliminates the hassle, but also saves you a lot of time and effort. You can simply sync Outlook contacts with QuickBooks. Here are the steps that you need to perform to make this process work for you smoothly.
Note: Contact Sync works with Microsoft Outlook 2010 (32-bit).
1st Step: Download QuickBooks Contact Sync Tool
The very first step here is to click on the Download tab to simply download the tool.
After that, you are required to Save the file somewhere you can spot without any issue.
This can be either your downloads folder or the desktop.
After QuickBooks contact sync is downloaded successfully, proceed with the install steps.
2nd Step: Install QuickBooks Contact Sync Tool
Here, you need to ensure to close Outlook.
After that, click twice on the contact sync setup.exe file.
The next step is to press the Next button to proceed with the installation.
Also, click on Next button again on the License Agreement page
Now select the location to install the tool and press Next.
The next step is to perform the onscreen steps to install the contact sync tool.
Now that you know what it takes to sync Outlook contacts with QuickBooks desktop, it is time to implement those steps and successfully sync Outlook contacts with QuickBooks. However, if you still have some issues with the process or if you need any sort of guidance, then you can simply connect with our support team at 1(800)761-1787, and ask them for immediate assistance. Our QuickBooks desktop support experts will help you in syncing Outlook contacts with QB.
QuickBooks Enterprise is one of the most promising software for mid-sized and large-scale businesses. The fact that the software is huge, there are certain issues that come along with it. Experiencing common QuickBooks Enterprise errors isn’t something new. You might end up in such errors if QuickBooks files are corrupted, or if you are using an outdated QuickBooks version, or the company file itself is damaged, any malware attack, or if QuickBooks isn’t responding.
Within this segment, a thorough overview of the most common QuickBooks Enterprise Errors, including QuickBooks Error 3371, Error 15215, QuickBooks Error 6177, including other errors. To get a better insight to address the most common QuickBooks Enterprise Errors, make sure to stick around this segment carefully. Thus, read this article until the end.
Major causes behind common QuickBooks Enterprise Errors
Some of the most common causes that encounters QuickBooks Enterprise errors are:
Corruption in the company files.
The latest updates for QuickBooks are not being set up on the system.
Another major cause can be if there is any virus intrusion in the PC
QuickBooks Installation files might be corrupted or damaged.
A third-party program may conflict with the software operations can also lead such errors.
QuickBooks Desktop Enterprise Common Errors and Troubleshooting
Some of the common QuickBooks Enterprise Errors are as below:
QuickBooks Enterprise Error Code 3371
QuickBooks Error 15215 (belonging to the 15xxx series of Error codes)
Error 6177 (belonging to the 6xxx series of Error codes)
QuickBooks Error Code H101, H202, H303 and H505
QuickBooks Error 99001
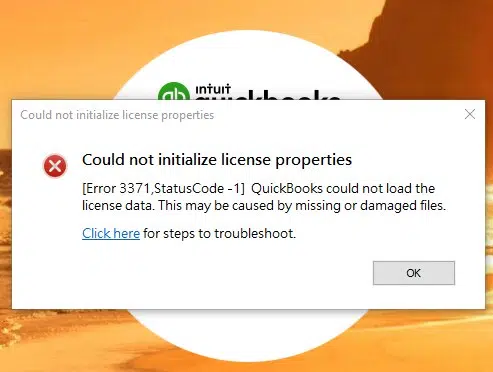
Error 1: QuickBooks Enterprise Error Code 3371
One of the most commonly experienced errors in enterprise is QuickBooks error 3371. This error occurs when there is some issue with license data. It appears on the screen stating a warning message: QuickBooks could not load the license data. This may be caused by missing or damaged files.
Solution
To fix this issue, you need reinstall QuickBooks using the steps below:
The very first step is to press Windows + R keys.
And then, a window will open immediately.
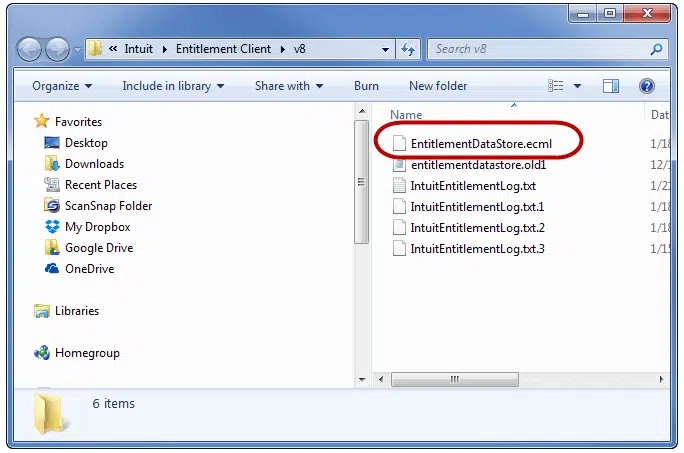
You now have to type C:ProgramDataIntuitEntitlement Clientv8
Here, you will see the Windows explorer.
After that, delete ecml file and right click and choose the Delete tab.
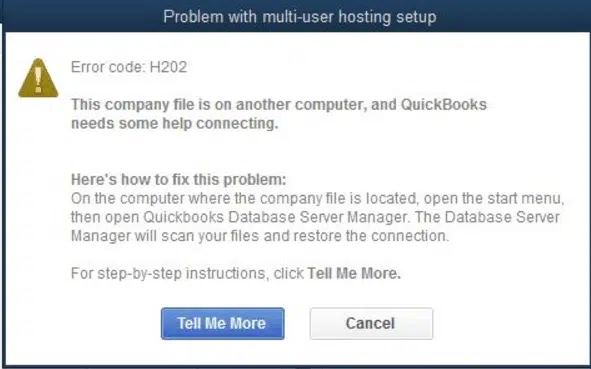
Error 2: QuickBooks Enterprise Error H101, H202, H303 and H505
QuickBooks enterprise users often face the H series error, which includes QuickBooks Error H201, H202 and H505. These errors usually show up when you try to access the company files located on the computer. Or the company file being accessed isn’t able to locate the server.
Solution
To fix these errors, you can perform a few simple steps, which include:
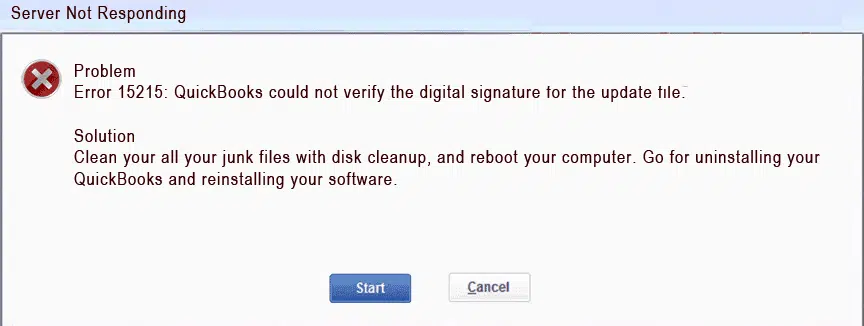
QuickBooks Error 15215 is basically an enterprise error that shows up crashing the active windows. You can further experience this issue due to a corrupted company file. And as a result of this error, the desktop screen might freeze periodically.
Solution
In order to fix this issue, you need to perform the set of steps we have given below. Or you can also refer to our detailed article addressing QuickBooks error 15215:
Fix 1: Run QuickBooks as an administrator
Restart the QuickBooks software, as this will ensure that all the settings are reset and you start afresh.
Another step here is to check whether your QuickBooks desktop program has been closed.
Now, on the desktop screen, you need to right click the QuickBooks icon.
Select the program to Run as admin.
You will see a prompt message stating you to allow the program to make changes to the system. All you need is to click on the Yes tab.
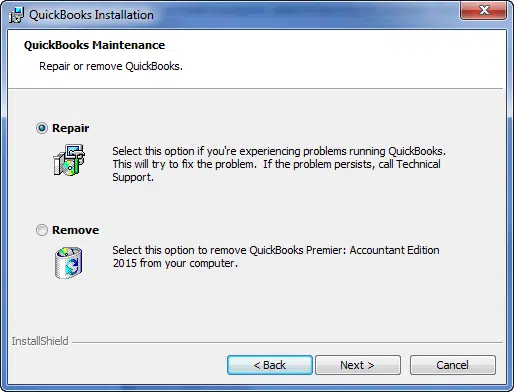
Fix 2: Repair QuickBooks
Click on the Start and go to Control Panel.
After that, go to Programs and Features and find QuickBooks program from the list.
Select Uninstall/Change.
Hit a click on Repair and wait for the repair process to end.
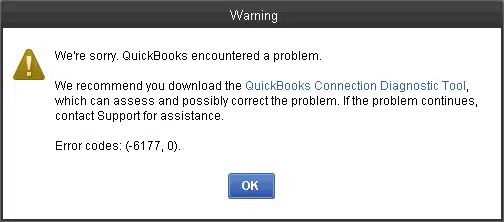
Error 4: QuickBooks Error 6177
QuickBooks Error 6177 is one common error and belongs to the 6xxx series of error codes. It is a company file issue and usually occurs at the time of opening the file.
Solution
Move to the company file folder and then copy the specific company file that is facing the issue.
Now, paste this file to a newly created folder.
Once done, run QuickBooks and try accessing the file from this new location.
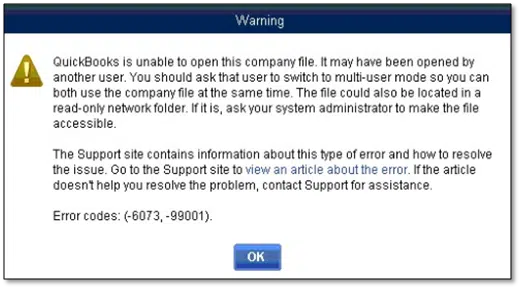
QuickBooks Error 99001 encounters when a user try to access company file in the multi-user mode. The main cause behind to this error can be that the company file is stored in a read-only server and you are trying to access the company file at the same time.
Solution
The methods to fix this error are given below:
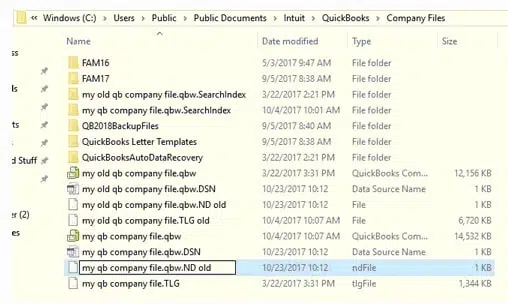
Fix 1: Troubleshoot the .ND file
Visit to the QuickBooks folder and search for the .ND files.
After that right-click on .ND file and click on Rename.
Now, change the filename and add extension with .old.
After changing the filename, you need to close the window and run QuickBooks.
The QuickBooks program will create a new .ND file.
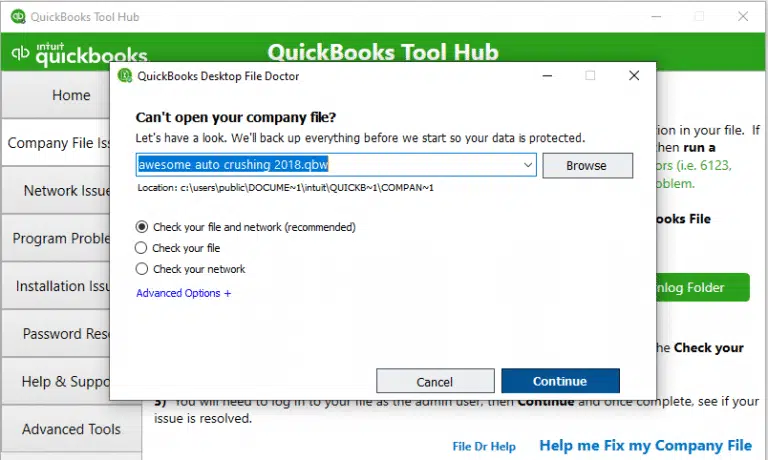
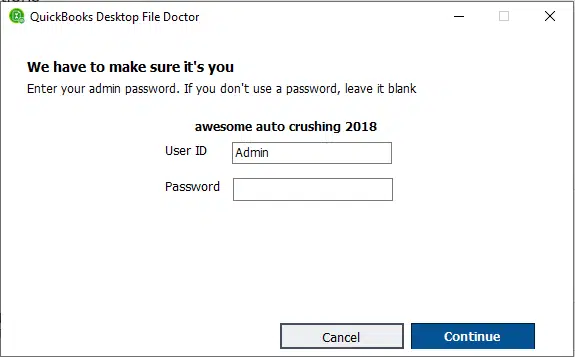
Fix 2: Use then QuickBooks File Doctor Tool
Launch the tool hub program on your server computer.
Go for Company issues tab and select Run QuickBooks File Doctor.
You need to wait for a while to open the file doctor.
Now hit a click on Browse and choose the damaged company file.
Also scan the file using the file doctor tool.
Winding up!
The list of most common technical QuickBooks Enterprise errors doesn’t end right here. You might face a lot of other errors when working on QuickBooks Enterprise. You can check out our blog section and explore the other enterprise errors along with their solutions. In case you need any sort of technical assistance, then give us a call at 1-800-761-1787 and our 24X7 QuickBooks enterprise support experts will provide you with immediate guidance. This guide helps users Fix QuickBooks Desktop Enterprise Most Common Errors in an effective way.
Learn how to rectify QuickBooks Error code PS038 when unable to update payroll:
Bumped into Error code PS038 when running payroll? Well, this error is accompanied with a warning message that states:
You have retrieved the latest payroll update and validated your payroll subscription. We strongly recommend that you go online again.
QuickBooks error PS038 can show up when running payroll, downloading tax table updates, and if paychecks get stuck as Online to Send. As a result of this error, one might now be able to run QuickBooks payroll smoothly. Furthermore, this error can be extremely annoying. In such a scenario, it becomes crucial to fix this error by implementing the right set of steps. And to help you with that, we have curated this segment sharing the complete information related to QuickBooks PS038 error and its quick fixes.
Methods to Fix QuickBooks Error Code PS038
Fixing QuickBooks payroll error PS038 involves some basic procedures and steps. Let's check each of the steps and find out the right fix for the issue.
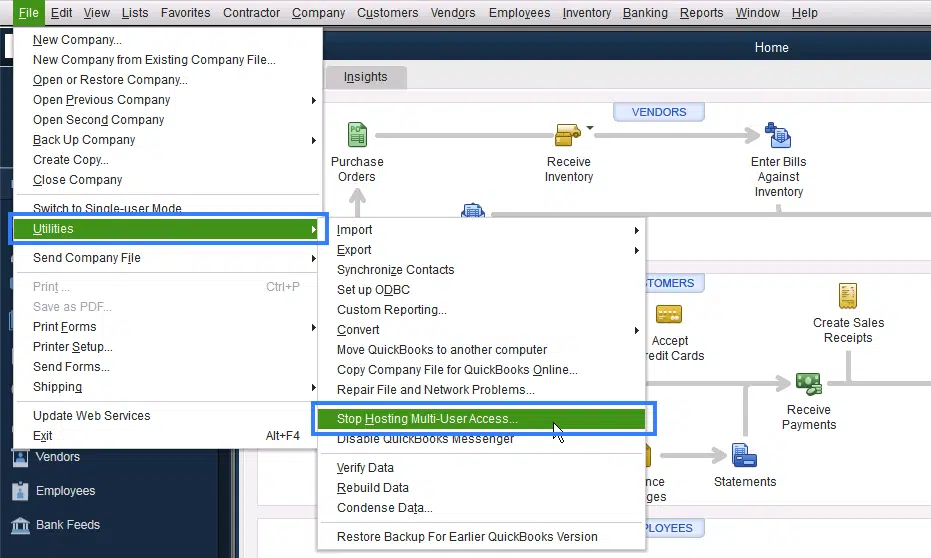
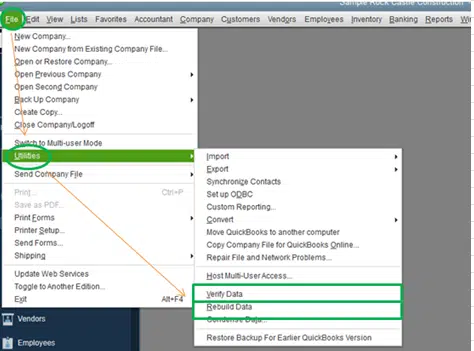
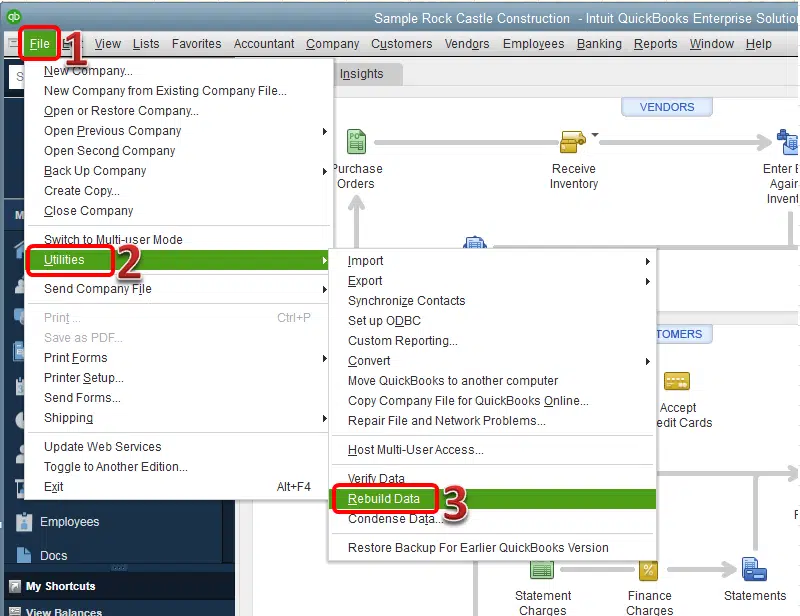
After that move to File menu and then Run verify data utility.
This will show the stuck paychecks that are waiting to be sent.
Steps to use Rebuild Data Tool
After which, you need to Rebuild the data file.
Click on File menu.
Select Utilities and then opt Rebuild Data option.
Also, try to download the payroll updates and check if the issue continues.
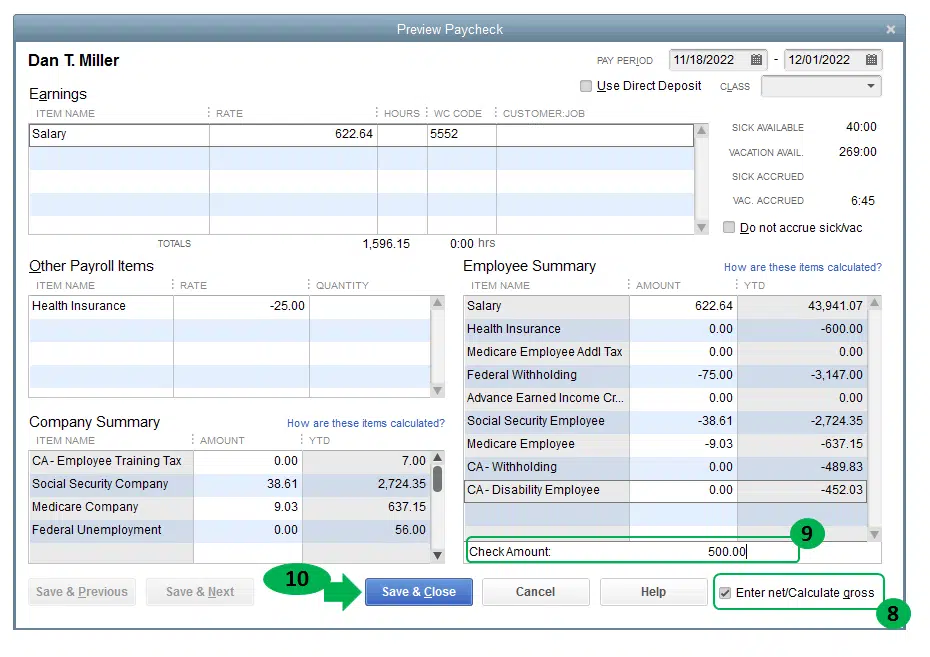
Solution 5: Toggle the stuck paychecks
Here, you need to open the oldest stuck paycheck.
After that, choose the Paycheck detail tab.
You now have to add the same earnings item as the last earnings item in the list in the Review paycheck window under earnings.
Now, a net pay locked message will show up, you need to choose No tab.
After that, ascertain that there are no changes to the Tax amounts and net pay.
Hit OK tab.
In case you get a past transaction message, choose Yes.
Now, choose Save and Close.
After that hit the Yes tab to the recording transaction warning message.
And then, open the Paycheck again.
Choose the Paycheck details tab.
Also, delete the earnings items that you have just added in the earnings section.
Ensure that there are no changes to the tax amounts and net pay.
Also, hit OK tab.
Repeat the steps for each of the stuck paychecks found in the second step.
After that, repeat step one and also download the tax table update again.
Solution 6: Update and backup the company file
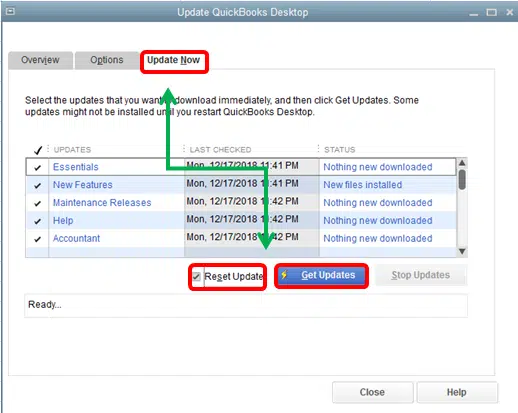
Just before you perform any of the procedures to fix error PS038 in QuickBooks, you need to begin with updating and backing up the QuickBooks data. You are supposed to perform the steps to update your QuickBooks software to the latest release and further create a backup of your company file.
Final words..!
Towards the end of this segment, we believe that you might be able to fix QuickBooks payroll error PS038. Just in case you face the same issue even after performing the set of steps listed above, then do not hesitate to dial our QuickBooks payroll error support experts. We are a team of certified QuickBooks ProAdvisors who work round the clock in providing immediate assistance for all accounting queries.
FAQs
What is QuickBooks PS038 error and why it occurs?
It is a payroll error and mainly occurs when one clicks on Online to Send option.
What are PSxxx errors in QuickBooks?
PSxxx error format indicates errors in QuickBooks Payroll. Most of these errors indicate QB payroll update issue.
Can System restore fix QuickBooks PS038 and other payroll errors?
In some cases, YES!
What are the requirements to rectify QuickBooks payroll Error PS038?
To rectify Payroll Error PS038, you need to follow these important steps: 1. Make sure your payroll subscription is active and up to date. In case it is not active then renew or subscribe to the payroll service. 2. Verify your company details, including the EIN, name and address are correct in QuickBooks. 3. Ensure all payroll items are correctly set up and linked to the right accounts. 4. You need to double-check the accuracy of your state and federal tax settings, as mismatches can cause this error.
How to determine QuickBooks error PS038?
To determine QuickBooks Error PS038, follow these important steps: 1. If system date is incorrect, it can occur. 2. An error message pop-up might appear on your screen. 3. Your QuickBooks desktop is not latest or outdated.
When can QuickBooks payroll Error PS038 appear?
QuickBooks payroll has been facing several error codes belonging to the family of PSXXX error codes, including Error PS034, Error PS038, Error PS036, etc. This error may show up for different reasons, few are as: 1. You might get this error if QuickBooks program is not up to date. 2. When users try to send online paychecks but get stuck at the Online To Send option, an error message related to such error may immediately pop up on the screen. 3. This error may also appear when you try to download and install the latest Tax Tables.
Request a Call Back and get instant assistance from certified QuickBooks experts. Our support team is available between 8:00 AM to 8:00 PM EST to ensure your issues are resolved without delay.