In certain scenarios when you connect to QuickBooks Online banking, you might end up in banking related errors that can be occur due to server side downtime or slow network. QuickBooks error 101 is one of the common bank error you may encounter. This is basically a scripting error that highlights the damage of the crucial Windows components like ActiveX, .NET Framework, Java, and Flash Player for functioning. You can further bump into such an error when the Windows fail to execute the command that is required to run Web-based applications.
The QBO bank error 101 usually shows up with a warning message:
We are fixing our connection to this bank as quickly as possible. Try connecting again in a bit.
Or
Looks like the connection to this bank - Business online banking is currently unavailable. Try again in a few hours.
This error message shows that a problem is present with the bank’s server. Well, this issue can be a bit confusing for QuickBooks users, but to help you with that, here are some of the most essential information about this error, along with the quick fixes that you can implement. Let us together have a look!
What can lead to QuickBooks online error 101?
There are a couple of reasons why such an error can show up on your screen, especially when connecting to the bank in QuickBooks online.
When you try to add an inactive account to QuickBooks Online, such an error can occur. An inactive account basically means that the account has no transactions in the last 12 months.
Another reason can be if you try to add a bank for which you haven’t accepted the terms and conditions.
It is possible to fix this error successfully using some basic set of steps. Here is how you can try to fix QuickBooks Online Error 101 using the below set of steps.
Method 1: Inspect the network and QBO Banking
Step 1: Sign in to the bank’s website
As we mentioned earlier, there might be some issue with the bank’s website, also as the error is a banking error, you need to sign in to the bank’s website in a new tab or a different browser and check if there are any sort of errors that show up.
Step 2: Check if your account is still active
An inactive account is another reason behind the occurrence of this issue, so you need to make sure that you have an active account. Your account is considered to be active if there is an existing balance or if there are transactions from the past 12 months. Once you have checked and found that your account is active, and if you are still unable to sign in to the bank’s website, then you need to reach out to your bank directly and get this fixed.
Step 3: Search for missed prompts
You need to head to the bank’s website and check if there are any messages that require your confirmation such as the terms and conditions. All you need is to acknowledge the prompt and then head back and refresh the account in QuickBooks online.
If by doing all this you aren’t able to fix the QuickBooks Banking Error 101, then you can try to sign in to QuickBooks using a private browser and perform other browser fixing options. Or simply reach out to your bank to verify if there is any issue with their website or server.
Method 2: Add Intuit as a Trusted Site
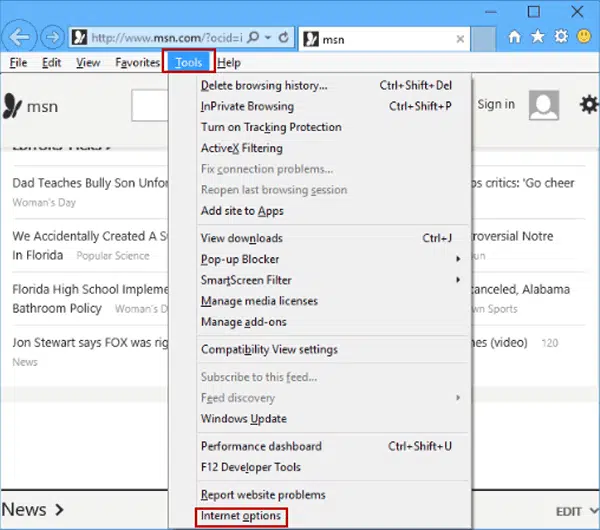
In the beginning, launch the Internet Explorer.
Hit the Gear icon.
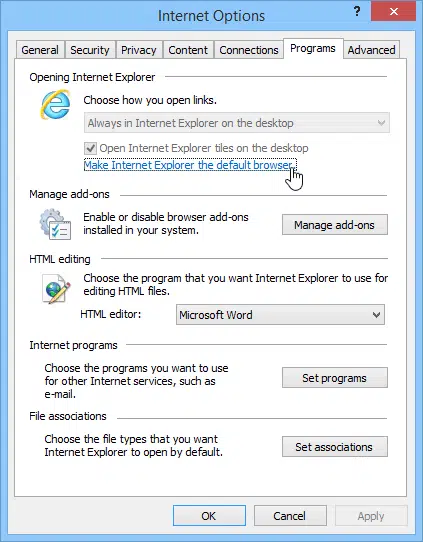
Click on Internet Options.
Now, hit on the Security tab.
Also, choose the Trusted Sites option.
In the next step click on Sites and add the following URL – “https://*.intuit.com.”
Hit on Add and then add another URL – “https://*.QuickBooks.com.”
Once done, click on Close.
In the next step, go to Custom Level and search for Miscellaneous.
After that click on Allow Cross-Domain Requests and then Ok.
Banking errors need immediate fixes, and so we hope that the above-discussed steps and procedures might help you in some or the other way to get rid of QuickBooks Error 101. However, if you still face the same issue, we can help you with that. Give us a call at 1-800-761-1787, and get answers to all your queries immediately. Our technically sound QuickBooks desktop error support experts will help you with your QB issues.
FAQs
What is QuickBooks Error code 101 in QBO?
This error is encountered by users when they attempt to download transactions or reconcile their bank accounts through QuickBooks.
Is Error 101 in QuickBooks encountered in QuickBooks Desktop as well?
No! Error code 101 in QuickBooks online is specific to QBO only.
Can tools by Intuit help in fixing QuickBooks Error 101?
The various tools rolled out by Intuit are now comes in QuickBooks Tool Hub. However, the features included in this tool can fix errors encountered in QuickBooks Desktop, not QBO.
Whare are Active X Controls?
ActiveX connotes an advanced technology by Microsoft through which users can view and edit documents in different extensions through their web browsers.
Errors can be extremely frustrating in QuickBooks desktop, but fixing every error is essential to avoid any further nuisance. Today, we are going to discuss about QuickBooks Error 6106, 1069 that usually occurs when there is having some company file issues. This error is usually experienced by users of QuickBooks Pro 2018 and later, however, the error has also been noticed in other QuickBooks versions as well. This error falls under the 6000 series and tends to be a local and network setup error. This error is related to a damaged company file and appears when users try to open or modify the data file.
If you are witnessing this error in QuickBooks, we have got you covered. In this segment, we are going to address QuickBooks error 6106, 1069. To learn further about this issue, make sure to stick around!
What Does QuickBooks Error Code 6106, 1069 Means?
QuickBooks Error Code 6106, 1069 is common company file error that usually appears when QuickBooks fails to open a company file in a multi-user setup. This error comes under the -6000 series of error in QuickBooks and generally linked with the QuickBooks database server manager service, which may not be running properly or is unable to start. Mostly, this error encounters when you are in multi-user mode and restricts you from opening the company file normally. In order to resolve this error you need to fix the database server manager service or correct the login credentials. Once you will do it, QuickBooks will reconnect to the company file without any issue.
Following are the error messages you may get on your screen:
Error 6106: QuickBooks was unable to reset the database service. Please restart your computer and try opening the company file again.
Error 1069: 'Service did not start due to a login failure.' There must be some login-related issue with your QuickBooks.
What leads to QuickBooks Error Message 6106, 1069?
Before moving ahead with the solutions to fix QuickBooks Error 6106, 1069, it is important to first understand the possible reasons behind this issue. Once you know the root cause, troubleshooting becomes much easier and more accurate. Here are a few factors that can lead to this error. Let us evaluate each of the factors one by one:
Corrupted configuration files, which include the network description and the transaction log files.
When there is some sort of restrictions caused by the firewall, ultimately hindering the smooth functionality of QuickBooks.
Outdated QuickBooks software can also lead to such an errors.
If the company file folder may be exceeding the file path limitation, you might get this error.
This section contains the different solutions for effectively fixing QuickBooks Error 6106, 1069. Try out each of these solutions and consequently check if the error got fixed.
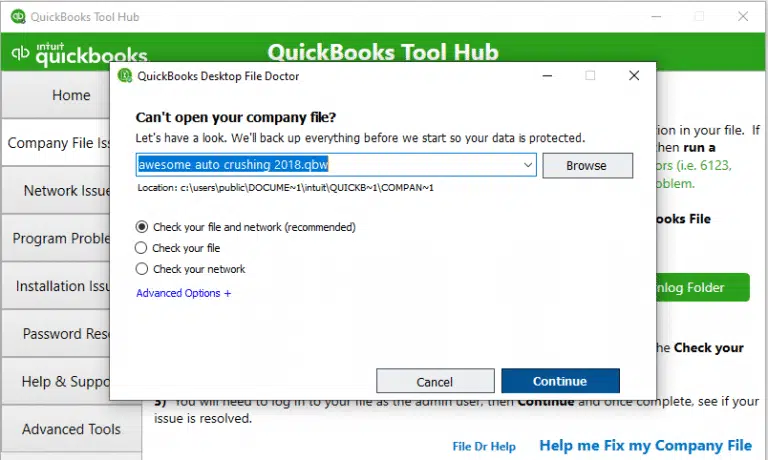
Now hit on Browse and select the corrupted company file to repair.
Hit on Check your file and then click on Continue.
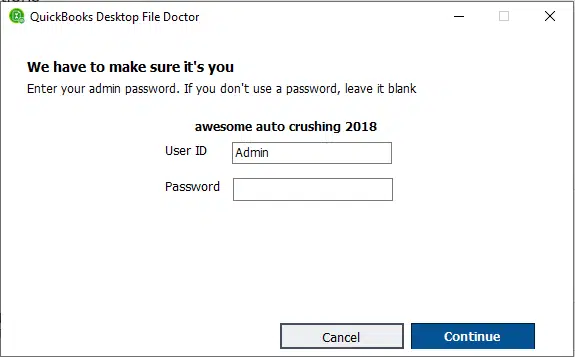
Provide all the necessary credentials including the admin password.
Enter Admin user ID and Password.
Finally, hit on Next tab.
It will take some time to repair the company file.
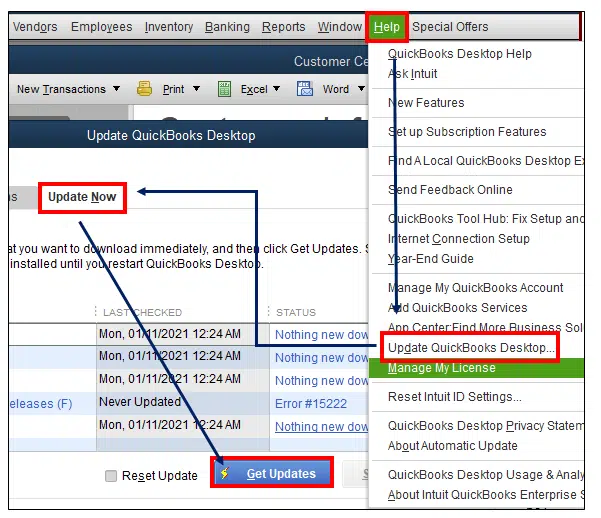
Solution 2: Update QuickBooks Desktop
This error might be due to unavailability of the latest features offered by Intuit. This can be ensured by updating QuickBooks desktop, for which the procedure is given below:
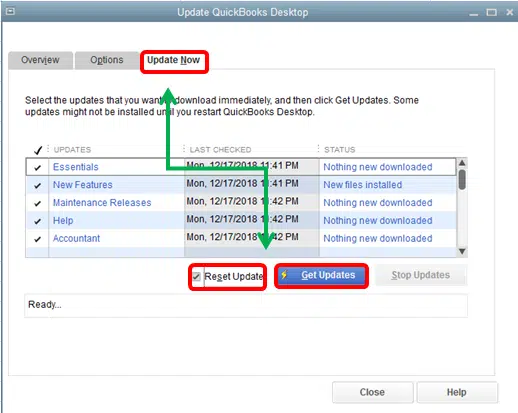
Open QuickBooks desktop and move to Help menu.
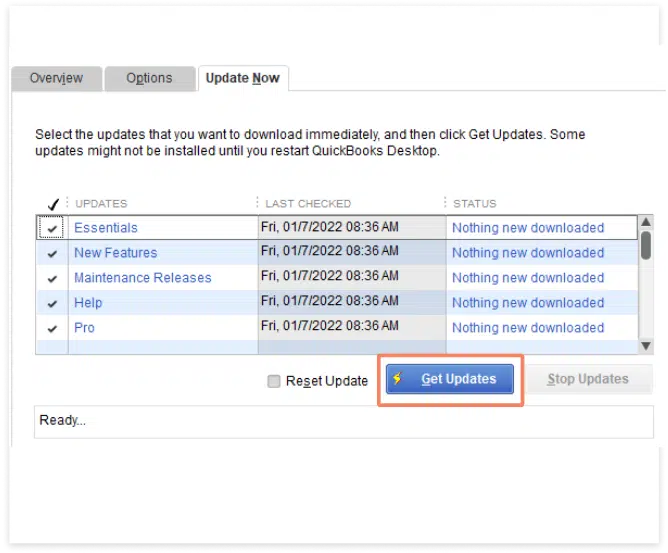
Scroll down and select Update QuickBooks desktop
Tap on Update now and checkmark on Reset updates tab.
Now hit on Get updates to download the latest updates.
Once done with downloading the updates, restart QuickBooks and allow the automatic installation of the updates.
To start with, you need to right click on the desktop and further select New >New folder.
After that, create a new folder named QBTest.
Later on, open the folder where your company file is saved.
Now, find out the tlg file in the company file’s folder.
In case you are unable to find the file, continue with the steps below:
To start with, open File explorer with Windows + R keys.
Choose Organize, and then head to the Folder and search options.
Now, delete the tick for Hide extensions for known file types.
Also, choose Apply tab and click on OK tab.
Right click and select the Copy tab for tlg file and paste it to the QBTest folder.
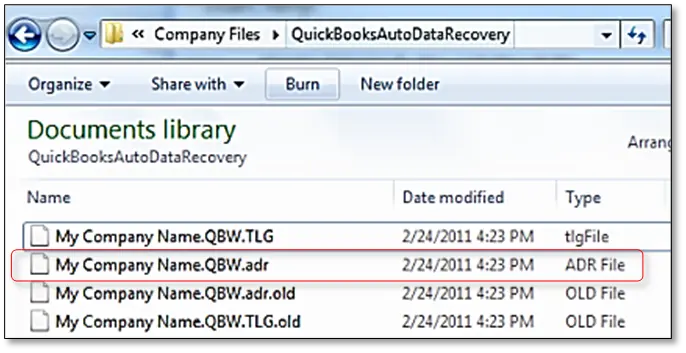
Access the QuickBooksAutoDataRecovery folder.
Now, right click and click on Copy tab on the QBW.adr file and then paste it to QBTest folder.
Right click the QBW.adr file in the QBTest folder and choose Rename and also remove adr file name.
You now have to open QuickBooks.
After that, open company file stored in QBTest folder and use the account register to verify all transactions.
Furthermore, choose File, and then Utilities and also click on Verify data to scan the data integrity of the recovered file.
In case this copy of the company file is satisfactory, then you can change the damaged file to a different location and transfer the copy from QBTest to the original location.
Solution 4: Renaming the .ND and .TLG files
As we mentioned earlier, corrupted nd and tlg files can cause such an error in QuickBooks, and these files are crucial to access the company files across a network. You can try renaming the files by using the steps below:
Right-click on the QuickBooks icon on the Desktop and click on Open File Location.
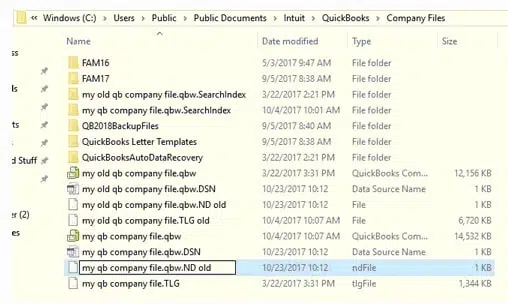
Find out the files that have the company file name matching and have tlg and nd at the end.
Once done, hit a right click .nd and .tlg file and click on Rename tab.
Add .old at the end of the file name.
Relaunch QuickBooks and make another try to access the company file.
And this would fix the issue up to certain extent.
None of us would like the interruption of such annoying errors, when performing some crucial task. Thus, we believe that reading this segment might have helped you in some way to get rid of the QuickBooks error code 6106 successfully. Just in case you aren’t successful in eliminating this issue, we have got you covered. Reach out to us at 1-800-761-1787, and our QuickBooks error support team will help you with rest of your queries.
Get attuned to the methods to identify, prevent and fix QuickBooks Corrupted file:
Did you notice possible data issues in QuickBooks or suspect any sort of data damage? Well, this can be a little too common for QuickBooks users, as data issues with the company file might occur due to a bunch of factors. As the company file carries some of the most crucial and sensitive information, it is essential to get the corrupted file fixed as soon as possible, to simply avoid any sort of data loss. That's why it is very important for users to identify, prevent and fix those QuickBooks Corrupted file. To help you with this, we are here with this segment sharing the complete information related to a corrupted file. Let us dive in deep:
Identification of Corrupted QuickBooks Company files
Before you just begin with the steps to fix a corrupted data file, you need to understand how actually to find out and identify the data corruption. You can simply analyze or examine the transactions or the items by log and closely verify the issues with the items and transactions. Once you are done with examining, head to the corrupted file and delete it. Proceed with the log till the file verifies each of the items. But make sure you have performed the verify and rebuild data procedure before you do this. You further have to review the logs that QuickBooks created in order to verify the data. You can further find out whether the company file is actually corrupted or not using the below signs:
Just in case you come across any issues when auditing the balance sheet.
Or when the QuickBooks shutdown unexpectedly.
You can further experience data corruption when the unpaid bill and invoice are displayed as paid in the balance sheet.
Or when the transaction history shows a negative balance.
Or if the transaction list is entirely missing.
What leads to a QuickBooks company file getting corrupted?
There can be various possible causes behind to company file corruption. Few are as:
Insufficient RAM /insufficient space.
System shutdown suddenly can be a major cause of company file damage.
A negative balance or missing transaction may also lead to company file issues.
What are the Different Ways to Prevent Corruption in the QuickBooks Company Files?
The various methods of preventing issues related to the company files are given as under:
Quick Fixes to a Corrupted company file in QuickBooks
If you have a corrupted file or you want to Identify, Prevent and Fix QuickBooks Corrupted File, then you need to do the following:
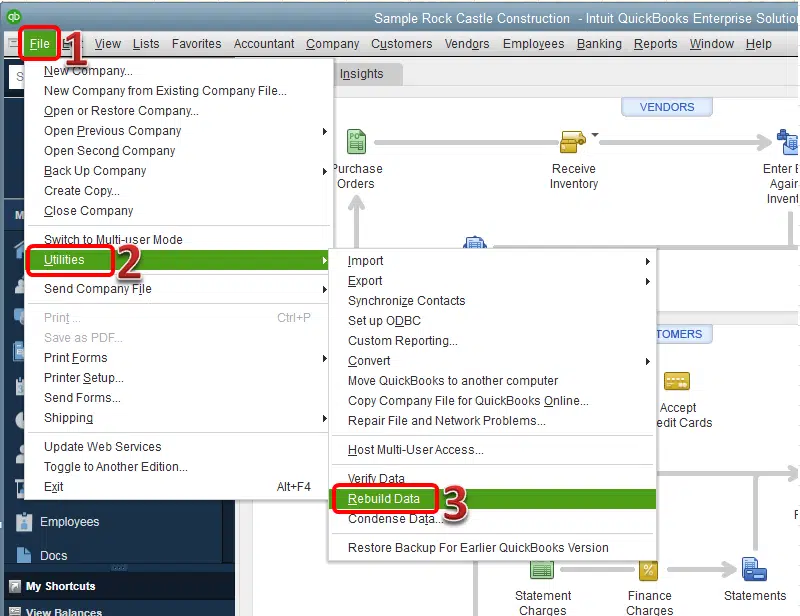
Solution 1: Repair the company file using the rebuild data tool
Simply start off by heading to File menu and then select Utilities tab.
After that choose Rebuild data.
Furthermore, choose OK tab on the QuickBooks information window.
Now perform the onscreen steps to Save a backup.
Followed by letting the tool repair your file. This might take some time.
QuickBooks might seem to be stuck, but if you are able to move your mouse, then it indicates that the tool is still working.
Now, you need to choose the OK tab.
And furthermore, head to File menu.
Navigate to the Utilities tab and choose Verify data.
Allow the tool to fix data damage.
Once done with that, let the tool check your file for data issues.
Just in case the software didn’t find any issues, click on OK tab. You can keep using your company file. And if the software finds an issue, then simply click on Rebuild now tab.
Solution 2: Repair Company file using QuickBooks Tool Hub
The user now needs to select the Company file and let the tool perform any necessary task to get this fixed.
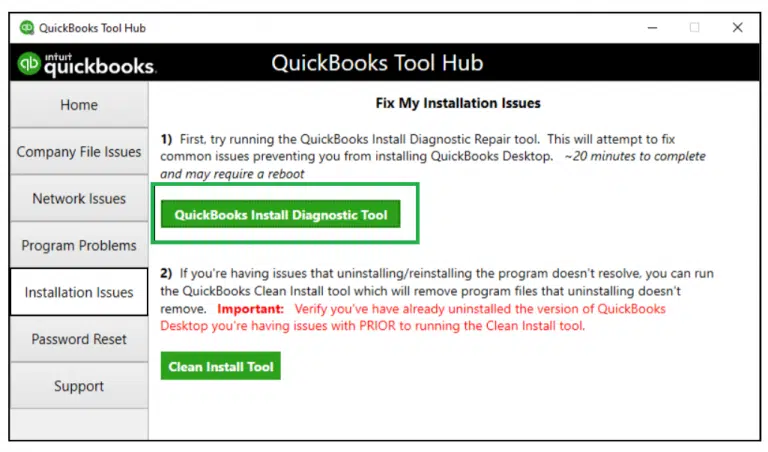
QuickBooks Install Diagnostic Tool
If any of your files facing issues due to corrupted installation or any sort of issues that you faced during installation of the software, then QuickBooks install diagnostic tool will surely fix the issue for you. You need to perform the following steps:
Open the tool hub and head to the Installation issues.
There you will find the QuickBooks install diagnostic tool.
You need to click on it to Run.
Other than the company file corruption, the tool will also help you fix other file-related issues.
Run Reboot.bat file
Many issues in the company file can be fixed by simply running the reboot.bat file. This works in the following way:
Start with the location where you have QuickBooks files saved.
Right-click the desktop icon and then click on the Properties tab to make things a bit quicker.
Now, click on the opt to Open the file location.
Look for the Reboot.bat file and double-click on the same.
You now have to let the software perform the necessary diagnosis.
And after everything ends, click on the reboot option and restart the system to save the changes.
QuickBooks component repair tool
The QuickBooks component repair tool can help you fix the issues related to QuickBooks components. It usually fixes issues that are associated with the Windows registry and other technical data file issues.
Now that you have learned how to identify, prevent and fix QuickBooks corrupted files, it is time for you to implement those fixes. However, if you failed to do so for some reason and seeking QuickBooks technical support professional guidance, we can surely help you with that. Reach out to us at our technical support number i.e., 1-800-761-1787 and get immediate assistance from certified professionals.
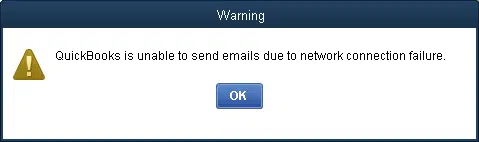
Sending emails in QuickBooks is a great feature that makes the task much easier. However, there can be scenarios, when you come across an error message stating: QuickBooks is unable to send emails due to network connection failure. Not only that, but there are a few more warning messages that might show up on the screen:
You have entered an incorrect email address or password
You are not connected to the internet or the firewall is blocking the connection
Your email server settings are incorrect
Getting this error can be extremely annoying, but of course, it can be fixed by performing some basic set of steps. To understand this issue better, here we are with this segment sharing causes, and fixes to QuickBooks is unable to send emails due to network connection failure. Let us together unleash further details about this error!
What leads to QuickBooks is unable to send emails due to network connection failure?
There are few reasons that can trigger this issue in QuickBooks. Here is a list of those:
One of the basic reasons can be if email server is misconfigured.
You can further come across this issue, if the installation of QuickBooks isn’t completed correctly or it is stopped in the middle of the installation.
Be prepared for this error if there are more than one Windows running QuickBooks.
Or if the user doesn’t have proper internet connection.
Another probable cause behind the occurrence of such an error can be if the MAP.dll file is corrupted.
.ND or .TLG file may be corrupted.
Or in case the email preferences are set incorrectly.
Effective measures to fix QuickBooks is unable to send emails due to network connection failure
A bunch of measures can be taken to eliminate this QuickBooks is unable to send emails due to network connection failure error. The steps involved to eliminate this issue are as follows:
Open the Email client other than the one you were using previously like M.S. Outlook, Gmail, etc.
Go to "Compose " option.
Provide the email of the person to send and also the subject.
Type in some message and send the email.
Solution 8: Edit the admin privileges
You need to first check if you have the admin access in QuickBooks.
Now, remove it if you have Admin access.
And then, close QuickBooks.
Go for Windows menu.
Search QuickBooks top open it.
Now right click on the same and Open the file location.
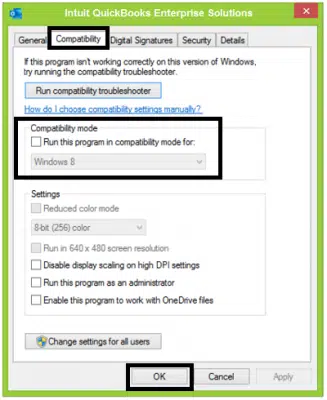
Right click the QuickBooks.exe file.
Select the option for Properties.
You now have to click on the Compatibility tab.
Tick mark the checkbox for Run as admin.
In case the option is un-editable, then click on Show settings for all users.
You now have to click on Apply tab and also click on OK tab to shut down window.
The last step under this process is to open QuickBooks and check if you are able to send the email.
Solution 9: Repair MAPI32.dll
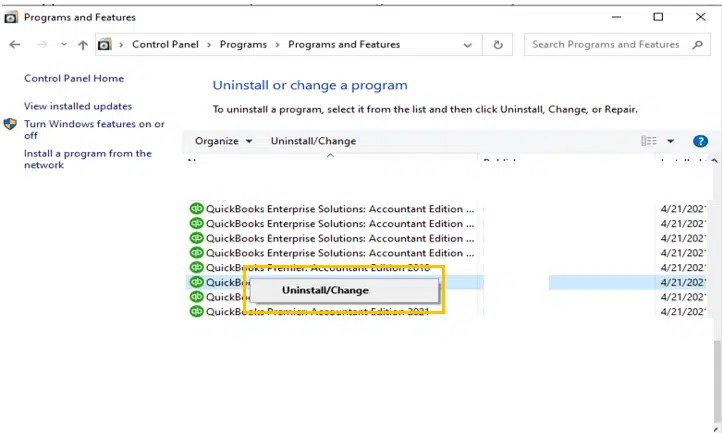
Under this solution, open Control Panel and click on Programs and Features.
After that select Add/Remove Programs.
You need to search Microsoft Office or Outlook from the installed programs list.
After that click on Change/Modify to open the Microsoft Office setup wizard.
Select the Repair option.
In last step, you need to reboot your system.
Conclusion!
Now that you have learned what causes this issue and what fixes can be implemented to troubleshoot QuickBooks unable to send emails due to network connection failure issue, it is time to incorporate the fixes manually. Just in case you come across the same error even after performing the steps above, then contacting our QuickBooks desktop error support experts at 1-800-761-1787 will surely work. Our tech support professionals will definitely help you with all your queries immediately.
FAQ's related to this problem
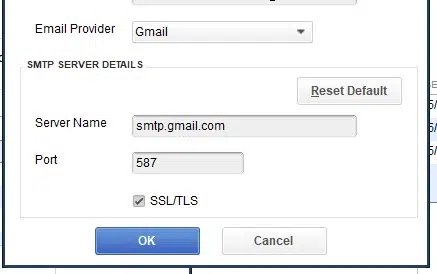
How do I set up SMTP in QuickBooks?
Go to Edit Menu > Preferences > Send Forms > My Preferences. After that, select the email account you want to use and enter the SMTP server details.
How to remove the network error message in QuickBooks?
To remove the network error message in QuickBooks, try the following steps: 1. Restart your computer and your router 2. Disable antivirus and firewall temporarily 3. Run the QuickBooks File Doctor tool
How do I check my Internet connection in QuickBooks?
Go to Help menu and click on Internet Connection Setup. After that select "Use my computer's Internet connection settings" and click on Next. That's it.
What is server connection error in QuickBooks?
Server connection error in QuickBooks generally occurs when there is a problem with the connection between QuickBooks and the server hosting the company file.
Downloading QuickBooks Payroll Update and suddenly interrupted by QuickBooks payroll error PS033? Well, this error usually emerges with a warning message on the screen stating: [PS033] QuickBooks can’t read your payroll setup files. This error is encountered in case the CPS folder gets damaged file. You should note the error message at the beginning of this message, and click help for troubleshooting tips to resolve this problem. This particular error can further be experienced when QuickBooks failed to read the setup files while you try opening the company file. A bunch of reasons can land you into such an error. To find out what those reasons are, along with what measures you can take to get rid of this issue, make sure you stick around this piece of writing.
What is QuickBooks Payroll Update Error PS033?
QuickBooks Payroll update error PS033 usually appears when QuickBooks is unable to read or verify your payroll setup files. This error directly affects your payroll updates and in some cases, this error can even prevent you from accessing the company file or downloading the latest payroll tax tables. You may also face this issue while opening the company file or when you don’t have the required permissions to access it. There can be multiple reasons behind the occurrence of this error, which we will be discussing further in this section. You might see the following error message in your desktop screen:
“QuickBooks cannot read your payroll setup files [Error PS033].”
What can drag you into QuickBooks update error PS033?
Getting into QuickBooks error PS033 is a result of a bunch of factors. These factors include:
If the version of QuickBooks being used is outdated.
If the UAC settings aren’t configured properly.
Company file issues or damaged data.
Damaged INI QuickBooks desktop file can also lead to this error.
If the QuickBooks CPS folder is damaged or corrupted.
In case there are conflicting programs running in the background.
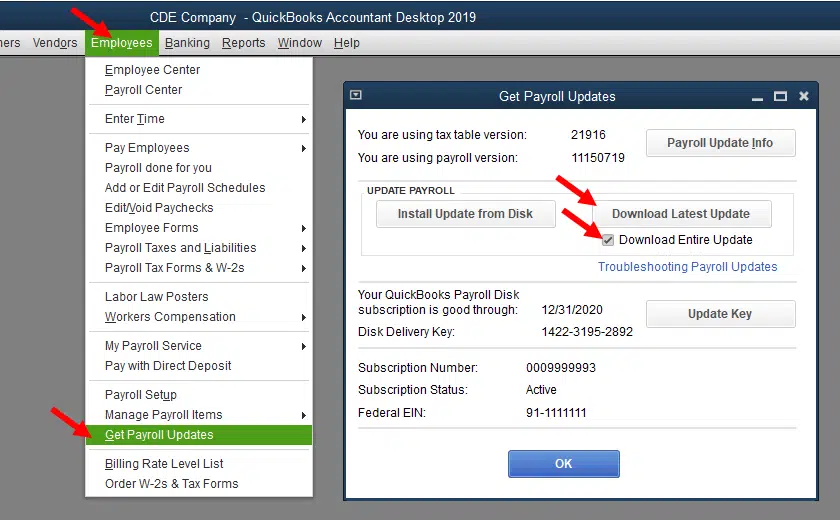
Open the QuickBooks program and move to Employees tab.
Click on Get Payroll Updates.
Make sure to Download the entire payroll update.
Finally click on the Update option.
Fix 2: Rename the QuickBooks CPS folder
QuickBooks CPS folder contains essential installation files. There can be scenarios when these files get corrupted. In such a case, you need to rename the folder. The steps to do that are:
Close QuickBooks and locate the given folder location– C:\Program Files\Intuit\QuickBooks 20XX\Components\Payroll\CPS
XX are in the above step is for reference to the yearly edition such as 2022, 2023, 2024 or previous versions.
Open the CPS folder using the above location.
Next step is to right click on CPS folder and select rename it to CPGYF.
Now click on enter to save changes.
Once the steps done, check whether the error is solved or not.
Fix 3: Disable User Account Control (UAC) settings
Under this method, press the Start tab and choose Control panel.
Select the User accounts option.
Locate the User accounts and hit a click on OK to open it.
Next step is to click on Change user account control settings tab and also click on Yes if prompted by UAC.
Turn the slider next to Never notify option.
Also click on OK tab. This will disable the UAC.
If the problem is solved after the above steps, then reactivate the UAC by toggling the switch to Always Notify and click on OK.
Now reboot the system and try to download the updates again.
Under this methods, you need to press the Start button.
After that type Update Windows on search bar.
Then click on Check for updates.
This process will take some time and check the available updates.
Mark the updates then download them.
Once done, restart the system and let these updates get installed.
Fix 7: Update QuickBooks Desktop
Updating QuickBooks works in majority of cases and the QuickBooks payroll update error PS033 is usually seen due to outdated QuickBooks software. The steps to update QB are as follows:
Close all company files and search for QB icon and right click on the same.
By far we believe that you might have understood what it takes to eliminate QuickBooks payroll update error PS033. However, if you fail to do so, or if you are stuck at some point in time, then feel free to connect with our QuickBooks payroll support professionals and all your queries will be addressed immediately. QuickBooks certified accounting professionals will ensure that your issues are fixed and you are successfully able to update payroll.