Thinking of getting the latest version of QuickBooks downloaded and installed in your system? Not sure about the system requirements which are necessary to support the installation of the new version of QuickBooks? Don't worry! The following article will give you the list of the best of requirements which can make your system environment suitable for the latest QuickBooks Desktop 2024 version.
QuickBooks Desktop 2024 is the latest version of QuickBooks desktop. It was launched on September 8, 2023 and comes with many new, exciting and advanced features. The new version has improved protection of data (data security, anti-theft features), it is very efficient as well as the version provides a useful picture of the user’s current inventory. This version comes with new add-on features for better transparency and control for the user. It also helps the users with routine tasks which can be automated by its accounting software tools and improvements, thus further helping the users do much more for their clients.
The software has proved to be a boon for the users. But, as users you may now be worry as to what changes must you make in your system to make it compatible with the newly version. Be absolutely free from worries. A quick but detailed glance of the article will be helpful enough for you to know all about the changes and the system requirements for QuickBooks Desktop 2024 which you as users need to bring into the system.
QuickBooks Desktop 2024 is an entirely customizable version of the QuickBooks software. It provides the users various plans according to the needs, irrespective of the number of users. With every new version of QuickBooks, it comes along improvisations. So, QB Desktop 2024, too, comes with better security, clear productivity and efficient growth. It enables the users financial records along with making the daily tasks automated and heling in making efficient decisions that promotes the growth of the business. Now first, let us learn about the new and improved features of QuickBooks desktop 2024 and the system requirements for this version.
The New and Improved Features of QuickBooks Desktop 2024
It’s time to explore what features are you going to enjoy as users of this version. Following are some of the latest features of QB desktop 2024 and Enterprise Solutions 2024:
QuickBooks 2024 version supports 64-bit processors for faster work. It generates reports, reconcile accounts and create invoices faster than any other traditional accounting software.
Additionally, this version creates invoices and sales reports quickly to track who owes the user what they purchased and when they made payments.
It can also help the user to utilize easy analytics tools to maximize operational efficiency, enable quick access to comprehensive financial, tax and sales reports for in-depth business insights.
The QB Desktop version 2024 helps the user to reduce complicated data input by effective integration and matching the online bank transactions with QuickBooks and improve reconciliation for accurate accounting.
This version helps simplify tracking, efficiently monitor cash inflows, consolidate payments and handle invoices that are still owed.
Also, the latest QuickBooks helps the users E-file the GST/HST forms as per CRA2 requirements and stay compliant with tax regulations with just a few clicks.
It improves efficiency by quickly deleting duplicate transactions in a single batch, improves data management and ensures the accuracy of financial records.
QB 2024 facilitates the tracking of customer deposits or prepayments. It also transfers credit when the sales order gets converted into an invoice.
The user can track and categorize the inventory items for better management- set pricing rules for every category.
It employs 256-bit encryption. It is known to be best-in-class and keeps the data safe.
With its feature of enhanced search, it helps the user to find items quickly.
The latest version of QuickBooks helps the users to send automatic reminders to the customers when the payments are due.
System Must Have - QuickBooks Desktop 2024 System Requirements
Checkout the following information about the operating system, hardware & software, and other type of system requirements to run QuickBooks Desktop 2024 smoothly.
Proper Operating System
Find operating system info in Windows 11 first
In order to get the information of the running version of Windows OS on your system, the user need to press the Windows logo key + R key together, and then type winver command in the Run box. Now click on the OK button.
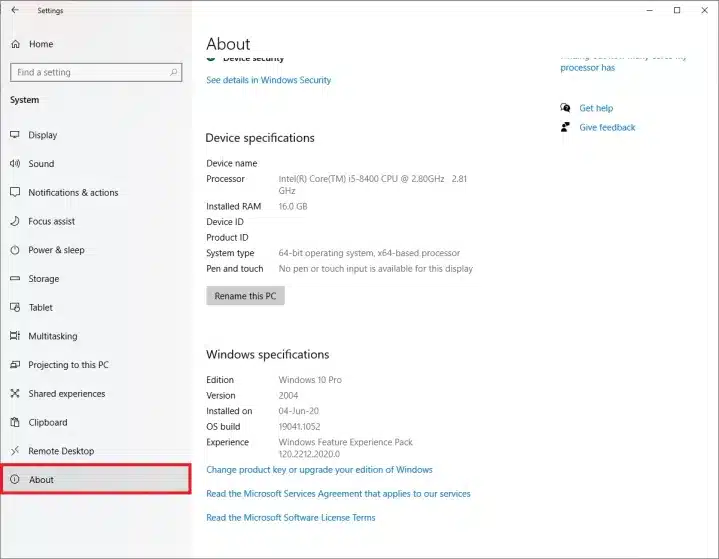
Initially, you need to press the Start button and go to the Setting.
After that hit a click on System and then tap on About.
In the next step, go to the Under Device specifications and then tap on System type (This command will open the information of running a 32-bit or 64-bit version of Windows.)
Now in the Under Windows specifications option, the user need to check which edition and version of Windows your device is running. (For example: Windows 11, Windows 10 or 7)
Now comes to compatibility of QuickBooks with Windows, if you have the latest QuickBooks Desktop 2024 version, Windows 10 & 11 versions are the one and only supported version of operating system that functions very well with this version.
What, If you are using Windows Server 2012?
Well, the latest news is that if you are using the Windows server 2012, then Microsoft Inc. will not provide or release any type of security updates and also not provide the technical support for all the PC computers that are running on the Windows Standard and Essentials Server 2012 & Server 2012 R2 after October 10, 2023 date. Due to this reason, the QB desktop 2024 won't support Windows Server 2012 and can’t be installed on it. Following are the Windows OS that will work with QuickBooks desktop 2024
Windows 11, 64-bit, natively installed
Windows 10, all 64-bit editions, natively installed
Windows Server 2022, Standard and Essentials
Windows Server 2019, Standard and Essentials
Windows Server 2016, Standard and Essentials
Note: The following operating systems are not supported with the latest QuickBooks:
Windows 8.1
Windows 10 S mode
Windows 11 IOT
Linux
If your system is using any of these later mentioned operating systems, then replace it with the Windows 10 (Microsoft 8.1) operating system. Also make sure that QuickBooks requires you to use only Windows natively and not through an emulator or virtual environment.
Database servers
The Windows should be natively installed. Following are database servers which are required for the latest QB desktop.
For a smooth functioning of QuickBooks Desktop 2024 Version, the required or recommended browser is Google Chrome and Internet Access. Try to avoid using any other browser such as Mozilla Firefox, Microsoft Edge or Internet Explorer. This will bring in a lot of interruptions in your work mode while functioning with the latest version.
Proper Storage Space
2.5 GB disk space for software files is recommended in order to make the QB 2024 version run in a smooth manner. As a user, you must also keep in mind that additional space is required for user data files. Without this recommended space, the system may result in errors, may slow down and might become sluggish.
Screen Resolution for Optimized Performance
For the latest version of QuickBooks to function in a smooth manner, the recommended screen resolution of the system must be 1280 * 1024 or higher. This size of screen resolution facilitates optimized performance of the system. This is optimized for default DPI settings.
Product Licensing & Licensing
As a user of QuickBooks Desktop version 2024, you cannot just download and install it in your system. All you need to do at foremost is the registration of product. It is needed to make the application run smoothly.
Hardware and operating system requirements
This version requires a 64-bit Windows operating system and won’t run on 32-bit.
Memory (RAM) for Workstation
The system requires a minimum of 8 GB RAM. Howsoever, the professionals and experts recommend a RAM size of 16 GB.
Required Processor
A 2.4 GHz minimum processor is what is of utmost necessity to the system to run the QuickBooks Desktop Version 2024 in a smooth manner. As a user, you must keep it noted and think of whether the processor of your system is of the required capacity. Slow and weak processors will be unable to provide you a smooth user experience.
RAM (Server)
For 1 to 5 users, the required RAM is 8 GB
For 10 Users, the requirement of RAM is 12 GB
For 15 Users, the required RAM is 16 GB
For 20+ Users, the RAM size should be 20 GB+
Disk Space
The disk requirement for QuickBooks desktop 2024 are as:
2.5 GB of disk space (additional required for data files). Additional software:
Microsoft .NET 4.8 Runtime - 60 MB, provided with the installation files.
It supports one workstation monitor with two extended monitors. So, the user must try and setup the monitor requirements as per the software demands.
The screen resolution for it as:
The display optimized for 1280 x 1024 resolution or higher with up to 2 extended monitors.
Best optimized for Default DPI setting for a given computer.
DVD Drive Size (Optical Drive)
4x DVD-ROM drive is required in order make the latest QuickBooks to function in a smooth manner. The use of it for physical CD installations.
Windows
North American version of Windows.
North American version of Windows.
Administrator rights are required for the server computer when hosting multi-user access.
Administrator rights are required for the server computer when hosting multi-user access.
Other hardware devices
If the user uses the Warehouse Manager in their QuickBooks Desktop mobile, here's the supported devices you can use:
Zebra TC20/TC25/TC51 Mobile Computer is recommended (Android 6.0 & above)
Zebra MC40 Mobile Computer (Android 6.0 & above)
QuickBooks Desktop Enterprise 24.0 also supports:
Honeywell Voyager 1602g Pocket Barcode Scanner
Socket Mobile CHS 7CI
Symbol CS3070
Software compatibility
QuickBooks desktop integrates with hundreds of other apps. Here are a complete list of the most common applications you can use with your QuickBooks.
MS Office
Microsoft Office 2021
Office 2019
Office 2016 (this includes Outlook 2016) both on 32 and 64-bit
Email estimates, invoices, and other forms with Microsoft Outlook 2016-2021, Microsoft Outlook with Microsoft 365, Gmail, Yahoo Mail, Outlook.com, and other SMTP-supporting email clients.
Preparing the letters in QuickBooks requires MS Word 2021, 2019, 2016, or Microsoft 365 (includes 64-bit)
Exporting reports requires Microsoft Excel 2021, 2019, 2016, or Microsoft 365 (includes 64-bit)
Contact Synchronization with MS Outlook requires Outlook 2021, 2019 (32 and 64-bit), or 2016
QuickBooks POS V19.0
Intuit TurboTax 2023 (Personal and Business)
Lacerte 2023
Pro-Series tax year 2023
Quicken 2023, 2022, 2021, 2020, 2019, 2018, 2017, and 2016
QuickBooks Desktop for Mac 2024, 2023, 2022, and 2021
Adobe Acrobat Reader: Business Planner, Payroll, and viewing forms require Adobe Acrobat Reader 9.0 or later.
Anti-malware and antivirus software compatibility
Intuit has already tested QuickBooks Desktop Pro 2024, Premier 2024, and Enterprise Solutions 24.0 with the following antimalware and antivirus programs.
Antivirus software
McAfee
Avast
Bitdefender
Norton
Kaspersky
Trend Micro Security
Webroot
Cylance (Internet/Regression Only)
ESET
Panda Dome
Sophos
Avira
Symantec
F-Secure
Microsoft Windows Defender
Anti-malware software
Bitdefender
AVG
Malwarebytes
Spybot
Emsisoft
McAfee
Avast
Webroot
ZoneAlarm
Kaspersky
F-Secure
The latest QuickBooks Desktop 2024 needs internet security protocol TLS 1.2 for the connected services to work smoothly.
Minimum System requirement for QuickBooks desktop Mac Plus 2024
Here are the minimum system requirement for QB Desktop for MAC Plus 2024:
An OS of at least Mac OS X v12.0 (Monterey) is required.
iOS 12.0 or later for iPhone related features.
The latest version of QuickBooks MAC supports either Intel or Apple CPU hardware.
An internet connection is required.
Multi-user Server: Intel Core 2 Duo or higher processor to run a server.
Minimum 2 GB RAM is needed (4 GB RAM recommended).
250 MB of available storage is required.
Macintosh-compatible printer is required if you want to print invoices, checks, deposit slips, lists, purchase orders, mailing labels, reports, or graphs.
You need to use Intuit Checks if you plan to print checks.
Integration/compatibility requirements
Export report data - It requires Apple Numbers v12.0 or later, or MS Excel 2016 or later, including Microsoft 365 to work smoothly.
E-mail as PDF - The system requires Apple Mail, Microsoft Outlook 2016 or later, including Microsoft 365.
File conversion - QuickBooks Mac 2024 supports:
One-way conversion to QBO
One-way conversion from QuickBooks Desktop for Windows 2021 and 2023.
Conversion to and from QuickBooks for Windows 2024.
What are the Steps to Download Install and Activate QuickBooks Desktop Version 2024?
Before the process of download and install, you need to follow some steps for a hassle-free and glitch-free experience.
Step 1: Verify the system requirements
You, as the user, must make sure that the operating system present on your device is capable of meeting the requirements before downloading the QuickBooks Desktop version 2024. The users have to check the compatibility and review the system requirements of the version.
Step 2: Purchase the version
A valid license or proper active subscription is necessary to download QuickBooks Desktop 2024 onto the system. The software is directly available on the official website of QuickBooks. The steps to purchase the version are as follows:
After that follow the instructions displayed on the screen to activate the version which best suits to your business requirements.
Most important of all, you must create or log in to the account:
For Existing Users: If you are an existing user, you can log in to the QuickBooks version with the existing credentials if and when you have been using QuickBooks for some time.
New Users: If you are a new user, you must visit the Intuit accounts page. Now, you must click on Create an Account and provide the email address and phone number.
Important Note: If you somehow encounter a message saying: “This user ID is already taken” or in case, if you forget the password, then click Forgot User ID or Password and enter your email address.
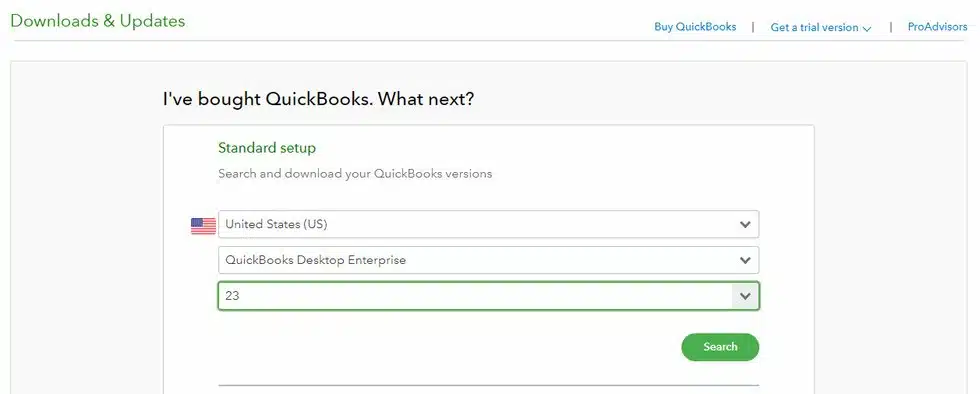
At the foremost, the user needs to access the Downloads & Updatespage from the Intuit account dashboard.
Moving ahead, the user needs to select whether they need to use the QuickBooks in single-user mode or multi-user mode. Select Yes, No or Not Sure.
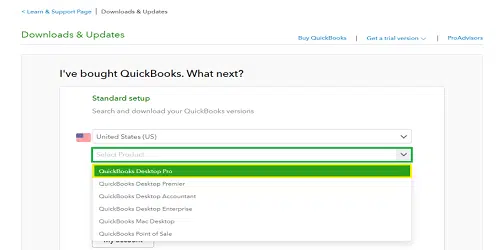
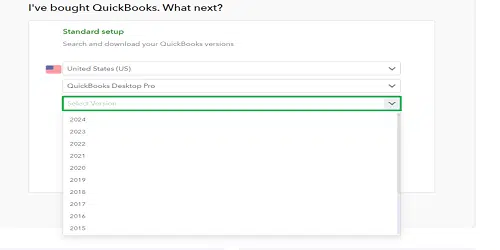
After that the user has to choose the preferred country.
once done with that, select the edition of QuickBooks Desktop version based on the requirements. Select from either Pro, Premier or Enterprise.
Later on, find the latest version in the list of available products and click on it.
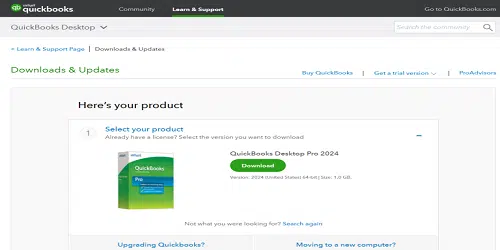
This will redirect the user to the download page for the QuickBooks Desktop 2024.
At last, the user has to click on Download and initiate the download process.
Steps to Install the newest version (QuickBooks Desktop 2024)
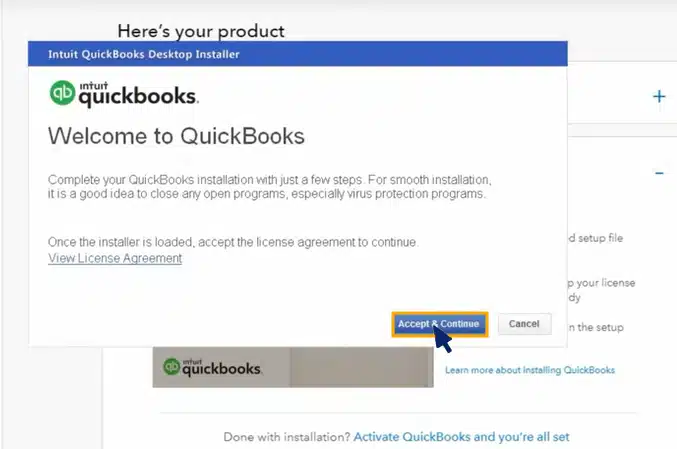
At first, the user has to search for and open the QuickBooks.exe installation file.
Next, follow the instructions displayed on the screen.
Heading forward, hit a click on Next after accepting the Software License Agreement.
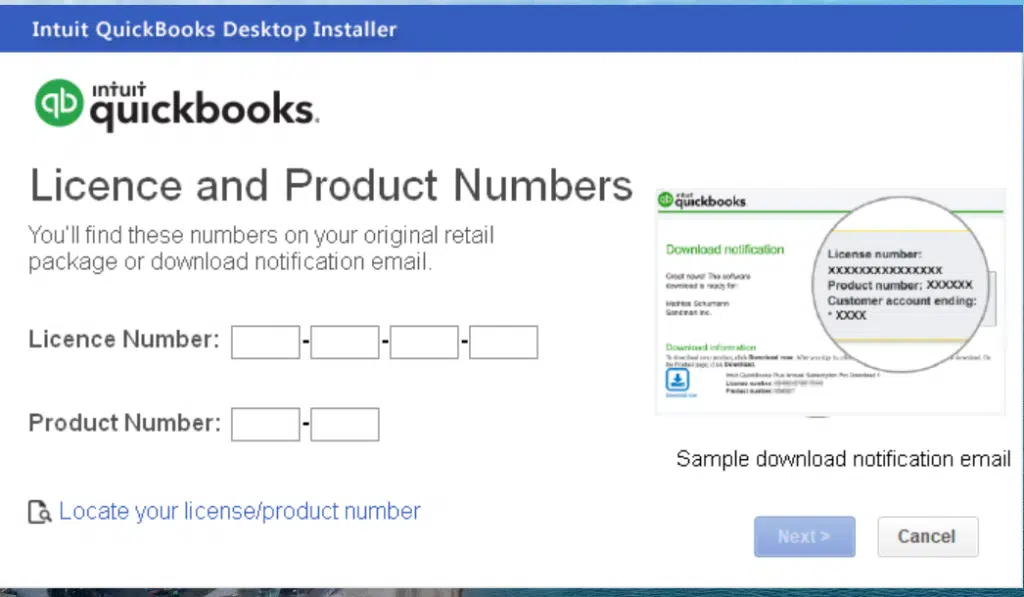
You now have to Enter the product and license numbers.
To proceed with the process of installation, click Next.
After the process of downloading and installing the QuickBooks Desktop Version 2024 is complete, you need to activate the software. For this you need to know the procedure while you will be learning in the following section of this article.
Note: To enjoy and use the latest features of this QuickBooks desktop, the users need to first activate it. For validation, a valid license and product key is received by the user through email or other method after the purchase.
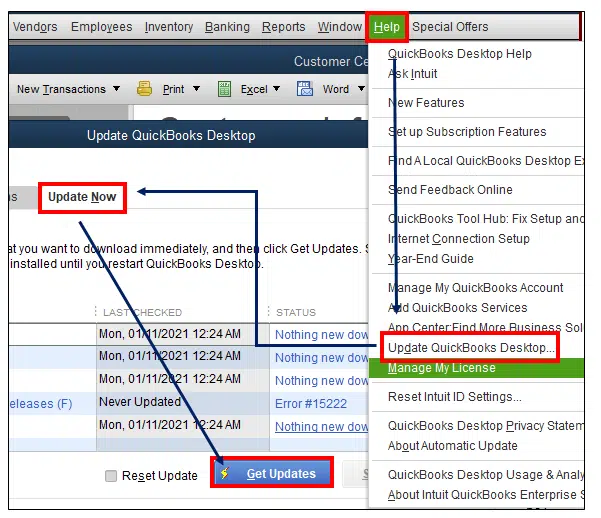
First of all, the user need to visit to the QuickBooks toolbar and click on Help.
Moving ahead, here you need to Enter the license and product information on the window that appears on the screen.
lastly, follow the steps on the screen to verify your information. That's it
Step-by-step Guide to Upgrade/ Update QuickBooks Desktop 2024
Now, as QuickBooks users you have come to know about the ways to download and install it. Let’s us learn the steps to upgrade/update QuickBooks Desktop differ from to version to version of the operating systems.
If you are a Windows Users:
First of all, the user must close the Company files and QuickBooks.
Moving ahead, users needs to open the Start menu and search for QuickBooks Desktop.
After that, right-click on the icon of QuickBooks desktop.
Heading forward, the user must select Run as administrator.
Thus, now you have come to know about the minimum system requirements for the QuickBooks Desktop 2024. Since you know all about QuickBooks 2024 including its additional features, it is the right time to upgrade. But, before that get the system requirements done and in place before downloading, installing and activating the software. However, if you get stuck anywhere during the process of installing, updating or downloading the new version and have any kind of queries, you can simply reach out to our QuickBooks desktop support team who are available 24*7.
FAQs (Frequently Asked Questions)
How can I, as a QB user can upgrade my current QuickBooks version to QuickBooks 2024?
The steps to upgrade QuickBooks version are: 1. Initially, you need to check system requirements 2. After that, create a data backup of your company files 3. Next, now install QuickBooks 2024 using the license key and product key. 4. Now migrate the data during installation. 5. lastly, check for changes and double-check moved data for a seamless transfer.
Can QuickBooks 2024 be downloaded for free?
Yes, QuickBooks 2024 offers a free 30-day trial.
What is the difference between QuickBooks Desktop Version 2023 and 2024?
The upgraded version of QuickBooks Desktop from version 2023 to 2024 enhances the capabilities of integrating of the software. Moreover, the new version helps it connect with a wide-range of third-party tools.
What gives Read-only access to my QuickBooks?
Custom reporting gives Read-only access to the QuickBooks.
How many versions of QuickBooks 2024 are there?
Based on different business needs, the latest version of QuickBooks offers various product versions. There are three main versions: 1. QuickBooks Pro 2024 2. QuickBooks Premier 2024 3. Enterprise Solutions 2024
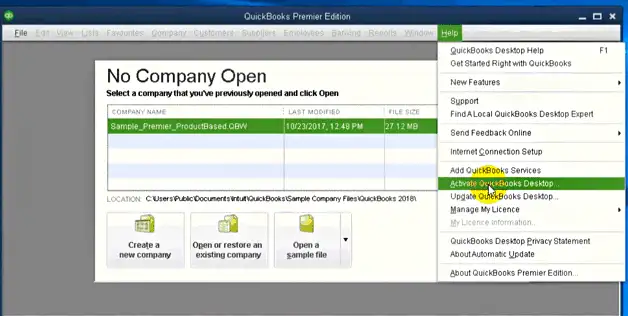
How can I activate the latest QuickBooks 2024?
The steps for activation are as follows: 1. First of all, go to the Help Menu. 2. Next, open ‘Activate QuickBooks’. 3. Thirdly, provide the license and product information. 4. Last but the not the least, you need to complete the Activation Process.
QuickBooks stands out to be one of the best software for accounting. It makes working with multi-currency easier. However, sometimes users encounter QuickBooks Multi Currency error when an overseas customer makes payment in their currency and wire transfer to a U.S. bank account is done accordingly with the exchange rate.
What is QuickBooks Multi-Currency Problem in Desktop and Online?
Multi-currency errors in QuickBooks desktop or QBO appears on the screen while running Profit & Loss report. It appears on the screen along with a message:
Something not quite right: “You can only use home currency balance sheet accounts with home currency A/R and A/P accounts.”
Due to this error several issues occur. Some of them are as follows:
Business validation error
Amount missing from the request
Sometimes the currency of the transaction becomes invalid for the customer/account
Duplicate Documents Number Error
The parameter line amount required is missing in the request
No matching reference found for the customer and account
Required parameters missing
The Multi-currency feature is inactive
No matching vendor found
Caution: Before Turning on the QuickBooks Multi- Currency Feature, the users must keep in mind the following aspects.
There are certain terms and conditions which user must keep in mind before turning on the Multi-currency feature of QuickBooks. These are as follows:
The user must not select multiple customers in the invoices for the Time and Expenses window.
The user would be unable to use the income tracker, insights and bill tracker.
The QB user would be unable to enter batch invoices or batch delete/void transactions.
Ways to Resolve Multi-Currency Error in QuickBooks Desktop and Online
Here are some conditions you need to monitor when trying to fix multi-currency error in QuickBooks desktop and online:
Condition 1: The Multi-currency feature is not activate on the user’s system
1: The user needs to turn on multi-currency in QuickBooks online
First of all, the user need to go to Settings.
After that, here choose the Account and Settings option.
In the next step, choose the Advanced tab.
Next, now under the Currency section, hit a click on Edit option.
Now select the currency, from the home currency drop-down list.
Then, the user needs to mark the multi-currency checkbox and make sure to understand that they can’t undo the option.
At last, the user should press Save button to finish the process.
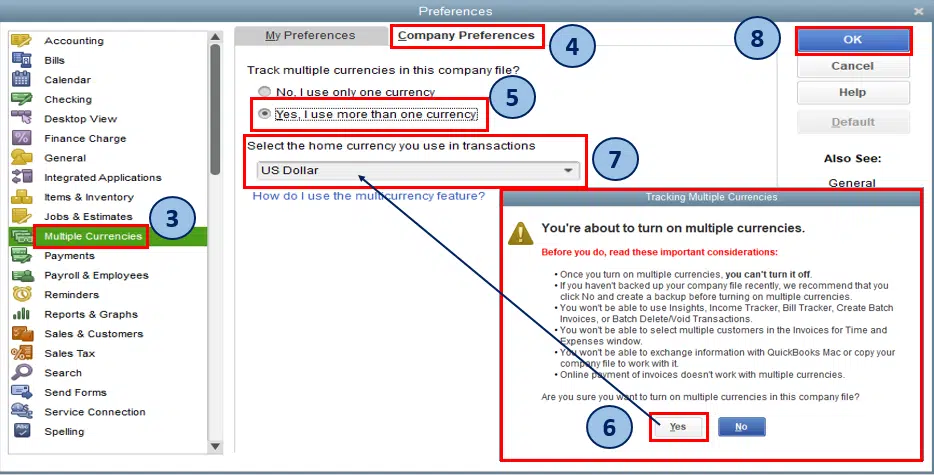
2: The user needs to turn on Multi-currency in QuickBooks desktop
Firstly, the user needs to go to Edit menu.
Then choose Preferences.
Now, the user needs to select Multiple Currencies.
Next, on the Company Preferences, click on Yes, I use more than one currency.
At last, the user has to select home currency from the drop-down menu that appears.
Condition 2: Not added the Vendors and Customers for making transactions in foreign currency
It is only able for the user to allot one currency per customer or vendor profile. So, the user has to create new profiles to allot a new currency. The steps to add Multi-currency vendors and customers.
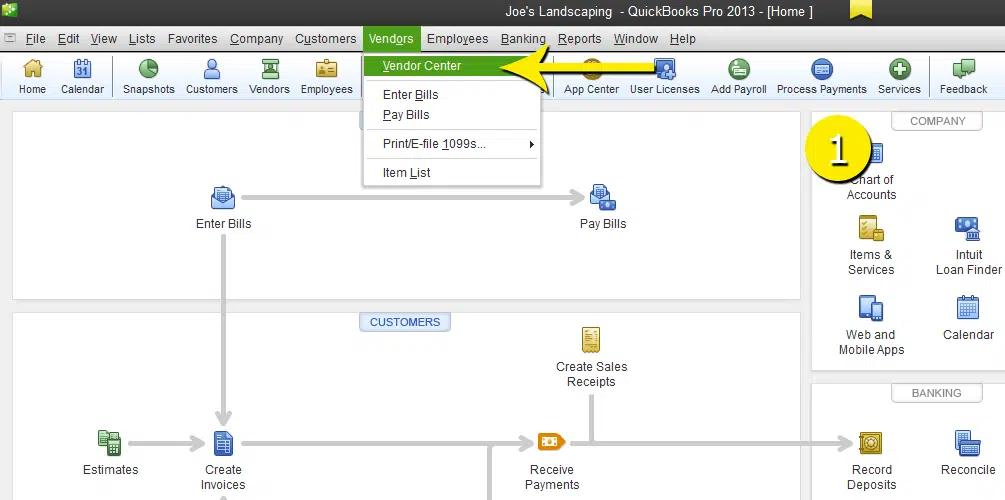
First of all, the user has to go to the Customers or Vendors menu.
Then, from the Customer/Vendor center, they needs to select the New Customer job or New Vendor drop-down list.
Next, the user has to assign a Customer/Vendor Name and Currency.
At last, once all the steps are completed, click on OK.
Condition 6: The Bank Account is not linked to the foreign currency transactions
Followings are the steps to link the bank account to the foreign currency transactions.
First of all, the user has to go to Bookkeeping and Transactions.
Next, he needs to open Transaction details.
From the For Review tab, the user needs to click on Add.
At last, the user has to enter the exchange rates offered by the banks under the currency fields.
Condition 7: The company file which is being used by the user is damaged
In case, the company file which is being used by the user is damaged, then the user needs to use the Verify and Rebuild Data tool within the QuickBooks desktop. This tool helps in determining the company file issue as well as troubleshoot it at once. The tool is quite an easy one to use. Following are the steps to use the Verify and Rebuild Data Tool:
How to Verify the data of the company file?
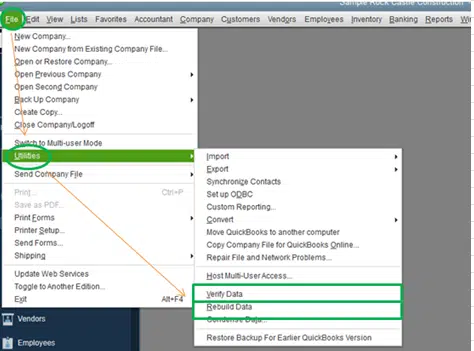
First of all, the user needs to go to the Window and Close All the tasks running on the background.
After that go to File menu and choose the Utilities option.
Moving ahead, the user needs to choose the Verify Data tab.
After clicking on the Verify Data tab, the user has chances of getting either of these following pop-ups:
An error prompt: After this, the user needs to get ways of troubleshooting this error prompt.
QuickBooks detected no problems with your data: This means that the data of the user is clean and that he is not required to do anything else regarding the data.
Your data has lost integrity: This pop-up message means that the data damage has been detected in the file. The user needs to rebuild the data.
How can the user rebuild the company file data?
At the foremost, the user needs to go to File menu > Utilities > Rebuild Data.
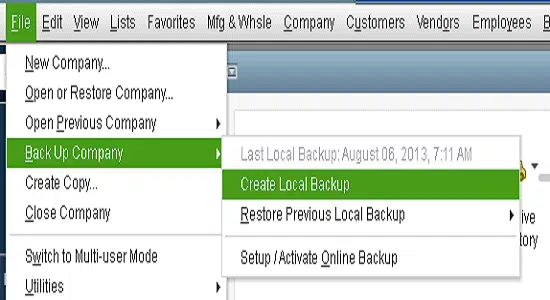
After that, the user needs to create a backup before the recovery of the company file.
After creating the backup, hit a click on OK.
(Note: You need to always remember that a backup is necessary while rebuilding)
After this, rename the File and hit a click on Save.
Next, the user needs to choose OK once done they receives the message Rebuild has completed.
In the next step, the user has to go to File menu > Utilities > Verify Data to check for additional damage.
(Note: If further damage is found, it must be fixed manually. Find the error or errors in the qbwin.log on the QuickBooks Desktop Customer Helpdesk and fix it. The user needs to restore the recent backup is the error is not noticed. Next, users needs to go to the File menu and Choose Open or Restore Company.)
FAQ's about QuickBooks Multi-Currency Error in Desktop & Online
QuickBooks users often come across issues while using the multi-currency feature in both Desktop and Online versions. To make it easier for you, we have created a list of the most frequently asked questions with their solutions.
What triggers “Something’s not quite right” during multicurrency entries in QuickBooks Online?
QBO blocks journal entries that mix home‑currency balance sheet accounts with foreign‑currency A/R or A/P, because it would create incorrect opening balances and FX gains/losses; align account and contact currencies or use a duplicate vendor/customer with the correct currency to proceed.
Can multi‑currency be turned off after enabling?
No, once you enable multi-currency in QuickBooks desktop or online, it cannot be turned off. The only option is to create a new company file/account if you want to revert back to single currency.
What is a Multi-Currency Error in QuickBooks?
A Multi-Currency Error occurs when QuickBooks fails to process transactions involving different currencies or when the multi-currency setting is misconfigured. It may also arise if exchange rates are not updating properly or if the feature is not turned on.
What causes Multi-Currency Errors in QuickBooks Desktop and Online?
Issues with automatic exchange rate updates, Incorrect or unsupported currency codes and Multi-currency feature not enabled properly are the most common reasons behind to this error.
Conclusion
QuickBooks multi-currency errors are often related to setup issues or outdated versions. By enabling the feature correctly and ensuring proper exchange rate updates, the user can resolve most of these problems easily.
Hope this article gives a detailed understanding of the ways to deal with the QuickBooks Multi-currency problem in Desktop and online. The steps are mentioned in detail and the user is sure to get a resolution if they follows the steps correctly. These steps of resolving the error has been provided by our team of professionals. However, if the user will stuck at any of the steps or needs troubleshooting ways to another issues related to QuickBooks, they are free to contact our QuickBooks Help and Support Team. Feel free to reach us at 1-800-761-1787. Our ready-to-help team of professionals is there for the users 24*7.
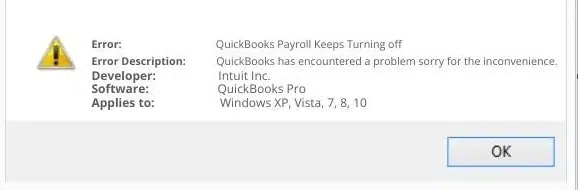
Using QuickBooks Payroll becomes a hassle when it turns off again and again due to certain technical glitches. Often when you try to work, QuickBooks payroll keeps turning off, or repeatedly shuts down, or stops functioning abruptly. Well, it is possible to deal with the error: QuickBooks payroll stops working and then switches off automatically.
Error: A problem causes the program to stop working correctly. The Windows will close the program and notify you if a solution is available.
In this segment, we are going to talk about how you can fix this payroll issue and what reasons can trigger such an error. Let us explore QuickBooks payroll keeps turning off issue in detail.
Why QuickBooks Payroll Keeps Turning Off Frequently?
Well, you can come across the payroll turning off issue in QuickBooks due to a handful of reasons such as:
Network connectivity issues
Damaged installation files
Antivirus hindering the software communication
Firewall blocking QuickBooks
Payroll unable to connect to the internet
Security certificate application is invalid
Or if the system date and time settings are misconfigured.
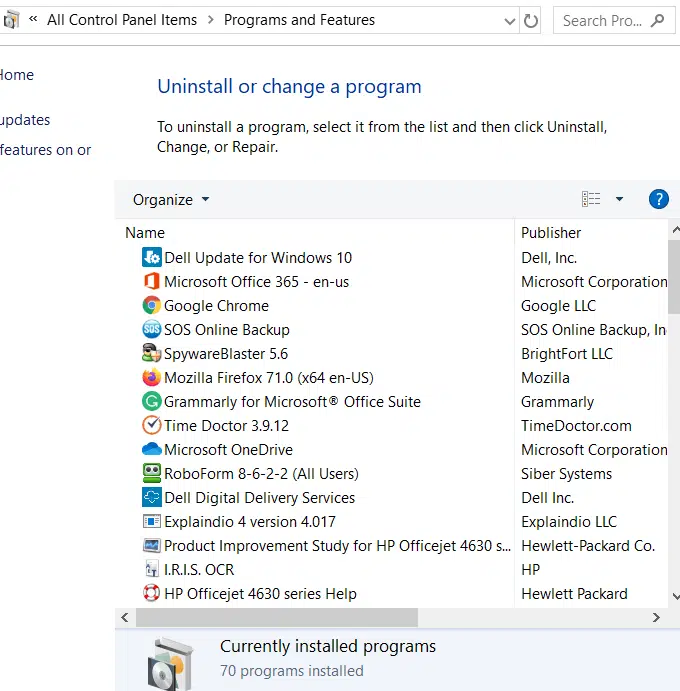
Head to the start icon and choose the control panel.
If you are a Windows 8 user, then you will see a variety of results when you search for the control panel.
Now, look for programs and features option on the control panel screen.
And then select uninstall a program.
In case the above options are not visible, then head to programs and select the program feature tab.
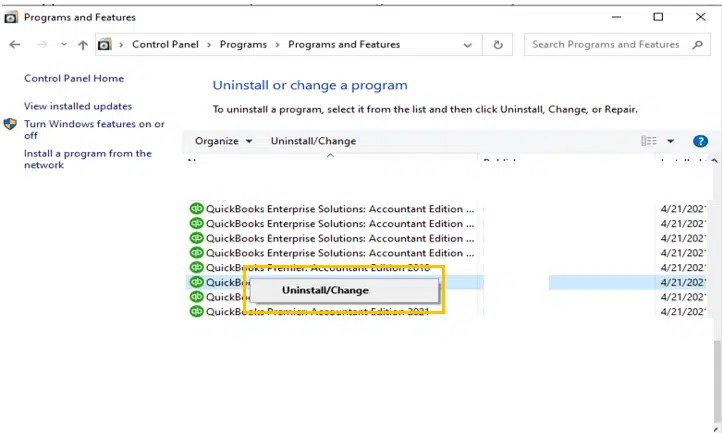
You now have to look for QuickBooks from the given program list that is installed on the system.
Furthermore, select the option to uninstall/change.
And when you are asked to confirm the step, choose to continue and click on the next tab.
By the end, you need to click on the finish tab and start the system again to complete the process.
What Next?
Did you see an error message when repairing: the QuickBooks file in use? If that is the case, continue with the steps below:
Step 1: Click on ignore and restart the system by clicking on the ok tab.
Step 2: You might have to click on ignore tab a number of times and after this is done, the repair process will begin.
Step 3: If you do not see the ignore tab, simply click on the close tab. After the repair is complete, the user is suggested to start the computer system again.
Steps to Validate the Service Key of QuickBooks Payroll
Now that you have completed the process above, it is time to validate the service key of QuickBooks payroll. You will have to refresh it and authenticate the service key. Here are the steps you need to carry out:
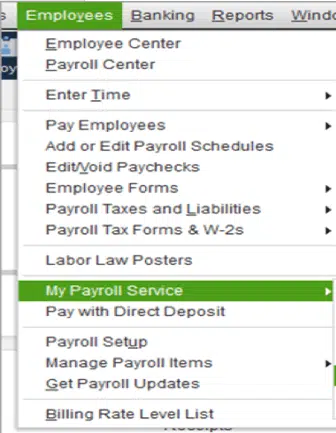
Head to the employee section initially, once opening the particular QuickBooks payroll software.
Select the option from the menu that shows My payroll service.
Now, go for the opt termed as Manage Service Key.
Find edit tab and click on the same.
The next step is to choose the next tab and further click on finish to conclude the process.
After you are done with the entire set of steps, a message will show up stating: You have recovered the latest payroll update and also authenticated your payroll subscription.
When you purchase a payroll over the phone or online, usually a mail with a 16-digit service key is sent. After you access this key, enter in QuickBooks to use payroll. Moreover, check for junk or spam folders or use an automatic service key retrieval tool, in case you are unable to find the service key. Now, log in with your Intuit Account Credentials:
In case you purchased your software from a retail store, then here are the steps you need to carry out:
Start off by opening the QuickBooks company file.
Head to the employees tab and then payroll.
Once done with that, select Install Payroll from the box menu.
Furthermore, you need to enter the payroll license on the payroll activation page and then the product information.
You can find the information related to the license and product number on the yellow sticker of the CD folder.
Hit the continue tab.
And carry out the onscreen steps to complete the payroll activation including the service key.
Step 2: Complete the payroll setup tasks
Enter any paychecks and tax payments made throughout the year, further enroll the employees, and set up the federal and state payroll taxes.
This might take time.
After that choose the employees tab and select payroll setup.
In order to add employees, you simply have to set up your company’s payroll items and taxes, enter the pay history if required, and lastly perform the onscreen prompts.
You can only use your payroll features in QuickBooks when you eliminate the error successfully. Implementing the measures discussed in this piece of writing can help you do that. However, if unfortunately, the error still troubles you, in that case we can help you. You can discuss your queries and doubts with our certified ProAdvisors at 1-800-761-1787, and let them help you with quick fixes immediately. Our QuickBooks payroll support team have proven experience in dealing with all sorts of QB-related issues. For more details, ring us up right away!
Frequently Asked Questions (FAQs)
What are the ways in which a user can resolve the QuickBooks Payroll Errors?
Following are the solutions to resolve the Payroll Errors from QuickBooks: 1. First of all, a Digital Signature Certificate should be downloaded and installed. 2. The user need to proper check of the Internet Explorer settings. 3. Further, the user may also try to uninstalling the QuickBooks desktop related entries. 4. Last but not the least, the user can even try to Updating the Windows.
What are the reasons behind Payroll Service Server Error?
The QuickBooks payroll service server error occurs due to several reasons. These are as follows: 1) Check for the Security certificate. It may be invalid. 2) The user may be involved in transferring data in multi-user mode. 3) Incorrect settings of system date & time may lead to such problem to occur. 4) Also, incorrect configuration of Internet security and firewall settings may result in the trouble.
What are the causes behind QuickBooks Payroll discrepancy?
There might be several reasons as to why the QuickBooks Payroll discrepancy occurs. Some of the reasons are as follows: 1) There might be some problem within the installation files. 2) Another cause might be if the security certificate is not valid for QuickBooks. 3) QuickBooks Application is having trouble connecting to the server may also lead to such errors.
Bothered by update error 503 and can't finalize on an ideal fix? Well, QuickBooks error code 503 is an update error that is often encountered when there is any sort of misconfiguration is present in the Windows operating system. Not just that, but if in case you are using an outdated version of your accounting software, then ending up in such an error is possible. Just as you upgrade your Windows operating system on a timely manner, you are supposed to update QuickBooks to the latest available release, to avoid any sort of possible threats. The QuickBooks error code 503 that we are addressing in this segment shows up on the screen with a warning message:
“QuickBooks has encountered a problem and needs to close. We are sorry for the inconvenience.”
The error can be addressed by performing some quick solutions, that we will be discussing later in this segment. To understand this error a bit better, all you need is to stick to this piece of writing till the end.
Quick Fixes to QuickBooks error 503
Fixing such errors becomes much easier, when you get the grip on to the right solution steps. Here are the effective measures that you can implement to get rid of QuickBooks error 503.
Method 1: Disabling Script Debugging
You need to start off with heading to the Search box and further you need to enter in Internet Options.
Once done with that, you need to proceed with Advanced tab.
Post that, you need to select Disable script debugging.
Later on, checkmark on the Radio tab.
By the end of the process, you need to simply unmark the display a notification about every script error.
And then, confirm by clicking on OK tab to restart the system.
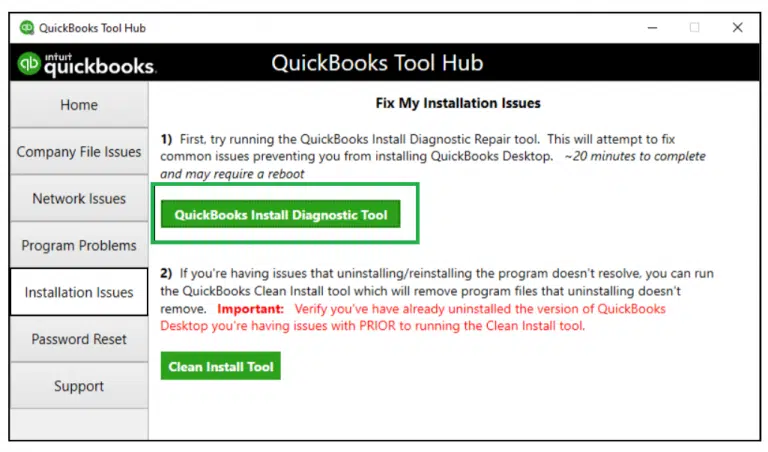
Method 2: Use QuickBooks Install Diagnostic Tool
Initially you need to download QuickBooks tool hub program directly from the Intuit website.
Once done with that, run the program on your system.
Hereafter, select QuickBooks install diagnostic tool from the Installation issues tab. (Now let the tool perform the necessary task.)
Once the tool carries out the required steps, you need to reboot the system and confirm if the issue gets resolved.
Method 3: Reinstallation of Graphic Driver
As the error might seem a bit confusing, so can be the solutions. You can try to reinstall the graphic driver to fix the QuickBooks error 503 permanently. This can be simply done using the steps below:
Simply find the graphic driver by opening the device manager of your device or operating system.
You need to right-click on the same.
And click on the Uninstallation tab.
After you are done with the uninstallation, you need to reboot the system.
And further, reinstall the same and check if the issue persists.
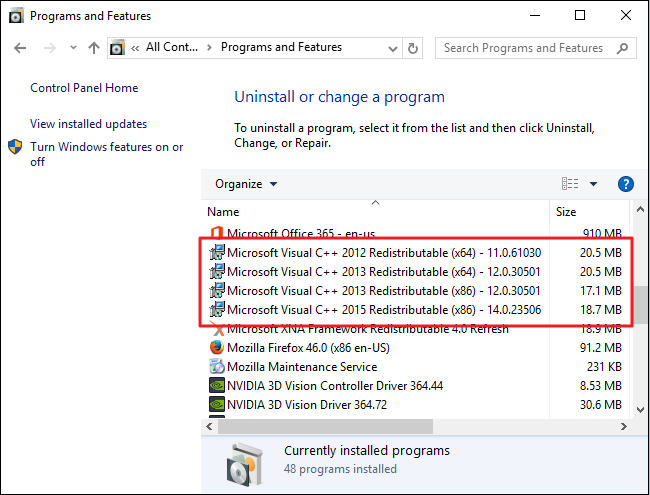
Method 4: Reinstalling Runtime Libraries
Navigate to Programs and features tab to find the Microsoft Visual C++ redistributable package.
And later, you need to select Uninstall.
Followed by, rebooting the system.
Towards the end, all you need is to download the latest package from Microsoft for installation.
Method 5: Run disk cleanup
At first, create a backup and then move to Clear the cache to reboot the system.
You also require to login to QuickBooks.
And and run the program from the payroll updates.
Method 6: Repair Windows Registry
Open the search box and type Command prompt or CMD.
After that press Enter key.
Now select Run as Administrator option.
Proceed by entering regedit command.
Navigate to the left panel to find the QuickBooks folder.
Now go for File menu and tap on Export tab.
Once you are done with that, rename the files with .reg extension.
Lastly, Save and Close the editor tab.
Method 7: Remove System Junk and Temporary files
Press the Windows key on your system and search for Disk cleanup in the search bar.
After that select Disk Cleanup from the list of results.
Choose the Drive you want to clean up, and then select OK.
Under Files to delete, you need to select the File types to get rid of.
To end the process select OK.
Method 8: Update Windows and drivers
At first, open the Control panel and search for System security.
Now, click on System update.
You will then click on Check for updates, if available.
In case you found any updates, then simply proceed to Windows and the drivers.
Following thar, click the confirmation tab to complete all the steps.
To apply the changes, reboot your system once.
Also, update your QuickBooks software to avoid any further compatibility issues.
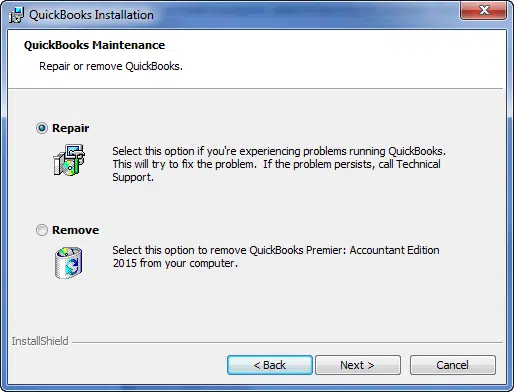
Method 9: Repair your QuickBooks Installation
Start off by opening Run window using Windows + R keys.
And then type appwiz.cpl command.
Now go to the Browse tab and opt for QuickBooks from the drop-down list.
Here you need to select Repair.
You need to carry out the onscreen steps to finish the process.
What leads to QuickBooks Error 503?
Other than the misconfiguration of the Windows, a few other factors can also trigger QuickBooks update error 503. These factors include:
Certain registry errors in the Windows Operating System.
An outdated or unsupported version of Windows or QuickBooks.
Just in case the Windows junk files and temporary files and folders are still piled up in the system.
Mistakenly installing a corrupted file of QuickBooks can drag you into error 503.
Signs to identify QuickBooks error 503
Finding out an error becomes easy once you know the signs of the same. Here are some quick signs and symptoms. Let us find it out:
Any feature individually causing crashes.
Another sign can be if the QuickBooks related files freezes while scrolling.
You can also identify the same error, when the Windows OS run slowly and fails to respond to your inputs.
Conclusion!
Still worried because of QuickBooks error code 503? Well, in this case, consulting certified ProAdvisors is something that would surely work for you. You can reach out to our QuickBooks error support experts, and expect your queries to be addressed by experts within the shortest span of time. Our professionals know what it takes to rectify errors permanently. For more information, give us a call today!
Have you ever found it difficult to update your QuickBooks subscription? Did you get a My subscription payment failed email? Well, this error is generally caused by incorrect or outdated billing details, and updating the payment method usually fixes it.
Updating QuickBooks subscription is an easy task, but this process may face few technical issues that can lead to 'QuickBooks Subscription Payment Failed Error' or other subscription related issues. However, if you are able to relate with it, then this means that Intuit is unable to charge the billing account for your subscription. Another possible reason why you came across my subscription payment failed error is that the card on file might be out of date, invalid, or the card issuer might have declined the payment.
Procedure to troubleshoot QuickBooks my subscription payment failed issue
A quick solution to this error is to update your billing information. Let us understand what steps can be performed to fix my subscription payment failed in QuickBooks:
Step 1: Update your billing information
Most of the times, incorrect billing info is the prime cause of this error. To sort out this issue, the steps to follow are:
Under this process, you need to sign in to QuickBooks Online.
Furthermore, head to the settings tab and also move ahead to the Account and settings tab.
You are further required to choose the billing and subscription tab.
Heading forward, you need to choose the edit tab for the payment method.
Now, update the billing info.
And once done with that, choose the save tab.
After you update your billing information, this might take around 24 hours to reflect and activate your payroll subscription. In case you need any further assistance or if the error is still troubling you, then in that scenario, you simply have to proceed to the steps below.
Step 2: Review your billing information
Did you see my subscription payment failed issues in QuickBooks even after performing the set of steps above, then you simply need to head back and edit the payment method once again. Here is what you need to check:
Ascertain that you do not use any special characters or symbols (such as @ or *) in the billing address. Using any special characters will trigger some sort of error.
Moreover, you need to ensure that every field on the payment method screen contains information, including postal code type in “00000”.
Carry out the step to update the billing info in the private web browser i.e., the incognito mode. In case you are unable to update the billing info, and the error isn’t present in the private web browser, then you will have to clear the web browser cache. You can perform the detailed steps to clear the browser cache.
You can also try a different card to make the payment because a different card may be having permissions to process the payment.
You should further check in the bank and ensure QuickBooks is approved to bill the account. In case you are using PayPal, make sure to contact PayPal or the banking institution that is linked to PayPal.
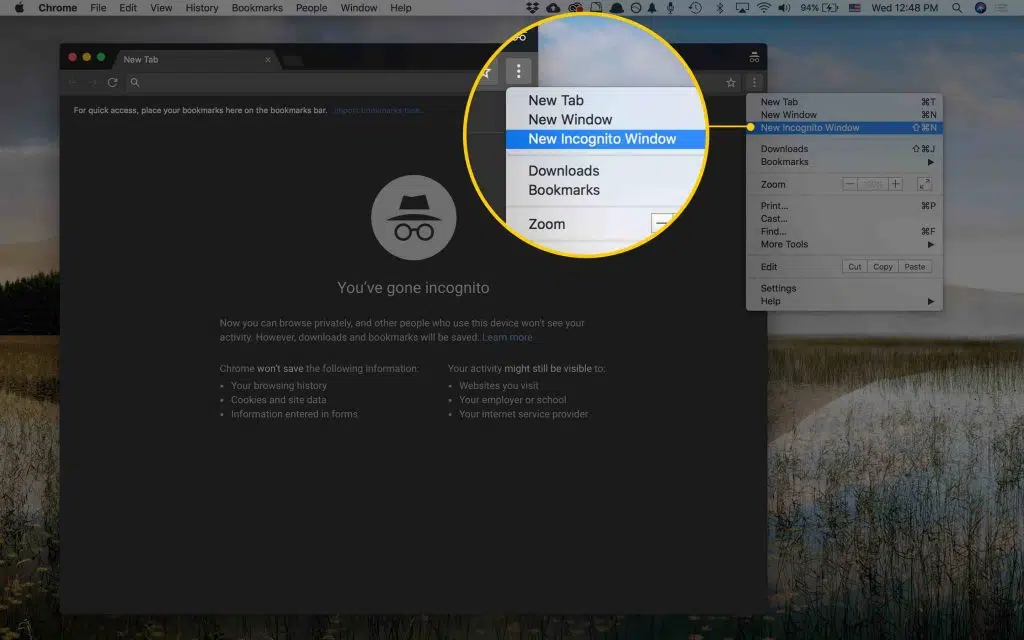
Step 3: Update the Billing info in Incognito mode
Open Google Chrome browser.
Press Ctrl + Shift + N keys to open Incognito mode.
Initially, you need to go to menu and choose settings.
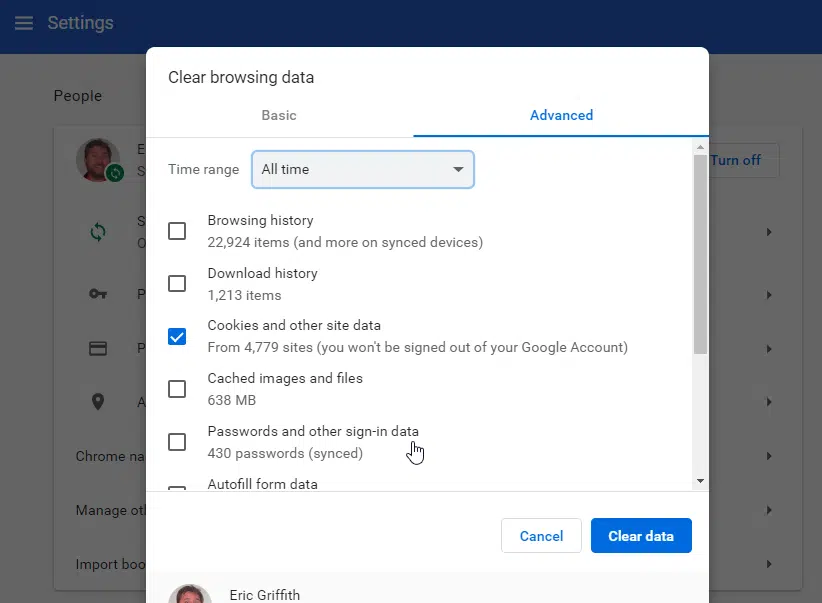
After that go for privacy and Settings, and then click clear browsing data.
Check-mark all the positive options such as Cookies and other site data, Browsing History, and Cached images and files.
Now select Clear data.
Once done, try to login to QBO and try to update the billing info.
Step 5: Contact Customer Support
Just in case you are unable to fix the payment issues, then simply reach out to customer support.
You need to sign in to the QuickBooks company file.
Further, choose help.
And go for the search tab, choose Contact Us, and perform the steps to further connect to professionals.
FAQ's
What does the “My Subscription Payment Failed” error mean in QuickBooks?
This error usually occurs when QuickBooks is unable to process your subscription renewal or payment transaction. It can happen due to incorrect billing details, expired card information, or issues with your bank/credit card provider.
What are the main causes behind this error?
1. Expired or outdated credit/debit card. 2. Incorrect billing address or payment details. 3. Insufficient funds in the linked account. 4. Issues with your bank’s payment gateway. 5. Internet connectivity or server glitches from QuickBooks’ end.
Can I use QuickBooks if my subscription payment has failed?
No, if the subscription payment fails repeatedly, QuickBooks may restrict access to certain features or stop working altogether until the payment is cleared. It is advisable to update your billing details immediately to avoid disruption.
What should I do if my payment still fails after updating my details?
If the issue persists even after updating billing details, try: 1. Using a different payment method. 2. Contacting your bank or card provider to check if transactions are being blocked. 3. Reaching out to QuickBooks support team for assistance.
Conclusion!
My subscription failed error in QuickBooks can be extremely devastating, especially when you try to access the software and fail to do so, ultimately affecting the overall work. Hopefully, reading this piece of writing might have helped you in some way to fix my QuickBooks subscription failed error. Just in case you come across similar issue again and again, then you simply have to connect with our QuickBooks Error support team at 1-800-761-1787, and our ProAdvisors will ensure to answer all your queries immediately.