Error codes ‘00000 XXXXX’ generally encounters during payroll setup and it restrict the completion of the payroll set up and may prevent payroll updates, employee data entry, or tax form downloads. Generally, these errors are caused when the name of a file in the Vendor or Employee Center, or on the timesheet, includes a particular character, or if there is duplicate entries for the employee's name.
If you are facing this error, then this segment will provide a detailed guide about QuickBooks error codes 00000 XXXXX in payroll setup. Later on this segment will assist you towards resolving these error codes and the related problems associated with them. It is important to note the general format of such errors is ‘00000 XXXXX’ and there is an error code associated with each format ranging from ‘00000 00001’ to ‘00000 99999’. As this error of QuickBooks is also known as Unrecoverable Error so it is recommended to fix this as soon as possible to prevent any data loss.
All about QuickBooks payroll setup error code (00000 XXXXX)
The QuickBooks Payroll Setup error code can range from 00000 00001 to 00000 99999. These clusters of errors can put restrictions in payroll setups and may lead to other issues which seem irresolvable. It usually encounters because the name of the company file in the vendor or employee center has a duplicate file of it or the name has a character in it. It may also occur due to some kind of special character in the company file.
What are the Different types of Payroll Setup Error or Unrecoverable Errors?
When Payroll setup error occurs in QuickBooks desktop, it blocks the setup wizard of payroll in the QuickBooks desktop payroll program from being opened. Also, in case you are trying to access the Payroll Setup Wizard within QuickBooks desktop payroll, and you see an error message that has an error code that reads: "00000 XXXXXX", don't be worried. We'll help you identify the root of the problem and get it resolved. A few error codes 00000 XXXXX in payroll setup are listed by users as:
00002 71328
00000 38049
00000 97340
00002 20123
00000 88579
00000 88703
00000 17002
00000 38772
00000 40370
Additional errors you may see:
00000 99867
00000 88703
00000 34289
What leads to ‘00000 XXXXX’ Error codes in payroll setup?
Error codes of the format ‘00000 XXXXX’ occur due to the following causes:
There is some special characters in the file name on the vendor list or the employee Centre.
Incomplete Payroll Setup.
Some special characters in the filename of the timesheet.
Some duplicate entry of an employee name has been identified.
There is compatibility issues with payroll updates.
Entering invalid or mismatched federal/state tax ID numbers (like EIN) may also cause payroll validation errors.
How can QuickBooks payroll setup error code format 00000 XXXXX be fixed?
Since you are now familiar with the causes that trigger the QuickBooks payroll setup error codes, let us now acquaint you with the methods needed to resolve the error and the problems which come along with it. Here is a some DIY methods to resolve QuickBooks desktop payroll setup error code format 00000 XXXXX:
Condition 1: When the Payroll setup error code 00000 XXXXX appears on the screen
First of all, when the error message gets displayed on the screen, the you need to click on the View Report Link from the error window.
This will open a new window. The window will open a partial window of the failure that has occurred.
Next, find the file ReportHeader.xml.
Then, you need to use Windows Explorer to go to the location of the file ReportHeader.xml.
Right-click on the file and select ‘Open with’ to open the file. Do it on a New Window on Internet Explorer.
Then press ‘Ctrl + F’ keys to open the search box. And look for ‘Exception String 0’.
The statement following ‘Exception String 0’ in the report provides details about the origin of the error.
Go for the necessary changes to solve QB Payroll setup error. For Example:
<Name>Exception String 0</Name> <Value>System.Exception: exception thrown in background thread ---> System.ArgumentException: Item has already been added. Key in dictionary: '(unnamed employee)' Key being added: '(unnamed employee)' at System.Collections.SortedList.Add(Object key, Object value)
Condition 2: Fix the following error messages:
Error 1: When Item has already been added. Key in dictionary: “[Vendor or payroll item name]” Key being added
Solution
If the Exception String 0 Statement displays that the item has already been added, then you are required to follow the below-mentioned procedure.
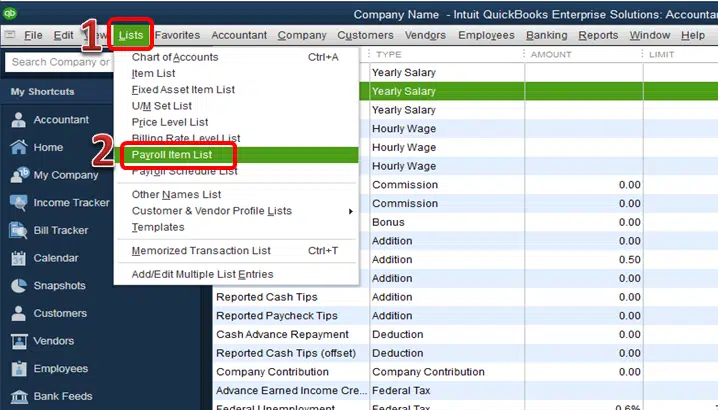
From top menu bar at top, you need to select ‘Vendors’.
Next, select Vendor center. You can also select Items.
After that, you have to search for the Payroll item list.
Next, you need to Identify the vendor that causes the error. The same vendor is enlisted twice.
Then, you have to opt for Show inactive. Selecting this option will show any potential duplicate items.
At last, rename one of the duplicate files with a unique name.
Error 2: If the Item has already been added. Key in dictionary: ‘(unnamed employee)’ Key being added
Solution
In case there exists a duplicate name of the employee, you are required to remove the same in the Employee Center.
From the top menu, you need to go to Employees tab.
Then, go to the Employee center.
After that, from the list that appears on the screen, select All Employees. (Note that this shall include inactive employees)
Right-click on the Duplicate names and select on ‘Delete Employee’.
If you are unable to Delete the duplicate employee because of transactions in the current payroll, you can move the transaction to the list of primary employees.
After that, try to delete the duplicate employee once more time.
If there is no payroll transaction on the account of an employee, then time card data might be damaged or corrupted.
Navigate to Employees and then Entry Time and look for entries that contain ODD or INVALID characters.
Error 3: Item has already been added. Key in dictionary: ‘(unnamed employee)’ ‘the specified special account already exists’
Solution
To remove unnecessary blank spaces, follow the below-mentioned steps:
At first, from the Menu, select the Employees option.
Next, click on Employee center.
From the view drop-down list select All Employees. This will include inactive employees.
Next, you need to remove the unwanted spaces.
At last, you have to manually enter the First and Last name.
Error 4: The storage category map is invalid for the Local tax payroll item
Solution
If you encounter an error message stating ‘Storage map being invalid for the Local tax payroll item’, you can fix the error as follows:
Step 1: First of all, you have to create an Employee Withholding Report. To create this, the user must follow the following steps:
For this, click on Employees & Payroll and then select Employee Withholding..
Next, click on Customize Report option from columns.
After that, from under the Columns tab, remove the check marks from the items in the current list. Check Marks should be placed near Employee, Local Tax 1, Local Tax 2, Local Tax 3, Local Tax 4, Local Tax 5, Local Tax 6, Local Tax 7, Local Tax 8, Local Tax 9, Local Tax 10, Local Tax 11, Local Tax 12.
Now visit the ‘Filters’ tab and click on the Active status.
Select All and click OK.
Click ‘OK’
At last, you need to leave the report open, print or select Excel and then create a new worksheet on it.
Step 2: Create a Payroll Item Listing Report
To make a Payroll Item Listing Report, follow the procedure mentioned below:
Navigate to ‘Reports’.
From there, you need to navigate to Employees & Payroll and then move to Item Payroll Listing.
Now click on Customize Report.
Remove the checkmarks from all the listings except from that of the Payroll item and Type of Payroll.
Next, click on the Active Status.
Then, select All.
Select the ‘Filters’ tab, and click on ‘OK’.
Keeping the report open, print or click ‘Excel’ and click on ‘Create New Worksheet’ to export the same to the Excel tab.
Step 3: You have to compare the two reports and find Local Taxes which are not of the Other type.
Step 4: It is necessary that you edit each employee with an item of tax which is not of type ‘Other’.
For this, first of all, to open the Edit Employee window, you have to double-click the employee from the Employee Withholding Report.
Next, you need to click on Payroll info tab.
After that, click on the Taxes button.
From Other tab, you need to remove the tax item which does not have a type Other.
Lastly, you have to click on OK twice to save the changes which have been made.
Step 5: You should run the Payroll Setup all over again. And check the error is fixed or not
Error 5: System.IO.FileNotFoundException: Could not load file or assembly...
Error 6: Unexpected value. The value is devoid of falling within the expected range.
This QuickBooks error occurs with a code: QuickBooks Payroll error 00000 99867. This error often signifies that the employee is devoid of any kind of state configuration in their profile. You can attempt a search of the missing employee and then try fixing it. Following are the steps that you need to follow to do this:
At first, go to Employees and then choose Employee Center.
After that, right-click anywhere on the Employee list and select the Customize column option.
Select the State lived and state lived in the available columns list.
After that, choose the State Worked column and then click on OK.
Then, you need to double-click on the Employee who is not present in the state.
Moving on to the next step, select the Payroll information.
Next, you need to click ok Taxes.
Lastly go to the State tab, and then select the Correct state.
QuickBooks Error 00000 88703: This means that the first and last name fields are not filled out on at least one profile of employees. The names of employees will appear within the Employee List, in the normal way; however, you'll need to go through each profile of the employee.
Change employee names:
Firstly, choose Employees and then hit a click on Employee Center.
In on the View drop-down menu, choose "All Employees" to include inactive employees.
View each employee's profile to look over the employee's First and last name fields.
Enter a First and a last name in case they're not there and only appear in the Print on checkas field.
If the error code isn't associated with a specific code, this means a payroll item has a missing or unexpected amount. Make use of Payroll Checkup to identify and change the amount that doesn't fall within the expected range.
FAQs
What do the QuickBooks Error Codes 00000 XXXXX in the payroll setup mean?
The Error Codes 00000 XXXXX in payroll setup usually indicates an issue with the payroll setup or configuration in QuickBooks. The "XXXXX" represents a specific error code number that helps identify the exact nature of the problem.
Are there any specific error codes within the 00000 XXXXX range related to payroll taxes?
Yes! Some specific error codes within the 00000 XXXXX range that can be related to payroll taxes include QuickBooks Error Code 00000 14775, QB Error Code 00000 15204, or QB Error 00000 40477.
How can I ensure the accuracy of payroll setup to avoid encountering QuickBooks Error Codes 00000 XXXXX?
Perform the following steps: 1. Verify the payroll settings. 2. Update the payroll to the latest release. 3. Perform payroll reconciliations. 4. Test the calculations of the payroll. 5. Review the payroll reports.
How can the QuickBooks users fix Payroll Service Server Error?
Following are the steps to resolve the Payroll Service Server Error: 1. Firstly, the user has to restart the system. 2. Next, the user has to go to the Command Prompt. 3. The user has to end DNS. 4. After that, the temporary files are needed to be deleted. 5. Then, the user has to carry on with the second step. 6. At last, the user has to try dispatching the payroll.
When are unrecoverable errors witnessed in QuickBooks?
Unrecoverable errors are those errors which are witnessed if in case some kind of network connectivity issues occur. These errors occur upon missing windows updates or damage in the data.
Winding up!
Hopefully, the above provide steps to resolve or troubleshoot the QuickBooks payroll setup error code (00000 XXXXX) are quite easy for the users to implement. These tips are provided by the professionals and are easy to go. Incase if you find any difficulty in any step or have queries regarding anything related to QuickBooks, feel free to contact our technical team at QuickBooks payroll technical support.Call us at our helpline 1-800-761-1787.
Was working on your QuickBooks desktop application and suddenly bumped into Error code 15104? Well, this error is commonly seen when there is a damaged QuickBooks update. Keep one thing in mind the damaged Windows registry is regarded to be the root cause of such types of errors. When trying to update QuickBooks desktop or downloading the latest tax table updates, you might come across to QuickBooks error code 15104. This error comes within 15XXX series of errors and directly interrupt the payroll process.
If you are affected by this error code and looking for the solution for same, then reading this segment might be very helpful for you. This error can be rectified with a few procedures, which we will be discussing further in this segment. To get a better insight into this error, make sure to stick around the space till the end.
Important points to remember
Just in case you have multi-user mode enabled, then it is highly recommended to switch to single user mode. And ensure that the mapped file location is appropriate.
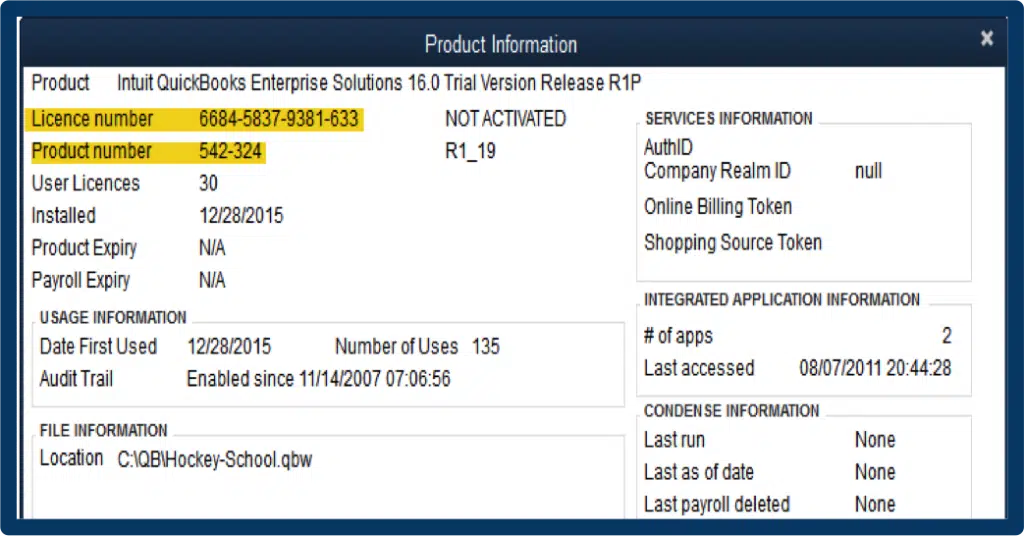
You would have to select the Ctrl + 1 tabs to open the Product information window.
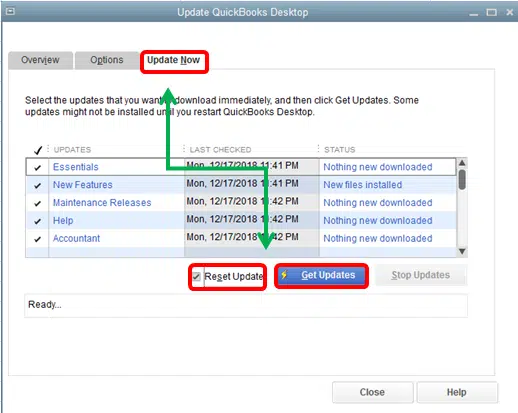
And furthermore, choose Help tab and then select update QuickBooks tab.
After that, you would be required to click and select the Options tab and ensure that the information in download location is appropriate.
The drive that you see in the product information window, then the shared download should be set to Yes, which means it should be the exact same as the drive in the download location. Just in case you are making use of Windows Vista, then you are supposed to run your QuickBooks desktop as an admin. Click on to the right mouse tab on QuickBooks icon and also click on run as admin. Choose and click on Continue when the system prompts to run the application. Reset the QuickBooks updates and head to the process further.
What triggers the QuickBooks error 15104?
There can be a bunch of triggers to the QuickBooks error message 15104. Out of the huge list, we have jotted down some of the most common ones. Let us have a look:
Just in case you are using QuickBooks in multi-user mode.
In case there is any damage in the Windows registry, then it is probable to bump into this error.
At the time of installation, the error message related to Error 15104 appears on the screen.
Methods you can Implement to Troubleshoot QuickBooks Error 15104
There are a couple of methods that you can implement in the hope that you can easily troubleshoot the QuickBooks error code 15104. Let us explore each of the methods one by one:
Method 1: Installing and uninstalling QuickBooks in selective startup mode
This is the first method that you can opt for to resolve this problem. The steps involved in here are:
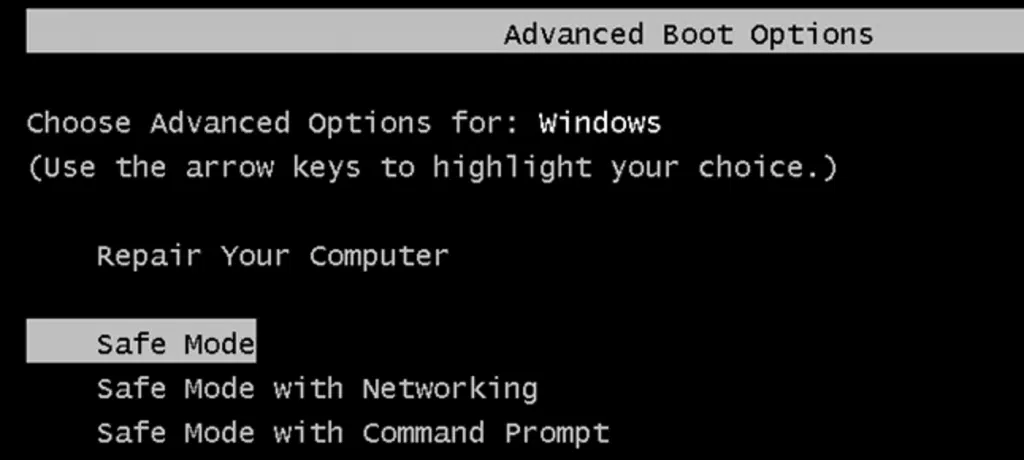
Step 2: Start the system in selective startup mode
Sometimes, certain 3rd party apps running in the background can block the important QuickBooks files to work smoothly. In such case, an effective way to get rid of from it, you need to run the system as well as QuickBooks in selective startup mode.
Under this process, you are supposed to open the Run tab and press Windows + R keys.
Just in case the dialog box is seen, you would have to type msconfig command and click on to the Ok tab.
Head to the General tab and select Selective startup and Load system services.
In the next step, move to Services tab and select Hide all Microsoft services.
Also, select Disable all tab.
Ensure that the Hide all Microsoft services are un-check.
You are also supposed to ensure that the Windows installer checkbox is selected from the list of services. Just in case it is not done, then click on the checkbox.
Now click on Ok tab.
In last, reboot the system configuration window.
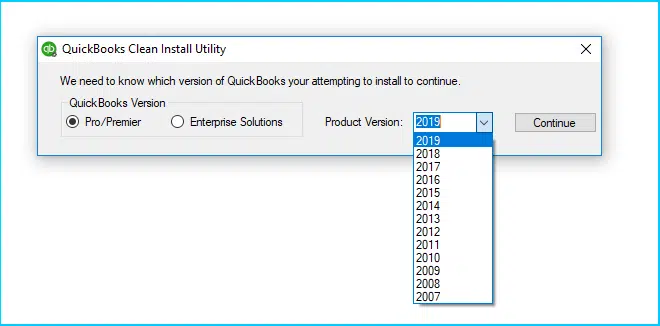
Step 3: Perform a Clean Installation of QuickBooks
Performing a clean installation of the QuickBooks software, including the files and folders that are associated with same. This method can certainly help in getting rid of many annoying errors in QuickBooks.
Step 1: At first, uninstall QuickBooks and then delete QuickBooks installation files
After that, go to the following folders and delete any QuickBooks folders or files you find:
If the method 1 didn’t work for you, then you are supposed to make use of a third-party cleaner program.
You need to first download and install a third-party cleaner software on the system.
And further, you would require to run the software on Windows. This will scan the system, and if it finds any issue in the registry entry, then it will fix it.
Make sure that your system is backed up and rebooted.
After performing the above solution, if the error 15104 in QuickBooks still appears on your screen, then proceed with the next method.
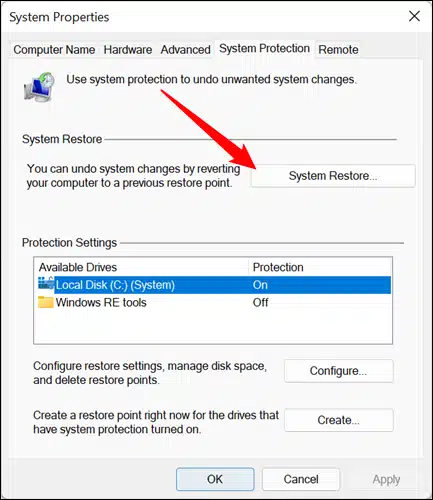
Method 3: Perform a system restore
If none of the methods helped you, then you would have to restore your system. This will involve the following steps:
At first, you would have to press Windows or Start button.
After that search for Recovery and click on it.
You would have to open the System restore window on the system.
Once done, select the Restore point.
Furthermore, click on to the option Scan for affected programs.
Click on Next tab and then tap on Finish to complete the restoration process.
Make a note that the system restore would not affect in any way the personal files in the system.
The solutions listed above are a breeze to resolve the QuickBooks payroll update 15104. However, if they fail to succeed, you can seek help from QuickBooks payroll technical support experts who are available all hours of the day to offer quick assistance. You can reach us by calling our dedicated support line i.e., 1-800-761-1787!
FAQs related to QuickBooks Error 15104
What is QuickBooks Error 15104?
It is a technical error appearing in the multi-user mode that indicates an issue with the update process.
Does Updating Windows can cause payroll error 15104?
Yes, updating Windows can cause such errors in QuickBooks program.
What are the DIY steps to fix 15XXX series errors?
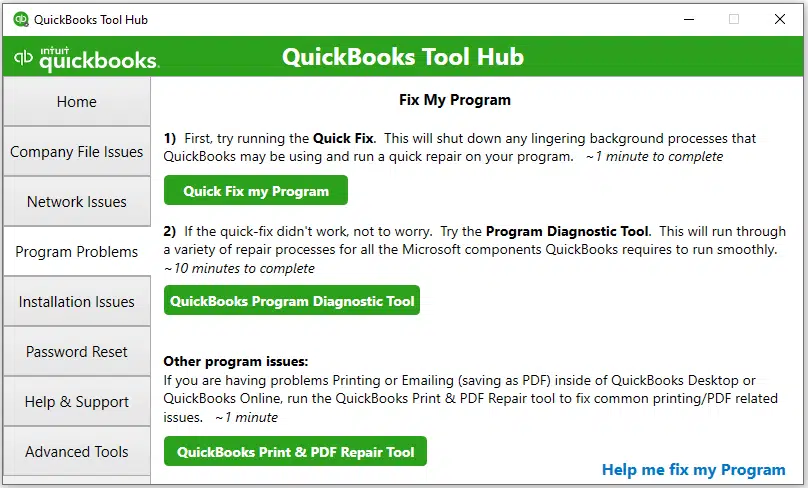
Try these tested and verified steps to fix QuickBooks Error 15xxx: 1: You can download the updates as an administrator 2: Also run Quick Fix my Program, from tool hub. 3: Installing a digital signature certificate can also rectify such an error.
All that you need to know about resolving the error: Could not connect to the email server when using webmail in QuickBooks desktop:
With Intuit’s introduction of QuickBooks to the world, the face of accounting and bookkeeping has considerably changed over the years. Once seen as a very complicated and time-consuming task, accounting operations have now become simplified and hassle-free with the coming of this software. In fact, many businesses, irrespective of their sizes, have benefitted considerably. Every year Intuit launches new updates of the application consisting of new and improved features in order to make business operations all the more seamless.
Error or technical glitches in QuickBooks are not uncommon, after all, it is just software. Most of the errors can be resolved quickly, but for some users, expert guidance is required. A common issue users face these days is the error message ‘Could not connect to the email server’. Users generally encounter this issue when they use the web mail in QuickBooks Desktop and enter their email and password. So, this article is all about this error and how you can resolve the issue in a hassle-free way.
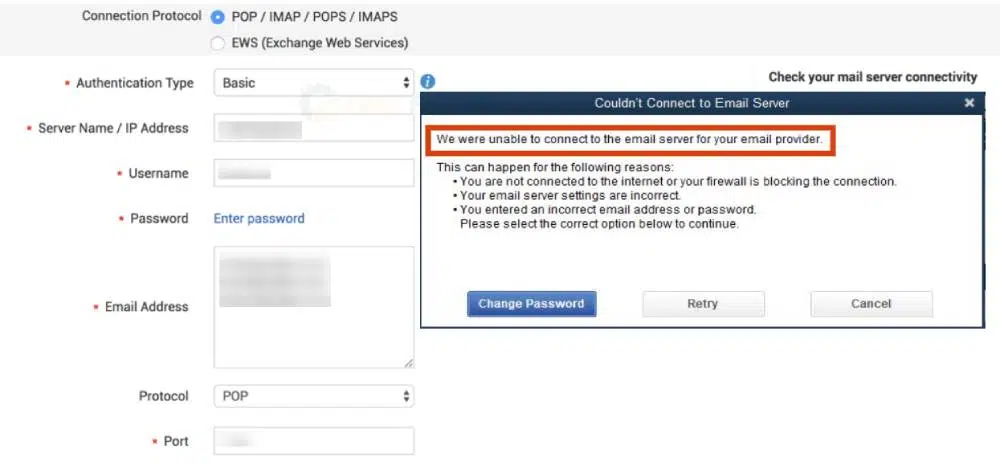
At the time you use the webmail in QuickBooks desktop, after entering your email and password, you may encounter the following error message on your computer screen:
Warning
Couldn't Connect to Email Server: We were unable to connect to the email server for your email provider.
Or
QuickBooks was unable to send your form for the following reason: QuickBooks was able to connect to the remote server but could not understand the server's response. Please try again to see if the problem has been corrected on the server.
What are the causes behind QuickBooks could not connect to email server problem?
You may see "Couldn't Connect to Email Server: We were unable to connect to the email server for your email provider" due to the following reasons:
Your internet connection is not great, or you are not connected to the internet.
When your email server settings are not properly configured.
You have used a wrong ID or password while trying to log into your email.
You may not be using the updated version of the QuickBooks desktop application.
In case the Internet Explorer settings is not don’t properly then it might hinder the internet connects with the email server.
When QuickBooks do not have the required admin rights on Windows.
Solutions for Fixing Error: Could not connect to the email server when using webmail in QuickBooks
Follow the below mentioned instructions in order to troubleshoot the QuickBooks could not connect the Email Server Error.
Solution 1: Verify the settings under webmail preferences
The first solution requires users to configure their webmail settings. If you are unknown of the process, then the below-given procedure should help you out.
First, open QuickBooks Desktop, and under the Edit tab, head to Preferences.
After that, from the left side of the screen, you have to click on the option to Send Forms.
Now select the Email account you are using to send emails from under My Preferences tab.
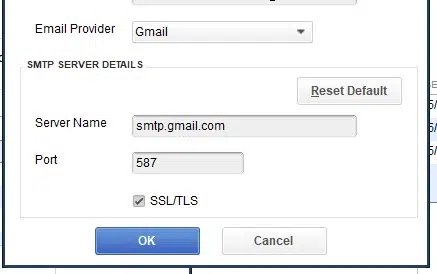
Click on Edit, and from the Edit Email Info window, navigate to the SMTP Server Details area.
Once done, you will be required to enter the correct server name and port number. For reference, visit Common Email Server Addresses (POP3 / IMAP / SMTP). Know how to Set up your email service in QuickBooks Desktop for a list of SMTP servers and Ports.
Once done, you will have to save the settings and then make an attempt to send an invoice once again using QuickBooks Webmail.
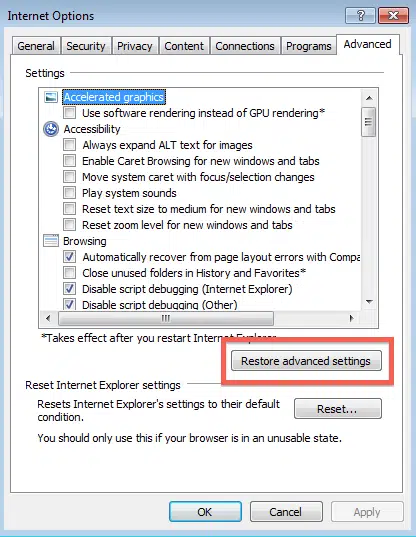
Solution 2: Reset your Internet Explorer to the Default Settings
The first thing you have to do is open the Internet Explorer and then click on the Gear icon at the top right corner of the window.
Now choose Internet Options and then navigate to the Advanced tab.
Click on the Restore Advanced Settings tab and then on OK.
Once done, you have to exit Internet Explorer and then try to send the email once again.
The very first step is to visit the Update to the Latest release page.
After that, ensure the product is selected. In case it is not, then you have to visit the Change link and then choose the QuickBooks product.
Now, you have to select the update button in order to download the update file.
Once done, the final step is to choose Setup automatic updates to set QuickBooks to automatically download and also install the latest updates in the near future and avoid the hassles of not using the latest updates.
After following the steps given above, there may be a time where you might see that your antivirus program is blocking the outgoing mail. In these situations, it is best to speak with your IT expert to prevent any further issues. If the error continues to persist, you can try the following procedure based on the error messages you may receive.
If you continue to receive the error message even after trying all these three different solutions, it is possible to follow the suggestion for the problem.
Error Message
Solution
You are not connected to the internet or your firewall is blocking the connection.
Try to open Internet Explorer and access a website.
Your email server settings are incorrect.
Verify you have the correct settings by following the steps outlined in Solution 2.
You entered an incorrect email address or password
Log in to your email account through a web browser and check if your email address and password works.
Important: If you're receiving this error message even though you don't use web email, it may be due to a system problem. You need to create a new Windows administrator user to fix the problem.
Fixing the QuickBooks couldn't connect to email server error is not a very complex issue to troubleshoot. But, if the problem persists after following the above given 3 DIY methods, then you have to seek assistance from our QuickBooks enterprise support team who are available 24/7 to guide you with all the queries. Our representatives are available round the clock at 1-800-761-1787 to assist you in all your issues related to accounting and bookkeeping.
FAQs
How do I troubleshoot Could Not Connect to the Email Server issue?
This email server-related error can be resolved by conforming to the procedure below: 1: Configure the Webmail settings. 2: Reset the I.E. settings to default. 3: Check the email login credentials. 4: Disable add-ons and plugins. 5: Update QuickBooks.
How do I check my email settings in QuickBooks?
The procedure to check email settings through QuickBooks are: 1. Click on the Edit menu. 2. After that, hit on Preferences. 3. Thereafter, click on the Send Forms option. 4. Herein, verify the email settings. 5. Make sure to double-check the server name, SSL, port, etc.
Can firewall or antivirus software cause QuickBooks Could Not Connect to the Email Server error?
Yes! Firewall or antivirus programs can lead to QuickBooks Error "Could Not Connect to the Email Server". This is possible as these security programs can block QuickBooks and prevent it from connecting with the email server.
All that you needed to know about Changing, Managing or updating you Intuit Account with CAMPs
QuickBooks is one of the Avant grade accounting software that has brought a revolutionary change in accounting, bookkeeping, and accounting. Businesses irrespective of their sizes have been largely benefitted from this application as it has saved a lot of time, money, and effort by easing complicated tasks.
CAMPs or Customer Account Management Portal is one feature that we will discuss in detail in this article. With the help of CAMPs you can easily manage products, accounts, billings, contacts and ID access. You can also review the charges, update the payment methods, update billing address or email address and lots more. Apart from the above-mentioned features CAMPs also helps in downloading the products, find license number and also cancel the subscription. Here's a quick video that gives an overview of how to manage your QuickBooks desktop account using CAMPs.
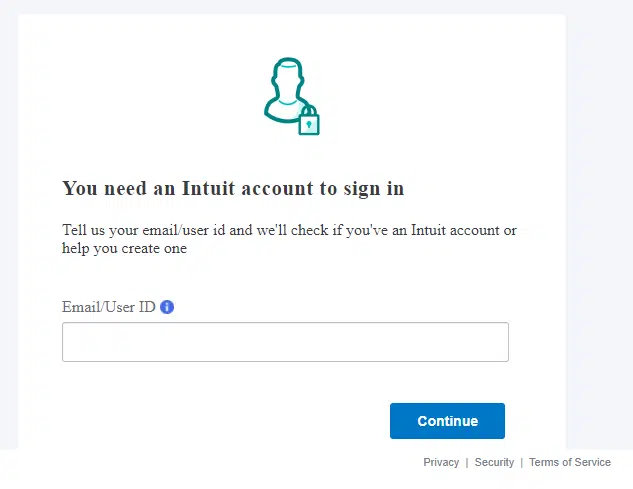
It often happens that users face difficulty in signing into CAMPs. In that case, you must note that CAMPs uses the same email ID with which the product is registered, and this can be different from the one used in the company file. If the email that is registered with the product is not yet connected with the Intuit account, then it will become much easier to create the account. And if you are using multiple accounts, then it can be merged with the below-mentioned steps.
Firstly, you have to select I forgot my user ID and password.
After that, go to camps.intuit.com and then select Claim Account.
If it doesn’t work, then you use Help signing into CAMPs
Uses of Customer Account Management Portal (CAMPs) for QuickBooks Desktop
Following activities you can perform using your Intuit CAPMs account:
You can easily edit or change the email.
Locate the License number.
You will also be able to easily download products that you have purchased.
Product orders, transactions and chargers can easily be checked.
The primary contact can also be changed.
You will also be able to add, edit and remove other users.
Lastly, even the changing of business phone number and address can also be easily done in CAMPs.
What if Unable to See all the Products?
Sometimes you may face the issue of not being able to see all the products, in that case you have to follow the below mentioned instructions
The user might have registered different products with different emails.
In that case, you can always sign out of CAMPs and again visit camps.intuit.com
Instead of signing in, you can try the claim account.
This will actually help you in connect with the accounts with different emails.
Once done, now you will be able to see all the other products.
Steps for changing the email using CAMP's
The steps for changing the email are given below:
Initially, visit to accounts.intuit.com.
Enter your old email address, and choose Edit in the User ID area.
Enter the Password field then tap on Save.
Note: The email address you provided will be used to verify your Account.
If you want to edit your email address, password, phone number, and personal info, select Edit next to these fields to update them.
The procedure for locating the license number is becomes quite easy if you use CAMPs to search for the same. The easy steps below will help you further:
Log in to the intuit.com CAMPs page.
In the list of Products & Services, locate your app or subscription.
Then select the product or service you want to manage from the Manage your QuickBooks page.
Scroll down to the Authorized Users section in My Account.
Update your phone and email, and then hit on Save and close.
Changing the business address and phone number
Log in to camps.intuit.com initially.
You now need to modify your primary address.
Click on Change next to the Primary Mailing Address. Y
After that click on Add a new address or choose the correct address from the list.
Now, click on save and close.
Log in to intuit.com/CAMPs page and then tap on Edit if all addresses or phone are selected.
Make any necessary adjustments.
Ending words..!
Understanding CAMPs is not that complicated as it seems in the beginning, you cam simply follow articles available in the internet. However, if you get stuck anywhere or need more information related to it, then you can connect with our QuickBooks enterprise technical support team at 1-800-761-1787 who are actually trained experts available all throughout the day to assist you with any queries regarding QuickBooks.
FAQs
What is CAMPs?
CAMPs means Customer Account Management Portal. It is a platform provided by Intuit that allows you to manage and update your Intuit account information.
Can I manage my Intuit subscriptions through CAMPs?
Yes! You have the prerogative to manage Intuit subscriptions through CAMPs. The procedure requires signing in to CAMPs. Soon after, make a move to the subscription or billing section within the account settings.
How can I update my payment method in CAMPs?
The steps for updating the payment method in CAMPs are: 1. Start off by Signing in to CAMPs via the Intuit account. 2. The next step requires locating the billing or payment section within the account settings. 3. Now move to update or change your payment method. 4. The next step requires following the on-screen prompts to provide updated payment information, such as credit card details or bank account information. 5. Follow up by reviewing the changes made and then save them.
Get the possible ways to resolve the QuickBooks error 15103 using 9 DIY hacks
For the past few decades small and medium sized businesses have been largely benefitted by using the accounting software called QuickBooks. In fact, it is known as one of the most efficient software that has brought a considerable change in the way accounting or bookkeeping done, thereby simplifying business operations. To ensure seamless usage, every year Intuit launches a new version of the software consisting of new as well as improved features.
QuickBooks desktop has gained immense popularity over the years, but it often runs down to technical errors which affects business operations. Most of these errors can be easily resolved but for some of the complicated ones, users require the assistance from the support team. A very common issue faced is the QuickBooks error message 15103 that may seen at the time you updating desktop or Payroll.
What is QuickBooks error 15103 and why it happens?
The payroll update error 15103 majorly happens when you try to download QuickBooks Desktop or payroll updates or sometimes due to incorrect configuration. When this glitch happens, you will not be able to use the improved features of the QuickBooks payroll service. Before you try to troubleshoot QuickBooks update error 15103, it is important to understand why it is happening and accordingly solutions can be found. Below are some of the reasons behind this error.
Microsoft Internet Explorer or Edge browser is incorrectly configuration.
If there are multiple versions of QuickBooks desktop running on your computer, it may cause a conflict during the update process.
When QuickBooks is unable to verify the digital signature of any file.
Poor connectivity of the network can also cause the error.
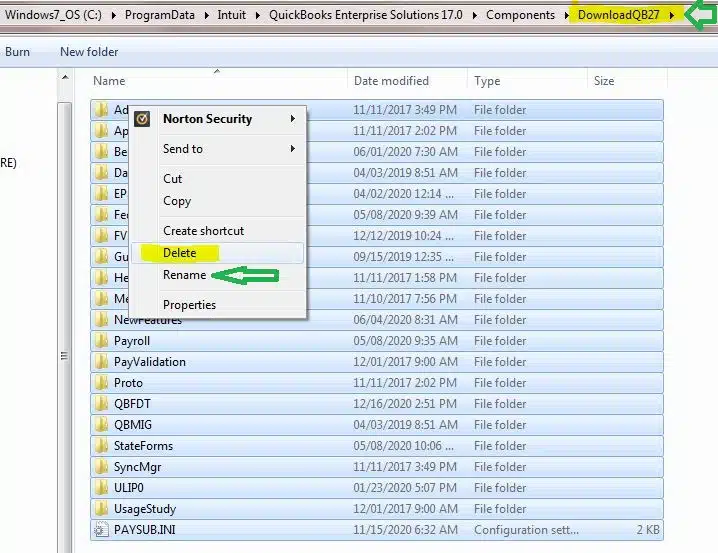
Now manually rename the QuickBooks Desktop installation folder.
Once that is done, reinstall QuickBooks Desktop.
Now you have to check whether the update error 15103 still persists.
Solution 2: Installing Digital Signature Certificate
Firstly, you have to start a window search for QBW32.exe which is in the C:\Program File\ Intuit\ QuickBooks and to also look for the QBW32.exe window.
In case, you are unable to find the QBW32.exe in the initial search then click on the More result in window search.
Now you have to click on the Computer icon on the Next screen.
From the search result, look for the QBW32.exe which has a type of application.
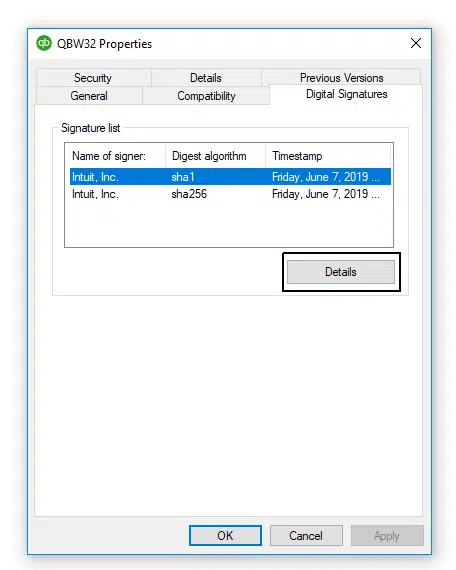
Once done, click on QBW32.exe then go to the Properties option.
Now, you have to click on the Digital Signature tab and ensure that Intuit Inc. is selected or it is not in the signature list.
After that, go to Details option.
In the digital signature, the Detail window clicks on the View Certificate.
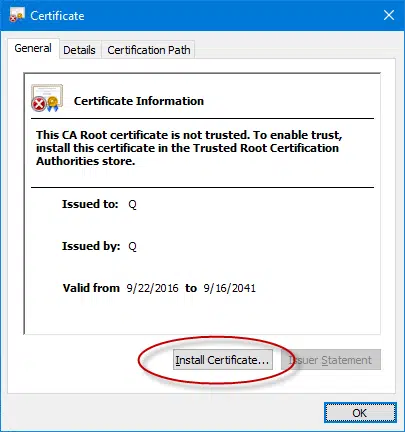
You have to now click on Install Certificate in the Certificate window.
Now hit on Next tab until the Finish tab gets displayed on the screen, then click on Finish.
After that you have to restart your computer system.
When the restart process is successfully completed then open QuickBooks Desktop.
The first thing you have to do is open your Internet Explorer.
After that click on Gear icon and then select Internet options.
You have to go to the Security tab > Trusted Sites > Site.
Once done with that, add the following websites:
For US version of QuickBooks:-
*.quickbooks.com
*.intuit.com.
For Canadian version of QuickBooks:-
*.quickbooks.ca
*.intuit.ca.
After you have added the above mentioned details click on Close button.
Then, choose Apply option and then OK tab.
Finally verify that whether the ongoing problem is resolved or not.
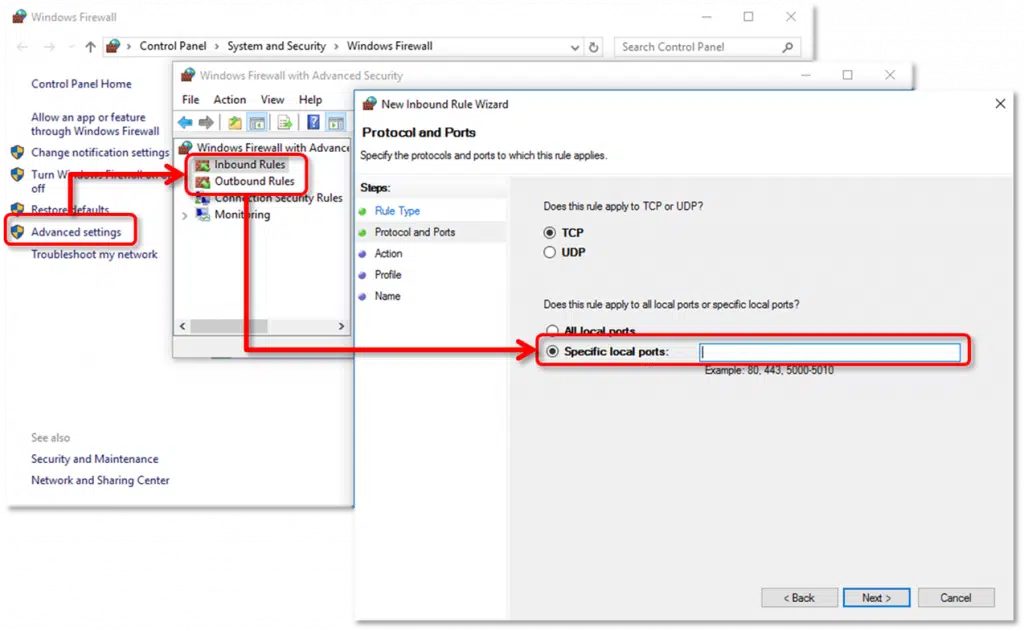
Solution 4: Configure Firewall and Antivirus Defender
You need to setup your firewall anti-virus defender to check if your QuickBooks files are all saved and secure. In case the firewall is not configured it will damage the QuickBooks files especially when you try to download updates or while reinstalling any version. Follow the given steps:
Resolving the QuickBooks payroll error 15103 is not that complicated as it seems. However if the problem still persists after performing the above given methods or you get stuck with some other issues while operating the program, then you are recommended to connect with our QuickBooks payroll support team. We are easily reachable at 1-800-761-1787. Our experienced and well-trained experts will assist you through all your queries and even share tips and tricks to avoid errors in the future.
FAQs
What does Error 15103 means in QuickBooks desktop?
This error code denotes, there are some critical issues running on your QuickBooks desktop at the time updating, installing or setting up the QuickBooks updates.
Can Installing a digital signature certificate fix QB error 15103?
Yes, by installing a digital signature certificate you can fix all the 15XXX series errors.
What are the possible causes behind to this error?
Behind to this error, there are a bunch of factors. Few are as: 1. You might get this error, if there is network timeout or connection issue running on your system 2. Also, Incorrect or incomplete update can be another factor. 3. Another reason can be, if there are multiple instances of QuickBooks desktop running on your computer
How can I fix Error 15103 in QuickBooks?
There are a bunch of methods that can be implemented to successfully get rid of this error: 1: Perform a Clean installation of QuickBooks. 2: Also, configure the Firewall and Internet Explorer settings. 3: Run Quick Fix My Program, from the tool hub.