Get the 5 DIY methods to rectify the QuickBooks error 6000, 82 or 6000, 106 when opening or accessing the company file:
No doubt, QuickBooks is an impeccable accounting software, but at the same time, it is prone to certain errors. One such error that we will be discussing about is the Error 6000, 82 or 6000, 106 while opening accessing the company file. This error belongs to the QuickBooks 6000 error series. It is very important ensure that before moving ahead and fixing the QuickBooks error 6000, 82 or error 6000, 106, make sure that QuickBooks software is updated to the latest release. It is also suggested to fix company and network issues with QuickBooks file doctor before performing any of the fixation steps. For further information make sure to Continue reading the article till the end carefully.
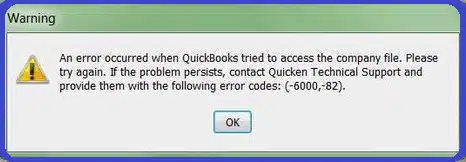
You may receive the following error messages on your desktop screen when opening or creating a company file in QuickBooks Desktop:
Error -6000, -82
Error -6000, -106
Moreover, you can also reach out to our technical support team via our toll-free number 1-800-761-1787, in case you required any kind of technical assistance, or if you want our experts and certified professionals to fix the problem on your behalf. Give us a call and leave the rest to our experts.
Methods to Resolve QuickBooks Error 6000, -82 or 6000, -106
There can be a couple of solutions that you can implement in order to troubleshoot the QuickBooks error 6000, 82, and 6000, 106. We will be exploring each of the methods one by one:
Solution 1: Clear unnecessary spaces in the company name and before the company file extension
Before proceeding ahead with this solution, the initial step is to log out of the QuickBooks desktop software on all systems.
After that open the folder where the company file is stored.
Next step is to right-click on the Company file and then select Rename option.
Moving ahead, choose the name of the file and then Check and Remove any unnecessary spaces between the file extension and also the name of the company.
Hopefully, this process of removal of spaces in the company file should fix the QuickBooks error 6000 82 or 6000 106. however, in case the error keeps showing up, it is advisable that you disable hosting on every system that has QuickBooks installed.
Solution 2: Disable hosting on each system where the QuickBooks software is installed
Step 1: For single-user access, follow the steps:
You need to note that turning off the hosting mode disables multi-user access. For this, you need to follow the brief steps given below.
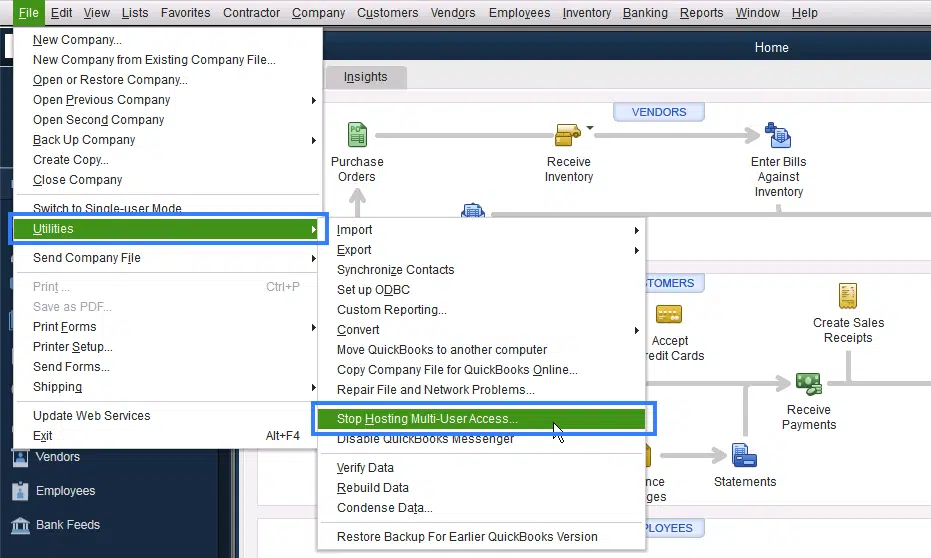
First of all, visit the file and Utilities tab and also select Stop hosting multi-user access.
After that, select Yes when Hosting multi-user access shows up.
Next step is to select Yes when the company file must be closed.
Step 2: For Multi-user Access, navigate as follows:
If you are having multi-user access, then this error indicates that one or more client systems are incorrectly set up to host multi-user access. In such case, you are advised to take note of the following points.
If each client system is displaying the error, proceed as follows:
You are required to select the file in the No Company open window and then select Utilities.
After that, confirm that the menu option Host multi-user access is displayed. In case one or more client systems display the menu option, then Stop hosting multi-user access. It indicates that they are already Hosting multi-user access.
You are then required to select Stop hosting multi-user access option on any client system displaying the Stop hosting multi-user access, and then carry out the prompts to turn off hosting.
Also, you need to make an attempt to open the company file that is facing the problems once again. After that, the log-in window will be displayed on the screen.
Solution 3: For Multi-User Access, Switch to Hosting Local and Remote Files Mode
It should be noted that perform this process only if the above steps fail to resolve the issue.
To begin with, press F2 key with open QuickBooks, in order to open the Product information window.
The next step is to verify that under the Local server information, hosting is Set to local files only.
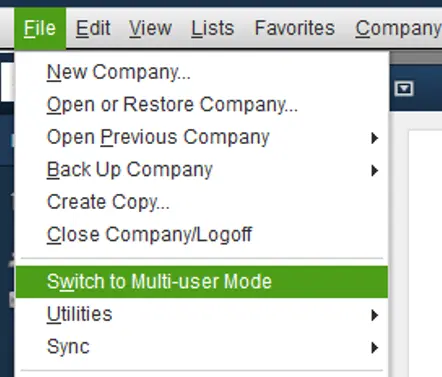
Now, you should choose the File menu and then select the Switch to multi-user mode.
After that, open a company file on a network system. For further information, you can check QuickBooks in-product help or Set up multi-user or network for QuickBooks Desktop resource page.
Moving ahead, after the company file is open, you need to press the F2 key to open the Product information window.
And then verify that under Local server information window, hosting is set to local files only. In order to provide other users with continuous access to the company file, the system that is Hosting multi-user access must be left on. Also, the user who set up QuickBooks must remain logged in.
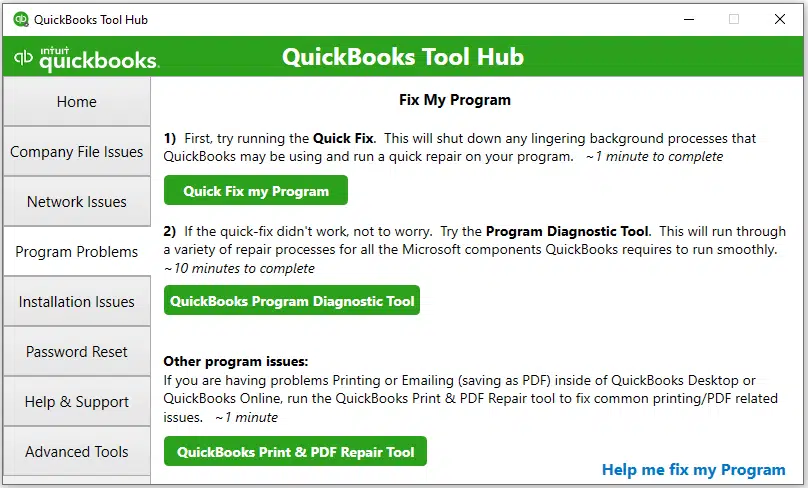
Solution 4: Running Quick Fix My Program Tool on the Client System
Another method that can be opted to get rid of the error is to run the quick fix my program tool on the client system. The steps involved in this process are as follows:
To use the tool hub, you will need to close the QuickBooks desktop. We recommend QuickBooks Tool Hub for Windows 10, 64-bit to get the best experience.
Solution 5: Following Standard Data Troubleshooting
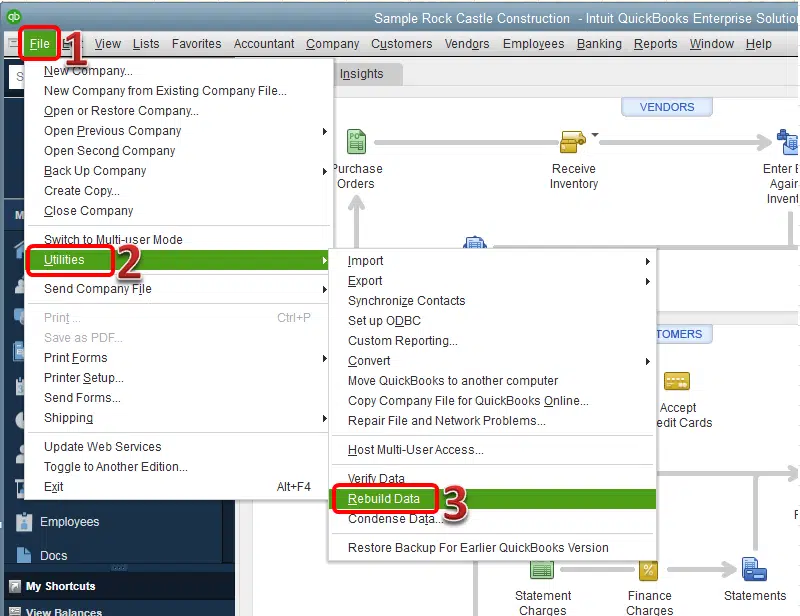
This error could lead to data damage to the company file. In order to resolve this, you can opt for the standard troubleshooting steps used for resolving data damage issues. Verify and rebuild data is an integrated tool in QuickBooks Desktop that automatically corrects minor company file data errors.
Navigate to the File menu and then choose Utilities opt, and then select Rebuild Data option.
After that, select OK from the QuickBooks Information window. Follow the on-screen instructions to save a backup data.
The tool will take a few seconds and repair your file. You might see that your QuickBooks is stuck or the mouse can't move. But don't worry, it will work in a few seconds.
Once the process finishes, hit a click on the OK tab in order to proceed forward.
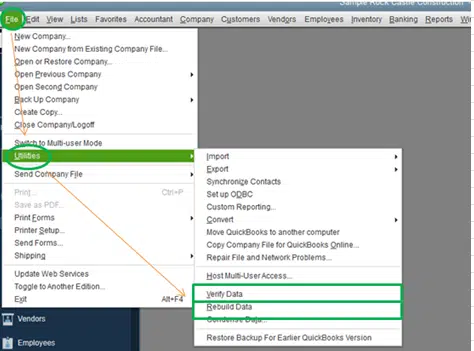
Navigate to the File Menu.
And then go to the Utility tab and choose Verify data.
The tool will inspect your file and identify data problems.
You need to select the OK button if QuickBooks does not find any issues. Now your company file can be used as usual. There is No data damage.
However, if QuickBooks detects an issue in your company file, then click on Rebuild Now option to start the process of fixing the data damage.
Expert Assistance is just a call away!
Though the above stated methods would be enough to rectify the QuickBooks error code 6000 82 or 6000 106, but if you still face the issue or in case any of your queries remained unanswered, then you can consult our QuickBooks error support team. Make a call at our toll-free i.e., 1-800-761-1787, and discuss the issue with our certified professionals, you will definitely get the most relevant solutions to all your queries. Do not hesitate in making a call anytime and discuss your issues with our dedicated support team.
FAQs
Is it possible to recover data from a QuickBooks company file affected by Error 6000, 82 or Error 6000, 106?
Yes! These error codes do not lead to data damage.
Can third-party applications or plugins cause QuickBooks Error 6000, 82 or Error 6000, 106?
Yes! Unregistered third-party applications and plugins downloaded from unofficial websites plugins can lead to such errors in QuickBooks.
What are the various errors in the QuickBooks 6000 series of error codes?
Learn the complete procedure to rectify the QuickBooks Unable to Print Invoices Issues:
Printing issues are very much common in QuickBooks. Unable to print error is often seen due to missing or corrupt component in QuickBooks. There can be various other reasons causing this issue, which we will be talking about later in this article, along with the solutions for the same. If you are also facing QuickBooks unable to print invoices issue, then in that case feel free to read this article till the end.
You can also connect with our QuickBooks desktop support team via the support line i.e., 1-800-761-1787, for any further information. We are a team of professionals who work to provide the best possible support instantly.
What Leads to Unable to Print Issue in QuickBooks Desktop?
You may end up with QuickBooks Printing Problems with Invoices due to the following reasons:
If QuickBooks isn’t connected to the printer properly.
If the QuickBooks software freezes when saving pdf for syncing issues or the software freezes due to an unresponsive XPS port.
The next reason can be if the printer driver is missing.
QuickBooks is unable to connect to the XPS document writer.
Methods to Troubleshoot the QuickBooks Unable to Print Invoices Issues
You need to perform the following steps to resolve the unable to print issues in QuickBooks desktop.
Method 1: Changing the name of the printing file
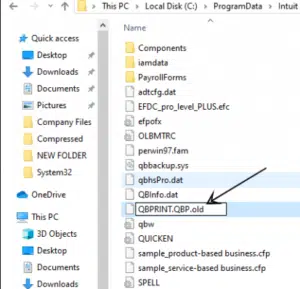
At first, you should right-click on the .qbp file.
And change the file by adding the word .old to the file name.
Next step is to open the QuickBooks software and also move to the File menu to select the Printer setup.
Once done with that, you should choose any transaction in the Form name list in order to make a new QBprint.qbp file.
After that, select the OK tab.
And also, try to open and print any transaction.
Method 2: Verify if the printer is correct one
Printer-related issues may also appear in case of users choose an incorrect printer, which is not connected to the system. To check whether you have the correct printer chosen follow the directions given below:
You should first select the File option and also choose the Printer setup option.
The next step is to select the Form to be printed.
And also, match the Printer’s name with the printer in use.
If it doesn’t tally, you will have to correct the setup within the System’s printer setup.
You should then click on Help in the area for detailed information.
After that try to print using a different printer in the printer setup.
Select the File and then click on the Printer setup.
Once done with that, choose the form to be printed.
And also, select a Different printer.
Select Microsoft XP printer.
Choose Help option for more detailed instructions.
Print a different form or in case you are using customized forms or Memorized reports, then try for standard form or report.
In case you are trying to Print a batch of forms in QuickBooks, then it is suggested to go for a single one.
After that choose Selective startup mode and ensure to perform reinstall of Windows with the help of clean install tool.
Method 5: Rename the QBPrint.QBP file (Manual Method)
Another additional steps to resolve PDF/print-related issues within QuickBooks desktop is to manually rename the QBPrint.QBP file.
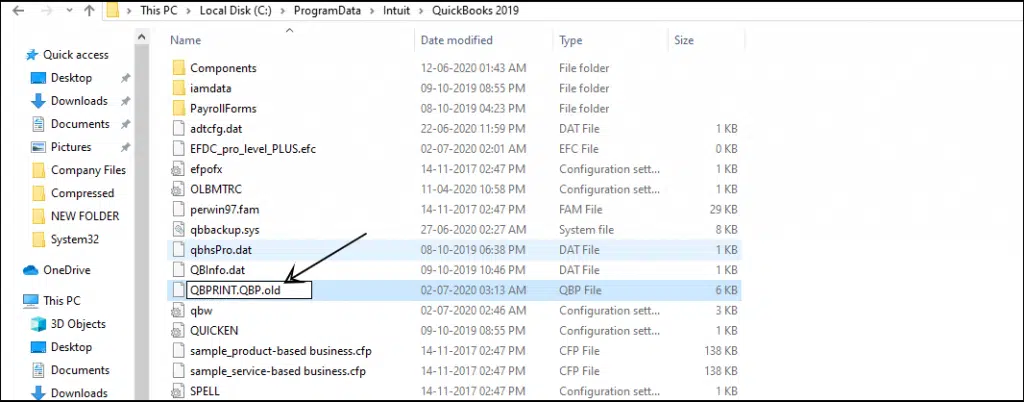
Find the QBPrint.qbp. file.
If you're using Windows 10, 8.1, and 8, go to C:\ProgramData\Intuit\QuickBooks 20xx (20xx represents the version of your QuickBooks
For Server 2008 and Server 2012, go to C:\Program Data\Intuit\QuickBooks YEAR and C:\Users\**remote user**\AppData\Roaming\Intuit\ YEAR VERSION\TSPrinterSettings
After that, hit a right-click on the QBprint.qbp file in your QuickBooks version.
Now choose it to Rename.
The file name should include the word "old", [e.g. QBPrint.qbp.old]
Next, open your QuickBooks Desktop.
In the next step, you need to choose the Printer Setup option from the File Menu.
After that, select any transaction from the Form Name and then choose OK. This will create an new QBprint.qbp file. This doesn't need to be done for every transaction.
Open an invoice once you have completed the process. You can then email it or print it to verify that the issue has been resolved. If the issue still persists there, then you need to do a clean install of QuickBooks for Windows.
Wind up!
With this, we end the article and hope that the information shared in above might help in fixing the unable to print invoices error in QuickBooks desktop. However, if for some reason You are unable to resolve the issue even after performing the steps above then in that case feel free to contact our QuickBooks enterprise technical support experts at 1-800-761-1787. Our team professionals will ensure to provide you with immediate assistance.
Learn how to fix Runtime Redistributable in QuickBooks Desktop Pro/Premier or Enterprise:
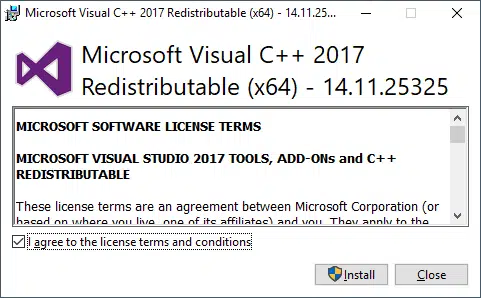
QuickBooks desktop runtime redistributable issue is seen if the Microsoft Visual C++ installation gets corrupted or damaged in the system. This is a Microsoft program that is used to run QuickBooks desktop. In order to start the program fresh, one can uninstall and reinstall it. Microsoft Visual C++ can be easily downloaded from the official website, and if you already have a CD version of QuickBooks, then you can load the CD and find and run the Microsoft Visual C++ installer there. If you are facing this problem, then reading this article till the end will surely help.
We are going to discuss the set of steps for QuickBooks runtime redistributable. However, if you are looking for any sort of technical assistance, then talking to our support team can also help. You can get in touch with our team professionals at 1-800-761-1787 and let our experts resolve this problem for you.
System requirements of QuickBooks Runtime Redistributable
What are the reasons for installing multiple Microsoft Visual C++ visual redistributable?
Below can be the reasons:
It should be noted that depending on the Windows version being used, various versions of C++ Visual are pre-installed along with it.
If you find another version of C++ visual redistributable on the system, it was most likely installed with software that need it.
When you start some programs for the first time, you will see a notification stating that redistributable packages have been installed.
After installation QuickBooks runtime redistributable errors
These errors basically indicate that a specific version of the visual C++ redistributable needed by the software you are trying to install is either corrupted or missing. MSVCR110 handles the visual C++ 2010 SP1 redistributable.
MSVCR71.dll, MSVCR08.dll, and MSVCR09.dll (from 2008 to 2010)
MSVCR120.dll (2012)
MSVCR130.dll (2013)
MSVCR140.dll (2015)
At the time of installation, most of the programs include a duplicate of Microsoft Visual C++ redistributable.
Issues you may face due to QuickBooks Runtime Redistributable
Following are the problems you may face:
The server may get crash or become unstable
Microsoft Visual C++ installation in your computer can be damaged.
With this, we come to the end of this article, where we hope that the information shared in above might be of some help in fixing the QuickBooks runtime redistributable issue. But if in case you need any of our assistance, then, in that case, contact our 24/7 QuickBooks error support team professionals at 1-800-761-1787.
FAQs related to QuickBooks Runtime Redistributable
What is QuickBooks Desktop Runtime Redistributable?
QuickBooks Desktop Runtime Redistributable encompasses various components that are mandatory for the seamless functioning of the QuickBooks Desktop program. These components comprise the libraries, frameworks, and other runtime files.
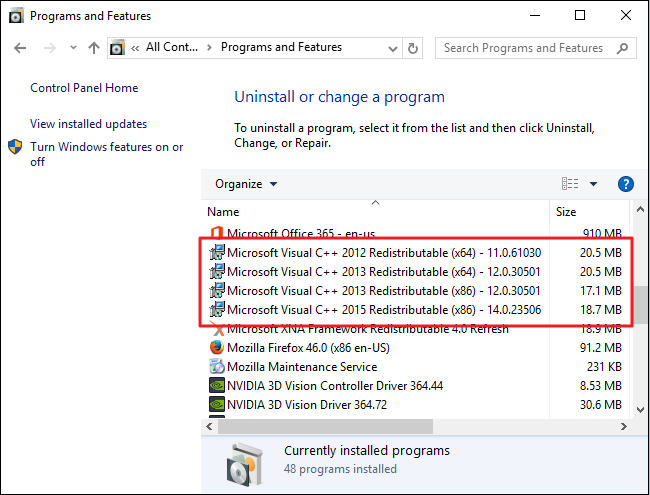
How do I know if I have QuickBooks Desktop Runtime Redistributable installed?
QuickBooks Desktop Runtime Redistributable gets automatically installed when you install QuickBooks Desktop. The same can be verified by opening the Control Panel and then going through the list of installed programs in the Programs and Features tab to check if Runtime Redistributable is included in the list.
Can I update QuickBooks Desktop Runtime Redistributable?
Yes! You can easily update QuickBooks Desktop Runtime Redistributable. The same can be downloaded from the official website of Microsoft. You should, however, only download the compatible version of the program.
What should I do if I encounter errors related to QuickBooks Desktop Runtime Redistributable?
If you come across technical errors related to Runtime Redistributable, reinstall QuickBooks Desktop software and the redistributable. Also, update the redistributable to the latest version.
All that you needed to know about resolving the QuickBooks payroll error: Failed to send usage data:
No doubt, QuickBooks desktop is a multi-faceted accounting software that comes with various features. It has boosted to businesses through it's systematic management of transactions, payroll and billing. However, while working with QuickBooks desktop, few users might encounter a a couple of error codes and warning messages on screen which might hamper the accounting operations. Sometimes, these errors can damage, corrupt or cause a damage to your important data files. One such error that interrupts the connectivity to QuickBooks payroll when sending to the payroll service is triggered by an error message:
QuickBooks has encountered a problem sending your usage data
These errors are common errors and generally occurs when a user creates accountant's copy or if an incorrect time zone running on your system. Moreover, In order to get a thorough insight into unable to send usage data error in QuickBooks payroll and to find easy-to-adapt solutions for resolving the same, we suggest you to follow this segment to the very end. thus, keep read on!
What are the causes of QuickBooks has encountered a problem sending your usage data error?
There are several reasons that may lead to sending usage data error in QuickBooks. Some are mentioned as follows:
If a copy of the QuickBooks accountant’s file is already exists.
Also, if your system is running on incorrect date/ or time zone.
Another reason can be if your default browser uses Expired or Invalid security certificates.
The user can also experience this issue if Internet connection speed is poor.
Another trigger can be if firewall or some security software running in the background blocking QuickBooks access to the internet.
How to Resolve QuickBooks Unable to Send Usage Data While Updating Payroll?
Being aware of the possible causes which lead to payroll error while sending usage data issue in QuickBooks, now you must be curious to know about the DIY methods to rectify this error. SO, LET’S PROCEED!
Method 1: Check your system date and time are set correctly
Go to bottom right corner of your computer screen taskbar and click on Date and time.
After that, check that both the Date & time are correctly set.
If the time and date are not correct, the go with the following steps:
Press the ‘Windows +R’ keys to open the Run box.
And further, type ‘Control Panel’ and hit Enter key.
You now need to move to Clock, Language and Region and select ‘Set the time and date.'
Followed by select the ‘Change date and time settings’ option.
Now move to Date and Time tab, click on Change date and time... button.
Once done with that, click on Time and Date button.
Set the correct date and time and then click on OK.
Method 2: Make sure that there is no Accountant’s copy exists
Here you are required to search for any Accountant’s copy and make sure that all the restrictions imposed on the same are removed. Delete the accountant’s copy, using the given steps:
From the ‘Top menu’ bar, select ‘Edit’ option.
And further, you need to tap on ‘Find’, followed by ‘Advanced tab’
Now from the filter box that follows, you need to select ‘Detail Level’ and click on ‘Summary only’.
Next, select the ‘Online Status’ and then move to the ‘Online to send’ option.
Also, select ‘Posting Status’ option and click on ‘Either’ tab.
Now select the ‘Find’ button on the top right corner of the screen.
Finally, check to see whether the changes have been applied.
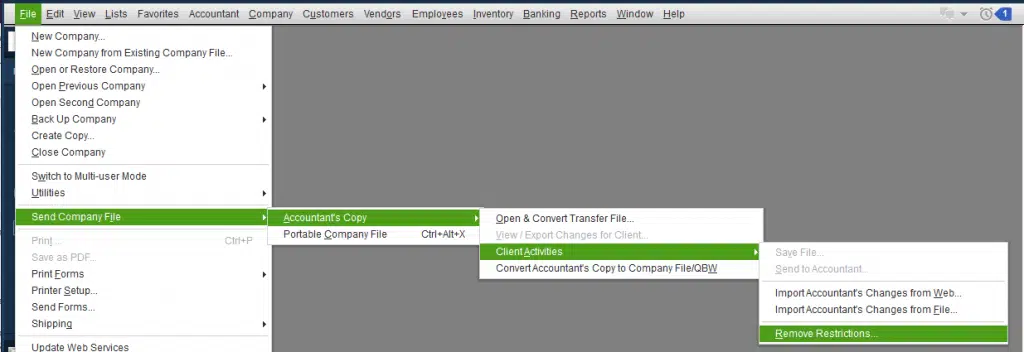
Method 3: Delete any Restrictions from Accountant’s copy
Navigate to File menu and select Send Company File.
After that select Accountant’s copy and then go to Client Activities and select Remove restrictions opt.
Now select Send Company File and tap on Accountant’s Copy.
Once done with that, you need to re-open QuickBooks desktop and check to see if the issues related to sending your usage data error have been resolved successfully.
Summing Up..!
We hope that the solutions mentioned in this article assisted you in resolving the QuickBooks payroll problem when sending your usage data error. However, if still the error code bothers you anywhere, then our QuickBooks payroll technical support team at 1-800-761-1787 is always committed towards providing you with an finest support services. We are available 24/7 in a week.
QuickBooks, being robust accounting software, has been aiding accountants and businesses in achieving their objectives in a timely and efficient manner. However, accompanied by its far-reaching applications are considerable errors that a user might face while using QuickBooks Desktop software. One such frequently encountered error while working with QuickBooks Desktop is related to the user being unable to log in to a Company file. This error is usually accompanied by a pop up message:
Warning
The attempt to log in with the user name xxxxx failed. This user is already logged into the company file. Try a different user name.
Error:
User ID Admin is already logged into the company file.
To get a better grip on this issue, ensure that you go through this segment keenly.
What triggers the error ‘The attempt to log in with the username Admin failed’?
While working with QuickBooks Desktop, you may encounter this error owing to several reasons. Some of the primary reasons which might trigger this error are mentioned as follows:
You are already logged in to the company file.
Some network issues erupted due to an electrical problem.
You are logging into the company data file using a Remote Access, and you haven’t logged out from the last session that you were working on.
You've already logged in with this username on a different system.
Solutions to fix the QuickBooks Error ‘The attempt to log in with the user name Admin failed’
You must now be well aware of the error and the various causes which can lay the ground for this error. Let us now jump to the viable methods which we can adapt to get Error message: The attempt to log in with the user name Admin failed resolved. Follow the methods enumerated below in order to fix this error.
1st Method: Run the QuickBooks Tool Hub, and Run Quick Fix my Program
QuickBooks Tool Hub program is a multifaceted tool that can identify and successfully resolve a plethora of errors and related issues in QuickBooks Desktop software. Running this tool can help you solve the error code encountered while logging into your QuickBooks account. In order to run this software, follow the walkthrough provided in the forthcoming lines below:
Step 1: Download and install the QuickBooks Tool Hub
You can see which version of Tool Hub you have if you've used it before. Select the Home tab. You will see the version at the bottom.
Now open the file you downloaded (QuickBooksToolHub.exe).
Follow the instructions on the screen to install and agree to the terms and conditions.
Double-click the icon from your Windows desktop after the installation is complete to open the tool hub.
Upon installing the QuickBooks Tool Hub, Run it.
Step 2: Run Quick Fix my Program
Navigate to the ‘Program Problems’ tab and click on the ‘Quick Fix my Program’
The process may take some time.
Once finished, open the Company file and check to see if the error has been resolved.
In case the error still persists, you are directed to move on to the subsequent method.
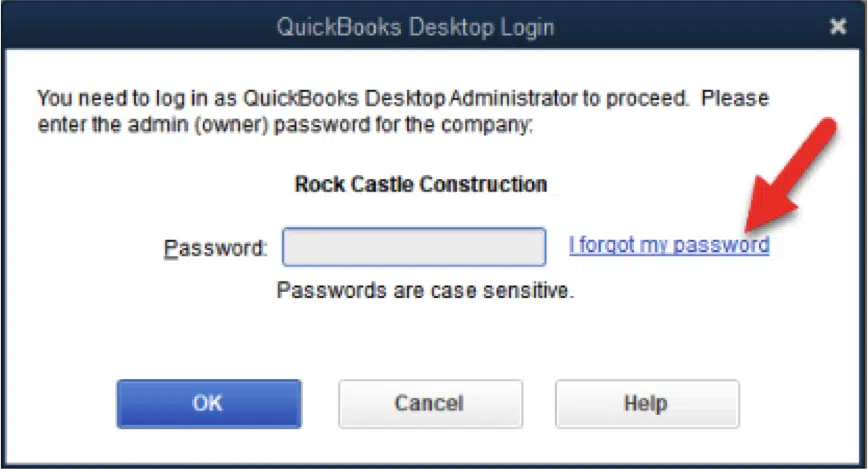
2nd Method: Click on ‘Forgot my password’ option or Log in as a different user
In case you forgot your password and are accessing QuickBooks Desktop as an administrator, you can reset your password by selecting the ‘I forgot my password’ option. However, If you are the QuickBooks Admin, hit click on the reset button at the login screen and answer the challenge questions you are getting there. If you still are unable to log in, then use QuickBooks desktop automated password recovery tool.
We hope that scrolling through this article and implementing the aforementioned methods proved viable towards fixing the login error ‘The attempt to log in with the user name Admin failed’. On the contrary, if the error still persists, we recommend you to get in contact with our 24/7 QuickBooks error support team by dialing the helpline i.e., 1-800-761-1787. Addressing your queries is our foremost concern.
FAQs
How do I reset the password for the "Admin" account?
The procedure to reset the password for the "Admin" account involves clicking on the "Forgot Password" or "Reset Password" tab. After that, follow the onscreen prompts to reset the password.
What should I do if resetting the password does not work?
If resetting the password does not work, users should necessarily check whether the account is locked or not. For this, log in to the system as an admin and then check the account settings. The account can be unlocked in the settings.
How can I prevent this error from happening in the future?
This error can be prevented to re-occur in the future by making sure that you type in the correct username and password and avoid mistyping the password. Users can also employ two-factor authentication for securing their account credentials.
Can this error be caused by a system error?
Yes! This technical aberration can occur due to network connectivity issues or other misconfigurations in the system settings.