Learn how to move your company data files from QuickBooks Online to QuickBooks Desktop:
Are you a QuickBooks user and looking for the method to convert and transfer QuickBooks online data files to desktop? Well, this is possible, but it might seem to be a difficult process to many users. The conversion process involves a lot of things, which might confuse you. Thus, to clear the confusion, we have come up with an in-depth guide which will help you in converting the software with much ease. There can be multiple reasons why you want to switch from QuickBooks online to desktop, and sometimes it becomes necessary for you to switch from online to desktop. There are a lot of things that you will have to keep in mind, before exporting a QuickBooks online to desktop. All those points will be mentioned in the post later on, so make sure to continue reading this post.
Moreover, if you are a bit skeptical about carrying out the process on your own, then in that case, you can ring up our accounting experts at our dedicated support line, i.e., 1-800-761-1787. Our team will ensure to provide you with the best possible support services round the clock and Export your QuickBooks Online data to Desktop with much ease.
Points to remember before carrying out the conversion steps
Before you convert QuickBooks online data to QuickBooks desktop, there are certain points that you should take into consideration, a few of which are as follows:
The first thing that you should take into consideration is that the internet explorer version must be 10 or higher for conversion.
And then the desktop software must be the 2004 edition or the later one in the case of Windows, as converting to versions older than QuickBooks Basic 2004 is not possible.
Remind it your QuickBooks desktop must be compatible, and the internet explorer has to be 32-bit, As the 64-bit version will return an error and hinder the progress.
In case you are having a non-US edition, then conversion is restricted to certain items-products, vendors, services, customers, etc.
You also need an ActiveX to carry out the conversion and cannot perform the process.
The direct conversion is not possible if you have the Mac version of QuickBooks desktop. As the process might differ.
You should have access to at least an invited accountant account, if you are already a master or a company administrator.
Steps to Convert and Transfer QuickBooks Online to QuickBooks Desktop
Following are the advanced steps to move your QuickBooks Online file to the QuickBooks Desktop. Make sure to go through with this segment carefully and implement all the steps uncovered in this section, without skipping out on any of the steps. So, let's start!
Step 1: Setting up security settings in Internet explorer
In order to set up Internet Explorer settings or Microsoft Edge, so that the data can be imported or exported smoothly, you need to carry out the steps below:
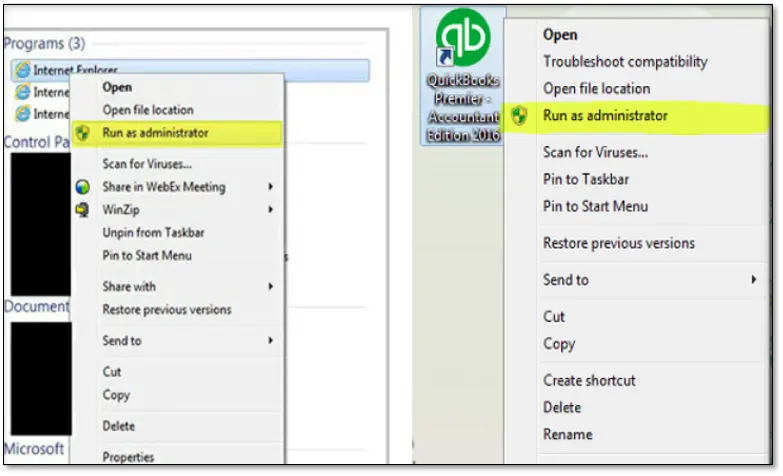
Right-click on the Internet Explorer icon and then select the Run as admin option.
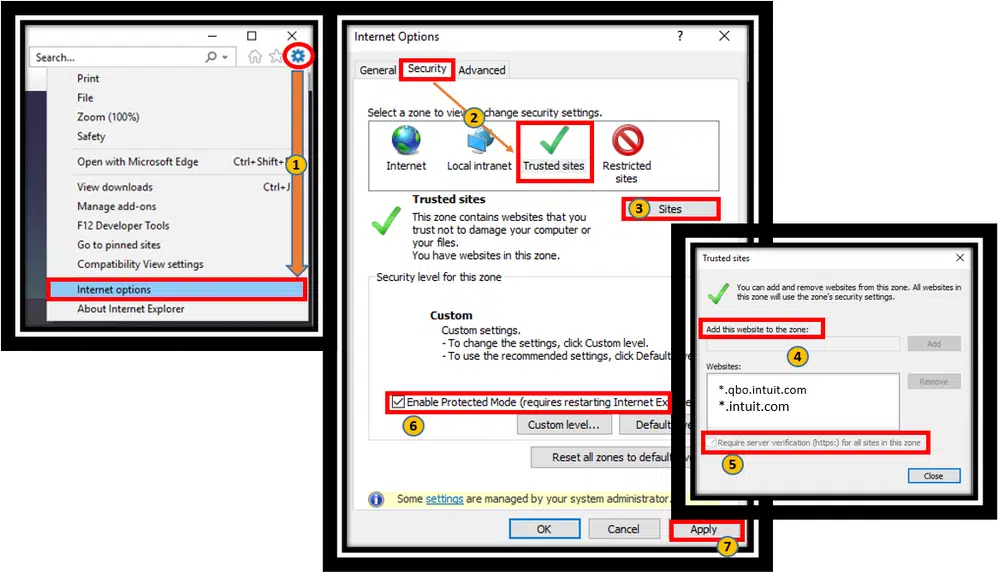
Followed by selecting the Tools icon and then click on the Internet options.
Opt for Security and trusted sites option.
Proceeding ahead, you will have to select Sites.
In the Add this website to the zone field, you need to enter: *.intuit.com and *.qbo.intuit.com
Ensure that the “Require server verification for all sites in this zone” is unchecked.
Now close the Trusted Sites window.
Ensure that the Enable protected mode is unchecked.
Once done with that, choose the Apply option and then hit on Okay.
Now you will have to close and re-open internet explorer for protected mode to be truly disabled.
The final step in the process is to leave internet explorer open.
Step 2: Set up QuickBooks Desktop for Export
This next step requires setting up your copy of QuickBooks Desktop for the export process. The procedure is briefed below:
For this, you are required to right-click the QuickBooks desktop icon and also choose the Run as admin.
If the QuickBooks desktop is not installed, then it is recommended to download the trial version. to use for this purpose.
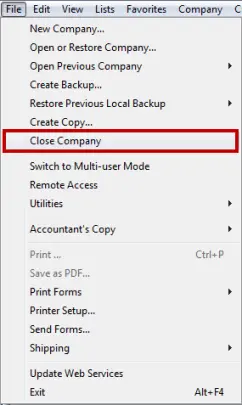
Ensure to move to the File and then select the Close company option.
Now, leave the QuickBooks desktop open at the time of completing the rest of the steps.
Follow the steps below to finalize all the preparation before exporting the data pertaining to QuickBooks Online to the Desktop version.
Open the version of QuickBooks that the company file will be converted to. It should be noted that you are recommended not to go ahead of No company open window and also you should avoid opening a company file yet.
Next, log in to the QuickBooks Online account.
Now you will then required to select the Gear icon and then under the tools tab select Export data.
Select the Reason from the pop-up window and then hit on Continue.
Under moving to QuickBooks desktop, you will have to opt for the Learn more option.
Choose Learn more under the download company data.
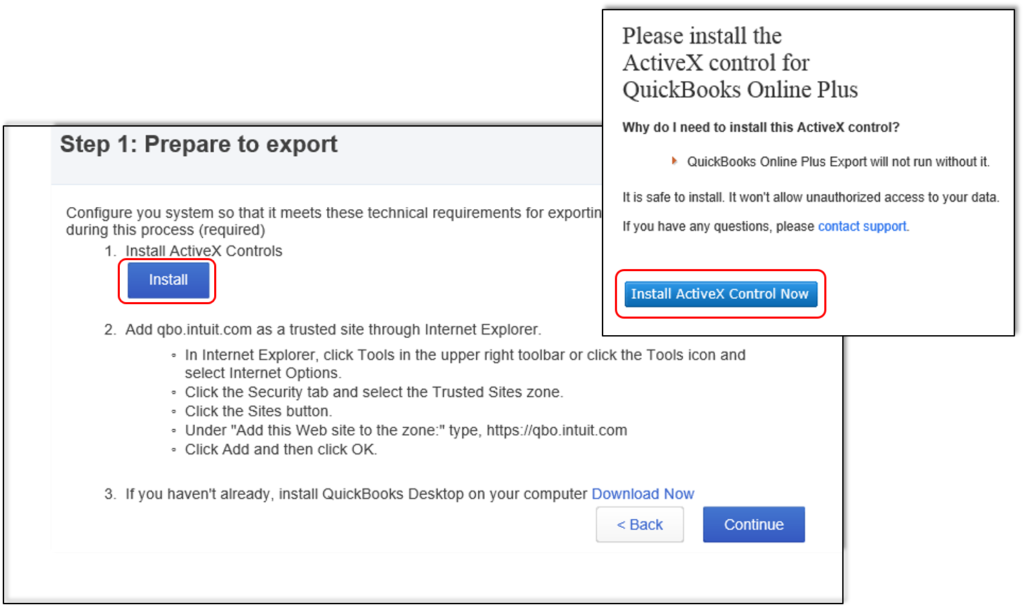
Review the Export overview. and then opt for Get started option.
Choose Install for ActiveX control and then select Install ActiveX Control Now to confirm the installation.
Choose Continue after the installation comes to an end.
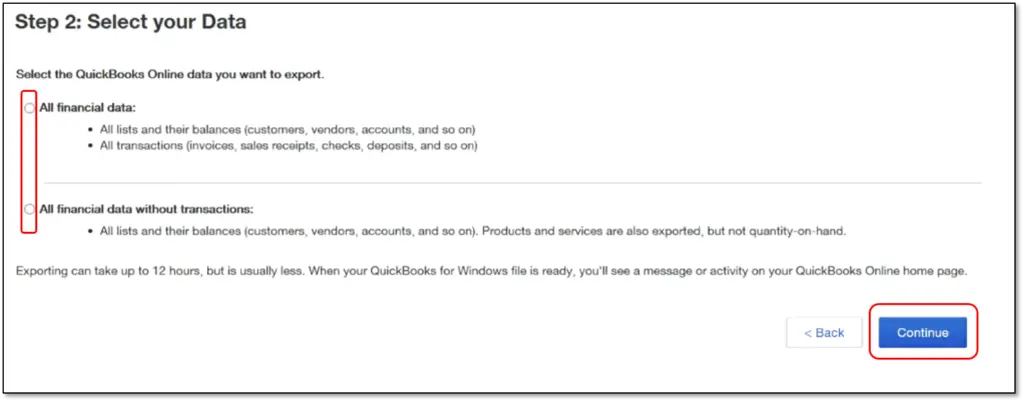
Pick the Data that you want to export and then select Continue.
Followed by reviewing the limitations of the data that will be exported, and then hit Continue.
Lastly, enter all the Contact information and then select Continue option.
Important: Note that you will receive an email with steps to end the export conversion within a few minutes to hours, which depends upon the amount of data that is being prepared. The receipt of the email will mean that the data has been complied and you will have to ready to move to the next step.
Step 4: Finish exporting the data
To start in QuickBooks online, you will be required to repeat the steps, so as to get back to the export page.
Navigate to the Setting tab and then select Export data in QuickBooks Online.
Repeat the steps and Prepare to export the QuickBooks online data.
Choose the Continue tab to download on the exporting from QBO page.
Now you need to switch to QuickBooks Desktop.
Ensure that the No Company Open screen, and also, if the company is open, you are recommended to visit the file and select Close company option.
Select the preferred option and then choose Continue option.
Followed by hitting on the Download option.
Save the company file window, and you need to select a Location to save the file.
You will then see a pop-up window that asks where you would like to save the file, and then select Convert Now option.
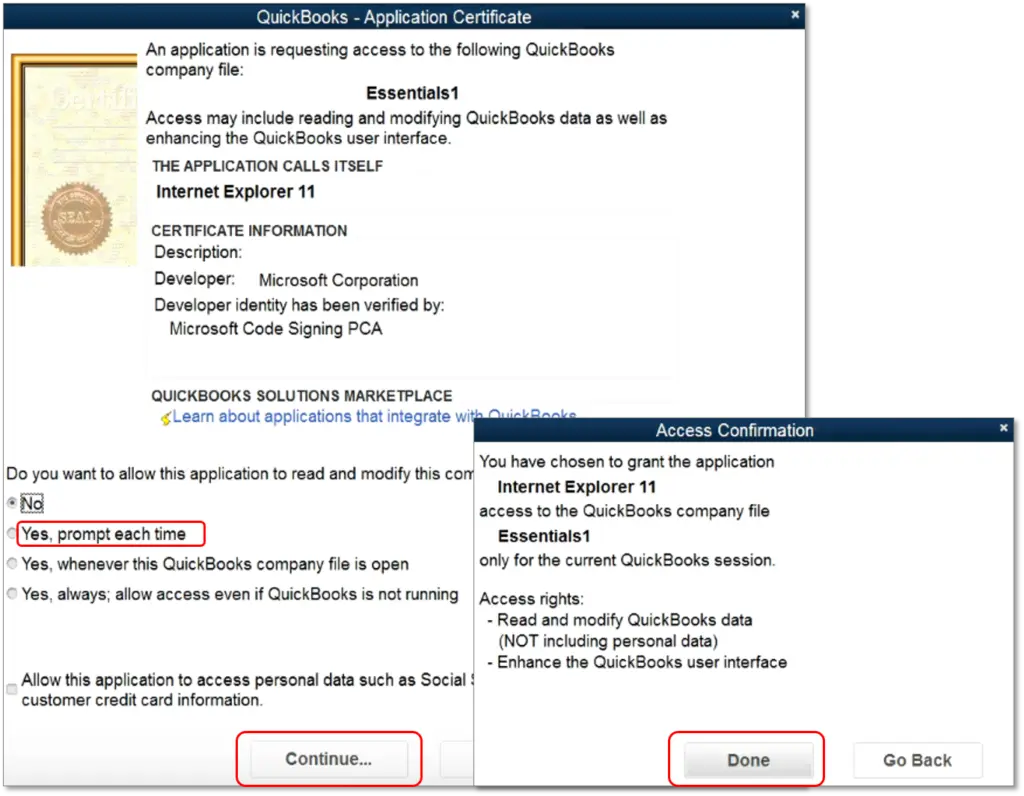
Opt for Yes, prompt each time in the application certificate.
Go for Continue and then select Done.
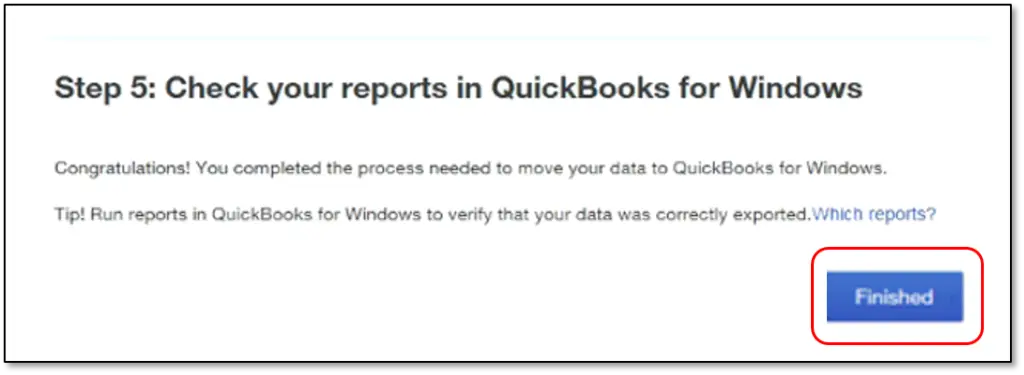
Pick finished and then run reports to confirm that the data is successfully converted.
So, this brings us to the end of this article, where we hope that the information, we have shared might work for you in converting QuickBooks online data file to QuickBooks desktop. However, if you are still unable to convert it or facing difficulty in exporting qbo files to desktop, then you might have to contact a professional, as experimenting with the process might lead to serious data loss.
Feel free to contact our QuickBooks customer support team using our dedicated support line, i.e. 1-800-761-1787, and our experts will help you out with the entire process in the best possible way. Call us anytime, and we will be happy to help you and clear all your clouds of confusion.
FAQs
Q.1. How to export QuickBooks Online data to Desktop?
To export QBO data to the desktop, users can opt for the Export Data feature in QuickBooks Online (qbo). For this, proceed to the Gear icon, and after that, hit a click on the Export Data option. Finally, the user needs to hit on the Export to QuickBooks desktop option.
Q.2. What file format is compatible to export QuickBooks Online data to Desktop?
The chosen file format should be compatible with the version of QuickBooks desktop. The compatible file formats encompass .qbo, .qfx, .ofx, .qbj, and .csv formats.
Q.3. What data is included in the QuickBooks Online file when exporting?
During the export process, lists in the form of charts of accounts, customers, vendors, and transactions like invoices, bills, payments, etc. can be exported.
Q.4. Can I still use QuickBooks Online after exporting data?
Here’s everything you need to know to start using QuickBooks Condense Repair Tool:
QuickBooks is a modern accounting software that is accepted by business owners all around the globe. The reason behind its huge popularity is nothing but the fact that it is easy to use and its functions are universally applicable. This software primarily caters to small and medium-sized organizations. It allows you to initiate functions such as payroll management, Inventory control, sales control, business management, etc.
Inuit, the company that introduced QuickBooks Desktop is known for providing regular updates and one of the best features that are brought out in recent times is the QuickBooks Condense feature. So, in this article, we will discuss about this condense data utility, how to use it and what the important factors are to keep in mind while using it. So, continue reading the article carefully. Or if you are seeking for expert assistance or professional guidance, then feel free to get in touch with our QuickBooks enterprise support team using our support number i.e., 1-800-761-1787. Our certified accounting professionals will be there to help you in a single call.
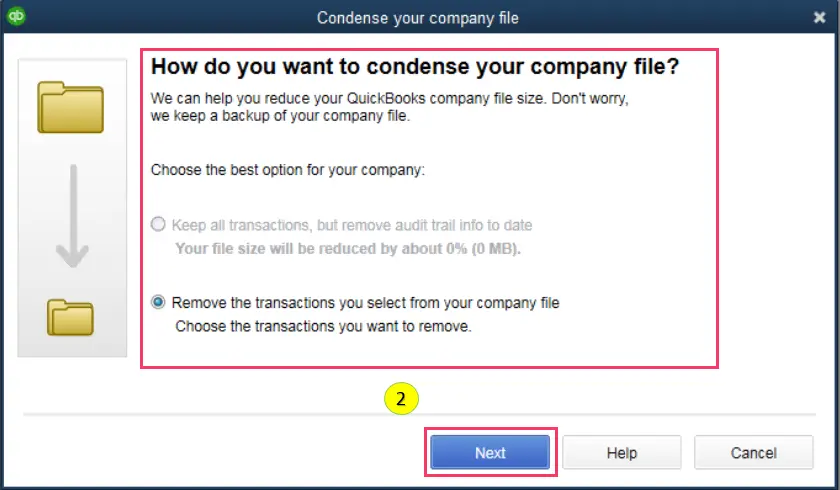
What is QuickBooks Condense Repair Tool and Condense Data Utility Feature?
When QuickBooks Desktop 2019 edition came out, one of the biggest factor that were in the highlight was none other than the QuickBooks Condense data utility feature. Not only this tool allowed users to work fluently but also it helped in maintaining accurate transactions seamlessly. With the help of this feature, QB users not only get the option to remove audit trails but also are able to minimize the file size of the company data. This was a revolutionary factor brought by QuickBooks desktop. Unlike prior versions of QB condense, the one introduced in the 2019 edition was not only faster but also compact in terms of usage. However, when it comes to the performance issues, you should opt for condense data utility, when no other option works.
You can easily minimize the file size without even causing any sort of data damage. The QuickBooks condense repair tool feature present in the newer versions is considered slightly better than the previous QuickBooks versions. The newer version has a unique feature that it leaves all the detailed transactions. Previously, the condense utility feature usually removed the transaction details and also created a consolidated journal entry for data before selecting the date. However, you can still go for the previous one having the traditional condense feature, if needed.
Steps to use the QuickBooks condense repair utility
In order to access the traditional condense feature, you can simply carry out the steps below:
At first, move to the file menu.
After that hit a click on the utilities option.
Followed by clicking on the condense data.
Decide from the options appearing on the screen.
In order to access the traditional feature, tick mark the first option.
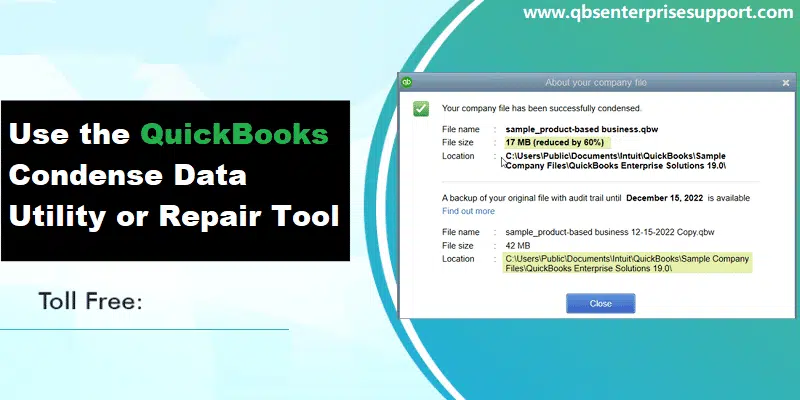
After that, hit next and a prompt saying "working on the file" will appear. After the process completes, a window stating the total reduction and location of the backup before the file optimization will open up on the screen.
What are the errors that QuickBooks condense data utility tool fixes?
Before we jump into the understanding of how to use QuickBooks Condense Data Utility Tool, here are some of the error codes that a user might experience:
Transactions of the server will get on hold and funds will not be deposited.
QuickBooks Condense might freeze while minimizing the file size.
Transactions that are held up in the form of Funds might not get deposited in the process.
So, these are some of the issues that you might have to face when you are trying to use QuickBooks Condense Data Utility Tool.
Facts related to QuickBooks Condense Repair Tool
You are supposed to check if the condense repair tool is ideal for the company or not, as condensing can't be undone. Thus, it is very essential for you to first try out all possible solutions and then move to condensing. Keeping all these facts in mind, we have jotted down a complete list of functionalities and facts related to QuickBooks condense repair tool, which will help in knowing more about the tool:
Irreversible nature:
One of the biggest fact about condensing is that it can't be reversed once done, which makes it important for you to think twice before opting for this process. Once a company file is condensed, it can't get back to normal condition. Thus, you are supposed to ensure that the file needs to be deleted or not. You can opt for condensing only in the below mentioned situations:
When a large data file is troubling you.
Or you have upgraded all the hardware.
You should opt for condensing only when you are close to a list limit.
In case the accountant and technical support has agreed on using the condense repair tool i.e. an emergency situation, go for condensing.
Another situation when one should opt for QuickBooks condense repair tool is when all other options failed.
Condense repair tool doesn't remove certain transactions:
There are certain transactions that remain intact even after using the condense repair tool. The table below will help you in understanding this in a better way.
Transaction
Description/Reason
Payroll transactions
In case the Condense date is prior to 12/31 or if an employee’s W2 is not reviewed.
Invoices, payments, credit memos, and refund checks
If it's not linked to each other in a proper manner.
Payments recorded to Undeposited Funds
The ones that are not deposited to a bank account.
Bills, bill credits, and bill payment checks
If not appropriately linked to each other.
Estimates linked to invoices
Estimates are non-posting entries and cannot be Condensed into journal entries which are posting transactions.
Sales tax not paid in Pay Sales Tax
Paying sales tax with checks leaves invoices open which are non-Condensable.
Transactions linked to a non-Condensable transaction
Example: You entered an invoice on 12/15/2015 and the corresponding payment on 1/15/2016, then ran the Condense Data utility through 12/31/2015. Both transactions will not be Condensed because the payment is outside the period and the invoice is linked to a transaction that was not covered during the Condense.
Might not lay an impact on the size of the company file:
In majority of the cases, the condense feature reduces the size as it removes the transaction details and the list entries. However, in case of the inventory items, the list remains the same. And very less transactions are condensed, which do not impact the file size at large. Also, the open transactions are not condensed, which means no impact to the file size.
File damage might not be fixed:
It should be noted that if the company file is damaged, you should first resolve the data damage, as the QuickBooks condense data utility won't fix the error. You can either restore the backup of the company file or can create a completely new company file.
The condense data utility might leave some effects, when it comes to specific reports. The reports that we will mention below will be affected for the condense period only:
Account- based and item-based reports:
The account based reports are expected to be accurate as the entries on the accounts remain unaffected. The account based reports are as follows:
Profit & Loss (accrual)
Balance Sheet (accrual)
Statement of Cash Flows (accrual)
Trial Balance (accrual)
However, the items based reports are expected to be blank as the item data will be deleted by this feature. The item based reports include:
Sales and Purchase reports
Job Costing reports
A/R and A/P Aging reports
All Cash Basis reports:
It should be noted that the cash basis reports will be inaccurate for the condense period. You will not be able to see any links from cash in to income or from cash out to expenses.
For example: If you entered an invoice on February 1 and the payment on March 1, the histories will indicate that you are linked. QuickBooks will involved the invoice in cash basis income for March 1. After that user runs the condense data, the income will be condensed into the February 1 journal entry and the cash will be condensed into the March 1 journal Entry. Also, the invoice and the payment will no exist. QuickBooks will not recognize that the invoice for February 1 was paid on March 1 or that the invoice and payment existed earlier. Just like that, on the A/P side, bills and bill payment checks will no longer exist and then expenses also will not remain linked to the cash payments. Thus, QuickBooks will not be aware when to show the cash basis expenses.
Reports filtered by Class:
It should be noted that any transactions summarized by the utility will not be assigned any class. Also, running a profit and loss by class report will show all amounts in the unclassified column. You will not find any sales tax liability report invoices with sales tax. A condensed journal entry will have the amount credited to income accounts, but the QuickBooks accounting software will have no way to know what part of the income is supposed to be taxable or non-taxable. Also, the tax collected comes from the invoices, which no longer exist, which means that it would show zero.
The sales and purchase detail reports draw their data from items or invoices and bills. There will be no more items and the reports will be blank, as there are no more invoices and bills.
Sales Tax Liability Report
Kindly note that Invoices with sales tax no longer exist. Moreover, a condensed journal entry has an amount credited to income accounts, but QuickBooks has no way of knowing which part of the income is taxable and which part is non-taxable. Along with that, the tax collected comes from the invoices, which no longer exist, which will show zero.
A/R Collections Report:
This report will show the Condensed journal entries under the head NO NAME. The journal entries will have entries to A/R that aren't linked to closing transactions and are considered as open. Also, the total will be zero as all the invoices in the trivial file are paid.
The A/R aging reports will not show the condensed journal entries as they consists of a default filter of Names = All Customer: Jobs. You will have to remove the filter and the A/R Aging reports will show the condensed journal entries.
Audit Trail Report:
As the condense removes the transactions from the company file, the transactions will be removed from the audit trail report.
Reconciliation:
It should be noted that the opening balance for the next reconciliation will be appropriate as the condensed journal entries are cleared transactions. The checks and deposits will no longer appear and the reconciliation reports might be incorrect or might disappear. The statement date may also be wrong, as the last reconciliation might also disappear.
Preserving Reports:
You should keep in mind that the original reports are preserved in the backup and the archive copy, and in any other backups that you create. Before running the condense, you should reconcile all the accounts and also print the reconciliation. To check the company performance compared to the previous year, you should check out the things below:
You are supposed to export the current date from the company file.
Open the archive copy and export historical data.
Combine the historical data and current data in any other program.
As we now have a decent understanding of what QuickBooks Condense Repair Tool is, let us move further and understand the procedure of using it in the best manner. Following this method will ensure that you will not have to suffer any sort of data loss and also the files that you are converting will be safe from any data breach. It will not only save a lot of space of the Hard drive but also will make loading up the files on QB quicker:
Step 1: Spot for non-condensable transactions
You are supposed to begin searching for the files that are non condensable. For which you are supposed to run any report and then look for the transactions that will not be condensed.
Running the report
Under this process, you need to start with a click on Files on the QuickBooks desktop then choose Utility option and follow it by clicking on the Condense Data Command.
After that select the Transactions Option which is located before the specific date radio button.
Moving ahead, hit a click on Remove Transactions before the date required, once done, click on Next once you are done sorting the transactions that you want to keep in QB Desktop.
Here, a window will come up where you will have to specify the method of condensing a transaction which is followed by simply clicking on Next button.
Now you will have to choose All the transaction which are supposed to be removed from the system, click Next to move to further steps.
Also you will have to specify any list cleanup that is supposed to be occurring, once done, click on Next button.
Once all the above mentioned is completed, the software itself will ask you as to whether you want to confirm the Condensing and Archiving operation.
Lastly hit a click on Start Condense and follow it by Backing up procedure on the data file as per the instructions on the screen.
Step 2: Preparing the company file
First of all, begin with eliminating the data file closing date.
Next step is to move to the edit menu and then click on preferences option.
Select accounting option and then move to the company preferences option.
Fill in the date in the closing date section.
Remove date from the closing date box and then hit OK button.
Condensing might result in deleting some files. Ensure to save a copy of all the reports as PDF, such as
Accrual based Profit and Loss for all dates
Accrual based Balance sheet for all dates
Cash Flow Statement
Account payable and Account Receivables
Other essential books required by the accountant
Step 4: Condensing QuickBooks desktop company files
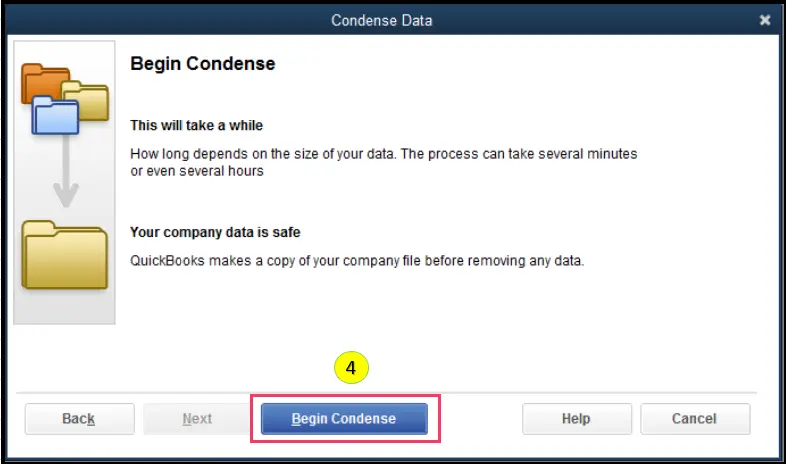
Condensing your company file may take some time which depends on the size of the file and the system performance. It is recommended to not run other applications while Condensing for it to be quicker.
If you're accessing the company file through a network, run the Condense Data utility on the computer where it is stored. If it is on a server, copy the file on a workstation before Condensing.
Steps to run the condense data utility:
You need to go to the File menu and then choose Utilities.
And further, select the Condense Data option.
Now go through the wizard and choose the options you need.
Heading forward, you need to choose Help in case you required any assistance.
Then you have to choose Start Condense option here.
Note: We recommend you to create a backup and an archive copy before starting the condensing.
Transactions
Unused List Entries
Uncleared (unreconciled) bank and credit card transactions
Transactions marked “To be printed“
Invoices and Estimates marked “To be sent“
ALL Estimates, Sales Orders, Purchase Order, and Pending Invoices
ALL Time and Mileage activities
Transactions containing unbilled expenses and items
Accounts
Customers and Jobs
Vendors
Other Names
Items
“Done” To Do Notes
Classes
Following all the above-mentioned instructions will make condensing a file in QuickBooks with QuickBooks Condense Repair Tool a lot easier. This particular feature is extremely productive as not only it helps in decreasing the usage of data storage but also the size of files being low, it makes the task of opening them a lot easier.
What are the Transactions that are free from condensing?
Here are some of the transactions which are completely free from the usage method of the QuickBooks Condense Repair Tool:
All the Payments that are recorded under the basis of Undeposited funds.
Payroll transactions of an employee whose account is not checked by an employee’s W2.
Estimates of Invoices that are created by the admin access users.
Period Copy
Period copy is basically a condensed version of the company file that contains the data for a specific period. In order to create a copy, the steps below can work:
The first step is to move to file menu and then choose utilities and also the condense data.
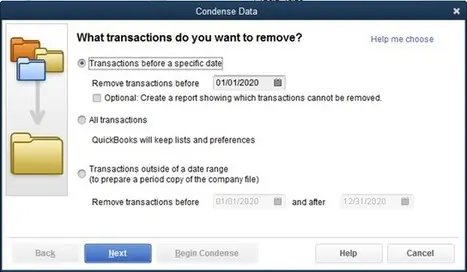
Now on the what transactions do you want to remove? window, you need to select the transactions outside of a data range.
Set the correct dates for the remove transactions before and after filter.
Move through the wizard and then choose the options required. Select help tab if required for any assistance.
It should be noted that the transactions and list entries that will be removed when a period copy is created is the same as the ordinary condensed file.
The Journal Entries
The QuickBooks accounting software combines multiple transactions into journal entries dated in context to the last day of the month. The condensed journal entries have no source data as there is no account present on the first line of the entry. It should be noted that you cannot edit or delete the condensed journal entries.
Checking for discrepancies
You can rerun and print these reports:
Accrual based profit & loss for all dates
Accrual based balance sheet for all dates
Statement of cash flows
After that compare them to the report saved before running the condense data utility. The reports should be identical to the pre-condensed data reports as they are accrual-based summary reports. In case you spot any discrepancies:
You need to note the transactions causing the differences.
So, this is all you, as a QB user, should know about the QuickBooks Condense Repair Tool. In case you face any sort of issue using this tool, you can contact our accounting experts to get QuickBooks technical support. You can simply make a call at our dedicated helpline number i.e. 1-800-761-1787, and get answers to all your queries related to condense data utility. Talking to our team will help you in gaining the best possible information and assistance from experts and certified QuickBooks professionals.
Frequently Asked Questions
Can I undo the changes made by QuickBooks Condense Data Utility?
No, the changes are irreversible.
Can I customize the criteria for condensing data?
Yes, QuickBooks desktop allows you to customize the criteria for condensing data based on certain time periods.
How can a user access the condense data utility?
In most versions of QuickBooks desktop, the user can access the condense data utility by going to the File menu > selecting Utilities > and then selecting the Condense Data.
When should I use QuickBooks Condense Data Utility?
When your company file data has grown large or it's causing the performance issues, you can use the condense data utility at that time.
Even the most reliable accounting software can hit a snag, and QuickBooks is no exception. One common issue that often surprises users is QuickBooks Error Code 15241. Users may face this error while using the payroll function or while installing updates to the software. This error prevents the software from completing critical updates, which can disrupt payroll processing, tax table updates, and other essential functions. The error code can be very much annoying for the users to tackle out but there is no need to be worry as we have come up with this post, in which we discuss about the causes, solutions, and various other facts related to this error.
However, if you are short of time or seeking help from experts to rectify this error for you, then you can simply get in touch with our QuickBooks error support team and let them fix the error on your behalf. You can directly ring up at 1-800-761-1787, and speak directly to our experts for any additional information.
QuickBooks Payroll Update Error 15241: A Brief Insight
QuickBooks error code 15241 is a commonly encountered error, which is seen while you open the QuickBooks payroll function. This sort of error can also be seen when you installs updates for the software. The error code comes up with an error message stating:
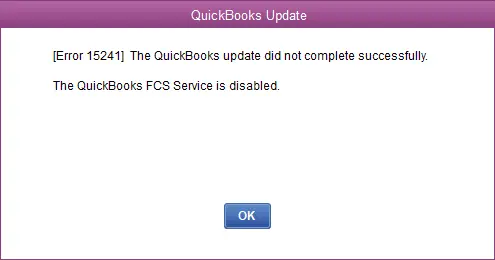
QuickBooks Update
[Error 15241] The payroll update did not complete successfully.
The QuickBooks FCS Service is disabled.
One of the common causes of this error can be if the QuickBooks desktop copy service (FCS) is disabled. It should be noted that the Intuit FCS Service is an important add-on service that manages file transfer at the time of QuickBooks update. There are various facts associated with this error, which we will be discussing later in this post. So, keep reading it.
What triggers to QuickBooks error code 15241?
Before you learn the ways to fix this QuickBooks payroll error 15241, much important to first understand what are the factors responsible behind the occurrence of this error. Some of the most common reasons are as follows:
Certain files related to the QuickBooks software got deleted mistakenly by any of the programs.
If the registry files are corrupted.
You can also encounter this error if the downloaded file or the installation file gets corrupted somehow.
Advanced Steps to Get Rid of QuickBooks Payroll Error 15241
There are a couple of steps that can be implemented by the users to get rid of from this error. But the steps differ as per the operating system. This means that the steps for Windows XP users might differ from that for Windows 7, 8, 10 or vista. So, in this post we will be exploring each set of steps one by one, let us explore each of them separately:
Steps for Windows XP users:
The steps to be followed by Windows XP users are given as under:
The initial step you need to follow if you are a Windows XP user is to close the QuickBooks desktop for a while.
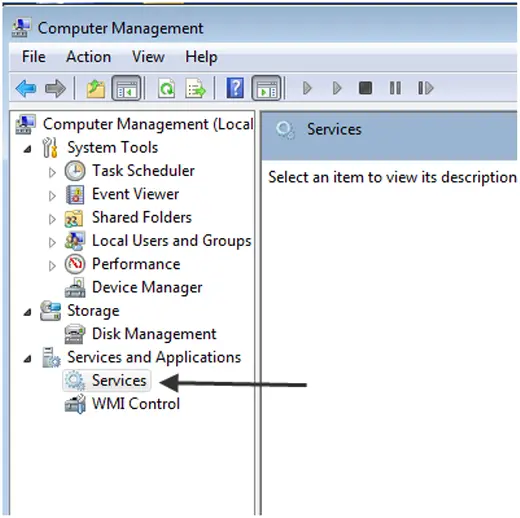
And then move to My Computer on the desktop and then right-click the same. Followed by select Manage option. This will open the Computer management system.
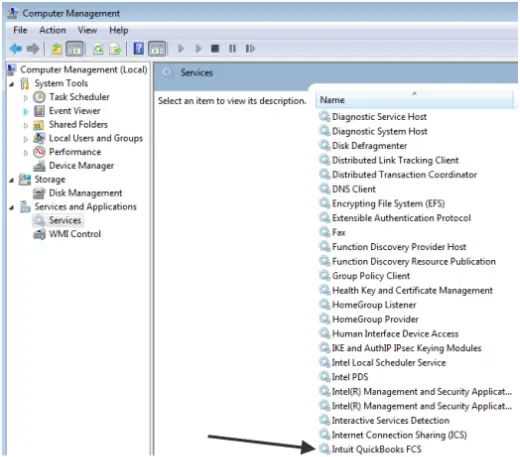
After that, move to Services ad applications window and then click on the Services option, which will open up the services window.
Next, scroll down and double click the Intuit QuickBooks FCS service, which will further open the window as Intuit QuickBooks FCS properties.
Now, move to the General tab and then also click on the drop-down list of start-up type. And then opt for the Manual option.
Once done with that, you are supposed to hit click on OK tab.
If you are a Windows 11, 10, 7, 8, or Vista user, go with the below given set of instructions.
To begin with, you need to close the QuickBooks desktop.
And then hit a click on the Start tab on windows. Now, move to the Computer and then right-click and select Manage.
Next step in the process is to be followed by Windows 10 users. They are supposed to click Search tab on the task-bar and then look for Computer. And then right click the This PC option and select Manage.
Once done with that, hit a click on the Services and applications option in the left pane.
In the right pane, double-click on the Services option.
And then move to the Intuit QuickBooks FCS and double click the same.
Now, the QuickBooks FCS properties window opens up and then move to the General tab and then click on the drop-down menu of start-up type and then choose the Manual option.
The next step is to tap on Apply and then click on the Start and OK options respectively.
After that open the QuickBooks software and download the updates.
Finally, update the payroll tax tables and you are good to go.
As mentioned in both of the above procedures, you need to update the payroll tax table, which can be done by carrying out the steps below:
At first, move to the Employees menu and then choose the Get payroll updates as shown in the images.
After that, checkmark the Download Entire update checkbox and then move to Update option.
Lastly, the process will end when the download complete pop up window appears on the screen and you are good to go.
Alternate Solutions to fix QuickBooks Payroll update failed error 15241
In case none of the above solutions worked, then we recommend you to try out these given steps below:
The first step is to insert the payroll update CD and then open Get payroll updates window.
For QuickBooks desktop pro and premier- select Employees and then select Get payroll updates.
In case you have proposed to determine the update.dat or update3.dat file. In install payroll update window, you need to reply to the prompts.
After that agree to Browse.
Now, from look in the drop-down arrow, and choose CD drive.
Select either update.dat or update3.dat from the payroll update disk and select open tab.
After that, choose OK in the payroll update window.
Also, you need to hit on the Windows start button and then quit QuickBooks.
Navigate to My computer and then right click the CD drive and also choose Explore.
Now, insert the same CD to another system and then test if you are able to view the files.
If you are able to View the files on the second system, then it means on the first system, you will have a hardware issue with the CD drive.
In case you are unable to View the files on both systems, then it is important to buy a New payroll update disk by simply visiting the Intuit online store and then selecting Payroll and also selecting View contact info.
Next step is to ensure to Install from the correct location in the install confirmation window and also examine the Tax table versions in the current and new fields are also correct.
Lastly, select Install and a confirmation window arises when the update is complete or the new tax table is installed. You need to read the message and hit the OK button. to conclude the troubleshooting process.
With this we come to the end of this post, and we hope that the above-given solutions we've provided through this article would be great helpful for you in solving the QuickBooks payroll error code 15241. However, there can be a situation that the error continues to trouble you even after following the methods discussed above, then in that case, simply get in touch with our QuickBooks payroll customer support team by dialing our helpline i.e. 1-800-761-1787. Our experts work round the clock to provide the best possible support services, so do not hesitate to call us anytime. We will be happy to help you.
Faq's
Why can't I install QuickBooks payroll update?
There could be several reasons why you are unable to install QuickBooks payroll update.
What is Payroll Update Error 15241?
It is a common error code that generally occurs when the QuickBooks desktop file copy service (FCS) is not running properly.
How can I fix Payroll Error 15241?
To fix this error, firstly you need to restart the QuickBooks file copy service (FCS). To do this, 1. You need to press Windows + R keys together, on your keyboard to open the Run command and then type services.msc command here and hit on Enter key. 2. Now locate the QuickBooks FCS service, and hit a right-click on it and choose Restart option.
Can I process payroll if I see Error 15241 in QuickBooks payroll?
You may not be able to process payroll, once the error encounters in your software.
Fix QuickBooks Point of Sale Error 1330 using the 2 solutions provided in this post
Have you ever been in the middle of a QuickBooks installation or update, only to be hit with Error Code 1330 and left wondering why? Then this segment is going to brief you on the entire steps and procedures that are required to chuck off QuickBooks Point of Sale error 1330. This error indicates that the data signature is invalid. You might land upon this error when trying to re-install QuickBooks POS Version 7 on Windows XP. It is a complex error that can trigger an unrecoverable loss of your QuickBooks data. This error generally points to a problem with corrupted installation files, damaged system permissions, or antivirus/security restrictions interfering with QuickBooks setup. This error generally points to a problem with corrupted installation files, damaged system permissions, or antivirus/security restrictions interfering with QuickBooks setup. This error could be accompanied by a warning message saying:
"Error 1330 Invalid digital Signature".
Keep reading this segment to learn how you can spot and fix this error. You can also get on a call with our QuickBooks error support experts, and let them handle this error for you.
Brief into QuickBooks error code 1330
The QuickBooks point of sale error 1330 is usually indicates that you are having invalid data signature. There can be various reasons due to this error could be seen . This error code appears on the screen with an error message stating "Invalid digital signature". It is usually considered as an unrecoverable error, and it is advised to address it immediately. To know more about this error and its fixes, make sure to read this post carefully.
What causes the occurrence of QuickBooks Point of Sale Error 1330?
The QuickBooks error code 1330 may occur due to one or more of the following issues:
Methods to troubleshoot the QuickBooks Point of Sale Error 1330
We have listed some of the most useful solutions herein to help you to fix QuickBooks Error Code 1330. However, we recommend you to create a backup of all your company data and file before instigating the troubleshooting process.
Method 1:
Initially, open your QuickBooks and login as an System Administrator.
After that download all available Point of Sale (POS) update on your system.
Ensure that there are No other applications or programs are running on your computer.
Now open Task Manager by pressing (Ctrl+Alt+Del keys) and choose Processes tab:
qbpos.exe
QBPOSShell.exe
QBPOSDBService.exe
You need to highlight all .EXE files and hit End All option.
Next, you should close POS services active: QBPOS Database Manager vXX.
Spot the .msc files and then opt for the Services Window and find QBPOS Database Manager vXX.
Close all running POS services and Service windows.
You will have to remove the data in context to the product update folder in the system:
It is supposed to move to the Windows Start tab and then open the Windows Explorer window.
Hit a click on Show as hidden window folders.
Followed by looking for the location: C:\Documents and Settings \ All Users\ Application Data\Intuit \ QuickBooks POS XX\ Update.
Move to the File menu and then hit the Delete option that appears on the window.
Towards the end, press Alt + F4 keys or manually close the Windows Explorer dialogue box.
Getting rid of QuickBooks error 1330 becomes easy by carrying out the above mentioned methods. We hope that you find these solutions helpful in getting the ongoing error fixed. In case you are still facing the error even after performing the above steps, then feel free to call us anytime at using our dedicated helpline i.e. 1-800-761-1787. Our QuickBooks POS technical support specialists and certified professionals will be happy to assist you and fix the error for you.
FAQs
What is QuickBooks Error 1330?
QuickBooks Error 1330 is caused by invalid data signature.
What are the ways to fix QuickBooks Error 1330?
QB Error 1330 can be resolved by Running QuickBooks as an administrator, Clean Install QuickBooks, updating QuickBooks, installing the updated digital signature certificate, etc.
Easy and effective measures to fix QuickBooks error 2000
QuickBooks Payroll makes paying employees and managing taxes easier, but sometimes unexpected errors can interrupt the process. At times while updating or installing QuickBooks you might come across the QuickBooks error code 2000. When this error happens, you might get the below mentioned messages on your computer screen:
Sign-on was rejected: This error shows up when your entered credentials are incorrect.
Problem uploading data to server: When the request is not inserted or queued either.
Problem with the bank account which is not active, and you tried to transmit data: When there is some issue with your bank account number.
Additional information from payroll service: This error usually shows up when the payroll service is inactive.
Verify the bank details and resubmit the request again: When you have provided incorrect details pertaining to your financial institution.
Users may stumble upon various error codes while accessing their company files or when going for online banking through QuickBooks. Error 2000 is one such error that shows up when you try to login to your financial institution/bank through QuickBooks. However, resolving this error becomes easier if you know the correct troubleshooting measures for fixing this issue. In this comprehensive segment, we are going to discuss the various ways to fix QuickBooks error code 2000. Thus, make sure to read this segment till the end, or if you want expert guidance from a certified professional, then you can reach out to our 24/7 QuickBooks payroll technical support team and ask our cordial team to fix the error for you.
What is QuickBooks error 2000 and it’s causes?
QuickBooks error 2000 is majorly due to remote network and server problems. The error correctly puts the message to contact Financial Institution. You should note that this error is not QuickBooks internal error, instead it is an external issue and it may be of temporary nature. If the problem persists for more than 2 hours at a stretch, then in that case you need to connect with the financial institution. If they aren’t able to help, then it might affect your file.
Signs and Symptoms of QuickBooks Payroll Error 2000
In order to identify the error code 2000 in QuickBooks, you can check out the signs and symptoms of QuickBooks. Let us have a look:
Sign-in was rejected.
You might be facing problems while uploading the data to the server.
Also, the problem with a bank account is not active and you tried to transmit data. Solution verifies the bank account and then resubmit the request.
Additional information from the payroll service can also be one of the symptoms.
The error may also show up while you attempt to access your company file through QuickBooks.
Possible Causes of QuickBooks Error 2000
You can encounter QuickBooks error code 2000 due to the following factors:
Account details back to your bank account and the server couldn’t read this new change and that’s why you might get the error 2000.
At times the issue may arise due to bank feedback which is very critical problem. Slow process of information and updation of details by bank actually leads to the error.
Connectivity issues, slow speed of internet, data transferring issues, etc. might lead to this error.
You might be facing certain connectivity issues, slow internet, data transferring issues, including other network-related issues. Various network issues may contribute to the occurrence of this error.
In case of data transmission is prohibited by remote server.
If the data transmission credentials are not recognized.
Server is unable to read the updated modifications or additions.
Fix QuickBooks Payroll Error 2000 through Easy Solutions
In order to fix this error, you can simply implement any of the below mentioned solutions. We have listed below, a few of the most relevant solutions that can help you get rid of the QuickBooks error code 2000 with much ease. let us check out each of the methods one by one:
Solution 1: Ensuring that the banking login credentials are correct
When you are facing the error 2000, you need to verify the login credentials in the first place:
At first, you need to navigate to the login page of the bank’s website and then insert the user name and password.
You will get a pop-up that login credentials are incorrect, then in such a scenario, you need to make a note of the login credentials on a text file.
Now, re-insert the login credentials with extra care and also check the CAPSLOCK to avoid to enter the case sensitive password.
The next step is to click on the Forgot password link and click on it and try to reset the password, in case the same error appears again.
Once done with resetting the password, you need to try again to access the online banking in QuickBooks using the new password.
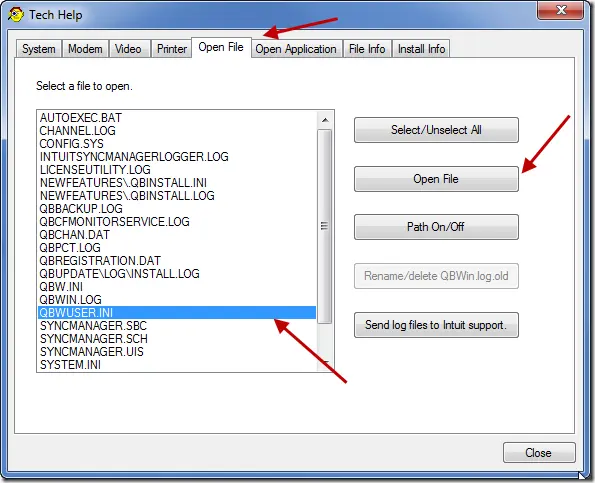
Solution 2: Modifying the file name of the QBWUSER.INI file
The first method is to change the name of QBWUSER.INI file. The steps to be followed are as follows:
To begin with, you are required to restart your computer and then log in to your system as System Administrator.
After that, open the C:\ Drive and look for the QBWUSER.ini file.
Now rename the file QBWUSER.ini. The name of the file should be changed from QBWUSER.ini to QBWUSER.old.ini.
After this you have to also rename the EntitlementDataStore.ecml file.
Once you are done with renaming the file, start the QBW user.ini file.
After you have renamed the Entitlement Data Store ECML file, make an attempt to open the sample file in QuickBooks.
From the drop-down menu, choose the Sample file and open it.
If the file opens, then it means that the error has been resolved. Otherwise, move to the next solution.
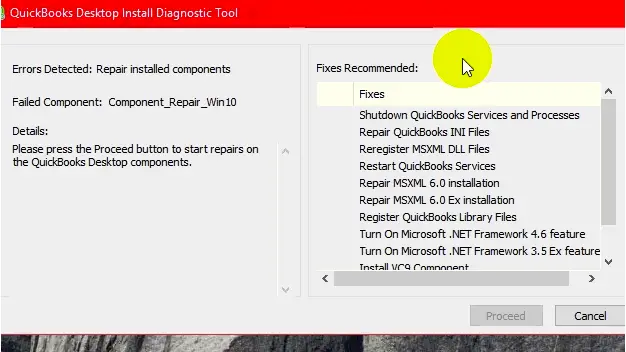
Solution 3: Use QuickBooks Install Diagnostic Tool
If the above method failed to work for you, then try using the QuickBooks install diagnostic tool to check for any network or company file-related issues. The steps to be performed in this process are as follows:
QBinstall diagnostic tool can be downloaded free from the official Intuit website.
And this tool can fix any issues with the company file or the network connection.
You will just have to download and install this tool and then let it work on its own.
After the tool is successfully downloaded and installed, you will have to open it and then the tool will diagnose and fix the error on its own.
You can also download and use the install diagnostic tool using the QuickBooks tool hub program.
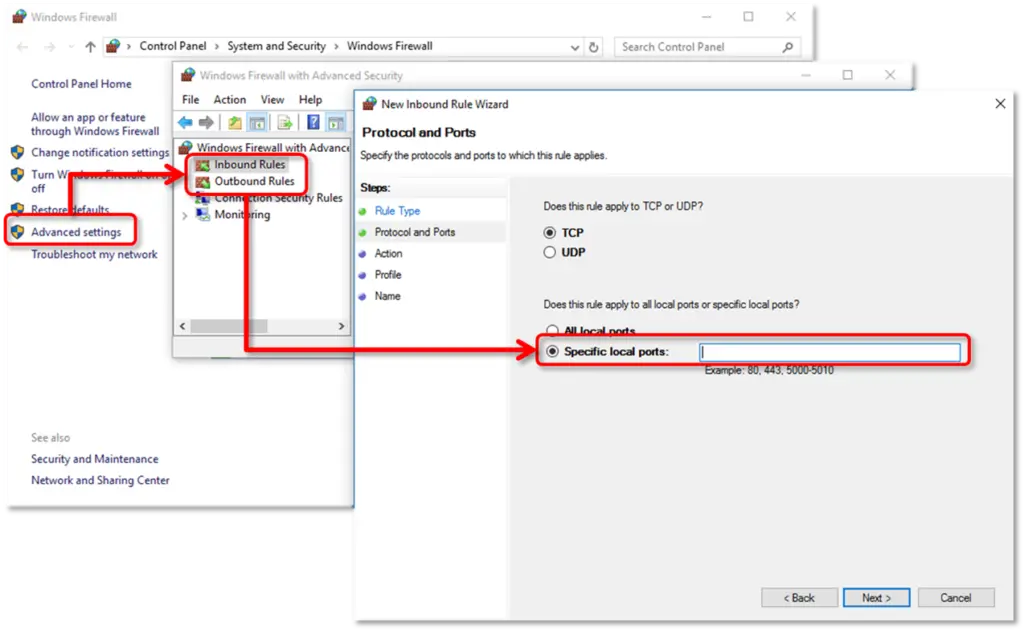
You can make an attempt to configure the firewall settings in order to fix QuickBooks error code 2000. The steps involved in this process are as follows:
Firstly, you need to open Windows Firewall with Advancedsettings.
Now, set the Inbound and outbound rules for specific programs.
Set both Inbound and outbound rules for QuickBooks.
Next process is to ensure to permit QuickBooks via all required ports.
Followed by contacting the Internet service provider.
Restart the system and then open the QuickBooks desktop.
If you encounters the connection issues due to any third-party software as a security software, then you will have to uninstall the security software or can also turn off and make an attempt to reboot QuickBooks.
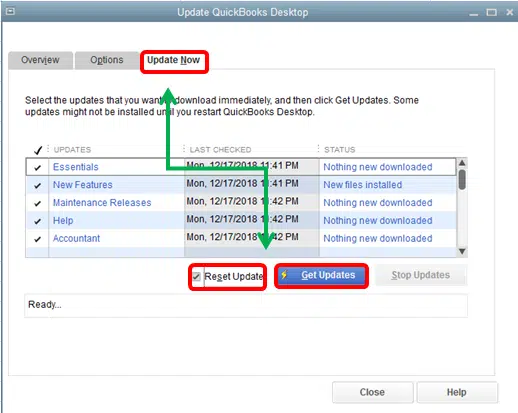
Launch QuickBooks desktop and navigate to Help menu.
After that select Update QuickBooks desktop tab.
Now, proceed to the Update Now option.
And, tap on the Get Updates tab to start the update process.
Lastly, reopen QuickBooks and examine if the update process could fix this issue.
Conclusion!
Well, this drives us towards the end of this blog post, where we hope that the information we have shared in above might be of some help in fixing the QuickBooks error 2000. In case the problem still persists on your system then you have to take assistance from the QuickBooks customer support team. Our experts will not only fix the issue but also guide you to avoid such errors in the near future.
Simply ring us a call using our dedicated support line i.e., 1-800-761-1787, and share your doubts and questions directly with our certified experts. Our team will ensure to provide the best possible support services for all your accounting worries. Help is available 24/7.
FAQs related to Payroll Error 2000
What QuickBooks Error 2000 depicts?
This company file error is caused by wrong network settings.
Can QuickBooks Tool Hub fix Error code 2000?
Yes! Tool Hub can fix QuickBooks Error 2000.
What fixes QuickBooks error code 2000?
Try any of the following: Type credentials correctly, Rename QBUSER.ini, Use File Doctor and Install Diagnostic Tools. Also, rename ND and TLG files.