Fix QuickBooks Error 1920: Database Manager failed to start problem immediately at your own:
No matter how hard you try, due to some or the other reason you might bump into various QuickBooks errors. This article is written with an intent to cater the fixation procedures for QuickBooks error 1920. Often while opening the QuickBooks database server manager, you might bump into the error code 1920 stating as:
Problem
“Error 1920: Service QuickBooks Database Manager (QBCFMonitorService) failed to start”.
It happens when the QuickBooks Database Manager Service (QBDBMgrN) fails to start during installation, often due to permission issues, leftover files from older versions, or interference from security software. Since this service is vital for QuickBooks to connect with company files, the error can completely halt your setup. There are a variety of facts related to this error that we will discuss later in this post. This article contains a full details about fixing QuickBooks error code 1920. So, Stay tuned until the end to find out numerous facts related to this error. However, if you feel the need to consult a accounting and bookkeeping professional, do not be hesitate to call us at any time. Contact us using our helpline, i.e., 1-800-761-1787 and you will be connected with our QuickBooks error support experts who are readily available to help you.
What is QuickBooks error code 1920 and it's causes?
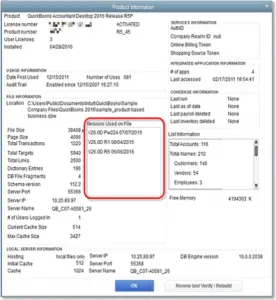
Install Error 1920 (QBCFMonitorService) failed to start error indicates failure in opening the QuickBooks database server manager. This error is often seen when the database server manager is unable to access a hard drive on the desktop in order to create a connection to company files. When the QBDBMS tried to access a drive on the desktop and was unable to, as a consequence of which the service would not start properly.
What leads to the QuickBooks error message 1920?
There can be a couple of causes that would end up in database server manager failed to start error. A few of the common causes of this error are as follows:
You can end up in this error if a malfunction in the operating system occurs.
If the installation or un-installation of QuickBooks failed.
Invalid entries in the registry of the Windows can end up in this issue.
Any sort of virus or malware attack.
You might also face similar issue, due to power failure or improper shut down of the system.
If the important files of QuickBooks got deleted mistakenly for some reason, then it could end up in this error.
QuickBooks installation error 1920 is observed as the database server manager isn't connected with the your company file. If you're trying to install QuickBooks onto your computer to the first time and you encounter this problem In that instance, you should install it as a Windows user with administrator rights. Additionally you can perform the steps listed below to fix this issue quickly.
CASE 1: When you are trying to install or update QuickBooks
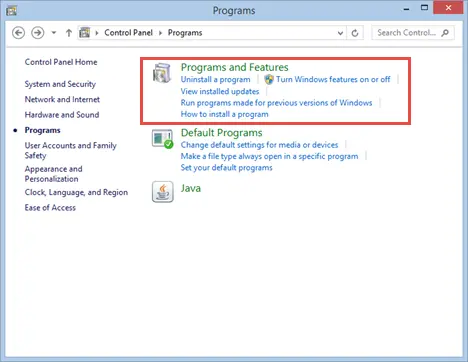
Press Windows key + R keys and then look for and open the control panel.
Choose the programs and features or uninstall a program.
Opt for QuickBooks desktop form the list of installed programs.
Go for uninstall or change option and follow the onscreen instructions.
Step 2: Renaming the installation folders
In case you do not see the application data or program data folder, then you need to display the hidden files and folders or look for files using Windows. Also, if you are having other intuit apps installed on the system, then make sure to only uninstall and rename the QuickBooks version folder found in the Intuit folder.
Navigate to the installation folders and then refer to the chart below:
CASE 2: When you are trying to update QuickBooks database server manager on the server system
You can carry out the steps below if you don’t have the QuickBooks on the server, but share the file over the network using the database server manager.
Step 1: Uninstalling QuickBooks database server manager
In this process, press Windows key + R keys.
Enter the appwiz.cpl and hit OK after the run dialog box appears.
At last, select uninstall/change and then carry out the on-screen instructions.
Step 2: Renaming the installation folders
This step is similar to that in the above process. If you are unable to see the application data or program data, then you need to display the hidden files and folders. Also, if you have other Intuit apps installed on the system, you should only uninstall or rename the QuickBooks version folder found in the Intuit folder.
Visit the installation folders and refer to the chart below:
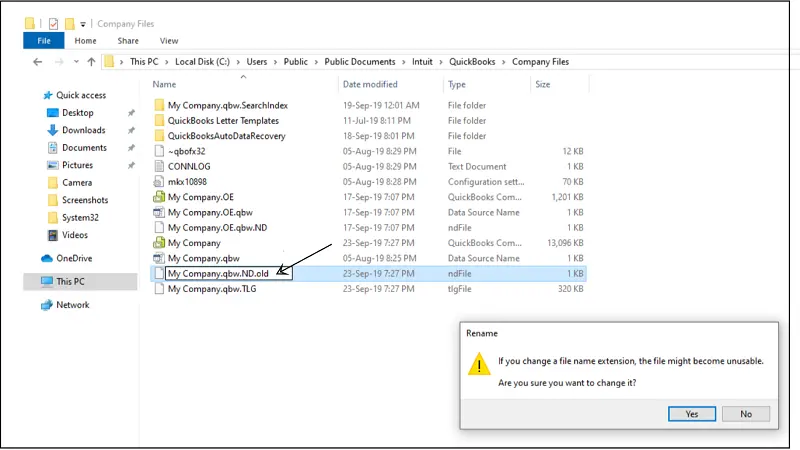
Now press the Windows key and R key to open the Run command.
Enter the location of the folder, and hit Enter key.
Right-click the folder and select rename.
End the process by renaming the folder to .OLD.
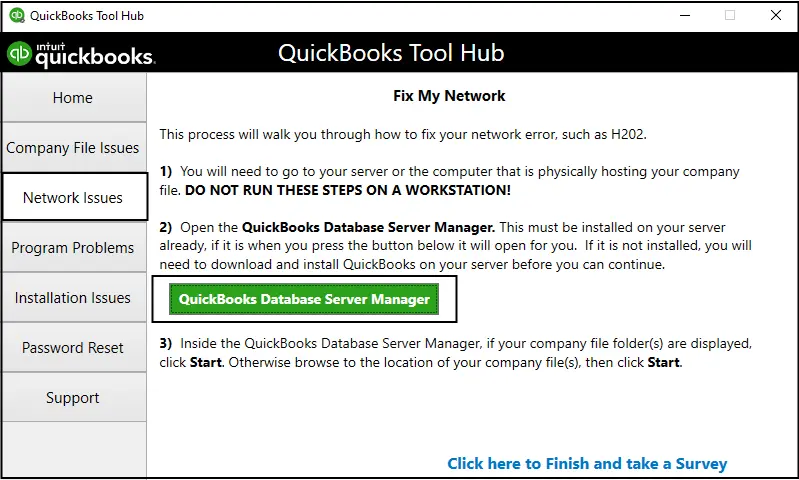
Step 3: Reinstalling QuickBooks database server manager
The last step in this process is to reinstall the QuickBooks database server manager and set up file sharing. The database server manager is usually used to run the multi-user access in QuickBooks desktop. This server manager assists in working with the same company file at the same time. The steps to download and install the database server manager are as follows:
At first, you will have to download and install the database server manager on the server system. The server system is the computer where the company file is hosted.
Note: If you are a professional accountant, bookkeeper or host more than one version of QuickBooks desktop on the network, then it is recommended to install them in order. This means to install the oldest version first and the recent one at the end.
You are then required to terminate all the open programs on the server device, also QuickBooks.
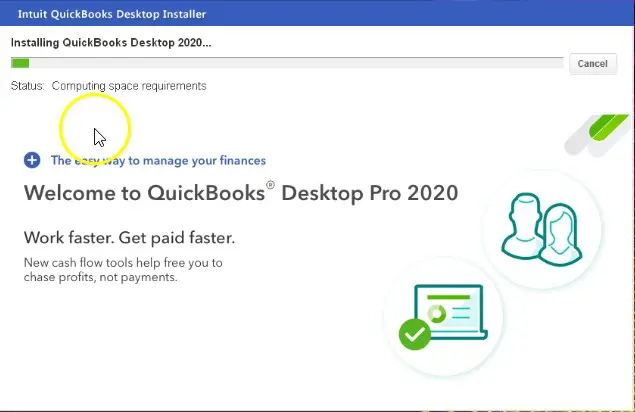
Now open the downloaded file Setup_QuickBooks.exe file and install it.
Follow all the onscreen instructions one by one.
QuickBooks will recommend choosing an install type, and then select of any of custom or network options. And then, move to the next tab. Also, ensure not to choose express.
Next steps is to click on preferred option for the network setup and click on next. Both options will install the database server manager.
If you want to have to both QuickBooks desktop and database server manager on the server system, then we will advise you to click on I'll be using as well as storing QuickBooks desktop on this device.
In case you want only database server manager on your server system, then make sure to click on I will not be using QuickBooks desktop.
And move ahead with the onscreen prompts, and when you are all set, then click on install. And Windows might ask for permission.
We wrap up the post over here, with the hope that the methods and the information we have discussed in above might have aided you in tackling the QuickBooks error message 1920. However, if by any chance the error persists or continues to bother you, then make sure to consult a QuickBooks enterprise support team right away. Feel free to ring us up at our 24X7 support helpline i.e. 1-800-761-1787.
QuickBooks Error 1920 - FAQs
What is QuickBooks installation error code 1920?
QuickBooks error code 1920 belongs to the subset of installation errors that are associated with the non-functioning of QuickBooks database manager server when the QuickBooks installation is commenced.
How do I manually start the QuickBooks Database Manager Service?
The manual procedure to start QuickBooks Database Manager Service is discussed below: 1. Start by tapping on the Windows + R keys so as to open the Run box. 2. The next step requires typing "services.msc" and hitting Enter. 3. Proceed by searching for the QB Database Manager Service in the Services window. 4. Followed by right-clicking on the QuickBooks Database Manager Service. 5. Later on, tap on Properties and then move to change the Startup type toAutomatic. 7. Now hit on Start button. This action will manually start the service. 8. Finally, tap on Ok.
Whenever you feel that your work is going great with QuickBooks accounting software, then at that very moment, you might be proved wrong by the errors that might pop up on your screen due to some or the other reason. One such error that is often reported by users is the 'QuickBooks error code 15240'. This particular error can be pretty much annoying. It is basically an update error that can trouble you while updating the QuickBooks desktop or also at the time of updating the payroll software. Moreover, this error might also be seen when there is mis-configuration with internet explorer settings, time and date settings, etc.
This error code is always accompanied by any of the two error messages:
Warning:
QuickBooks error 15240: HRESULT XXXXX the QuickBooks updated did not complete successfully
Warning:
QuickBooks error 15240: HRESULT XXXXX the payroll update did not complete successfully
Important
You might also encounter any of the below errors while updating the QuickBooks Desktop or downloading a payroll update,
What is QuickBooks payroll error 15240 and why it appears?
To understand it better, we can say that QuickBooks update error 15240 may appear when you try to download any update for the software. This error might also hamper the work and can be encountered often. There can be a handful of factors leading to such an error, which we will be elaborating later in this article.
Considering the trouble that you are facing, we have come up with this technical piece of information, where we will be talking about the ways to resolve this type of payroll issue. Make sure to read this segment carefully till the end. You can also consult our QuickBooks payroll customer support team to get an instant resolution of this error and save your precious time and effort.
What may trigger the QuickBooks error 15240?
As we mentioned above, there can be a couple of causes for this error. Let us have a look at some of the common factors leading to the error:
You might also face this error in case of damaged windows or corrupted registry files.
There might be a damaged QuickBooks update.
Signs and symptoms of QuickBooks error 15240
In order to identify the QuickBooks error code 15240, it is important for you to check out the signs and symptoms enlisted below:
The first sign can be if QuickBooks is not able to install the latest update.
Your payroll update has failed
If you are unable to do payroll in your QuickBooks
This error usually ends in hindering the payroll update, and also, as a consequence of this error, the system crashes frequently. The Windows might also run sluggishly and do not or give the slightest response to the mouse and keyboard inputs. It might also freeze for a few seconds, which can be annoying as hell for you.
Methods to Fix the QuickBooks payroll update error 15240
QuickBooks payroll provides the payroll updates to the customers, and gives the current and correct rates and calculations. So, if you are unable to transfer the most recent payroll update, then the wage of the worker created by the software might not be accurate. Or you might also face certain irregularities resulting in hampering the productivity of the business. It is very important for you to ensure that the correct and timely payment of salaries are made. There can be a couple of solutions that you can perform to fix the QuickBooks error code 15240. Let us check out each of the methods one by one:
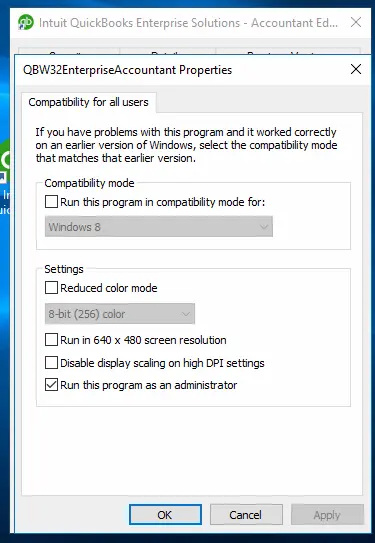
Method 1: Run your QuickBooks as admin rights
Many times, you need to access the QuickBooks using the admin credentials, and in case you have not logged in as admin, then it is probable to encounter the error. You need to carry out the steps below:
The initial step is to visit the QuickBooks icon on the desktop and right-click the same.
You need to select the Run as Administrator option.
Next, open the Properties and check the Compatibility for all users.
Method 2: Verifying the Internet Explorer settings
In case running QuickBooks as admin doesn’t work, then you can verify the internet explorer settings. The steps involved in this process are as follows:
To begin with that, you need to choose the gear icon and then select the Internet options.
You need to navigate to the advanced tab.
Under the Security tab, you need to mark Use SSL 2.0 and Use SSL 3.0.
The final step in this process is to select Apply and then hit the OK button.
You can also check the third-party firewall settings to get rid of this issue, as many times the firewall might hinder the smooth communication of the software with other files. The steps involved in this process are as follows:
Consult the developer of the third-party firewall for instructions on the process to adjust the settings and permit QuickBooks to download and install updates.
Also, ensure the following files have access to go through the firewall:
Qbw32.exe
Qbupdate.exe
You are also supposed to verify that ports 80 and 443 are not disabled.
Method 4: Checking the system date and time settings
For this, you are supposed to choose the time display on the system and then select the change date and time settings.
Method 5: Reinstalling the software using Clean Install tool
This process can help you in clearing all the junk that might have accumulated over the period of time with continuous use. You must ensure to have a complete backup of the company file, in order to avoid any kind of data loss. The steps involved to perform a clean install of QuickBooks desktop are as follows:
Firstly, uninstall the QuickBooks desktop from the system.
Renaming the installation folders by downloading and running the QuickBooks clean install tool.
Reinstall the QuickBooks software.
You can also run the clean install tool using directly from QuickBooks tool hub.
Method 6: Verifying that the security software settings are tuned in correctly
Often the security software and anti-malware software might interfere with the working of QuickBooks, resulting in such an error. You will have to ensure to configure the settings of the software, and make the process smooth in QuickBooks.
Method 7: Adding Windows permissions to QuickBooks installation folders
This is the last method, where you can add the Windows permissions to QuickBooks installation folders in order to fix the error by carrying out the steps below:
At first, close your QuickBooks.
Visit the C:\Program Files\. And for 64-bit uses, C:Program files (x86).
Hit a right-click on the Intuit folder and then choose the properties option.
Now move to the security tab and then select advanced option.
You need to ensure that the owner of the folder is the user group. If not, then you will be required to take ownership of the Intuit folder, by carrying out the steps below:
Select change beside the owner name on the advanced security settings Window.
Type users in the enter the object name to select field, and also select the check names.
The next step is to hit the OK button.
And also, mark replace owner on sub-containers and objects.
Once done with that, hit Apply and OK tabs.
Select the users on the permissions Window and then click on the full control option.
Select the Apply and OK tab.
You should try downloading the updates, and if the error repeats, then carry out the above steps for the following folders:
Carrying out the above mentioned steps can help you in getting rid of the QuickBooks payroll error 15240 up to a great extent. However, if you are still having trouble with something, then do not think much in calling us anytime. Connect with us right away using our dedicated support line i.e. 1-800-761-1787 and speak to our QuickBooks enterprise customer support team today. Feel free to reach out to us with any of your QuickBooks queries, as you will definitely get the most satisfied answer to your query here. We are available to help you 24/7.
FAQs - QuickBooks Error 15240
How to fix Error 15240 in QuickBooks Desktop?
Error 15240 in QuickBooks desktop can be fixed by: 1: Run QuickBooks as an administrator. 2: Configure the Firewall. 3: Clean Install QuickBooks. 4: Configure the Internet Settings.
What causes QuickBooks Error 15240?
The principal causes behind Error 15240 are: 1. Not being logged in as a Windows admin. 2. In case the download link that has been specified is incorrect, the error may appear. 3. Using multi-user mode in the terminal service settings can also incite this error. 4. The Windows registry files or keys might be corrupted.
What is QuickBooks 15xxx series related to?
Error codes 15xxx comprises different errors, all of which are related to the update process in QuickBooks.
Learn how to access your data remotely from anywhere using QuickBooks remote access:
QuickBooks has marked its presence in the accounting industry in the past few years. This accounting software has managed to maintain its reputation, and has managed to be on top. QuickBooks software is loaded with functionalities and features. Businesses in the last few years have gone through significant changes. One of the most notable changes is the transitioning to work from home. And the change required tools and technologies to enable their resources work from remote locations without impacting the productivity. Small business owners and accountants, too, needed programs that allowed them to work from any location.
Intuit, a leading accounting software manufacturer, kept up with the changing business scene and presented finance and accounting management solutions businesses were looking for – QuickBooks remote access. If you are in search of an easy but effective procedure to access QuickBooks desktop remotely, then in that case, check out this particular blog carefully. With the growth in demand of this software, QuickBooks remote access feature has become an essential tool rather than just being a choice, as you can access your QuickBooks data no matter where your location is. But how does it work? Considering this question, we have come up with this article where we have explored the simplest ways to access QuickBooks desktop remotely. So, stick to this article till the end, and read the article carefully. Let’s dive in!
However, if you are seeking for expert assistance from a certified professional, then you can feel free in calling us anytime. We can be easily reached through our toll-free helpline number i.e. 1-800-761-1787, and our experts will be delighted to assist you in accessing and making the most effective use of QuickBooks desktop remote access tool on your system.
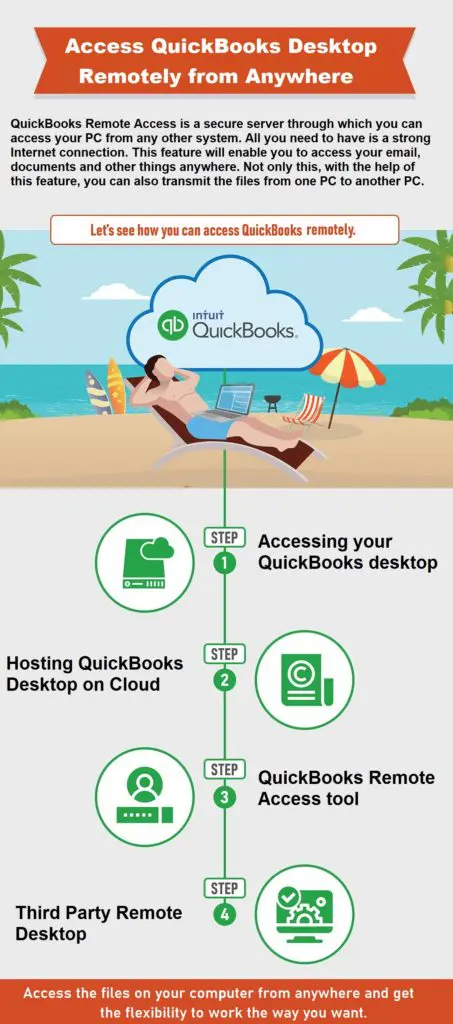
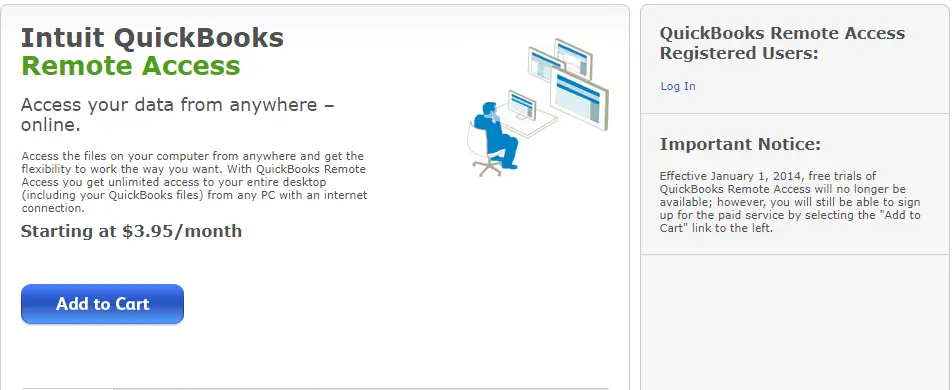
What do you understand by QuickBooks Remote Access?
QuickBooks desktop remote access allows accessing the accounting program through a secured server on the web from any location. With the freedom to use QuickBooks remotely, the users now have access to their documents, emails, and other significant information all the time. It assists in lessening travel expenses and office infrastructure costs. Furthermore, remote access allows multiple users to collaborate and work on one project, helping business owners and managers keep track of the activities of their co-workers.
The remote access tool requires a strong internet connection. This feature also helps in transmitting the files from one system to another. There can be countless benefits of QuickBooks remote access, which will be discussed later in this segment.
Important: Unfortunately, after May 31, 2020, access to add-on services has been discontinued for QuickBooks desktop for Windows 2017. This also includes the versions of QuickBooks desktop pro, premier, and Enterprise solutions 2017.
Multiple Benefits of Using QuickBooks Remote Access
Talking about the benefits of QuickBooks remote access, the list is huge. Let us check out the benefits of this feature caters to, before learning the steps to access it:
The first benefit of QuickBooks remote access is to transfer file or folder between systems.
It saves travel time and infrastructure costs, which would be required to accommodate and adjust accounts.
You can also copy and paste between different PCs, both locally and remotely.
It reduces infrastructure expenses and travel time.
This also permits various users to work together on the same file of QuickBooks.
You and other business partners can monitor the accountant’s operations in your QuickBooks.
Accessing QuickBooks desktop trough remotely allows users to stay indoors and avoid the impact of the pandemic.
It becomes easy with the QuickBooks remote access to track the various activities of accountants.
We can also print documents from remote PC to a local printer with much of ease.
You should not worry about your data as the service providers handle the cloud servers.
We get the below listed option, in case of QuickBooks remote access functionality. Let us check out those options:
Switching to QuickBooks Online:
A popular software offered by Intuit, QuickBooks works on the cloud. Users can subscribe to one of the different plans depending on the user counts they want to work with. Opting for QuickBooks Online rather than QuickBooks Desktop is beneficial in many ways as QB Online provides:
Simple QuickBooks shared access to the data and files among multiple users
Efficient online chat support
Robust data security with no backup requirements
As we all know that QuickBooks online is one of the finest solutions from Intuit that completely carry out its tasks on the cloud. This can be accessed anywhere, and all it requires is an active internet connection. The number of employees working together can be decided according to the plan one opts for. QBO also safeguards data from unauthorized users, viruses, and malware attacks, as it offers countless security measures and stores data in remote servers. The only drawback of QuickBooks online is that it do not offer all features of QuickBooks desktop. It is quite different from the desktop version.
Hosting QuickBooks Desktop on Cloud:
Another option is authorized hosting of QuickBooks desktop software on third-party servers. Intuit permits authorized hosting of QuickBooks desktop software on third-party servers. This means that the QuickBooks installed on the server of the hosting providers can be accessed by authenticated users from anywhere using the internet. All the features of the desktop version are available for us and also it supports cross-device operations. This service gives an edge to accounting professionals, as the extra hassle of maintenance of the software is taken care of by the service provider. We also get multi-user collaboration and easier integration of QB add-ons. The security issues are also taken care of by the service provider.
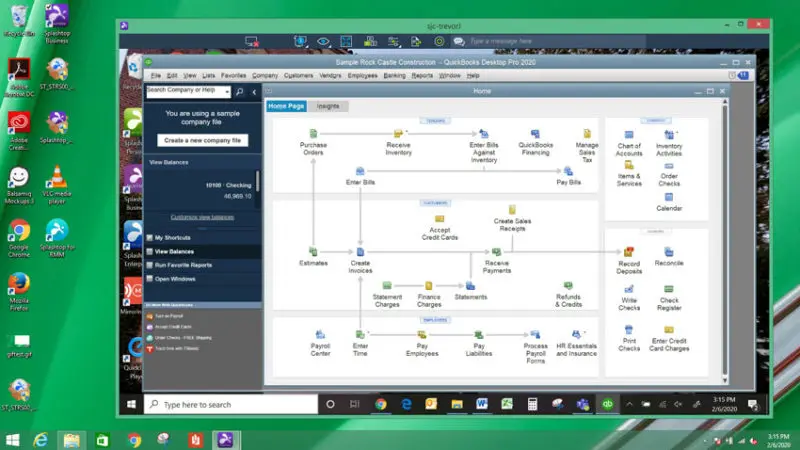
QuickBooks via Remote Access Tool:
This tool basically allows us to connect with the remote system that has the QuickBooks software installed in it. This tool can be easily accessed on the Intuit official website. Also, many third-party software's are available in the market having similar functionalities. This can perform basic tasks such as copying files between local and remote systems, printing files on the remote server using the local printer, etc. This software basically works on the Cisco WebEx tool that supports communication services and also online meetings.
An add-on in QuickBooks, the remote access tool allows users to access the software from different locations. Some of the benefits of the QuickBooks remote access tool are:
The remote access tool allows users to print locally and access data files.
The users can copy files and folders between remote and local machines.
The QB remote access tool offers compatibility, security, and integration.
Cost of Accessing QuickBooks Remotely
In order to access QuickBooks remotely, we will have to accept the fact that it is not free of cost. We will have to pay a certain amount for this service. This involves two plans namely:
QuickBooks Access ($99.95/month)
Full Desktop Access ($149.75/month)
Security and Reliability
The accounting activities are confidential for each business, and the industry they belong to doesn’t matter. Also, there is a need for a security check at each level. The need for a reliable medium to source information and carry out accounting activities for both online as well as offline operations, can’t be denied. QuickBooks remote access tool and QBO are efficient and reliable, which makes them the best suitable option for the current situation. And also, we can easily rely upon these tested solutions.
If we are going for the cloud-based solutions like QuickBooks online or hosting, then the security is reliable. Intuit authorized commercial hosts are screened to make sure that the data of the client is completely safe. Many service providers practice 256 bit encryption. Also, the encryption level with QuickBooks remote access tool and online is more or less the same. Or if we are going with other remote access tools, then the security concerns vary on the abilities of the tool.
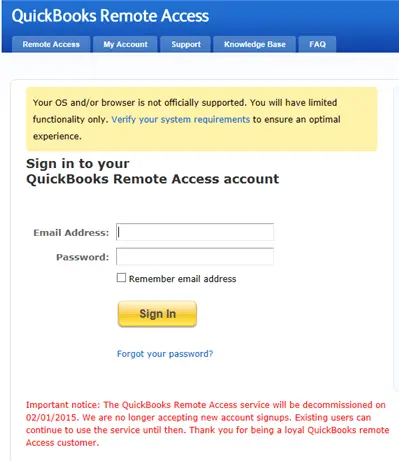
Step 2: After doing that, log in to the Account on QuickBooks remote access website. Having logged in to your QuickBooks account, you are now supposed to launch the web browser on the system on which you want to Access QuickBooks remotely on.
Step 3: The next step is to download the Remote access tool installation file. Followed by clicking on setup computer.
Step 4: Now, in the nickname field, you are supposed to Enter a computer nickname and hit Next tab.
Step 5: Later on, place a checkmark next to the Options to initiate every time a remote session is logged into.
Step 6: We will get a few options namely: “Use full-screen view by default”, “Disable this computer’s keyboard and mouse”, “Automatically reduce screen resolution to match”, and “Make this computer’s screen blank”.
Step 7: And then place a Check mark next to the applications to access remotely on the system. For a minimal monthly fee, we need to access only the QuickBooks Accounts. And then hit a click on Next tab.
Step 8: You now have to check the box for the Verification option to use. We can either Enter a phone number or Enter a passcode. And after entering the information respectively, hit Finish tab. And you are good to go.
Connect to QuickBooks Remote Access from Another Location: Alternative Approach
The alternate way to access QuickBooks remotely, the user can check out the steps below:
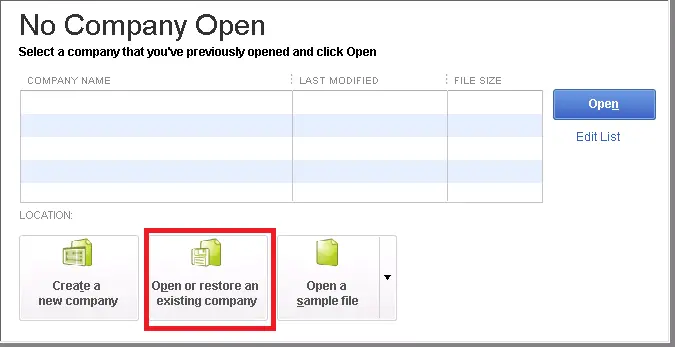
Open a web browser and log in to your QuickBooks account on the official website.
Go to the box next to the defined Computer nickname.
In the Action column, select ‘Connect’.
Enter the Passcode or use phone authentication and authorize your computer.
Select ‘Remote Access’ and then click ‘End the Remote Access Session’.
Why should you choose QuickBooks hosting?
QuickBooks hosting is an excellent way of boosting business outcomes. Hosting QuickBooks desktop on the cloud has multiple advantages compared to QuickBooks online. The following are some of the most notable advantages of QuickBooks hosting over QB Online.
QuickBooks Online
QuickBooks Hosting
At times makes the accounting process is slow due to increased traffic
Multiple hosting providers provide QuickBooks hosting
Outsourced and managed by Intuit
More choices for packages, benefits and costs from multiple providers
So, this brings us to the conclusion of this article. Within this post, we have included everything you need to know about accessing QuickBooks from remote locations. However, in case of any difficulty or if you are facing any sort of error in the entire process, then don't hesitate in calling our professionals anytime. If you need additional help or have any queries – you can simply ring up a call using our support number i.e., 1-800-761-1787. Our QuickBooks desktop support team will handle all the issue for you. Our U.S based certified experts and accounting professionals will be happy to provide you feasible services.
Frequently Asked Questions (FAQs)
What are the requirements for using the QuickBooks Remote Access feature?
The major requirement for using the remote access feature of QuickBooks are: 1. QuickBooks should be installed on the remote computer. 2. You must have a hosting service. Otherwise, mapping the network drive is crucial.
What is the purpose of remote access?
The purpose of using this feature is to allow users to access their system over a network from any place.
Is QuickBooks remote access still available?
Yes. You can still take the benefits of remote access from different locations by using the QuickBooks remote access feature.
Learn how to Fix QuickBooks error 1618 when attempting to install or update:
Bumped into QuickBooks error code 1618 and still not sure what to do? Well, if that is the case, we are here to rescue you. It is an often seen error when you try to install QuickBooks desktop on the system. You might come across such an error during the installation or updating the programs. This error is accompanied by an error message i.e., "There was a problem installing Microsoft Runtime library". Well, you might find this error to be time consuming and annoying. Considering that, we have come up with this post, where we will be discussing the signs, causes, and fixes of this error in depth. So, make sure that you stay tuned with the error.
Moreover, you can contact our support team, in case you need any technical assistance to resolve this QuickBooks error 1618 from the root. Feel free to give us a call at our dedicated support line i.e., 1-800-761-1787. Our QuickBooks error support team will be there to assist you.
Insight into QuickBooks error 1618
While installing QuickBooks or trying to update the software, an error message flashes on the screen stating:
Feature transfer error
Error: There was a problem installing Microsoft Runtime Library (Error 1618).
Warning
Error 1618. “ERROR_INSTALL_ALREADY_RUNNING” error message when you run the Setup program to install QuickBooks programs."
This error is also seen when there is more than one Windows installer instance running at the same time and also blocking the installation process. It should be noted that the Windows installer is the basic system requirement for installing the program. It is also very important for us to install, update, uninstall, and repair the system application. Later in this post, you will explore the symptoms and causes of this QuickBooks error code 1618.
Signs and symptoms of QuickBooks error 1618
You can identify the error code 1618 in QuickBooks by considering the following signs and symptoms:
The error code 1618 appears on the screen along with the QuickBooks runtime library error message.
Now that you are aware of the causes and symptoms of QuickBooks Error 1618: Another program is being updated, it is the right time to explore the fixation methods. We have jotted down some of the best solutions that you can implement and get rid of the issue with much ease. So, let us have a look:
Method 1: Updating the version of Windows installer
You can update the Windows installer in order to fix this issue. The steps involved in this process are as follows:
You need to first log in as System Admin.
Further, look for the Windows installer is updated.
Move to My Computer.
Open C:\WINDOWS\system32 and then right click the exe file.
Pick the properties and the version.
Later on, you will find all the information related to the Windows installer’s version.
Update the software if updates are available.
Reboot the system.
Method 2: Creating a backup for the Windows registry
Another method is to create a backup for the Windows registry. The steps to be followed are listed below:
The initial step is to hit a click on the Start tab from the Windows taskbar.
Open the Run command with Windows + R keys.
Type in regedit and then click OK button.
Moving ahead, visit my computer and open the file menu and export option.
Choose all option in the export range.
Once done with that, save the created registry backup on the desktop and then delete the keys.
Make a note of the fact that the deletion of the keys will also delete all the sub keys.
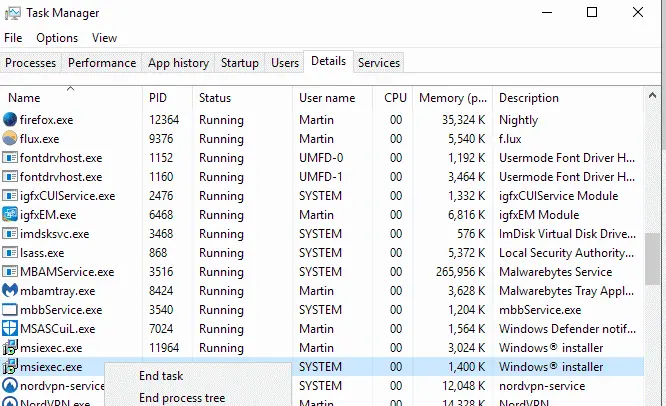
Method 3: Close MSIEXEC.EXE running in the background
If the above method failed for you, then you need to close MSIEXEC.EXE running in the background. The steps involved in this are listed below:
For this, open the task manager by pressing Ctrl + Alt +Delete keys.
Go for the processes tab and sort the processes in alphabetical order.
Pick MSIEXEC.EXE and then hit a click on the End process option.
Lastly, close the task manager window and try to install QuickBooks desktop.
Method 4: Installing and run QuickBooks install diagnostic tool
Installing and running QuickBooks install diagnostic tool also works for resolving such an issue. This tool is designed and developed in a way to fix install errors. The steps to be followed here are as follows:
Close all open applications, and also close QuickBooks desktop.
Method 5: Reinstalling the Microsoft runtime libraries via the Microsoft Visual C++ Redistributable Package
This is the last method one can try to fix the issue. It is recommended to contact a Windows expert to carry out this process, as it might require knowledge of Windows operating system.
Download the MS Visual C++ redistributable package.
Next, save the downloaded package on an easily accessible location.
Rename the package as vcredist_X86.exe or vcredist_X64.exe
Pay heed to on-screen prompts.
By the end, you need to restart the system and reinstall QuickBooks.
Recommendation!
It is expected that the above steps will be enough to fix the QuickBooks error 1618. We have tried to cope up with all possible solutions that you can implement without any technical assistance to tackle this error. However, in case the error continues to trouble you, it is recommended to consult our QuickBooks desktop support team by making use of our dedicated helpline i.e., 1-800-761-1787. Our experts will be there to assist you and fix the error on your behalf.
FAQs
Q.1. What causes Error 1618 in QuickBooks?
A.1. Some of the major causes that may provoke this error are: 1. QuickBooks software installation files are corrupted. 2. There may be corruption in the Windows registry. 3. A virus attack on the system may also instigate Error 1618. 4. If the QuickBooks installer file got deleted due to some reasons, it might lead to Error 1618.
Q.2. How do I know if Error 1618 has affected the system?
A.2. The error comes up in the form of an illustrative error message. Besides, it has various signs and symptoms associated with it. These include: 1. The installer for the QuickBooks program continues to freeze. 2. Windows start functioning sluggishly. 3. The PC starts malfunctioning upon the advent of this error.
Learn the best ways to Resolve Intuit Data Protect backup failure issue
Hunting for the right process to fix Intuit data backup failed issue? Or Unable to back up with Intuit Data Protect and don’t know what to do? Well, all your worries end with this technical piece of writing. Often it happens that when you try to backup with Intuit data protect, you might fail to perform the entire process.
As a consequence of various factors, you might encounter these error messages:
Error
Message
Intuit Data Protect Backup Failed:
Firewall or connection issue
Intuit Data Protect Backup Failed:
One of the configuration files is damaged or corrupted
Intuit Data Protect backup incomplete:
Files did not backup because they were open or not reachable
The good news is that this error is easily resolvable. The removal of the Intuit Data Protect Backup Failure error could require a little knowledge on Intuit's Data Protect, which we will be providing later in this segment. Get a better grip of this technical bug by going through the segment with ease. However, if you don’t want to chuck off the issue manually, then in that case our QuickBooks support team is available to assist you.
Dial our helpline i.e. 1-800-761-1787, and our team will help you in getting rid of the Intuit Data Protect Backup Failed snag without any further mess. Just share your issue with us, and we will help you to get rid of the error with ease. We work relentlessly to help you to achieve success on all sorts of errors.
Well, before you learn all the solutions to get rid of this Intuit Data Protect Backup Failed: Firewall or connection issue, it is more sensible to first find out what Intuit Data Protect is. Intuit Data Protect is commonly known as IDP. It is a subscription service by Intuit. This subscription basically permits you to backup the vital business information online. The best part is that the backup is taken on secure servers. Intuit Data Protect can be integrated with 2016 and also with the later versions of QuickBooks with much ease. When this IDP gets activated, it takes the backup of the data automatically, considering the preferred time every day. It is also capable of taking reinforcements of the information. But at times due to various factors, the IDP fails to take the backup. In this scenario, you usually panic, considering which we have come up with this article. So, let us check out what can be done to deal with this error.
What triggers to Intuit Data Protect Backup Failed problem?
As stated above, the failure of Intuit Data Protect backup can be a consequence a various factors. One of the most commonly seen causes if that when the application can't access the file which is to be backed up. The list of triggers does not end over here, let us have a look on a few other causes:
In case the company file that you wish to backup is already open on some other workstation, you might end up in a backup failure.
Another cause can be, if the ibuenghost.exe process runs on the local user on Windows, rather than the admin user.
If the operating system makes use of some other file instead of NTFS, you might end up in this bug.
Methods to get rid of the Intuit Data Protect Backup Failed issue
Intuit data protect can be an great asset, especially when it comes to daily automatic backup of the data. But at times this also might fail, in such cases carry out the manual procedures which we have discussed below get rid of the error. So, let us find out what those procedures are:
Solution 1: Ensuring that the Windows firewall isn't blocking the Intuit data protect
Many times, it happens that the firewall blocks access for security purposes. In such a scenario, you might end up in failing to backup with Intuit data protect. So, it is important to check the firewall and ensure that important files are allowed. The steps involved in this process are as follows:
Step 1: Adding important files to the Windows firewall
The initial step is to press Windows key and then type in the Firewall in the search field.
Go for the Allow an app through Windows firewall option. And then allow another app option is to be selected.
Pick the Browse option and move to the path Program Files(x86)Common FilesIntuitData Protect.
Moving ahead, you need to opt for QBIDPservice.exe, followed by selecting Open option.
Later on, choose the Network types and choose the Private checkbox. This will now require you to click on Add.
Repeat the steps 4 and 5 for the files IBUenghost.exe and IntuitDataProtect.exe. In case a message appears on the screen saying that the files exist, then you are all set.
The point to be noted here is that, the third-party antivirus software present on the system can also block the important files. So, you need to ensure that these files are permitted.
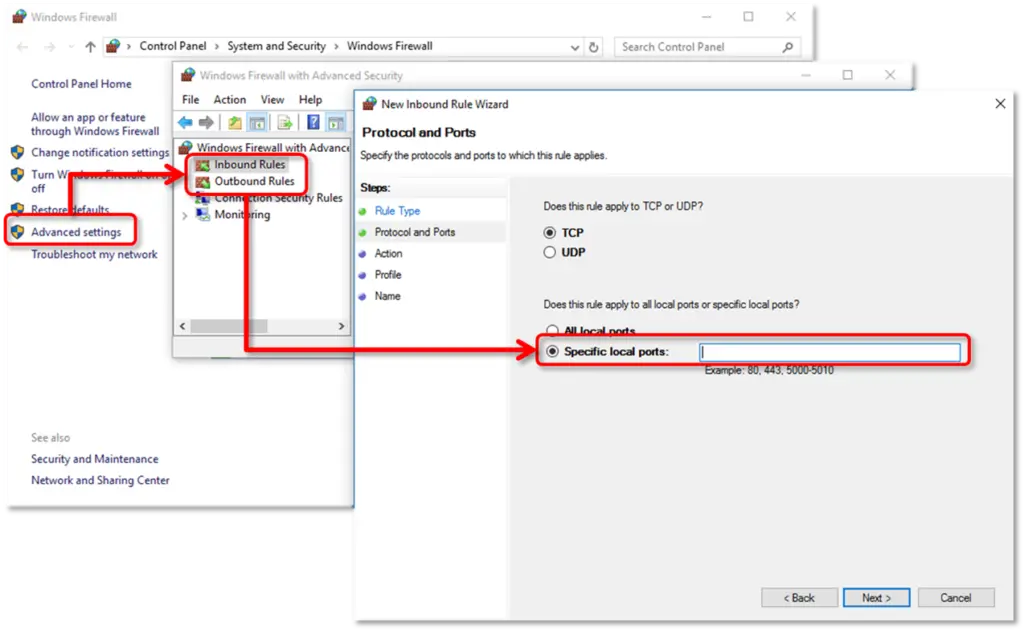
Press the Windows button to access the Start menu.
Type Control Panel in the search field.
Now navigate to the System and Security option.
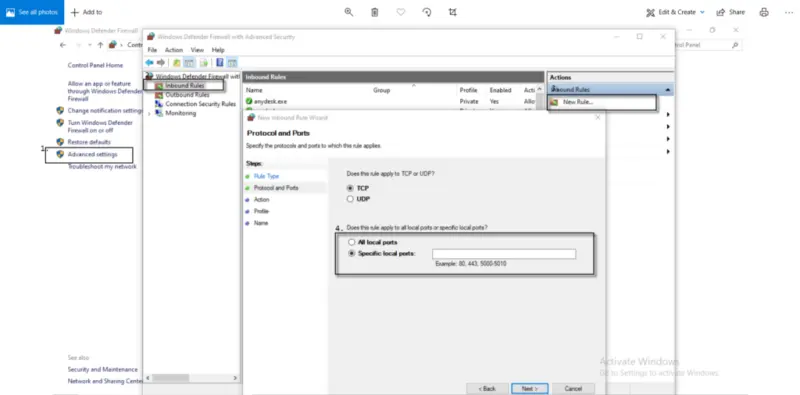
Go for Windows Firewall program and then choose Advanced Settings.
Opt for Inbound Rules settings, from the left side of the Advanced Settings window,
Next, select New Rule from the right side of the same window.
Enter the ports manually and then hit on Next option.
Incoming Port: 80
Outgoing Ports: 443, 16841
Here you need to follow the on-screen instructions until it gets close.
Repeat the same steps for the Outbound Rules.
Step 3: Add Intuit Data Protect to the trusted sites
If the above steps didn't work, then you can add Intuit data protect to the trusted sites.
You need to ensure that the Intuit websites are set as trusted sites in Internet Explorer. The steps involved in this process are:
Initially, press Windows key and then type in Internet options in the search bar.
Choose the Security and trusted sites options, respectively.
Go for the Sites option and then add the following websites. You can either copy and paste or type manually. After that, select the Add option for each of the sites:
backup.com
*.intuit.net
*.intuit.com
*.intuitdataprotect.com
*.quickbooks.com
workplace.intuit.com
emerald.backup.com (a new trusted site that updates your Intuit Data Protect certificates)
Now you need to ensure that the required server verification for all the sites in this zone is unchecked.
Hit a click on the Close option and then hit OK button.
Moving ahead, you need to ensure whether you are able to open the Intuit Data Protect certificate site or not. In order to avoid any further backup errors, the site should open up.
Finally, make an attempt to Back up with Intuit data protect.
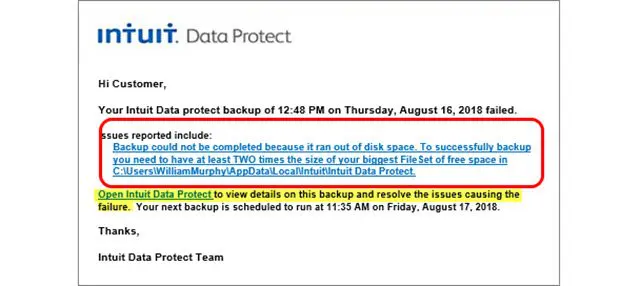
Solution 2: Freeing up the space in the Intuit Data protect
Another solution to get rid of this issue can be to free up the space in the Intuit data protect. This can be done as follows:
Check the Intuit Data Protect version and ensure it is up to date.
After that, Delete the backup folders, after downloading the backed-up files first.
Next step is to reduce the backup file size, as it would clear the space:
Hit a right-click on the Data Protect icon, then choose Open Intuit Data Protect.
Choose Change Backup Settings.
Now Untick on the Files and folders you don’t need to back up.
Hit on the Continue button until you see Exit backup settings.
Lastly, try to back up once more time.
Solution 3: Make use of the Intuit Data Protect diagnostic tool
Intuit Data Protect Diagnostic tool can be of much help in fixing this error. This tool basically checks the computer's memory, disk space, Windows components, and Intuit Data Protect version. Not only this, it also tests whether you are able to connect to the backup service or not. The steps involved in this process are as follows:
To begin with, right-click Bank with Intuit data protect icon, and then opt for the About Intuit data protect option. It would look like a green padlock.
You need to press ctrl+ F2 keys to open the Intuit Data Protect diagnostic tool.
Next step is to select Run Diagnostics. In case the Diagnostics Tool detects an issue with a firewall or third-party security software, you will need to reconfigure the software to allow access to Intuit Data Protect files.
For information about configuring your security software and hardware, check your manufacturer’s website, then add the following files for exceptions:
Solution 4: Ensuring QuickBooks desktop and Intuit Data Protect are updated
You are supposed to ensure that the QuickBooks desktop software and the Intuit data protect are updated. If not, then you can carry out the required procedures to update the software.
Solution 6: Clearing the Internet Explorer Cache, Cookies, Temporary files, and SSL state
The last method that one can opt for to fix Intuit Data Protect backup failed issue is to clear the internet explorer cache, cookies, temporary files, and the SSL state. The steps involved in this process are as follows:
First of all, you need to open Internet Explorer.
Visit the tools and choose the Internet options.
Next step is to note that if you are unable to find the tools on the browser, then you need to tap on to ALT tab once to un-hide the hidden tabs.
Next, go to General tab and choose the Delete option.
Check the following boxes: Temporary Internet files and website files cookies and website data, history, form data, and also the InPrivate Filtering. Then you are required to un-check the preserve favorites and the website data box.
Next step is to choose the Delete option and clear the items.
Go for the Content tab.
At last, choose the Clear SSL state and then tap on OK tab.
Solution 7: Include Data Protection in the startup programs list
Hold down the Win+R keys on the keyboard while pressing it.
After that type MSConfig as the command.
Put a checkbox next to each QuickBooks service under the Startup tab.
In last click on OK and then Apply.
Winding up!
The above-enlisted methods are capable enough to resolve the backup failed error with Intuit Data Protect. But if in case the error continues to trouble you, then you just need to give us a call using our dedicated support line i.e.,1-800-761-1787, and we will leave no stone unturned to free you from this technical snag. Our QuickBooks error support team and Intuit-certified professionals will be happy to help you.
What does the "Intuit Data Protect Backup Failed (Firewall or Connection Issues)" error mean?
This error generally occurs when there are issues related to the firewall settings or network connectivity.
How often should I back up my QuickBooks data using Intuit Data Protect?
Users should back up the QuickBooks data using IDP at least once a day. Regular backups ensure that you have up-to-date copies of your data in case of any data loss.
Are there any specific firewall or network settings I should configure for Intuit Data Protect?
Settings of the firewall or network related to Intuit Data Protect may vary based on the specific firewall software or network.
Can I back up multiple company files using Intuit Data Protect?
Yes! You can back up multiple company files using Intuit Data Protect.
This error generally occurs when there are issues related to the firewall settings or network connectivity.
Users should back up the QuickBooks data using IDP at least once a day. Regular backups ensure that you have up-to-date copies of your data in case of any data loss.
Settings of the firewall or network related to Intuit Data Protect may vary based on the specific firewall software or network.
Yes! You can back up multiple company files using Intuit Data Protect.