Get the easy methods to resolve QuickBooks unable to connect to remote server problem:
Have you stumbled upon QuickBooks unable to connect to remote server error and don’t know what to do? Well, if yes, then continue reading the article and unleash the process to fix this issue. We all know that QuickBooks is a powerful software and easy to handle all financial tasks. Multi-user mode is one such feature of QuickBooks that enables businesses to scale up users in order to simultaneously work in a company file. To use multi-user access a normal PC is setup as a host, or a dedicated server is deployed. QuickBooks database server manager is the component that turns the hosting on and bridges QuickBooks workstations to communicate with the company file.
Many times, QuickBooks cannot connect to the remote server, especially when the workstation is not able to access the company file. As a result of connectivity issues of QB, you can not communicate with the QuickBooks company file. There are many other factors that can result in QuickBooks unable to connect the remote server issue, which we'll discuss later in this blog. This error comes up with an error message stating as:
Can’t communicate with QuickBooks server
QuickBooks desktop unable to connect to the remote server
QuickBooks server and workstation communication problems.
To know more information about the error, along with the possible causes and fixes, you should continue reading this article till the end. However, if you feel that the error is too complicated and technical for you, then give us a call immediately through our helpline i.e. 1-800-761-1787. Our QuickBooks error support professionals will help you out and resolve the issue for you.
There are various Remote Screen tools available, which includes the discontinued QuickBooks Remote access service from Intuit. The concept is almost always the same: "Connect remotely to the screen of the system running QuickBooks. When connected, the image from the system is streamed across and user interactions are sent back."
This gives control over the whole system as if you were physically sitting in front of the system, this is also the main drawback: "A remote user has access to the whole system and anyone with the access to the system will be permitted to see what the remote user is working on."
Remote access to my QuickBooks cloud
QuickBooks remote access has a great potential for small offices. This requires multi-user access without any expense of an official QuickBooks solution or the inconvenience of being locked out of the system, if remote access tool is used:
This basically differs from the actual remote access products in that you don't tie up the hosting system. The local user will still be able to run applications on some desktop.
This also differs from the hosted QuickBooks solutions in that you have significantly lower cost per user. Moreover, you need to keep in mind that you are providing own hardware. Cost analyses are complicated sometimes. In case you are making use of a variety of QuickBooks, add-on products, or using products like Microsoft Excel or data export.
Causes behind to QuickBooks unable to connect to remote server issue
As we said before, there can be a couple of factors due to which this error could trouble the users, out of which the common ones are listed below:
First reason can be if there is an issue with the QuickBooks file hosting or permissions.
When the QuickBooks database server manager is not working on the server.
Another possible reason could be if the local area network is not in the active state.
You could face the same issue if there is not a proper set-up of the QuickBooks server.
Any third-party firewall can also be one such factor.
Outdated QuickBooks version can be another cause.
In case there is a halt in the connection of the QuickBooks server, you will have to suffer such an error.
Methods to resolve QuickBooks Cannot connect to remote server problem
You can implement a variety of methods to get rid of QuickBooks unable to connect to remote server problem which includes the ones listed below. Let us check them out together.
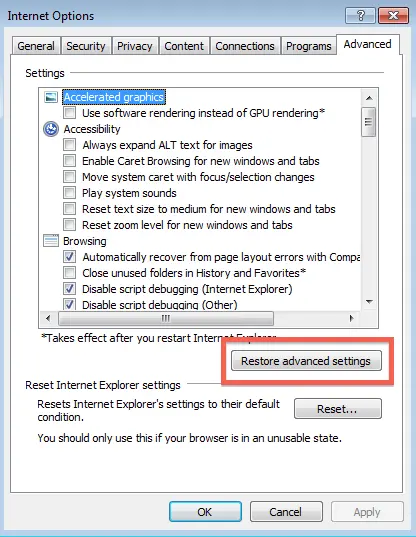
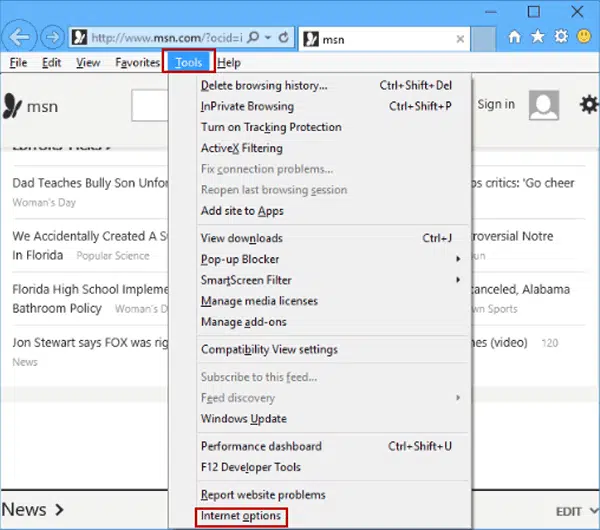
Method 1: Resetting Internet explorer settings to default
This method to opt for is to reset internet explorer settings to default. The steps involved under this process are as follows:
In this method, first open the internet explorer browser.
After that, hit a click on the tools menu or the gear icon.
Next, navigate to the internet options.
Also, click on the advanced tab and then click on the restore advanced settings.
Next step is to hit a click on the OK tab and also close the browser.
Now check the error is gone or not.
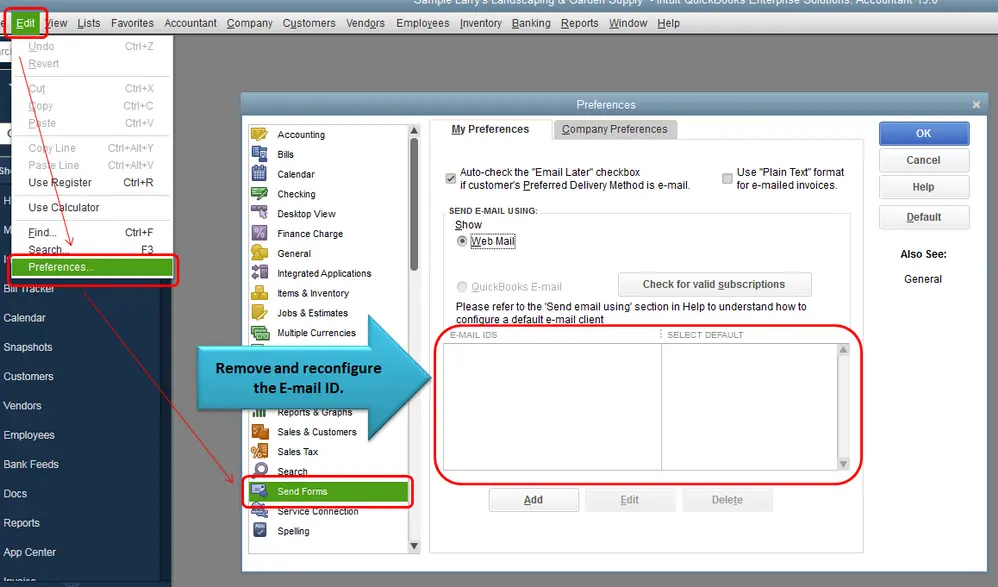
Method 2: Checking settings webmail preferences
Another method to try is to check settings webmail preferences. The steps to be followed in this are as follows:
For this process, you will have to navigate to the QuickBooks edit menu and also select preferences.
Also choose send forms on the left pane.
And then select the email account being used and then click on edit, under My preferences.
Next, move to the SMTP server details section and then set the server name and port to the email provider settings in the edit email info screen.
Final step in the process is to set up email service in QuickBooks for a list of SMTP server and ports.
Method 3: Creating the network data file (.ND file)
In case the above two methods failed to work then in that case, you need to create the network data file. This can be done as follows:
To begin with, press the Windows key once and then type in QuickBooks database server manager.
After that, choose the database server manager.
Next, in case you cannot find the QuickBooks database server manager in the program list, then you might need to uninstall and reinstall the QuickBooks.
Followed by confirming the installation process.
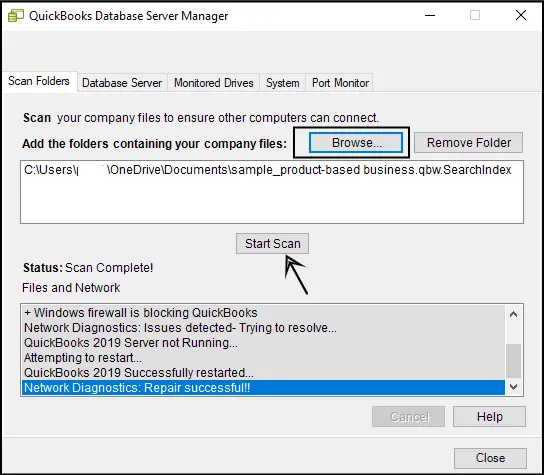
Now go to the QuickBooks database server manager window and browser to the location of the folder containing the company file, you will have to hit a click on add folder.
Again hit a click on scan now when all the folder is added.
Next, scan QB company files.
At the end of the process, make sure to verify that .nd files are created for each data file.
Method 4: Updating QuickBooks to the latest release
Updating the QuickBooks to the latest release can help in fixing the QuickBooks unable to connect remote server error. The steps to be followed under this are as follows:
You can validate the QuickBooks desktop file hosting services, as they might conflict between the server and workstations. The steps involved are:
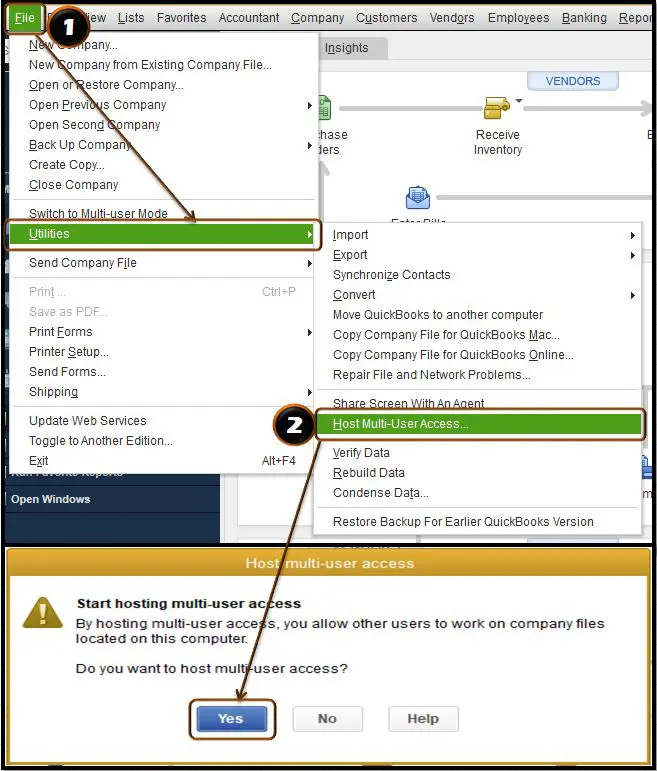
Step 1: Turning off hosting on all workstations
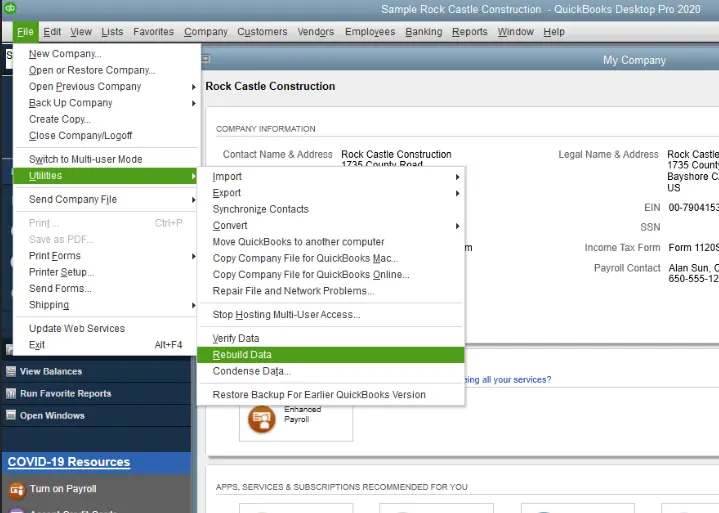
For this, go to the QuickBooks file menu and select utilities.
After that, choose stop hosting multi-user access option.
In case you see host multi-user access instead of stop hosting multi-user access, then confirm it by pressing yes.
Step 2: Turning on hosting on the server computer
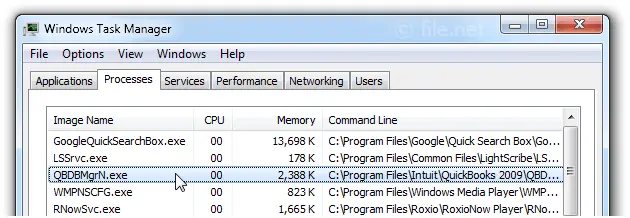
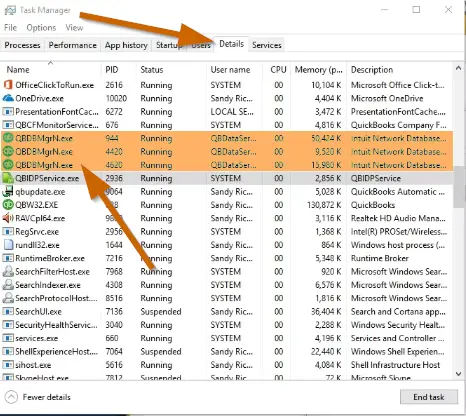
In this method, first, click on the Windows key and then type Windows task manager and then click on enter key.
After that, click on more details of the task manager windows.
And also, choose the services tab and place QBBDBMgrN.exe from the list.
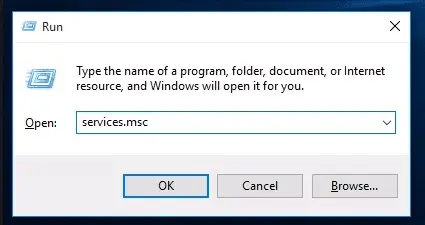
Followed by, pressing Windows + R keys to verify the file.
The next step is to open the run box and then type services.msc and click on OK tab.
Now press Q button to find the QBDBMgrN.exe.
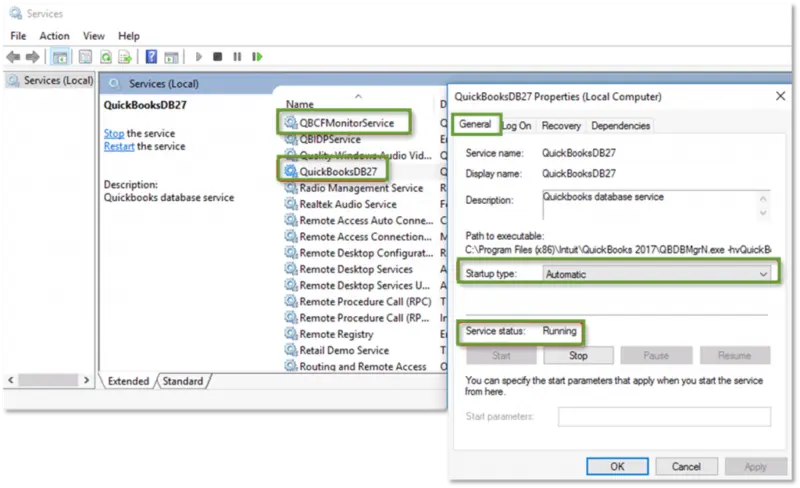
And lastly, start the service and select the automatic start option.
Method 6: Organizing QuickBooks database server manager
If none of the above methods worked in your favor, then in that case, organize QuickBooks database server manager, as it might help in fixing the issue up to a certain extent. The steps involved under this method are as follows:
This is the last method, in which you need to type QuickBooks database server manager.
All the above given 6 DIY solutions drives us towards the end of the article, where we expect that after implementing the measures and methods, you might be able to get rid of the error easily. If in case, your QuickBooks is still unable to connect to the remote server, then it is highly recommended to immediately look for technical assistance. You can directly connect with our dedicated support team at 1-800-761-1787, and our QuickBooks desktop support team and accounting experts will be there to assist you in a single call.
Learn the best ways to provoking QuickBooks error C=51:
Being a software that is loaded with some unique features and functionalities, QuickBooks comes in with some terrible technical errors that might trouble you. One of these errors can be QuickBooks error code C=51. If you are reading this article, then you might definitely have encountered this annoying error and to know what takes to rectify it. This error blocks your screen to warn you when QuickBooks cannot find TxList. You might come across this when you try to eliminate the transactions from a report. Even at the time of working on transactions in the QuickBooks company file (.qbw), you might stumble upon any such error.
In this piece of writing, we have tried to summarize some of the most effective fixes to this error. However, if you are in search of some professionals, who can deal with the issue for you, then get on a call with our tech geeks here: 1-800-761-1787. Our certified QuickBooks enterprise technical support team will ensure to eliminate the error permanently for you.
Error message C=51 in QuickBooks basically indicates that QuickBooks software is not able to locate the TxList. This error may be noticed when you try to delete the txList from your list of txLists and you are unable to spot it. This error can also be seen when you attempt to delete the transaction from any report. When you faces this type of issue, it is necessary to shut down this application. Shutting down all windows, including QuickBooks and then reboot it again. You will have to repeat the actions where the error C=XX problem was occured.
Triggers to the QuickBooks Error Code C=51
Learning the triggers of the error code C=51 in QuickBooks makes it easy for you to tackle the issue. The triggers to the error are listed below, let us have a look:
Any kind of issues with QuickBooks verification or QuickBooks rebuild error.
If there are issues with updating QuickBooks desktop.
Specifications for QuickBooks error message C=51
For tackling the issue, you are required to check out the requirements for carrying out the troubleshooting process. There are three essentials that you can’t afford to miss, in order to rectify the QuickBooks error C=51. The three of requirements are as follows:
The basic requirement is that the transaction log file (.TLG- in the same folder as the corrupted QBW file)
You could take a note if the QuickBooks data file is corrupted (.QBW)
When the QuickBooks error code C=51 appears, you might face issue with the working of the QuickBooks software. This error might also delete the important data files, which indicates the importance of creating a backup of the file. Below are some quick fixing steps, that you can try before jumping onto the main solutions:
You can turn off the QuickBooks desktop, when facing the issue.
And can also terminate all the running windows within QuickBooks desktop.
Techniques to resolve the QuickBooks Error Code C=51
Now that you know the requirements as well as other related information, it is time to learn the techniques to fix the error. The methods involved to fix the ongoing error are as follows:
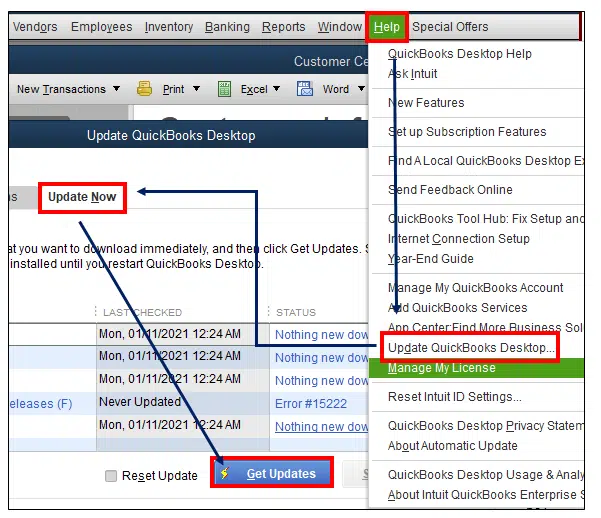
Method 1: Updating QuickBooks to the latest version
The basic method is to update QuickBooks to the latest version. You need to upgrade the software to the latest version and check if the error is fixed. Many times, QuickBooks version leads to certain issues, and it is recommended to opt for this method and try to resolve the issue.
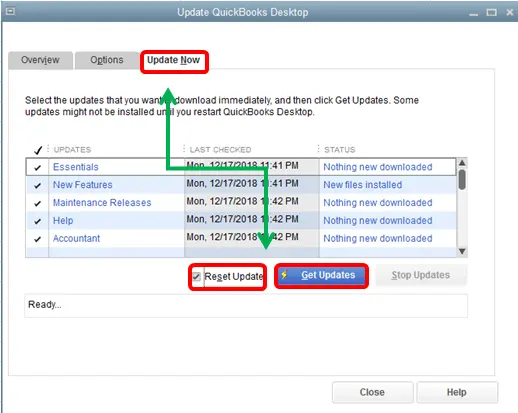
Open QuickBooks desktop and move to Help menu.
After that select the Update QuickBooks desktop option.
Now move to Update now tab and checkmark on Reset Update box.
In next method select Get updates to start the updation process.
Method 2: Close all the QuickBooks processes
In this particular method, you need to close all tabs in QuickBooks.
Shut down all the QuickBooks related files using task manager.
Reopen the QuickBooks and then carry out the same work where the error occurred.
Method 3: Verifying and rebuild data in QuickBooks desktop
Step 1: Steps to Verify data
Running the verify data utility method will help you to identify the most commonly encountered issue within the QuickBooks company file. Also, running the rebuild data utility will help you to fix the data integrity issues. You can run the verify data utility by carrying out the steps below:
Start off with clicking on the file menu and then utilities and verify data option is to be selected.
When the message “QuickBooks detected no problems with the data” appears, no further action is needed.
Next step is to select the location where you wish to save the backup and then hit OK button.
When you gets the message “Rebuild has completed” and then hit OK.
Run the verify data utility again to check for data damage. In case the error is still detected, then look for an expert assistance.
Method 4: Using the QuickBooks file doctor tool
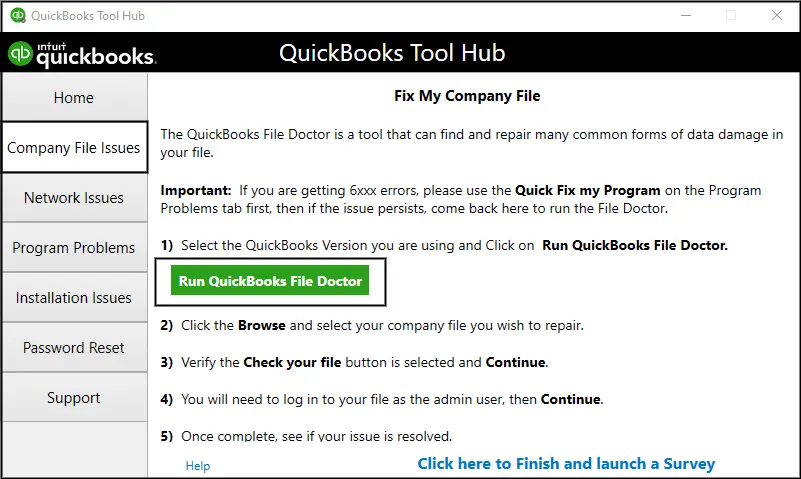
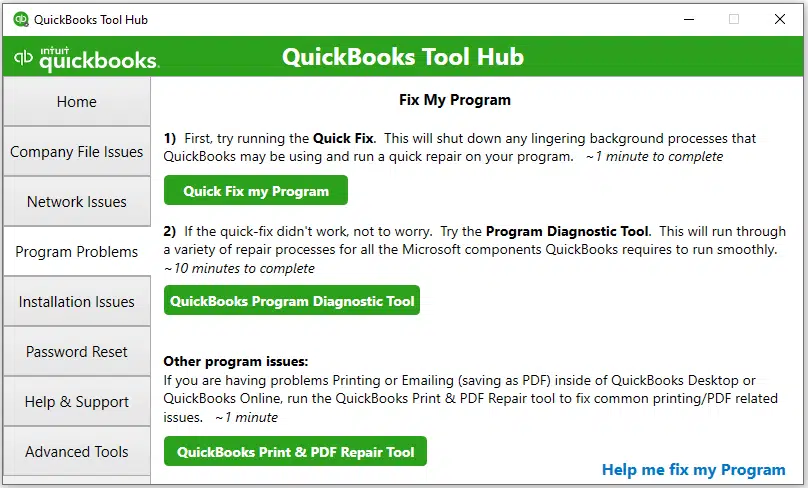
You can make use of the QuickBooks file doctor tool in order fix error code C=51 in QuickBooks. This tool can be used through the QuickBooks Tools hub or can be downloaded directly from the Intuit website. You need to run this tool and it will diagnose and fix the error automatically. You will have to follow the steps below:
First of all download the QuickBooks tool hub program.
Run the tool on your computer.
After that open the tool and go to the Company File Issues tab and choose Run QuickBooks File Doctor option.
You can restore the backup files to fix the issue. Also, while restoring the backup, it is recommended to use the latest QuickBooks version.
After the backup files are restored, you need to hit Ctrl + C keys and then move them in a new folder.
Verify the file size, and ensure that it meets the limit i.e. 6MB.
Hit a right click on the file and hit properties.
In case the backup file is less than 6 MB then it is the wrong backup file.
And you might need to make a backup file again.
Method 6: Check Network connectivity
Many times, the QB error C=51 could be seen due to network connectivity issues, while the system undergoes the downloading process. This might prevent the transactions from getting downloaded. You need to check the internet connection, before beginning with the downloading process.
Solution 7: Try to access the lost or deleted transactions
You might not be able to find a transaction or list of transactions that might have become inaccessible or got deleted mistaken from the QuickBooks company file. In order to restore those deleted or altered transactions, the below steps would definitely work:
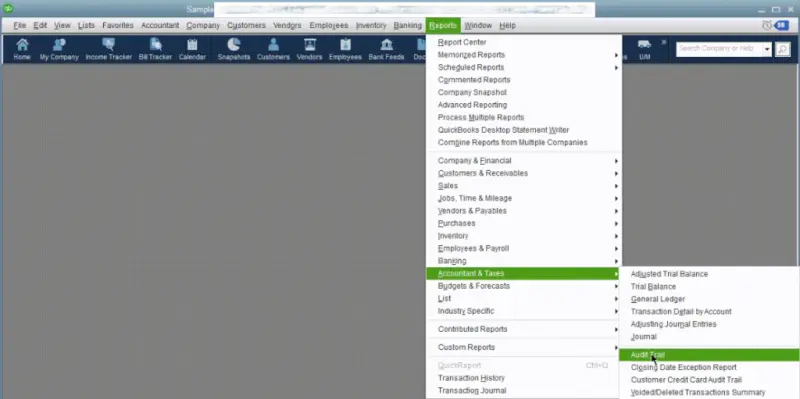
Accidentally deleted or altered transaction might be visible in QuickBooks audit trail report. You can restore those transactions by re-entering the information. It should be noted that the audit trail report shows all the transactions that have been entered in that particular company files, along with the deleted ones. This even helps you in displaying any historical changes made on the transactions.
For opening the report, the below steps should be carried out:
You are first supposed to open the Reports menu.
Choose the Accountant and Taxes, along with that click on Audit trail.
Now restore the transactions that are lost as a consequence of a technical glitch.
Many times, the transactions can be lost or might not be accessed, due to various technical snags. If the same situation arises, then you can try to restore the lost transactions, along with it's data, by using QuickBooks backup file with (.QBB) extension.
Final Words..!
This drives us towards the end of this post, where we expect that the information scribbled above might be of some help in getting rid of QuickBooks error code C=51. There can be a situations where none of the above strategies worked for you, then in that case we recommend you to connect with our QuickBooks desktop support team by calling our dedicated support line i.e., 1-800-761-1787. Our certified accounting professionals will assist you in dealing with such type of software issues.
Working with full concentration on QuickBooks and suddenly bumped into Error code C=47? Though, QuickBooks is a renowned accounting software that has marked its presence since its inception. As it is loaded with various features and functionalities, it involves countless codes and algorithms, but these codes make QuickBooks prone to certain errors. One such error we are going to talk about is the QuickBooks error code C=47. Every time you post the payments to customers, the error code C=47 appears on the screen. This error is usually resolved by closing and reopening QuickBooks. There can be various other facts related to this error, which we will be discussing later in this post.
Thus, make sure to stick around this segment carefully till the end, or you can also get in touch with our QuickBooks error support team at 1-800-761-1787. Our experts will help you in get rid of the error permanently.
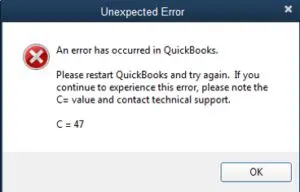
QuickBooks error code C=47 is an issue that appears on the screen due to an issue in the settings of the Internet explorer for a few protected websites. While performing a cleanup Windows server 2008, the QuickBooks users could come across the error. This error indicates that the software is unable to find transaction and also fails for the same time update. This usually happen when you try to remove the transaction from a report. Other error messages that appear on the screen are as follows:
Error C=47
Error has occurred in QuickBooks, please restart the computer, but it does not go away even after restarting.
Unexpected Error
"An error has occurred in QuickBooks.” Please restart QuickBooks and try again. If you continue to experience this error, please note the C=value and contact technical support. Error: C=47
Factors causing the QuickBooks error code C=47
There can be certain factors due to which the QuickBooks error code C=47 appears on the screen. A few of the common factors we have listed below:
There can be multiple solutions to opt for in order to get rid of the QuickBooks error code C=47. Below we have listed the most effective ones, let us have a look:
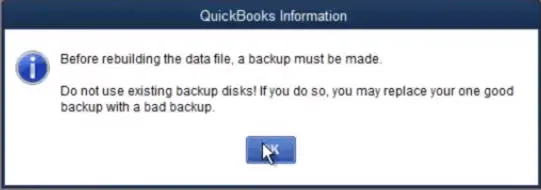
Method 1: Verifying and rebuilding data on the company file
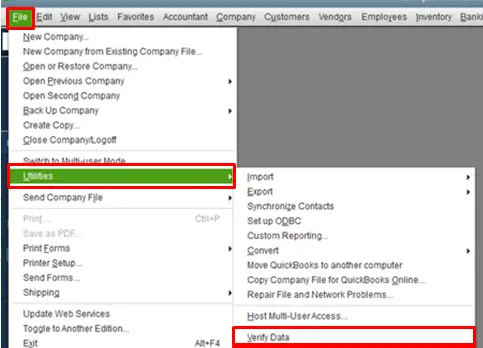
At first, you need to hit a click on File menu and then hit the Utilities tab to initiate the process.
After that click on the Rebuild data option.
Moving ahead, click on OK in the QuickBooks information window.
Now click on OK tab again to backup the company file.
At last, hit OK tab, when the message appears on the Rebuild has completed.
Step 2: Run Verify Utility
Once the damaged data is repaired by using the Rebuild data utility, run the verify utility. The steps involved are:
Initiate the process by clicking on the File menu.
And further, choose the Utilities tab and then hit a click on Verify data.
If the QuickBooks doesn’t spot the ongoing issue with the data then clicking on OK tab. After you are done with that, you might be required to continue to use again the company file.
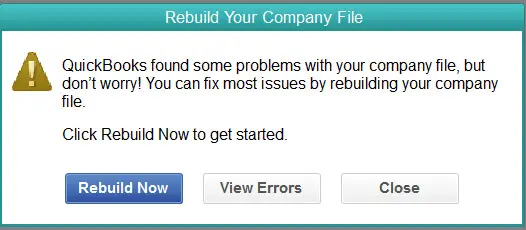
And if the verify detects any data issues, then you will be prompted to Rebuild now or View errors.
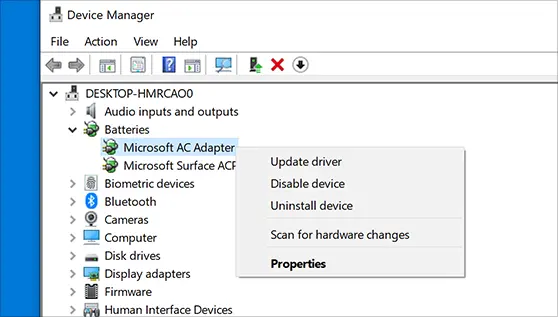
Method 2: Updating the driver software
You are required to ensure that their driver software is updated to the latest versions. For this, they can follow the instructions given below:
The initial step in this process is to reboot the system once the driver is un-established.
After that, configure the driver and wait for it to complete.
Followed by clicking on Start and then click on Sort device manager.
Next step is to look for the main seeking outcome and then choose the Gadget on which you will employee the driver.
Now you need to Update the driver software.
And in the new window, you can Browse the system for driver software.
Followed by picking from the list of Gadget drivers.
Identify and introduce the driver that finishes with legacy.
Another method to get rid of this error is to scan for viruses. You need to:
Scan the system for viruses when the error message appears whileloading\3\LXCRtime.dll.
Also, the antivirus scan will clean all the junk from the system and resolve the ongoing problem.
Method 4: Updating QuickBooks desktop to latest
You need to first check if the QuickBooks software is completely updated or not. If it is not completely updated, then update QuickBooks. By updating QuickBooks desktop to latest release, you can fix this error up to certain extent. The steps involved in this process are as follows:
Method 7: Configure Internet Explorer in QuickBooks Desktop
If the above methods failed to work in your favour, then you can try configuring the internet explorer in QuickBooks desktop. At times when you try to update the internet explorer, it might use the standard settings for browsing. This is especially when you might drive into such an error. Thus, it is recommended to configure the internet explorer in QuickBooks.
Conclusion!
We conclude the post over here, with the hope that the information we have provided above may assist you in eliminating QuickBooks error code C=47. But if the error continues to trouble you even after implementing the above steps, then you don't fret, we're here to assist you. Talking to our QuickBooks enterprise support team will help you in resolving the error with much ease. Feel free to call us anytime using our dedicated support line i.e., 1-800-761-1787, and discuss the issue with our experts. They will answer all your queries immediately.
Find the quick solutions for various QuickBooks Online login errors on Chrome:
QuickBooks Online is a cloud-based web application, and while attempting to utilize this software application, users may get issue with logging in on Chrome. Various login issues and connectivity issues are often encountered while logging in to QuickBooks Online on Chrome. This error is usually seen when users enter the incorrect login credentials. The solution to login issue might seem to be a tedious process for the majority of users, however, you need not worry because we're going to go through the complete steps to resolve common login issues for QuickBooks Online on Chrome, along with the reasons. So, make sure you've read this article carefully.
An effective alternative for getting rid of can't log in to QuickBooks Online login errors is to get in touch with a team of experts at 1-800-761-1787 who can easily deal with this issue. Our QuickBooks error support team will be available round the clock to provide the best possible assistance for all accounting related issues. For further information, continue reading the post.
QuickBooks Online Login Errors on Chrome - A Brief Insight
The issue of QuickBooks online login errors might be seen due to security purpose that is developed by Intuit company. When you face such an issue, then the accounts need to be updated to a new Intuit account with enhanced security. The login issues could be seen due to various factors, which will be discussed later in this article. This error comes with an error message stating as “Account services unavailable, please try back later”. At times you might see different types of issues when you log in to QuickBooks online using the Chrome browser.
The computer screen displays a loading message on the web browser, but nothing loads up. As such, you are unsuccessful in accessing QBO.
An error message stating "The services are not available" or "WebPage cannot be found" or "Error 404: File Not Found" or "QBO is currently unavailable, please try again later" might appear on the screen.
Also, the sign-in screen and screen to choose my company might show up in a loop.
QuickBooks Online login error on Chrome showing the message “Account services unavailable, please try back later.”
Factors triggers to QuickBooks online login issues on Chrome
There are certain factors that might contribute to the error in QuickBooks online login with the Chrome browser. These errors include the following:
In case someone else is logging into another location using your account credentials, this might be one of the major causes of the error.
Another reason can be if you didn’t sign out correctly from the previous QBO session.
At times, antivirus and other firewall applications might also be the primary reason behind the QuickBooks Online login errors. The majority of the time, the antivirus might block you from accessing QuickBooks online.
If there might be any issue with Intuit, you might need to check the status of the website.
The same issue can also be caused by old history or cache, as they might slow down the performance of Google Chrome and any other browser being used.
Different Types of QuickBooks Online Chrome Errors
There can be various types of QuickBooks online login errors that could be encountered by the users, which includes the below listed ones:
QuickBooks Online not working with Chrome.
QuickBooks online doesn’t load in a proper manner.
Any blank or black screen appearing after logging in to QuickBooks online.
QuickBooks Online is not responding after you log into the account.
If the Chrome is unable to load the QBO page.
There was an unexpected failure of google chrome while opening QuickBooks Online.
Methods to Resolve 'Can't Login to QuickBooks Online' Issue
QuickBooks Online login error on Chrome showing the message “Account services unavailable, please try back later.”
There can be a couple of solutions that can be implemented in order to resolve QuickBooks online login errors on chrome, these include the following:
Method 1: Using Any Other Web browser
Trying to log in to QuickBooks Online using an alternative browser like Firefox, Safari, or Edge to resolve Chrome login issues.
The very first method that you should follow is to use an alternative web browser other than the google chrome browser. Many times, it is seen that Chrome might not be configured well and might create issues. This might lead to login issues using Chrome. You can use Internet Explorer, Safari, and Mozilla Firefox browsers, in order to access QuickBooks online. This will give you an assurance whether the QBO login errors are caused due to the Google Chrome browser.
Method 2: Adding a New User Into Chrome
You should consider adding a new user to Chrome and then make an attempt to log in to QBO to check if the QuickBooks online login errors are dealt with. The steps involved in this process are:
Visit your Google Chrome browser and then opt for Settings tab from the left side.
Jump to the base of the page and then figure out Users option.
Herein, you are supposed to hit on Add new user option in the pursuit of adding a new user.
Creating a new user in Google Chrome to troubleshoot QuickBooks Online login problems.
Followed by selecting the Icon, write the Name, and then leave Create a Desktop shortcut option.
Using an incognito window in Google Chrome to troubleshoot QuickBooks Online login issues without saving cookies or browser history.
Another method to resolve issues can be to use an incognito window. It is expected that using the incognito window will resolve the issue, as it doesn’t save the browsing and download history, along with that the window doesn’t save any new cookies permanently. The steps to be followed are:
To begin with the process of accessing the incognito window, you need to open the Google Chrome browser.
After that, click on Customize and Control icon.
Now select New incognito window.
It should be noted that you can also use the shortcut keys, including Ctrl + Shift + N keys, to open the incognito mode directly in Chrome.
Method 4: Cleaning up the history/cache of the browser
Steps to clear Google Chrome history, cache, and cookies to resolve QuickBooks Online login errors.
Many times, cleaning up the history of the browser can resolve the issue to a certain extent. The steps involved are:
Initially, you need to Hit on the Customize and Control icon.
Followed by selecting the Settings tab.
After that, hit the Advanced icon present at the bottom of the page.
In the next step, you can search for Privacy and Security option.
Now, hit a click on the Clear browsing data under the same tab.
After that click on the Advanced tab.
Check out the list and then choose the appropriate boxes attentively for clearing the cookies and other site data, cache images, and files.
Method 5: Verify Google SSO (Single Sign-on)
In one of the updates of Google and QuickBooks, it was mentioned that QuickBooks users making use of iPhone and iPad, will not be permitted to log in to the QuickBooks online app via the Google account. However, iOS mobile users can use the Google account for the login process. Thus, if you are using iPhone and trying to sign in to the QBO with the Google account, then don't waste your time doing that. You can simply make use of your Intuit account credential for the login process. Simply put the user ID and password and further log in to QuickBooks online using the Intuit account.
Culminating Words!It is possible that, after going through this article, you will be capable of solving the QuickBooks Online login errors on the Chrome browser. If you're encountering the same issue repeatedly, then you can connect with the technically sound experts at QBS Enterprise Support by means of 1-800-761-1787, and we will ensure that your issues are resolved in one go. Our 24/7 QuickBooks Online support specialists and certified accountants will be available to help you with just a single phone call. Don't hesitate to call QBS Enterprise Support at any time.
Learn how to turn on advanced inventory in QuickBooks enterprise solutions:
QuickBooks Enterprise is loaded with features, one of which is advanced inventory. Advanced inventory helps in the long run in optimizing the economic order of quantities that helps in maintaining the stock. Advanced inventory in QuickBooks Enterprise is basically an add-on option for tracking inventory. Turning on advanced inventory in QuickBooks enterprise is a must, which demands a step-by-step procedure. If you are also looking for the process to turn on advanced inventory, then here is a comprehensive guide for you.
In this segment, we will be talking about the procedure to turn on QuickBooks enterprise advanced inventory in depth. Thus, make sure that you go through the procedure carefully. Moreover, if you require any technical assistance, our experts and certified accounting professionals will assist you with the process. Give us a ring right away at 1-800-761-1787, and we will be there to assist you immediately.
What is advanced inventory in QuickBooks enterprise?
The advanced inventory system was directly integrated by Intuit with the QuickBooks account, which saves the time of users. In simple words, this is an inbuilt tool that can easily compete with other inventory management software for small businesses. This feature helps users in maintaining and tracking the stock and also virtually moving the products. It can be integrated with much ease and can also be subscribed with new software in various ways. This program can be bought online, or it can be availed in a package under the platinum subscription of Intuit. You just need a license key with the advanced inventory feature, and the inventory can be tracked from site or locations.
What are the benefits of tracking inventory?
Tracking inventory can be extremely beneficial for you. We have listed below some of the common benefits that this feature offers:
This makes tracking stock in different locations easy
You can easily scan the barcode
This feature allows you for tracking the serial number or lot numbers
Tracking bin location also becomes easy
Advanced inventory feature permits you to transfer the items between the inventory sites
This makes possible for you to track inventory data in one place
And the list is huge….
Moreover, in the case of QuickBooks desktop enterprise, you can purchase or subscribe to advanced inventory, which enables you to use:
FIFO costing
Multiple location inventory
Bar-code scanning
Bin or lot tracking
Serial or lot numbers
Features of QuickBooks Enterprise for Advanced Inventory
You can purchase or subscribe to advanced inventory, which enables you to make use of it, if you are using QuickBooks desktop enterprise. Below is the list of features:
Mobile inventory barcode scanning
Multiple location inventory
Customizable inventory reports
Bin location tracking
Real-time inventory picking
Barcode scanning
Using FIFO costing
Serial or lot numbers
Transferring inventory from one location to another
What is the need of tracking inventory?
The most common question is the need to track inventory. Well, the advanced inventory in QuickBooks enterprise tracks either inventory store from different sites or different locations. To understand this easily, we can take this example, if you store the inventory from different warehouses, either in the multiple tracks or in the different areas within a warehouse at the consignment locations, or from the outside manufacturer, it can easily manage the inventory in the business. In case you are willing to make use of this feature, then you are required to buy advanced inventory, or you have the license that includes these advanced features in the subscription.
Procedure to turn on advanced inventory in QuickBooks enterprise
In order to turn on the advanced inventory, you can carry out the below steps:
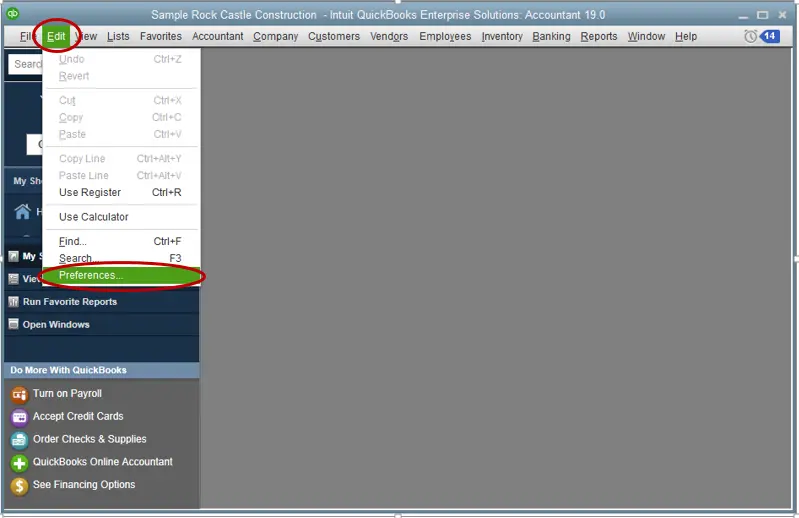
When you try to operate the QuickBooks enterprise, you will see the Edit menu. And then, hit a click and spot Preferences under the same. Then you required to hit a left-click on it to select that option.
Next step is to move the cursor to the left panel to choose the Items and inventory. This will change the right panel.
Once done with that, you will see two divided sections named My preferences and company preferences. After which, you are needed to hit a click on the Company Preferences.
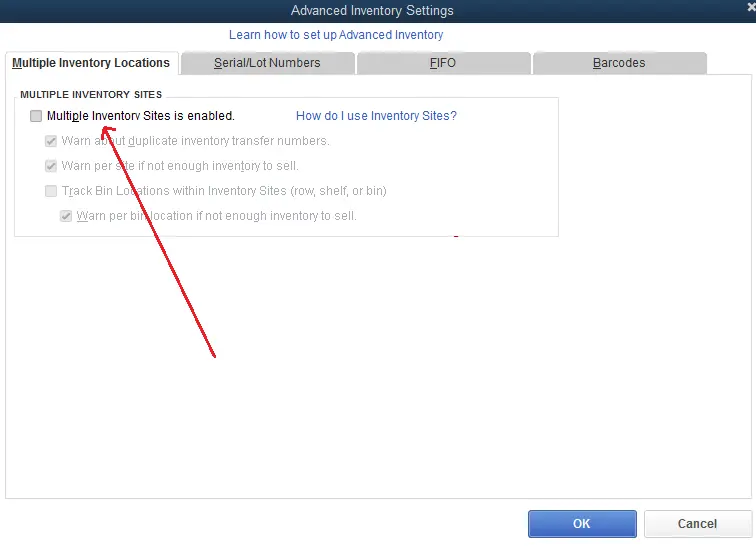
Now the window after selecting Company Preferences will show four sections. At the bottom of the first section, you will have to click on Advanced Inventory Settings tab.
And a new window will pop up, after which enable the option of Multiple inventory sites is enabled under the heading of multiple inventory sites.
Moving ahead, hit a click on OK at the bottom of the Advanced inventory settings Windows pane.
And lastly, you need to click on OK on the right-hand side of the preferences windowpane.
In order to implement this feature in a better way, you can close the QuickBooks enterprise software running on the device, and if it doesn’t close on time, then you can always select the task manager to end the running tasks.
And also, you can restart the device and then restart the software for the smooth working of the advanced inventory feature. In certain cases, you might find difficulties like the advanced inventory settings option might be grey in color, and you will not be able to click on it to move the steps ahead. The solution to such a scenario is revealed later in this post.
Steps to follow for activating the advanced inventory settings
As we mentioned above, these steps can be followed to activate the advanced inventory settings, if the advanced inventory tab is not clickable. The steps involved are:
It is supposed to align the license that you have got after buying the QuickBooks software, and also before the advanced inventory settings can work for you.
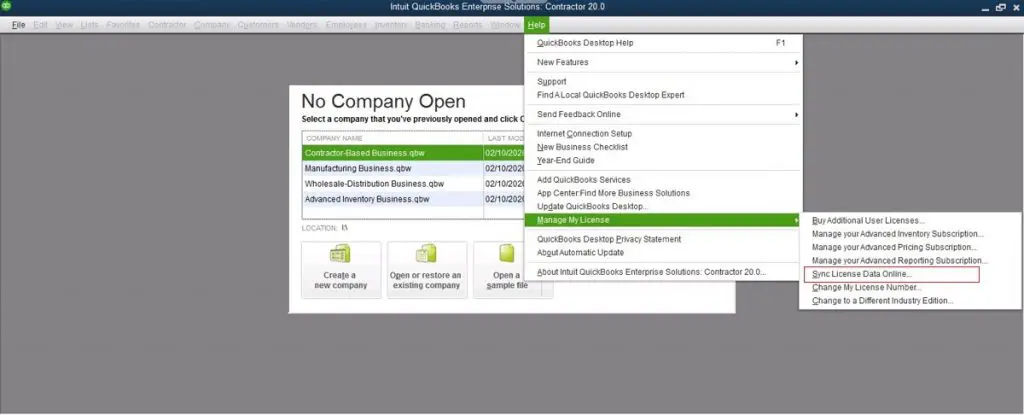
You will also have to visit the Help on the extreme right-hand side on QuickBooks enterprise version.
Next step is to hit a click on Manage my license and then click on Sync license data online.
After this you can easily head back to the actual procedure and carry out the remaining steps. Moreover, there can be another common set of issues that might appear in case you are missing one piece of information or another. This could be from the purchase until the final installation of the QuickBooks enterprise software on the working device.
What if Failed in syncing problem occurred?
In case you are facing a sync fail issue on the system, then it is a system-specific error. You can opt for the below-stated issues to get rid of the problem. It should be noted that, you need to need to carry out the below steps for Windows.
Step 1: Downloading and installing the QuickBooks tool hub
You can opt for QuickBooks tool hub, in order to resolve common issues. The steps involved here are:
Initially quit your QuickBooks and then download the QuickBooks tool hub tool from the internet and then save the .exe file someplace, where you can find it easily.
After that, open QuickBooksToolHub.exe, which is the file downloaded earlier.
Next step is to follow the on-screen instructions to install and Accept all the terms and condition.
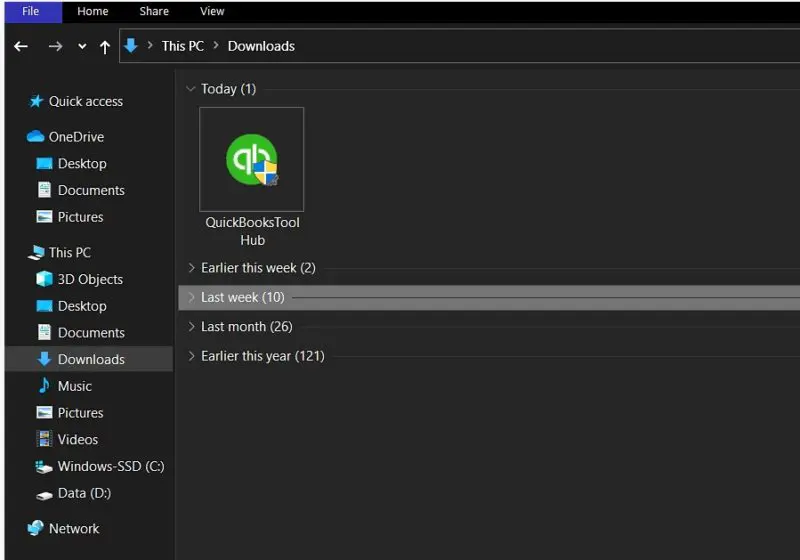
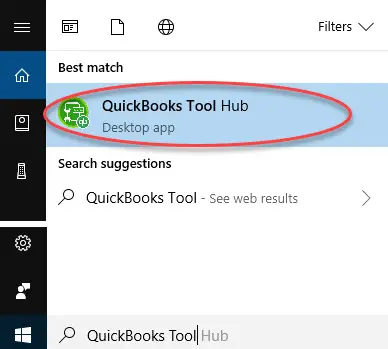
Next, when the installation completed, open the tool hub and double-click on the Icon.
It should be noted that if you are unable to find the icon then you need to navigate to the Windows search bar and do a direct search for QuickBooks and opt for the program.
Step 2: Run Quick fix my program
This tool will run a quick repair and will stop all QuickBooks background process, if any. The steps to be followed here are:
At first, select Program problems in the tools hub.
After that hit a click on Quick fix for my program.
And then choose the QuickBooks program diagnostic tool.
Important: If you have faced any issue during the repair or uninstalling .NET framework, then it is recommended to consult a professional.
You can easily sync the account to enable the advanced inventory option.
And then, by using serial or lot numbers you can track the inventory.
In case more space is needed, you need to ensure that you are having at least 2.5 GB of hard drive space available.
Winding up!
We feel that the above-mentioned information would be enough for users, in order to turn on advanced inventory successfully in QuickBooks enterprise. However, in case of any query or any further information, getting in touch with a professional is recommended. You can call our U.S.-based accounting professionals at 1-800-761-1787, and our QuickBooks enterprise customer support team will be there to provide you with immediate technical assistance. Feel free to call us any time.