Is your QuickBooks desktop suddenly crashed into QuickBooks payroll error 15223 and can't come up with an ideal solution to chuck off the issue? Well, not to worry at all, It is one of the update-related errors that usually occur while updating QuickBooks desktop or while downloading a payroll update or when QuickBooks fails to connect with the server due to Internet Explorer settings, SSL certificate misconfiguration or security restrictions.
As QuickBooks program relies on Internet Explorer to create a secure connections, and if any issue with the IE settings or digital signatures, it can can block updates and triggering such errors. In order to technically rectify such type of errors, this segment is crafted by our industries best accounting experts. Moreover, this error might come up when there is any sort of error with the Windows registry. You might see a warning message that says:
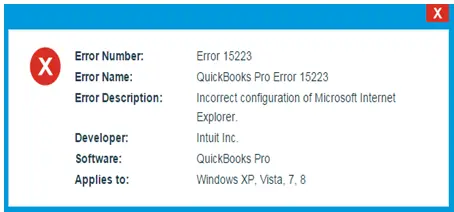
Error
Description
Error 15223:
The QuickBooks Desktop update did not complete successfully.
Error 15223:
Cannot connect to QuickBooks Desktop Payroll.
There can be other facts related to error code 15223 in QuickBooks, which we will be mentioning later in this article. Just in case you do not wish to manually fix the error, then connecting with our tech geeks is highly recommended. Our QuickBooks Payroll support team and certified ProAdvisors, will provide you with immediate assistance and will fix the issue for you in no time. Get on a call with our tech professionals at 1-800-761-1787, and leave the rest on us.
What are possible causes for QuickBooks error code 15223?
You can end up in the payroll update error 15223 in QuickBooks, due to the below mentioned factors:
QuickBooks related files are deleted mistakenly by any of the programs.
There is many damaged windows registry files.
In case of corrupted or damaged Windows or QuickBooks desktop files.
Incorrect Internet Explorer configuration.
You Internet Explorer digital signature requires an update.
Methods to Troubleshoot the QuickBooks Error 15223
Here is a guide to resolve the QuickBooks error code 15223 - while updating or downloading a payroll update successfully. Let us explore each of the methods one by one:
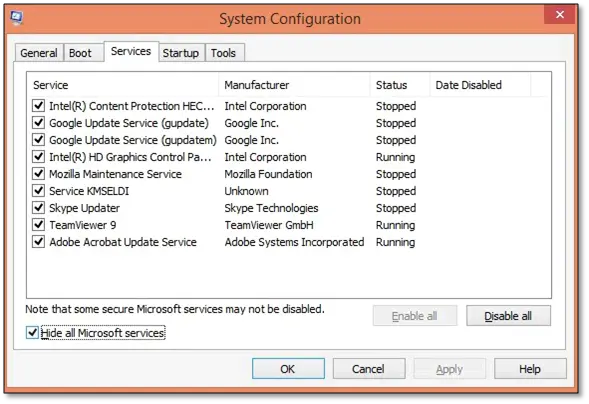
Method 1: Install or uninstall QuickBooks in selective startup
The very first method to fix such error can be to register the .DLL files. The steps involved in this process are as follows:
First step is to press Apply and hit OK to leave the window.
You will have to register the first file with the help of the below steps:
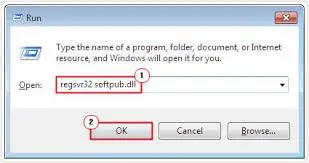
This can be done by pressing Windows Start or Windows Icon + R keys and then moving to the Run tab.
Copy the regsvr32/s% systemroot/system32/softpub.dll.
Paste this in the open field and also hit the OK tab.
If you don’t receive any message, the file was registered successfully. If you receive a message, ensure that you have copied the register file exactly as it appears.
Next, again press Windows + Rkeys to open Run command on your keyboard, then copy the following code: regsvr32 /s %SystemRoot%\system32\WinTrust.dll.
Now you will not get any messages.
Towards the end, Verify and ensure to copy the register file the same way.
Registering the second file
You can register the second file by pressing Windows.
Copy the regsvr32/s% systemroot/system32/wintrust.dll.
After that, Paste in the open field and then click on OK tab.
Now you need to Clear IE SSL state.
Also, open the Internet Explorer again.
You will then have to select the Tools and the Internet option and hit Content.
Next step is to press Clear SSL.
Also, reboot the system and open the QuickBooks desktop to download the tax table update.
Conclude the process by configuring the firewall.
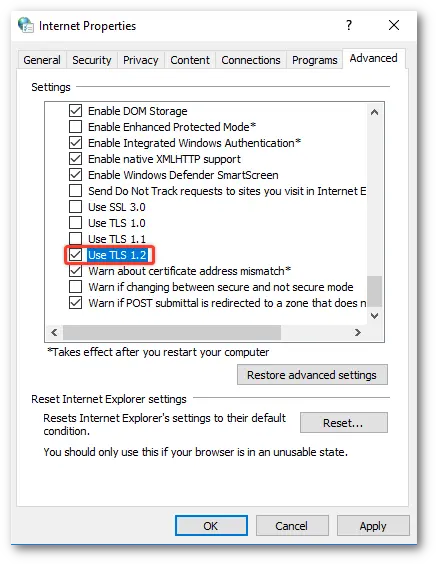
Method 4: Clear the Internet SSL state
Another method can be to remove the Internet SSL state. The steps involved in this process are as follows:
First of all, open the Internet Explorer browser.
Go for the Tools and the Internet options and also the Content tab.
Method 6: Temporarily turning off the antivirus protection
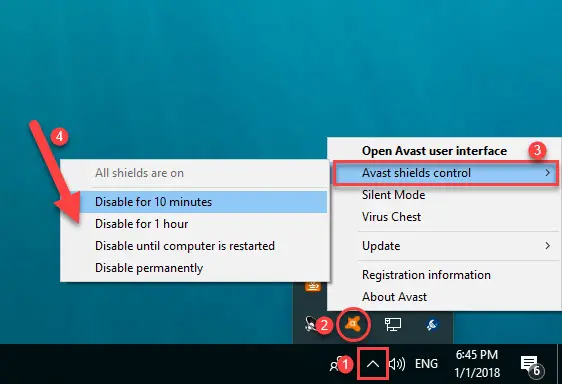
Just in case the foregoing method of firewall configuration doesn't work out, then users are advised to temporarily disable their antivirus protection by right-clicking the Antivirus icon on the taskbar, followed by choosing the opt that relates to Disabling the antivirus protection. Likewise, firewall protection should also be disabled. Now, the user should re-attempt logging into QuickBooks to examine if the error got under control.
FAQs
What are the errors in QuickBooks Error 15xxx series of error codes?
Various error codes belonging to the family of Error 15xxx include QuickBooks Error 15204, QB Error 152155, Error code 15311, QB Error 15317, QuickBooks Error 15101, etc.
What tools can fix QuickBooks Error 15223?
These tools include QuickBooks Install Diagnostic Tool, QuickBooks Fix My program, QuickBooks File Doctor, including others are some common tools to fix such issue.
Can outdated QuickBooks cause Error 15223?
Yes, using an older version of QuickBooks Desktop can prevent payroll updates, triggering this error. Always keep QuickBooks and payroll updated.
Will restarting my computer can help to fix this error?
Sometimes. Restarting can refresh network settings and services, which may fix temporary connection issues causing the error.
Do I need professional help to fix this error?
Not always. Many fixes are user-friendly, but if the error persists, contacting QuickBooks ProAdvisors or QuickBooks help team ensures quick and safe resolution.
Conclusive lines..!
Once you follow the above steps carefully, you might successfully fix the QuickBooks error code 15223. But, if by any chance you continue to end up into the same error, then feel free to call us at any point of time to our QuickBooks error support team. You can ring up to us at our dedicated support line i.e. 1-800-761-1787, and let our professionals help you to resolve this issue for you.
You might end up with QuickBooks error 6144, 301 or error 6144, 82 while accessing your company file. Well, you are not the only one facing this issue. Many QuickBooks users encounter these errors when the software fails to open or access the company file. It is one of the most common errors that are reported by users. This error is often encountered when you attempt to access your company file. When this error occurs, it stops you from performing any task through the main or other systems. Error 6144 in QuickBooks can be easily fixed, if the below-given steps are followed properly. Few time, you will need to close your QuickBooks desktop on all systems and disable the antivirus a few times.
For more information, we will discuss in detail about this error. Make sure to sail across the article and visit each section very carefully. For many users, this issue may seem to be difficult to deal with. If you are experiencing similar, don't be afraid to reach out to our support team by calling our dedicated helpline number i.e., 1-800-761-1787. Contacting our experts may provide great assistance in solving the problem. We will solve the issue for you in under an hour.
What is QuickBooks error code 6144? - A brief overview
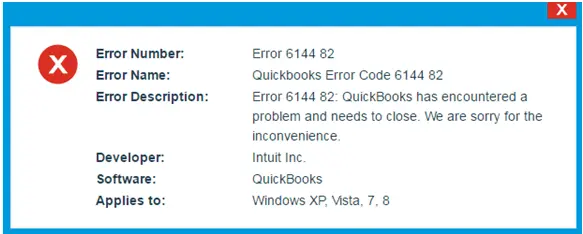
Talking about the QuickBooks error 6144, 301 or Error 6144, 82 - it is one of the most common error that you might come across while accessing your company file, and it doesn’t let you to perform any task. These errors usually pop up with an error message saying:
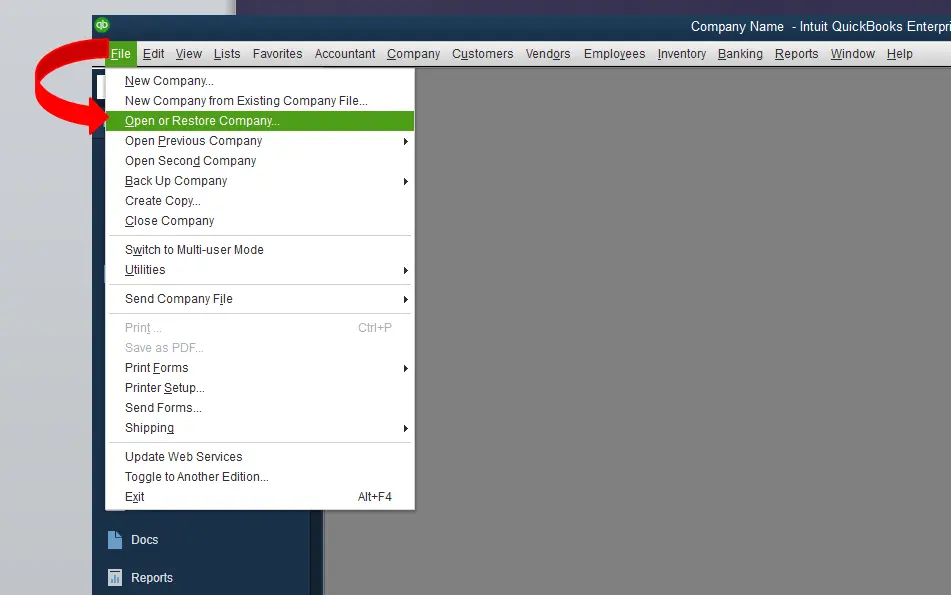
Error -6144, -301: QuickBooks is unable to open the company file.
Error -6144, -82: This company file cannot be opened. Please verify your network settings.
Both these errors comes under the 6000 series QuickBooks errors which are directly linked with company file access, network configuration, or hosting issues. It can also crash the active program Window, which can be very much annoying for you to handle. However, a good news is that this error is fixable and you can easily resolve it by following a few simple steps. There can be certain causes to this error, which we will be discussing later in this article.
Important points to understand
Before you jump on to the causes or the process to fix the QuickBooks error 6144 issue, it is very important to consider the below stated pointers. Let us have a look at what those points actually are:
Ensure to practice all the steps on the host i.e. the server system except the last step.
Keep in mind that all the systems are properly shutdown including the host or other.
Turn off the system security software.
What factors lead to Error code 6144 in QuickBooks?
Coming to the factors causing the issue, there can be many. We have jotted down some of the most common ones.
Network issues on the server or the system in particular can cause this error.
Corrupted Windows system files or QuickBooks related program files due to a virus or malware infection.
Another factor leading to the QuickBooks error -6144 or -6144, -301 can be pernicious deletion of QuickBooks related files caused by any other program.
A recent QuickBooks related change can also induce corruption in the Windows registry, ultimately leading to the error.
Incomplete installation or damaged download of QuickBooks.
Signs and symptoms of the QuickBooks error message 6144
Now that you know what leads to QuickBooks error message 6144, you must also know the ways to identify the same. The below listed signs and symptoms can ease the process for you:
The active program Window crashes or the system frequently crashes while running the same program.
The Windows start running sluggishly and do not respond to the keyboard and mouse inputs.
The computer experiences frequent freezing, or QuickBooks crashes immediately when opening the company files.
If the error itself appears on the screen, but with a slight change in the error code i.e. 6144, 82.
Effective methods to rectify the QuickBooks error code 6144, 82 - When opening company file
Now that you have uncovered the causes and symptoms of this error, you can now learn the process to troubleshoot the QuickBooks error 6144 82 when opening a company file or restoring a backup. So, without wasting much time, let’s quickly go over each step so you can easily implement them.
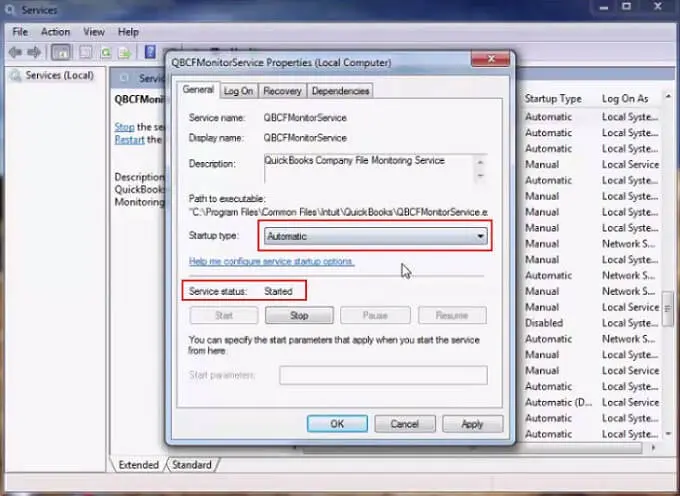
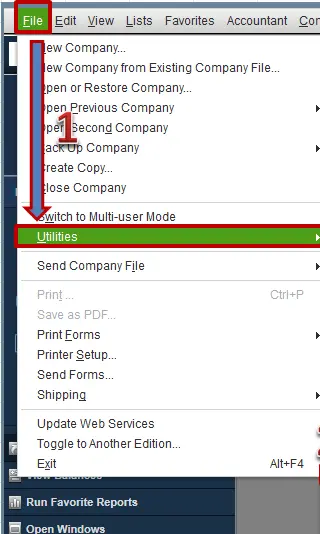
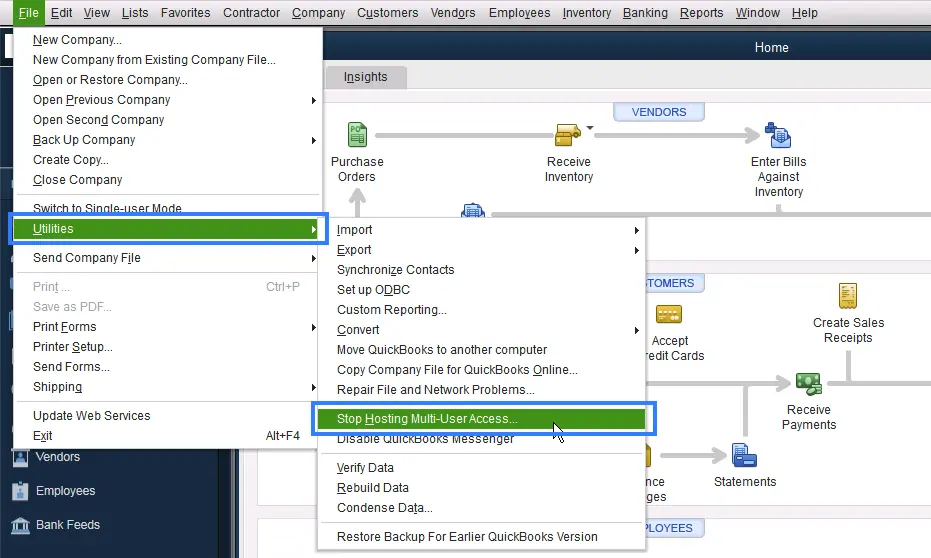
Method 1: Start the QuickBooks service
The initial step is to move to the Start icon and then hit a click on the Services tab in QuickBooks.
Click the QBCFMonitoringservice icon that could be seen in the services list.
Verify that the services have Started and also that they are setup in the Automatic mode.
In case the services are not in Automatic mode, then you need to Verify the radio tab and then hit Apply and OK options respectively.
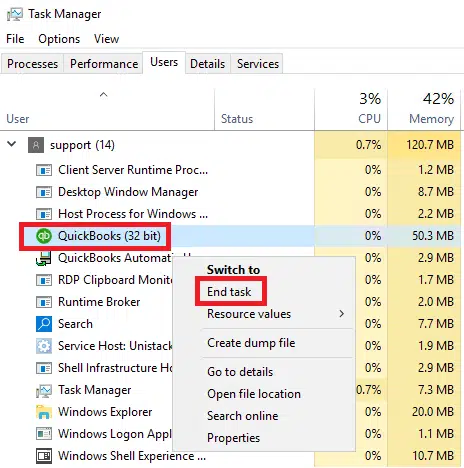
Method 2: End the programs conflicting with QuickBooks desktop
At firstly, press the Ctrl+Alt+Del keys to launch Task Manager.
After that select the Processes tab.
Search for any suspicious process that can be conflict with QuickBooks.
If not found any, terminate all the process one by one.
To terminate the process, click on the process and select End Process.
Check the error status after terminating every process.
At first, Change the account type, by clicking the Start icon.
Go to the Control panel and selecting the User Account icon.
Next, hit on the Add/remove user account tab.
Also click the QBDserviceuser23 icon and modify the account type according to the requirement, which can be done by verifying the administrator user icon.
Method 4: Create folders in the C Drive
You are now required to create a new folder with the name QB in C drive. And later on, select read/write options for all the folders. The folders that you need to create are as follows:
Administrator
Add system
QBDataServiceuser23
Add user
Everyone
You need to endow the permissions for the complete folder list. Also hit a click on share icon, in order to share all the folders to the systems.
Method 5: Copy the company file into the new folder
After creating the folder, copy the company file in the new folder. As per the observations, the file size might be a reason behind the corruption of the files, due to which the software doesn’t open up.
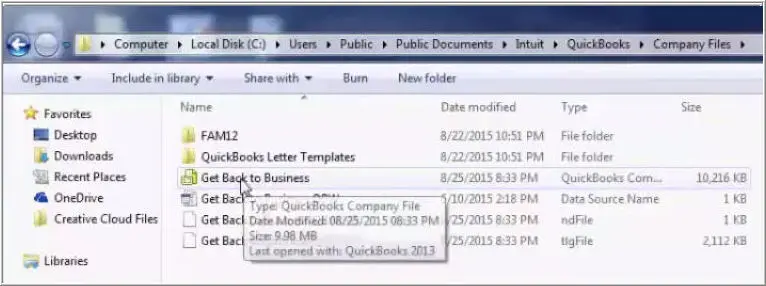
Navigate to the Users option in the C drive. Follow it up by clicking on Public icon.
Followed by selecting the Public documents tab and then hit a click on the Intuit icon.
Next, click on the QuickBooks icon and also the company files.
Now, you will see the Default Company file location.
You will have to Copy and Paste the QuickBooks file in the new folder. Also, avoid cut paste method to move the company file, as it may lead to corruption.
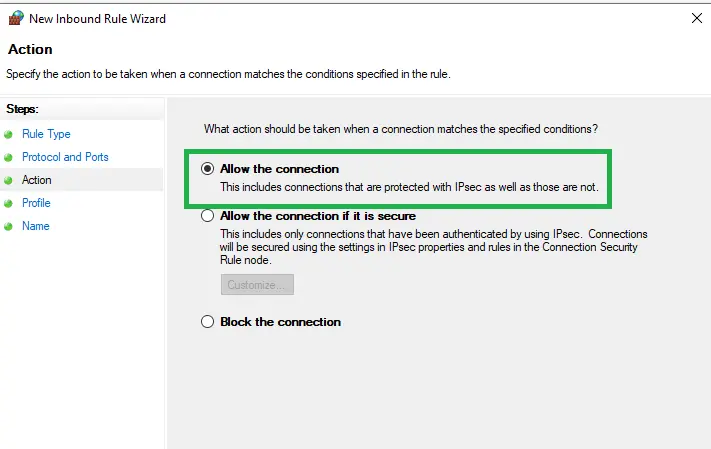
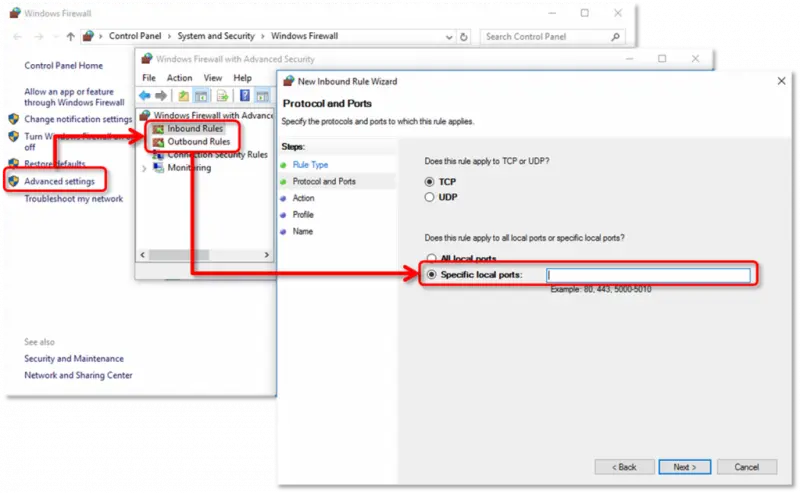
Method 6: Setup inbound and outbound firewall rules
For this, select the Windows firewall option in the Firewall tab.
Now in the Advanced settings tab, you need to visit the Inbound rules icon.
And along with that move to the New rule and port icons respectively.
Other Quick Steps to Resolve QuickBooks Error 6144, -301 or Error 6144 , -82
In case the above method fails to fix the issue for you, it is recommended to check out the below mentioned processes once:
Step 1: Make use of the QuickBooks file doctor tool
Downloading and using the QuickBooks file doctor tool can help you in resolving the error automatically. This tool is designed and developed in a way that it has the capability to diagnose and fix the error by itself. You can simply need to download the tool from the QuickBooks tool hub program and then install it on to the system and then run it.
Initially, close your QuickBooks program.
After that download the latest version of QuickBooks Tool Hub from here.
Next, you need to open the downloaded file (QuickBooksToolHub.exe)
To install the tool hub software on your system, right click on QuickBooksToolHub.exe and tap on Run.
In the next step you need to go through the on-screen steps to install and agree to the Terms and Conditions.
Once the installation process complete, you need to double-click on the tool hub icon to open it.
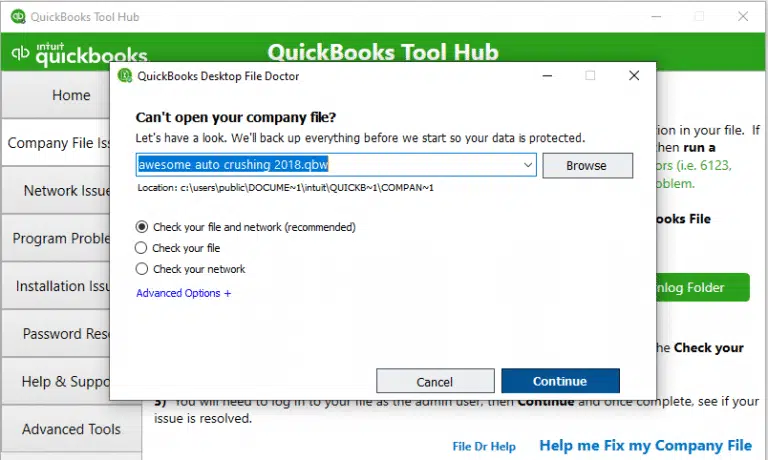
Now go to Company File Issues tab and choose Run QuickBooks File Doctor.
This process may take one or more than one minute to open the file doctor.
You need to select the Company file from the drop-down menu.
And choose Browse and search to find your damaged company file.
Now select Check your file opt and click on Continue. Wait for few minutes to scan the file.
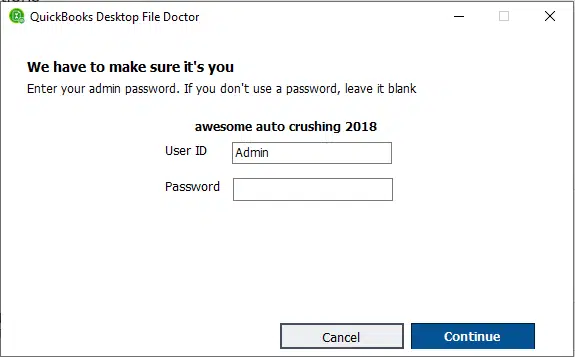
Lastly, put your QuickBooks admin password and then select Next tab.
Step 2: Reinstalling the QuickBooks software
There can be a situation when the file doctor also fails to fix the issue, then in that case you can simply reinstall the QuickBooks software. It should be noted for performing this process, it is supposed to have the admin rights. Also, you should have the installation CD of QuickBooks.
For Windows Vista, 7, or 8
Open run by pressing Windows and R tabs.
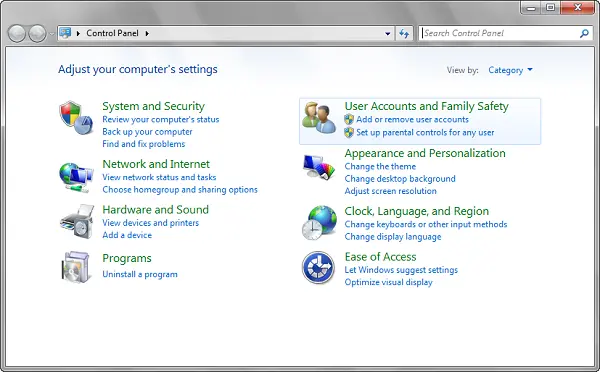
Furthermore, open the Control panel and hitting Enter key.
Under the User accounts and family safety options, select Add or remove user accounts.
Followed by clicking on the particular qbdataserveruserxx which is similar to the version you are using:
QuickBooks 2013: qbdataserviceuser23
QuickBooks 2012: qbdataserviceuser22
QuickBooks 2011: qbdataserviceuser21
QuickBooks 2010: qbdataserviceuser20
QuickBooks 2009: qbdataserviceuser19
QuickBooks 2008: qbdataserviceuser18
QuickBooks 2007: qbdataserviceuser17
QuickBooks 2006: qbdataserviceuser16
Hit a click on Delete the account option.
Finally, reinstall the QuickBooks software.
For Windows XP
Hit a click the Start tab and then choose the Control panel.
Followed by double clicking the User accounts.
Click the Specific qbdataserviceuserxx that is similar to the QuickBooks version you are using:
Initially, access the QuickBooks folder and move to the company files location.
Look for the TLG and ND files.
Next, click on .TLG and .ND file and right-click on the file and select Rename.
You need to rename the files by adding '.OLD' at the end of the file name.
It will prevent QuickBooks from accessing this file. As a resort, the software will create new files when opened.
Frequently Asked Questions
What is Error code 6144 in QuickBooks?
This error belongs to 6xxx series of error codes that related to company file. It might appears on your screen when opening the company file and that has some corruption or data damage.
Does Error 6144, 301 damage my QuickBooks company file?
No. The error usually prevents QuickBooks from opening the file but does not directly corrupt the company data. However, improper troubleshooting may risk data loss, so it is recommended to take a backup before applying fixes.
Will repairing QuickBooks installation fix Error 6144, 301 permanently?
In most cases, Yes. If the error is caused by damaged installation files, repairing or reinstalling QuickBooks ensures that all missing or corrupted components are restored, eliminating the error permanently.
Do I need admin rights to fix these errors?
Yes. Without administrative rights, you may not be able to adjust hosting settings, firewall configurations, or perform QuickBooks repairs, which are necessary to fix these errors.
How can I prevent QuickBooks Error 6144, 301 in the future?
To avoid this error, always ensure that: 1. QuickBooks is updated to the latest release. 2. Hosting is enabled only on the server. 3. Firewall and antivirus settings allow QuickBooks connections. 4. Company files are stored in a secure and accessible location.
Winding up!
We have tried to scribble all possible solutions that you can implement by yourself in order to fix the QuickBooks error code 6144. In certain cases, you may end up in more trouble or you’re not able to properly incorporate the solutions, ending up in encountering the same error again. In such situations, contacting our support executives with the help of our dedicated support line i.e., +1-800-761-1787, can work amazingly for you.
You can discuss the issue directly with our QuickBooks desktop support team and ask our certified professionals to fix the error on your behalf. We are a hub of technocrats, who work round the clock to offer the best possible support services to you. Don’t think too much, Just ring us and let us do the rest. We are available to help you 24X7X365
Learn how to use the QuickBooks Conversion Tool to move your sage accounting data into QuickBooks desktop:
QuickBooks is an innovative bookkeeping and accounting software and many of the small- and medium-sized business owners have been switching to it from other accounting software for years. It has been noted that a large number of Sage 50 (previously known as Peachtree) users have switched over to QuickBooks Desktop or Enterprise solutions in the last couple of years. If you too are a Sage 50 user and want to convert/move to QuickBooks desktop, you may learn everything you should know in this article.
One tool that is required to convert Sage 50 to QuickBooks Desktop is QuickBooks Conversion Tool. The tool can help you move your data from Sage 50, earlier Peachtree, convert to the latter automatically. Read this article till the end to learn how you can download and use the conversion tool. You can skip these steps and contact our support team for help. We can help you with the end-to-end process for converting Sage 50 to QuickBooks desktop. Please feel free to connect with our tech geeks using our dedicated support line.
The payroll transactions and employee year to date info.
Payroll items used to calculate paychecks.
Individual employee wage or deduction information.
Fixed asset
Work tickets
Closed or partially closed sales orders, purchase orders, and estimates.
You should also keep in mind, that you can only convert versions of Sage 50 and QuickBooks desktop from the same region. In case you are having US version of Sage 50, then it is required to convert it to a US version of QuickBooks desktop.
Step 2: Prepare for conversion
Now that you know the requirements for conversion, it is time to prepare for conversion. It is very much important for you to avoid conversion tool errors, to ensure to save the file locally. The steps involved in this process are:
Install QuickBooks desktop, if you haven’t already. This should be done on the same system having Sage 50.
Ensure that the Sage 50 and QuickBooks desktop data are saved on the load hard drive. If it isn’t, then you need to move it to the local hard drive before starting. The conversion tool will encounter an error, if you are hosting a file over a network or on a server.
It should be noted if the data file is located on a server, you are required to convert it on the server system.
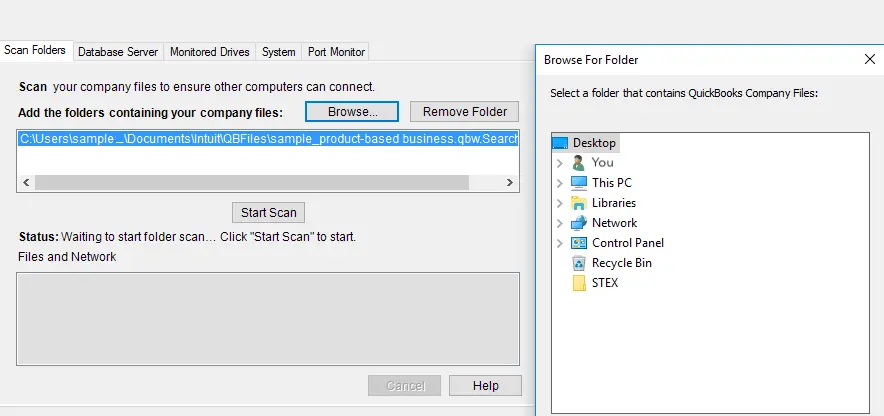
For this, select browse in the conversion tool and select browse.
Look for and choose the Sage 50 company file that you wish to Convert.
In the pervasive 32-bit ODBC engine DSN setup window, and choose the sage 50 company file from the database name dropdown menu and hit OK button.
Enter the Sage 50 password just created by you and then hit next.
Choose the QuickBooks desktop version and edition you are moving the Sage data into and then enter the company file name in the field.
Select browse and select the folder to save the converted data to and select next. In case you don’t pick a folder, then the default is the My documents folder. In case you selects a folder, it is recommended to import into a file that is 2 folders deep maximum.
Review what you have entered. If everything works well, choose convert file to start the conversion. This step will launch QuickBooks and also the QuickBooks application certificate window requesting access to the company file.
Allow the application and choose Yes, prompt each time. You need to select continue.
This might take some time to convert the data and the conversion tool will let you to know if the conversion is successful.
Proceed ahead to Step 6.
And if not, then there is something went wrong during the conversion, you need to reach out to our support team.
Step 6: Review the conversion
Once the tool is finished, choose open in QuickBooks desktop. You need to review the data in QuickBooks and ensure that everything is there. After that, it is recommended to review the transfer log:
Open the windows start menu.
Look for and open File explorer.
Move to C:\USERS\[Your Windows User Name]\My Documents\Intuit\QuickBooks.
Review the Failed transaction log file in the folder. This will tell you if the data didn’t transfer over.
Once the failed logs are reviewed, the process will be complete. In case you are new to QuickBooks, you should learn about its features and tools to make the most of it.
This article explained to you the 6 DIY steps to convert from Sage 50 to QuickBooks Desktop. We hope that you found it helpful and have no trouble in carrying out the steps provided herein. In case you have any queries or you require any help, feel free to call us using our dedicated support line i.e.,1-800-761-1787. Our QuickBooks enterprise support experts and certified accounting professionals are available 24×7 and can be accessed almost immediately. Feel free to call us, we will be happy to help you.
FAQs
Which has a better user interface, Sage 50 or QuickBooks?
QuickBooks is considered to have a more user-friendly interface when compared with Sage 50. While QuickBooks comes with a more modern and intuitive design, Sage 50 is slightly outdated and complicated.
What are the benefits of QuickBooks over Sage 50?
Some of the major benefits of using QuickBooks over Sage 50 are: 1. User-friendly interface 2. More integrations 3. Better customer support 4. More affordable 5. More scalable
Is Sage 50 compatible with QuickBooks?
Sage 50 and QuickBooks are two different accounting software packages that are not directly compatible with each other. However, there are third-party tools and services like the "Transaction Pro Importer" available that can help with data migration and integration between Sage 50 and QuickBooks.
Can I convert back to Sage 50 after converting to QuickBooks?
Yes, users can convert back from QuickBooks to Sage 50.
Is there any cost associated with converting from Sage 50 to QuickBooks Desktop?
The cost of converting from Sage 50 to QuickBooks desktop can vary depending on the method used for conversion.
What are the file formats supported by QuickBooks Desktop for data conversion?
QuickBooks Desktop supports the following file formats for data conversion: 1. QuickBooks for Windows (.qbw) 2. QB for Mac (.qb2014 or later) 3. Quicken for Windows (.qdf) 4. Microsoft Excel (.xls, .xlsx, .csv) 5. Comma-Separated Values (.csv) 6. Tab-Separated Values (.tsv)
Did you encountered error 401 while working in QuickBooks accounting software and are unable to come to any conclusion? Well, we can definitely help you with this issue. This error is basically about an unauthorized request in QuickBooks desktop, and can be easily fixed. You can come across such an error while:
Signing in to the company file or accountant toolbox.
Such an error can also be faced while sending an invoice with QuickBooks payments.
This error code usually comes up with an error message stating “The remote server returned an error: 401 unauthorized. Request is unauthorized”.
This error code can be easily handled by a couple steps, which we have discussed later in this article. So, we would recommend you read this article carefully till the end and implement the process discussed below.
There are not much of the solutions to this QuickBooks error code 401. Once the error appears on the screen with the error message, you are simply required to carry out the steps below:
At first, opt for No and close the error message window.
Steps to update the QuickBooks software to the latest version
There can be a handful of options to update the QuickBooks software. Let us have a look:
Step 1: Setting up automatic updates
In order to update QuickBooks to the latest version, you can opt for setting up automatic updates. The automatic updates option saves a lot of time and ensures timely update. The steps involved in this process are:
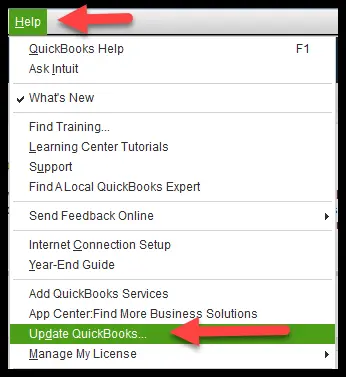
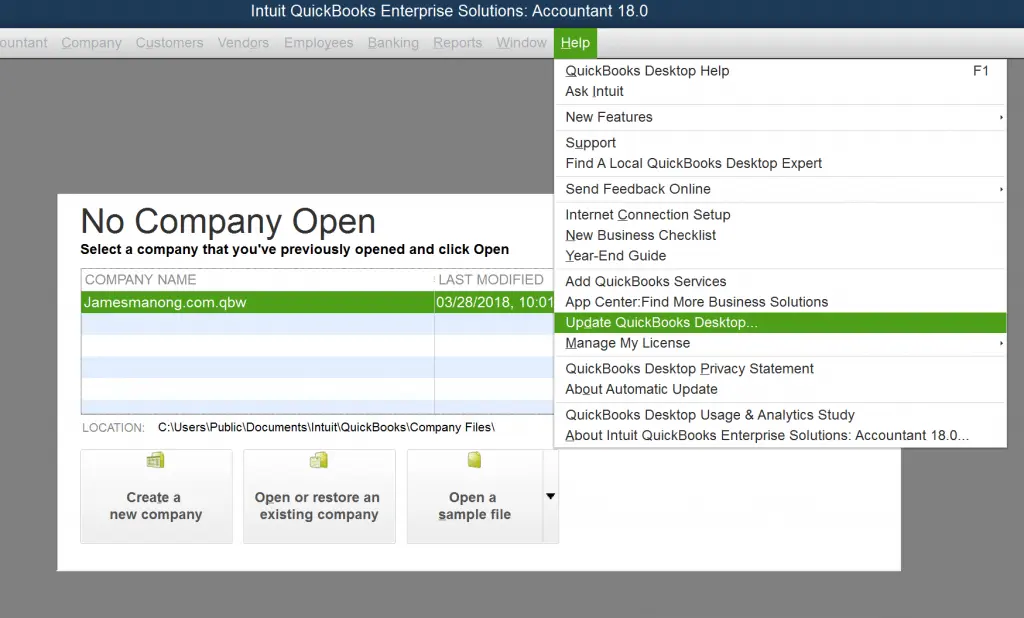
This can be done moving to the help menu and selecting update QuickBooks desktop.
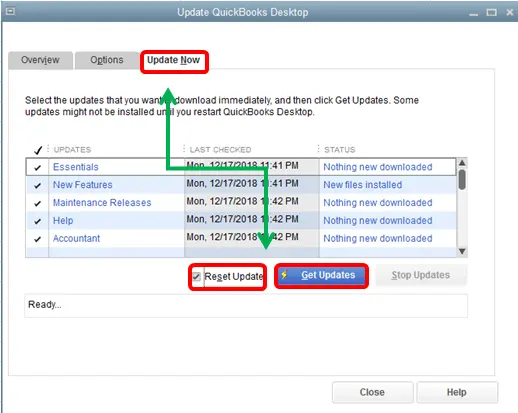
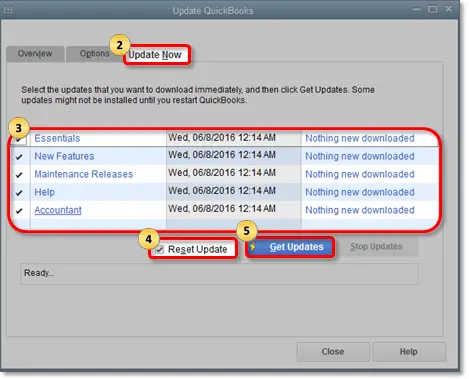
Move to the update now tab. It is recommended to select the reset update checkbox and clear all the previous update downloads.
You will then have to choose get updates to start the download.
After the download ends make sure to restart the software.
Last but not the least, accept the option to install the new release.
Facing issues while setting up the Automatic updates?
In case you face any hindrances while setting up the updates in QuickBooks, adhere to the following pointers to fix them:
Make sure that you are using a fast internet connection.
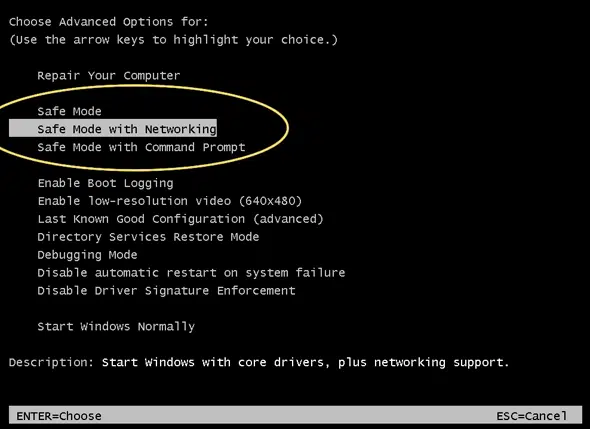
If the issues keep persisting, then, in that case, restart your Windows in Safe Mode with Networking option.
Press the Windows + R keys to open Run command.
Type Msconfig in the run window.
After that, select Safe mode with networking. Now, try updating the software.
Now close all the running programs. This will ensure that no other program is conflicting with the Quickbooks update process.
Also, consider turning off your antivirus software temporarily while the updates are in progress.
Step 2: Scheduling for future automatic updates
Another option that one can opt for is to schedule updates. This means that you can schedule QuickBooks updates according to their comfort and the software will get updated automatically. The steps to be followed for this are:
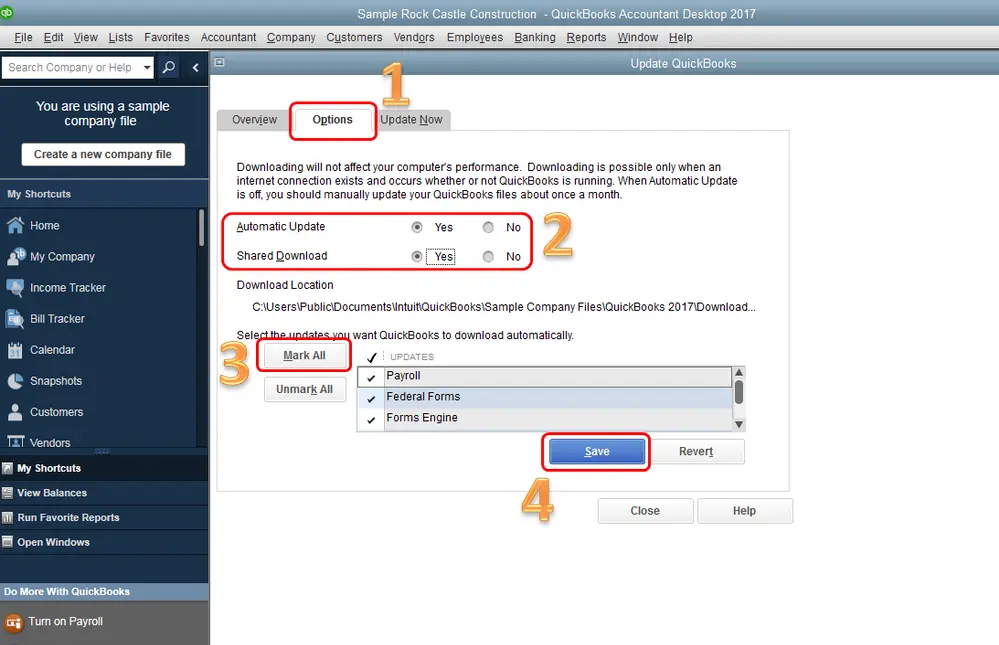
Move to the help menu and opt for the update QuickBooks desktop.
Navigate to the Options tab.
Now, select yes to turn on automatic updates. It is recommended to share automatic downloads to other systems on the network, you can select yes for each system.
In case you are not comfortable with automatic updates and want to update the software manually, then below steps would be helpful for you:
You can simply close the company file and QuickBooks.
Open the Windows start menu.
Once done with that, look for QuickBooks desktop. And also, right-click the icon and choose run as admin.
Move to the help menu while on the no company open screen and then click on update QuickBooks desktop.
Go to the options tab and then choose Mark all and then select Save.
Navigate to the update now tab and also choose the reset update checkbox.
Then choose to get updates.
It is believed that updating the QuickBooks software by following any of the above methods, would definitely work in fixing the QuickBooks 401 error. You can implement any of the three above mentioned steps to update the QuickBooks accounting software to the latest release.
Miscellaneous Solutions for QuickBooks unauthorized error code 401
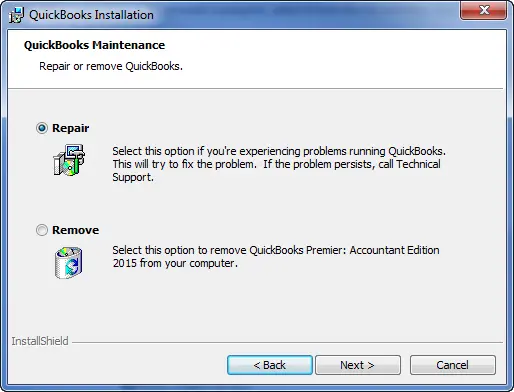
Solution 1: Repair QuickBooks desktop
If updating QuickBooks fails to rectify the issue, the user should go for the repair process to roll back any changes that contributed to error 401. The procedure for repairing QuickBooks is:
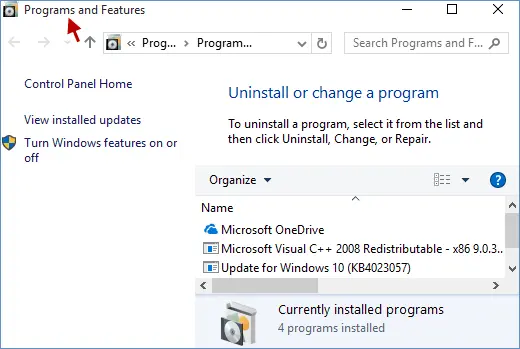
At first, click on Start button and select Control Panel.
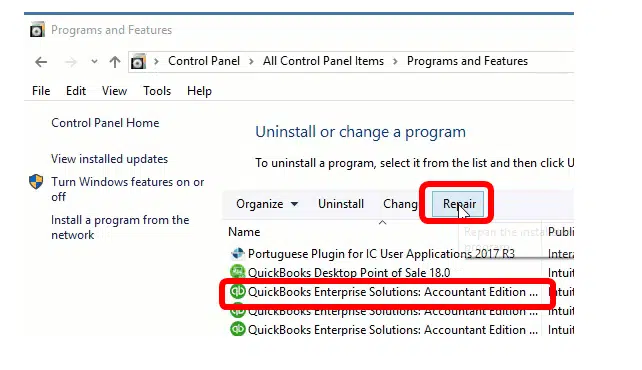
After that, go to Programs and Features.
From the list of installed programs, select QuickBooks.
Now right-click on QuickBooks and opt for Repair.
When all is done, restart QuickBooks and check whether the issue got curbed.
Solution 2: Restore the system
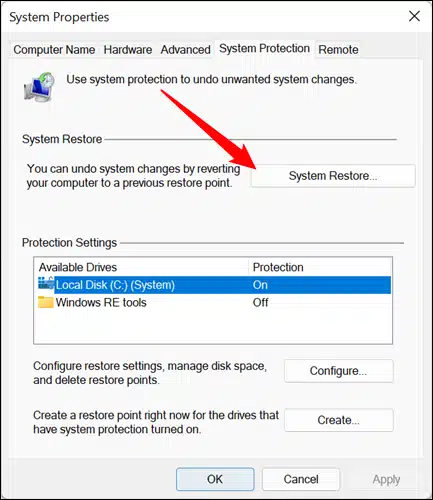
From the Start menu, open System Restore feature.
Choose a recently created restore point from the list and proceed with the Repair process.
Note: This is possible only when a restore point is available in the list.
We conclude the article over here, with the hope that the issue is no longer troubling you. But if you still face the same error, then you can consult our QuickBooks error support team for technical assistance. Ring up to us using our dedicated customer support line i.e., +1-800-761-1787, and we will help you with the error to be tackled easily.
FAQs
What can cause Error 401 in QuickBooks?
Incorrect login credentials, expired or invalid subscriptions, issues with Intuit server, or problems with the QuickBooks company file can be common causes for this error.
Can QuickBooks Error 401 be fixed by restarting the computer?
Yes! Restarting the computer can sometimes resolve such types of QuickBooks errors.
Can a firewall or antivirus software cause Error 401 in QuickBooks?
Yes! Firewall or antivirus software can sometimes blocks the communication between QuickBooks and its online services, which may in turn lead to this error.
QuickBooks users do reap its countless benefits, but at times they become victims of various technical issues such as QuickBooks POS error code 7149 that usually occurs while trying to open your company file or during regular operations. This error also occurs when QuickBooks is unable to read the company file due to incorrect file path, permission issues, or a corrupted data file. Sometimes, your computer may also freeze for a few seconds when this error occurs.
When this error encounters, the system generally crashes, and an error message pops up on the screen:
Warning
“QuickBooks has encountered a problem and needs to close. We are sorry for the inconvenience.”
This problem needs immediate attention, but before fixing it, we should have to understand the causes behind to it. Meanwhile, if you find a need of technical guidance from our certified QuickBooks ProAdvisors, you may call us at the helpline at 1-800-761-1787.
What triggers to the QuickBooks error message 7149?
QuickBooks Error 7149 usually occurs due to several reasons. Few are as:
Incomplete or corrupt installation: Few times installation process doesn’t get completed or gets damaged and this doesn’t let the computer from copying the files that are important to run QuickBooks desktop.
Corruption in Windows Registry: The recent installation or changes in modification causes corruption in Windows Registry which leads to this error.
Virus in the computer: Virus threats can be another cause of error code 7149.
Other issues: Few of the antivirus software causes hanging of the system or can affect working of QuickBooks. In that case the antivirus or firewall needs to be disabled.
System: Each of the computer systems are different and at times some local issues can cause the error.
Network Issues: In a multi-user setup, if the server or hosting computer is not accessible, Error 7149 may appear.
Signs and Symptoms of QuickBooks error code 7149
You can land into the QuickBooks error code 7149 in certain situations that can be identified using the following signs and symptoms. Let us check out of them one by one:
In case the error itself flashes on the screen, then you might be able to spot the issue easily.
In case of active application or program window getting crashed, it is probable that you might end up with this error.
Another sign can be if the Windows run slowly.
Your software freezes repeatedly.
DIY Solutions to Fix QuickBooks Error Code 7149
Below are the methods to resolve the QuickBooks error code 7149:
Solution 1: Repair or Reinstall QuickBooks
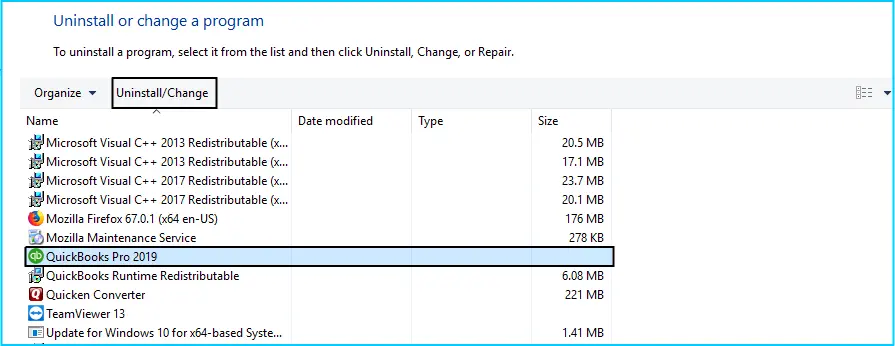
You have to open the Control panel of your computer and then click on Add or Remove Programs. The same can be searched in the Start Menu.
Find QuickBooks and then take your cursor on it and right click on it.
Now you have to click on repair and then follow the instructions that come up on the screen.
Hit a click on the Uninstall tab if you want to uninstall QuickBooks desktop and then again reinstall it.
Once done restart your system and the open it.
Lastly, open the QuickBooks software to inspect if the running issue is got solved. Move to the next solution if still the error appears.
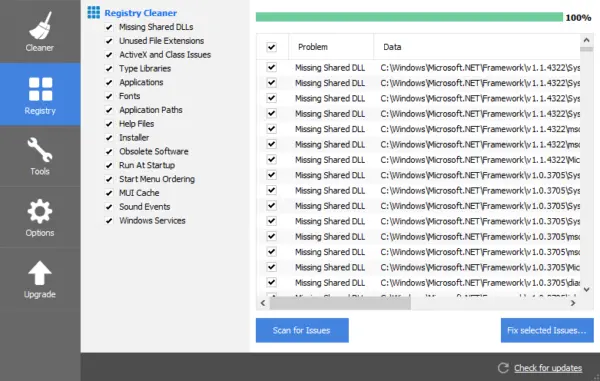
Solution 2: Repairing windows registry Key
It is suggested that you seek professional help for this, as trying it without technical knowledge can be quite risky. Follow to the steps below for repair and fix Windows registry key.
Firstly, you need to press Win + R keys to directly open the Run window on your screen.
Ands type Regedit and press Enter key. This command will open the Registry Editor Window.
In the next step, click on HKEY_CURRENT_USER.
Also, you are required to Find and Delete the keys related to the names of the already uninstalled apps.
The duplicate keys for the programs, that have been uninstalled need to be essentially deleted. The easy steps are as follows:
At first, click on Ctrl and Fkeys to open Find box.
And further, you need to type the application's name.
Followed by hitting on Enter key.
In such as case, your should tap on Delete.
Additionally, you can use the F3 key to switch between alternatives and then Delete them.
Once you are done with all the steps mentioned above, you now need to perform the same procedure with the paths provided as follows:
The above given steps might be bit technical for you, we recommend you to consult with your IT professionals. After done with the steps, you should restart your QuickBooks once and check if the error got fixed.
Solution 3: Remove malware
With the help of your antivirus software, run a complete scan of your computer to check if there any virus or any potential threats that are causing the error code 7149 in QuickBooks. Once detected by the antivirus all the viruses will be immediately removed. Once done restart your computer and see if its fixed or not.
In case you find out that it is your antivirus that is preventing QuickBooks from working then disable for some time. Once it is done QuickBooks will be able to open normally. You can reboot your system as well and then run in safe mode. Open it and update it also.
You need to look for the Antivirus icon in the taskbar.
After that, hit a right-click on the same.
Once you see the options on the screen, look for the Disable tab and hit the same.
Later on, try opening QuickBooks after disabling it.
You might require to start the system in safe mode, and then open the software and update it.
Solution 5: Close any conflicting programs
Herein, you are supposed to open task manager by clicking on to Ctrl + Alt + Del keys.
This will let you see the list of programs running at the moment.
You need to then head to the processes tab and stop the programs one by one by highlighting each of the program and also clicking on the end process tab.
Moving ahead, look carefully at the message, when it occurs at the time of stopping a process.
After you are able to spot which process is causing the snag, then you can perform the steps for reinstalling the application.
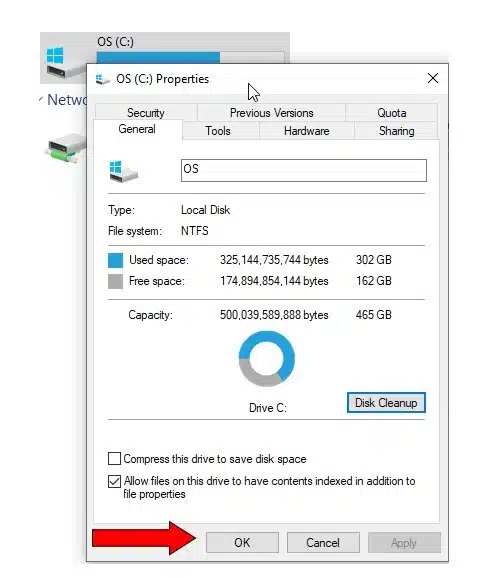
Solution 6: Go for disc cleanup
A low amount of free space on your PC, may also lead to such error. In this situation, clearing up space on your hard disk is a good idea. Checkout the following steps below:
At first, press Win + E keys to open Windows Explorer.
After that right-click on C drive and select Properties.
And, move to General tab and select Disk Cleanup to start the clean-up process.
Fixing the QuickBooks error code 7149 is not much of a problem. But if you are having trouble or have some query related to it, then you can seek assistance from QuickBooks error support team. Our accounting professionals are highly trained and equipped with latest edge-cutting tools and the best part is that they are available 24/7 to you out.
Few FAQ's related to QuickBooks Error 7149
What error message displays if Error 7149 in QuickBooks encounters?
This error appears in the form of an error message stating:
“QuickBooks has encountered a problem and needs to close. We are sorry for the inconvenience.”
Can I open my company file if QuickBooks shows Error 7149?
You may not be able to open the file until the underlying issue is resolved. Using QuickBooks File Doctor, checking folder permissions, or moving the file to a local drive usually resolves the issue.
Why am I seeing QuickBooks Error 7149?
This error can appear because of a damaged company file, improper file location, insufficient folder permissions, network issues in a multi-user environment, or interference from antivirus/firewall software.
Does QuickBooks Error 7149 affect multi-user mode?
Yes. In multi-user setups, if the hosting computer or server is inaccessible, QuickBooks may show Error 7149, preventing other users from accessing the company file.
Is QuickBooks File Doctor effective for Error 7149?
Yes,QuickBooks File Doctor is designed to detect and repair damaged company files. Running it can often fix Error 7149 without any additional steps.