Want to learn the easy ways of moving customers, vendors, products, services, and accounts from QuickBooks Online to QuickBooks Desktop? Read this article, and clear all your doubts about how to move lists from QuickBooks Online to Desktop. In case you require to move lists from QuickBooks online to desktop desktop, then this article would be of significant assistance. We will be discussing the process to move your lists and balances to the new desktop file so that you don't spend less time on data entry. You can also learn the process to transfer the open balance of customers, vendors, and accounts to the desktop file. If you have already cancelled your QuickBooks online, then you can also access the data for a year many times to everything.
To know more about the thing, you can read this article ahead, or can also get in touch with the support team. We are a team of technically sound accounting professionals who work round the clock to provide the best possible support services. So, feel free to get in touch with us anytime.
Steps for Moving the Accounts, Customers, Vendors, and Opening Balances
Before you move ahead with the procedures, make sure to reach to your accountant. And also, ensure this change is right for you. Moreover, keep in mind that this won’t bring over transactions associated with the customers, vendors, or accounts. It will simply bring their current open balances in QuickBooks online. In order to move the transactions too, you will have to export the data.
Step 1: Exporting account, customer, and vendor list reports to Excel
Follow the below-given directions for exporting the various reports from QuickBooks to Excel.
- You are first required to Sign in to QuickBooks online as an admin.
- And then move to the Reports menu.
- After that, you are supposed to look for and open the Account list, customer contact list, or vendor contact list.
- Followed by selecting Customize on the report.
- Once done with that, select Rows and columns and then change Columns.
- The next step is to select and reorder Columns. Followed by checking the table below to learn what columns to select and their correct order.
Column order for each list report
| Account List | Customer Contact List | Vendor Contact List |
|---|---|---|
| Customer | Vendor | |
| Company Name | Company Name | |
| Account | Phone Numbers | Phone Numbers |
| Type | Billing Street | Street |
| Detail Type | Billing City | City |
| Balance | Billing State | State |
| Billing ZIP | ZIP | |
| Billing Country | Country |
After you are done with the steps, make sure to select Run report tab. Then follow the steps to export the report and save it in a folder.
Step 2: Adding the customer and vendor open balances
The steps for incorporating the open balances corresponding to the customer and vendor are given as under:
- At first, it is required to move to the Sales menu and then choose the Customers tab. After that, move to the Expenses menu and choose the Vendors tab.
- Now, select the Export to Excel icon. And also, save the Excel file in a folder you can access easily.

- Next step is to get the Open balances and open the excel file saved. Also, copy the Open balance column.
- Followed by, opening the Excel file of customers or vendors.
- Now, you do not require the first 4 rows, so ensure to remove them from the worksheet.
- And lastly, add the Open balance column that is copied and then save changes.
Step 3: Mapping QuickBooks fields and import
The third step is to map QuickBooks fields and import them with the help of the following:
- At first, it is required to Sign in to the company file in QuickBooks as an Admin.
- After that, select Utilities from the File menu and also choose Import.

- Now, choose Excel files and opt for No on the window that appears.
- Choose the Advanced Import tab afterward.
- Also, choose Browse and move to the Excel file of account, customer, or vendor list you need to import.
- Once done with that, opt for Choose a mapping drop down and then Add new tab.

- After that, add a Mapping name, based on the list being imported.
- And also, select Import type and then start matching QuickBooks fields with the worksheet headers. Also, select Save after you are done.
- It should be noted that for the customer list, check the mapping sample to map the billing address details correctly.
- The next step is to pick Preview.
- Followed by, selecting the Preferred option.
- The last step is to hit the OK tab and choose the Import tab respectively.
Now hopefully, these steps helped you to easily move lists and balances from QuickBooks online to Desktop.
Read Also: How to Record Journal Entries in QuickBooks?
Steps to Move Products and Services in QuickBooks Online to Desktop
Below are the steps to move the products and services. Let us check out each of them one by one:
Step 1: Exporting the products and services report to Excel
You need to export the list of products and services to Excel. Then, you need to ensure that each item type has its own worksheet in the Excel file.
- At first, sign in to QuickBooks online as an Admin.

- And then move to Settings and opt for Product and services.
- Now, hit the Export to excel icon. And save the excel file in a folder you can access quickly.

- After that, browse to the Folder where you saved the file, and open it.
- The next step is to move to the Type column header, and then filter it to only Services inventory or Non-inventory.
- Also, Copy all of the data.
- Now, add a new worksheet. And rename the Worksheet after the item type so it is easier to transfer them later.
- Once done with that, paste the data you copied into the New worksheet
- Check the column order for each item type table below and follow the correct column order for each item type.
- And lastly, follow the steps for all item types. And Save changes.
Column order for each item type
| Services | Inventory | Non-inventory |
|---|---|---|
| Product/Service Name | ||
| Sub Item of (Note: Add this if you have sub-items in QuickBooks Online) | ||
| Product/Service Name | Sales Description | Product/Service Name |
| Sub Item of (Note: Add this if you have sub-items in QuickBooks Online) | SKU | Sub Item of (Note: Add this if you have sub-items in QuickBooks Online) |
| Sales Description | Sales Price | Sales Description |
| Sales Price | Income Account | SKU |
| Income Account | Purchase Description | Sales Price/Rate |
| Purchase Description | Purchase Cost | Income Account |
| Purchase Cost | Expense Account | Purchase Description |
| Expense Account | Quantity On Hand | Purchase Cost |
| Inventory Asset Account | Expense Account | |
| Quantity as-of Date | ||
| Reorder Points (if you set reorder points in QuickBooks Online) |
Step 2: Adding the sub items
All the items, including the sub items and their parent items, are in the product/service name column. You need to use these steps if you also need to move the sub items to the desktop file.
- You will have to add a Sub item of column right after the Product/service name column.
| Product/Service Name | Sub Item of |
- Also, find the Sub items in the Product/service name column. They will look like: Landscaping, trimming.
- And arrange the Sub items. Also, ensure that the Sub items are under their parent items or categories to keep everything organized.
| Product/Service Name | Sub Item of |
|---|---|
| Landscaping | |
| Trimming | Landscaping |
| Gardening | Landscaping |
Read Also: Steps for Importing QuickBooks desktop to new computer
Step 3: Turing on inventory preferences
- For this, you are supposed to Sign in to the company on QuickBooks desktop as an Admin.
- Also, ensure that you are on Single user mode. From the File menu, choose Switch to single user mode. In case you see switch to multi-user, then you are already on a single user.

- After that, move to the Edit menu and then choose Preferences.
- Followed by picking Items inventory and then choosing Company preferences.
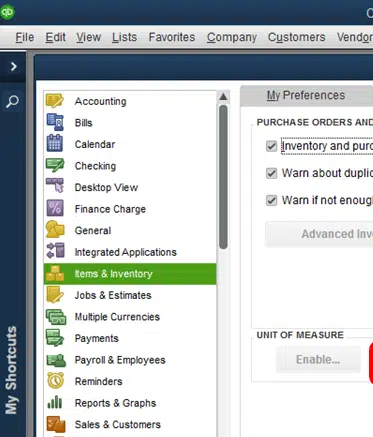
- Also, turn-on inventory and purchase are active.
- And lastly, pick the OK tab.
Step 4: Setting up inventory tracking accounts importing inventory
In case you haven’t already, you will have to set up inventory accounts in the desktop file. The steps to be followed are:
- The first step is to pick the Chart of accounts from the Lists menu.

- And then, right-click anywhere and also select New.
- Now, choose an Account type. Also, ensure to create one account for each of the types.
- Income account
- Cost of goods sold
- Inventory asset
Step 5: Importing inventory
- For importing inventory, it is required to open Excel file of products and services that were prepared in step 1.
- And then, follow the steps to Add multiple list items. You can also Customize the columns on the Add/edit list window. This would help in focusing on the columns you to work on.
Step 6: Adjusting the value and quantity of inventory items
After you are done importing inventory, it is recommended to add items current value and quantity. Once you are done with the above steps, make sure to start with your QuickBooks desktop.
- At first, you are required to connect the Bank and Credit card to the desktop file. After that, it would be easy to download transactions.
- And then, add Checks to record the checking activity.
- Followed by creating and sending an invoice as soon as you finish a job. This winds up the process to move lists from QuickBooks Online to Desktop.
Conclusion!
We conclude the article over here, with the hope that the information shared above might work to move lists and balances from QuickBooks Online to QuickBooks Desktop. However, in case of any query, or if you require any technical assistance, then feel free to give us a call right away at our helpline i.e., 1-800-761-1787. Our QuickBooks desktop support experts and certified professionals will assist.
FAQs
What are different lists in QuickBooks?
The different types of lists in QuickBooks include Vendor list, Customer list, Employee list, Item list, etc.
What are the various types of balances in QuickBooks?
Different types of balances include Account balance, Bank reconciliation, and Trial balance.
How do I export a balance sheet from QuickBooks Online?
The steps to export balance sheet from QBO are:
1. Head to Business Overview, and from there, move to Reports.
2. Choose the report, and in the top section of the report, choose Export.
3. Choose an easily accessible location to save the file.
Does Intuit offer any tool to move balances and lists from QBO to QuickBooks Desktop?
No! There is no specific tool to transfer lists and balances from QBO to QB Desktop.
Read these topics also: