Different Errors and Solutions to fix QuickBooks Sync Manager Error
Did you use QuickBooks sync manager to sync the data of the company files to the third-party application? Does An error just pop up hindering your activity? Well, many of you might come across a QuickBooks sync manager not working problem due to a handful of reasons. This feature is only available to Pro, Premier, or Enterprise users. And it can be further used to sync the file data with the add-ons provided by Intuit. If this feature is not working, we can help you with that. But before that let us understand what this error is all about.
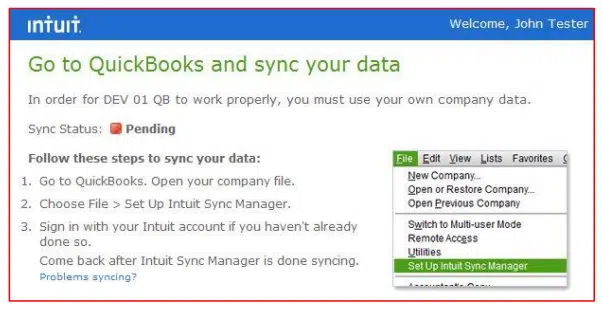
What is QuickBooks sync manager error?
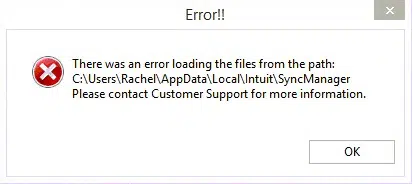
QuickBooks sync manager works as a tool to sync data with other software. In certain scenarios, you might face an issue where the data of QuickBooks fails to sync. You can experience this error if the components or files are either missing or damaged. To understand how this error can be fixed, make sure to scroll down, but before that, let us understand the reasons behind the occurrence of QuickBooks sync manager error. A error message might appear on your screen when such sync manager related occur:
Error!
“Intuit Sync Manager is Not Setup to Sync any Files”.
Most Common QuickBooks Sync Manager Errors along with their Quick Fixes
A handful of QuickBooks sync manager errors can be experienced. Fixing every error involves unique steps. Let us explore each of the errors and the fixes that can be implemented.
Error 1: QuickBooks Sync Manager Error for QuickBooks 2014
You can come across such an error if certain files related to sync manager get damaged or corrupted. To deal with this issue, you will simply have to change the folder name and check if the issue continues.
Solution
Start with opening the file and then logging out from the QuickBooks account.
Now, if you wish to log out, then you will have to look for an option of the sync manager and further click on it.
Then click on the opt to end it.
Look for the folder in which the sync manager file is stored.
The next step is to change the name of the file by adding old towards the end of the name.
Moreover, navigate to QuickBooks and start using the sync manager.
This will create a new folder for the same and then you will have to click on the sync option.
Hopefully, this will fix the issue.
Error 2: Download error in QuickBooks sync manager
Solution
Issue when downloading the sync manager can be dealt with by uninstalling QuickBooks from the system.
Search for the folder in the C drive and rename the folder.
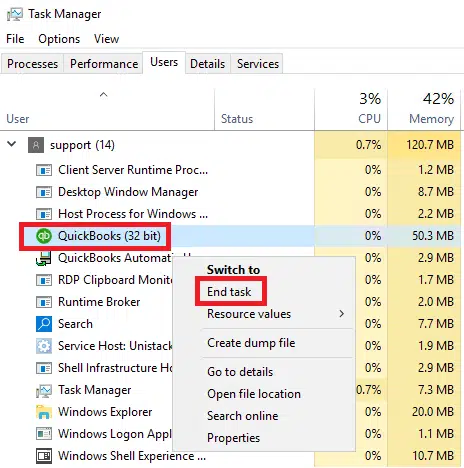
You now have to head to the process tab in the task manager in case you are not able to rename the folder.
Once done with that, find all the processes running related to QuickBooks and then end them.
You will now get a prompt, where you need to click on the ok tab.
After all this is done, you need to install the sync manager again.
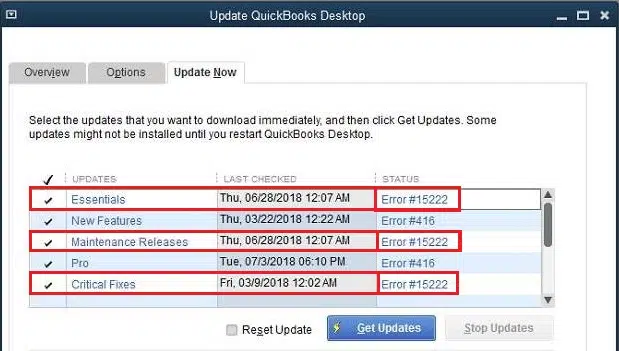
Error 3: Error 17_7300 in QuickBooks Sync Manager
Another common sync manager error is 17_7300, which occurs when the system fails to write the data that you have downloaded. You can perform the following steps to get rid of the error:
Solution
Check if the QuickBooks sync manager present in your system is updated.
Now, open the file.
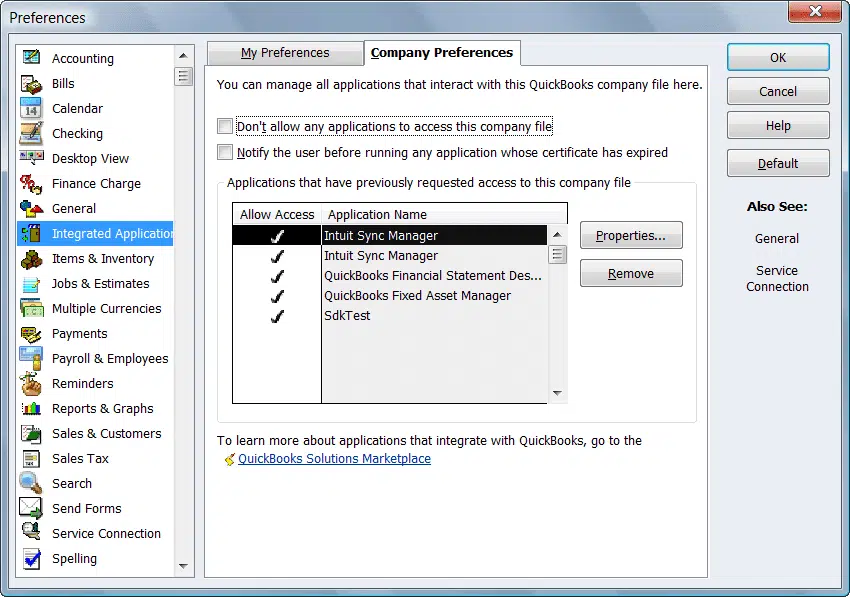
Head to the preferences tab.
And then, look for the opt for the integrated apps.
Tick-mark the box besides Intuit Sync manager.
Please remember to select the company preferences option.
The sync process should work fine now.
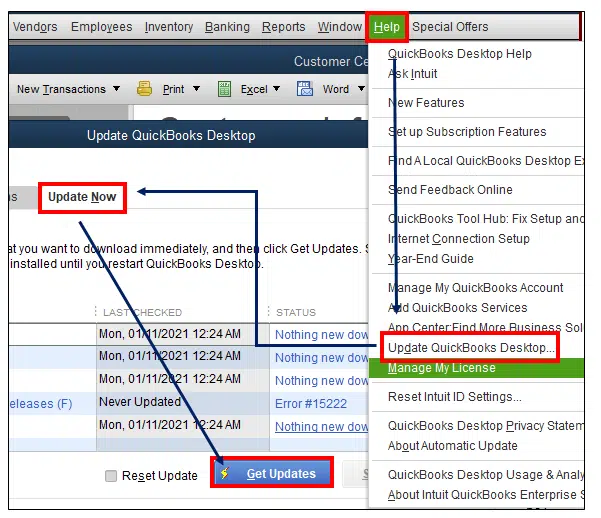
Error 4: Error 17_7118 in QuickBooks Sync Manager
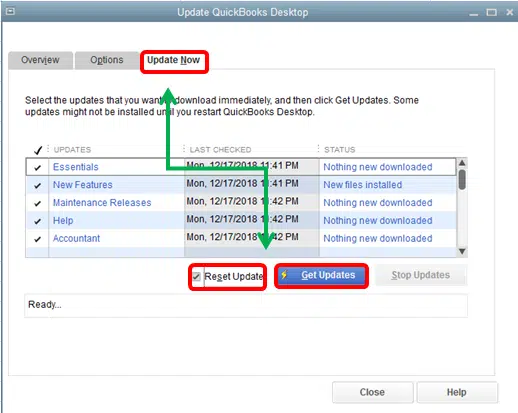
This error may occur when sync manager and the QuickBooks program both are not updated to the newest version.
Now, checkmark Reset Updates box, then click on Get Updates.
Once all this is done, you need to start the sync manager.
Error 5: Error 5_13944 in QuickBooks Sync Manager
If there are any sort of connectivity issues, then you can experience the error 5_13944 in the QuickBooks sync manager, especially when uploading data.
Solution
Search for the folder of QuickBooks sync manager and then search for the SBconnect.crt file in that folder.
The next step is to delete the file.
Start QuickBooks sync manager again on the system.
Once open, go to Help > then > Manage Data Sync and > reset the Intuit Sync Manager.
Reset the existing settings.
And then, try again to sync your data successfully.
Go to Connect your Company page, and hit on Continue.
Now you need to select the Business profile with the same Realm ID, then hit Continue.
Click on Finish after selecting the account.
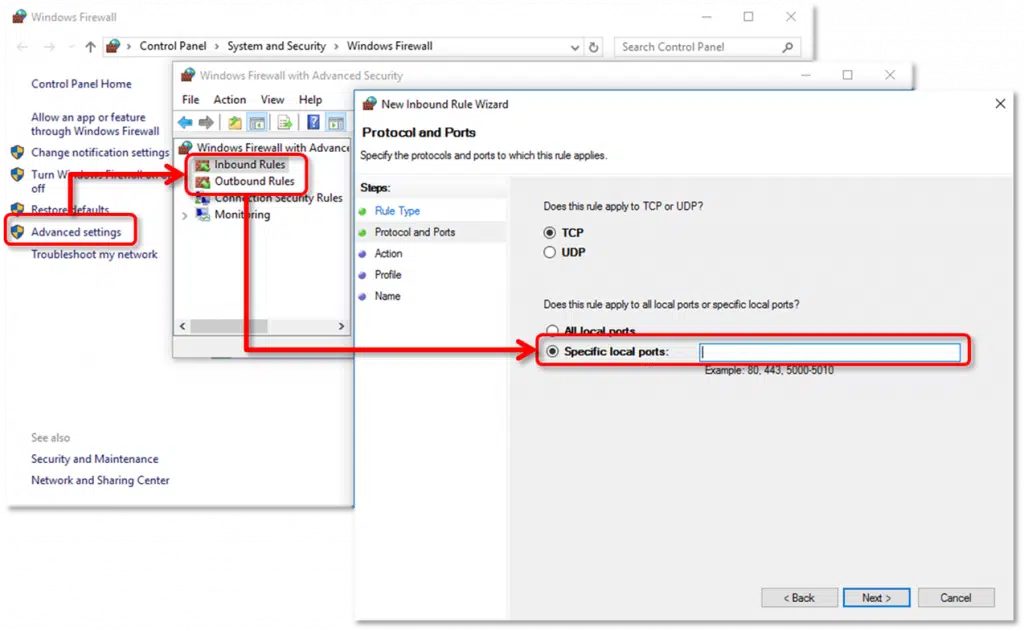
Solution 4: Exempt the URLs from Blocking the QuickBooks Sync Process
Firewall should not prevent Sync Manager from performing the Sync process. For this, exempt the QuickBooks folder and Intuit URLs by adding them to the exception list in the security programs.
What lands you upon QuickBooks sync manager error?
Here is what factors can trigger QuickBooks sync manager error. Let us have a look:
In case the internet/firewall security restrictions or issues related to the network connectivity.
You can further come across such an error if there are corrupted Windows components.
Moreover, if there is insufficient access to the files.
Also, if your data download fails during sync.
The Intuit sync manager failed to work.
How to identify QuickBooks sync manager error?
Identifying the QuickBooks sync manager error becomes easy, using the below signs:
The software isn’t working properly.
Or if the sync manager has stopped working.
You can further spot the issue if the error message flashes on your screen.
The Window crashes in the middle of the activity..
Identifying the error further becomes easy, if the Windows OS responds sluggishly.
Summing Up!
Sync manager can be extremely beneficial when used wisely. With this segment, we have tried to brief you about how you can fix QuickBooks sync manager errors. However, if you aren’t sure this works for you, feel free to contact us via Live chat support, toll-free and email. Our QuickBooks error support professionals will ensure that you get the desired answers to all your queries.
Learn how to set up a bank account and connect it to Bank Feeds in QuickBooks Desktop:
QuickBooks Desktop allows you to use Bank feeds for connecting the bank and credit card accounts with online banking. This feature eases the process, as you do not have to record them manually. It is possible for you to set up bank and credit card accounts for online banking in single user and multi-user mode. You can set up an account in two different ways and we will help you do that. Either you can connect with direct connect or Web Connect. This entirely depends upon what’s available at your bank. To help you with the procedure, here we are with this segment sharing the entire process to set up or edit bank accounts for bank feeds in QuickBooks desktop.
Before you proceed, note that you can connect around 40 accounts, and in case you need more than that, separate the accounts that you need to connect between two or more company files. Now, without ado let us explore the procedure to setup or edit bank accounts for Bank feeds in QuickBooks desktop together. For any queries call us at 1-800-7610-1787.
Steps to Setup or Edit QuickBooks Desktop Bank Accounts for Bank feeds
As we mentioned earlier, you can connect the accounts to bank feeds in two different manners. Here are the detailed steps that can be performed:
Steps for downloading your transactions with direct connect
Well, for this process, you will require a PIN or password from the bank. Once you set up the account, you can download the electronic statements to the bank feeds. When the transactions are downloaded for the very first time, QuickBooks sets up an account for bank feeds. And before you proceed, make sure to find out from your bank, if a fee is allocated or not.
Bank provided credentials
Head to Bank feeds from Banking menu.
You will then have to select Set up bank feeds for an account.
Now you need to enter and choose the bank in the Enter your bank’s name field.
Just in case you are enrolling for the very first time, then simply choose the Enrollment site link. Now, apply for the option of direct connect. In case your bank requires to approve the application, then contact them. Also, ask them in case special sign-in credentials are required.
Once you have enrolled, here is what you need to do:
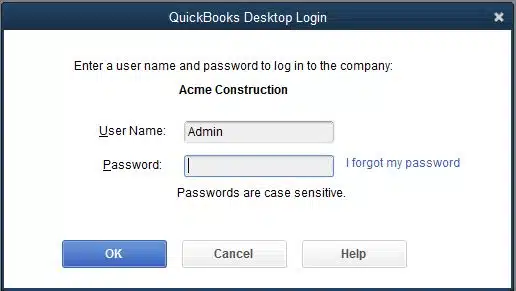
Initially, you need to choose Continue tab.
Next, enter the Online banking Id and password that you have for your account.
After that select Connect your QuickBooks to your bank’s server.
Also, go for the Bank account you wish to connect to the account in QuickBooks.
And towards the end, choose the Finish tab after the connection completes.
In situations when you download the transactions from the bank for the very first time, the software will automatically set up the account for the bank feeds. After setting up the account, you will be able to download transactions from the bank.
It should be noted that the web connect .qbo files are basically the online banking transactions from the bank’s website. The .qbo files can be downloaded and also saved on the system. After which, you will be able to import the transactions so that they become available in the bank feeds. Just in case your bank offers web connect, then follow the procedure below:
Under this, you simply have to select Bank feeds from the Banking menu.
Then go for the Import web connect files option.
Choose the QBO file that has been saved, and choose Open.
After you are prompted to select bank account, choose:
Using an existing QuickBooks account: You can use a QuickBooks account that already exists, in case the account you are importing transactions into is already set up in QuickBooks.
Create a new QuickBooks account: Now, create a new QuickBooks account, in case the account you are importing transactions into isn’t available in QuickBooks yet.
Heading forward, you need to click on Continue tab.
This will show you a dialog box that would tell you that the data has been successfully read into QuickBooks.
Now hit a click on OK tab.
Complete the process by heading to the Bank feeds center to review your transactions.
Steps to Change from Web Connect to Direct Connect or Direct Connect to Web Connect
Just in case you wish to change the way you connect, you will have to simply disconnect the bank feeds using some simple steps. And after disconnecting you can set up your bank feeds again.
Steps to Edit QuickBooks Bank feed settings for bank or credit card accounts
One can simply change the login and other info for the bank account you use. You need to simply turn off the bank feeds to make any changes. And furthermore, set up the bank feeds again.
Firstly, you need to disconnect Bank Feeds for your account.
Setting up bank accounts for bank feeds in QuickBooks desktop is possible using the set of steps discussed above. However, if you failed to do so, even after incorporating the set of steps elaborated above, then in that case, do not hesitate in connecting with our QuickBooks desktop support professionals. Dial our number i.e., 1-800-761-1787, and all your queries will be addressed by our experts immediately.
Did you see an error popping up showcasing: QuickBooks not responding when opening company file? Well, this can be extremely frustrating and scary at the same time, as it involves company files and crucial data. Also, it can slow down work and other users. To help you with the QuickBooks not responding issue, we have curated this segment, discussing the reasons causing the error, along with the quick fixes.
In this segment, we will offer a detailed solutions for dealing with can't open your company file in QuickBooks desktop problem. We will also help you to understand the causes behind it. Let’s dig in deep to understand it better.
What Does Error - Can't open your company file in QuickBooks Desktop means?
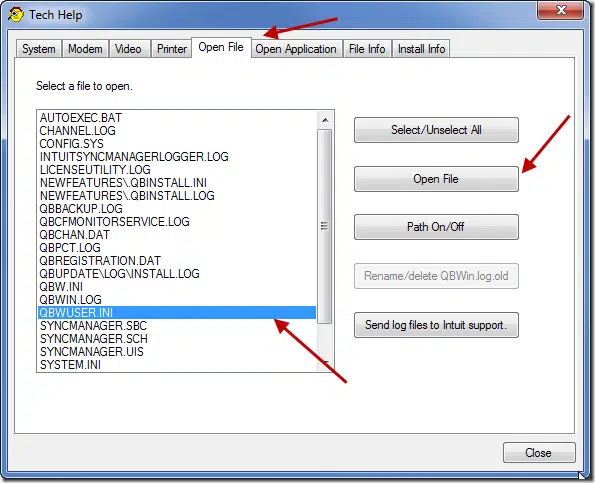
Experiencing QuickBooks not responding when opening company file error is possible when the Windows freeze. It shows up with a warning message: A problem caused the application to cease operating correctly or Windows is looking for a solution to the problem. There can be chances that you didn’t see the error message directly, but the system might freeze. Coming across this issue can be seen when there is a way too long company file name and a damaged QBWUSER.INI file is present. Let us now find out why this particular error shows up:
Different error messages related to QuickBooks not responding when opening company file
You may come across the following error messages which directly or indirectly result in the unresponsive behavior of QuickBooks. These include:
QuickBooks not responding when opening company file
Solutions to Implement to fix Unresponsive QuickBooks when Opening Company File
Now that you know what factors can lead you to this issue in QuickBooks, here are some quick solutions that you can incorporate to troubleshoot the problem of QuickBooks not responding when opening a company file:
Solution 1: Use the disk cleanup tool
For Windows 10, 11:
To begin with, you need to press the Windows tab and click on the Start menu.
After that, look for Disk cleanup and then click on Disk cleanup icon.
The next step is to choose the file type you wish to Delete under the files to delete.
In case you need to clean up your system files then head to clean up system files.
Lastly, restart the system and check if the error QB not responding is still popping up.
Windows 8:
Here, you need to open the Control panel.
Furthermore, click on the Admin tools tab.
Also, select the appropriate drive where your QuickBooks software is installed.
Wait for the process to complete.
It will show a list of the options involving the items that are deleted in disk cleanup.
You later have to click on the OK tab and let the tool remove the junk data from the system.
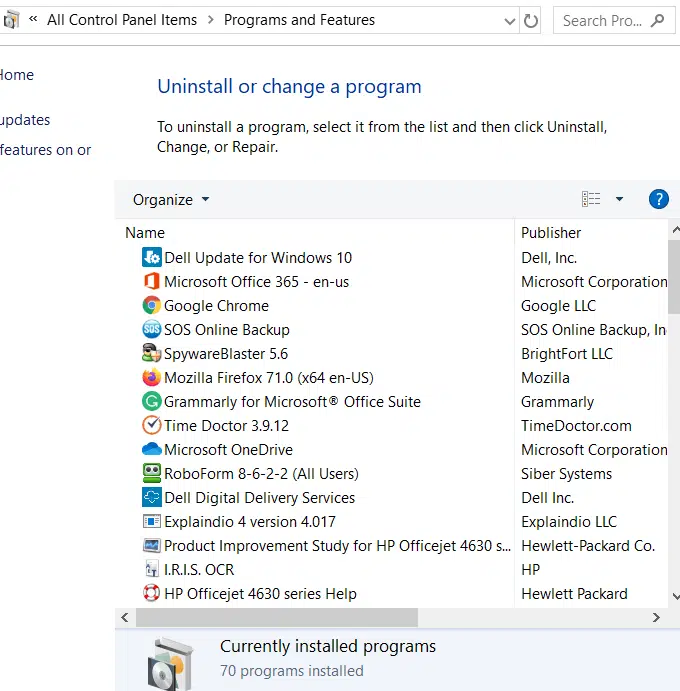
Solution 2: Remove any latest installed third-party app
If you have installed any third-party app or software lately, it might be the reason behind this issue. Thus, in that scenario, you simply have to remove the plugin or third-party software.
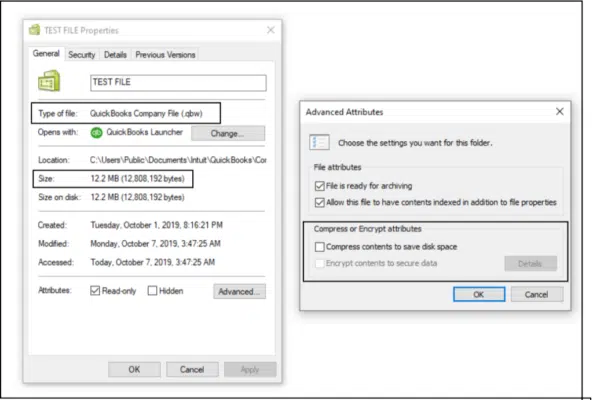
Solution 7: Make sure company file is not encrypted or compressed
You need to move to Company file folder which is affected.
After then, select Properties.
Then click on Advanced.
You need to remove check-boxes next to Compress and Encrypt.
Once done, click Ok.
Now make sure the company file has .QBW extension and not any other extension.
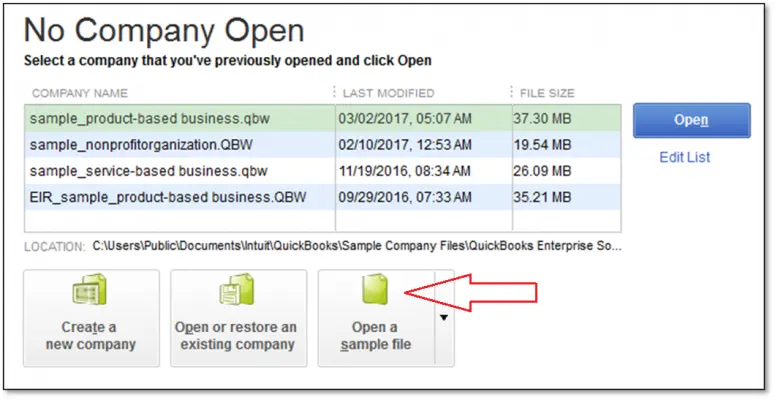
Solution 8: Opening a Sample company file
In the first step, press Ctrl key and hold it.
Following that, click on Open a Sample File.
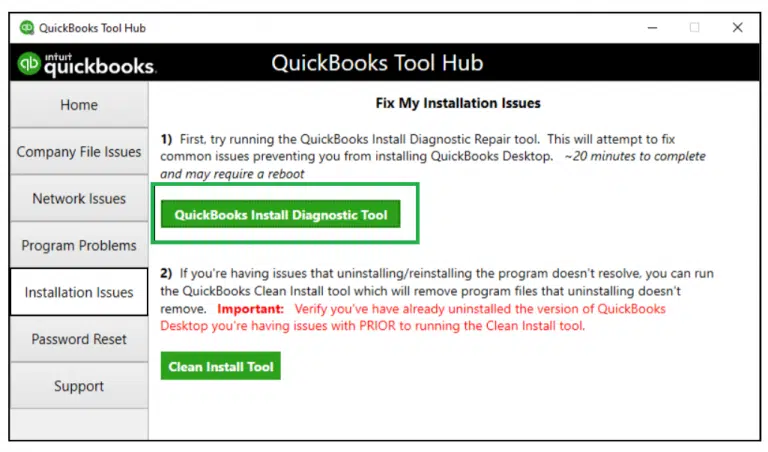
If the file doesn't open, then go for the repairing of QuickBooks desktop. However, if the file opens without any issue, then change the company file location.
Now paste the file on your Windows desktop and rename it.
Open QuickBooks and go to the File menu
Choose Open or restore company.
Open the company file that you already copied on the desktop.
If the copied company file does not open, move the copied file back to the original folder and use it as your main company file.
Rename the original .qbw file you copied.
Solution 10: Temporarily disable antivirus when opening company file
You should temporarily turn off the antivirus and then make an attempt to open the company file. This has proved to be an effective measure for the resolution of many technical errors related to the company file.
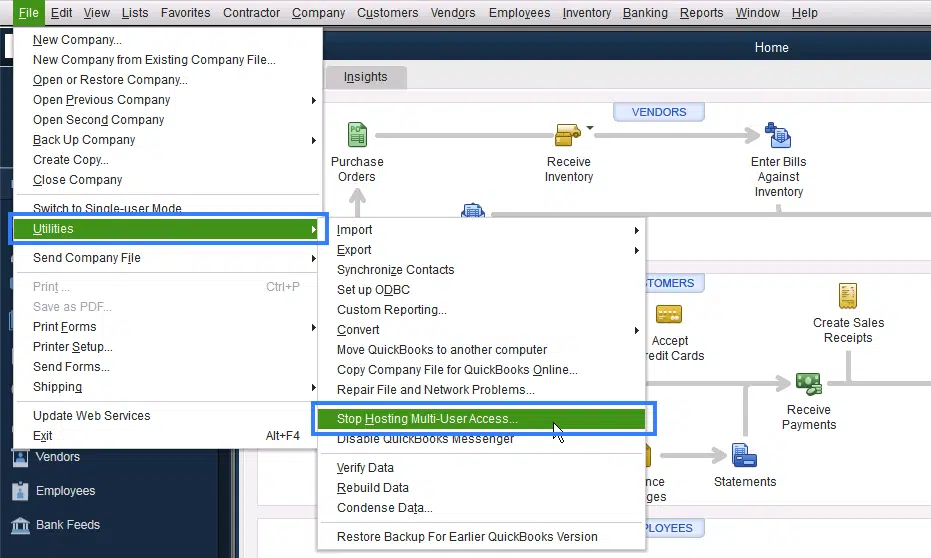
Then choose Stop hosting multi-user access option.
Conclusion!
Getting rid of the QuickBooks not responding issue when opening QuickBooks company file isn’t a tough nut to crack. Having said that, if you still face any sort of technical glitch when performing these solutions or if you still face the same error, then do not hesitate in connecting with our QuickBooks desktop error support team at 1-800-761-1787, and you will get the best assistance from certified professionals. Our dedicated accounting professionals will address your problems quickly.
Errors in QuickBooks can be extremely annoying, yet each error can be resolved by performing some set of steps. In this segment, we are going to talk about QuickBooks error 30102. Well, this is termed as an unexpected payroll error that can show up when sending payroll related information. Not just that, the QuickBooks payroll error 30102 can trigger browsing performance issues and a lot more than that.
You can further end up in this technical error, in case the browser's cache data turns out to be damaged or full. There can be a handful of reasons behind the occurrence of such an error, which we will be addressing this segment, along with the measures that you can take to technically remove the error from its root cause. To get a better insight into QuickBooks payroll error 30102, make sure to scroll through the segment carefully.
What is QuickBooks Payroll Error 30102?
Before you move to the solution to this error, it is crucial that you get a gist of what this error is all about. QuickBooks payroll error 30102 tends to be a technical error at the time when “Sending payroll-related information” or “Processing of payments in the Direct Deposit mode”. This issue has also been reported while “Printing direct deposit slip” in QuickBooks.
What can lead you to QuickBooks Payroll Error 30102?
You can probably come across error code 30102 in QuickBooks due to the following factors:
If the security software is not valid anymore, then you can surely bump into this error.
Not just that, but if there is improper internet connectivity, then such an error can show up.
In case QuickBooks fails to connect to the server due to system timeout, it triggers QuickBooks payroll error 30102.
Just in case you switch to multi-user mode when sharing files.
What measures can be taken to eliminate QuickBooks Payroll Error 30102?
Now that you have an idea about what QuickBooks payroll error 30102, here are some quick fixes that you can carry out to eliminate the error permanently.
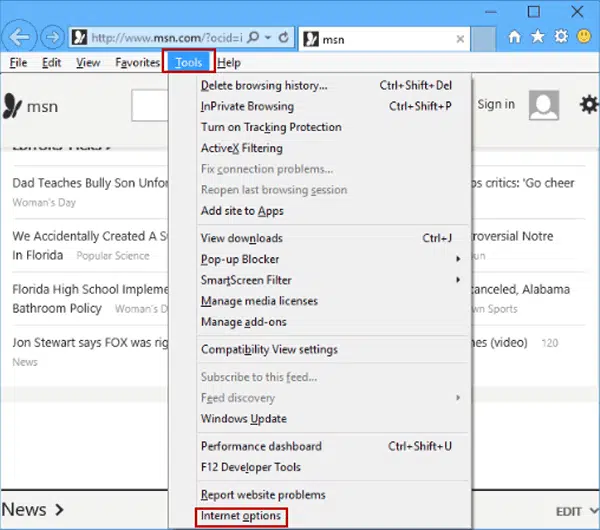
Steps to follow: If you are using Internet Explorer
Navigate to the tools menu and further choose Internet options.
You now have to click on General tab.
Go for Delete tab under the browsing history section.
Verify and confirm the internet files/documents associated with the selected website.
Opt for the Delete tab.
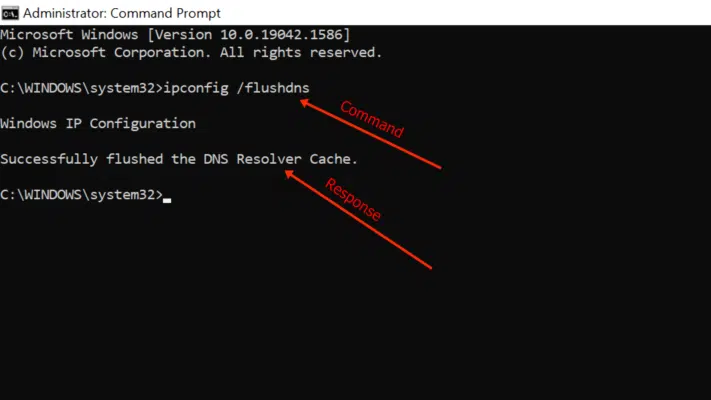
You need to launch CMD and head to delete the DNS.
After that click on Start tab.
You now have to proceed to the All programs option and choose Accessories.
Later on, click on Run tab.
Enter in ipconfig and hit the Enter tab.
Towards the end, send your payroll.
Error 1: In case you are not connected to the network, reboot the system and accept the settings
Solution
If you aren't connected to the network, you simply have to perform the following steps and this would fix the error for you:
Simply remove the DNS by launching CMD.
Now, opt for the Start from the menu.
You now have to open the Run command.
Navigate further and click on Start tab if you are using Windows 7 or Vista.
Once done with that click on All programs menu and then press Accessories tab.
Go for the Run tab.
The command prompt will show on the system after you type CMD.
Enter in flushdns/ipconfig in the search box.
At the end, you need to click on Enter tab.
Error 2: The Application installed successfully, but the data couldn’t be sent
Solution
If you installed the program, but fail to submit the data, then this indicates that the software is blocking the transfer. You need to perform the following set of steps to address this issue:
At first, restart the system.
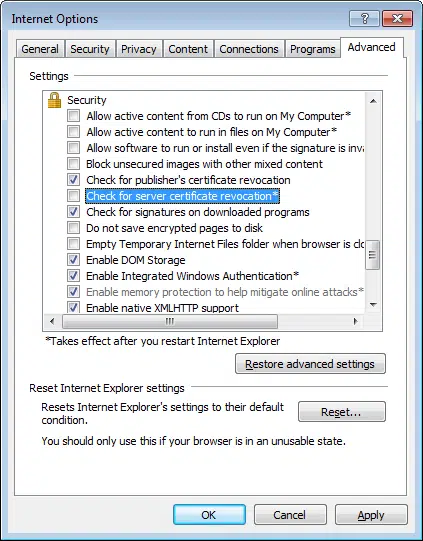
You now have to move to the Internet explorer advanced settings.
Verify that the availability on the network after performing the steps above.
Now, choose the option depending upon your requirements.
Ascertain that QuickBooks is running in single-user mode.
Once done with that access the most recent payroll release.
Correct the Date and time.
Move to the Internet Explorer as the Default browser.
At times, you misconfigured system date and time settings can trigger errors in QuickBooks. All you need if to set the date and time correct with the help of the steps below:
Hover the mouse to Date and time tab on the Taskbar.
Then, go for Adjust date/time.
Then, correct the time and time zone.
Now hit on Apply, and then Ok to save the changes.
Step 4: Set up the latest tax table by updating QuickBooks Payroll
You can further try to set up the latest tax table by updating QuickBooks payroll, if the above steps didn't work for you.
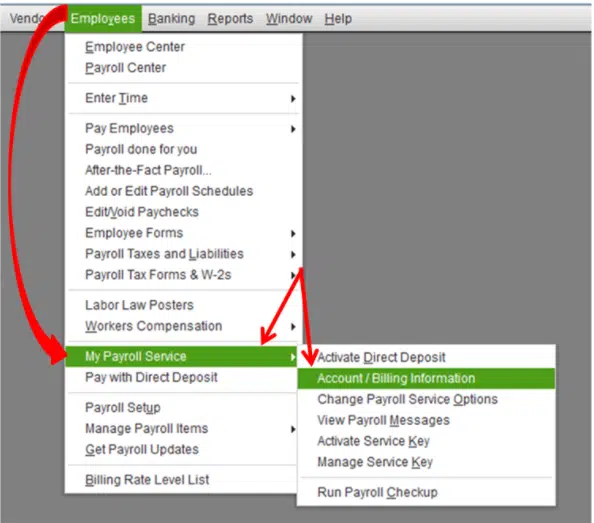
For this, open your QuickBooks desktop and go to the Help tab.
Dealing with QuickBooks error code 30102 becomes way easier, if you have the right steps in handy. Hopefully, reading this segment has helped you a little. If not, then reaching out to our tech support professionals at 1-800-761-1787, is something that will surely help you. Give us a call and your queries will be addressed by our experienced tech support members in no time.
Checkout the DIY methods to resolve checks or paychecks printed in the wrong order in QuickBooks Desktop:
My checks aren't printing in reverse order, what to do? Recently one of the QuickBooks users reached out to us with an issue, where their paychecks were printing in reverse order. Well, this usually happens when you modify the printer options. You might see an error message on the screen stating that QuickBooks checks printing in reverse order (Invoices, PDF & Ledger). As a result of this error, checks, paychecks, and other transactions including purchase orders and invoices might fail to be printed in the desired orders.
To deal with this issue, it is essential first to understand it better. So, here we are with this segment sharing the complete information related to QuickBooks checks printing in reverse order issue, along with the quick fixes. Let us have a look:
What causes QuickBooks Printing (Checks, PDF, Invoices, Ledger) in Reverse Order Issue?
This issue during the printing process is mostly seen when one makes changes to "printer preferences" option. QuickBooks does not change print preferences for certain checks and transactions, this results in this error. This blog encapsulates easy solutions to fix paychecks or checks printed in the wrong order in QuickBooks Desktop. Thus, keep reading!
Solutions to Fix QuickBooks Checks Printing in Reverse Order Error (Checks, PDF, Invoices, Ledger)
If you got a paycheck that is printed in the wrong order, then here is what you need to do to fix the issue:
Solution 1: Updating Print Order Preferences
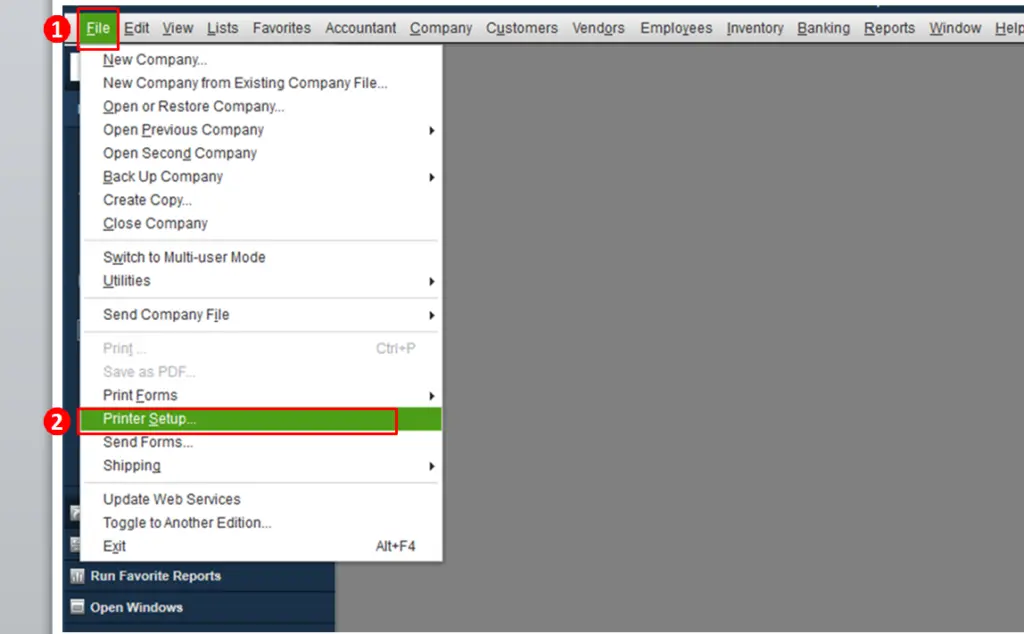
Head to the file menu, later on, choose printer setup.
Furthermore, select check/paycheck in the form name dropdown.
You now have to select the options tab present in the dropdown.
In the page order dropdown, make sure to either go for front to back or back to front.
The current selection might be back to front, which is the core reason why it is printing in reverse order. You simply have to go for front to back and this will now work for you.
It should be noted that the page order location depends upon the printer. You will have to check your printer’s manual that came with it or reach out to the manufacturer.
The next step is to click on the ok tab twice.
Now, the next that you will print checks or paychecks, they will get printed in the correct order. Even though you have performed the steps to fix the reverse printing issue, here are some another fixes that you can carry out.
Method 2: Modifying Properties of Printers settings in Windows 7
Head to the Windows tab and click on the start menu.
After that select the control panel from the list of Windows.
In the control panel, select the hardware and sound option.
Head to view devices and printers and select the same.
Ensure that you select printing preferences from the menu when right-clicking on the printer icon.
Search for the setting that shows the first or last page prints first.
And after you are done with all the changes, click on the save tab and save all of the changes made tab.
Method 3: Loading of the checks in order to use reverse order printing
Well, you will have to ascertain that you load the tests to support printing in reverse order, in case you fail to fix the printer settings.
Quick points:
Various locations where the page order preference might be accessed are present. You can access that on the advanced page, after opting for the options tab. You can also reach out to professionals for any help.
Certain printers by default produce pages in reverse order. You can try modifying the printer settings in such scenarios.
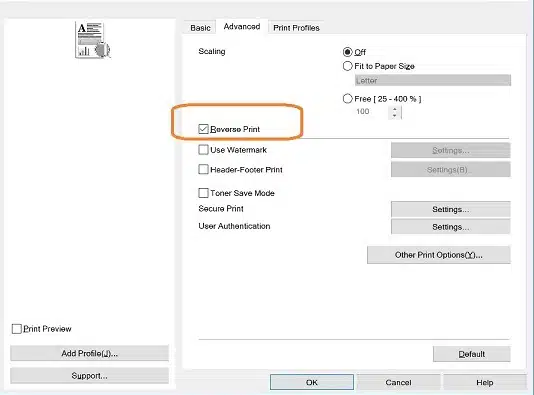
Procedure to Reverse Print Order of Checks in QuickBooks Desktop for Mac
For users working on MAC, the steps to reverse printing order of checks are:
Go for the Print option for opening the print dialog box.
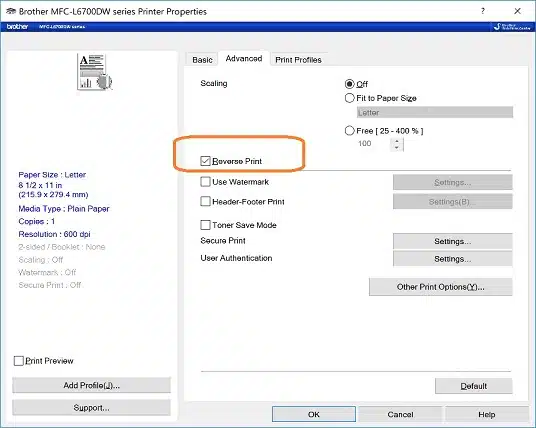
After that, go for the Paper Handling opt.
Now, in the Page Order section, opt for Reverse Print option.
Steps to Convert Reverse Printing to Normal Printing
Have you received a check or paycheck that was printed in the reverse order? Well, you should not to be worry at this time, you can fix it using few simple steps given here:
Initially, go to File menu and select Printer setup option.
In the form name drop-down, you need to choose Check or Paycheck opt.
Here you need to click on Options.
It should be noted that there printing can be done using two options –
Front to back
Back to front
Furthermore, most of the times it is the Back to front option which is mostly selected, and this results in the reverse order printing.
So, to switch to normal printing, you should need to select Front to Back.
Reversing printing of paychecks and checks in QuickBooks can be an annoying error. It is pretty much easy to rectify this error using the right set of steps that we have elaborated in this particular segment. However, if you fail to fix the checks or paychecks printed in the wrong order in QuickBooks or if you fail to fix this issue, then feel free to connect with our certified QuickBooks desktop support ProAdvisors at 1-800-761-1787, and you will get answers to all your queries immediately.