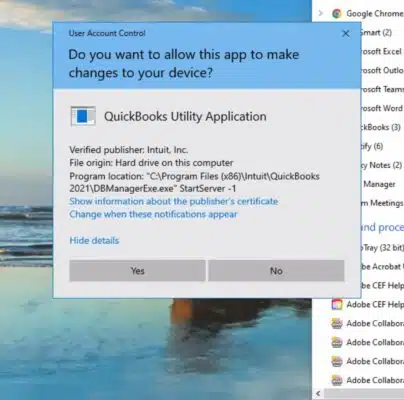
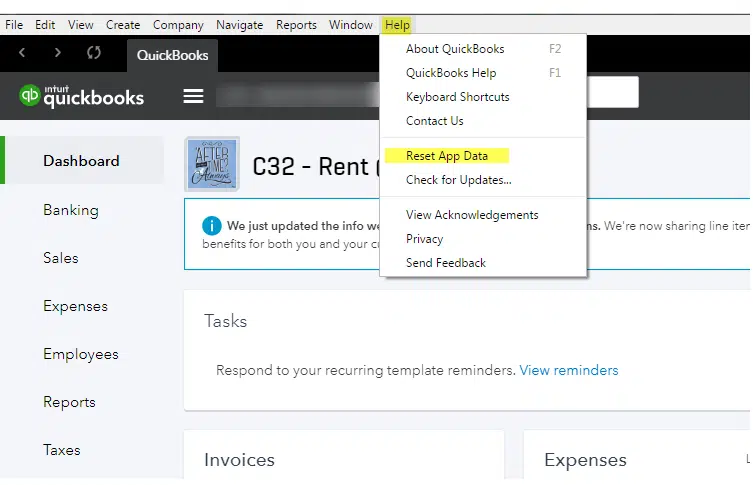
You might see a QuickBooks Utility Application issue while using QuickBooks to update the finance along with the accounting data. The QuickBooks utility application pop-up issue will definitely slow down the business's productivity. Due to utility application, various issues might impede window operation. Moreover, when using the QuickBooks utility application, you won’t be able to perform any action on the open window. Not just that, but certain errors that negatively impact the business accounts due to the QuickBooks utility application pop-up issue. The error message that might be accompanied here is:
Program Location: C;/program files...DBManagerExe.exe”Startserver1028
This error can appear out of the blue, and to address this issue, this particular segment will surely help. Let us have a look:
What is QuickBooks Utility Application Pop-Up Issue?
Well, this error can be a bit confusing for users. QuickBooks utility application pop-up error occurs when you have installed the software and the utility tool on different servers, systems, or workstations. If you are someone who has recently installed the R7 for QuickBooks, then the probability of experiencing this issue increases. The utility tool pop-up takes authorization from the users before allowing the program to run along with QuickBooks. This can be fixed using the User control settings.
Steps to use QuickBooks Utility Application
Now that you know what steps can fix this issue, here are the steps that you can implement to use QuickBooks utility application:
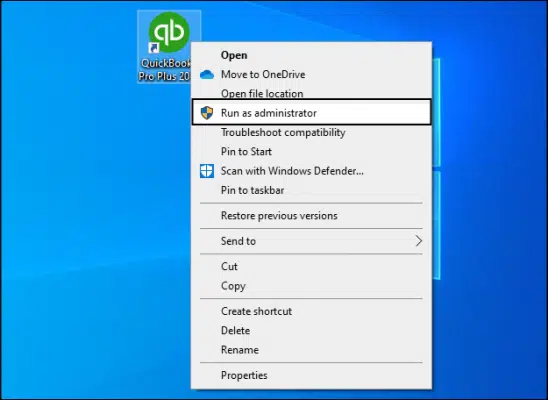
Ensure that you run QuickBooks as an Admin.
Now, launch the QuickBooks utility tool.
Head to the QB utility, it will ask for permission to connect to QuickBooks. Provide the necessary permissions.
You will now see a login screen, where you need to enter the information.
After you log in, the initial data will load and you can import the invoice tab and timesheet tab.
Export the client and employees tab.
You will now be able to use the QuickBooks utility application.
Basic Steps to Resolve QuickBooks Utility Application Pop-Ups
One can restart the framework to fix this issue. Furthermore, you will have to open the control panel and proceed with the steps below:
Initially, you are required to sign out QuickBooks.
Furthermore, shut down your system.
After that, reboot the system again.
And log in with QuickBooks account.
You now have to head to the desktop screen and further click on the start-up menu.
Later on, head to the control panel icon and click on the accounts tab.
You will have to navigate to UAC and drag the slider to don’t notify.
Once done with that, turn UAC off.
Hit a click on the ok tab.
Reboot the system to save all new changes.
And Lastly, run QuickBooks desktop to ascertain that the issue is settled.
Other Errors that appear when running the QuickBooks Utility Application
When you see a pop-up message on your screen, it indicates that there is an issue with the QuickBooks database executable file. Even though Windows User Account Control is responsible for triggering this issue, you might experience a several error message in addition to this. These issues include:
QuickBooks Utility Application requests Windows Admin Password.
Quick Fixes to QuickBooks Utility Application Pop-Up Issue
There are a few fixes that you can implement to get rid of this unique error. Let us decode the fixes one by one:
Solution 1: Disable the User Account Control (UAC)
Initially, press Windows + E keys.
Now, press the Control panel tab.
After that, select too large icons under view from the drop-down menu.
You now have to click on the User account link.
Furthermore, choose Change user account settings from the menu.
And in case UAC notifies you, you need to click on Yes tab.
In order to Turn off/disable UAC, set it to Never notify and click on the OK tab.
Reboot the system.
And further disable or enable utility application in QuickBooks.
Solution 2: Log in to QuickBooks as an admin
You can come across this issue when the QuickBooks software is operated without the required admin privileges. You simply have to right-click the QuickBooks.exe file and then choose run as admin. The steps involved here are:
To start with, head to Start menu.
Now, access the Control panel.
Head to the User accounts section.
Select the option to Manage user accounts.
Go for the User account and then click on Manage account.
Head to Properties and select the Group membership section.
The last step is to go to the Admin group and click on the OK tab.
How to Fix QuickBooks Utility Application Pop Up Issue Prompt for Password?
To prevent recurring prompts for passwords, the user should perform the following steps:
At first, go to Company menu.
After that choose the opt Set Up Users.
Then, choose Passwords.
Now go for the opt to Manage Login settings.
In the section to Manage Login Settings, opt for 1, 7, 30, 60 or 90 days.
To end the process, hit on Ok.
Winding up!
The QuickBooks utility application pop-up issue can be a bit confusing and difficult to understand for you if you are someone who has just started using QuickBooks. This error isn’t like your regular errors in QuickBooks. And so, do not hesitate to contact our QuickBooks desktop support team, if you fail to fix this issue using the set of steps enumerated above. Our technical team will ensure that all your queries are addressed immediately. Dial 1-800-761-1787, and get answers to your queries.
QuickBooks desktop regularly sends update service pop-up notifications to users to remind about latest available updates. However, many QuickBooks users find these repeated pop-ups annoying, especially when working on important accounting tasks, thus it might feel the need to disable the update service pop-ups. This simply means that you need to disable the QuickBooks automatic update feature. However, we recommend that you update your QuickBooks software whenever a new update is available, in order to avoid any sort of technical snags. However, in this segment, we are going to highlight the entire procedure to disable the QuickBooks update service pop-up. Let us have a look:
The update service pop up is a reminder from Intuit apprising the user of the newly rolled out QuickBooks update. Users generally tend to overlook the latest updates, and for this purpose, the Update Pop-up Service reminds the user about the update. Notably, new updates carry avant-garde functionalities and security features to help users in every possible way.
Essential points to consider when disabling QuickBooks update service pop-up
You need to consider the following pointers while you disable the QuickBooks update service pop-up.
Having patience is the key to updating your QuickBooks software. The update process consumes a few minutes.
To update, you would have to convert a file. This might include taking backups, closing QuickBooks for a specific time, or closing another program.
If one user installs the update, then every QuickBooks user in your business will have to install the update.
Why did you need to disable QuickBooks update service pop-ups?
The reasons behind disabling QuickBooks update service pop-up include:
QuickBooks might show up technical issues when this pop-up appears making it essential to disable it.
If you think that the latest release won’t be of much help to your business.
Another reason why you might have to disable the QuickBooks update service pop-up is if the software is incompatible when the operating system upgrades frequently.
Create a company file backup
Before turning off QuickBooks update Service pop up notification, you should first backup their company files, the procedure for which is given below:
Open your QuickBooks.
After that hover the mouse to File tab and click on it.
Then go for the Back Up Company option.
Now select the Local Backup.
Follow the on-screen commands to complete the backup process successfully.
Steps to Turn Off/Disable QuickBooks Update Service Pop up
The process to disable update service pop-up doesn’t involve any rocket science. A few basic steps can be sufficient. Let us unveil what those steps are:
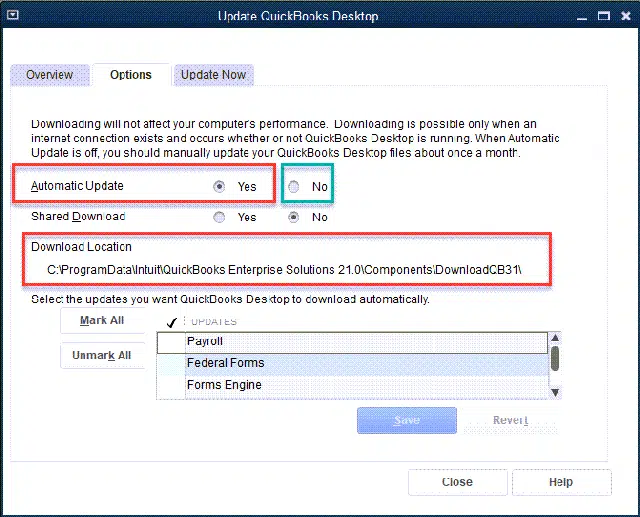
Step 1: Turn Off Automatic Updates
The steps to turn off automatic updates are:
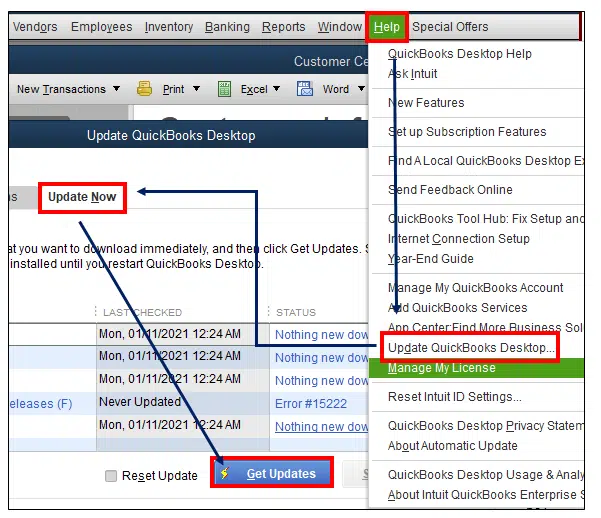
Simply head to the Help menu.
After that select Update QuickBooks desktop.
You now have to press the Options tab.
And later choose No in the automatic update section.
The last step is to choose the Close tab.
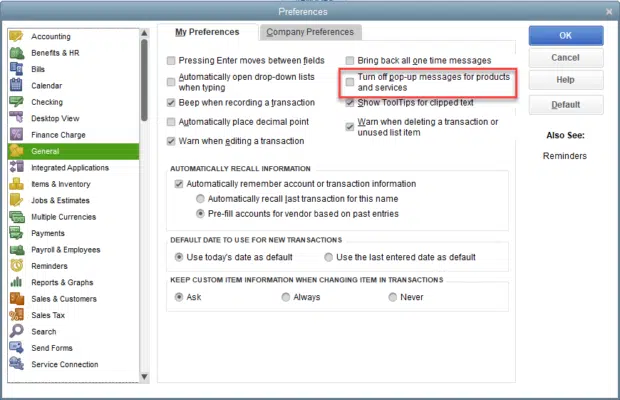
Step 2: Turn off software pop-up notifications
To disable QuickBooks pop up message related to the updates, follow the guidelines below:
Hit a click on the Edit tab present there.
Then click on the Preferences option.
Choose the General tab after the above step.
Now click on the toggle to disable pop-up messages for products and services.
Click on the OK tab to end the process of turning off the pop-up.
Check by closing and opening QuickBooks, if the pop up shows up again.
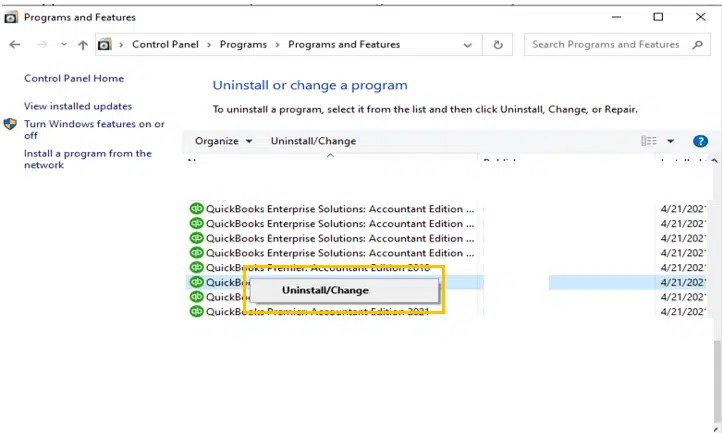
Use the Windows + R keys as a shortcut to open the Run command.
The next step is to enter control and hit OK tab.
Press Programs and click on the Programs and features tab.
Click twice on QuickBooks desktop from the Program list.
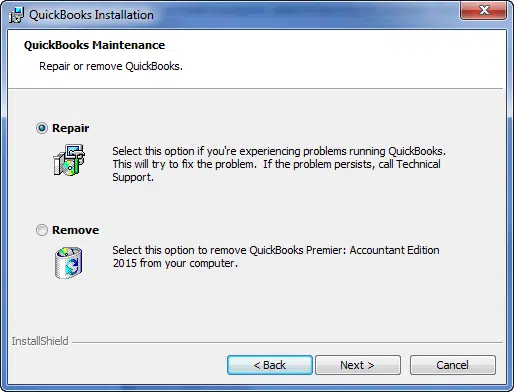
Click on Yes tab.
Now click on the Next tab.
Choose the Repair tab and hit the Next tab.
To end this process, opting for the Repair tab is suggested.
Now, perform Step 1 and Step 2 again and then check if the service pop up is disabled.
Conclusion!
Disabling the QuickBooks Update Service Pop-up is extremely easy. However, if you fail to disable the update service pop-up or if you face any sort of technical glitch, do not hesitate in connecting with our technical support professional. Dial 1-800-761-1787, and all your queries will be addressed immediately. Our QuickBooks desktop support ProAdvisors will ensure that your accounting issues are resolved and your software is ready for your use. Our support team will be more happy to assist you.
When you have so many clients, it becomes a task to send them multiple files. However, the QuickBooks batch action helps send bulks of files to clients daily making your lives easier. This feature lets you perform precise actions at the same time. From sending emails to sending sales receipts, transactions, and much more, batch actions make it easy. But in certain scenarios, this feature might fail to work. One of our clients recently reported QuickBooks batch action has stopped working error. Well, this can be a tiring error. But do not worry, we can help you fix it.
This QuickBooks Online error can be rectified by looking for the right batch action tab. Upon locating it, choose the correct actions for the specific documents. This segment is designed in a way to help you fix QuickBooks batch actions has stopped working errors. Let us explore together:
Though the QuickBooks batch actions ease the task, but in certain situations it might stop working. In such a scenario, you need to check your web browser. This issue can be experienced in case your internet isn’t working properly. If your Internet Browser is working properly, then the online version will function properly. Cookies and cache can lead to such an error in your browser.
What causes QuickBooks Batch Actions Not working error?
The QuickBooks batch actions error is a problem encountered by QBO users. This error means that an operation is performed by the user which is unsupported by the current QuickBooks document type. Due to this, the user tries the function for printing bills. Furthermore, temporary files and(or) outdated cookies could also be a major cause.
Quick Fixes to Resolve QuickBooks Batch Actions has stopped working error
You can try to eliminate the batch action failed error in QuickBooks by implementing the set of steps listed below. Let us have a look:
Method 1: Clear Browser Cache and Cookies
As we mentioned earlier, excessive caches and cookies can lead to such an error. Thus, you simply have to delete these so that the feature of batch action starts working again. The steps involved here are:
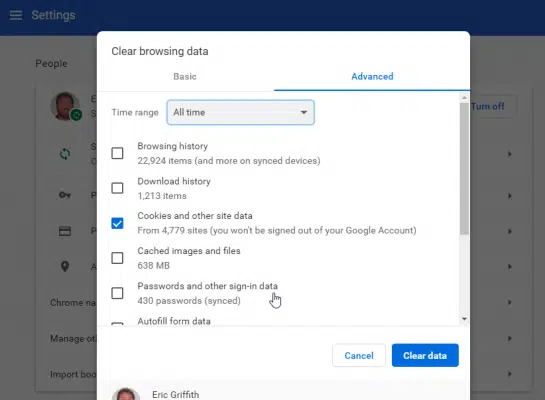
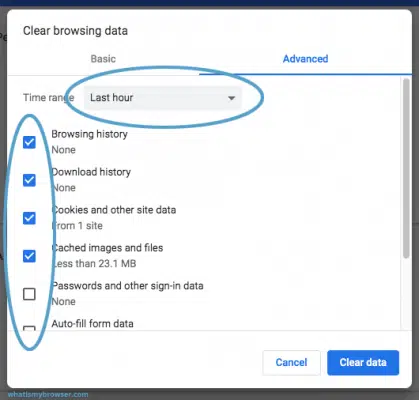
At first, you need to head to the settings tab.
Furthermore, select the clear browser data option.
You now have to mark the cache from the advanced tab.
And choose a specific time for cache removal.
This might range from the last hour to all time, select the suitable option.
And click on delete.
This will remove the browser cache and resolve your issue up to a certain extent.
Method 2: Run QuickBooks Online in Incognito
Try opening QuickBooks online in incognito mode. Here is what you need to do:
Click on the three vertical dots i.e., the Ellipses icon on the screen
And then, select the new incognito mode tab.
Other than this, there are a few shortcuts that you can go for to open the incognito mode.
Ctrl + Shift + P keys (This works for Internet Explorer and Mozilla Firefox)
Ctrl + Shift + N keys (Works for Google Chrome)
Command + Shift + N keys (This is a shortcut for Safari)
If you want to use batch actions feature and can’t find it, then head to the sales transactions in your QuickBooks online account. This can be searched for in two different ways either through sales transactions or expense transactions. Here is what you need to do:
Using Sales Transactions
Open QBO.
Head to Sales Tab.
Now, select invoices section.
Go for the transactions you wish to send at a go.
And then, click on the batch drop-down option after you mark all the transactions.
This will help you send the transactions in batch.
Using Expense transactions
Under the expenses tab, mark the desired transactions.
Now, select the batch action.
Choose the necessary options available.
And click on the finish tab.
This will do the job.
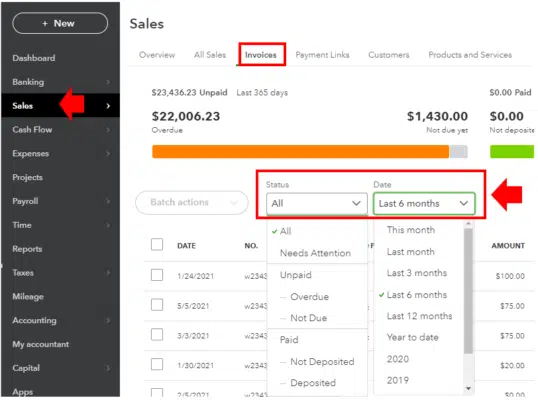
Steps to Print Multiple Invoices and Sales Forms
This can be done by heading to the Sales menu.
Opting for All Sales option.
Furthermore, choose all the transactions that you need to email or print.
Now, QuickBooks lets you filter the transaction from the drop-down available.
Go for the batch action.
And click on the Send Transactions tab or Print Transactions tab.
And you are good to go.
Method 4: Export to Excel
Following are the quick steps for exporting the files in the Excel format:
The initial step requires logging in to the QuickBooks account.
After that move to the Reports menu.
Type the Name of the report to be exported.
Now select the report, and click on Export icon located on the top of the report.
Following that, select Export to Excel.
Reaching the end!
With this, we reach to the culmination of this article. QuickBooks batch transaction feature lets you save a lot of time and effort. If this feature stops working, try implementing the steps we have enumerated in this segment. If you fail to do follow the different methods to fix Batch Actions has Stopped Working error in QuickBooks then, reach out to our experienced QuickBooks error support professionals team at 1-800-761-1787, and get answers for all your queries immediately.
While working on QuickBooks, there can be scenarios when you might come across errors that you don’t expect. One such error that you might come across suddenly is “QuickBooks something’s not quite right”. Well, you might face this issue when the account type you opt for doesn’t match the transaction or is not suitable for your transaction. Thus, you simply need to change the account type. You might land upon this issue in various circumstances, like when saving, editing, or even voiding an invoice. The same error further shows up on the screen when adjusting a payment or changing the bank account types.
Many a times, users have come across with such error message stating as:
Error
Description
Warning
"QuickBooks Something’s not quite right". We're unable to complete your request at the moment, try again later.
Warning
"Something's not quite right. Email address already in use." in QuickBooks Online Accountant
There can be a few reasons causing this issue in QuickBooks, and a few solutions can be performed to get rid of QuickBooks something’s not quite right. So, to help you with your queries, here we are, sharing the complete set of information related to this issue. Let’s dig in!
What does QuickBooks something’s not quite right error means?
This error occurs mostly when the QB user opts for a new member, when the email attached to a newly inducted user is already associated with some other account. Furthermore, it can also occur when the user opts for an account showing a mismatch with the transaction. This problem requires the user to change the account type. Well, this error is encountered by QuickBooks Online (QBO) users, specifically the ones using QuickBooks Online Accountant.
What can drag you in QuickBooks Something’s not quite right issue?
A handful of reasons can lead to such an error in QuickBooks, here are some quick ones that you can address:
When you try to save, edit, or void an invoice, and something incorrect happens, this error shows up
Another reason can be adjusting a payment.
You can further come across a similar issue if you recently modified the account type.
Moreover, if the save internet files like caches and cookies can further trigger such an error.
Also, if the QuickBooks workforce login session expires or times out, then QuickBooks, something that’s not quite right might show up.
Trying to add a user with an email id which is already linked to other profile.
Solutions to QuickBooks Something’s Not Quite Right Error
Now that you know what reasons can cause this issue, it is time to perform the right solutions. Let us have a look:
Fix 1: Go Private with Incognito Mode
Using private browser will ensure that you are able to successfully login to your software without the cache issue. The steps to use incognito mode are as follows:
To simply begin with, you need to open Google Chrome on the system.
And then, select the new incognito tab.
Once done with that, a new window with the incognito icon will show up.
And you will have to use the following shortcut keys:
Ctrl + Shift + N keys for Windows / Linux / Chrome OS
Press Ctrl + Shift +N keys for Safari
Shortcuts for various browsers:
Ctrl + Shift + P keys for Firefox and Internet Explorer.
Control + Option + P keys for Safari.
Fix 2: Remove your browser’s caches and cookies
When using a browser in order to simply use QuickBooks online, one might come across the change account type in QuickBooks online error. In such a scenario, you simply have to clear the cache and cookies stored in the internet files and build them over time.
To get started, you need to open the internet browser.
Furthermore, click on the three dots and this will open up a dropdown menu.
You need to head to the settings tab and then clear browsing data.
This will be present under the privacy and security section.
Once done with that, set the time range to all times and then mark the box that is present next to cache images, files, cookies, and other site data.
Lastly, you will have to click on the clear browsing data option.
Users encountering this error can make use of a different email to send invite. This will create a "new user profile for that Email id". This email id should not link to other user profiles.
Fix 6: Editing existing user email
This solution applies to QBO Accountant users who are facing this error. The steps to change the email id in QBO Accountant are:
Initially, head to QuickBooks Online Accountant and then select Team tab
Now, move to Access tab and select the team member.
Followed by hitting on Edit and make changes to the Email id associated to that user.
Fix 7: Change the account type in QuickBooks Online
You can change the account type in QuickBooks online using some simple set of steps. When you create an expense transaction, you will have to go for a bank account. The account from where the payments need to be deducted should be the intended bank or credit card account. Here is how you can see the account details opted:
Now, search for the account you wish to use in order to create your transactions.
The next step is to click on the drop-down menu from the actions column.
And further click on the edit tab.
After you are enabled to update QuickBooks change account type mission, try again to form a transaction. You might have to curate a journal entry, here is how you can do that:
Navigate to the gear icon.
Select journal entry.
And then, enter the details in the fields to create the entry.
Lastly, click on save and close.
To summarize!
Winding up the segment, we believe that reading this might help you in getting rid of QuickBooks something’s not right issue. However, if you still can’t find out what’s not right with QuickBooks, feel free to consult our QuickBooks desktop error support experts team at 1-800-761-1787, and let them help you find out answers to all your queries. For more details, ring up to our certified ProAdvisors Now!
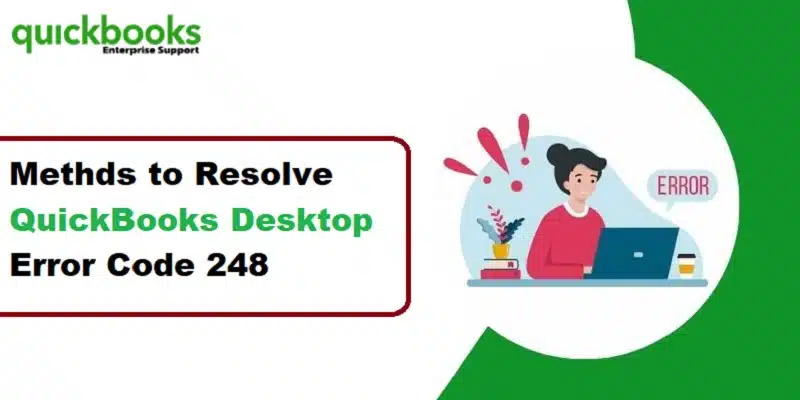
Noticed an unexpected backup error and can't find an ideal fix for that? Well, QuickBooks backup errors can be a bit confusing and needs to rectified immediately. One such error that we will be addressing in this piece of writing is QuickBooks backup error 248. You can often end up in QuickBooks backup error after rebuilding the data in QuickBooks verify/rebuild results. You can come across the following warning message:
QuickBooks found some problems with your company file
But don't worry! Tackling through this error becomes super easy , once you try rebuilding your company file. Another scenario when such an error shows up can be when the company data is corrupted. To rectify all this, there are a couple of solutions that you can implement. In this segment, we have tried to provide you the real time solutions to QuickBooks error 248. To understand this better, let us scroll through this piece of writing carefully. Getting rid of QuickBooks backup error 248 surely needs some effective solutions, and below we have tried to jot down some of the most effective ones. Let us get into the details:
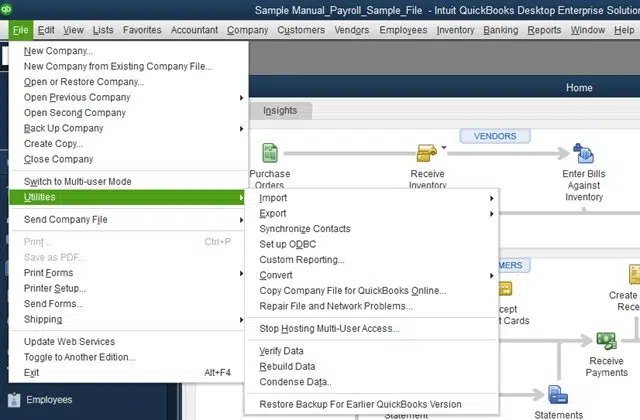
Solution 1: Run QuickBooks Rebuild Data Utility
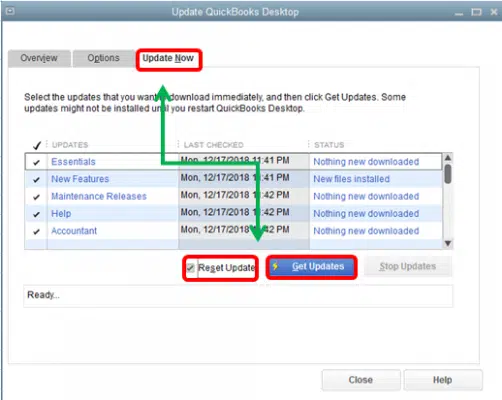
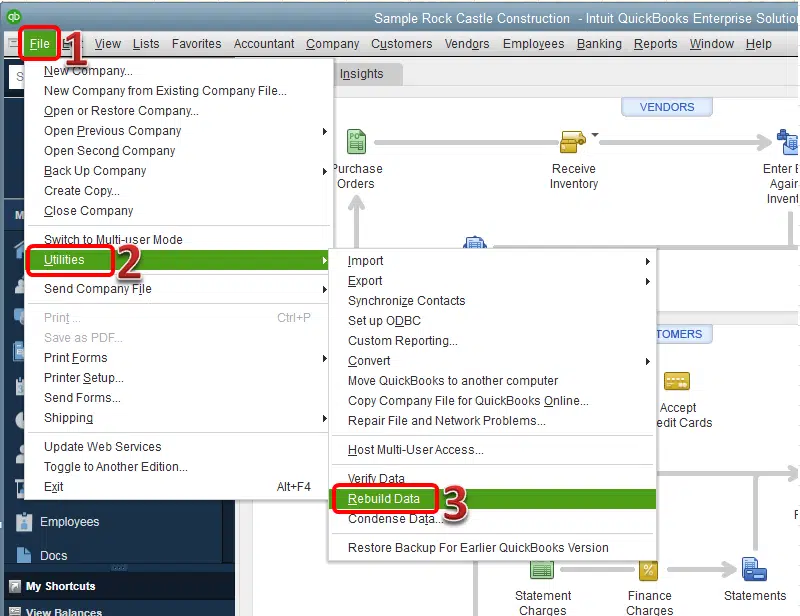
Running rebuild data utility can surely be an effective fix to the backup issues. You need to run the Verify and Rebuild tool in order to fix such data errors. It is an important tool that fixes multiple issues in the company file. The steps to use the tool are:
Step 1: Run the Rebuild Tool
Under this process you need to simply open QuickBooks desktop.
After that, you need to head to the file tab.
Choose the utilities tab.
Furthermore, click on rebuild data and then carry out the prompt to save a backup of the company file.
You now have to wait for QuickBooks to complete the backup process.
The last step in this solution is to click on the ok tab and when the message Rebuild has completed shows up on the screen.
Step 2: Run the Verify Data Tool
This step requires you to run verify data tool using the steps below shared below:
Here you simply have to head to the utilities tab under the file tab.
Choose verify data.
Now, you need to click on the ok tab, in case you get the message QuickBooks detected no problem with your data.
Just in case the verify data tool finds out any issue with the company file, then you need to click on Rebuild now.
And towards the end, you need to click on close.
Important: Note that, in case you are running the QuickBooks rebuild data tool brings up an error message: Type: paycheck, Paycheck: Txn # 30159 on 15/06/2019, doc#:’8000, PO#:”, last edited by,” Source, accnt: <bank name>, $:-200.20, name:<name>” then you simply have to edit the company file manually.
Solution 2: Create an additional item to reimburse the payment
Another solution that can work in this case can be creating an additional item to reimburse the payment with the help of the steps shared below:
You need to first open QuickBooks.
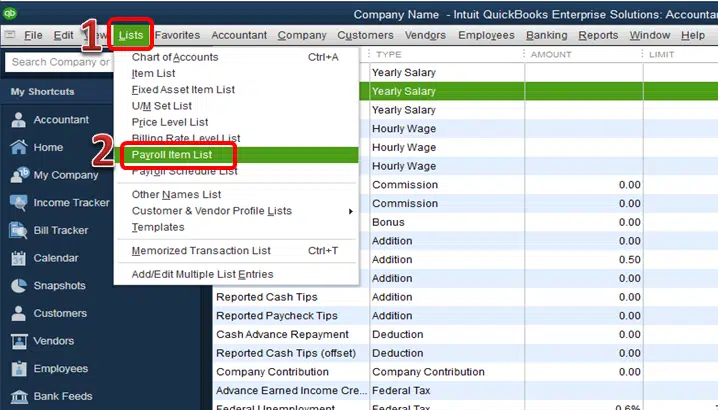
Proceed to the list section.
After that go for the Payroll List Option.
And then, opt for the custom setup option.
Hit a click on the next tab.
Followed by, assigning a name to the new item.
You will then have to choose the appropriate account to link the item.
Followed by selecting none for the tax tracking type option and then click on next twice.
The next step is to click on neither and then hit the next tab.
Lastly, enter the amount that is overpaid, and towards the end click on the finish tab.
Solution 3: Configure Employee Info
There aren't much solutions to this error. One last solution that you can try in this case is to configure the employee information. This can be done with the steps below:
To begin with, you need to choose payroll taxes and liabilities from the employee menu.
Heading forward, you need to enter the date and effective date after opting for adjusting payroll liabilities.
You need to choose employee and employee’s name in the adjustment section.
And lastly, under taxes and liabilities, go for the payroll item you need to adjust and further enter a negative value to reduce it.
Troubleshooting errors in QuickBooks isn't that tricky. However, it is essential that you implement the right steps. Here in this segment we have tried to summarize the essential steps that can be performed to permanently fix QuickBooks error 248. However, if your queries aren't addressed yet, then reaching out to our QuickBooks error support professionals at +1-800-761-1787 is something we suggest. Hopefully, our certified ProAdvisors will find a way out of this error and help you get rid of it permanently.
FAQ's
What is QuickBooks Error 248?
As we mentioned earlier, QuickBooks backup error 248 is an error associated to the issues in the backup and payroll processes, and it generally comes up in the form of the following message:
Warning: QuickBooks found some problems with your company file, but don’t worry! You can fix most issues by rebuilding your company file (File/Utilities/Rebuild Data).
If this error isn't dealt with on time, it can pose a threat to the accounting data, involving loss of data and payroll related issues.
What are the causes of QuickBooks Backup Error Message 248?
Identifying the actual causes of the backup error 248 becomes essential to fix the error permanently. Let us check out the basic factors causing this backup error. 1. In case your employee may have overpaid, then experiencing such an error can be quite possible. 2. Or if the company file is showing some sort of corruption issues. 3. You can later on end up in such an error if there are some sort of payroll Item related issues present.