Disturbed by any sort of technical issue in QuickBooks associated with the verify data utility tool? Here, we are talking about the QuickBooks error 213, which is an error that shows up on the screen stating: Error: Verify Name list. To fix, edit this element in the list and change its name. Details: List: ‘Name‘, record name: ‘XXXX, List: ‘Name’, record name: XXXX. Duplicate name encountered. Name: XXXXXXX. It tends to be a rebuild data error can be a bit confusing to handle. To get an in-depth information about the error, all you need is to stick to the segment till the end.
What is QuickBooks Error 213?
Talking about the QuickBooks error 213, you can probably end up in such an error when using a company file using the verify and rebuild data utility tool. This error not just appears on the screen abruptly but also hinders the smooth update process.
Error
Description
Error 213:
LVL_ERROR–Error: Verify Account list. Duplicate name encountered. Duplicate entries in the QBWin.log file
Problem
Error: Verify Name list. Duplicate name encountered. To fix, edit this element in the list and change its name.
Not just that, but you can bump into this error, in case of any sort of duplicate entries in the QBWIN.log files. Or during the installation, startup or shutdown of the Windows operating system, you can experience the same error.
Identifying QuickBooks Error 213
Prior to the error showing up on the screen, there are some sort of hints that show up, which often a user might overlook. Here are some of the signs that show up when error 213 in QuickBooks occurs:
At times, you might fail to switch to the multi-user mode, then it indicates that you might come across this type of error.
Not just that, if you aren't getting any response from the system, then it indicates QuickBooks error 213
Another sign for this error can be if you fail to make use of the company file, after accessing the verify data tool
The possibility of experiencing the error 213 shows when your system crashes out of a sudden.
Possible causes behind QuickBooks Rebuild Error 213?
The error does not appear out of a sudden, rather are triggered by some factors. Here are the major reasons why QuickBooks error code 213 shows up on the screen.
If you are facing issues with the registry entry, then you can probably end up in QuickBooks error 213
Another possible reason can be if there are any sort of incorrect inputs from the customers
Not just that, if you have performed any sort of transaction of lists imports from another applications, then it can trigger QuickBooks error code 213
Also, if there are duplicate entries in the QBWin.log file, then probability of experiencing the rebuild data error gets high.
Methods to Fix QuickBooks Rebuild Error 213 (Duplicate Name Issue)
Now that you know what reasons instigate the QuickBooks verify data error 213, it is time to perform the right fixes to get rid of the error permanently. Here are some tried and tested methods that might help you get rid of such errors. Let us get a detailed insight:
Method 1: Use QuickBooks to access the log file
If you haven't already, then simply try using the QuickBooks software to access the log file. The steps to be followed here are:
Start off with opening the QuickBooks first and then press the F2 key to head to the product information window.
You now have to proceed to the F3 key and this will lead you to the tech help option.
Later on, click on the open file tab and there you need to select QBWin.lig file
The path to access the file is C:\Users \USER NAME \AppData \Local \Intuit \QuickBooks \log \XXX\
Lastly, try opening the log file and this would resolve the issue for you up to a certain extent.
In case you aren’t able to resolve the issue using this method, try changing the name of duplicate entries.
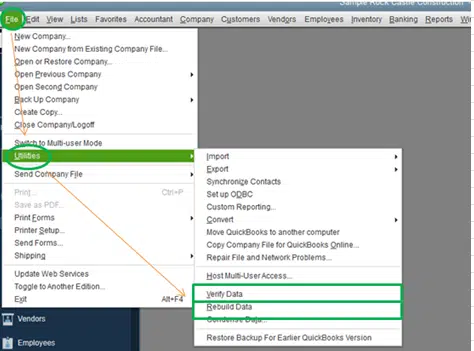
Once the process is done, close this file and visit the Verify and Rebuild options from the Utilities tab under the File menu. This should deal with Rebuild Error 213.
Method 2: Rename duplicate entries
Duplicate entries can be a valid reason causing QuickBooks error 213 and tackling through it is possible by simply renaming those entries. The steps involved in the renaming process are as follows:
Scroll down to the end of the log file.
You now have to make use of the shortcut key i.e., Ctrl + End keys.
Later on, search for any duplicate entries.
You can also use Ctrl + F keys to make things easier.
Once done with that, try removing and renaming the duplicate entries available on the list.
Ascertain that the entries are no more on the list.
You can do this using the run Verify data utility.
Start by opening QuickBooks.
Proceed to the File menu.
Later on, go for the Utilities tab.
And then, click on Verify data.
You need to wait for the process to complete .
And in case any issue is identified that you need to fix it with the QuickBooks verify/rebuild data utility option.
Proceed to the File menu.
Opt for the utilities tab.
And there, select rebuild data.
After all this, try running the verify data tool to complete the process.
Insufficient rights can be a problem causing QuickBooks error 213. Thus, we recommend you to run QuickBooks using the admin credentials, so as to have the admin privileges. Once you have the admin access, you need to try the Verify and Rebuild tool again.
Method 4: Change the inactive name in Lists to a different one
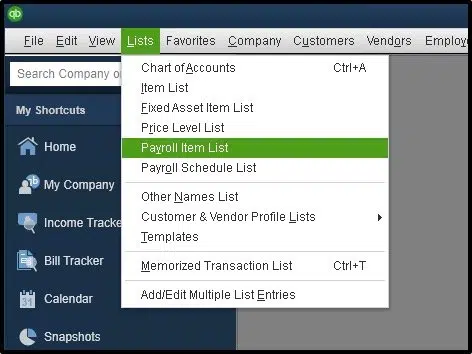
If the above methods didn't help, you can try changing the inactive name in the lists, as this can reduce the risk of the error up to a certain extent. The steps to be performed here are:
Start by opening the Lists menu.
Post that, opt for the Item List.
You now have to head to Item tab.
And there, go for Show Inactive Items.
Once done with that, check for existence of any duplicate names related to the item.
If you found any duplicate names, try to change the names or get them deleted.
And this would fix the issue for you up to a certain extent.
Getting rid of errors in QuickBooks can be sometimes traumatizing, but using the steps shared above, fixing QuickBooks error 213 might be a bit easier. However, if you are still dicey about the solutions, or if you aren't able to deal with the issue, then reaching out our technical support team is something we recommend. Our professionally trained QuickBooks team know what it takes to get rid of these errors. You can reach out to our team at 1-800-761-1787, and our experts will be there to address your queries immediately.
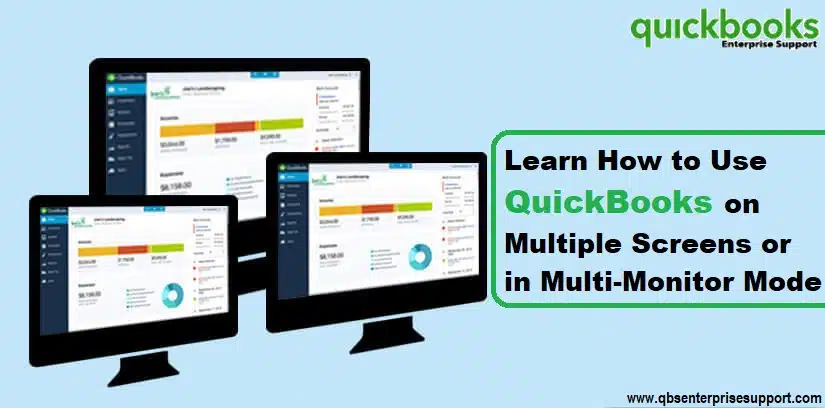
Get to know how to Use QuickBooks Desktop in Multi-Monitor Mode or Multiple Screens:
Do you want your QuickBooks to work on more than one screen or in multi-monitor mode? Well, we can help you do that using the right set of steps. To simply enhance your productivity, QuickBooks desktop lets you use it on multiple screens with the all-new multi-monitor feature. This feature has been a great respite for business owners who seek for ways to manage their accounting data. It is available in QuickBooks Desktop 2018 and the later versions. You can now easily manage your financial information with this feature.
Did you know: A University of Utah study from 2008 indicated that adding another monitor to your workspace can add up to your productivity by around 44%.
No doubt, using QuickBooks on multiple screens will definitely enhance your productivity. To help you use this feature, here we are with the steps involved in it. Let us have a look:
Quick tips to perform before you use QuickBooks on multiple screens
Of course, before you start using this feature, you will have to keep certain things in your checklist.
Setting the DPI settings for all the screens/monitors at default level i.e., 100% is recommended.
Moreover, you need to set the screens at the same resolution.
Another quick tip that you need to follow is to align your monitors horizontally in your Windows display settings.
Now, use the toggle tab to move windows from one monitor to the next.
Run QuickBooks as an admin by right-clicking on its icon and select Run as administrator.
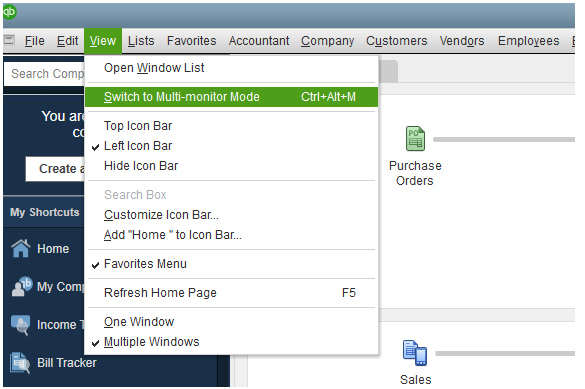
You will have to head to the View menu.
And then further go for the Switch to multi-monitor mode.
And that’s about it.
The process is super easy and quick.
Limitations of QuickBooks Multi-Monitor Mode
Certain limitations come in handy with this multi-monitor mode. Make sure to keep a check on them before you proceed. Some of the major limitations of the QuickBooks Multi-monitor mode are:
Limitations
Description
When using Single View mode
Just in case you have the preference set to a single view, it isn’t possible to use multi-monitor mode. You will have to change it by: * Head to edit menu. * Choose the preferences tab. * Go for desktop view.
Anything other than 100% DPI settings
When your display settings are set to anything other than the default DPI, then this feature will fail to work.
Using Third-party multi-monitor programs
Well, any third-party multi-monitor programs like display link, display fusion, etc. won’t work properly when used with QuickBooks multi-monitor mode. You will have to use Windows native multi-monitor support.
Tile/Cascade Windows
At the time when you have enabled multi-monitor mode, you will not be able to use the QuickBooks function to tile/cascade windows
Moving the main program window
When in multi-monitor mode, you will not be able to move QuickBooks main program window. This will be only possible in single-monitor mode.
Monitors’ horizontal alignment
In case you haven’t aligned your monitors horizontally even, then you might not be able to use this feature.
Hosted Environments
You might not be able to use this feature if you are using QuickBooks in a hosted environment like Rightworks or Summit Hosting.
Some Commonly Encountered Issues when Using Multiple-Monitor Mode in QuickBooks
There are certain issues that you might face when using multi-monitor mode in QuickBooks. Here are what these issues are:
Issue 1: Dialogue boxes show up on the other monitor for the one you are working on
Certain dialog boxes might show up on the screen you are working on. To understand it better, here is an example. If you have your home page on the right monitor, and you go for invoices, then the invoices page might show up on the left monitor. You will simply have to toggle it back to the right monitor or move it on your own.
Issue 2: Certain windows extend across into another monitor
When you enter in multi-monitor mode, you might see Windows span across into the next monitor. You will have to move that window to where you wish to and then maximize it to that screen or adjust the window length.
Issue 3: How many monitors does QuickBooks multi-monitor mode?
This feature supports up to 3 monitors. In case you have more than that, you will get the choice to pick the monitors for enabling the multi-monitor mode on them.
When you use QuickBooks in multi-monitor mode, it surely enhances your productivity. Hopefully, these steps might have helped you in some way to make the most of your QuickBooks multi-monitor mode. If you fail to do so, do not hesitate in contacting our QuickBooks desktop support team at 1-800-761-1787, and we will provide you with immediate support and guidance.
Do you want to upload or download files with Intuit file exchange in QuickBooks? Well, we can help you with that. The urge to upload or download files with Intuit Customer file exchange occurs, when Intuit requires a file from you, to simply help you, or resolve your issue in the quickest possible way. Intuit Customer File Exchange is a secure platform provided by Intuit that directly allows users to upload or download QB related files safely while working with QuickBooks support professionals. With this piece of writing, we will help you through the process to do so. Let us have a look:
Note: Customer File Exchange can be employed for transferring "Transactions", "Invoices", "Lists", "Reports", etc. For sending the file to Intuit, you will require a PIN and to get that PIN you will have to contact Intuit.
What is Intuit Customer File Exchange?
Intuit Customer File Exchange is a platform offered by Intuit that allows users to safety upload or download QB related files. With the aid of this service, users can access latest backups, screenshots, logs, sharing company files, upload or download accounting data files while working with QuickBooks professionals from the Intuit servers. This platform offers data privacy and security when exchanging data to nullify any chances of data breach.
Contact Intuit for PIN
In order to send your file, a secure Personal Identification number is required. Your PIN is in the email from the Intuit and it will probably expire after 48 hours. In case you do not find the PIN there, check your spam folders for an email. Or contact Intuit for further support.
Steps to Upload Files with Intuit Customer File Exchange
Intuit lets you send any sort of file. However, if you send your company data file, then don’t forget to take a backup of the file to avoid any sort of data loss. Moreover, if you upload a file with the same name as the file exists, then it will overwrite the present file. Thus, either change your file name or create a folder name. Having said that, here are the steps that you need to follow:
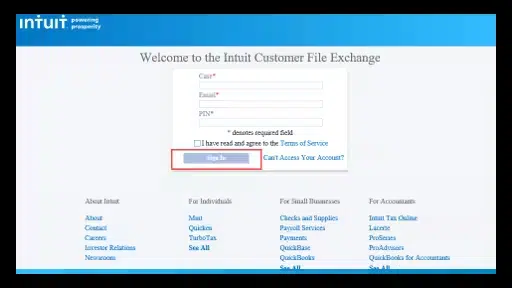
And if you see the sign-in option grayed out, then it indicates that you are on a browser that isn’t supported by Intuit. You will have to use another browser to access Intuit.
Now enter the Case number, email, and PIN.
Next step is to Accept the terms of service.
Then choose Sign-in.
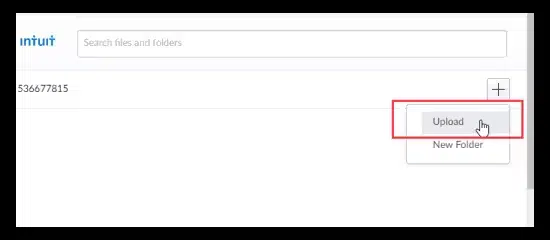
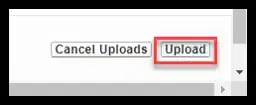
Opt for +and hit a click on Upload.
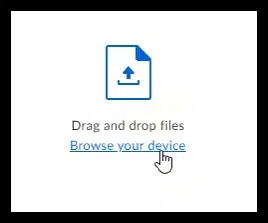
The next step is to drag and drop your File or choose Browse your device to find the file.
You will now have to choose to Upload.
After the files are uploaded successfully, click on Close to exit the tab.
Steps to Download your files with Intuit Customer File Exchange
Now that you know the process to upload files, here is how you can download your files from Intuit Customer File Exchange. Ensure that you download the data files, as they are removed from the portal and server after 20 days. Now, let us have a look at the steps to download the files with Intuit customer file exchange:
Next step is to Accept the terms of service and choose Sign in tab.
Also locate the File.
And then select the Ellipsis icon and further click on Download.
You will then have to Browse to the location where you wish to save the file.
And lastly, hit a click on the Save tab.
Steps to upload and download files from Data Services
In case you send your company file to the data services, then avoid entering any data in the file on the system. As, when you will receive the file back, you will have to add the data again.
Moreover, if available, try downloading Readme.docx file. This file carries information that you will require to use the fixed file. Note, save both downloads at an easily accessible place.
Not just that, but if you are on a network or a server, you will have to restore the file locally before saving it to its host location.
Also, the data file might end with .qbm file extension, which is a compressed copy of your file. If you require, it is possible to convert this file.
Conclusion!
In certain situations, one might have to upload or download files, from and to Intuit with the help of Intuit customer file exchange. At that time, these steps come in handy. Hopefully, reading this segment might have helped you in some way to upload or download files with Intuit customer file exchange successfully. Just in case you fail to do so, here is our number i.e., 1-800-761-1787., do not hesitate to contact our certified ProAdvisors. Our QuickBooks desktop support team will ensure that your queries are addressed immediately.
Checkout the multiple way outs to tackle - No Version of QuickBooks was found to update error:
Did you see No version of QuickBooks was found to update error? Recently several users have suddenly experiencing the error message. Well, this might happen when your internet connection isn’t stable, or a few other reasons as well. This error usually shows up in Windows or the software that is compatible with Windows along with the driver vendors. Updating QuickBooks to the latest release is very much essential to make use of the new features and functionalities. However, fixing this issue is crucial to access these features. You can implement a set of steps to fix the error depending on the reason triggering the issue. Let us find out the causes along with the fixes to the No version of QuickBooks was found to update error:
Triggers to QuickBooks No version found to Update error
You might have experienced a bunch of update errors in QuickBooks, but this can be a pretty unique and confusing one. You can come across this error due to the following factors:
As we mentioned earlier, inappropriate internet connection can be a major cause behind the occurrence of this error.
How to resolve the No version of QuickBooks found to update error?
Now that you know what reasons can drag you into this error, it is time for you to implement the right set of steps to get rid of the No version of QuickBooks found to update issue successfully. Let us have a look:
Method 1: Verify date and time settings
Ascertain that the date and time appearing on the system is correct. If not, then right-click the Date and time in the low right corner and select Adjust date and time.
You now have to Unmark Set the time automatically and click on Change under the change the date and time tab.
After that, set the Correct date and time and ensure that set the time zone automatically open is toggled on.
The next step is to Change and Close the date & time window.
And lastly, open QuickBooks and try to download the updates.
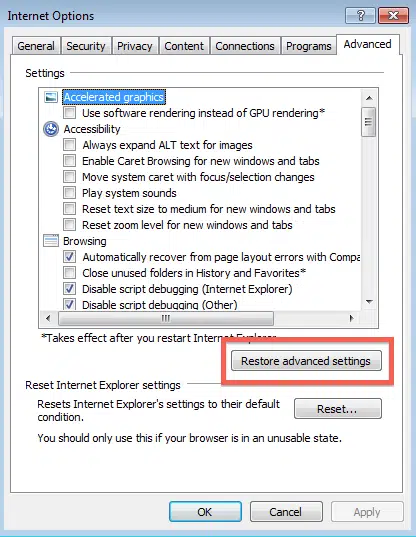
Method 2: Configure Internet Connection Settings
The steps to restore advanced internet settings are:
To begin with, you need to open the Internet explorer and head to a safe website.
Now, if you are unable to access the site or getting an error stating unable to connect to the internet, then we suggest you to contact your IT support.
Or if you are able to scroll through the site, then proceed with the steps below:
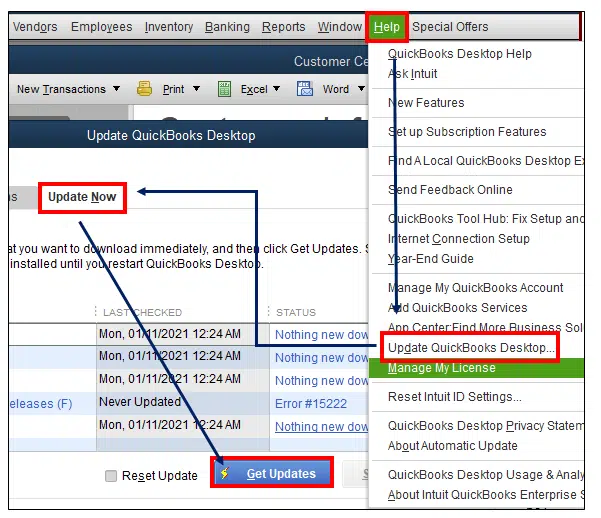
Open QuickBooks.
Head to the Help tab.
Click on Internet connection setup.
Go for using my computer’s internet connection settings to establish a connection when this application accesses the internet.
Tap on the Next tab.
Select Advanced connection settings.
Click on Restore Advanced settings.
Lastly, hit a click on the OK tab and then proceed to the done tab.
Method 3: Close Duplicate Copy of QuickBooks running in the background
If another copy of QuickBooks is already installed or running in the background, try to get rid of it. When more than one copy of the same version is installed on QuickBooks, then this error might show up.
Go to the "ask Manager by pressing (Ctrl + Alt + Del) keys.
End all tasks related to QuickBooks that are open.
Do the same for processes as well.
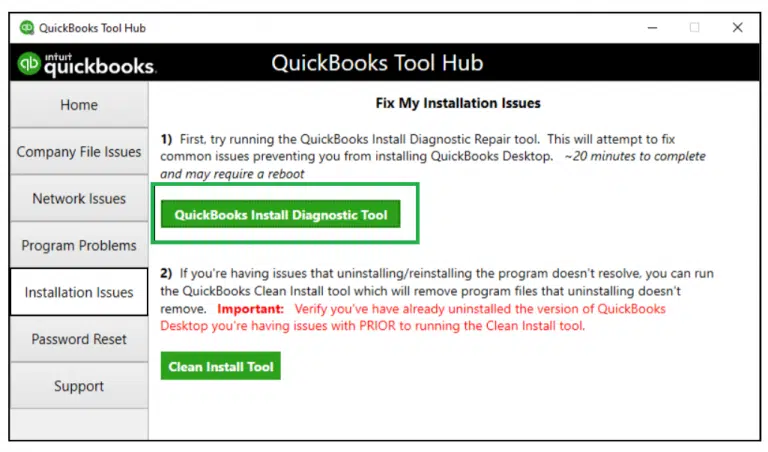
Method 4: Use QuickBooks tools hub program
Step 1: Run QuickBooks Install Diagnostic Tool
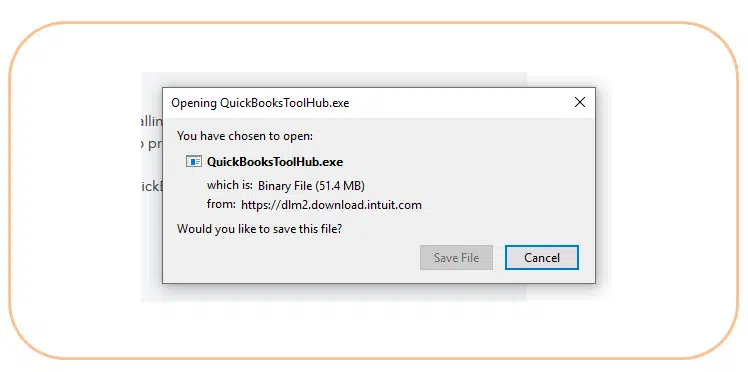
Download and install the QuickBooks tool hub program from official Intuit website, if you haven’t already.
Now, open the same and head to the Installation problems tab.
Did you find it easy to fix the update error message “No version of QuickBooks was found to update” after implementing the set of steps decoded above? Well, if not, then our certified ProAdvisors are here to help you. Reach out to us today at 1-800-761-1787, and get answers to all your QuickBooks queries and our QuickBooks error support professionals will ensure to help you fix this error permanently.
As we all know that, QuickBooks has too many features to perform different-different accounting tasks. PDF and printing is one of the important feature you have used in your QuickBooks software. This feature allows users to print their transactions and reports and also to convert them into the PDF format.
Did you see a QuickBooks PDF component missing error when working on QuickBooks? Or failed to print, email, or save as a PDF from QuickBooks? Well, we have got you covered. In case you can’t print, email, or save as a PDF from QuickBooks and see a warning message: "QuickBooks can’t complete the current action due to a missing component: Missing pdf file component" or "Quickbooks detected PDF component missing".
To handle such situation, this segment will provide you with some quick information related to QuickBooks PDF Component Missing Error. Let us have a look:
Causes behind to QuickBooks missing PDF component error
Some of the most common causes that trigger the "Component Required for Pdf Print from QuickBooks is Missing Error" are as:
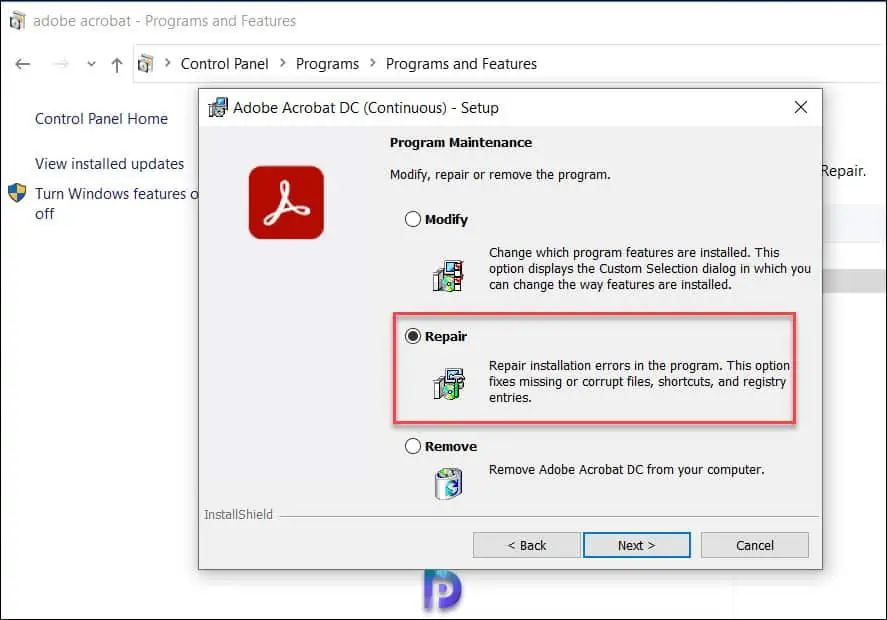
Adobe Reader might be corrupted or incompatible with QuickBooks.
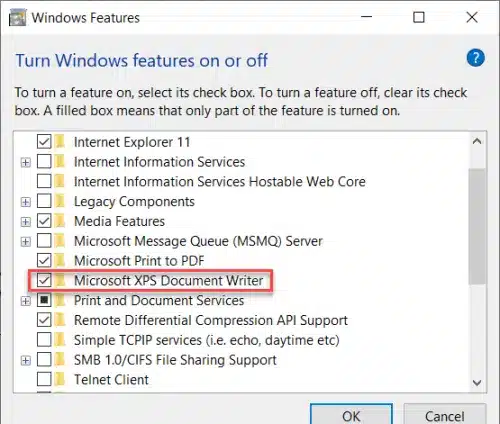
Microsoft XPS Document Writer may be turned off.
QuickBooks Desktop not updated for a long time.
Symptoms associated with QuickBooks Missing PDF Component
This will initiate the download process. Once done, restart QuickBooks.
Method 2: Run QuickBooks Print & Print Repair Tool from QuickBooks Tool hub
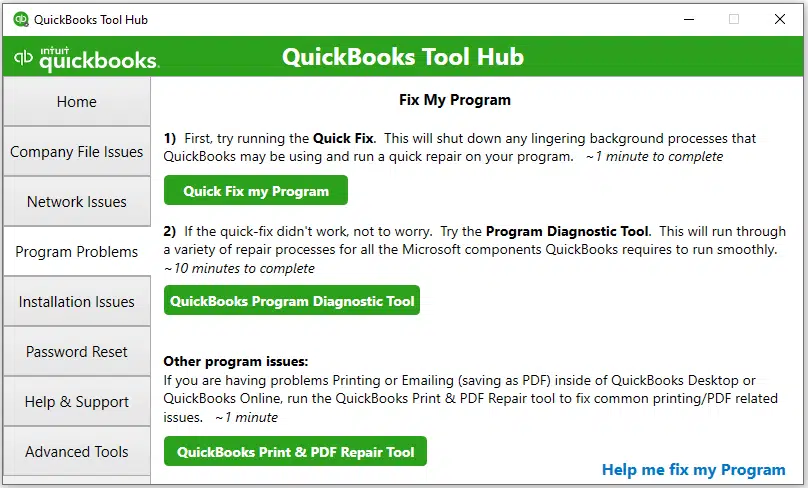
Step 1: Download and install the QuickBooks Tool hub
QuickBooks tool hub is a one-stop solution for all your QuickBooks error resolutions. Here you will find all sorts of tools you need to deal with various errors in QuickBooks. Proceed with the steps below for the best experience and also use Tool Hub on Windows 10, 64-bit.
Method 5: Restart and reset temp folder permissions
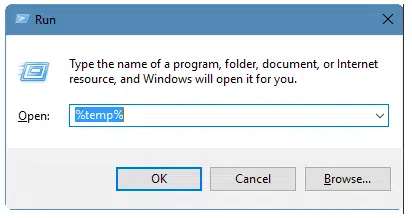
Step 1: Reboot the system
You need to restart your computer and then try to use the pdf feature again. If this doesn’t work, then reset your temp folder permissions.
Step 2: Reset Temp folder permissions
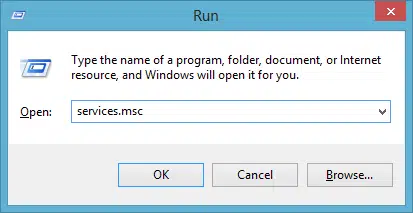
At first, press the Windows + R tab to open the Run command.
Now, enter in %TEMP% and click on Enter tab.
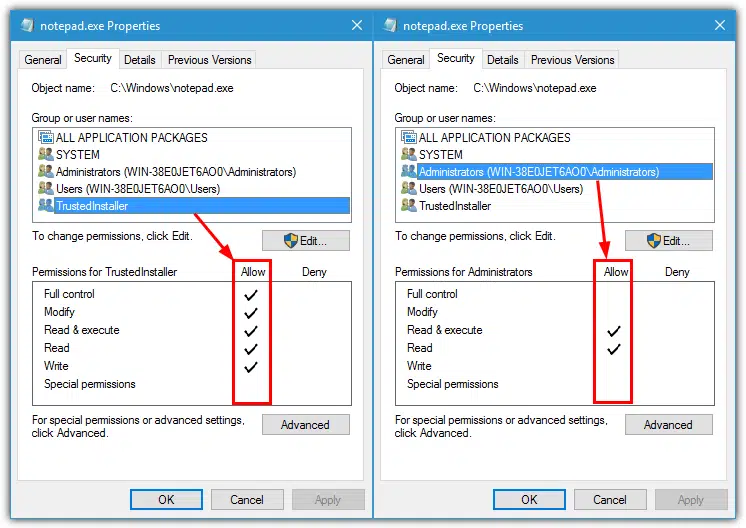
You will then have to right-click the empty space and choose Properties.
Go for the Security tab.
Ensure all user names and groups in security have Full control.
After the permissions have been set to Full control, save as PDF again in QuickBooks.
Reconcile Windows disappears or doesn’t show
Well, if that is the case, or if QuickBooks locks up after you choose Reconcile from the Banking menu and the pdf function works, then the reconcile window might show off-screen. Here is what you need to do:
Search for all open Windows to see if your reconcile window is listed.
Now, choose Close all and begin the reconciliation again.
In case you continue to receive the same issue when reconciling the accounts, seek further assistance.
Method 6: Configure Microsoft XPS Document Writer v4.
Under this process, press Start and go to Settings.
After that move to Bluetooth and devices option.
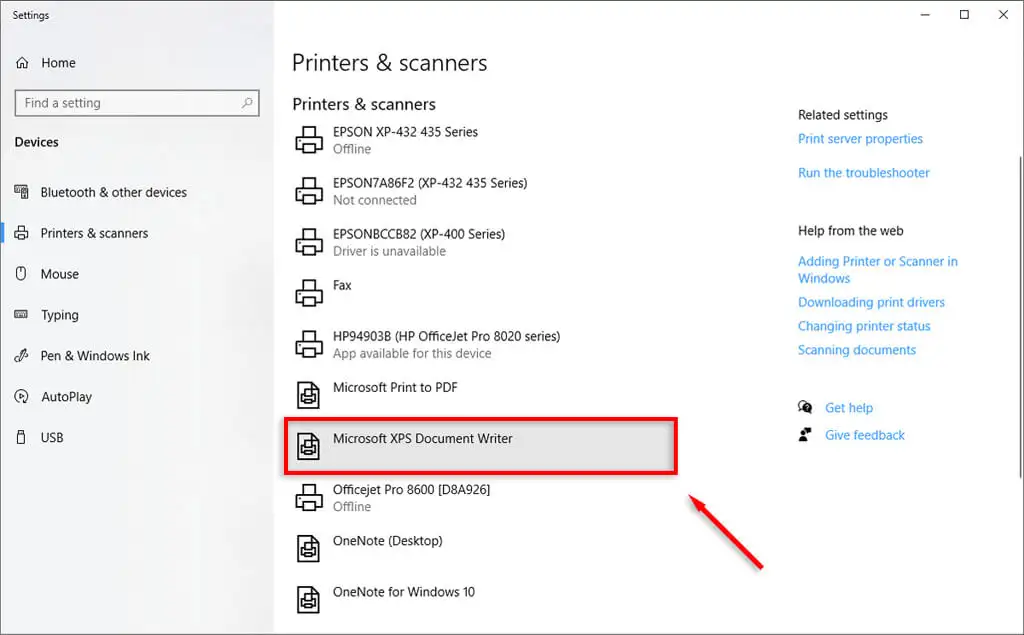
Select Printers and Scanners tab.
Herein, click on the Add a printer or scanner option.
Now add a local printer or network print with the Manual settings.
Also, click on PORTPROMPT: (Local port) and click Next in the Use an existing port.
Here you need to select Microsoft from the manufacturer list.
Select Microsoft XPS Document Writer v4.
Once done, select Next and Replace the current driver.
Now again click on Next and Finish to save changes.
Make sure to unmark the box next to make XPS the default printer.
For Windows 7/ Vista:
Click on Devices and Printers option from the Start menu.
select Microsoft XPS Document Writer.
Here you need to click on Remove Device.
Then, select Add a printer and click Add a local printer.
Now you need to choose Use an existing port.
Hit on XPS Port: (Local Port) and after that click on Next.
Opt for Microsoft in the manufacturer list.
Select Microsoft XPS Document Writer v4 and hit on Next.
Missing PDF components in QuickBooks isn’t the only pdf-related issue you might come across. There are a bunch of other errors as well. It is believed, that implementing the set of steps that we have mentioned in this segment will surely help you in dealing with this error. However, if you still face similar errors, do not think twice about connecting with our QuickBooks desktop error support professionals. Dial 1-800-761-1787, and all your queries will be addressed immediately.