Learn the best ways to troubleshoot QuickBooks error PS036: Unable to Verify Payroll Subscription:
Payroll error code PS036 is a quite common payroll error that displays in QuickBooks payroll very frequently due to a few of reasons. This sort of issue generally takes place when QuickBooks users attempt to update the payroll tax table. Sometimes, users might see an error abruptly on the screen and slow down the update process of your software. One of the major reasons behind the occurrence of this error can be when users face difficulty in verifying the payroll subscription. There can be other reasons as well, due to which the error might appear and crashes an active Window and prevents users from performing an ongoing task.
You might see the below-given error message on your computer screen:
Warning:
PS036: There is a problem verifying your payroll subscription or QuickBooks Unable to Verify Payroll Subscription
Error:
PS036 - Trouble verifying payroll subscription and can't install new payroll updated
If you are also experiencing the QuickBooks unable to verify payroll subscription error PS036, then we can assist you. All you have to do is to read this article carefully till the end, or you can also seek our help by calling us at1-800-761-1787, in case you get stuck at any stage.
What leads to QuickBooks payroll error PS036?
One can end up in this error due to the following reasons:
If the multiple payroll agreements are energetic with an inactive direct deposit settlement.
Also, if the QuickBooks utility document paysub.ini is corrupted or broken.
In case the status of the payroll subscription in the QuickBooks Desktop Service Keys screen appears as Invalid EIN Number or EIN additionally an explanation.
In order to rectify the QuickBooks error message PS036, make sure to perform the below set of measures:
Step 1: Check for QuickBooks payroll subscription
The first step requires checking if your payroll subscription is active or not. An inactive/expired subscription can potentially lead to the PS036 error code in QuickBooks. The steps to check the subscription status are given as under:
Next step is to open the QuickBooks and Log in to the payroll service account.
After that, it is required to move to the Employee, and My payroll services and then Account or billing information.
Once done with that type the Login credentials and select sign in.
Moving ahead, reboot the system and once again download the updates.
The final step is to open the QuickBooks software and verify whether the issue is resolved or not.
If you are trying to deposit direct paychecks for the company, then avoid performing the steps.
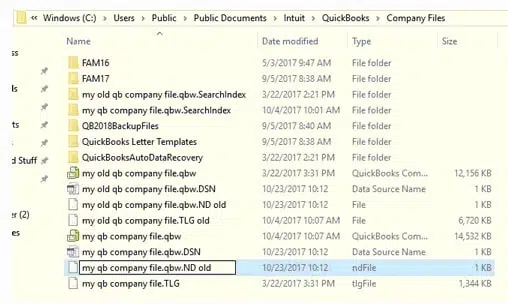
Step 2: Change the name of the Paysub.ini file
The steps to change the file name of the Paysub.ini file are given as under:
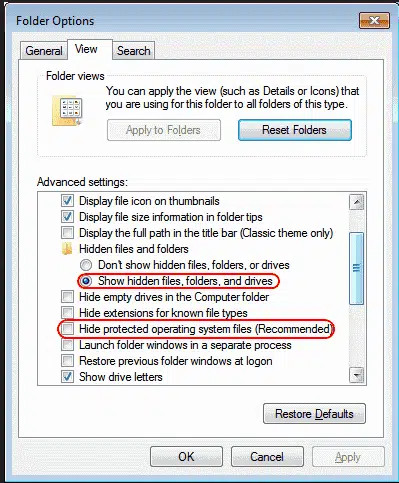
Under this, users should note that the INI is a hidden file on Windows, to see this file initially, it is required to change the Settings of the Windows folder options.
Next step is to select My Computer and click on Organize.
Once done with that, click on the Folder and Search option and also select the View tab.
Moving ahead, click on the Hidden files and Folders and select the Show hidden files, folders, and drivers option.
Choose the Apply and OK tab.
Move back to the My computer and in the search bar at the top find the Paystub.
After you see the paystub.ini file, then right click the same and select Rename tab.
The last step is to repeat the steps for all the paystub files found.
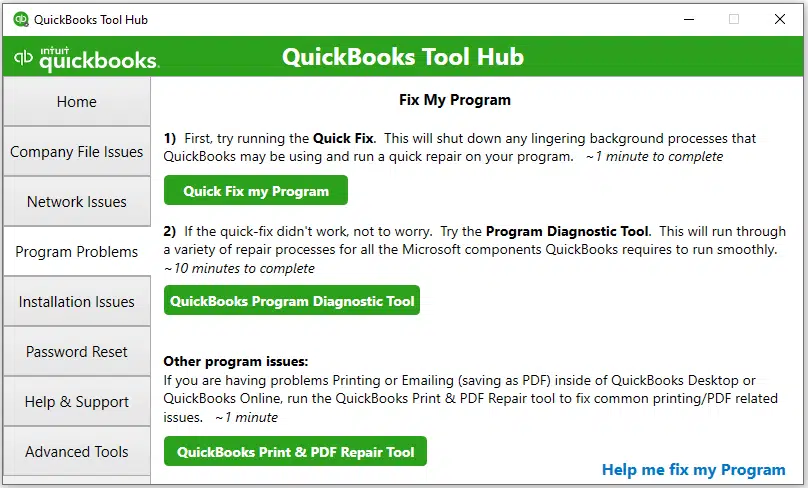
Step 3: Run Quick Fix My Program from QuickBooks Tool Hub
The QuickBooks tool Hub combines all of the other tools into one program. This tool can be used to fix common errors or issues that may arise while using QuickBooks desktop.
At first, you need to close your company file also the QuickBooks Desktop.
By now, we believe that you might be well versed with the steps to fix the QuickBooks error message PS036. Whereas, if the error continues to trouble you, then we can help you. You can consult our team professionals using our QuickBooks payroll support number i.e., 1-800-761-1787 and let our experts and certified professionals resolve the issue for you. If you have any query, please don't hesitate to contact us.
FAQ's
What does Payroll Error PS036 in QuickBooks indicate?
This error indicates some technical issue with the payroll subscription. There may also be a possibility that QuickBooks is unable to verify the payroll subscription information.
Does updating the payroll tax table help resolve QuickBooks Payroll Error PS036?
Yes! Getting the payroll tax table in QuickBooks updated is a practicable solution to fixing this error code.
What are the common payroll service errors in QuickBooks?
Some common payroll service errors include: QuickBooks Error PS032, Payroll Error PS033, Error PS036, QB Error PS038, Payroll Error PS058, Payroll Error PS077.
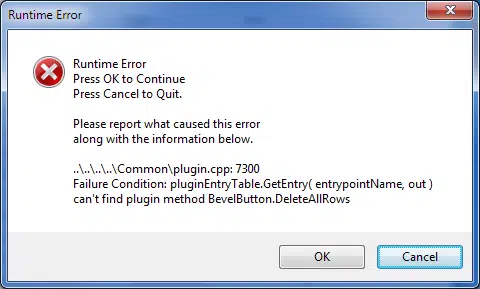
While working on the QuickBooks accounting software, users might end up in the QuickBooks error code 7300. This error is seen when the program is set up or during Windows startup or shutdown or even during the installation of the Windows operating system. Another reason behind the occurrence of error code 7300 can be opening the company files. This error restricts users from opening any company data files or work on the software. There can be various other causes of the QuickBooks error code 7300, which we will be discussing later in this article. You might get the following error message on your system's screen:
However, You can read the entire post carefully, or you can also get in contact with our QuickBooks experts via our toll-free number i.e., 1-800-761-1787. Our certified professionals will ensure to provide immediate technical assistance.
What leads to QuickBooks error 7300?
QuickBooks error code 7300 is usually seen when users opens their company files. This error stops users to continue working on the software. This error is also caused when the Intuit sync manager stops working. At times, the Intuit sync manager or QuickBooks manager stops because of which the error occurs.
64-bit version C:\Program Files (x86)\Intuit\QuickBooks (year)
Files\Intuit\QuickBooks (year)
At the time of renaming the folders, the user will get the error, “Access denied when renaming folders.” In case you aren’t allowed to rename the folders, then follow the steps below.
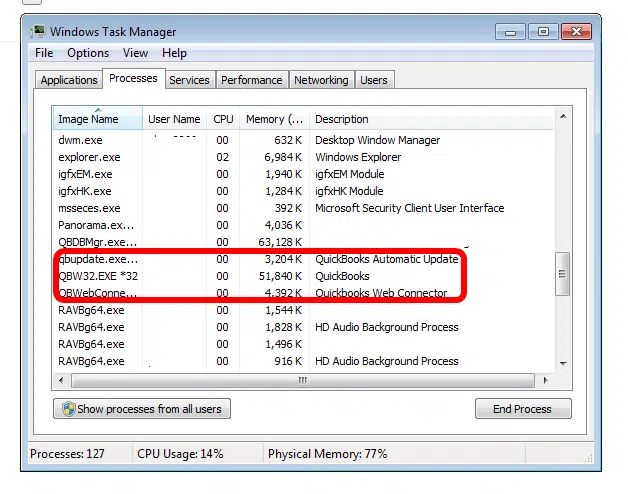
Next step is to right click on Windows taskbar and then click on the Task Manager.
And click on the Processes tab.
Also, select the Column heading with Image name and click on the Alphabetical order in which the process will Start.
After this, under the image name column, users will be able to spot QBDBMgrN.exe, QBDBMgr.exe, QBCFMonitorService.exe, and Qbw32.exe. And select these files.
Now, click on End process.
And when a warning message is seen, just select Yes to proceed.
By now, we believe that the QuickBooks error message 7300 might be resolved after followed by the above stated solutions. However, if the error persists or if you have any queries, then please call to our helpline number i.e., 1-800-761-1787. Our 24/7 QuickBooks error support team is made up of certified professionals and experts who are available to assist you at all times.
FAQs
What is Error 7300?
Error 7300 in QuickBooks is a company file error.
What causes Error code 7300?
This issue can be caused by a damaged Windows Registry or due to Intuit Sync Manager not working properly.
Can Clean install of QuickBooks fix QuickBooks Error 7300?
Yes. If other approaches fail, then you can Clean Install QuickBooks.
Do you want to know an easy procedure to rectify error code 179 in QuickBooks? If yes, then reading this post till the end would surely work for you. QuickBooks error code 179 is seen when users tries to log into the bank’s site on the system. As a result of such error, users are unable to log in to the software. You can also see this issue after incorporating an Accountant's Copy into the company file forces a rebuild for my company file.
It is important to fix this error immediately, so as to use the banking services as you used to use earlier. To know more about QuickBooks error message 179, you are suggested to read this article till the end.
What leads to QuickBooks Error Code 179?
You can end up in such an error due to other following reasons:
One of the major causes can be if there are some issues in the reports, such as negative values on the invoice.
If there is a bad network connection in the system, the error may show up.
In case there are chances that the transactions are missing in QuickBooks.
If a user uses the wrong credentials while logging in, that may also lead to such errors.
If the system is infected with any virus attack.
In case you forgot to log out of the last session.
Solutions to Fix QuickBooks Error Code 179
You can try fixing the QuickBooks error code 179 by performing the steps below:
Method 1: Repairing the Windows registry
In this process, you should first click on the Start tab.
After that enter command in the search bar and also click on enter tab.
Once done with that, the next step is to type in regedit in the black box.
And then, select the error 179 related key.
Now, save the key information.
And also, create a file and assign a name to it.
Now you should then select the reg extension and also save it.
You will now have to try to login into the bank website to ensure that the issue is fixed.
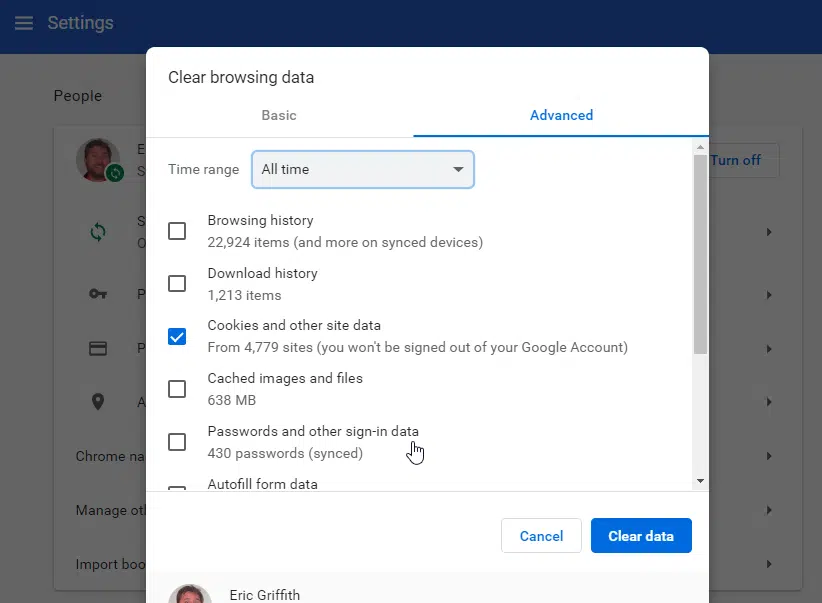
Method 2: Clear the browsing data
Remove the browser data and then try logging into bank account once again using these steps:
Under this process, you should open Google Chrome and click on the three dots that are visible to you on the system screen.
After that, delete the browsing history comprising the cache too.
You are finally required to log in again to the bank’s website.
Method 3: Log out from the Online banking account
At first, you need to sign out of the bank website from all computer systems.
And then check that no one is using the same credentials to log in.
The last step is to log into the bank website as an admin.
Method 4: Update Bank in QuickBooks
Initially, run QuickBooks and move to the tools tab.
After that, you need to click on the online center.
You should select the financial institution and also click on the choice that you wishes to choose.
After that, press Ctrl + F3 KEYS.
You will then have to move to the online center and also click on the contact info option.
Run the QuickBooksToolHub.exe file in order to install the software.
Now follow the on-screen instructions to install and agree to the T&C of Intuit company.
Also, double-click the icon to open the tool hub program.
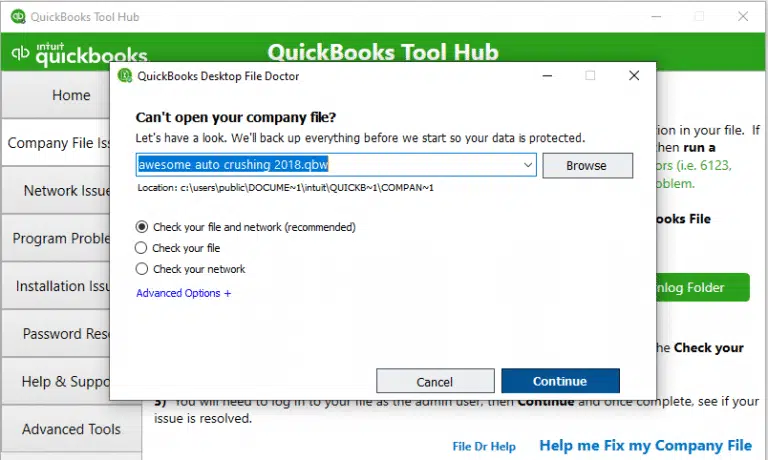
After that, from the tool hub program, select the Company File Issues option.
Then hit a click on Run QuickBooks File Doctor.
The file doctor tool may take up to 1 minute to open.
Once done, in QuickBooks File Doctor tool, you need to choose the company file from the drop-down menu.
And then click Browse to search for the file.
Now choose to Check the file and then hit a click on Continue.
Now finally enter the password for QuickBooks admin and select Next.
Wrap up!
With this, we come to the end of this article, where we hope that the information shared above might be of some help in fixing the QuickBooks error code 179. In case there is any query, or if you are still unable to fix the issue even after performing the steps above, then it is recommended to contact our QuickBooks error support team at 1-800-761-1787.
Experiencing WDDM service not running in QuickBooks? Well, need not to worry, as we are here for you with this article, where we will be discussing with the right steps involved in fixing WDDM service not running in QuickBooks desktop. You might come across this particular issue when the DDL files (Data Definition Language file)aren’t available or damaged and when the users try to update the Windows. As a result of this error, you will experience the slowdown of the system, startup and shutdown issue, blue screen error, program locks up.
If you are a victim of the WDDM Service Not Running problem in QuickBooks, then going through this piece of writing will surely work. However, you can also connect with our tech personnel for any further assistance using our dedicated support line i.e. 1-800-761-1787.
What leads to WDDM Service Not Running Error in QuickBooks?
Triggers behind the WDDM service not running in QuickBooks are as follows:
You can experience the WDDM service not running in QuickBooks in case there are any sort of virus or malware infections present in your system.
Experiencing this issue is also possible if the drivers are not installed properly or the drivers are corrupted.
If the installation and uninstallation of the application is incorrect.
Just in case when updating the Windows some of the .DLL files aren’t available or are corrupted then in that case probable chances to face this issue.
Steps to Perform to Resolve WDDM Service Not Running in QuickBooks
You can perform the below-stated measures to resolve the WDDM service running issue in QuickBooks Desktop:
Method 1: Make the WDDM service automatic
The first method requires ensuring that the WDDM service is automatic, for which you should proceed as follows:
Initially, move to the Start menu and click on the Windows icon.
Go for the Control Panel option.
Oft Administrative tool from the Control panel.
You now have to click on the Services option.
Find out the WDDM service from the list.
Right-click the WDDM service option.
You now have to go for the Properties option.
Heading forward, move to the General tab.
Pick the Startup type to Automatic.
Conclude the process by clicking on the Apply option and restart the service.
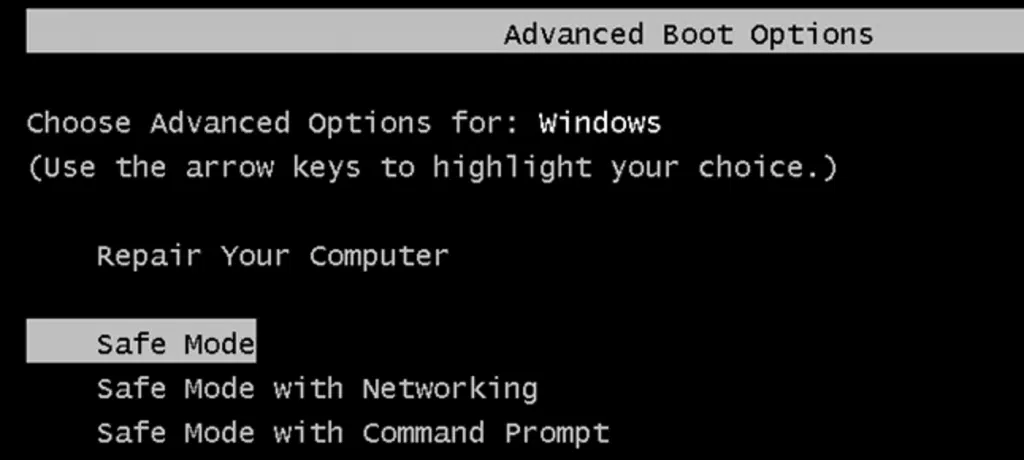
Method 2: Turning on the system in the safe mode
If the previous method doesn't work in your favor, then make a move towards restarting the PC and enabling the Safe Mode in the Advanced Boot options. If you are unaware of the procedure, follow the brief walkthrough given below.
You need to first log in to the system asAdmin.
Furthermore, turn on the system inSafe Mode.
This will reduce the WDDM issue.
You now have to press the F8 key while booting to ensure that the system starts in safe mode.
Check the PC drivers to see whether they are updated or not
This can be done by opening the File Explorer on my computer.
You now have to right-click on it and choose the Manage tab,
You will see a window appearing on the screen stating find the system tools; you need to click on the same.
Now click on the Device Manager.
Right-click on any of the Options from the list and check for Driver updates in the Driver tab.
Make sure to Update all the drivers.
Check if the Windows version is updated to the latest one or not
For this, the user is required to head to the Start tab.
Click on the Settings option.
Navigate toward the Systems tab.
Also, click on the About option.
You will now be able to check your version under Windows Specifications.
Coming across the end of this article, we expect that the above-stated set of steps might be of great assistance in troubleshooting off WDDM service not running issue in QuickBooks desktop. On the contrary, if you still aren’t able to fix the WDDM service not running issue, then in that case, connect with our QuickBooks enterprise support tech geeks right away using our helpline, i.e., 1-800-761-1787, and our experts will ensure to resolve the issue from the root cause for you.
FAQs
What does the "WDDM Service Not Running" error mean in QuickBooks?
The "WDDM Service Not Running" error in QuickBooks reflects a malfunctioning of the Windows Display Driver Model (WDDM) service.
Can I continue using QuickBooks if I encounter the "WDDM Service Not Running" error?
Users should avoid using QuickBooks if they come across the "WDDM Service Not Running" error. It will present any harm to the accounting data stored in the program.
Is the "WDDM Service Not Running" error specific to QuickBooks, or can it occur with other applications as well?
This error is not confined to QuickBooks but can be encountered in other applications as well. All those applications that require Windows Display Driver Model service are prone to this error.
How do I check if the WDDM service is running on my computer?
The steps to check the status of the WDDM service are mentioned below: 1. Hit on the Windows and the R keys together. 2. Within the Run box, enter the command "services.msc". 3. Follow up by hitting the Enter key. 4. This will open the Services window. 5. Look for the "Windows Display Driver Model" or "WDDM" in the services list. 6. Finally, check the "Status" column and check if the service is running. If it is running, the status will show Running or Started.
Is the WDDM Service Not Running error specific to a particular version of QuickBooks?
The WDDM Service error can occur in different versions of QuickBooks that include the older and the newer versions.
Smooth QuickBooks functioning is often interrupted by some or the other technical snags. And one such technical glitch is QuickBooks unexpected error code C=184. You might usually end up with this error when there is any sort of damage to the network file (.NG file) or Transaction log file (.TLG file). This error also impacts the company data file. You can also experience similar issue if the reporting dates of QuickBooks desktop do not tally due to 29 days in February.
Take a deep dive into what triggers QuickBooks error code C=184 and what it takes to rectify it, by scrolling through the segment carefully. Moreover, if you need our tech assistance at any point in time, then connect with us through our helpline number i.e., -800-761-1787.
Insight into QuickBooks unexpected error C=184
You might see the following error message on your screen when opening the QuickBooks software:
Error Code
QB unexpected error C=184
Error message
“An error has occurred in QuickBooks. Please restart QuickBooks and try again. If you continue to experience this error, please note the C= value and contact professionals”
Error Software
QuickBooks
What triggers QuickBooks unexpected error C=184?
There are certain factors triggering QuickBooks error message C=184 which include the following:
You can experience this problem when reporting dates of QuickBooks desktop aren’t matching due to leap years.
Another possible trigger can be when QuickBooks isn’t installed in a proper manner.
If the files including .Nd and .TLG files are damaged or corrupted.
Intuit Inc, recently launched QuickBooks Tool Hub program which contains all the set of tools in one place. You can use the tool to fix error code c=184 in QuickBooks. Follow the steps listed below:
Later on, head to Help tab in QuickBooks and select QuickBooks tool hub from the drop-down.
Once done with that, run QuickBooksToolHub.exe file to start the installation and perform the steps that appear on the screen.
Moreover, double-click on Tool hub icon and run it.
Now move to Company file issues tab.
From there, you need to choose QuickBooks file doctor and choose both file Damage and network connectivity option.
And also, enter the Admin account login credentials and then select Next tab.
You can try to re-access QuickBooks desktop or run a report to see if this issue is fixed.
Measure 4: Run QuickBooks Install Diagnostic Tool
If the issue still persists after performing the above-mentioned steps, then follow these steps to download and run QuickBooks install diagnostic tool.
Under this method, you are required to open Tool Hub program on your QuickBooks desktop.
After that navigate to Installation Issues tab and select QuickBooks Install diagnostic tool.
Let the tool run. It will take up to 20 minutes to open the diagnostic tool on your system.
Once the tool finishes the process, you need to restart your computer.
Now open your affected company file. It will work fine now.
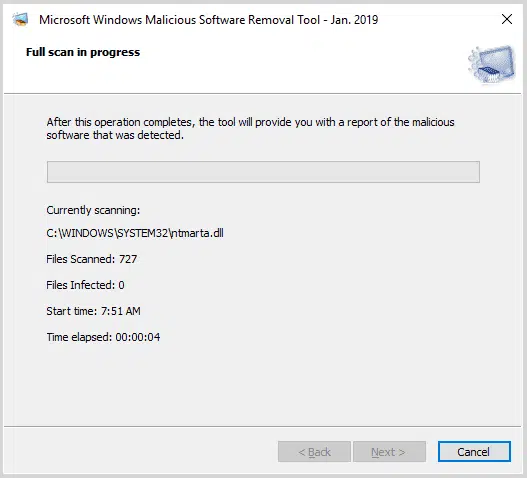
Measure 7: Check your computer for viruses or malware
Checking your computer for viruses or malware is an important step in maintaining the security and integrity of your QuickBooks data.
You need to install a good company antivirus software, if you don't have one already.
Also, make sure that you have update your antivirus software with the latest virus definitions.
Perform a full system scan to check for viruses and malware.
Restart your computer once the scan process is complete.
Conclusive lines:
Once you scroll through the segment, it becomes a little easy to repair the QuickBooks desktop error code C=184. However, if you need our technical assistance at any point in time, then do not think much about contacting us using our QuickBooks error support helpline i.e., 1-800-761-1787.
FAQs related to QuickBooks Error C184
What is QuickBooks Error C184?
This error denotes that your QuickBooks has some damaged data files such as (ND & TLG files)
What is QuickBooks File Doctor?
File Doctor tool can easily fix your company file and network issues within your QuickBooks desktop.
How can I fix this error in QuickBooks?
Mostly QuickBooks errors can be resolved by the following methods: 1: Try to run the Reboot.bat file. 2: Also, using the QuickBooks Install Diagnostic Tool can resolve all the installation related issues in no time. 3: Perform a Windows Update can also resolve such errors.
How do I fix QuickBooks has reached the maximum number of unregistered users?
If you see the error message "QuickBooks has reached the maximum number of unregistered users" it means that the maximum number of users allowed to use QuickBooks without being registered has been exceeded. To fix this error, you need to register your QuickBooks software.