Get the updated methods to fix QuickBooks Error code 15218:
QuickBooks Desktop is a useful robust software yet easy to use. However, like any other software, this application too receives bugs and errors. These errors generally show up in the form of particular error codes and error message. However, you may rectify these errors by simply following the DIY instructions offered by the software, but at times, the issues may get complex for you and require an immediate solution for it. In such cases, an expert will be required to deal with them.
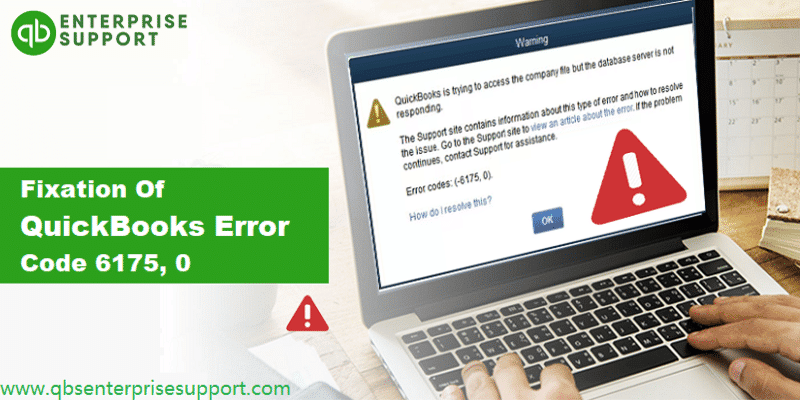
Have you just realized how challenging QuickBooks errors can be? Well, one such time-consuming error that we will be addressing here is QuickBooks error code 15218. This tends to be a payroll update error that often occurs due to misconfiguration of the internet settings. While the error falls under the 15xxx series, it might seem to be a bit tricky to rectify for some QuickBooks users. Understanding how essential it is for you to deal with this error, here we are with this informative article sharing the nitty gritty of QB error 15218. For more details, keep scrolling this segment and towards the end, you will definitely be able to fix the error permanently. Moreover, if you need an expert guidance in resolving the error, you may call us at our dedicated helpline at 1-800-761-1787.
What causes QuickBooks error 15218?
There can be a few reasons that can lead to QuickBooks error 15218, which we have tried to cover in the list shared below:
One of the basic reasons can be if the wrong configuration of the web browser such as Microsoft Internet Explorer.
Another reason can be if the .nd file is somehow damaged.
You can further end up in such an error if the system firewall hinders the software.
Also, if the QBCF monitor service shows some issue.
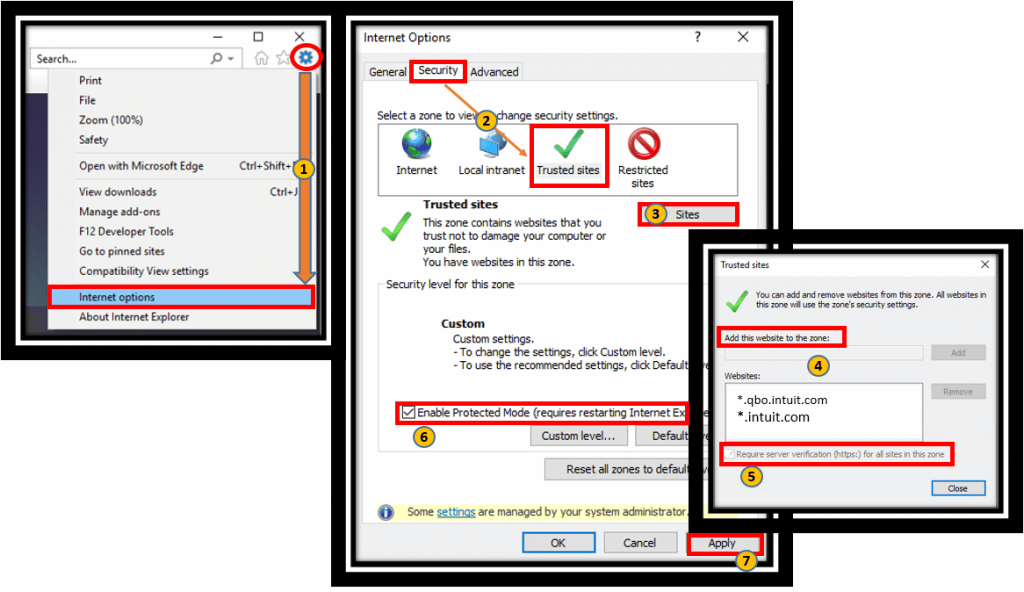
The following steps given below to ass the URL as a trusted website.
Here, you need to first log into the system as Admin.
Later, you need to, right click the Internet Explorer.
Once done with that, you need to head to the Internet option.
Followed by, go to Security tab and select Trusted sites options namely:
QuickBooks.com
Intuit.com
Intuit.ca
Herein, you have to click on Add.
Now click on Close and then Ok to close the window
After which, you need to start the system again.
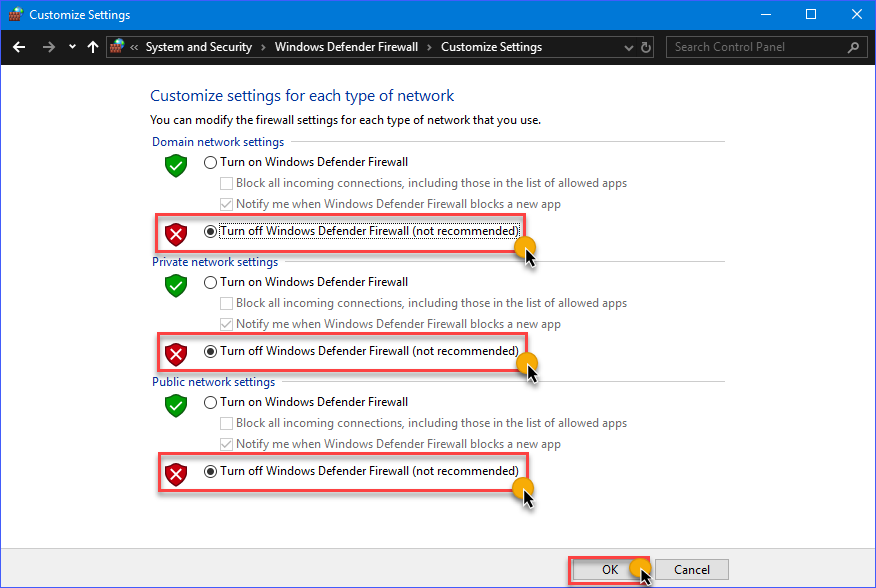
Method 4: Disable System Firewall
At times, temporarily disabling the firewall can resolve the issue up to a certain extent. You can simply use the below steps to successfully disable firewall.
Here, you have to move to the Start menu.
You further have to enter in Firewall.
Moreover, you need to click on Windows firewall.
Once done with that, you are required to turn off Microsoft Defender Firewall with Network Types.
Terminating errors in QuickBooks becomes easy, once you know what steps can be followed to get through it. Just in case you have some queries while performing the above solutions related to QuickBooks error code 15218, you can get in touch with our QuickBooks error support professionals at 1-800-761-1787 and your queries will be instantly answered. Our team will be more that happy to assist you.
Frequently Asked Questions
What is QuickBooks Error 15218?
This error is usually caused by incorrect web browser settings or any other security software blocking QuickBooks from accessing the internet.
What are the ways to quickly fix this error?
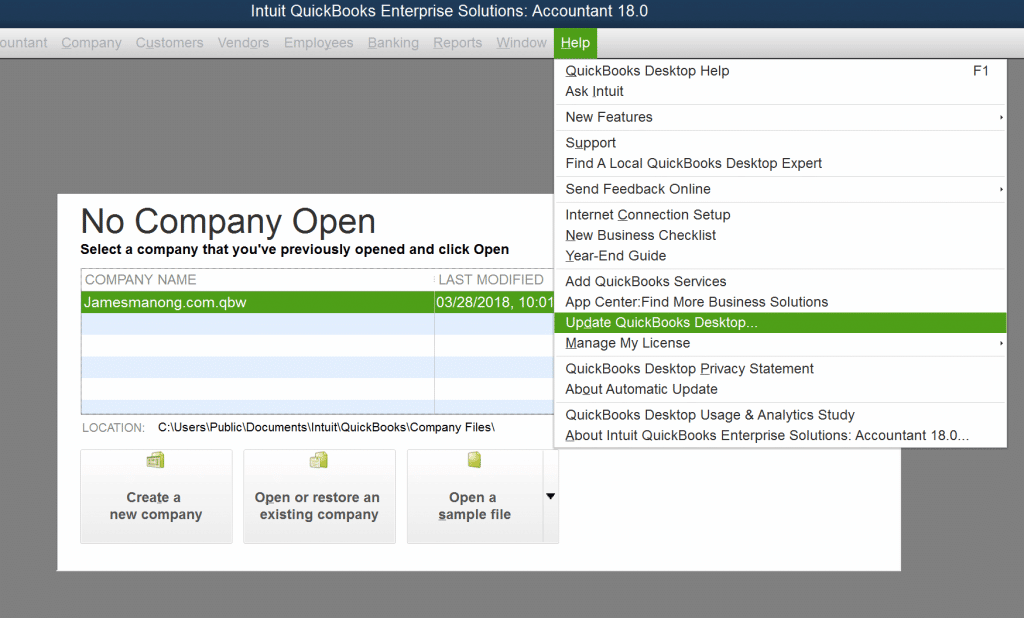
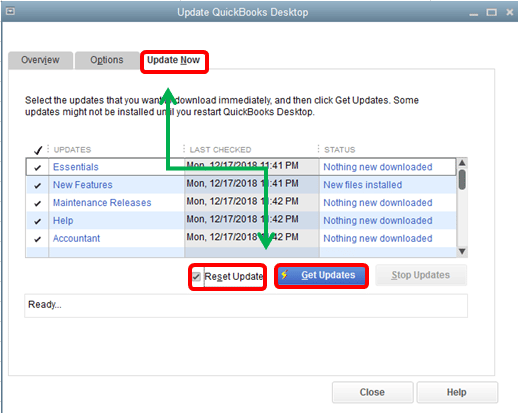
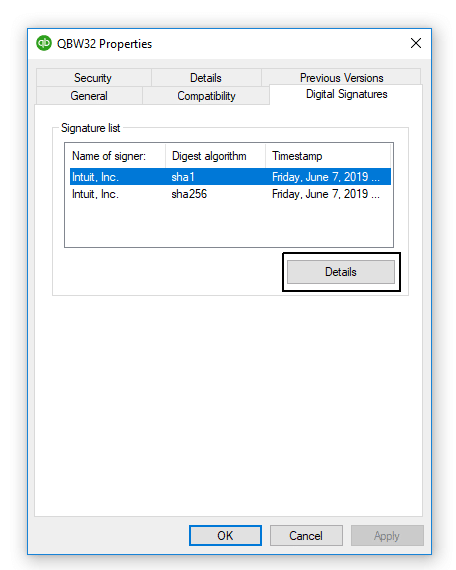
This error can be easily rectified by performing the steps given as under: 1: Update your QuickBooks desktop in Safe Mode. 2: Also set up the latest digital signature certificate.
What are the symptoms of this error?
Slow computer performance, software freezing or crashing etc, can be some common symptoms behind to error code 15218.
Interrupted by QuickBooks migration failed error, while trying to move QuickBooks desktop? Well, this migration error tends to be an unexpected error that often shows up when you try transferring the QuickBooks data from one system to another. Right after you run the Move_QuickBooks.bat file, the probability of running into QuickBooks migration failed unexpectedly error increases. When you manually move QuickBooks either from one system to another or from a particular storage on a same system to another, then the process might seem to be a bit of a hassle. And this is where, you seek for QuickBooks Migration Tool. You might require QuickBooks Migration tool to simplify the migration process.
And when this tool shows some issue, it might trigger the QuickBooks migration failed unexpectedly error. To help you understand the error better, here we are with this informational segment, sharing the quick insights into migration failed error.
What Files Cannot be Migrated by Using the QuickBooks Migration Tool?
QuickBooks Migration Tool, no doubt, is a data transfer tool for QuickBooks, but it has certain restrictions when it comes to the file types to be migrated. Some of the common file types that cannot be migrated through the Migration Tool are given as under:
There are certain system requirements that are a must for QuickBooks Migration tool, in order to avoid errors like migration failed unexpectedly. Here are some quick system requirements that you need to keep into consideration:
Operating System Requirement:
Windows 11, 64-bit, natively installed
Windows 10, all 64-bit editions, natively installed
Windows Server 2022, Standard and Essentials
Windows Server 2019, Standard and Essentials
Windows Server 2016, Standard and Essentials
Windows Server 2012 R2, Standard and Essentials
Windows Server 2012, Standard and Essentials
Database Server Requirement
Windows Server 2022, Standard and Essentials
Windows Server 2019, Standard and Essentials
Windows Server 2016, Standard and Essentials
Windows Server 2012 R2, Standard and Essentials
Windows Server 2012, Standard and Essentials
Browser Requirement
There is a need of an additional browser to allow QuickBooks connect to the internet. Moreover, you need to have an active internet connection to sync license data online.
System Hardware and Operating System
Processor
QuickBooks needs at least 2.4 GHz to run properly.
RAM (workstation)
8 GB minimum, 16 GB suggested for better performance.
RAM (server)
For 1-5 Users: Minimum 8 GB
For 10 Users: Minimum 12 GB
For 15 Users: Minimum 16 GB
For 20+ users: Minimum 20+ GB
Disk Space
2.5GB of additional disk space is needed for data files. In case there is additional software: 60MB for Microsoft .NET 4.8 Runtime, that you get with the installation files.
In case of Intuit Data Protect in QuickBooks Connected Services offerings, this is what you need: * At least 4.0 GB RAM is needed. * At least twice the size of free space is needed for the largest file you have to back up in addition to an additional 100 MB of storage.
You must have this space in this folder: LocalApplicationData+”Intuit\Intuit Data Protect.”
Note: Using an SSD drive is suggested for best performance.
Windows
North American version of Windows.
Regional settings are supported when set to English.
Having admin rights is a must on the server computer when hosting multi-user access.
Natively installed and doesn’t need to run in a virtual environment or emulation software.
Optical drive
For physical CD installations, a 4X DVD-ROM drive is required.
Screen resolution
Display must be set to 1280 x 1024 resolution or higher with up to 2 extended monitors.
Default DPI setting on the system for best display.
What contributes to QuickBooks Migration Failed Unexpectedly Error?
Ending up on QuickBooks Migration Failed Unexpectedly Error is quite possible with the set of reasons listed below:
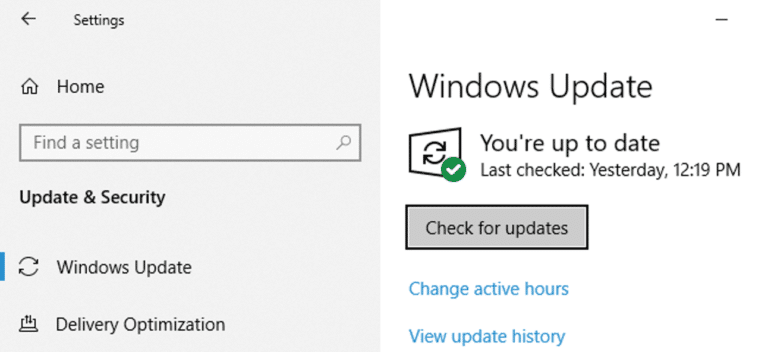
Using an outdated Windows operating system can be a core reason leading to QB Migration Failed error.
Not just that, but any issue with the migrator tool can further trigger this error.
Moreover, if you face any sort of issues with the version compatibility of QuickBooks with the migration tool, ending into Migration failed unexpectedly error occurs.
Another trigger for the same can be if there is some sort of compatibility issue among the migrator tool and QuickBooks.
Also, if the company file folder is damaged somehow.
Or if your Windows operating system is misconfigured.
Effective Solutions to Fix QuickBooks Migration Failed Unexpectedly Error
A bunch of methods can be implemented to successfully get rid of QuickBooks migration failed error. Let us evaluate each of the methods one by one:
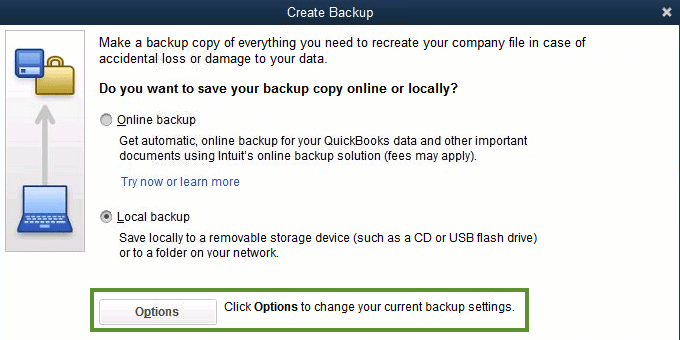
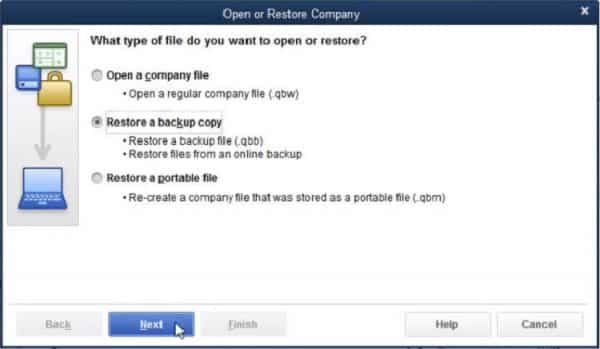
Solution 1: Moving company file to another location
As one of the reasons can be corrupted file location, you can surely try to fix it by moving the company file to another folder using the steps below:
To begin with, you need to copy the backup files.
Now, you will have to open the folder and further find the backup file.
The next step is to access the restored_companyname_files folder.
You will then have to right-click and go for the Copy option there.
Now, paste the file to the location you wish.
Furthermore, you need to copy and paste the following files:
As we end this segment, we expect you to be able to shun off the QuickBooks migration failed unexpectedly error. Just in case you have queries unaddressed, give us a call at 1-800-761-1787, and your issues will be answered by our QuickBooks error support experts in no time. Our certified ProAdvsiors understand what it takes to tackle through QuickBooks issues immediately. Support is just a call away.
FAQs
Can a large company file size affect the data migration process?
Yes! A large company file size can impact the data migration process.
Is it possible to reverse a failed data migration in QuickBooks?
No! you can not reverse a failed data migration in QuickBooks.
Can third-party applications interfere with data migration in QuickBooks?
Yes! many unregistered 3rd-party apps on the system can conflict with the data migration process in QuickBooks.
Is your QuickBooks installer facing EXEAdapter error or generally termed QuickBooks error 61686? Well, this definitely isn’t a common error you might land into, but is at times experienced when you try installing pr updating QuickBooks desktop. A core reason behind the occurrence of QuickBooks EXEAdapter error, in case there is a damaged framework.xml file. Not just that, but you can also end up in this unique error, in case there is a missing component of Windows operating system that is crucial for installation of the program. While the error tends to be unique, so is the error message that might show up on your screen. It would appear as follows:
We’re sorry! Something went wrong with your installation.
EXEAdapter error: InstallExe method received the system error from create process, command-“c:\user\asaeed\appdata\local\temp\premier_us27r1\ thirdparty\dotnet46\ndp46-kb3045557-x86-x64-allos-enu.exe”\q\norestart\chainingpackage QuickBooks system message – The component store has been corrupted”.
To help you deal with this annoying QuickBooks error code 61686, here we have curated this segment sharing some quick details about the same. Let us together get a grip on to this error and find its quick fixes. For live expert assistance, you can call our experts anytime at the helpline, i.e., 1-800-761-1787.
How does this QuickBooks Error 61686 Show Up?
Installation of the QuickBooks program requires a seamless functioning of the Microsoft components, including the .NET Framework. Any damage caused to this component can prevent access to the web-based applications as well as QuickBooks installation.
The QuickBooks Error 61686 typically shows in the form of error messages given below:
Error
Description
Warning 1
‘’ The installer encountered an error when running "Drive:\Users\Owner\AppData\Local\Temp\Premier\QBooks" /quiet /norestart INSTALLDIR="C:\Program Files\Intuit\QuickBooks 2011" QB LICENSENUM=####-####-####-###’’
Warning 2
Location: "C:\Users\Owner\AppData\Local\Temp\Premier\QBooks\windowsinstaller-kb93803.exe " EXEAdapter Error: InstallExe method received the system error from CreateProCess , command - "C:\Users\Owner\AppData\Local\Temp\Premier\QBooks\windowsinstaller-kb93803.exe" /quiet /norestart INSTALLDIR="C:\Program Files\Intuit\QuickBooks 2011" QB LICENSENUM=####-####-####-###
Getting rid of the error becomes easy, once you have the right set of causes listed.
One of the reasons could be incomplete Microsoft.net framework installation.
Another possible trigger behind QuickBooks error 61686 can be windows being affected by malware.
Or if the framework.xml file is removed for some reason.
Another possible reason can be if the MSXML file is missing.
You can also end up in error 61686, if the Windows registry entries are damaged.
Moreover, in case the windows installer is damaged, then you can face this particular error in QuickBooks.
Methods to rectify QuickBooks error 61686
Fixing the error is quite possible, especially when you have the right set of steps stated right in front of you. Here are some quick solutions that you can try to fix the QuickBooks error 61686 permanently.
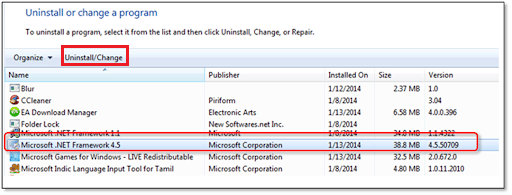
Method 1: Repair .NET Framework
To start off, close all the running programs on the system.
After that, press the Start button and type Control Panel on the search bar.
Press Enter key.
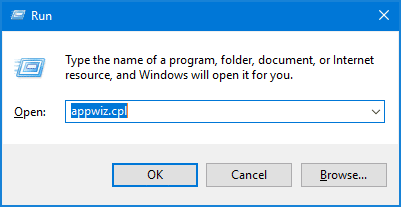
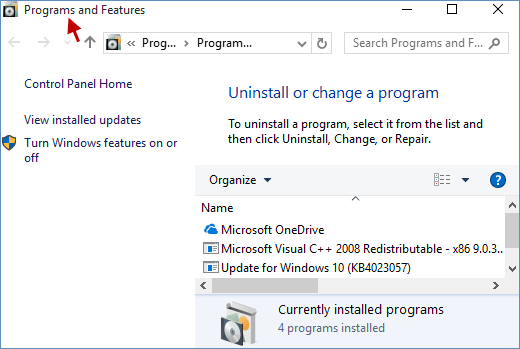
Now, go to Programs and Features.
After then click on Uninstall a Program.
In the next step, select the Turn on or off the Windows features option.
And further, choose .NET Framework.
Now check the .NET Framework 4.5 (or later) and .NET Framework 3.5 SP1 settings.
Turn on .NET Framework 4.5 (or later) by hitting on checkbox next to .NET Framework 4.5.
Later, click on OK.
Once done with that, reboot the system and turn on Framework 4.5 again.
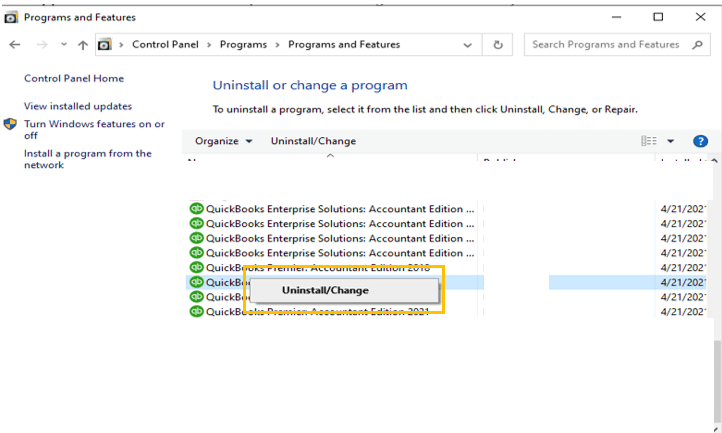
If the above methods not worked for you, then you can definitely fix it by running the QuickBooks install diagnostic tool. This can be fixed using the steps below:
To begin with, you need to head to the Start menu.
And now, proceed to All programs.
Once done with that, you are required to click on the Control panel.
Followed by, clicking on Programs and features tab.
Now, find the Installer.
And then, click on Uninstall/change option.
Now, complete the uninstallation process and Remove the junk files.
The last step is to install it again and find out if the error gets resolved or not.
Conclusion!
Fixing the error code 61686 in QuickBooks becomes quick and easy, once you have the right set of steps into consideration. Just in case you are left with unanswered queries, then reaching out to a technical service provider is all we recommend. You can dial our 24/7 QuickBooks error support helpline i.e., 1-800-761-1787, and your queries will be addressed immediately.
FAQs
What is QuickBooks Error 61686?
Damaged Framework.xml file can cause such type of errors when installing or updating QuickBooks desktop:
How can I ensure that I have sufficient permissions to install QuickBooks and avoid Error 61686?
You can perform the following steps: 1. The very first step is to login to your system as an Admin. 2. Next, start the installation process. 3. And further, adjust the User Account Control (UAC) settings. Thats' it!
Can third-party firewall or security software cause QuickBooks Error 61686?
Yes! 3rd party firewall or other security software can trigger such errors.
Even after using QuickBooks for years, ending up into errors is something you can’t change. However, every error that you might experience in QuickBooks is fixable. One such error that is addressed in this informational guide is QuickBooks error 6250. Well, this error is often experienced when making certain transaction to a customer and the particular customer isn’t present on QuickBooks list. This error tends to be a QuickBooks online error that can be experienced due to a bunch of factors. While you experience this online error, you might come across a warning message stating:
"There was an error loading the files from the path: C:\Users\Rachel\AppData\Local\Intuit\SyncManager Please contact customer support for information."
Or
The customer you have specified has been deleted or invalid customer.
As this error is a bit unique for QuickBooks users, fixing it might seem to be a tough nut to crack. But, being QuickBooks experts, we understand how challenging these errors can be, we have tried to summarize the actual fixes for the QuickBooks online error 6250 in this particular segment. To understand the error better, you can definitely go through this post and you might be able to fix it permanently. However, you can take quick assistance from our QuickBooks error support helpline and allow us to make the process seamless for you.
What leads to QuickBooks sync error 6250?
As there are a few factors causing the error, identifying those factors is essential to effectively fix the issue. Here are some of the common fixes to error 6250 in QuickBooks desktop:
A quick reason can be if there are damaged or missing components required for QuickBooks to sync with customer list.
Another reason can if there is some connection issue faced while data transfer.
You can further end up in error 6250, if the firewall or internet security is blocking the software from syncing.
Not just that, but missing QuickBooks manager updates can further cause such error.
Now that you have unveiled the causes behind QuickBooks error code 6250, fixing it might seem to be quite easy. Let us evaluate a few methods that you can perform to get rid of this error permanently.
Method 1: Unarchive the customer
If you have somehow archived the customer’s name from the folder, then you definitely need to unarchive it right away. This can be done using the steps shared and you will be able to successfully unarchive the name:
To begin with, you need to click on the left menu.
Once done with that, choose invoicing and sales.
Followed by, pick a customer list.
And further, click on the gear icon.
You will be able to edit the list and choose the customer you desire.
Later, you need to go for inactive to unarchive the customer option.
And click on make active tab.
This will unarchive the customer and you now proceed with the process.
Method 2: Recreating sync manager folder
Your sync manager can be a reason behind the occurrence of error code 6250. You will have to sync all the data manually while you recreate the folder.
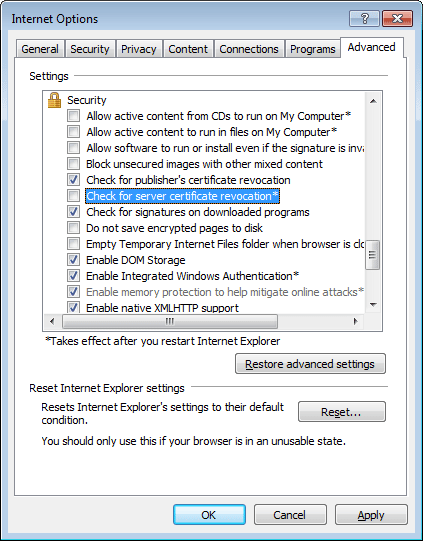
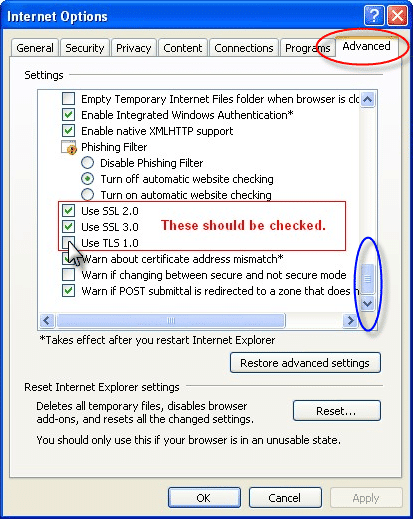
Incorrect SSL settings in the internet options may rectify the QuickBooks Error 6250. Proceed as follows to double-check and correct the same:
At first, move to the internetoptions.
After that, go to the Advanced connection settings.
And then, head to Advanced option and click on Security.
Now check that Use SSL 2.0 and SSL 3.0 options are check-marked. If not, then check-mark on them.
Then click on Apply button followed by OK.
Method 4: Renaming Intuit Folder
The last method that might help you in fixing the online error 6250 in QuickBooks can be to simply rename the Intuit folder.
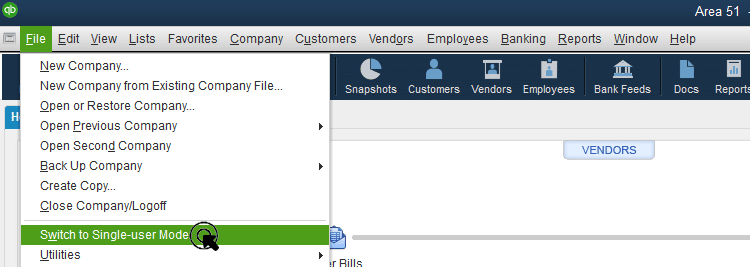
The first step here is to close QuickBooks.
And then, update QuickBooks to the most recent version.
Heading forward, you need to find the system tray and then double click the sync manager icon.
Now, close the sync manager.
And head to C:\users\username\appdata\local\intuit.
And lastly, you need to rename the sync manager folder.
Conclusion!
That's all.! While we reach the end of this segment, we expect you to be able to fix the error code 6250 in QuickBooks successfully. While we have tried to cover most of the technical errors in QuickBooks through our helpful troubleshooting articles. On the contrary, if you face some issue while fixing the error or while performing the above fixes, then connecting with our technical team at 1-800-761-1787 is all that we recommend.
You can reach out to our QuickBooks support helpline team and they will guide you with the fix for the same. Feel free to reach our support team to rectify all your unaddressed queries and accounting issues.
FAQs
What is QuickBooks Error 6250?
This error code an be relate to QuickBooks company file. It generally occurs when QuickBooks is unable to open/access the company file.
Can a third-party application cause Error 6250?
Yes! Unauthorized third-party programs that are incompatible with QuickBooks program can lead to such an error.
What are the error codes in QuickBooks Error 6xxx series?
The various error codes in the family of QuickBooks Error 6xxx series include QB Error code 6000 77, Error 6000 80, QB Error code 6000 83, Error code 6000 301 etc.
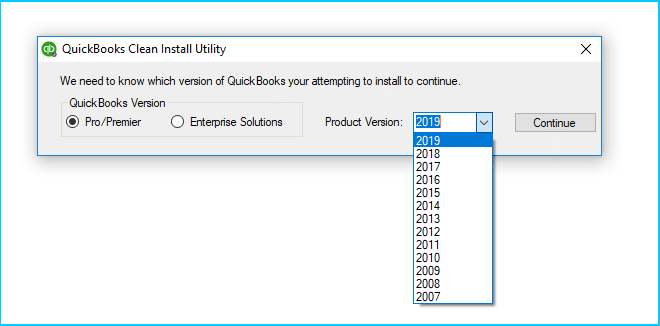
Your QuickBooks software isn’t accepting your product number? Well, you might be panicking while you see this error, but it is simply an installation error that needs some basic fix and you are back to normal. Errors like QuickBooks Invalid product number can be a bit challenging, but are often experienced when you try opening or registering QuickBooks. As the program will start only with the correct product number, the QuickBooks won’t accept product number during installation error might pop-up again and again on your screen. It can be due to invalid product number being used, or a few other factors.
To help you deal with the QuickBooks won’t accept product number during installation error, we have curated this informational article, where we have jotted down the cause and some quick fixes to the issue. Let us together understand what this error is all about.
What causes invalid product number error in QuickBooks?
Facing invalid product number error in QuickBooks is possible due to the following reasons:
Just in case the point of sale entitlement folder and the files inside are compromised, then you can end up in such an error.
Another reason can be if you are mistakenly using incorrect product number.
Or if your system’s date and time isn’t set properly, then facing the invalid product number error is possible.
You can also end up in such an error if you have added hyphens when entering the code.
Or if your authentication files are somehow damaged.
Quick Solutions to fix QuickBooks won't accept product number during installation
There are definitely certain ways that can help you tackle through the QuickBooks Won’t Accept Product Number During Installation Error. Let us checkout each of the solutions and find out the most suitable fix for you.
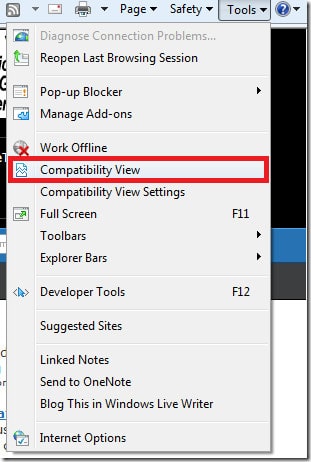
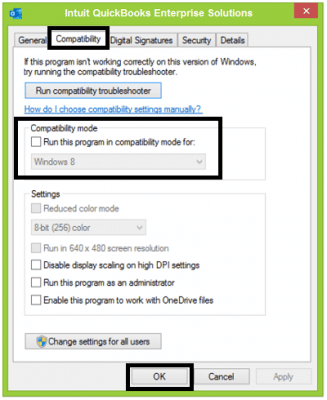
Solution 1: Install QuickBooks in compatibility mode
This process requires you to simply run QuickBooks in Compatibility mode.
By right clicking on the QuickBooks icon.
And further, opting for Properties tab.
You will further have to access the Compatibility tab.
And there you need to click on Run this program in compatibility mode for and go for the windows version.
This would fix the issue for you up to a certain extent.
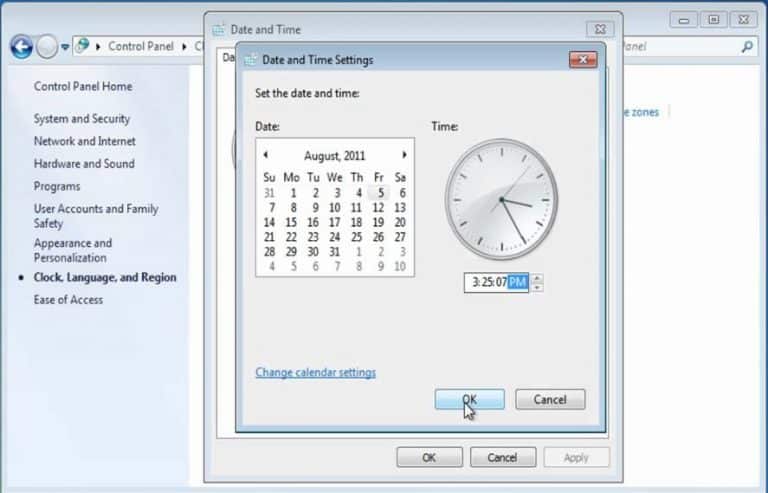
Solution 2: Configure system date and time settings
As we mentioned earlier, the error can be a result of incorrect date and time settings. You need to try fixing the QuickBooks Won’t Accept Product Number During Installation error by simply configuring the system date and time settings.
Start with closing QuickBooks.
And proceed by right clicking the time display and click on Adjust date and time option.
Now, confirm if the date and time is set correctly.
If not, then click on the Date and time tab and set the date.
Now, click on Apply and click on OK tab.
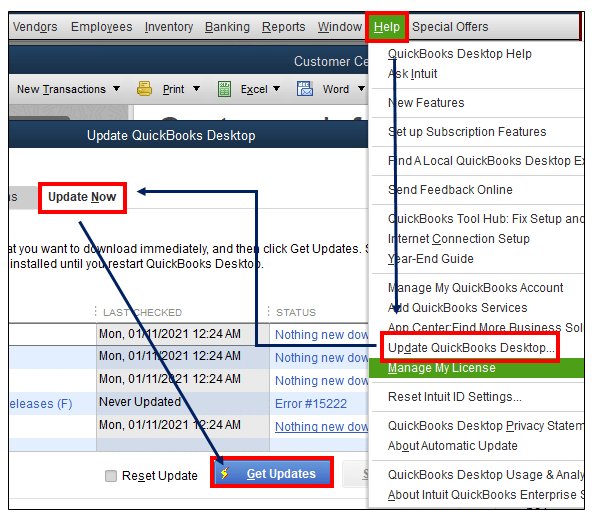
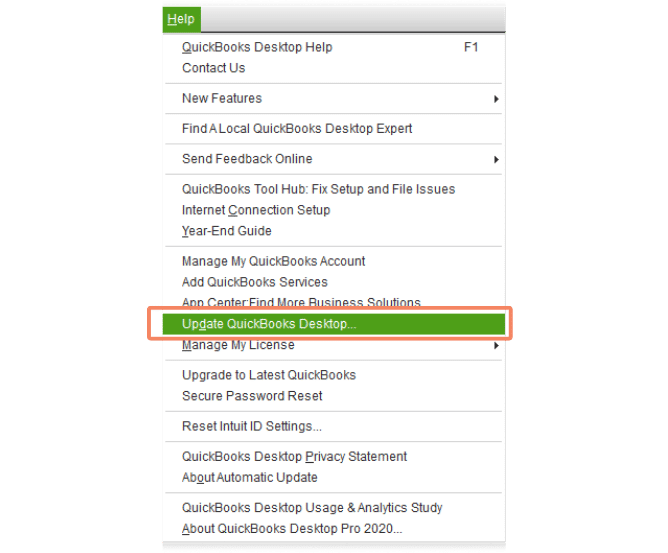
After that, you need to reopen QuickBooks and head to Help.
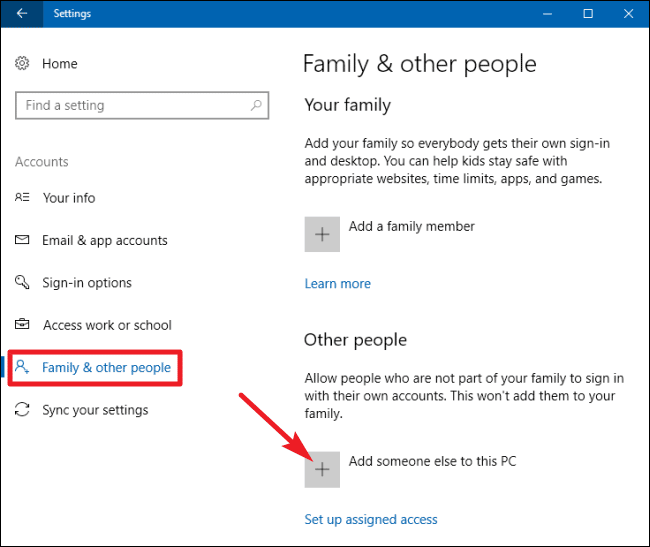
Under this solution, press the Start button and head to Settings.
After that click on Accounts.
Here you need to choose Family and Other users.
And then click Adding another user.
Now, you need to select the Add an account option.
Make sure to checkmark the box beside the addition of a user without a Microsoft Account.
Once done, you need to type the Username and the password and click Next.
Now, restart the system and login with using the newly created account.
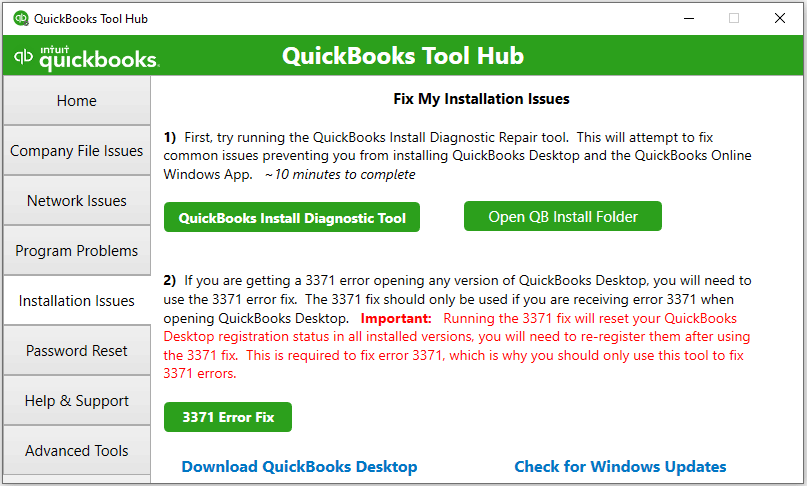
Solution 4: Using QuickBooks Install Diagnostic Tool
Certain tools in QuickBooks come handy when you face issues like this. Here you need to use the QuickBooks install diagnostic tool and fix the error incorrect product code issue permanently.
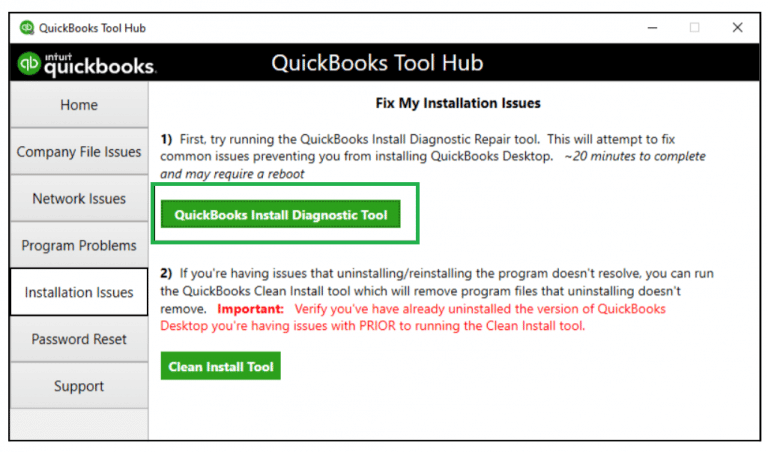
To start with, you need to download and install the QuickBooks tool hub, if you haven’t already.
Once done with that, navigate to the Installation issues in the tool hub.
And there, you would see QuickBooks install diagnostic tool.
Now, pick that tool and run it.
Let the tool take its time to perform the diagnosis and fix.
After the tool finishes, you need to try opening QuickBooks and checking if the issue is fixed.
To begin, press the Start button and select Control panel.
After that go to Programs and Features.
Now choose QuickBooks from the list of installed programs and click on Uninstall.
Later on, move to the directory where QuickBooks was installed previously and then rename the QuickBooks folder.
After then Reinstall QuickBooks desktop.
Once all is done, restart the system and run QuickBooks.
Solution 6: Log into CAMPS
If you use the customer accounts maintenance portal, then login using the right credentials and check the product code. You will get the correct details, and then this would fix the issue for you.
Solution 7: Tally your license and product number
One of the reasons behind the occurrence of this issue can be, if you are mistakenly using the incorrect product number. Thus, you need to ensure that your license and product number is correct. Make sure to check the purchase confirmation email or the CD for the correct details. And try logging in using the right credentials.
As we head to the end of this segment, we believe that the solutions listed above might turn out to be a bit helpful for you in fixing QuickBooks won't accept product number during installation. However, if the error continues to pop-up on your screen, then reaching out the 24X7 QuickBooks enterprise support experts team at 1-800-761-1787 is the only solution left for you. Dial our tech support number, and you will be connected to our certified professionals, who will ensure that your queries are addressed within no time. Our support team is always available for your help.