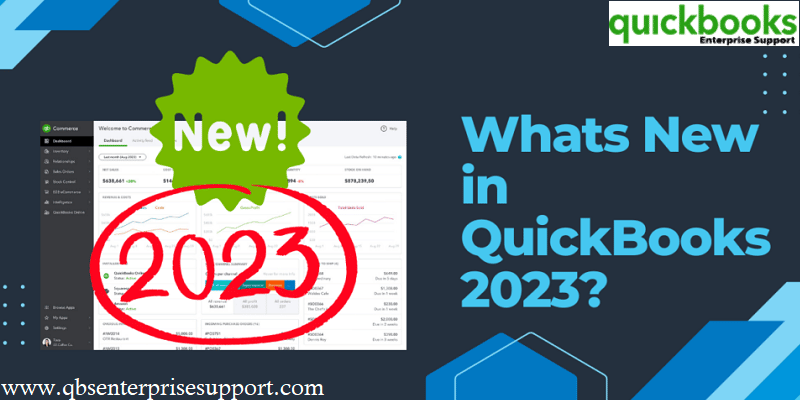
Intuit has come up with the latest version of QuickBooks Desktop 2023, and this new version comes up with a wide range of perks to facilitate easy accounting operations. QuickBooks Desktop 2023 subsumes unprecedented state-of-the-art features to enhance the productivity and efficiency of businesses. This new version comes with security features that make up a strong bulwark against previously occurring technical errors.
If you’re wondering, is there a QuickBooks Desktop 2023 version available, the answer is yes, and it brings multiple new tools for improved accounting. While we apprise you of the new features in quickbooks-desktop-2023, if you have any doubts or want any form of technical issues in QuickBooks Desktop sorted out, you can call qbsenterprisesupport at 1-800-761-1787.
System Requirements for QuickBooks Desktop 2023
The latest QuickBooks Desktop 2023 requires a 64-bit version of Windows OS. It does not run on 32-bit. Get a complete information about the operating system, hardware, software, and other requirements to run QB Desktop 2023 smoothly.
System requirements needed to run QuickBooks Desktop 2023 on Windows.
New and Improved Features in QuickBooks Desktop 2023
This section unravels the new avant-garde features that come along with QuickBooks Desktop 2023. So, stay attuned till the end.
1. Now you can Categorize your Inventory
Inventory item categorization screen in QuickBooks Desktop 2023, allowing users to group and manage items efficiently.
To aid users in keeping their data well-organized, this new version of QuickBooks Desktop allows users to group items in their inventory into different categories. This comes as a major respite for users. They don’t need to manually search for specific items from one single list. This feature can especially be used while running reports. It not only saves time but also lets you keep your data in your own customized categories.
How to access Inventory item categorization?
Add or edit inventory item categories in QuickBooks Desktop 2023 for better item organization.
2. A separate field for expiration dates on lot numbers
QuickBooks Desktop 2023 introduces a dedicated expiration date field to manage inventory lot numbers more accurately.
Enable and customize expiration date tracking for lot-numbered inventory items in QuickBooks Desktop 2023.
To sort out the hassle created while combining the expiry dates of items with their lot numbers, QuickBooks Desktop 2023 includes a separate option for expiration dates. This lets you conveniently make reports based while also letting you easily search for the items corresponding to their expiration dates. This new feature deters QB users from inadvertent selling items that are expired. Besides, it also lets users to add appropriate discounts to those products that are on the verge of getting expired.
How it can be accessible?
At first, the user needs to log into the file as the Admin user.
From the menu bar, the user needs to choose Edit and then hit a click on Preferences.
Next, hit a click on Items & Inventory.
After then, the user needs to choose the Advanced inventory settings button and then choose Serial/Lot No. & Expiration tab.
Once the option is enabled, the user can then choose the desired items to require a Lot No. and if applicable required expiration date.
3. Tracking mileage of your company trips
The new Mileage Tracker in QuickBooks Desktop 2023 helps users record and manage business travel distances efficiently.
The new exciting feature in QuickBooks Desktop 2023 allows users to record their vehicle mileage. This feature will definitely provide a fillip to your convenience in availing tax deductions. This is possible through the mobile application of QuickBooks. Once the mileage is recorded, it can be imported and verified through QuickBooks Desktop. It is pertinent to note that the new QuickBooks mobile app works for iOS devices and is downloadable from the Apple App Store.
Mileage data recorded in the QuickBooks mobile app can be easily imported and reviewed in QuickBooks Desktop 2023.
How this feature can be accessed
Initially, the user needs to select Company option from the menu bar.
4. Monitoring your business finances via the Cash Flow Hub
The Cash Flow Hub in QuickBooks Desktop 2023 provides a centralized view of your company’s financial health and cash movement.
The Cash Flow hub in QuickBooks Desktop 2023 is an effective means of monitoring the financial status of your company. This option lets you keep a closer look at the company-related transactions and helps you in organizing your business finances in an organized and hassle-free manner. You now have an easy avenue to managing any payments that are overdue. Furthermore, the cash flow hub also lets you incorporate new accounts into the list of monitored accounts.
How can you use Cash Flow Hub?
You can easily use the Cash Flow Hub via the Company tab. Another quick access to this feature is through the shortcut available on the sidebar of the Home Screen.
5. Incorporation of Payment links tracking
QuickBooks Desktop 2023 now lets users send and track payment links, making customer billing faster and more convenient.
One of the most sought-after features by QuickBooks Desktop 2023 users is the option to make payments via the payment links. Users of QuickBooks can now send a payment link for the transaction and subsequently collect the invoice related to the transaction.
How to Access Payment links tracking?
Open QuickBooks and navigate to the menu bar.
Here you need to choose the customers option and the select Payment Links.
6. Convenience in transactions across different company files
QuickBooks Desktop 2023 interface showing the Intercompany Transactions feature used to manage bills and checks across related company files.
QuickBooks Desktop 2023 allows users to link multiple company files under one Intuit account to enable intercompany transaction workflows.
QuickBooks Desktop 2023 enables users to create bills and checks across related company files using the enhanced Intercompany Transactions feature.
QuickBooks users can now get their bills and checks issued across different company files. This is a boon for those users who tend to use separate but shared company files for conducting their business operations. This will save significant time and also shall leave no room for manual errors.
How to access the new Intercompany transactions feature?
At first open a QuickBooks company file.
After that select F2 key and on the top right you will see the Intuit account email associated with the file.
After logging in to each related file with the same Intuit account, create the relationship between of them.
Now from the menu bar, choose company and the hit a click on Intercompany Transactions.
7. Easy Creation of approvals for bills workflow and Purchase order
QuickBooks Desktop 2023 introduces enhanced workflow approvals, allowing users to manage and track purchase order and bill authorizations efficiently.
QuickBooks Desktop 2023 interface showing the workflow approval setup for purchase orders and bills.
You can easily manage your approvals related to bills and get all your past approvals tracked. This helps you in the easy delegation of work through an active engagement in your business operations.
How we can access this new feature?
To setup the approval process in your QuickBooks, the user needs to login as the Admin user.
Now from the menu bar section, choose the Company option and then select the Set Up Approval Processes option.
The process of compiling large company files was a tedious task in the previous versions of QuickBooks. However, QuickBooks Desktop 2023 allows easy compilation and optimization of company files that exceed 300 MB in file size. The reports will also take lesser time to load as compared to the previous QuickBooks versions. This feature is specific to Desktop version 2023 in U.S. and Canada in the R1 release.
9. Evolved Bank Connectivity
QuickBooks Desktop 2023 offers improved banking connections, enabling smoother bank linking and more reliable transaction downloads.
This version of QuickBooks Desktop comes with exceptional bank connectivity. You are now open to connect to a wide range of banks that were inaccessible in the previous versions of the QuickBooks software. Furthermore, the connectivity with the bank server will now be seamless and won't be marred by frequent network disruptions or technical glitches.
How to enable Banking connectivity in QuickBooks Desktop 2023?
To leverage this feature, you need to proceed as follows:
What was the date of release of QuickBooks Desktop 2023?
The release date of QuickBooks Desktop is September 20, 2022.
If I don’t buy QuickBooks 2024 update will my QuickBooks 2023 still work?
Yes! Updating to 2024 is optional. You can keep using QuickBooks Desktop 2023 as long as you pay the renewal fee.
Does Windows 10 support QuickBooks Desktop 2023?
Yes, QuickBooks is supported by all 64-bit editions of Windows 10.
What is the RAM requirement of QuickBooks Desktop 2023?
The minimum RAM required for QuickBooks Desktop 2023 is 8 GB minimum and 16 GB is the recommended RAM.
The release date of QuickBooks Desktop is September 20, 2022.
Yes! Updating to 2024 is optional. You can keep using QuickBooks Desktop 2023 as long as you pay the renewal fee.
Yes, QuickBooks is supported by all 64-bit editions of Windows 10.
The minimum RAM required for QuickBooks Desktop 2023 is 8 GB minimum and 16 GB is the recommended RAM.
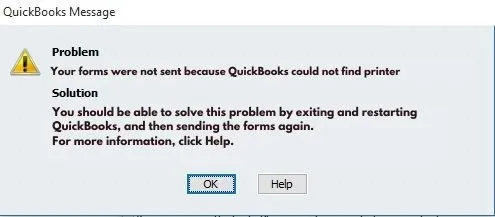
An efficient way to fix No Printer installer error in QuickBooks
Interrupted by No Printer Installed error? Well, we have got you covered here. No Printer Installed error in QuickBooks is a major issue experienced by QuickBooks users interrupting them to print their transactions from QuickBooks. This particular error is accompanied with the following warning message:
Your forms were not sent because QuickBooks could not find printer.
To assist you in troubleshooting printing issues, we have tried to cover the entire set of steps to eliminate this error. Thus, make sure to stick around this segment till the end and get rid of the No printer installed issue in QuickBooks successfully.
What causes No printer installed error in QuickBooks?
You can land into QuickBooks no printer installed error due to the following factors:
One of the core reasons can be if the qbprint file gets corrupted.
Another reason can be if the driver for the printing device is incorrectly set.
You can further end up in no printer installed error if the printer status may be offline.
Or if the ancillary printing issues that might be sorted out by using QuickBooks tool hub.
Effective Methods to resolve No Printer Installed error in QuickBooks
A bunch of methods can be performed to eliminate QuickBooks No printer installed error. Let us elaborate each of the methods and find out the right fixes.
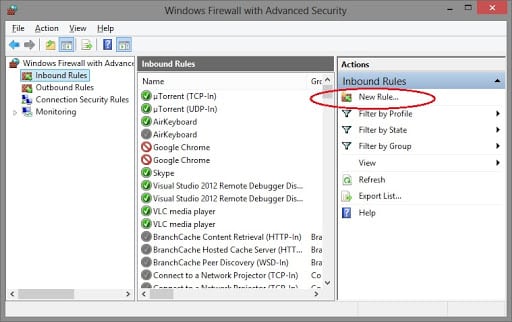
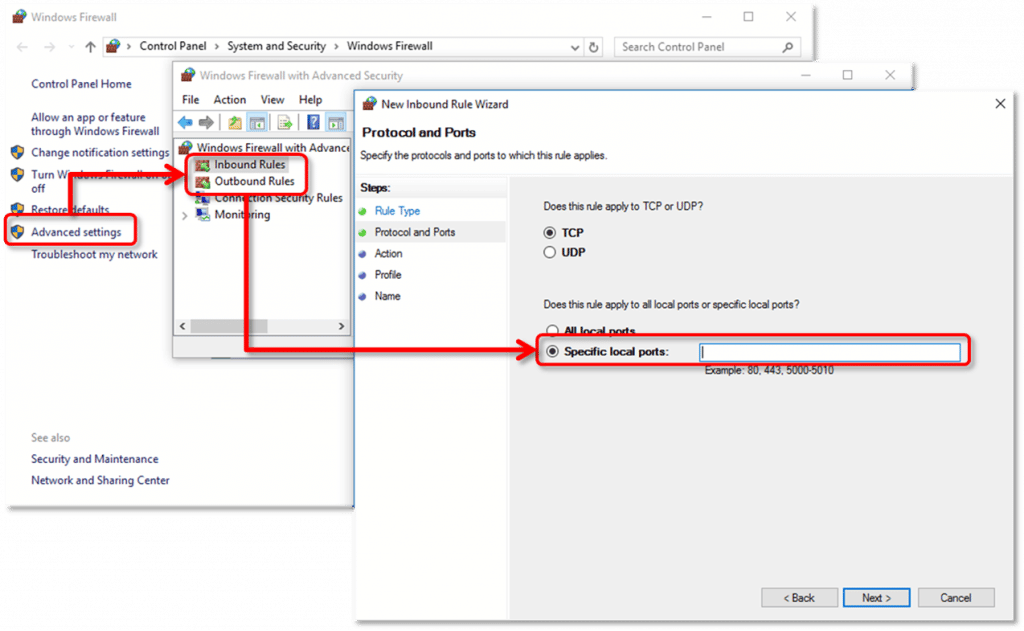
Method 1: Check Printer Connection
Well, one of the core reasons can be the printer connection being wobbly. You will have to check for the printer connection using the set of steps below:
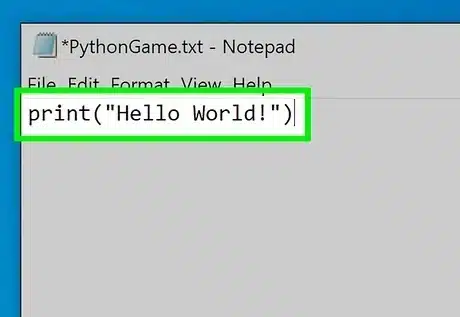
The very first step is to choose Start tab and further search for Notepad.
You now have to enter certain text and further choose specific file and then go for Print command (CTRL+P).
The next step is to choose the Correct printer and then click on Print tab.
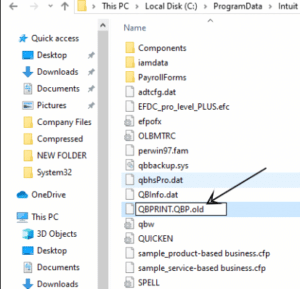
Method 2: Renaming the QBPrint.qbp file
At first, right click on QuickBooks icon and select Properties.
After that, click on Open file location tab.
It will open QuickBooks folder, now search QBPrint file here.
Once done, right click on the file and select Rename.
Lastly, open QuickBooks and try to print a report.
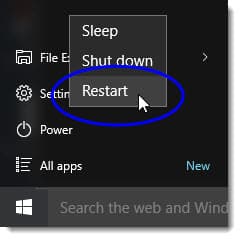
Here you need to switch off the printer and further reboot the system.
After this, you are supposed to reboot and then turn the printer back ON.
Later, ensure that the printer paper is loaded properly.
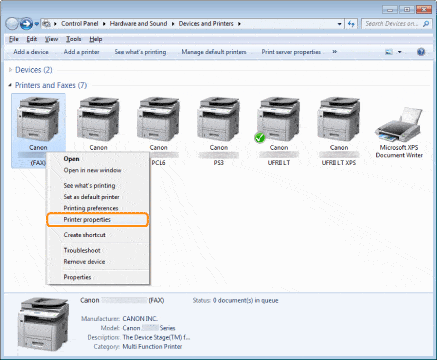
Now, you need to click on Windows start tab and then browse to the Control panel.
After this, you will have to double click the Printers and faxes.
In case the printer is showing OFFLINE status and then right click the printer and then choose the option of Use printer online.
The user will then have to double click the printer in case there are Print jobs showing on the screen and then choose Printer and then cancel all documents.
Now, close the window and right click the Printer and select Properties.
Lastly, you need to choose the Print test page tab.
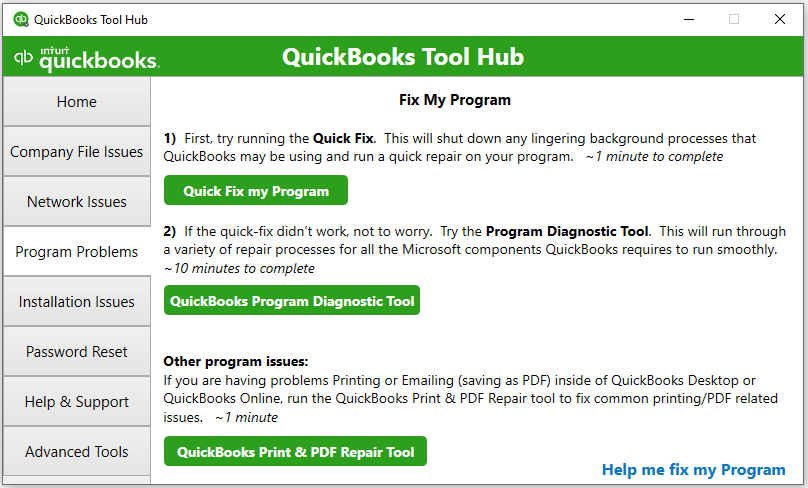
Method 4: Using QuickBooks tool hub
Another method that would work is to use QuickBooks tool hub and there you can go for print and pdf repair tool. At times when nothing could help you fix the issue, the tools offered by Intuit can definitely help you fix the error from its root cause.
Printer not installed or other printing related errors can be extremely frustrating, especially when you have something important to print in QuickBooks. However, we hope that the steps discussed above might have helped in getting rid of no printer installed error in QuickBooks in no time. If that isn’t the case, then you can give us a call at 1-800-761-1787, and share your queries with our QuickBooks error support professionals and they will answer all your queries immediately. We are readily available 24/7 through toll-free and live chat support services.
Get familiar with the various solutions to fix QuickBooks Error 539
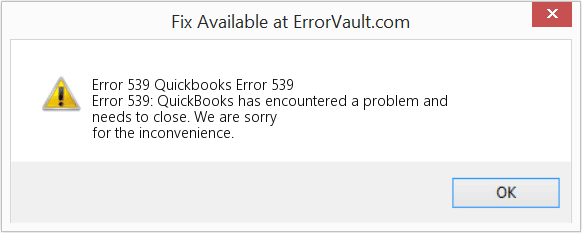
Did you just see QuickBooks error 539? Well, to state simply, this is basically a printer error or a runtime error that shows up when QuickBooks fails or crashes during its run. The error usually happens without any prior warning and can show up anytime on the screen while you perform certain activity on the program. Now just that, but the error can be annoying to a level where the error message might pop-up again and again on the screen. As the error can be extremely annoying, fixing it as soon as possible becomes crucial. This error usually shows up in the form of an error message which states the following message:
“Error 539: QuickBooks encountered a problem and needs to close.’’
It is a runtime error that might occur in case some virus is affecting your system. There can be a few other reasons why you might end up in QuickBooks error code 539. In this segment, we together evaluate the error code 539 in QuickBooks and some quick solutions that you can try out to fix the error. Keep reading to find the right fix for such error codes.
What causes QuickBooks error code 539?
While there aren’t some actual reasons behind QuickBooks error 539, but such errors usually show up when the software isn’t compatible with the Windows operating system. Not just that, but issues like bad graphics driver, virus infection, not enough memory, poor internet connection, can be one of the reasons behind QuickBooks runtime errors like 539.
Symptoms of QuickBooks Error 539
Following are the signs and symptoms of QuickBooks error code 539:
When using QuickBooks, an error message related to Error 539 could show up at any time.
Sometimes the reason behind the occurrence of the issue can be programs open in the background. Thus, you need to close all the conflicting programs and you will be able to resolve the issue.
Start with, opening the Task manager.
And further click on Ctrl, alt and Delete tabs at the same time.
Now, you need to navigate to the Processes tab and stop the programs present on the list.
Click on End processes tab.
And you will see a message showing up when you stop a process.
Once you are able to find the program causing the issue, close it and you are good to go.
Solution 4: Update conflicting programs
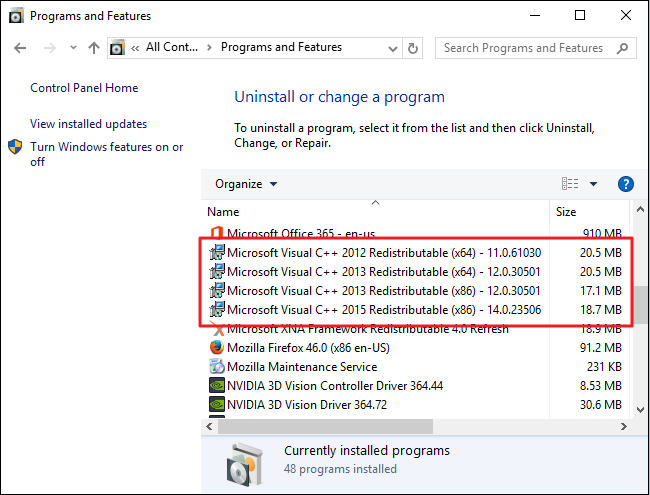
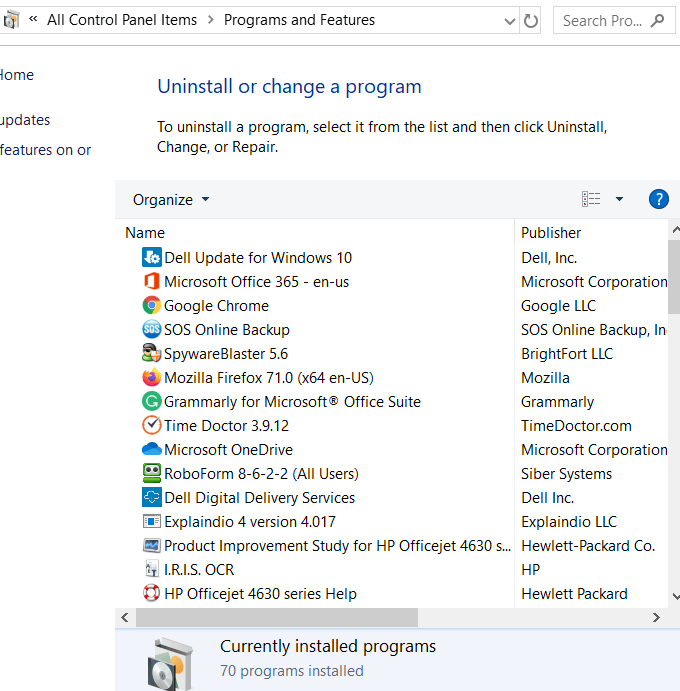
You need to proceed by using Control panel.
And further, click on the Programs and Features within the Control panel.
From there, click on Uninstall a program.
Now find out any conflicting program and Uninstall it.
And then, reinstall or update the program.
Now, if you have opted to update, then perform the onscreen prompts.
Now search for Display Adapters or Graphics driver option.
And hit a click on it to Uninstall it.
Conclusion!
Fixing the QuickBooks error code 539 isn’t that difficult, especially when you have the solutions discussed above in handy. In case you are left with some queries, then reaching out to our certified QuickBooks error support team at 1-800-761-1787 might work. Your queries not just related to error 539, but also related to all sort of QuickBooks issues will be addressed by our technicians within no time.
Get to know the various ways of fixing Payroll service connection error in QuickBooks Desktop:
Did you see a payroll server error in QuickBooks? The payroll service error in QuickBooks can also be a QuickBooks payroll connection error that you might experienced when sending the payroll data or using direct deposit service. This is a unique error that often is triggered by invalid security certificate or sending the information in multi-user mode. The payroll service server error in QuickBooks shows up stating the following error messages:
Message
Description
Error
Payroll Service Server Error. Please try again later. If this problem persists, please contact Intuit Technical Support.
Error
Payroll Connection Error.
Of course, just like other QuickBooks errors, fixing this is definitely possible. All you need to learn the actual process to fix the payroll service server error or payroll connection error in QuickBooks. And this will be further shared in this segment. However, you can also contact our certified U.S.-based accounting team. Our team of experienced accounting professionals is always there to provide users with unwavering assistance.
It is suggested to update your tax table every time you make payments to your employees.
If you use QBO Payroll, your tax tables are automatically updated. You don't need to take any action.
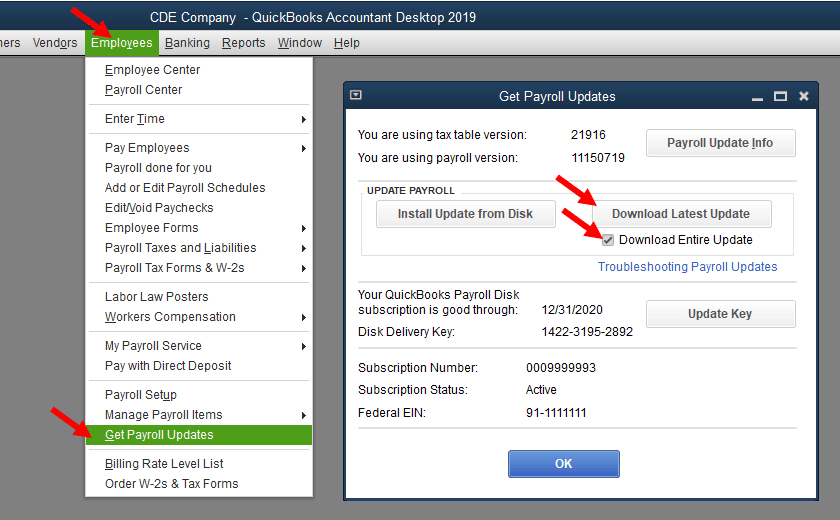
Steps to update Tax table in QuickBooks Desktop?
The first step is to open QuickBooks menu and go to Employees tab.
After that select Get Payroll Updates.
And further, checkmark on Download entire update.
Lastly click on Download latest update option.
Once the download finished, a new confirmation window will appear on the screen.
Solution 2: Verify if the time and date properties are correct
As one of the reasons can be incorrect date and time settings, you need to simply verify the time and date properties before heading forward. The steps that can be performed here are:
To begin with, you need to verify the date and time properties and further make sure that the date, time zone, time, year, and other related information is set correctly.
If not, then make sure to click on the Clock on the taskbar and make the necessary corrections.
Now, choose Settings and then click on Confirm.
Followed by rebooting the system in order to implement the changes.
And lastly, you need to send payroll data again and check if it this helps.
Was this segment helpful for you in fixing payroll service server connection error in QuickBooks desktop? Well, if not, then we have your back. You can definitely get this error resolved by our technical support professionals. We have a dedicated QuickBooks payroll technical support team, who are available on a single call at 1-800-761-1787, and are always there to provide answers to all your queries. Feel free to contact our team and they will assist you in fixing the payroll connection error permanently. Our team of experts can also be reached via live chat, where our support team is always there to respond to your queries.
Learn what to do when the COGS account in QuickBooks doesn't accurately reflect sales in Point of Sale:
Did you know incorrect COGS in QuickBooks can lead to further mismatches in your financial records? An incorrectly recorded COGS can lead to an improper profit and loss report. COGS basically stands cost of goods sold by a company. At times, even after checking the item list, the QuickBooks accounting software might display a negative COGS or in the worst case it might fail to include the COGS number in the reports.
In such scenarios, it becomes essential for the users to correct the incorrect COGS in QuickBooks by performing the right steps and procedures. And thus, to help you out in this process, here we are with this guide sharing the complete steps to correct the incorrect COGS in QuickBooks desktop.
What leads to Incorrect COGS in QuickBooks?
Here are some quick reasons why you can experience incorrect cost of goods sold in QuickBooks:
One of the core reasons can be if you have mistakenly entered incorrect value of the item.
Another reason can be if the cost of the item once it was sold has been recorded.
You can also end up in incorrect COGS if the data being retrieved is from the wrong account.
Or if the changes made to the COGS account doesn’t reflect in POS.
Another reason causing this error in QuickBooks is if the inventory products are being sold separately after being purchased in bulk.
Methods to rectify incorrect COGS in QuickBooks
Here are some possible solution steps that you can perform to eliminate incorrect COGS in QuickBooks desktop.
Method 1: Verifying the amount for the item sold and entered correctly
You need to first choose Sales and further go for Item summary.
And then, you need to modify the reports by clicking on the Modify option and further click on Revert.
The user will then have to sort the items starting that how you wish to view it like with the Item name section.
The next step is to look for item having $0.0 in the ext cost section now.
Also, note a few things that doesn’t have any Setup costs.
Now, choose Item list from the inventory section.
Look for the item that is sold that how many items that item has been sold for free.
Choose the Edit tab.
And further head to the Item’s history and then choose it.
You need to complete Selling price of the products.
Method 3: Make sure that the correct COGS account is setup
The very first step here is to open QuickBooks POS application and then move to the File menu.
And then, choose Preferences option and then select the Company option.
After this, you need to click on Financial and then choose Accounts opt.
You will then have to verify that the correct COGS account has been selected for each listed item.
Choose the Item list option from the Inventory section.
Also, go for the Customize columns from the Column header.
The next step is to check and verify that the Set cost of goods account is correct.
In case the account is not correct, you need to click on the Item list and select the Correct account for it.
After this, open the QuickBooks and then create a journal entry to transfer the amount to the correct account.
Method 4: Inspecting for any Deleted Transactions
The user first needs to move to Sales History section in QuickBooks POS.
After that, select I wish option.
Then go for Financial Detailsto Display option.
In case the financial information is sent to QuickBooks Successfully, the status shows, but there is no option to access the file in QuickBooks, then, in that case, the entry might have been deleted.
However, in case QuickBooks does not contain the receipt, the user should opt for resending the document available under the next Financial Exchange option.
Now deselect the sent checkbox if any receipts show a Not sent status and if the option to Mark this document as successfully sent is chosen.
Finally, hit on Ok to complete the step.
Conclusion!
Correcting cogs in QuickBooks desktop isn’t a huge task, especially when you know what steps are to be followed. With this segment, we have tried to provide you with the entire set of steps that you can follow and fix the cost of goods sold in QuickBooks. If you continue to face the issue or if you are stuck at some point, then you can definitely reach out our QuickBooks desktop support experts at 1-800-761-1787, and your queries will be addressed by our team immediately.
FAQs
What is COGS in QuickBooks Desktop?
COGS is knows as Cost of Goods Sold. It indicates the direct costs incurred in the production or acquisition of the products.
What can cause incorrect COGS in QuickBooks Desktop?
Incorrect COGS in QuickBooks desktop can occur due to various factors like incorrect inventory settings, incomplete purchase orders or inaccurate sales orders.
Can I use 3rd-party tools to correct incorrect COGS?
Yes! you can use different third-party tools to fix incorrect COGS in QuickBooks Desktop.


")