How to Fix Error: QuickBooks Desktop is Unable to Send your Emails to Outlook?

How to Fix Error: QuickBooks Desktop is Unable to Send your Emails to Outlook?

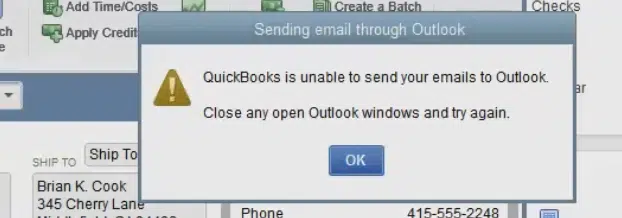
Failed in sending emails to Outlook using QuickBooks Desktop? Well, many QuickBooks users have reported the issue, where they see a warning message:

QuickBooks is unable to send your email to outlook.

It is seen due to some sort of issue with the settings. Sending emails to Outlook using QuickBooks is one of the easiest features that this software offers. It not only saves you a lot of time, but also increases efficiency. When this feature fails to work it might create unwanted issues.

QuickBooks Desktop is Unable to Send Your Emails to Outlook - Image

To help you out in fixing the QuickBooks desktop is unable to send your emails to Outlook, here we are with this segment sharing some quick insights.

Causes leading to the error while sending emails in QuickBooks

The causes behind this error are enlisted below:

  • Incorrect email preference settings may lead to such errors.
  • The MAPI32.dll file may be damaged.
  • You may not be running the QuickBooks program as an administrator.
  • Incorrect settings in Internet Explorer may also cause this error.

Checking Microsoft Office 365

In case you are unable to send emails from QuickBooks, once you update to Microsoft Office 365 version 2402, then you simply need to check out unable to send emails from QuickBooks using Outlook desktop after update to version 2402. In order to find your version, you can proceed with the steps shared below:

  • You need to first open Outlook.
  • Later, go for File tab.
  • Now, opt for Office account and then click on About Outlook.
About Outlook - Image

In case you come across a message that states: Outlook cannot log on, when trying to email a report or transaction with Office 365, you need to go for the steps related to Outlook cannot log on when emailing in QuickBooks.

You may see also: Steps to Fix QuickBooks Error: Could Not Connect to the Email Server

Quick Steps to resolve QuickBooks unable to send your email to Outlook error

You need to proceed with the steps shared below to successfully tackle through QuickBooks failed to send emails to Outlook issue.

Method 1: Run QuickBooks as Administrator

  • You need to right-click on QuickBooks icon and choose Properties option.
  • Now choose Run as Administrator option.
run as admin-screenshot
  • And further, click on Yes.
  • You are now logged in as a system admin with all privileges in your QuickBooks.

Method 2: Edit Email Preferences in QuickBooks

  • Under this process, you need to choose Edit tab in QuickBooks and then choose Preferences.
  • In case you use Microsoft Outlook with Microsoft exchange server, then simply open and sign in to Outlook before you move on.
  • Now, go for Send forms and then opt for My preferences.
Send forms option - Screenshot Image
  • The next step is to choose Outlook as the email option and then choose OK tab.

Furthermore, you need to send a test email from QuickBooks. In case the error continues, toggle the preferences.

  • Here, you simply need to choose Edit menu and further go for Preferences.
QuickBooks email service in webmail-screenshot
  • The next step is to choose Send forms.
  • Head to My preferences tab.
  • And choose QuickBooks email or Webmail.
Select my preferences option - Screenshot
  • Now, click on OK tab and this toggles your preference off.
  • You further have to repeat the steps and head to the My preferences tab.
  • Choose Outlook and click on OK tab.
  • After that, close QuickBooks and all other open programs.
  • The last step here is to restart the system.

You need to open QuickBooks and further send a test email or transaction. If the error still pervades, move on to the next method.

Read Also: How to Troubleshoot QuickBooks Error 6189?

Method 3: Change Email preferences in Internet Explorer

  • In this method, first close your QuickBooks.
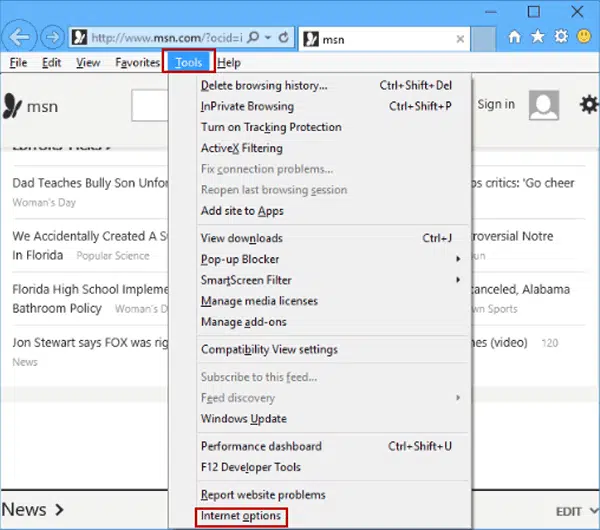
  • After that, launch the Internet Explorer browser.
  • And further move to Tools menu and move to Internet options.
Internet Options - Image
  • Later on, click on Programs tab and select Set Programs.
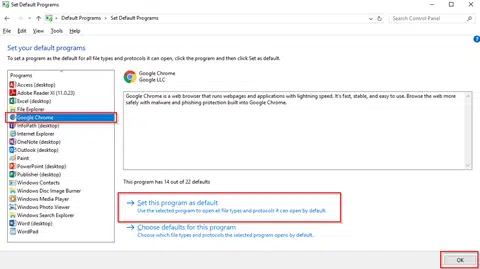
  • In the next step, click on Set your default program.
Set Google Chrome as your default browser - Image 3
  • Next, select the email provider and hit on Apply.
  • Now tap on OK and close Internet Explorer.

Method 4: Repair MAPI32.dll

You might find this step to be a bit difficult to handle. You can try performing the steps below to repair MAPI32.dll file and this would help you fix the error.

  • Quickly run a test to narrow down the error.
    • First restart your system
    • Click on Microsoft Word.
    • Create a fresh document.
    • And then, choose File menu.
    • Now, click on Send tab.
    • And then, go for Email as pdf attachment.

You further need to send a test email and check if the issue persists. If the error continues, then it indicates that there is issue with the Outlook or office suite.

However, if you are able to send email from Microsoft Word and not in QuickBooks, then here are the steps you need to follow:

  • Simply close all open programs at first.
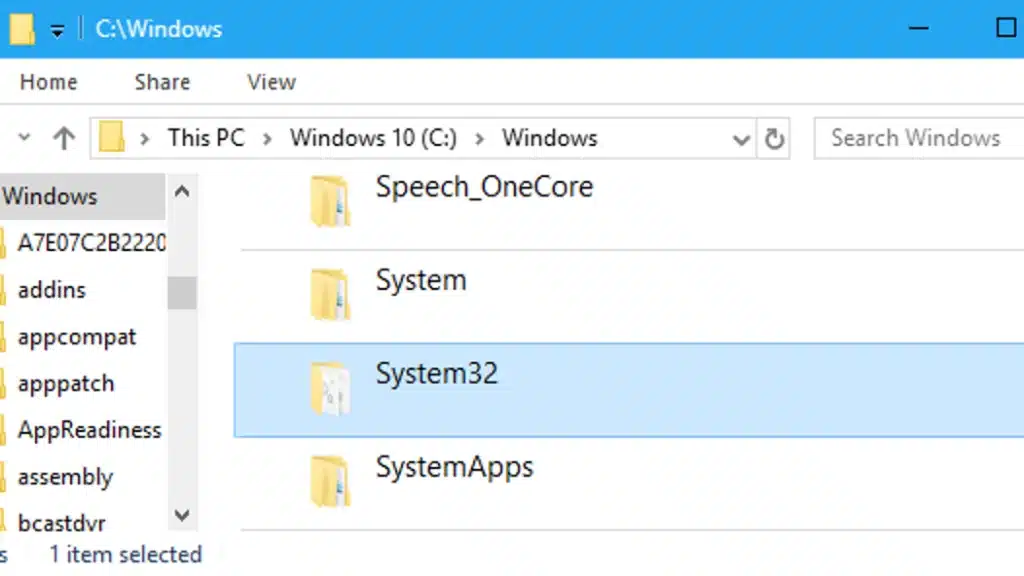
  • Later, open windows Start menu.
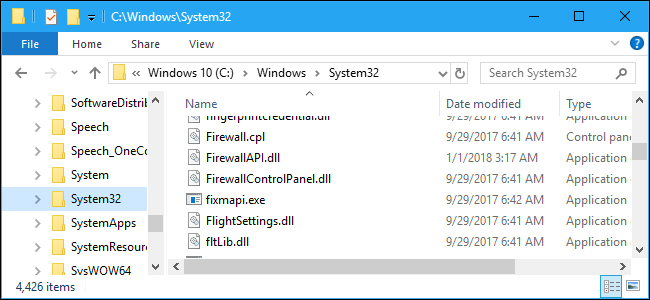
  • You now have to enter C:\Windows\System32 into the search.
System32 folder - Image
  • After that, Find and open Fixmapi.exe
Fixmapi.exe file - Image
  • Perform the onscreen steps to run the repair and after all is done, try restarting the system.

Also See: How to Fix QuickBooks Error 1603 While Installing the Software?

Method 5: Clean Install QuickBooks

  • Press the Start button and open Control Panel.
  • After that, move to Programs and Features.
  • In the next step, search for QuickBooks from the list of installed programs.
  • Then click on Uninstall/Change button.
Uninstall your QuickBooks desktop - Screenshot Image

Method 6: Edit the admin rights

You need to ensure that the QuickBooks isn’t set to automatically run as admin. You can continue using the set of steps below:

  • To begin with, you need to close QuickBooks.
  • Post that, open Windows start menu.
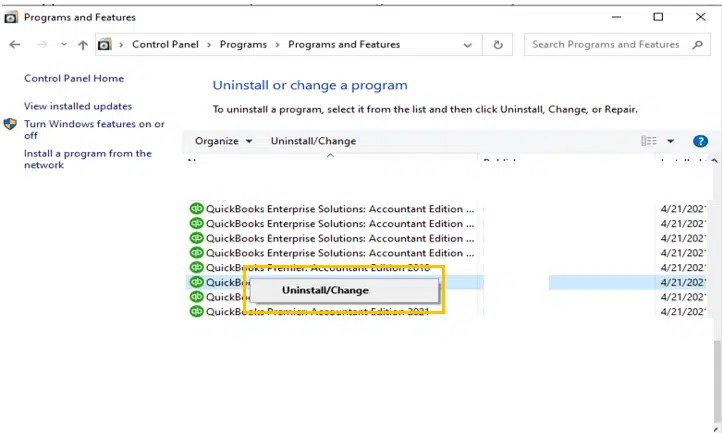
  • You now have to, enter QuickBooks into the Search bar.
  • Followed by, right-clicking QuickBooks.exe file and further choose Properties.
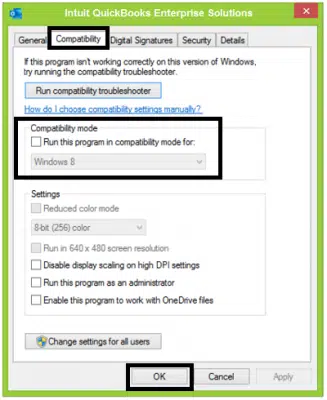
  • You also have to go for Compatibility tab.
QuickBooks in Compatibility Tab - Screenshot
  • Also, choose to uncheck the Run this program as admin option.
  • In case the option is grayed out, choose Show settings for all users.
  • This will make the option available.
  • And choose Apply tab and hit OK tab.

Ascertain that you open QuickBooks and send a test email or transaction. If the error shows up on the screen again, then you need to proceed with the steps below.

Read it Also: How to Fix QuickBooks Error 1334?

Winding Up..!

The set of solution steps shared above are expected enough to settle down the QuickBooks unable to send emails to Outlook error. However, if the error solutions shared above didn’t help much, then you definitely need to seek assistance from certified QuickBooks professionals. Give us a call at 1-800-761-1787, and your queries will be addressed by our QuickBooks error support experts team immediately.

FAQs

Is there a recommended email setup or configuration for QuickBooks to work seamlessly with Outlook?

Yes, QuickBooks offers many options for integrating with Microsoft Outlook.

Can I use an email client other than Outlook with QuickBooks Desktop?

Yes! Users have the option to use other email clients in addition to Outlook. The only thing here is that users are required to configure QuickBooks with the specific email clients including Gmail, Yahoo, etc.

Are there any specific Outlook settings that need to be configured for QuickBooks integration?

Yes! The user is required to configure some specific settings in Outlook.
1. The Outlook profile should be correctly set up and configured.
2. The email account should necessarily be configured properly in Outlook.
3. Configuring the default email settings related to Outlook.


Other recommended posts to read:

How to Recover Lost Data With QuickBooks Auto Data Recovery Tool?

What is QuickBooks Error H303, and How to Resolve It?

How to Transfer QuickBooks Desktop from Old Computer to New Computer?

How to fix ‘This company file needs to be updated’ error in QuickBooks?

How to fix ‘This company file needs to be updated’ error in QuickBooks?

A thorough walkthrough to fix Company File Needs to be updated error:

Is your QuickBooks saying “This company file needs to be updated” when you try to open a company file after upgrading? Well, don’t worry, this can be resolved. Often when you move between different versions of QuickBooks, this error appears. Whenever you upgrade your QuickBooks desktop version, updating your company file to match the new software version is an essential step, in order to experience smooth transition. In case you try to open an older version company file in the updated software, then you might see a warning message stating the company file needs to be updated. Error messages you might see on your desktop screen are as:

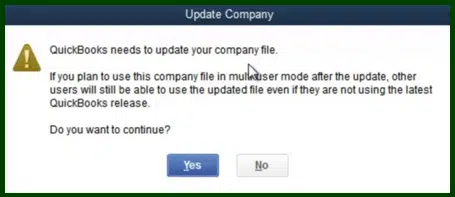
Update Company: QuickBooks needs to update your company file.

QuickBooks needs to update company file - Image

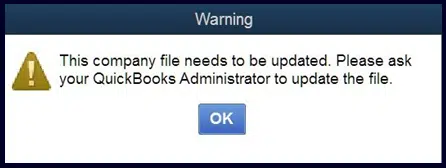
Another warning you might see as:

Warning: This company file needs to be updated. Please ask your QuickBooks Administrator to update the file.

QuickBooks needs to update company file - Image 1

While this error can be frustrating, there can be certain solution steps that you can follow to permanently get rid of 'the company file needs to be updated error'. This error might seem a bit confusing at first, but reading this segment will definitely clear all your clouds of confusion. However, if you need further guidance to fix this issue, just ring us a call and our team of certified professionals will guide you through the troubleshooting process.

What triggers company file needs to be updated error in QuickBooks?

Well, a handful of reasons can land you into the error stating “The company file needs to be updated. Please ask your QuickBooks administrator”. Here are the common ones you need to know:

  • One of the basic reasons can be if the company file is damaged, as a result your software won’t be able to access the company file.
  • Or if you are using incorrect format to open a particular company file.
  • Another reason can be if the company file is already in use over the network by someone else.
  • You can also end up in the company file needs to be updated issue, if the company file size is larger than the said requirement.
  • Or if the version of QuickBooks isn’t compatible with your company file.
  • In case you do not have the required permission to access the company file.
  • You might not be logged in as an admin.

Read Also: How to Setup, Install and Update Intuit Data Protect?

Efficient Fixes to the Company File Needs to be Updated Error in QuickBooks?

You can follow the fixes below to resolve the company file needs to be updated error.

Method 1: Opening the company file in the updated version of QuickBooks

  • Start the process by opening QuickBooks.
  • After that go to File menu and select Open or Restore Company.
Open or Restore a company file - Image
  • Following that click on Open the Company file and select Next.
  • Now choose the company file.
  • Once done click on the File and select Open.

Method 2: Repair QuickBooks Installation

  • The very first step here is to head to the Control panel.
  • And then, select Programs and features option.
  • The next step is to choose Uninstall option.
  • And select the QuickBooks application.
  • Now, select Uninstall option here.
Uninstall or Reinstall QuickBooks - Image
  • And you will see a choice between Uninstalling and Repairing.
  • Click on the Repair tab to continue with the process ahead.
Repair QuickBooks Desktop - Image
  • Let the procedure run and reboot the system and further access the company file again.

You can also read: How to Fix Custom Email Template Issues in QuickBooks Desktop?

Method 3: Update QuickBooks desktop company file

You need to perform the following steps to update company file QuickBooks. However, ensure that you open QuickBooks using admin rights.

  • At first, you need to launch QuickBooks program.
  • Now, hit the File tab.
  • You need to then select Open or restore company tab.
Open or Restore a company file - Image
  • And then, select one of the two options namely, open a company file or Restore a backup copy.
  • Select Local backup, in case you wish to access the backup of the company file from the local storage.
Local Backup option - Screenshot
  • You now have to fix the issue by opening the required company file and clicking on Open tab.
  • Once done with that, if you aren’t logged in with admin rights, then you will be asked to enter them.
  • After that, sign in to the company file after entering the details.
  • The next step is to click on Update now tab when you see the company file needs to be updated window.
Update now - Screenshot

Read it Also: How to Fix QuickBooks Error 12038?

Method 4: Run Rebuild Data Tool

  • You will have to open QuickBooks latest version using admin privileges.
  • Furthermore, open the specific company file that you wish to upgrade.
  • The next step is to run the rebuild data tool:
    • Go to File menu.
    • After that select click on Utilities.
    • Then select Rebuild Data.
Rebuild data utility - Screenshot

Quick Note: In case the company file is stored on the network, then you need to move the company file to the local system.

Method 5: Clean install QuickBooks in safe mode

  • Under this process, you need to exit QuickBooks and then launch run window.
  • You now have to enter msconfig and hit Enter tab.
Type msconfig in Run - Image
  • The next step is to proceed to General tab.
  • And then, select the option Selective startup and Load system services.
Load system services - Screenshot Image
  • After that, head to the Services tab and choose Hide all Microsoft services option.
Hide all Microsoft services - Screenshot Image
  • The user will then have to click on Disable all option.
  • You now have to uncheck Hide all Microsoft services.
  • Select windows installer from the service list and click on OK tab.
  • Reboot the system from the system configuration window.
  • After that, you need to Uninstall and then install QuickBooks desktop.
  • Run clean install tool and then launch the run window.
  • Enter MSconfig.
  • Also click on Enter tab and head to General tab.
  • You will then have to switch back to the Normal startup option.
Select normal startup - Screenshot
  • The last step is to choose OK tab and reboot the system from the system configuration window.

Also Read It: How to Fix Web Connect Import Issues in QuickBooks Desktop?

Conclusion!

Getting rid of “This company file needs to be updated error in QuickBooks” becomes quick and easy using the steps shared above. If in case you have some queries that needs to be readdressed, then connecting with our tech support team at 1-800-761-1787 might help. Our experts understand what it takes to eliminate all QuickBooks issues permanently. Thus, feel free to connect directly with our QuickBooks enterprise error support experts and get all your queries answered immediately.

FAQs

What is meant by the QuickBooks error "The Company File Needs to be Updated"?

This company file error indicates that the company file belongs to an old release of QuickBooks. It also directs the user to update the company file.

Are there any precautions I should take before updating the company file in QuickBooks 2022?

Yes! some precautions should be undertaken when updating the company file. Few are as:
1. System should meet all the system requirements.
2. QuickBooks needs to be updated to the latest version.
3. Close all the conflicting programs.

Can I access the company file in QuickBooks 2022 after updating it from an older version?

Yes! while updating the company file in QuickBooks 2022, the same can be opened without facing any technical hassle.


Related Topics:

How to Access QuickBooks Desktop Remotely From Anywhere?

Steps to Fix QuickBooks Error 502 Bad Gateway

How to Sync And Share The QuickBooks Files Between Two Computers?

How to Troubleshoot QuickBooks Payroll Error 15203?

How to Troubleshoot QuickBooks Payroll Error 15203?

Unfold the different approaches to fix QuickBooks Error 15203:

Ending up in payroll update errors in QuickBooks is something that many of you might find relatable. At times, when you try updating your QuickBooks payroll software, you might end up in different sets of errors, one of which is QuickBooks payroll error 15203. As termed by experts, it is a hexadecimal partition error that is often seen due to Windows operating system. Each hexadecimal code shows up with an additional memory address space that carries the instructions related to the error. In this article, we are discussing to discuss about QuickBooks error code 15203 and it's various factors that can lead to such errors. Also, we have provided you some DIY methods to troubleshoot this error by your own. Thus, keep read on!

What does QuickBooks error 15203 means?

As we all know that QuickBooks error 15203 is caused by hexadecimal partition error, which is generated by the Windows operating system. You should aware of that each hexadecimal code denotes an additional memory address space that contains instructions regarding the problem that occurred. This error is a unique error in QuickBooks that has various error messages linked to it:

QuickBooks payroll error 15203Error code 15203 crashed
QuickBooks Recovery Error 15203Install QuickBooks Error 15203
Remove QuickBooks error 15203Error code 15203 lost

This error might seem to be a bit complicated, but fixing this is surely possible. Let us evaluate entire information related to QuickBooks error 15203 in detail.

What leads to QuickBooks error 15203?

You can end up in QuickBooks payroll error 15203 due to the below stated factors:

  • In case the software itself is causing some trouble.
  • You can experience this issue if the RAM has Insufficient space.
  • Or if there is insufficient disk space for the system to perform necessary task.
  • Another reason can be if another third party program is causing issue in the software.
  • Also, if the internet connection isn’t working fine.
  • You can further end up in error 15203 in QuickBooks payroll if the disk space isn’t enough.

You may read also: How to Fix The QuickBooks Error Code 12152?

Tried and tested methods to fix QuickBooks update error 15203

Getting rid of the QuickBooks error message 15023 becomes easy, once you use the below tried and tested fixation methods:

Solution 1: Launch Reboot.bat file in QuickBooks folder

Another helpful method that you can try to fix this error can be to run reboot.bat file. The steps to be followed here are:

  • To start with, click on QuickBooks icon and then choose open file location.
  • Following that, click on Open File Location.
  • Now, you need to search for bat file.
  • Right click the File and choose Run as admin option to provide admin access.
  • It will run the reboot.bat file on your system.
Run ‘reboot.bat’ file - Screenshot
  • After the reboot.bat file is complete, you need to restart the system and download all the needed updates.

Solution 2: Restore the PC to the earliest date

If the solution 1 does not fix this error, then go for the system restore tool. The steps to run the system restore are as follows:

  • If you have sound knowledge of QuickBooks, then you can proceed by first restarting your system.
  • And then log in with Admin rights.
  • Now, click on the Start tab.
  • The next step is to go for All programs.
  • You now have to choose Accessories and then proceed to System tools.
  • After that, click on the System Restore option.
Create a System Restore - Image
  • Followed by selecting Restore personal computer on the first computer and then click on Next tab.
  • Now, choose the Device to restore by using the latest state.
  • The next step is to click on Restore point.
  • Followed by, clicking on Next tab.
  • And click OK next again till you see a verification box on your screen.
  • This will start the automatic restoration process.
  • The last step here is to reboot the device.

Related Article: How to Fix QuickBooks Error 15103 when updating Desktop or Payroll?

Solution 3: Update QuickBooks in safe mode

If you continue to face the issue, then try updating QuickBooks desktop in safe mode.

  • To begin with, you need to shut down the system.
  • You need to keep hitting on F8 key repeatedly till the Advanced Boot Options appears on the screen.
  • And then turn on in safe mode.
  • After that, choose Safe mode with networking.
Safe mode with networking - Screenshot
  • Followed by, heading to the Help menu and select Update QuickBooks desktop.
  • Move to Update Now tab and check-mark on Reset Updates box.
  • Now select Get updates option.
Update Now Option When Updating QuickBooks - Image
  • Lastly, you need to shut down the system and turn on in normal mode.

Solution 4: Verifying Internet Explorer configurations

Lastly, you can try to configure the internet explorer settings and fix error 15203.

  • Start by opening Internet explorer and checking it is set as the Default browser.
  • After that, you need to check if date and time of your system is correct.
  • Also, update the settings of your internet explorer from the Internet options.
  • And then, Install digital signature certificate.
  • You now have to search for the QBW32.exe file and this file is in C drive.
  • After which you need to right click on the file.
  • And choose Properties tab.
  • Now, click on Digital signature and ensure that Intuit.inc is opted in the signature list.
  • Moving ahead, you need to head to Digital signature details window and choose on View.
  • And then, in the certificate window, head to Install certificate.
Install certificate - Screenshot
  • Carry out the onscreen prompts and end all currently running QuickBooks Windows.
  • You also have to restart the system.
  • And towards the end, you need to download the updates and check if the issue is resolved or not.

Similar Post: How to Update State Unemployment Insurance Rate (SUI) in QuickBooks?

Solution 5: Upgrade your RAM in case of less memory

  • Under this solution, press the Start button and type Information.
  • After that click on System information tab to open it.
Check your available RAM memory - Image
  • Then, scroll down to the Memory section and check your available RAM memory.
  • If the free available memory is less, it is time to enhance the RAM.

Solution 6: Use ‘’SFC/scannow’’ command

  • Press Windows or Start menu and then type cmd.
  • After that click on cmd icon to open the command prompt window.
  • Here you need to type SFC/Scannow and press Enter key.
Type sfc-scannow - Screenshot
  • Wait for the process to complete.
  • Once it is done, restart your computer.

Solution 7: Automatic Response for Newbie users

  • Under this process, you need to download QuickBooks repair tool.
  • And then, install the tool on your system.
  • After the download is complete.
  • You have to click on scan tab.
  • Followed by, clicking on fix error which shows on the screen.
  • The next step is to normally start the system.

Check Also: What is QuickBooks Cloud Hosting and How it Works?

Conclusion!

Once you are versed with the set of steps shared above, it becomes easy to eliminate the QuickBooks error 15203. Just in case you failed to fix the issue, then reaching out our technical support team at 1-800-761-1787 is what we recommend. Our QuickBooks desktop error support experts team will ensure that your queries are addressed in the least possible time period and your errors are resolved to give you better QuickBooks experience.

Some FAQs related to this error

What is Error 15203 in QuickBooks ?

It is a payroll updates error that belongs to the subset of the Error code 15xxx series of error codes in QuickBooks.

What are the symptoms of this error?

The signs and symptoms of this error includes, - slow computer performance, QuickBooks freezing or crashing repeatedly etc.

How can I prevent Payroll Error 15203 from happening again?

To prevent such errors from encountering again, you should regularly update your QuickBooks to the latest version and avoid installing conflicting programs on your system.


Similar Topics:

How to Resolve QuickBooks Error Code 15222?

What are the solution for QuickBooks Error Code 15227?

How to Troubleshoot the QuickBooks Update Error 15240?

What are the Methods to Fix QuickBooks Update Error 12057?

What are the Methods to Fix QuickBooks Update Error 12057?

Get the updated Methods to Fix QuickBooks Error 12057 like a professional:

Is QuickBooks error 12057 bothering you? Well, this error is termed as an update error that often shows up, when you try to update QuickBooks to latest release, it turns into an error displaying a warning message:

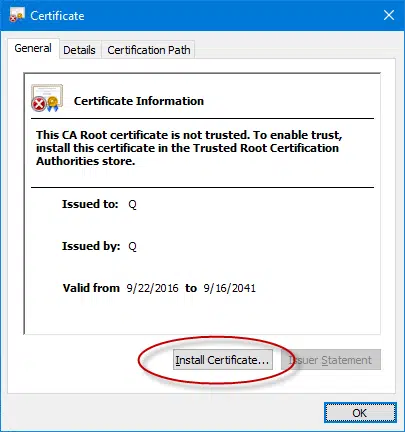
QuickBooks update error 12057: A security certificate cannot be validated.

You might end up in this update error, when there is an issue with your internet connectivity or if your internet settings aren’t configured properly. As fixing this error becomes really essential to ensure smooth installation of QuickBooks update, here we are with this segment drafted in a way to provide you the best assistance to get rid of QuickBooks error code12057 permanently.

What is QuickBooks payroll update error 12057?

Error 12057 in QuickBooks is a common error that belongs to the 12xxx series of error codes. It generally caused due to an internet connectivity issues. Also, this error may encounter at the time updating QuickBooks Desktop to recent version. In this segment, we are going to deal with the various factors leading to such error and also uncover the quick troubleshooting methods to fix this error in easy manner.

What leads to QuickBooks error message 12057?

Getting into QuickBooks error 12057 can be due to a bunch of reasons namely:

  • One of the common reasons can be poor internet connection. If your internet connection is a bit wobbly, then you might end up in error 12057.
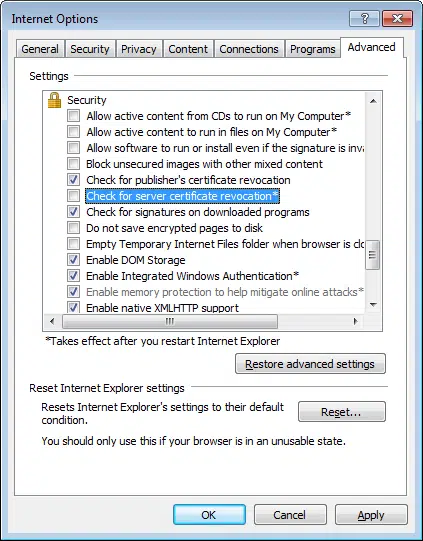
  • Or if the SSL settings aren’t configured properly, then you might face issue when validating the security certificates.
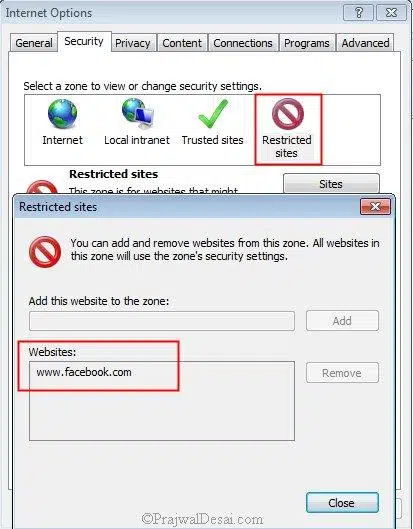
  • Another cause behind this error can be if the firewall or antivirus is creating issue.
  • You can also end up in such errors, if the proxy server settings are creating an issue.
  • Another trigger can be, if insufficient admin privileges for installing the updates.

Read Also: How to Fix ABS PDF Driver Issues in QuickBooks Desktop?

Effective Methods to fix QuickBooks error 12057

Here are a few methods that you can try to fix QuickBooks error code 12057 successfully. Let us have a look:

Method 1: Configure Internet options

  • At first, press Windows and R keys keys to open RUN.
  • Moving ahead, type Control Panel, and hit Enter key.
  • Within the control panel, select Internet Options.
Internet Options - Image
  • Also, choose Advanced option.
  • Now go to Security section, and unmark the boxes next to Check for server certificate revocation.
  • Followed by select Check for publishers certificate revocation.
Check for server certificate revocation - Image

Method 2: Check for SSL settings and configuration

You need to ensure that your SSL settings are configured properly using the set of steps below:

  • To start off with, you need to press Windows and R keys tab.
  • Enter control panel in the Run box.
  • Now, click on Enter tab and then choose Network and internet options.
Advanced Connection Settings - Image
  • Once done with that, click on Internet options and then choose Advanced tab.
  • You also have to scroll down and checkmark USE SSL 2.0 and SSL 3.0.
Use-SSL-2.0-Use-SSL-3.0-and-Use-TLS-1.0-are-checked-Screenshot
  • The next step is to click on Apply tab and choose OK tab.
  • Lastly, try to update QuickBooks payroll again and you are good to go.

You might see also: Move Fixed Asset Data to your New QuickBooks or Another Computer

Method 3: Run QuickBooks as admin

You need to run QuickBooks as admin using the set of steps below and this would resolve the QuickBooks error 12057 up to certain extent.

  • The very first step here is to open Control panel and choose User accounts.
  • After which, you need to click on Manage user accounts.
  • Followed by, checking if the account has Admin rights or not.
  • In case your account is not an admin account, then simply reboot the system and then sign in with an account having admin rights.
  • After which, you need to try to update payroll.
  • Also, right-click QuickBooks desktop icon and choose Run as administrator, in order to open QuickBooks as admin.
run as admin-screenshot

Method 4: Update QuickBooks in safe mode

  • Under this method, you need to first reboot your computer.
  • On the boot screen, press F8 key repeatedly till Advanced boot Options appears.
  • Then select Safe mode with the networking and hit on Enter key.
Safe mode with networking - Screenshot
  • When the desktop screen loads, open QuickBooks and try updating the software.

Also see: Verify Error: QuickBooks found a problem with the Acct # / Card # / Note field for other asset

Method 5: Repair QuickBooks

You can try to repair QuickBooks desktop using the set of steps below:

  • To begin with, you need to press Windows and R tab and then enter in appwiz.cpl.
  • After which, you need to click on OK tab and then proceed to List of programs to find QuickBooks.
  • Now, double click the QuickBooks software and then choose Repair tab.
Repair QuickBooks POS - Screenshot Image
  • Once the repair process is complete, you need to restart the Windows software and then update payroll again.

Method 6: Check for Proxy server settings

At times, you can end up in error code 12057 due to proxy server settings. The steps to fix this can be as follows:

  • At first, you need to open Internet explorer.
  • Now, search for Tools menu.
  • And then, choose the option stating Internet options.
  • After which, you need to head to the Connections tab.
  • The next step is to click on the LAN settings.
  • Now, check the box stating Automatically detect settings.
Automatically Detect Settings checkbox - Screenshot
  • Followed by, ensuring that the proper Proxy address and port numbers are being used.
  • The last step is to click on OK tab and Save the settings. Also, check if the issue is resolved successfully or not.

Also Read: Latest methods to troubleshoot QuickBooks Error 6177

Conclusion!

While the error code 12057 in QuickBooks hinders the smooth installation of the software, getting rid of it instantly becomes essential. Hopefully, the solutions enumerated above might be of some assistance for you in eliminating the ongoing error permanently. On the contrary, if you fail to do so, then reaching out to our tech support professionals at 1-800-761-1787 will be quite helpful. Our QuickBooks payroll support experts will cater to all your accounting queries immediately.

Frequently Asked Questions (Faq's)

How do I fix Error 12057 in QuickBooks Desktop?

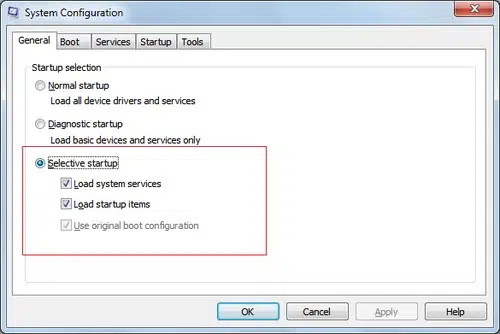
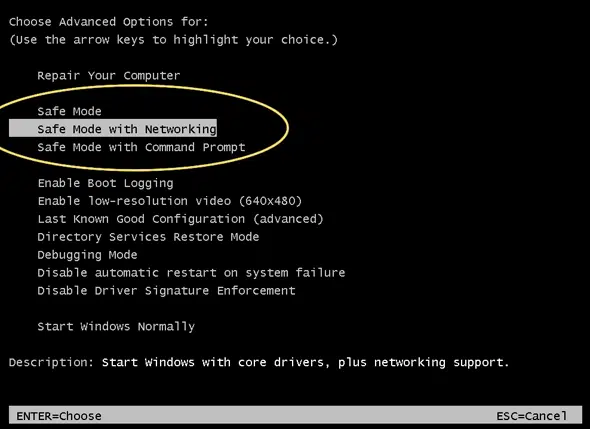
The various troubleshooting methods are as:
1. Fix the Internet settings and configuring SSL settings.
2. Updating QuickBooks in the Safe mode can fix such error.

What is SSL TLS in QuickBooks?

TLS is the know for Transport Layer Security. It is a cryptographic protocol employed to enhance the security over computer networks.

How do I enable TLS 1.2 for QuickBooks?

The steps to use TLS 1.2 are: 
1: At first you need to open your QuickBooks Desktop and then click on Help tab.
2: After that choose Internet Connection Setup.
3: Later, move to Advanced tab and here you need to click on Advanced Connection Settings opt.
4: Now move to Security option, herein click on enable SSL 1.2 option and tap on OK.
5: Finally, click on Done to save the changes.


Related Posts:

How to Use Accounts Payable Workflows in QuickBooks Desktop?

Steps to Fix QuickBooks Unexpected Error Code C = 184

How to Resolve QuickBooks Error Code 3008?

How to Troubleshoot QuickBooks Error 15276?

How to Troubleshoot QuickBooks Error 15276?

QuickBooks is known as one of the most popular accounting software that is being used by small and medium businesses. It has many efficient features that bring great productivity for the organizations. No matter how great this software is, it often gets some technical errors. Payroll errors in QuickBooks are quite common, especially when a user tries updating or installing the payroll software. One such error that occurs when updating payroll is QuickBooks Error 15276.

If you are searching for Fix QuickBooks Error Code 15276 or wondering QuickBooks Error 15276? How do I resolve it?, then this complete guide will help you understand and fix the issue easily.

The possibility of experiencing this issue increases when you update your QuickBooks payroll software and there is some sort of internet issue. You might see a warning message on the screen stating:

Error Description
Error 15276: The payroll update did not complete successfully. One of the files to be updated was in use and could not be replaced.
Error 15276: The update did not complete successfully. One of the files to be updated was in use and could not be replaced.
QuickBooks Payroll Error 15276 - Image

QuickBooks Payroll Error 15276 appears when a file needed for the payroll update is missing or incomplete.

Getting rid of payroll errors becomes easy once you have a grip on the right set of solutions. To help you get rid of QuickBooks Error 15276, here are a bunch of solutions shared in this segment that you can implement and turn down the issue permanently.

Assumptions

You have an active QuickBooks payroll subscription.

What leads to QuickBooks payroll error 15276?

You can end up in QuickBooks update error 15276 due to a handful of reasons. Let us understand what can actually cause the issue.

  • One of the basic reasons can be if the mapping of the shared download drive isn’t correct.
  • Another reason can be if a core component of the software is damaged for some reason.
  • Or if the configuration of the internet explorer isn’t done properly.
  • Not just that, but if the firewall settings are blocking the software.
  • Another possible cause can be if the file copy service is deactivated in QuickBooks.
  • You may not have an active subscription to QuickBooks Payroll.
  • Another trigger can be if the latest Tax tables may not be set up on your system.
  • The latest digital signature certificate may not be installed on your system.

You might see also: Steps to fix QuickBooks Payroll Error 15107

Easy Solutions to Resolve QuickBooks Error 15276 Like a Pro

Now that you are well versed with the reasons causing the error, it is time for you to implement the solution steps to fix error code 15276 in QuickBooks payroll.

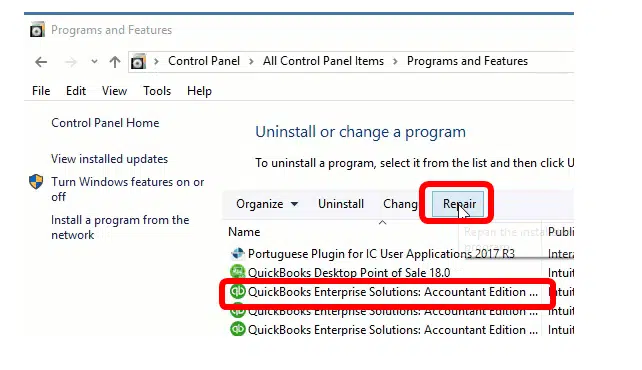
Solution 1: Run Quick Fix my Program Feature of the QuickBooks Tool Hub

  • At first, you are required to download the latest version of QuickBooks Tool Hub from Intuit website.
  • After that, press CTRL+J keys to open the download history.
  • You need to click on QuickBooksToolsHub.exe file .
  • Select all the positive options to Agree the terms of the license and click on Next.
  • Followed by click on Install.
  • Once the installation process done, click on Finish.
  • Now run the QuickBooks tool hub program.
QuickBooks Tool Hub - Icon
  • Here, go to Programs Problems tab and select Quick Fix My Program.
Screenshot of QuickBooks Tool Hub showing the Program Problems tab with Quick Fix My Program, Program Diagnostic Tool, and Print & PDF Repair Tool options

QuickBooks Tool Hub provides Quick Fix My Program and diagnostic tools to repair common program and printing issues.

  • The program will take sometime to scan the file and rectify the problem.

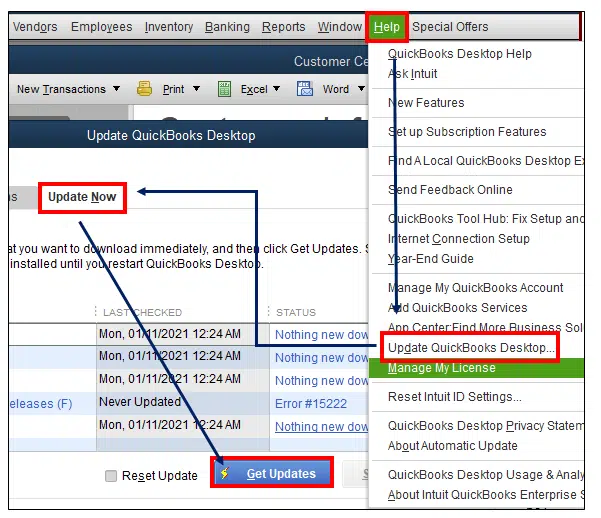
Solution 2: Update QuickBooks and tax table

You can try to download the latest update for QuickBooks and tax table on your system with the help of the steps below and this would resolve the issue up to certain extent.

  • The very first step is to exit all the company file.
  • Now, right click the QuickBooks icon and choose Run as admin.
  • After that, go for Yes tab when it asks Do you want to allow this program to make changes to your computer.
  • The next step is to choose Help menu in QuickBooks.
  • Followed by, opting for Update QuickBooks desktop and then click on Update now.
Update Now Option When Updating QuickBooks - Image

The QuickBooks Desktop Update menu allows users to download the latest software and payroll tax table updates.

  • After which, you need to click on Get updates and then let the updates download and install quickly.
  • The next step is to launch QuickBooks and head to Employees.
  • Also, click on Get payroll updates.
  • Followed by, Download entire payroll update.
Get payroll updates - Screenshot Image

QuickBooks Desktop – Get Payroll Updates screen with download options.

  • The user is then required to selecting Download latest updates.
  • Towards the end, you need to finish the update download and installation.
  • The last step is to finish the update download and installation. Followed by rebooting the system and opening QuickBooks.

You may see also: How to Fix QuickBooks Error Code 15227?

Solution 3: End Qbwebconnector.exe service

Important Points:

  • Check the payroll subscription is active.
  • Reset the QuickBooks Desktop Update.
  • Re-check the payroll service key is accurate.

To end the Qbwebconnector.exe service, checkout these steps carefully:

  • At first, close your QuickBooks and all the background running apps.
  • After that open the Task Manager by pressing CTRL+SHIFT+ESC keys.
  • Then move to Processes tab and search for QBwebconnector.exe.file from the list.
End QBConnector.exe process - Screenshot Image

QuickBooks processes highlighted in Windows Task Manager.

  • Now click on End Process.

Solution 4: Install Digital Signature Certificate

  • Under this process, you need to open Windows explorer tab, and then head to C:Program Files Intuit QuickBooks.
  • After that, search for QuickBooks executable file and right click QBW.exe file in QuickBooks.
  • And then, choose Properties tab and click on Digital signature.
  • The next step is to check if the Intuit.inc is opted and then click on Details tab under the digital signature.
Digital Signature Details - Image

Digital signature details window showing the QBW32 file verification in QuickBooks.

  • In next step, hit a click on View Certificate
  • You are then required to click on Install certificate and then click on Next tab.
Install certificate - Screenshot

Certificate installation window showing the option to install a trusted root certificate.

  • The last step here is to click on Finish and open QuickBooks and try updating the app again.

If still the issue persists after following the above solutions, the it's better to move to the next solution.

Read Also: How to Resolve QuickBooks Sync Manager Not Working Problem?

Solution 5: Reinstall QuickBooks

You need to remove and reinstall QuickBooks desktop and try fixing the QuickBooks error 15276. Here are the steps that you can follow:

Step 1: Uninstall QuickBooks desktop

At first, delete the QuickBooks software by heading to the control panel and the continue with the steps below:

  • At first, choose Programs and features.
  • Now, go for Uninstall a program.
  • Followed by searching for the QuickBooks from the list of programs on the screen.
  • Moving ahead, select Uninstall/Change option.
  • And then, perform all the instructions on the screen in order to delete the QuickBooks desktop.
Uninstall or Reinstall QuickBooks - Image

Screenshot showing the steps to uninstall or reinstall QuickBooks Desktop in Windows.

Step 2: Reinstall QuickBooks

Reinstall using the installation CD or official Intuit download.
Enter your license & product key to activate.

If your query was Fix QuickBooks Error Code 15276 manually, reinstalling is one of the most reliable fixes.

Solution 6: Manually resolve this error

To manually resolve this error, you can follow these steps:

Step 1: Make Microsoft edge as default browser

  • Firstly, press the Windows/Start

    button on your system.
  • After that search Set as default app on the search bar.
  • Now click on it to open.
  • Here you need to search Edge from Search apps bar.
Make Microsoft edge as default browser - Image

Screenshot showing the Windows settings screen where Microsoft Edge is selected as the default web browser.

  • Lastly, select Set default option to make Microsoft edge as default browser.

Step 2: Check time and date in is correct on system

Change Data and Time in Windows - Image

Screenshot showing the Windows settings panel where users can adjust the system date and time manually.

  • In the system double click on the Time Display
  • In the Date and Time Window, make necessary changes if required.
  • Set it the correct Time Zone.

Read Also: How to Terminate the QuickBooks Error 15103 Completely?

Conclusion!

Technical errors like QuickBooks Payroll Error 15276 can be tricky to handle, especially for new users. The methods above are designed so you can Fix QuickBooks Error Code 15276 on your own.

If the error still persists, contact QuickBooks error support at 1-800-761-1787 for expert help. Their ProAdvisors will ensure your issue is fixed quickly.

Similar topics you may like:

How to Resolve QuickBooks Error Code 15222?

Methods to Fix QuickBooks Error Code 15221

How to Troubleshoot the QuickBooks Update Error 15240?

FAQs
What does QuickBooks Error 15276 state?

The payroll update did not complete successfully. One of the files to be updated was in use and could not be replaced.

  • Use Quick Fix My Program.

  • Install latest tax table update.

  • End QBWebConnector.exe.

An inactive payroll subscription or outdated digital signature certificate can trigger the issue.

1-800-761-1787