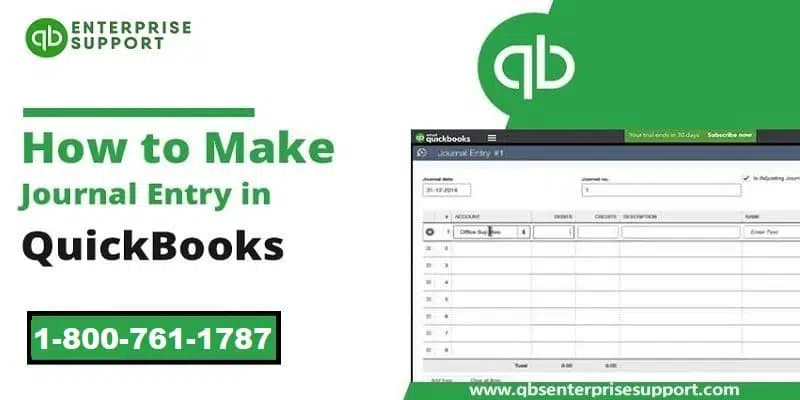
A quick guide create/record journal entries in QuickBooks Desktop Windows or QuickBooks Desktop Mac:
Entering accounting transactions incorrectly into the accounting system is one of the common blunders that you can make. When this kind of situation arises, you need to make changes to the transaction even after it is recorded. You can simply perform this by creating a journal entry. In order to adjust or correct transactions and post entries, you can easily make journal entries in QuickBooks Desktop. Creating journal entries is a simple process with a couple of steps. The journal entry process is simple, as we said earlier, but you can only make a journal entry for one customer or vendor at a time. In case you want to correct multiple customer or vendor balances, separate entries are to be posted. Scroll through the post to learn the entire process properly.
Moreover, If you require help with your technical issues at any point in time, then do not think much to giving us a call at our helpline number i.e. 1-800-761-1787, as our QuickBooks desktop support team will be there to assist you round the clock. You will get the most relevant answers to all your journal entry in QuickBooks related queries, so get in touch with us today!
Talking about a general journal entry, it is an accounting transaction entered, or posted directly to the general ledger. A company’s general ledger basically acts as its main group of accounts, which is used to record the balance sheet and income statement transactions. In simple words, it is a record of transactions that show the credit and debit balance of the company. Journal entry is regarded to be a very important and essential part of business accounting. So, it is important for you to learn all possible facts related to journal entries, which we will be discussing later in this post. So, read ahead and explore further!
Pointers you can’t miss while creating the journal entry in QuickBooks
It should be noted that QuickBooks Online doesn’t support multi-currency in a single journal entry. This means that each and every currency has its own journal entry.
If in case you create an entry and wish to rectify the transaction, then it can be done by deleting and reversing the journal entry.
You need to view the additional column for the location and class if you are making use of QuickBooks online plus.
To reflect on the sales or expense tab, you are required to ensure that the entry has a line for either A/R or A/P and also the vendor or customer name.
Other important rules to make journal entries:
You are recommended not to make journal entries to inventory or payroll accounts.
The entry to the accounts payable type or the accounts receivable will require a customer or vendor.
Moreover, it is important for you to use the accounts receivable or accounts payable account on the second line of the journal entry.
Along with that, you should include one account receivable or accounts payable type account in every entry.
When to use Journal Entry in QuickBooks online?
You are recommended to make use of the journal entry in QuickBooks online when:
At the time of sending the money between income and expense accounts.
When transferring money from an asset, liability, or an equity account to the income or expense account.
In case you enter the debits and credits in the general journal or the ledger.
Steps to Creating Journal Entries in QuickBooks Desktop
Checkout the following steps in order to record journal entries in QuickBooks Desktop:
Step 1: Navigate to the Journal entry feature
You need to first required to move to the journal entry feature.
Hit a click on the plus icon at the top right of the file.
This will show up a drop-down menu as Create, which will have the Journal Entry option.
After clicking the option, you will be redirected to the window having the blanks for necessary information.
Step 2: Entering date and journal number
It should be noted that the journal entry form in QuickBooks online is not at all complicated.
After the form opens up on the screen, you are supposed to edit the journal date, whereas the current date will be automatically entered by QuickBooks.
However, if you are recording any entry from any other date, then ensure to correct the date before moving ahead.
Once the date is corrected, you are supposed to fill in the journal number.
Otherwise, the QuickBooks software will automatically enter the sequential number.
Step 3: Entering the need information
Accounts: It means the accounts in the chart of accounts.
Journal code: The journal code related to the account is the next thing you are supposed to enter. It is very much important to enter the new journal code. Make sure that you use the same journal code, which is related to the transaction for the debit and credit accounts.
Debit and credits: You are supposed to look for the transactions in the recent transaction report and also make a note that the first in line is debits. Another thing is to check out if the debit has changed after the transaction is saved.
Description: Entering a description to check the transaction details on the report is another important step.
Name: Now, you need to choose the customer, employee, or vendor.
If the total of the debit column doesn’t match the sum of the credit column, then it is important to fill in the distribution lined until the total of both tallies.
Step 4: Selecting to make recurring journal entry schedule
You are required to select the recurring journal entry schedule and then finish the process by saving the transaction.
Editing a journal entry
Now that you know the process to add and create a journal entry, it is time to learn the process to edit a journal entry in QuickBooks. The steps involved in this process are as follows:
You need to first visit the company menu and then choose the Make general journal entries option.
Choose the find option and then enter the name, date, entry no, or amount, then click on find.
Double-click the journal entry and then make the updates. Once done, choose save and close.
Lastly, in order to record changes, hit the Yes option.
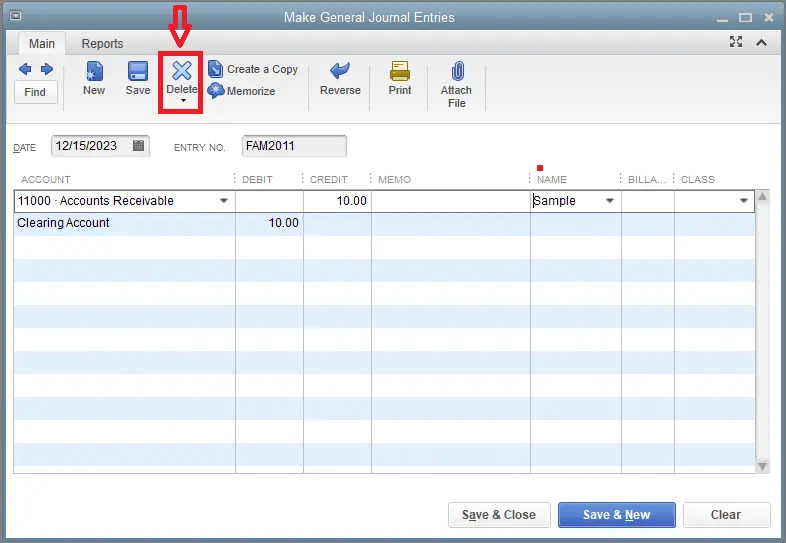
Deleting a journal entry
In case you are required to delete or void a journal entry, the below steps need to be carried out.
You are supposed to first visit the company menu and then choose the make general journal entries.
Choose the find option and then enter the name, date, entry no., and other required info. And then choose to find.
Now double-click the journal entry and then, choose the delete or void option and hit the OK button.
To end the process, choose save and close.
Reverse a Journal Entry
You can reverse a journal entry by performing the below steps:
Move to the company menu and then choose the Make general journal entries option.
Look for and select the journal entry that is to be reversed.
In QuickBooks for Windows, you are supposed to choose find and then enter the name, date, entry no. or amount and then choose the find tab.
In QuickBooks for Mac, you will have to look for and choose the journal entry that is to be reversed on the left side of the Make general journal entries window.
Now choose reverse.
Followed by selecting the save or save & close tab.
The reversed journal entry has an "R" next to the entry number, and any debit and credit amounts are reversed. The new entry is dated the first day of the next month, following the original transaction date.
We believe that making journal entries in QuickBooks desktop becomes easy with the steps scribbled above. Moreover, if you wish to make journal entries that affect a particular customer’s account receivable or a vendor’s accounts payable, then for that, you require to put the customer or the vendor on the first line of the entry.
We have tried our best to provide the steps to create journal entries in QuickBooks. However, if you feel the need of expert assistance, then contact our QuickBooks enterprise customer support team anytime at 1-800-761-1787. We ensure immediate assistance and customized support services to all our clients across the globe.
FAQs
What is a journal entry in QuickBooks Desktop?
Journal entry is a process of recording financial transactions manually. It allows users to adjust account balances, record transfers between accounts, allocate expenses, record depreciation, and process other accounting entries and operations.
Can I modify a journal entry after it has been saved?
Yes! You can modify a journal entry in QuickBooks Desktop. The steps to modify a journal entry are: Step 1: The initial step requires locating the journal entry by using the Find feature. A substitute method is to head to Reports, followed by Accountant & Taxes, and finally click on Journal. Step 2: Follow up by opening the journal entry and making the necessary changes. Step 3: Finally, save the modified entry.
How can I delete a journal entry in
The steps to delete the journal entry are: Step 1: Go to the Edit menu. Step 2: Click on the Delete General Journal Entry option and confirm the same.
Can I create a recurring journal entry in QuickBooks Desktop?
No! QuickBooks Desktop does not have a built-in feature to create recurring journal entries.
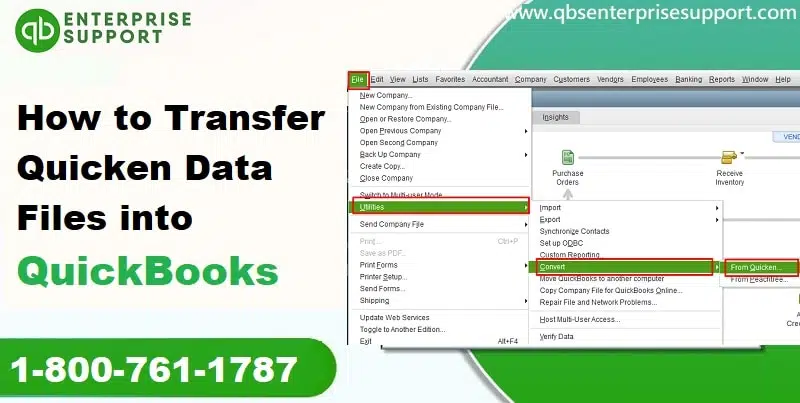
Learn how to upgrade to QuickBooks Enterprise solutions from Desktop Pro and Premier:
Greater efficiency and better outcomes are what everyone seeks for, and same theory is applied when it comes to QuickBooks accounting software. Many QuickBooks Desktop Pro or Premier users look for upgrading to QuickBooks enterprise due to many reasons. Core features and advanced inventory and advanced pricing features are what mainly compel the desktop pro/premier users to upgrade to Enterprise solutions. This makes it pretty much clear that there are certain features exclusively present in Enterprise solutions.
If you are also a QuickBooks Desktop pro/premier user, and want to upgrade to QuickBooks Enterprise, then this post can be of great help to you. The process to upgrade doesn’t involve any rocket science, a few simple sets of steps can work. We will be discussing those steps in detail, in the post later. So, make sure that you stay connected to the article till the end.
Well, if you feel that carrying out the upgrading process is not your cup of tea and is too technical for you, then do not waste time in thinking what to do next, simply give us a call at 1-800-761-1787, and let our QuickBooks desktop technical help team assist you in the process.
Why to Upgrade from QuickBooks Pro/Premier to QuickBooks Enterprise?
As we mentioned earlier, core features and scalability are what compels users to upgrade. Let us take a brief look at those features:
The very first factor that makes QuickBooks Enterprise better than the desktop Pro/Premier is that Enterprise version can handle much larger company file sizes as compared to the desktop Pro/premier.
Also, the QuickBooks Enterprise was built with windows terminal services, which means that it works great with multiple users connected to the same windows server.
The Enterprise version possess the capability of having up to 30 to 40 users, whereas the Pro/Premier is limited to 5 and 3 respectively.
QuickBooks Enterprise can have up to 15 custom item fields and 12 custom name fields, where as the other two are restricted to 5 and 7 respectively. Not only this, but also the Enterprise version can be configured so that the custom fields have data field format input specifications, and with even drop-down menus.
The QuickBooks Enterprise feature is US based technical support and you can automatically upgrade to the latest version available with an active subscription.
Another factor that makes Enterprise version better is that it can search items within transactions, which assists you to use part number, description, or a custom field to search for a specific item.
The Enterprise version has default classes, which allows you to automatically assign a class in transactions to a name, item or account.
The list of core features that are present only in Enterprise version of QuickBooks doesn’t end over here. There are multiple other features as well that justifies the up-gradation of QuickBooks desktop Pro/premier to Enterprise. So, now the picture might be clear in your mind that why you should upgrade to Enterprise. Let us now see how this process is to be carried out.
Similarities to QuickBooks Desktop Pro/Premier and Enterprise
QuickBooks Enterprise solution looks and feels quite similar to the QuickBooks desktop Pro/premier. The features are also quite similar to that of the previous version that you might be using, so this means that the working environment might be similar to the previous one. The existing lists will transition seamlessly into the new software, but the enterprise doesn’t not put the limits to the data just like the other version.
To understand this better, let us take an example: QuickBooks pro and premier permits only 14, 500 names and 14500 items. However, these limits do not apply to Enterprise. You can set up more robust security by fine tuning the permissions granted to each other, with up to 30 simultaneous users now allowed. Enterprise version is expected to run swiftly and build reports more quickly. You can store more information about the employees in the optional payroll feature, and Enterprise makes it easier to track raises, bonuses, and other activities.
Newly Introduced features
We suggest you to take a few minutes to get familiarize with the extras and new features not available in QuickBooks pro and premier. The list of new features in QuickBooks desktop enterprise are as follows:
Enhanced inventory receiving
Advanced inventory
Better option for creating custom fields
Ability to assign classes to accounts, items, or names
A financial professional also is required who knows the company’s financial needs and can set up company file.
2. Selecting an option for setting the network
Central server option: The QuickBooks database server manager is installed on a central server, which also has the company file. Enterprise is installed on each workstation, that can access the company file over the network.
Peer-to-peer option: In this option, one workstation stores the company file. The other workstations access the company file over the network.
Remote desktop services option: The third option is that the enterprise application is installed on a powerful central server that also stores the company file. The workstations do not have Enterprise installed.
Or you can store the QuickBooks company file on a Linux server and use Enterprise, running on the Windows desktop client, to access the data.
3. Testing the network bandwidth
It is very important to test the network bandwidth for multi-user environment. To ensure that the network connection is fast enough to run enterprise, the steps below can be followed:
Initially, select a Large data file for testing.
Take note of the size of the test file in megabytes.
Copy the test file from a network location to the system and not the time it takes to copy.
Now carry out the calculations to determine the network bandwidth: file size x 8/ copy time.
Install the same version of Enterprise on all computers. After that start with the install QuickBooks desktop enterprise software on the server:
Initial step is to close all running programs, along with antivirus programs.
And then double click the file downloaded. You need to note that if you have ordered the optional backup CD, you can also install from that.
Carry out the on-screen instructions until you reaches the choose installation type window.
And then select the option you wishes to install:
You need to choose express to let the installer automatically make the best choice and then choose the custom and network option to customize installation and location.
You will be asked to select out of the three options for how QuickBooks will be installed.
I'll be using QuickBooks on this computer, but the company file will be located on a different computer.
I’ll be using QuickBooks on this computer and storing our company file here so it can be shared over our network. This might be a server that is also actively used as a user workstation. It should be noted that in peer-to-peer network, this should be the faster user workstation. You can choose this option if you are installing enterprise on a server that also serves as a workstation system, or if you are installing it on a terminal server with software and company data store on a remote system.
I will not be using QuickBooks on this system, but I’ll be storing our company file on it so the file can be shared over our network. This system is typically the server. It is recommended to choose this tab when you wants to install the QuickBooks database server manager only and no additional user license is required.
Now select the options according to your requirement.
After that follow the on-screen prompts and complete the installation.
Installing QuickBooks Desktop Enterprise Server Manager
In case you are a Linux user and want to know the procedure to install QuickBooks desktop enterprise manager, then it is recommended to go for the Linux database server manager.
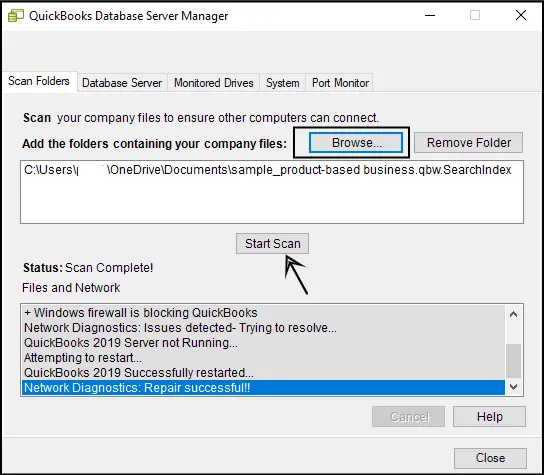
Configuring the Database Server Manager
This step is not mandatory on user workstations. You need to carry out the steps only on the server or the computer on which you will store the QuickBooks desktop enterprise company file. You need to configure the database server manager. The steps to be followed here are:
At first, move to the Start tab of the Windows and then click on it.
Once done with that, you can see the option of Programs and click on it and also choose the QuickBooks option.
Now, click on the database server manager option to open it.
And lastly, the database server manager tool will open.
Scan the company files:
At first, Scan all the company files to allow access to other QuickBooks users, as all the company files are stored.
After that, select Scan folders tab in the configuring database server manager window.
And then select the add folder tab to browse the server and choose folders that contain company files.
The next step is to select the scan tab to start the scanning process.
Monitor the hard drives:
Select the monitored drives tab.
And then, choose all the local drives that you want to monitor.
To share the folder containing QuickBooks company files across the network, you need to ensure that all users have read/write access and create/delete rights to the directory where the files have been stored.
Setting up multi-user hosting
The system having the company file should be set up to host multi-user access. In multi-user mode, only one system can host the multi-user access feature. And on all other installations of the software, multi-user hosting should be turned off to avoid conflicts. If you have installed QuickBooks database server manager on a file server, then you will not have to enable multi-user hosting on the server.
Step 4: Converting the data from Pro or Premier
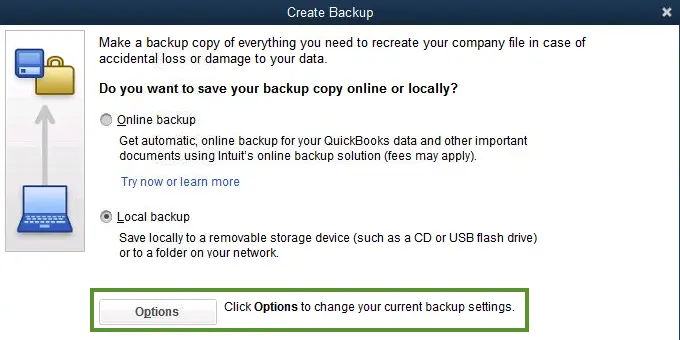
Backing up the company file
You need to back up the QuickBooks data files before opening them in a new version of QuickBooks. Once you have converted the company file from QuickBooks Pro or premier to QB desktop Enterprise, you will not be able to read or use that file in pro or premier software. To backup the company file before you continue:
The very first step is to visit the file menu and then choose create backup.
And then, select a safe location for the file, preferably on a separate system or server.
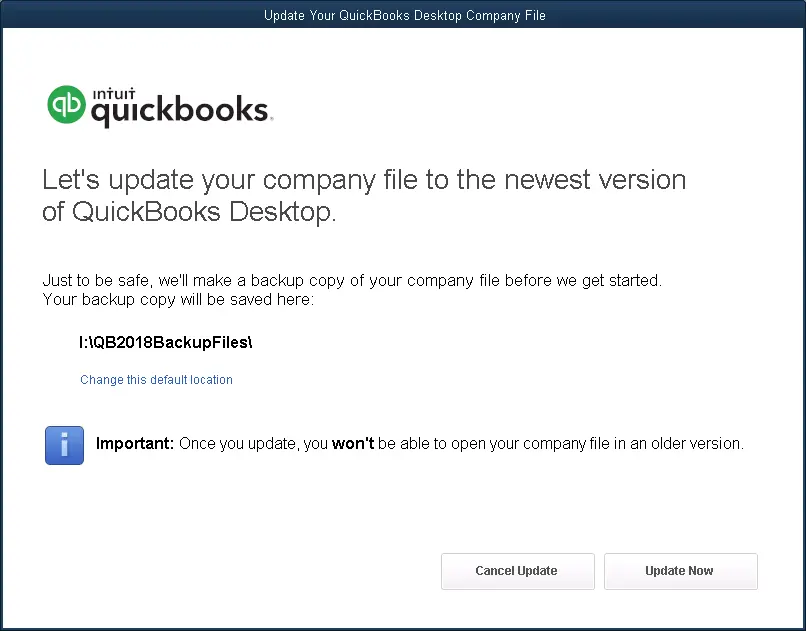
Updating the company file
Firstly, start QuickBooks desktop enterprise and then open the company data file used for Pro/premier.
Then, Enter the admin password.
Select the checkbox next to I understand that my company file will be updated to this new version of QuickBooks and after that, hit Update now.
Now select OK and carry out the on-screen instructions.
Step 5: Configuring the network and server settings
In this last step you need to configure the network and server settings. QuickBooks enterprise has the same look and feel and the same features as the previous version of QuickBooks, so you will have a familiar environment to work upon.
Configure the lists and user permissions
The existing lists will transfer to the enterprise software, but the will not have the same limits on the data. Such as, QuickBooks Pro and Premier only permit storage 14,500 names and 14500 items. These limits won’t apply to the Enterprise version. You will be able to change the permissions granted each time with up to 30 simultaneous users now permitted.
Registering Enterprise software
The registrations permits you to take advantage of the benefits that come along the Enterprise version such as the access to technical support. You can register Enterprise using the steps below:
At first, you need to start QuickBooks desktop enterprise.
The last step is to select Begin registration option and follow the onscreen steps.
The point to be noted here is that, if you moves the installation from one system to another, you will need to re-register the Enterprise on the new system.
Final Words..
This brings us towards the end of this process and also the post. We hope that the information shared in above might be of some help in upgrading QuickBooks desktop pro/premier to QuickBooks Enterprise. However, if you face any issues or in case of any errors, then feel free to call us anytime at 1-800-761-1787. Our experts and certified QuickBooks enterprise support professionals will assist you in upgrading the software to enterprise with much ease.
FAQs
What should I consider before converting to QuickBooks Enterprise from Desktop Pro/Premier?
Before you proceed with converting to QBES, you should check the license cost and ensure whether the added features and capabilities justify the additional cost.
Can I still access my company data in Desktop Pro/Premier after converting to QuickBooks Enterprise?
Yes! You can access the company data in Desktop Pro/Premier upon converting to QuickBooks Enterprise.
All you need to get the steps to convert a QuickBooks Desktop for Windows file to QuickBooks Desktop for Mac:
Trying to convert QuickBooks for Windows file to QuickBooks for Mac? Well, this can be a huge conversion. The QuickBooks desktop is available for both Windows and Mac. Often it might happen that the QuickBooks for Windows user might plan to switch to QuickBooks for Mac for some or other reason. Well, in such a scenario, reading this segment carefully till the end can help you up to a great extent.
QuickBooks for Windows and QuickBooks for mac installation processes are differ. In simple words, the installation file for every operating system is separate. Converting QuickBooks window to QuickBooks Mac doesn’t involve any rocket science, all it needs is to carry out a couple of steps. This conversion will transfer all the regular transactions, employee, customers, and vendors data. The data will be converted to a Mac-compatible file. There are numerous other facts associated with this conversion process, which we will be discussing later in this particular segment. So, make sure that you stay connected to this piece of writing, or if you are short of time, then you can directly contact our QuickBooks desktop support team. Our experts will be more happy to convert QuickBooks for Windows file to QuickBooks for Mac on your behalf.
Do you know your QuickBooks version?
After you convert the file from Windows to Mac, you will surely expect some great results. Thus, in order to get the best results, you need to ensure that you are using QuickBooks 2007 or any higher version of the software. Or else you can also update their QuickBooks to the highest version. As the ones who wish to convert QuickBooks Windows to QuickBooks 2019 Mac, it won’t be possible unless you upgrade the software. You will have to hit the menu bar and then ensure to use the higher version. Also, make sure to check the version that you are using.
Steps to Convert QuickBooks for Windows File to QuickBooks for Mac
If you are moving from QuickBooks desktop for Windows to Mac, then you need not start over. However, it should be noted that you can only move company files from QuickBooks desktop pro, premier, or premier accountant editions. The steps involved in this process are as follows:
Step 1: On the Windows system
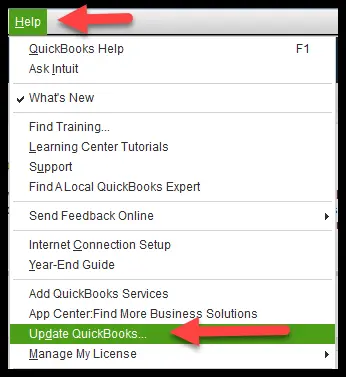
Update QuickBooks Desktop for Windows to the latest release.
Open the file as the admin.
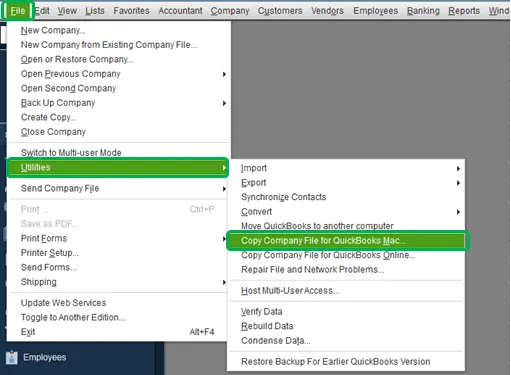
Now move to the file menu and then pick the utilities option. Also, you need to select the copy company file for QuickBooks Mac, and then pay heed to on-screen instructions. QuickBooks will create a MAC.qbb file.
A warning message stating “It looks like QuickBooks for Windows might be a better fit for the company” would appear . You need to ensure to check what data isn’t converted from Windows. To continue, hit a click on Yes.
The next step is to visit the folder to save the file and then name the file and also select save. Please ensure to use special characters in the file name.
Move the file to the Mac by using any storage device, such as a USB flash drive.
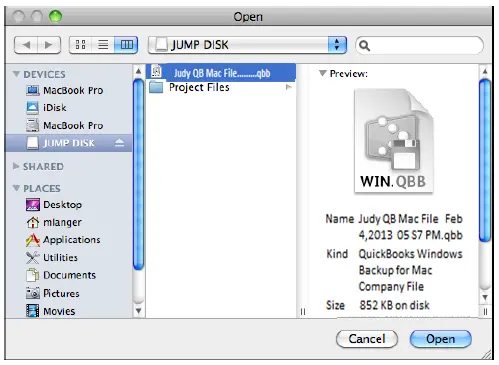
Step 2: Restoring the Mac.qbb backup on the Mac
A Mac.qbb file is basically the copy of QuickBooks desktop company file that you can restore in QuickBooks for Mac. The steps involved in this process are as follows:
Data that’s converted to QuickBooks Desktop for Mac
1099 categories
Account list (Chart of accounts)
Admin password
All list reports
Audit trail
Budgets
Classes
Contacts data
Customer message list
Custom field definitions
Customer type lost
Employee list (notes will not be converted)
History of QuickBooks versions used with the data file
Income and expense tracking by class
Item list
Customer list
Vendor type list
Vendor list
Transactions and their links
Transaction statistics
To do list
Time and activity records
Shipping via list
Reminders
Reconcile
Preferences
Company name and address
Which features are enabled
Payment method list
Payment terms list
Vendor list (notes will not be converted)
Job costing data
Job types list
Links between pay items and other lists
Memorized transactions
Multiple estimates per job
Data is not converted from Windows to QuickBooks desktop for Mac
It should be noted that QuickBooks for Mac doesn’t support multiple currencies. As the accounts and balances are affected by the multiple and home currency settings, you can’t change the settings in QuickBooks for Windows once they are set. In case you have used multiple currencies in Windows company file, you will not be able to convert the data to QuickBooks for Mac. Certain features and data will not be converted from Windows to Mac, including the following:
Any data in case multiple current has been used in QuickBooks for Windows
Intuit integrated payroll and payroll list items
Online banking transactions that are not accepted into a register
Online banking aliases
Customized settings for forms such as invoices, estimates, statements, and purchase orders
Multi-user data like usernames
User passwords
Memorized reports
Business planning, expert analysis, and business optimization tools
User added columns to lists
Multiple ship to addresses, preferred send method, and payment information for customer:jobs.
There are certain reports that are not supported by QuickBooks desktop for Mac. In case you wants to use them even after knowing that they are not supported, then you can create most of these reports by using the customization, filtering, and memorization features.
Profit & Loss Unclassified
Open Purchase Orders by Job
Sales Tax Revenue Summary
Pending Builds
Income Tax Preparation
Profit & Loss Budget Performance
Fixed Asset Listing
Voided/Deleted Transactions (available in Premier versions of QuickBooks for Windows)
Voided/Deleted Transactions History (available in Premier versions of QuickBooks for Windows)
Closing Date Exception (available only in Premier versions of QuickBooks for Windows)
Open Sales Orders by Customers (available in Premier versions of QuickBooks for Windows)
Open Sales Orders by Item (available in Premier versions of QuickBooks for Windows)
Adjusted Trial Balance (available in Premier versions of QuickBooks for Windows)
Adjusting Journal Entries (available in Premier versions of QuickBooks for Windows)
Forecast Overview (available in Premier versions of QuickBooks for Windows)
Forecast vs. Actual (available in Premier versions of QuickBooks for Windows)
All payroll and workers comp reports
Unsupported report filters
Just like reports, there are a few unsupported report filters that are not supported by QuickBooks for Mac. The balances of memorized reports that were created using these filters won’t tally the balances in the original data file. The list includes the following:
This brings us to the end of this article, and we hope that the information shared in above might be of some help converting QuickBooks for Windows file to QuickBooks for Mac. However, if you are still doubtful of the process or for any query, feel free to call us anytime at our dedicated support line i.e. 1-800-761-1787. Our QuickBooks enterprise support experts and certified accounting professionals will be happy to help you.
FAQs Related to Converting QuickBooks Desktop for Windows Company File to Mac
How to restore QuickBooks on Mac?
In QuickBooks for Mac, you need to choose File > Open Company, select the .qbb file, and then hit a click on Open. After that click on OK when asked if you want to restore a QuickBooks for Windows file. Now you need to enter a name for the restored file, and then hit a click on Save.
Can we open QuickBooks file on a Mac?
If you're using a QuickBooks for Windows edition that is earlier than 2009 version, you can still open your company file in QuickBooks for Mac. You need to follow a couple of steps.
An easy guide to understand about the TLS 1.2 for QuickBooks Desktop:
Being a QuickBooks user, have you ever heard of TLS 1.2 for QuickBooks Desktop for Windows? QuickBooks TLS 1.2 is basically an advanced internet security protocol. For any business, the security is the foremost priority, and it can’t be denied that a weak code can leak sensitive and confidential information and can cause irrecoverable loss to the business. The sensitive information of every company can’t be compromised, which makes data security the primary concern. This is where TLS 1.2 comes into the picture.
QuickBooks update it's security standard on a regular basis, and this security update includes the QuickBooks TLS 1.2 update. In this article, we are going to talk about TLS 1.2 for QuickBooks Desktop for Windows. Thus, keep reading this post ahead can be of great assistance. You can also give us a call at 1-800-761-1787, and discuss your queries directly with our professionals.
TLS basically stands for transport layout security and, as mentioned above, is a type of protocol that helps secure communication with the internet. Earlier, SSL/early TLS was QuickBooks desktop as an effective security protocol. It is changed from 1st of June, 2018. This change was made in order to meet the PCI data security standards. In order to provide greater security and stability, all the connections used by QuickBooks desktop to access Intuit services require to meet certain system requirements. In case the system requirements are not met, then it might affect the services, which includes:
All connected services, such as payroll, payments, online banking, etc.
If in case you are not sure of the following requirements, then you can go for the TLS 1.2 Readiness tool. This will update the system to become TLS 1.2 compatible and ensure that it meets all Windows operating systems, internet explorer, and .NET requirements.
It should be noted that from 22nd May 2017, QuickBooks desktop is no longer supporting TLS settings of 1.0 or TLS 1.1. Moreover, QuickBooks needs Internet Explorer settings of TLS 1.2 only. In case you access it via Internet Explorer (Windows), then this will impact the access to QuickBooks online. But in another browser, such as Google Chrome or Firefox, this doesn't impact the changes.
For Windows 10 & IE 11 Users:
In case you use Internet Explorer 11 quite frequently, then it should be taken into consideration that IE TLS 1.2 is enabled by default, so you need to confirm TLS 1.2 is enabled.
For XP/Vista or IE 8 users only:
The IE 8 or Windows XP/Vista users are suggested to upgrade their OS to a later version to get IE 11, where one can use TLS 1.2.
Windows 7/8/8.1 & IE 9/10 users only:
It should be noted that in Internet Explorer 9 or 10, TLS 1.2 is not enabled by default, so you need to upgrade the internet explorer to 11 or enable TLS 1.2 in the browser settings.
TLS 1.2 over SSL/Early TSL
If you are doubtful about TLS 1.2 over SSL/Early TSL, here we have mentioned why you should go for TLS 1.2. The secure layer i.e. SSL was introduced by Netscape in 1990. The SSL and early TLS both have some gaps in them. Several times, via widespread POODLE and BEAST exploits, attackers have taken advantage of these gaps. The factor causing these vulnerabilities was the failure to update the SSL with time.
On the other hand, TLS has goneThe TLS 1.2 is more reliable than any other service present out there through a lot of revisions, which has made it better. They have been adding support for new cryptographic algorithms. The TLS 1.2 is more reliable than any other service present out there. So, you are recommended to update to the latest QuickBooks desktop update for the TLS 1.2.
Consequences of not updating TLS 1.2
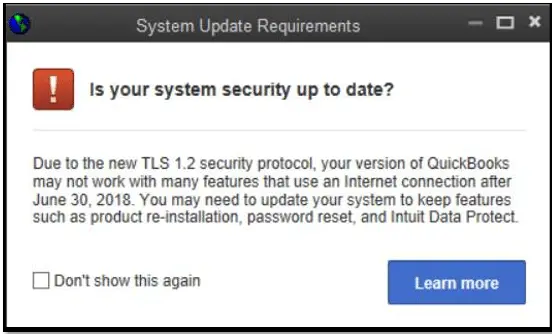
Intuit launched a security protocol that needs all the connections used by the QuickBooks software to fulfill specific requirements after May 31, 2018. This is just for stringent security and confirmed confidentiality of all the data that you might fill in its QuickBooks. Inability to comply with the requirements might lead to further consequences, which include:
Affecting connected services like payroll, payments, online banking, etc.
Hampering the activation of the QuickBooks desktop program on the new system
Issues in ordering checks and supplies
VAT e-filing
Or Intuit Data Protect feature might not work properly
Services that require Intuit account credentials to operate might be affected.
In case you lost the password, then there is no way back.
Do you know the system compatibility of TLS with your system? In order to prevent any issues with the services, you need to ensure that the software is up to date and also ensure that the system meets all the basic requirements. Let us explore the basic necessities to make the system compatible and ready for TLS 1.2:
Operating System
The list of operating systems that you might need includes:
Windows 10
Windows 8.1
Windows 10
MS Windows Server 2008 R2
Windows Server 2012 R2
Windows Server 2017
Internet Explorer
QuickBooks desktop makes use of the features of internet explorer. So, you need to ensure to install Internet Explorer 11 in order to have the latest updates from Microsoft.
Firstly close QuickBooks.
And then upgrade to IE 1.1
Reopen QuickBooks desktop.
.NET Framework
The QuickBooks accounting software demands 4.5.2 or greater .Net framework. Here is the process to get an updated version.
Downloading the .Net framework from Microsoft’s website.
And then save it to the desktop.
Followed by that, double-click the file and carry out the onscreen prompts.
Lastly, reboot the system.
Internet Explorer group policy
In case the internet explorer group policy shows that you have the correct Internet Explorer but the TLS 1.2 isn’t set up, then you can follow the required steps.
Elevated privileges
You might need to run QuickBooks with elevated privileges. This is to ensure that the correct internet security settings are established. The steps to be followed are as follows:
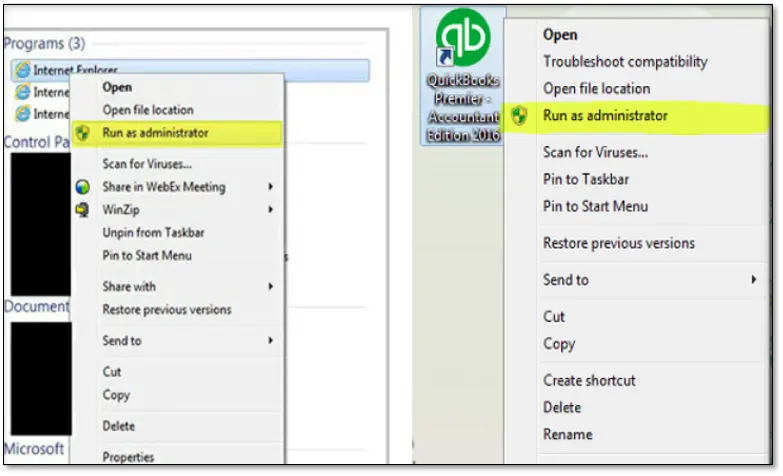
The first thing is to close QuickBooks.
And then, hit a right-click on the QuickBooks icon.
You might use Intuits TLS 1.2 readiness tool on any system with the updated version of QuickBooks. This will help in finding out whether it is ready to use the security layer.
If the tool indicates that the system is not ready, then you need to review the details and make the required changes.
Downloading the latest Internet Explorer is also required.
Admin access and privileges are a must to have the best internet security settings.
What issue you may face due to TLS 1.2?
TLS 1.2 failure warning messages on Windows 10
TLS 1.2 error continues after .net, and TLS 1.2 operations are confirmed
Internet Explorer TLS 1.2 Validation Failed Contact your administrator for further support. ErrorKey - HKLM_IE_SECURITY_PROTOCOL_ERROR
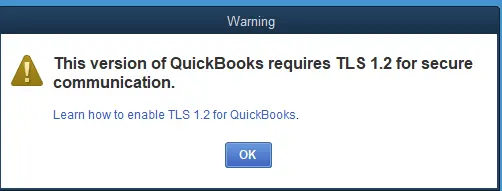
TLS 1.2 validation failed in QuickBooks Pro
This version of QuickBooks requires TLS 1.2 for secure communications. You must perform the following actions to allow QuickBooks to use TLS 1.2
Steps for Resolving QuickBooks TLS 1.2 Errors (Prompts Related)
When you make use of the QuickBooks desktop, you might face some error prompts. Here is how you can deal with this:
Method 1: Run the TLS 1.2 Readiness tool from the QuickBooks Tools Hub program
When you run this tool, you will update your operating system to be TLS 1.2 supportable.
Step 1: Download and install the QuickBooks Tool Hub
And then, download the latest version of the QuickBooks Tool Hub and save it where you can easily find it.
Later on, here you need to open the downloaded file (QuickBooksToolHub.exe).
You need to follow the on-screen instructions to install and agree to the terms & conditions.
Once the installation done, hit double-click on the Icon on your Windows desktop to open the tool hub.
Step 2: Run the TLS 1.2 tool from Tool Hub
Choose Installation Issues and then select QuickBooks TLS 1.2 Tool from the bottom right corner.
Click OK to open the TLS Tool and then hit on Yes to the EULA Agreement.
You need to select Run and wait for a few seconds.
Once the tool completes the procedure, hit a click on Exit.
Important: If the above given steps will not resolve your issue or you are not good in technical aspects to follow the steps then go through these options:
You can contact an IT professional.
The error might be prompted due to a lack of privileges. You need to run the software as admin.
The information we have shared above is expected to work up to a great extent when it comes to TLS 1.2 for QuickBooks Desktop for Windows and related information. However, if you are looking for any help or want to speak with an expert, then you can contact our executives at 1-800-761-1787 and discuss your issue directly with our QuickBooks support team. We are a group of certified QuickBooks ProAdvisors, who work round the clock to provide the best possible services to you across the globe.
FAQs related to TLS 1.2 for QuickBooks Desktop for Windows
What is TLS 1.2?
TLS is the know as for Transport Layout Security. It is a protocol used for securing communication with the internet.
How do I know if TLS 1.2 is enabled?
The steps to check if TLS 1.2 is enabled or disabled are: 1. Hit on Start menu and then open the Control Panel and then go to Internet options. 2. After that, head to the Internet Properties window and hit a click on the Advanced tab. 3. Now go to the Security section and checkmark the box beside Use TLS 1.2. 4. That's it!
Is TLS 1.2 enabled by default?
Yes! TLS 1.2 is generally enabled by default by the Operating System.
Learn the process of creating invoices in QuickBooks desktop and online:
Hunting for ways to create an invoice in QuickBooks desktop? Well, if yes, then you have landed on the right place. Crafting an invoice is one of the essential or key document required to be developed for a business. The businesses and entrepreneurs are required to manage their cash flows in the most appropriate manner. Saving money and simplifying the process of invoicing is possible with the help of QuickBooks. Invoices are basically used to record sales transactions from customers who make no or partial payment at the time of sale. In simple words, you can manage the account receivables with the help of invoices.
The QuickBooks desktop has a feature to create Invoice and also the document given to the buyer to collect the payment, which makes QuickBooks one of the most compelling accounting software. You might generally look for the process to create Invoice in QuickBooks, as it might invoice certain steps. In this blog post, we are going to discuss the process in detail. Thus, make sure to stay connected to this piece of writing till the end. Whereas, if you aren't interested in investing your time in performing the process manually or if you want our tech geeks to assist you, then link up with our QuickBooks support team using our dedicated support line i.e., 1-800-761-1787.
What is an Invoice?
Well, an invoice is a promise to pay. It is basically an asset for the seller and a liability to the buyer. Invoice creation is a part of the routine accounts receivable workflow in QuickBooks. The invoice is used for recording the sales transactions from customers that haven't made the payment upfront or had made partial payments. There are different ways in which an invoice can be created on QuickBooks. This depends upon the type of transaction made with the client.
Why you should create invoices in QuickBooks Desktop?
There is a wide range of benefits to creating invoices in QuickBooks. Creating an invoice can help you in:
Easily sending email invoices to customers directly from QuickBooks.
It updates financial statements in real time.
One important thing that people should take into consideration is to ensure having all the required details to create invoices before beginning the process.
How beneficial is crafting invoices in QuickBooks?
There is a huge list of benefits of creating invoices in QuickBooks. Let us have a look at the list below:
Maintaining legal records of sale.
Payment tracking on both seller and buyer’s end.
Legal safety, as it acts as a legal proof.
Simple tax filing, recording all sale invoices guarantees the right amount being paid.
Business data, gathers essential data.
Steps for Creating an invoice from scratch in QuickBooks
For the ones who do not require creating sales orders or estimates, then A/R workflow begins from creating the invoice. The steps to be followed are:
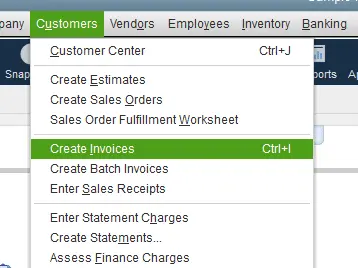
Select create invoices from the home screen or the customers menu.
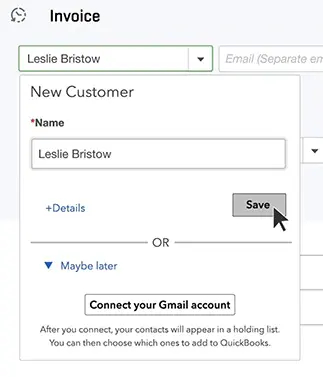
From the customer job drop-down, you need to select the customer or customer job. In case the customer or job is not on the list yet, you can select the add new option.
Followed by filling in the relevant information at the top of the form such as the date invoice #, Bill to/Sold to, and terms.
Choose the items. It should be noted that the when you choose or adds an item, the description and amount are populated based on the description and unit cost entered when it was set up that too on its own. You can also delete or modify this while creating invoices.
This step is not mandatory, as if you wish to apply for a discount, you will have to create a discount item.
You need to move to the list menu form the home screen.
Select the item list.
You need to now right-click anywhere, followed by selecting new.
Choose the type drop down and then select the discount.
Furthermore, you would have to enter the item name/number and a brief description.
In the amount or % field, you need to enter the discount amount or percentage. In case the discount amount varies, you will have to leave the amount or percent field blank and then enter the amount directly on the sales forms.
Select the income account to be used to track discounts from the account drop-down.
You will have to choose an appropriate tax code for the item.
If you have created a sales order, then create an invoice. This can be done in two ways:
From sales orders window
Initially, select create invoice tab, on the sales order main tab.
When the prompt appears, you need to select:
Select create invoice for all the sales orders to add all items from the sales order to the invoice.
You need to then create invoice for select items, in case to put only some of the items on the invoice.
Make important changes in the invoice. It should be noted that, in the list of items, enter a quantity in the to invoice column for each item. In case you do not wish to invoice any of the listed items, then enter 0 as the quantity.
Lastly, select save and close.
From the invoice window
You need to select create invoices from the home screen.
Furthermore, select a customer or customer job. After which, the available sales order window will appear.
You will have to pick one or more sales orders that have items to include in the invoice.
In this particular step, you need to essential changes in the invoices. It should be noted that in the list of items, you will have to enter a quantity in the To Invoice column for each item. In case you didn't want to invoice any of the listed items, then enter 0 as the quantity.
In the last, choose save and close.
Steps for Creating invoice for an Estimate
When the customer accepts the estimates and agrees to pay a fixed amount, you can turn the entire estimate into an invoice.
From the estimate window
You should first open the correct estimate.
Moreover, you need to select create invoice at the top of the estimate form.
Furthermore, if you have progress invoicing turned on, then a prompt might appear asking the items and quantities to put on the invoice. Specify what to include as prompted.
In this step, you need to edit the information as needed.
Toward the end of the process, select save and close.
From the invoice window
To begin with, select create invoices from the home screen.
Select customer or customer job on the customer job drop down.
Now you need to select the estimate the user wishes to include in the invoice. You should note that QuickBooks will only permit to select one estimate to invoice. Also, note that if you have progress invoicing turned on, then you might get a prompt asking what you want to have on the invoice. Being a user, one can simply specify what to include as prompted.
In this particular step, you need to edit the information as required.
This article was entirely focused on the different processes to create an invoice in QuickBooks desktop. We hope that the information we have shared in above might have helped you in some or the other way. However, in case of any query or if you feel the need of technical assistance, you can simply ring up at our helpline i.e. 1-800-761-1787, and let our experts carry out the process for you.
We are a team of certified QuickBooks enterprise support team and the industry's best accounting professionals with years of experience and expertise, and we aim at providing the best possible support services. So, do not hesitate in calling us anytime, we will be happy to help you.
FAQs
Does QuickBooks support customization of the invoice template?
Yes! Customization of the invoice templates, like logos, fonts, layouts, etc is possible in QuickBooks.
What are the ways to track and manage QuickBooks invoices?
QuickBooks offers a myriad of different approaches for managing invoices. You can keep track of the invoice list and filter the invoices.
Is it possible to set up recurring invoices in QuickBooks?
Yes! You can set up recurring invoices for customers within QuickBooks. This requires indicating the frequency, duration, and ancillary details.
Does QuickBooks support multiple currencies on invoices?
Yes! QuickBooks supports different types of currencies on invoices.
Can I email invoices directly to customers from QuickBooks?
Yes! You can email invoices directly to customers using QuickBooks. The customer's email address is the only necessary prerequisite for the process.