Here is how you can write off bad debts in QuickBooks desktop
QuickBooks Accounting software is widely popular amongst various start-ups and established organizations because of its various advanced features and tools. It uses advanced Industry recognized standards to ensure that the data which is entered in the software is secured as well as encrypted. In this comprehensive blog post, we will discuss one prominent use of QuickBooks which is writing off bad debts in QuickBooks desktop.
Bad debts are one of the biggest issues any organization has to go through. This is why all organizations, whether big or small, want to ensure that they can write off their bad debts as soon as possible and with the least amount of hassle. And this is where QuickBooks desktop accounting software comes in. So, let us dive into the various aspects of the process.
You may also like: Steps to Set up Multi-User Network in QuickBooks desktop
Important points to note
Before we going to the process to write off bad debts in QuickBooks, you need to take note of the following points:
- You can write off bad debts as deductions.
- Once creating a bad debt account, you can get familiarize with all different types of bad debts and unpaid invoices.
- There is an easy process to write off overpayments as well by utilizing the QuickBooks software.
What does writing off Bad Debts mean for an Organization?
In any organization, when the amount which was in the lucrative form and was supposed to be received from the customer fails to be recovered, it is termed Bad Debt. For those organizations that are already using QuickBooks Desktop, bad debts can be understood as invoices that become uncollectible over the course of time.
Writing off bad debts makes it convenient for an organization to track its profit and the average net turnaround. Although, the same can become quite tedious as well if the records are to be handled and managed manually without the help of any accounting software.
How can QuickBooks Desktop help in writing off bad debts?
QuickBooks Desktop software makes writing off bad debts relatively easy as it is dedicated to cloud-based accounting software. So, any organization, whether big or small, do not need to bother about hiring an Accountant to managing their finances as the QuickBooks software is highly user-friendly.
Methods to Write off Bad Debts in QuickBooks Desktop
Following are some of the methods which the users can follow in order to write off the bad debts using QuickBooks desktop without any hassle:
Step 1: Create a Bad Debts Expense Account
The first step demands the creation of an expense account for bad debts.
- At first, you are required to open QuickBooks Desktop and go to the Settings option.
- Now, from the list of options, click on Charts of Accounts.
- Then, on the top-right corner, select New to create a new account.
- From the Account type dropdown, click on the Expenses option.

- Here, in the Detail Type dropdown, click on the Bad Debts option.
- Once the above-mentioned steps are complete, you need to click on Save and Close.
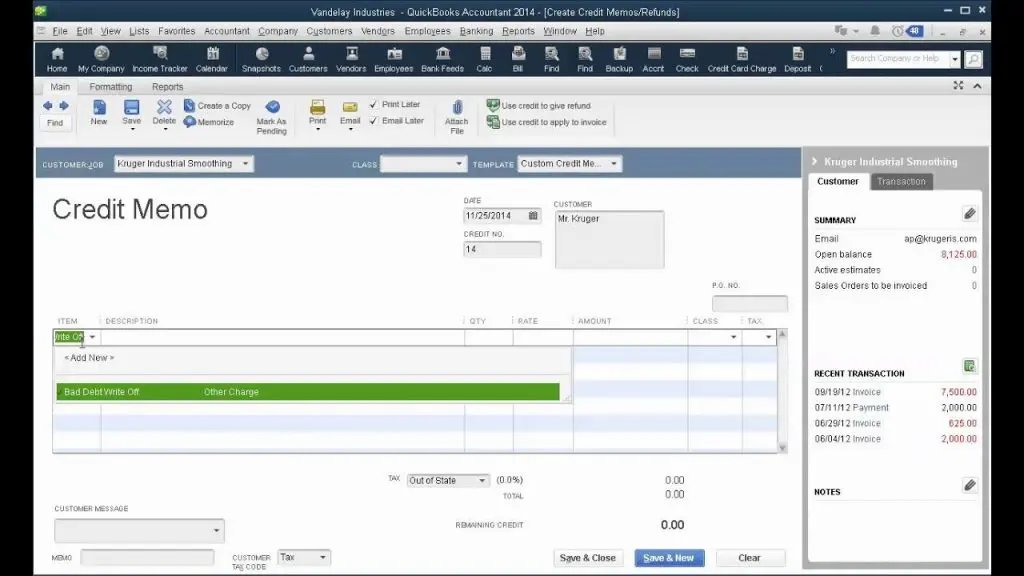
Step 2: Close out the unpaid invoices
- Open Customers menu and select the Receive Payments.
- Type in the customer’s name in the Received from field.
- In the Payment amount space, enter $0.00 and choose Discounts and credits.
- In the Amount of Discount field, put in the value that you would like to write off.
- For Discount Account, select the account you added in the previous step, and select Done.
- Conclude it by choosing Save and Close.
So, these were some of the methods that you can use to write off bad debts in QuickBooks Desktop software without any hassle. These methods are easy to follow and will help you to get the process automated.
Read Also: Learn how to set up your email service in QuickBooks Desktop
Steps to Writing off bad debt in QuickBooks online
If you are using QuickBooks online, then you simply have to perform the below steps to write off bad debt. Let us explore them one by one:
Step 1: Checking ageing accounts receivable
To check aging accounts receivable. the process is quite easy to implement and goes on as follows:
- To start off, you need to initially head to reports menu.
- Furthermore, look for and open accounts receivable aging detail reports.
- Also, check which of the outstanding accounts receivable should be written off.
Step 2: Creating a bad debts expense account
Create a bad debt expense account by performing the easy steps given below:
- Herein, you simply have to move to the settings option and also choose chart of account.
- Choose new to create a new account.
- Now, from the account type dropdown, choose expenses.
- And from the detail type dropdown, choose bad debts.
- Conclude the step by selecting the save and close options.
Step 3: Creating a bad debt item
Follow the below-given set of instructions to create a bad debt item:
- To create a bad debt item, you need to move to settings tab and also choose products and services.
- Choose new tab and also go for non-inventory.
- Furthermore, enter bad debts in the name fields.
- Moreover, you need to choose bad debts from the income account dropdown.
- Complete the process by opting for save and close tabs respectively.
Related article: How to set up landed cost in QuickBooks Enterprise?
Step 4: Creating a credit note for the bad debt
This next step involves the creation of a credit note specifically for the bad debt. For convenience, follow the directions given below:
- To create a credit note pertaining to the bad debt, you are simply required to choose +New.
- The next step is to choose credit note.
- You need to go for customer from the customer dropdown.
- Now, in the product/service section, choose bad debts.
- You now have to enter the amount you wish to write off in the amount column.
- In the message displayed on the statement box, you need to enter the bad debt.
- Lastly, choose save and the close tab.
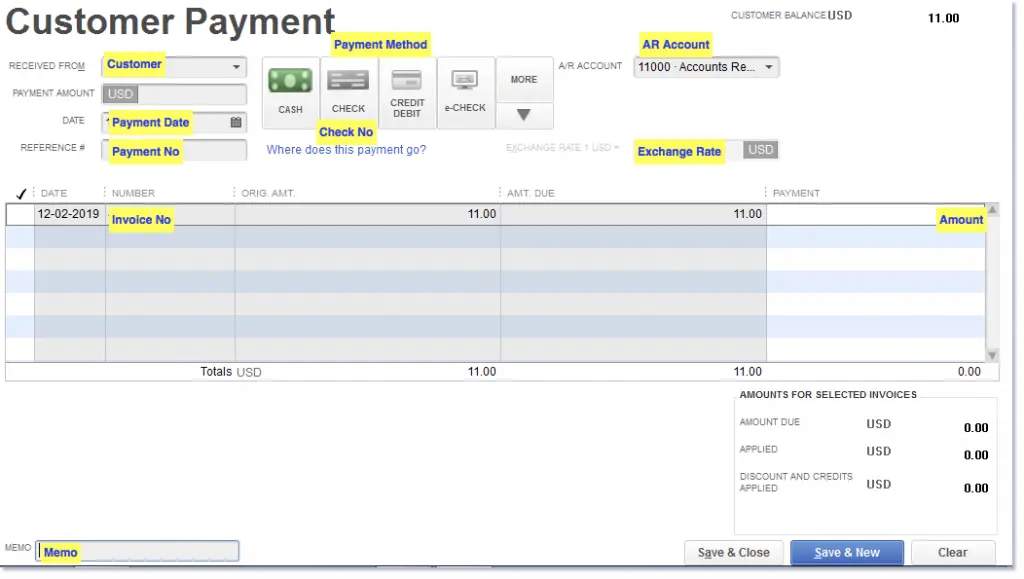
Step 5: Applying the credit note to the invoice
- Choose the +New option first
- Now under customers and choose receive payment choose the appropriate customer from the customer dropdown.
- Now, go for invoice from the outstanding transactions section.
- Moreover, from the credits section, and also choose the credit note.
- Finally, hit on save and then close.
Step 6: Running a bad debts report
- Move to the settings ⚙ option.
- Then, go for chart of accounts.
- Now, in the action column of the bad debts account, you need to choose run report.
Keep a note that, you can tell a bad debt entity apart from other customers by adding a note to their name:
- Move to the sales menu and also choose customers.
- You now have to choose the customer's name and also hit on edit.
- Now, in the display name field, you need to enter bad debt or No credit after the customer name.
- Finish the process by clicking on Save.
Also see: Quick Troubleshooting Guide to Fix QuickBooks Error 1723
Final Words!
We hope you find this article helpful and informative. We also offer technical support to QuickBooks users. Therefore, if you cannot follow any method or face any issues with the software, then reach out to us at 1-800-761-1787 for the unmatched and time-effective solutions. Our support services are just a call away. So, without waiting any further, reach out to us.
FAQs
What is the allowance for bad debt in QuickBooks?
The allowance for doubtful accounts is an estimate of a company's outstanding accounts receivable that is unpaid.
What does it mean to write off bad debts in QuickBooks desktop and online?
Writing off bad debts in QuickBooks desktop and Online infers the process of acknowledging and removing uncollectible customer invoices or accounts receivable.
Can I recover or reinstate a written-off bad debt in QuickBooks?
Yes! If you recover a bad debt that was previously written off, you can reinstate it in QuickBooks.
Recommended readings:
How to Resolve QuickBooks Error 3008?
Steps to Fix QuickBooks Error 15240 (Update's Complete Successfully)
Solve Unable to Find or Open QuickBooks Desktop 2022 after Installation Issue