The process of creating and filing 1099s with QuickBooks desktop isn’t that tricky. When you pay your contractors in cash, check, or direct deposit, you simply have to file 1099s with the IRS. QuickBooks lets you prepare 1099s from the information that is present already in your account. A quick point to be considered here is that you can prepare 1099s in QuickBooks contractor payments.
To help you easily create and file 1099s with QuickBooks desktop, we have tried to summarize the set of steps that would work in this case. And once you prepare your forms, you will have to opt for the option to file them online or print and mail them to the IRS. To find out the detailed process, make sure to scroll through the segment till the end. Moreover, you can also get in touch with our certified professionals who will help the user in making the best use of 1099 wizard, as well as repairing and filing 1099s with QuickBooks.
What needs to be reported?
In case users pay the vendor more than $600 in a year, then users would have to fill out a 1099 MISC form.
It should be noted that the IRS does not permit electronic payments to be reported on 1099 MISC forms. We can take an example to understand the situation in a better way in case the user has paid via credit card, debit card, PayPal payments, gift card, etc., then he/she would not require to report those on a 1099 MISC. The reason behind this can be that the QuickBooks desktop software automatically excludes the above-mentioned modes of payment. And the payment companies will report those payments, so the user need not worry.
For whom is the creation and filing of 1099s mandatory?
The creation and filing of 1099s are very important for the following:
Filing 1099s is indispensable when the user makes payments to contractors in different forms like cash, direct deposit, and checks.
If the user is an employer and has hired vendors or freelancers, then in that case, also the filing of 1099 is essential.
Also, under the withholding rules, if you have withheld the federal income tax, then filing 1099s is important.
Steps to create and file 1099s with QuickBooks desktop
While the process involves a handful of steps, performing each steps one by one is a must.
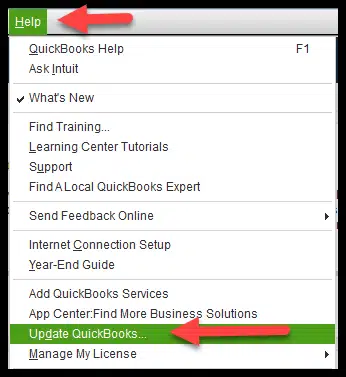
Step 1: Update QuickBooks Desktop
Using an outdated version of QuickBooks wont work, you need an updated QuickBooks version to process your 1099-NEC and 1099-MISC forms. Thus, ensure that you have the latest QuickBooks update available and choose reset update checkbox.
Step 2: Create 1099s in QuickBooks desktop
The first step is to head to the Vendors tab.
Choose the 1099 forms and then Print/e-file 1099 forms.
Also, choose Get started for 1099 form you wish to create.
In case you require to create both 1099-NEC and 1099-MISC, then you will have to perform the steps for both the forms individually.
In majority of the cases, businesses opt for Nonemployee compensation, box 1 on the 1099-NEC, but you need to discuss with your accountant first.
In case you are filing for New jersey, then 1099 forms filed in these states require special rules for boxes 16 and 17. You can see how to file your state 1099 forms.
You are required to opt for Vendors that need a 1099 form and then click on Continue tab.
Once done with that, verify the Vendor information and edit any Incorrect information and click on continue tab.
Also, Map the vendor payment accounts.
Head to the drop-down menu in the apply payments to this 1099 box.
Choose the account you wish to Link the payment to.
In case the boxes are gray, then they are mapped other form.
After that click on Continue tab.
Also, Review the payment information.
And choose View included payments or View excluded payments and hit the Continue tab.
You further have to Review the vendors and the amounts that you are going to report.
After this, click on Continue tab.
And choose whether to Print the form or e-file it.
In case you choose to Continue to e-file the form, then perform the necessary steps.
Step 3: Importing the data into Tax1099
Once you have prepared 1099s in QuickBooks, then choose the e-file button to carry out the onscreen steps to import the data into the Tax1099 account.
Step 4: E-file 1099s in Tax1099
To start with this, you need to choose the Vendor name or the edit tab.
After which, you need to choose the update tab.
Also note that changes you make in Tax1099 don’t flow back to your QuickBooks company file.
Now, enter the information under the right state boxes.
And choose the Vendors you wish to update to e-file by clicking on the box.
Now, hit the Next tab.
And in case there are any issues, you will see a message on your screen, after corrected, make sure to choose Vendors again.
Also, click on Next tab.
You need to choose the Vendors by checking the box next to the Date column.
After that, select How you wish to send copies to the vendors.
Now, choose Download multiple PDFs to provide vendors their copies.
In case you need to file with your state, then opt for them.
Now, click on Next tab and calculate Tax1099.com fee.
After you are done with that, choose Forms page.
Enter the needed information and choose Pay and submit to e-file.
In case you need to create both 1099-NEC and 1099-MISC, then perform the steps for the other form as well.
Step 5: Check for filing status
Once done with the submission, you need to head back to the account and check for the status.
Easy Steps on How to Create 1099 in QuickBooks Wizard
In order to open the wizard, you are supposed to choose vendor option and then click on print/e file 1099s, followed by clicking the 1099 wizard. After that, click the Get Started tab and carry out the steps below:
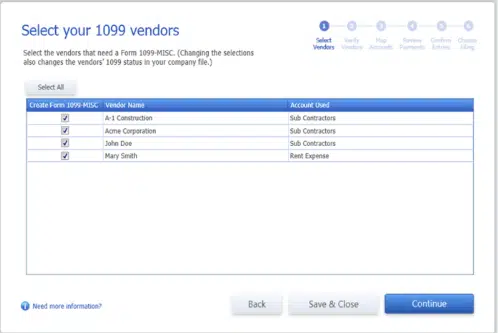
Step 1: (Choose Vendors) Opting for the vendors needing 1099 MISC forms
In this step, the QuickBooks 1099 wizard will show a list of vendors.
You are supposed to select these vendors that require 1099 MISC forms.
Once done with the selections, tap on Continue tab.
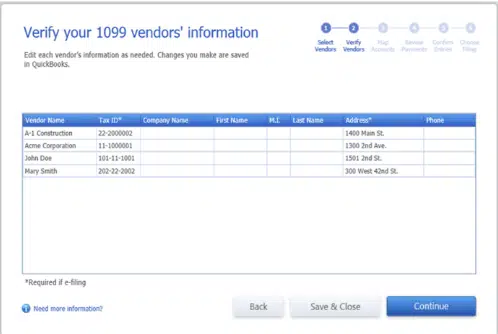
Step 2: (Verification) The vendor information needs to be verified
Now in this step, a table will appear on the screen, which allows you to Edit and Verify each of vendor's info.
The information that you will verify in this step will further be used in the forms.
Now edit the values by double-clicking on Cells in the table.
In last step, move to next step by pressing the Continue tab.
Step 3: (Mapping) Map the vendor payment account
Moving to this step, you have to ask QuickBooks where the amount paid from each account will appear in the form.
In order to map accounts or omit payment from 1099 MISC forms, you need to select from Apply payments to the 1099 box drop-down list.
Also you can select Report all payments in the box 7 checkbox, only if applicable.
In case a red-colored message box appears on the QuickBooks wizard screen, stating that the settings do not tell me the current IRS threshold, then you have to follow the below given steps:
Click on the hyperlink showing IRS 1099 MISC filing thresholds.
And then select Reset to IRS threshold.
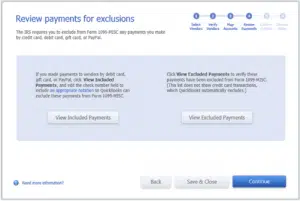
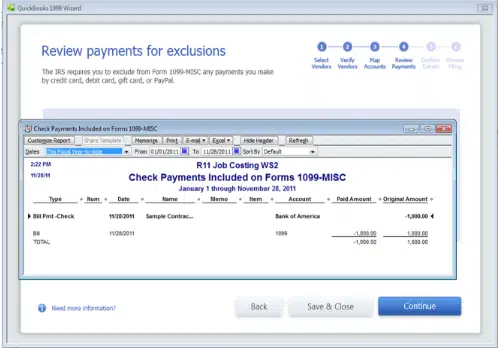
Step 4: (Reviewing) Check the payments for exclusions
As per the rules of IRS, it is supposed to exclude from form 1099, the payments just like a credit card, debit card, PayPal payments or gift card, etc.
If you have made any kind of payments via debit cards, gift card, or papers, then you will have follow the following steps:
Click on View included payment button.
Then Edit the cheque number field.
In order to include the proper notation for ensuring that the QuickBooks can exclude the payments from form 1099 misc.
For verifying the payments that have been excluded clicking the View excluded payment button will be helpful.
Step 5: (Confirmation) The 1099 entries should then be confirmed
Now comes the fifth step in the process, you will see a table on the screen that will permit reviewing the summary of vendors, for whom the 1099 MISC forms are created, and also the amount being reported for the provided calendar year. After that, you can easily review transaction details by simply double-clicking the Amount.
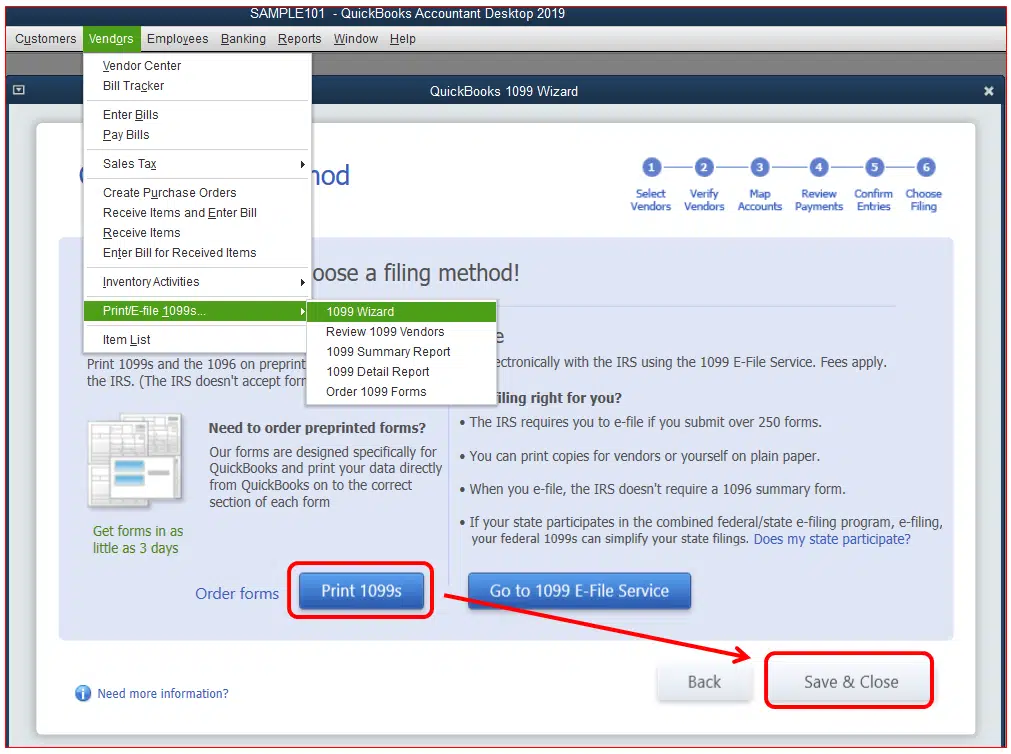
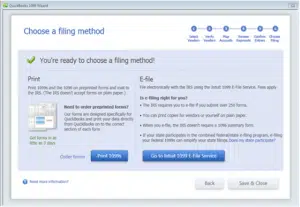
Step 6: Selecting a filing method
Here you need to select the preferred Filing method. There will be two available options you can see on screen:
Printed
E-filed
By selecting Print, you can easily Print 1099 MISC and also 1096 on pre-printed forms and mail them to IRS. However, in order to file electronically, another option of E-filing can be chosen.
Step 7: (Verification) The status of filing 1099 needs to be verified
Now, this brings us to the end of this process and final step. The following actions should be followed to check the status of the 1099s' filing:
To begin with, access the Tax1099 account and log in.
After that, tap the Plus sign.
Now check the Status check box
The reference number has nine digits.
You need to hit on Check Status.
Conclusion!
Filing the form is crucial part of your financial routine. Thus, ensuring that you create and file 1099s with QuickBooks desktop perfectly is essential. Hopefully, the steps above might have helped you in successfully creating and filing the form. In case of queries, we suggest you to reach out to our QuickBooks desktop support experts at 1-800-761-1787, and let them carry out the necessary steps for you and they will surely help you with your 1099s creation and submission successfully.
Learn how to Install and Use QuickBooks Desktop on Two Computers Simultaneously:
Many QuickBooks users have this query in their minds that whether they can install and use QuickBooks on two computers or not. Well, the answer to this query is 'Yes', but you might have to follow a proper procedure to do that. You can install and use QuickBooks desktop on two computers with the help of multi-user mode features. It not only saves time, but also increases the productivity of the business. If you have a large number of employees, then the multi-user mode feature can be way too effective for you and can help you in providing every employee random access to the software. The procedure to install and use QuickBooks software involves multiple steps, which we will be exploring later in this post, so make sure to continue reading the post.
However, if you are short of time and seeking professional assistance, then feel free to connect with our experts at 1-800-761-1787 and discuss the issue with our technical support team. You can speak to our experts and certified professionals anytime and ask them to Install and setup QuickBooks desktop on multiple computers for you.
Is it Possible to Install QuickBooks Desktop on Multiple Systems?
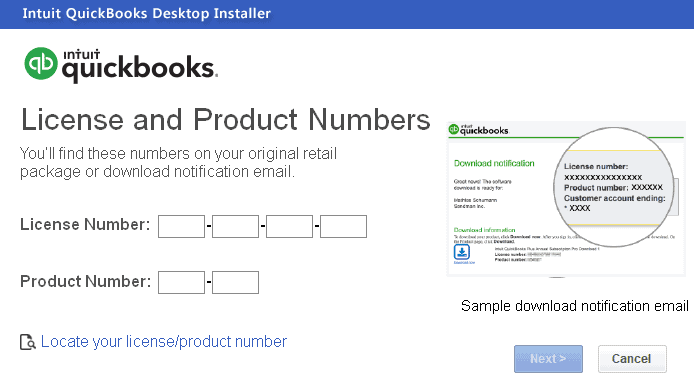
The answer to this query is YES, it is possible to install QuickBooks on multiple systems. You might require to install QuickBooks on multiple computers when the employees of the company demand random access to the software. As per the norms and regulations of Intuit, the QuickBooks user might install a single user license version on a system and also on a portable device, only when the user for both the devices are same.
Installing QuickBooks on additional systems, makes it mandatory for the user to buy additional licenses. It should be noted that you can only use up to five user licenses for QuickBooks pro and it comes with one license. The enterprise users have an upper hand in this case, as they have 10 licenses and permits up to 15 licenses.
You further need to revise the installation, location and other details.
And click on ok tab to complete the process.
Also, click on finish tab and you need to wait for the process to complete.
You will have to repeat the same process on all other system and enter the license number that you purchased for all other computers and you are good to go.
Steps to setup and use QuickBooks desktop on multiple computers
The steps involved in the process to install and use QuickBooks desktop on two computers are as follows:
Step 1: Setting up QuickBooks desktop
On a multi-user network, the system hosts the company files. It's the server system, and all other systems connected to the network that doesn’t host the company files are known as workstations.
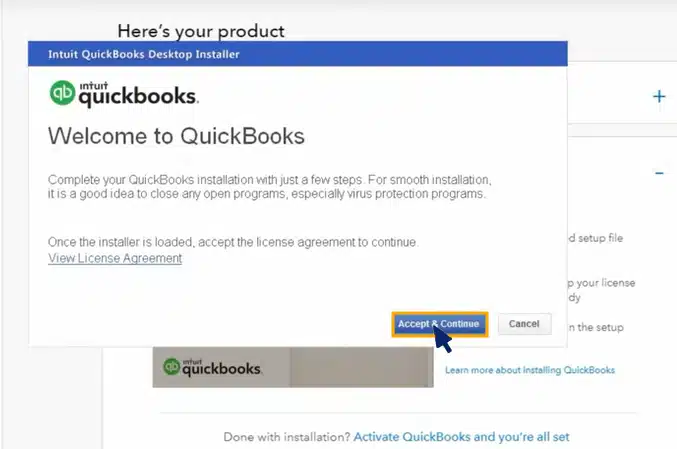
The first step is to Download and Install QuickBooks desktop on the server system.
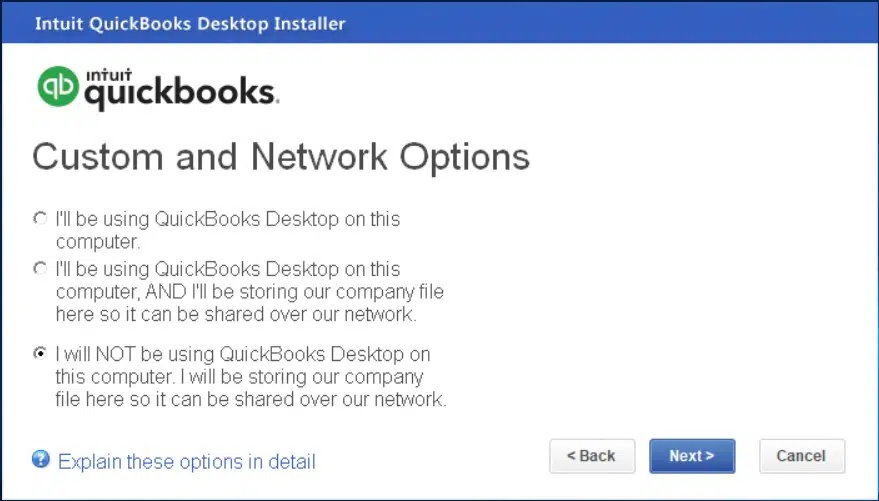
And then click on Custom and Network Install for the install type.
Next step is to click on I’ll be using QuickBooks desktop on this system option, And I’ll be storing… if you are having the required version of QuickBooks on the server system. Or if you merely wants the server system to host the files, then you need to click on "I will not be using QuickBooks desktop on this computer".
Followed by carrying out the on-screen instructions to complete the installation.
It is recommended to keep the QuickBooks company files on the server system’s local hard drive. It will be easy for you to share them over the network.
Map Network drive in window
In case you wish to put the files on a mapped network drive, then the below steps can be carried out.
At the time of mapping network drive in Windows, you can get entrance to a folder that is stored in another drive, server, or computer over a network. You can easily access files from the shared storage through mapping. The steps might vary for different Windows versions namely:
For Windows 8/10/11:
If you are a Windows 8/10/11 user, then perform the below given instructions:
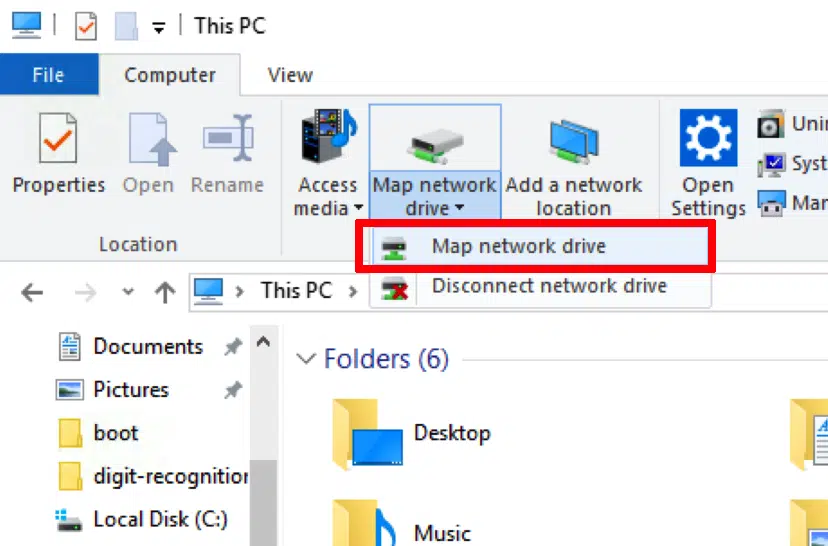
The initial step is to look for this PC option in a window search bar and then select This PC option.
After that in the Computer tab option, opt for Map a network drive option.
And then select any unused drive and select Browser.
Followed by moving to the Network location where the company file is situated.
And then click on OK tab.
And reopen the QuickBooks company file.
Step 2: Set or change folder permission
This step requires making some changes to the folder permissions. The steps for the same are as under:
You need to right click the Company file folder to select the Properties tab.
And then click on Advance and Security tab.
After that select QBDataServiceUserXX and then click on Edit option.
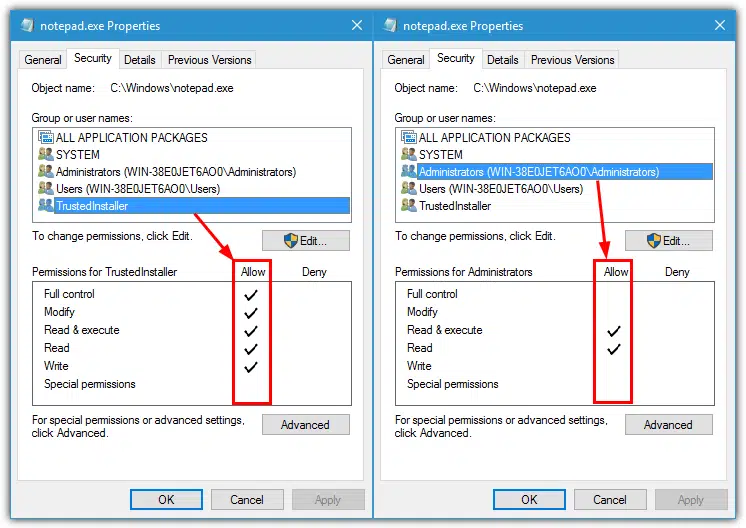
Ensure all given settings are allowed:
Traverse Folder/ Execute File
List Folder/Read Data
Read Attributes
Read Extended Attributes
Create files/Write Data
Create Folders/Append Data
Write Attributes
Write extended Attributes
Read Permissions
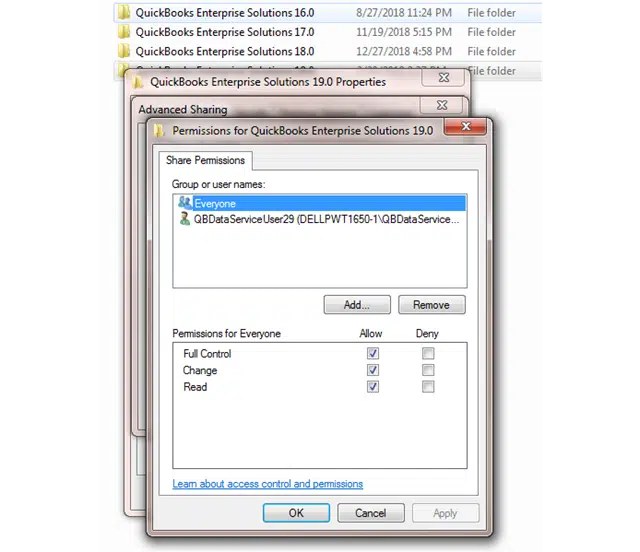
In case the permissions aren’t set properly, you can follow the steps below:
Right-click the Company file folder and Properties.
And then click on Security option and select Edit tab.
Select QBDataServiceUserXX and click on Full Control; after that, hit Allow tab.
The next step is to click on Apply option and hit the OK tab.
Change folder permissions
Open File Explorer.
And then, move to the parent folder and select Properties.
The point to be noted here is that you need to process these steps for every folder on the list, but all the folders may not apply to each installation as they apply to a particular version of QuickBooks.
The point to be noted is that if everyone option is not listed in group or username box, then you need to select Add and type in Everyone and select the OK tab.
Select Full Control and then choose Apply and OK tab.
After that, select Everyone and click on the Security tab.
And then click on Full Control and click on Apply and OK tab.
Setting Windows access permissions to share company files
You need to ensure that QuickBooks has the right access permission that can help stop future issues while working with the company files across the network:
Windows 10, 8 and 7
The first step is to click on Windows + E keys to open the File Explorer.
And then right-click the Folder having the company file.
Followed by clicking on the Properties option and then Sharing and share add options.
Next step is to select QBDataServiceUserXX that corresponds to the version.
Now set the Permission level to access Full control over the file.
Window 8.1
Select the Folder and select Share.
And then, move to the Advanced security, followed by selecting Change, Advanced and find now options respectively.
And after that, select User and click on the OK tab.
Grant full control
At first, choose the Folder and then the Share option.
After that, move to the Advanced security option and then Add and select a principal.
Next step is to click on the Advanced option and then the Find now option.
Moving ahead, select The User and click the OK tab.
Step 3: Installing the QuickBooks database server manager
You need to use QuickBooks database server manager to verify an existing setup. In order to scan the company file in the system where the file is stored. You need to ensure that the database server manager is installed in the system. This helps users in sharing company files with other systems over the network.
Step 4: Setting admin rights
Signing in with other users demands the account to have Windows admin rights, and the database server manager has admin rights.
Step 5: Using Database server manager
Once the QuickBooks database server manager is installed on the system to scan the folder having the company files, you will see the file in the QuickBooks company files found. After that, you can access the files in these folders via a network.
Step 6: Turning on Hosting
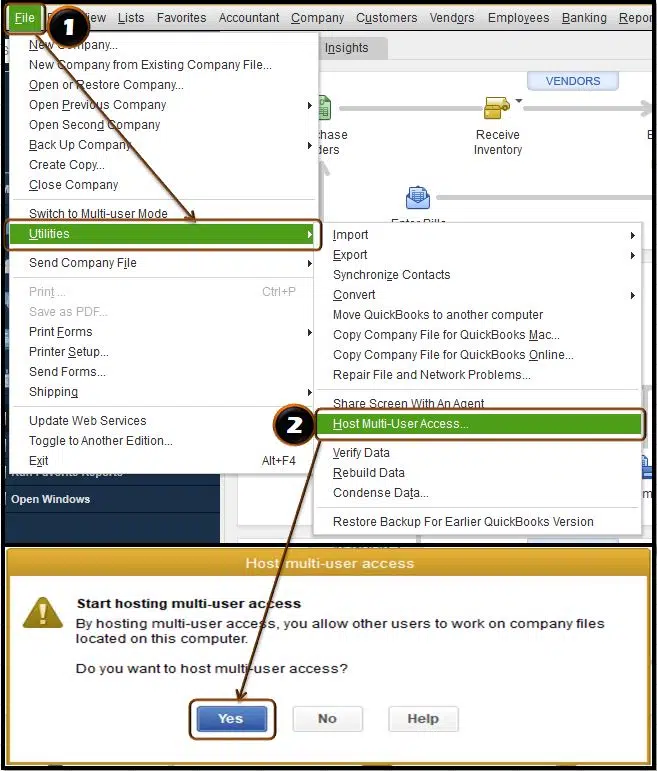
Now you need to turn on multi-user access on the server. You to ensure that the server system should be turned on. And then carry out the steps below:
At first, go to QuickBooks desktop and then move to File menu and select Utilities.
At first, click on Host multi-user access and Yes tab.
Now you can easily Host the company files through the network.
As you reach the end of this segment, where we expect that the information shared in above might be of some help in installing and using QuickBooks desktop on more than one computer. However, if you are unable to use the software even after following the above steps, or if you are facing some sort of error, then feel free to call us anytime and get in touch with our QuickBooks desktop support team via our toll-free number, i.e., 1-800-761-1787. Our experts and certified accounting professionals will be happy to help you.
FAQs
Can I install QuickBooks Desktop on two computers?
Yes! You have the freedom to install QuickBooks desktop on two systems. However, the only prerequisite is that you should have a multi-user license acquired for QuickBooks.
Can I use the same QuickBooks license on two computers in different locations?
Yes! You can conform to the use of the same QuickBooks license on two systems located at different places.
How can I share QuickBooks reports or data with someone on a different computer?
There are many ways of sharing QuickBooks reports or accounting data with a user on some other PC. You can go for exporting of the reports or file formats including PDF or Excel.
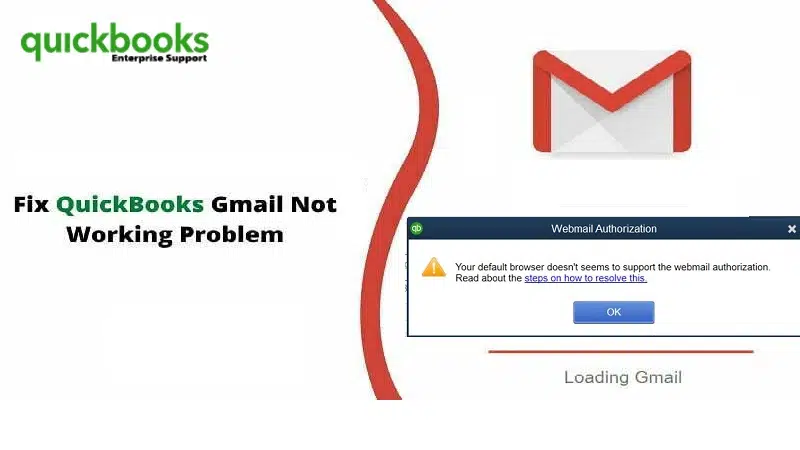
Did you know that you need to reauthorize QuickBooks desktop, in order to continue using Gmail? Well, this isn’t only for Gmail, you also have to do the same for Outlook. Reauthorizing simply means avoiding an error that might show up stating QuickBooks unable to send emails due to network connection failure. Not many of you might know, but Google and Outlook have recently made certain changes that lead to this particular error, especially when sending an email from QuickBooks desktop. In such a scenario, it become crucial to reauthorize the account, in order to continue using the webmail apps with QuickBooks without any glitch.
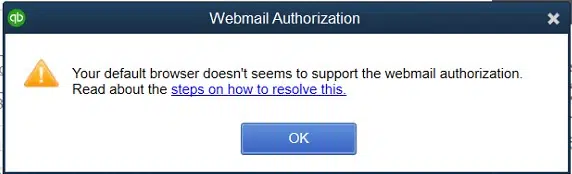
Google usually keeps rolling out with new updates and amends its policies occasionally. Lately, it has revised its privacy statement. By November 11, 2019, any software that makes use of the Google data must be authorized to ensure that it complies with Google's policy. You'll notice a message stating that "The app is not verified if it isn't reauthorized" or "Webmail Authorization - The default browser doesn't seems to support the webmail authorization".
While this might seem to be a bit tricky, but it actually involves some basic steps. To help you figure out what reauthorization is all about, we are here with this segment sharing some quick steps. Although the procedure should be easy to implement for the majority of QuickBooks users, some might find it slightly technically difficult to perform. In such case, don't hesitate to call the QuickBooks desktop experts team and let them perform the steps to make your work easier.
Steps to reauthorize QuickBooks to use Outlook and Gmail
To keep using Gmail, there are certain steps that you need to follow to reauthorize QuickBooks to keep using Outlook and Gmail. But before that, you need to update QuickBooks to the latest release, if you do not have one. Here is how you can download the latest QuickBooks update.
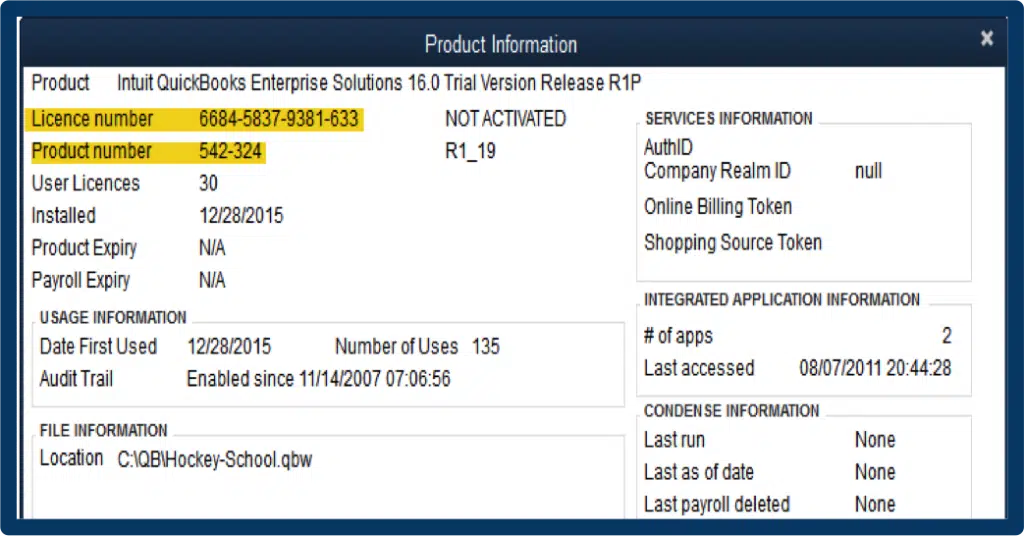
Solution 1: Check if you have the latest release of your QuickBooks desktop
Open the software.
And further, click on F2 key.
This will open the Product information window for you.
You now have to check your current version and release.
And further see the latest release available.
Solution 2: Install the update
You need to choose the update available and go for install now tab, in order to install the update.
Once done with that, you need to wait for the update being installed.
This might take sometime to get your update installed.
After your update is installed, make sure to open QuickBooks and check for the same.
Steps to authorize or reauthorize QuickBooks to keep using Gmail
After you have installed the update for QuickBooks, you need to proceed by opting for Email from any open transaction or report in QuickBooks.
Once done with that, you simply need to opt for Send.
You will be prompted to log in using the Intuit credentials, make sure to do that.
After this, you need to choose the Continue tab, after the webmail authorization window opens up.
The last step here is to choose Allow tab and you are done with the process.
Quick note: There isn’t any need to change any default permissions set by Microsoft.
After you perform the steps above, the reauthorization process comes to an end. While the process might sound a bit complicated, there aren’t much to perform in the process.
Troubleshooting Webmail Authorization Error in QuickBooks Desktop
Checkout the following DIY solution methods to fix webmail authorization errors in QuickBooks desktop:
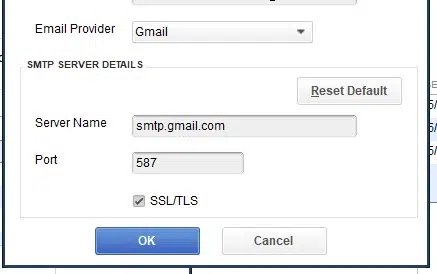
Solution 1: Set your email preferences
At first, select Email from a report or some open transaction in QuickBooks.
After that, select SendForms option then enter your Intuit login information.
Now hit on Continue, on the Webmail Authorization window.
Here you will need to Log in with your Gmail account information to continue.
Next, click on Allow button once you have logged into your Gmail account.
You need not to uncheck the Google default permissions.
Note: Once you've clicked on Allow, your QuickBooks will now able to send emails using your Gmail account. Close the Google Chrome window. You will also need to click on OK in the Preferences pop-up to save your all changes you have made.
Solution 2: Update QuickBooks desktop to the latest version
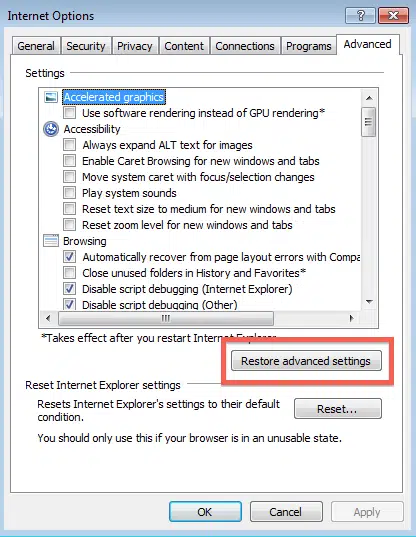
Solution 4: Set Google Chrome as your default browser
Under this solution, press the Start button and Programs folder.
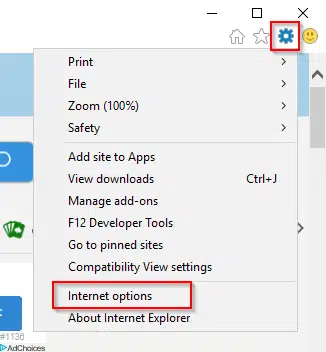
After then, double-click on Internet Explorer icon to launch it.
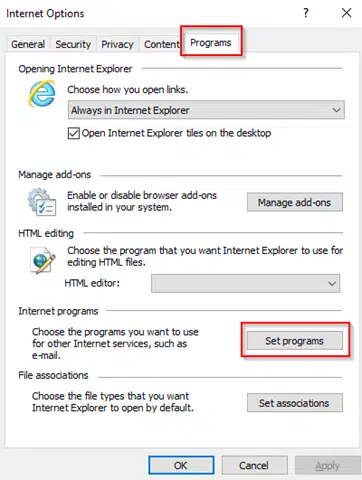
Then click on the Settings icon and tap on Internet Options.
In the next step, select the Programs tab and then choose Set Programs option under the Programs section.
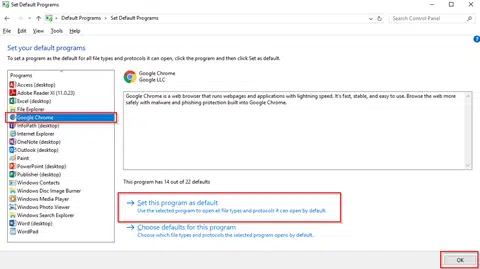
Here you need to click on Set your default programs.
Next step is to choose Google Chrome from the list of programs.
Also, click on Set this program as default and tap on OK.
Winding Up!
Reauthorization process isn’t that complicated to handle, especially when you have found the right steps that can work for you. With this segment, we have tried to provide you with the actual steps that you can perform to reauthorize QuickBooks desktop to keep using Gmail and fix Webmail authorization issues in QuickBooks desktop. The steps are valid for Outlook as well, and no separate steps are needed.
However, if this doesn’t work for you, then you definitely need assistance from certified QuickBooks error support experts, who will help you with the smooth reauthorization of QuickBooks. All you can do is to ring us up at 1-800-761-1787., and your queries will definitely be addressed by our technicians in no time.
FAQs
What is the need to reauthorize QuickBooks desktop to use Gmail?
QuickBooks should be reauthorized with Gmail since this enables email functionality in QuickBooks. Users can send invoices or reports directly via QuickBooks.
Will reauthorizing QuickBooks Desktop affect my existing Gmail settings or emails?
No! Reauthorizing QuickBooks Desktop to use Gmail has no effect on the Gmail settings or emails.
What should I do if the reauthorization process fails or encounters an error?
In case the reauthorization fails, follow the steps below: 1. Ensuring that the net connectivity is seamless. 2. Typing in the correct credentials when reauthorizing QuickBooks to Gmail. 3. Clear the web browser cache and cookies.
As company file tends to be a crucial element of your QuickBooks software, moving it either to another folder, or to another computer all together might seem be a bit complicated task. If you want to move your company files around, then the easiest way to do that is to create and restore a backup of the company file. This not only saves your data, but also the supporting files. All you have to do is to copy and paste the entire QuickBooks folder to completely new location. To help you in moving QuickBooks company files to another computer, we have curated this quick guide sharing the core steps that you can perform to successfully move your company files to another location.
Let us together find out what moving or migrating QuickBooks company files to another system looks like. In case you use QuickBooks desktop as a single user, then you can simply move it using the migrator tool. To know more about how to move company files in QuickBooks from an old computer to a new one, make sure to read this article carefully till the end.
Steps to move your company files to another computer
Here are the steps that you can follow to move your company file to another location. However, note that moving the company file to another computer doesn’t affect the product license.
Steps to move your company file to another location on the same system
If moving the company file to a new location is your motive, then here are the steps that might help you.
The very first step is to perform the onscreen steps to create a backup company file.
Followed by giving it a unique name, which makes finding it easy.
After that, save the backup and carry out the steps to restore the backup to the new location.
Once you have restored the backup, use it as your new main company file and rename it to original one.
Steps for moving your entire QuickBooks data folder
If backing up the company file isn’t something you want to do, you have an option to simply move the QuickBooks folder in total. Here are the steps that can help you move the QuickBooks data folder:
Start by opening the QuickBooks software and further the company file you wish to move.
Now, click on F2 key and this would lead you to Product info window.
After which, you need to look in the file information section and this would show where your company file is saved.
The next step is to open the Windows start menu.
And then, go for File explorer.
Also, choose the folder having the company file and right click on the same.
Go for Copy option.
And then, open the External device that you are using to move the files.
The last step is to Paste and you are good to go.
This will give you a copy of the entire folder and you can move it to another location or computer as per your choice.
Before moving forward, keep in mind that your Intuit data protect plan might not include the backup of non-QuickBooks files. Here are the steps that you can perform to restore with Intuit Data Protect.
Perform the steps to create a backup of the company file on your system.
Further, you need to sign in to Intuit data protect.
Perform the onscreen steps to restore the backup file with Intuit Data Protect.
What types of file types can be moved?
Here are the files that are transferred and restored:
File types inside the QuickBooks data folder that can be moved to another computer
Logos and images files
Transaction log (.tlg) files
Network data (.nd) files
Cash Flow Projector (.cfp) files
Loan Manager (.lmr) files
Business Planner (.bpw) files (QuickBooks Desktop Premier and Enterprise only)
Your company file in QuickBooks stores the sensitive data and in case you performed some incorrect procedures to move the file, you might end up in data loss. In that case, all we recommend is to reach out to a team of professionals, who are experienced technicians and can help you with the smooth migration process. For more information about moving QuickBooks company files to another computer, you can ring us up at 1-800-761-1787, and let our QuickBooks desktop support team help you with your queries.
FAQs
Can I transfer QuickBooks company files over a network instead of using external storage?
Yes! You can transfer QuickBooks company files over a network if both the source and destination computers are connected to the same network.
What should I do if the QuickBooks company file is too large to transfer easily?
Go with the following suggestions in case the company file is too large to be transferred. 1: Compress the company file. 2: Use a file transfer service. 3: Transfer the file using an external storage device 4: Use QuickBooks Online to use the cloud storage.
Is it possible to transfer QuickBooks company files from a Mac to a Windows, or vice versa?
Yes! The steps for transferring the company files from Mac to Windows are: 1: Convert the company file to make it compatible. 2: Transfer the converted company file. 3: Install QuickBooks on the new computer. 4: Restore the converted company file. 5: Finally, verify the converted data.
There are different types of networks that one can make use of for running QuickBooks desktop. This article unravels a long list of networks one can choose from. It should be noted that Intuit support team won’t be able to provide assistance beyond QuickBooks configuration to networks other than the recommended ones.
Go through the entire article to get a better insight into the recommended networks for QuickBooks Desktop. However, if you want to speak to our team professionals, then in that case, reach out to our team professionals and let them resolve all your queries immediately.
Recommended Networks
Network type
Brief Description
Local Area Networks
Networks that have at least 40 MBPS transfer speed (bandwidth), either a workgroup.
Terminal Services
All versions of QuickBooks desktop can run under terminal services. However, intuit provides troubleshooting assistance only for QuickBooks Desktop Enterprise. See Intuit support limitations for QuickBooks desktop on a Microsoft Windows Terminal Server for more information.
Cloud hosting
Third party companies host your file which you access over the internet.
Having a server in a domain and your workstations in workgroup/s can work, but you must have your authorizations set up correctly.
Networks that are NOT recommended
Network Type
Brief Description
Remote Area Network
Gives remote users access using analog modems or Internet Subscriber Digital Network connections from the host computer's modem.
Wide Area Network (WAN)
Computers are connected over long distances using telephone lines and satellite communications.
Virtual Private Network (VPN)
Connects computers over long distances via the Internet using an encrypted tunnel.
File Transfer Protocol (FTP)
Copies files from one location to another. Intended to move files and not to open them.
Network Attached Storage (NAS)
A device connected to a network that only provides file storage for other devices on the network. These devices do not have full computer functionality which QuickBooks requires.
Virtual Servers/Virtual Machines
Mac M1 won't work on a virtual network.
After reading this article, the user might be able to learn the most significant information related to recommended networks for QuickBooks Desktop. However, if there is any sort of query, then feel free to contact our QuickBooks enterprise support team professionals right away at 1-800-761-1787. Our team will ensure to come up with the best possible support services instantly.
FAQs
What is LAN?
LAN connotes Local Area Network. It is a network that allows multiple computers to connect over a network in a specific region.
What are the benefits of using cloud hosting in QuickBooks?
Cloud hosting aids users in accessing QuickBooks from anywhere using an internet connection.
What to consider while opting for a host provider for QuickBooks?
When opting for a host provider in QuickBooks, users should consider different aspects. These encapsulate different security measures, backups, prices, support services, and compatibility with the installed version of QuickBooks.