Learn how to troubleshoot the QuickBooks update error 1625 (This Installation is Forbidden by System Policy):
QuickBooks error code 1625 is usually seen during installation of the program. This error may also annoy you if some Microsoft Corporation-related program running in the background, such as Windows installer. Moreover, intuit releases latest update of QuickBooks which makes the error even more frequent. This error usually appears with a message on your screen that states:
This installation is forbidden by system policy that occur when installing or updating QuickBooks.
This issue can also be encountered when the system starts or the windows shut down, or also at times when the windows working framework is being installed. QuickBooks software can also fall into some issues that can interrupt the workflow. If you are also facing such an error, then reading this article will assist in fixing the QuickBooks error code 1625 successfully. Whereas, if you don’t want to fix the issue on your own, then in that case, you can contact our team professionals for any further assistance.
What Does QuickBooks Error 1625 means?
Few users have reported that they have encountered this error when they were trying to install Windows but there is any security policy was being enabled on the system. Also, you might be possible to stumble upon such an error if any tool is accessed by you that can only be accessed by using admin credentials. In this article, we will be talking about the QuickBooks error 1625, the factors that trigger it, along with the quick solutions in detail. So, to know more make sure to read the article carefully till the end.
Situations when you face such an error
This error can be seen in the following situations, let us have a look:
At the time of installation of working framework.
Also, during opening or shutting down of Windows.
Another situation can be a Windows installer and software alike are processing in the background.
What are the factors causes QuickBooks error 1625?
You might end up in this error due to the following reasons, namely:
In case any of the files related to Windows installer got deleted by any other program.
If the Windows Registry is corrupted due to changes made to the Windows installer programming.
In case of any malware that damaged Windows registry units, framework records or installer-related program files.
Another reason can be, when the installer prevents you from programming refreshes.
If the Windows installer framework gets corrupted/damaged or you may have not logged in as admin.
Other external programs have erased Windows installer records.
Quick Methods to Fix the QuickBooks Update Error 1625
There can be a handful of methods that can be adopted in order to get rid of the QuickBooks error 1625. Let us explore each of the methods one by one:
Method 1: Verifying Obsolete gadget drivers
In case you use a wrong drive, then it will provoke the issue. In order to fix this issue, you can verify the obsolete gadget drivers in QuickBooks. The drivers can work one day but all of a sudden they work the following day. All that is required is to refresh the drivers and also check them that they are used correctly. In case any incorrect driver is being used, it might lead to such an error. It is recommended to use the driver doc to refresh the gadget driver’s major part. This process will help in enhancing the overall functioning of the drivers and improve the working by resolve the errors.
Method 2: Configure your Windows settings
The steps involved for configuring the settings of your Windows are different for Windows vista 7, 8, 10 and Windows XP. Thus, make sure that you carefully carry out the steps below:
For Windows vista 7, 8, or 10
The Windows vista, 7, 8, or 10 users can carry out the below steps:
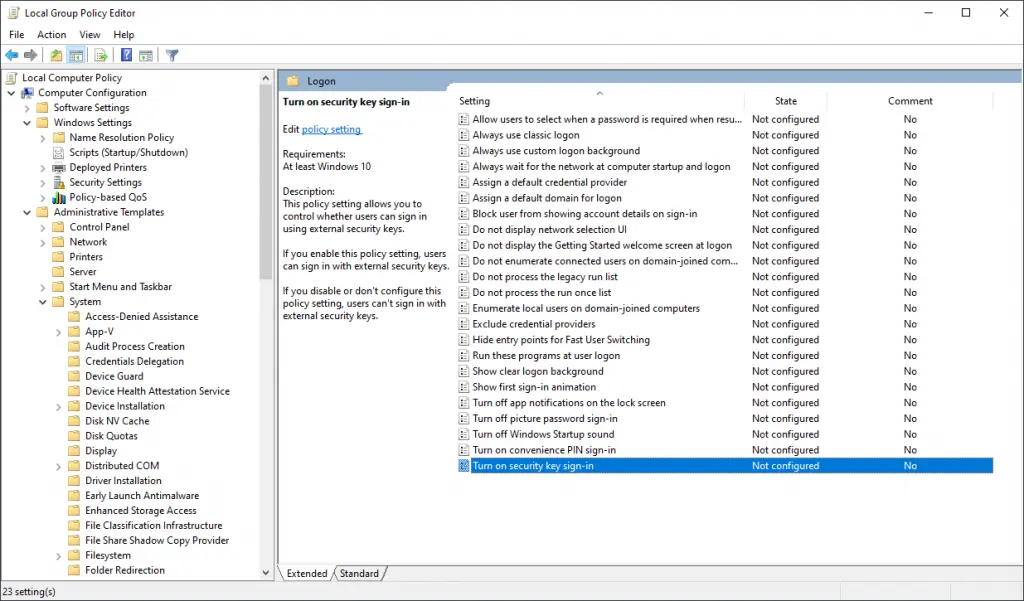
First of all, move to the Run window by pressing Windows key + R keys.
And then, type gpedit.msc and click on OK tab.
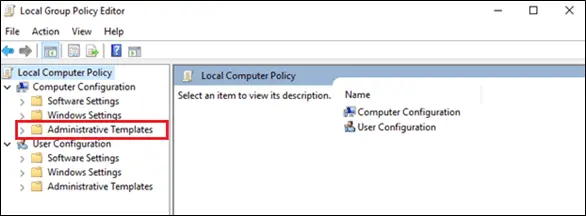
Move to the local computer policy window and then click on Computer configuration.
Now you should move to the Administrative templates.
Once done with that, move to the Windows components and click on Windows installer.
After that from applying vendor-signed updates, double click on prohibit non-administrators.
The last step is to move to the Disabled option and click on OK tab.
For Windows XP
In case you are windows XP user, then the below steps would be the most suitable ones for you:
Move to the Start tab on the taskbar and also choose Run.
After that type gpedit.msc in the run window and click on ok tab.
Now move to the Local computer policy window and click on the Computer configuration.
After that navigate to the Admin templates.
Followed by moving to the Windows components and click on the Windows installer.
Now from applying Vendor signed updates, double click on Prohibit non-administrators.
And lastly navigate to the Disabled option and hit OK tab.
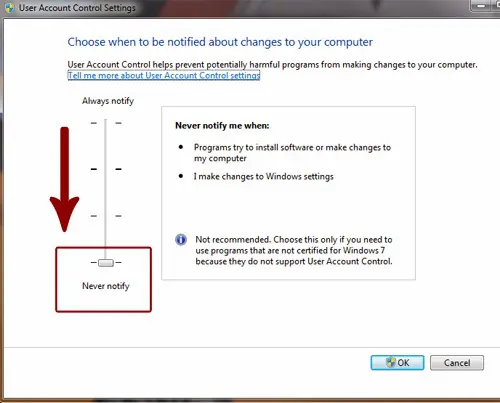
Another method to try out is to change the UAC settings or configure them. The steps involved in this procedure are as follows:
The initial step is to navigate to the Start menu.
Followed by typing in MSCONFIG in the search bar and also hit Enter key.
Next step is to hit a click on Continue tab if the UAC window prompts.
Now move to Tools and then highlight the Change UAC setting and click on Launch.
It is then required to select Never notify.
Followed by restarting the system if prompted to.
Method 4: Configuring software restriction policy
If the above methods didn’t work, then try configuring the software restriction policy, as this might resolve the error up to a great extent. The steps to be followed in this are:
Firstly hit a click on Start tab and move to the Control panel.
After that, open Admin tools and move to the Local security settings.
Next step is to opt for the Software restriction policies.
Followed by hitting a right click on the Software restriction policy node if here is No software restrictions policy defined.
After that hit a click on the New software restriction policy.
You are then required to double click on Enforcement.
Now it is required to move to the All users except local admin and hit OK tab.
This is the last method that one can opt for in order to fix the QuickBooks error code 1625. The steps to be followed here are:
In this method, you need to click on Start tab.
And then type in command in the Search bar, also avoid pressing enter key
Next step is to press Ctrl and shift on the keyboard and also hit Enter tab.
Also, you need to click on Yes, when the permission dialog box.
After which a black box will be seen on the screen with a blinking cursor.
Where, you need to type regedit and hit Enter key.
Select Export in the File menu.
And also type a name for the backup file in the file name box as Windows installer backup.
See that you must select the Selected branch and then Export range box.
Next, select Save tab and after that save the file with .reg file extension.
Towards the end, you will have the backup of the windows installer.
Conclusion!
QuickBooks error code 1625 becomes easy to resolve once the above steps are followed. It is believed that the above stated methods and steps would be enough to fix the error. But if in case you stuck at any point of time, or if you need any sort of technical assistance, then in that case we would recommend you to get in immediate touch with our 24/7 QuickBooks enterprise technical support team at 1-800-761-1787. Our team of certified professionals will ensure to assist you with immediate technical assistance.
FAQs
What is QuickBooks Error 1625?
Error 1625 is an install error in QuickBooks.
What error comes with QuickBooks Error 1625?
The error shows up as “This installation is forbidden by system policy that occur when installing or updating QuickBooks”
What are the causes behind Error code 1625?
This install error is caused generally due to Windows Registry errors, damaged installer, QuickBooks files being deleted.
Learn the hassle-free procedure to upload a QuickBooks company file to Intuit:
Are you planning Planning to upload or download a QuickBooks desktop company file to Intuit? If that is the case, then going through this piece of writing will surely be of some help to you. Keep a note of the fact that Intuit needs to get customers' company files so as to gain the information to rectify any technical snags. This article will provide you with sufficient information in the form of convenient steps to upload a QuickBooks Company file to Intuit. So, keep diving in!
However, if you are skeptical of performing the steps listed in this section manually, then get on a call with our U.S-based technical professionals using our customer support line i.e., 1-800-761-1787, and let our technocrats handle the issue on your behalf. With our certified experts, you will get the most relevant answers to all your queries. Let's jump onto the easy process to upload a QuickBooks company file to Intuit.
Procedure to Upload the QuickBooks desktop company file to Intuit
The QuickBooks users need to follow certain steps in order to upload the data file. The steps involved in this process are as follows:
At first, you need to create a backup of the QuickBooks desktop data file. The fact to be noted here should be that if you are unable to create a backup (.qbb), then you need to use the regular company file (.qbw) to upload.
Once done with that, open a web browser and then sign in to https://intuit2b.secure.force.com/FileExchange. (The URL is case sensitive). Now, make a note that when an unsupported browser is being used, then you need to sign in button will be grayed out.
The next step is to ensure that you enter the Case, email, and PIN provided to you by the agent.
Followed by accepting the Terms of service and then choose the sign in option.
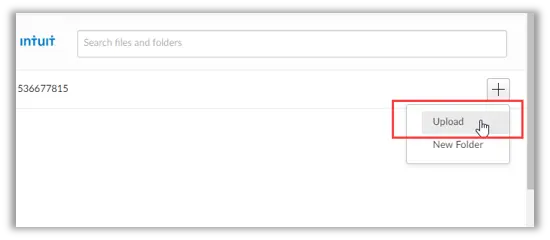
After that, choose the + tab to the right of the case number and then click on Upload option.
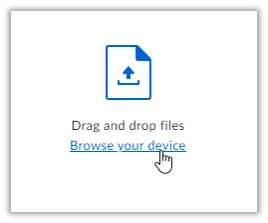
Now, choose the Browse your device to look for and select the File. (You can also drag and drop the files here).
Important: The point to be noted here is that uploading a file with the same name as the existing file will overwrite the original file. Thus, it is recommended to create a separate folder in the box instead.
Next step is to go for Upload to start with the uploading process.
After the files are uploaded successfully, you are required to select the Close tab to exit.
The point to be noted here is that, until and unless advised by Intuit, you need not to enter any information into the file, till the time repaired file is not returned.
Steps to recover the repaired data file (download the data file)
After you are aware of the steps to upload the QuickBooks desktop company file to Intuit, it is time to retrieve the corrected data file. Below are the steps that you need to follow:
Step 2: Enter the Case number, Email address, and PIN. The important point to consider here is that the PIN is case-sensitive. In case you have forgotten or misplaced the PIN, then you can contact us.
Step 3: Ascertain to Accept the terms of service and then opt for the Sign-in tab.
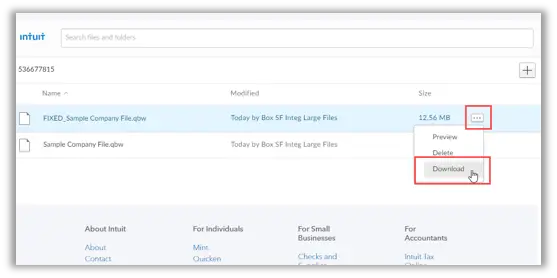
Step 4: Followed by spotting and locating the file. (The file should be renamed by FIXED_added to it.)
Step 5: Choose the three dots (…) button, along with selecting Download option from the drop-down menu.
Step 6: Next, it is supposed to browse the location where you wish to save the file.
Step 7: Now, select Save.
Step 8: In case the Readme.docx file is available, then download it. The file carries information that are required to start using the repaired file. Now save both the data file and then Readme.dox in the location where you wishes to store the file. This needs to be done in order to avoid getting the data compromised or any unexpected results.
Step 9: If you are accessing the file over a network or on the server, then you need to restore the file locally first before saving it in the location where it is being hosted.
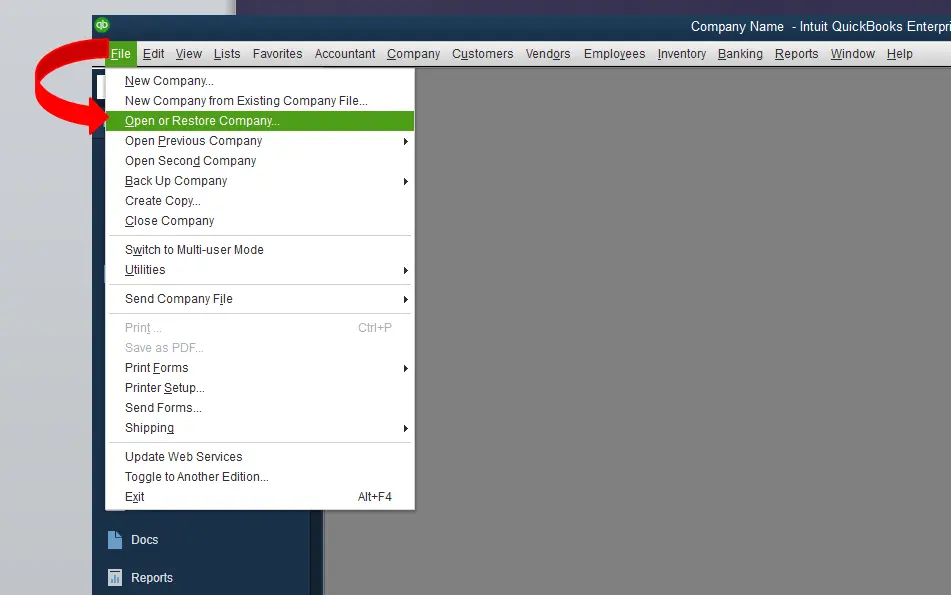
Step 10: The final step in this process is that the data file may have the extension as .qbb, which denotes a backup company file. You might need to convert the downloaded backup company file to the full company file.
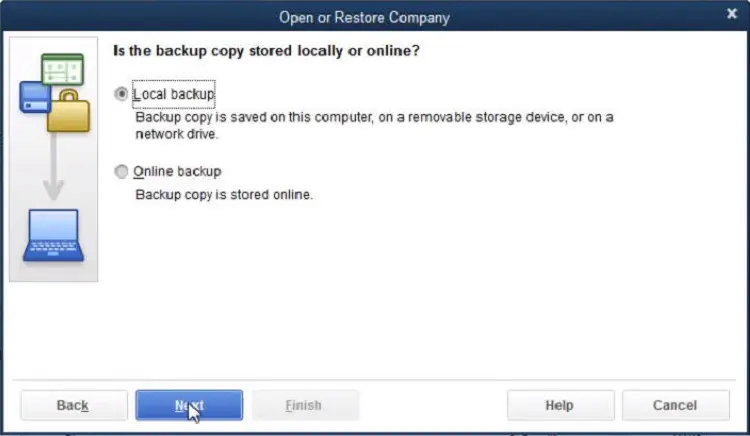
This can be done by moving to the File menu in QuickBooks, and then choose Open or restore company.
Also, opt for the Restore a backup copy and then hit Next tab.
Now, pick the Local backup option along with clicking on Next.
Browse the system for the Backup company file. And it would look like: [Your company name].qbb
Next, you need to choose a folder to decide where to save the restored company file and then click on Open tab.
Once done, you should opt for Save tab and in case any message is seen related to overwriting the data, then it is recommended to select the option that best fits the needs. You are suggested not to overwrite anything unless required.
The above scribbled steps are enough to successfully download and upload QuickBooks company file to Intuit. However, if you are stuck somewhere at any stage or if you have any queries, then give us a call right away at 1-800-761-1787. Our U.S based QuickBooks desktop support team is available 24/7 to offer the best possible assistance for all sorts of QuickBooks-related issues.
FAQs
Are there any file size limitations when uploading or downloading QuickBooks company files to Intuit?
Yes! Intuit puts a certain cap on the company file size while uploading or downloading the company files. The file size limit for the company files is 350 MB when uploading and 3 GB when downloading.
Are there any specific requirements or compatibility considerations when uploading or downloading QuickBooks Desktop company files to Intuit?
Some requirements to be taken into consideration when uploading or downloading QuickBooks Desktop company files to Intuit are: 1. The QuickBooks desktop version should be supported by Intuit. 2. Verifying that the Intuit account possesses all the permissions for accessing and managing the client files. 3. Checking the system requirements and compatibility for Intuit.
Can I upload a QuickBooks desktop company file to Intuit if it is password-protected?
Yes! Password-protected company files can be uploaded to Intuit.
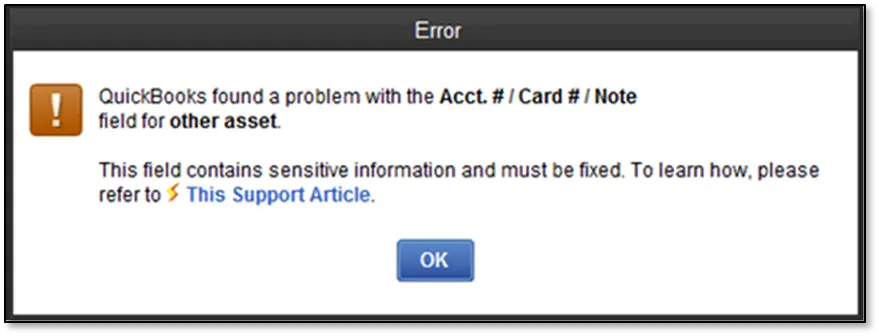
Have you stumbled upon an error message “QuickBooks found a problem with the Acct.#/Card #/Note field for other asset” while working on the QuickBooks desktop? Need not to worry, this article will answer all your queries related to this problem. In case an error message appears while running the verify data utility, the QBWin.log file will show the following:
Error
“DMEDLEditListElement.cpp (127) : CHECKPOINT: 6204: Tue Mar 19 14:24:07 Decryption error in [Record Field Name] for '[Error Displayed Name]': Failed. The decryption has failed.”
Error
QuickBooks found a problem with the Acct. # / Card # / Note field for other asset.
This error can be seen by the QuickBooks 2013 R7 users while:
If you're a sufferer of this issue, be sure to keep following this blog until the very end. However, if you are in a hurry, there is a way to contact our support team by calling our dedicated U.S support number i.e. +1-800-761-1787. Our experts will be delighted to permanently resolve this issue for you.
Fields that show up in the QBWin.log file
Accounts
Record Type: Accounts
Record Field Name
Error Displayed Name
Bank
Bank Account No
Account Bank Number
Bank
Routing Number
Account Routing Number
Income
Note
Account Bank Number
Expense
Note
Account Bank Number
Fixed Asset
Note
Account Bank Number
Other Current Liability
Account No.
Account Bank Number
Other Current Liability
Routing Number
Account Routing Number
Credit Card
Credit Card Acct No.
Account Bank Number
Equity
Note
Account Bank Number
Accounts Receivable
Note
Account Bank Number
Other Current Asset
Account No.
Account Bank Number
Other Asset
Account No.
Account Bank Number
Accounts Payable
Note
Account Bank Number
Long Term Liability
Account No.
Account Bank Number
Cost of Goods Sold
Note
Account Bank Number
Other Income
Note
Account Bank Number
Other Expense
Note
Account Bank Number
Non-Posting
Note
Account Bank Number
Customers
Record Field Name
Error Displayed Name
Credit Card No.
Customer: Job Credit Card Number
Resale No.
Employees
Record Field Name
Error Displayed Name
Social Security No.
Employee Social Security
Date of Birth
Employee DOB
Vendors
Record Field Name
Error Displayed Name
Vendor Tax ID
Vendor Tax Identification Number
Important Points to Remember
There are certain pointers that you can’t afford to miss. Some of the most important ones are listed below:
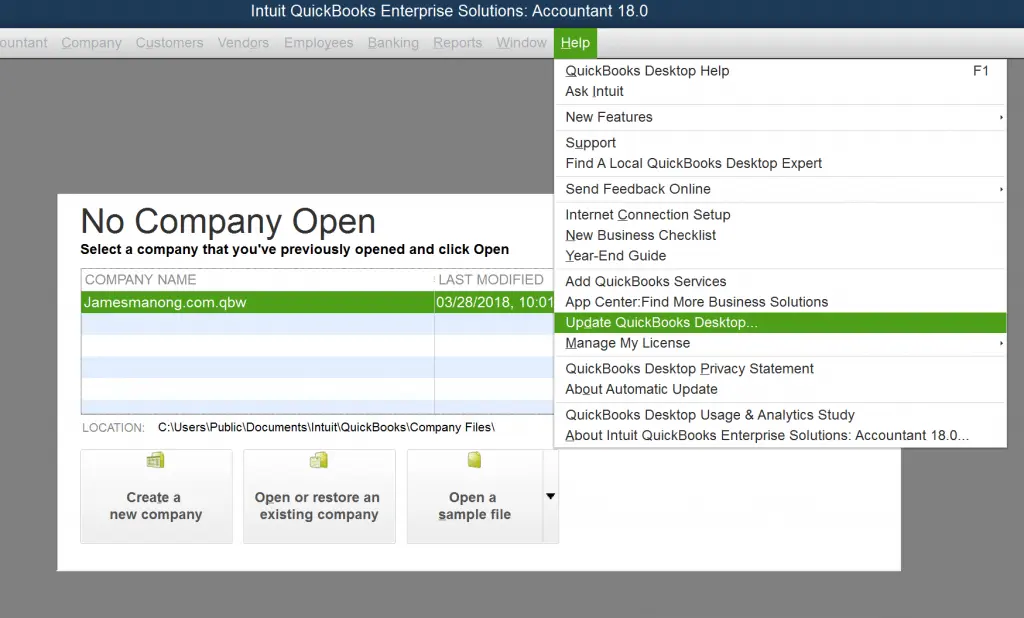
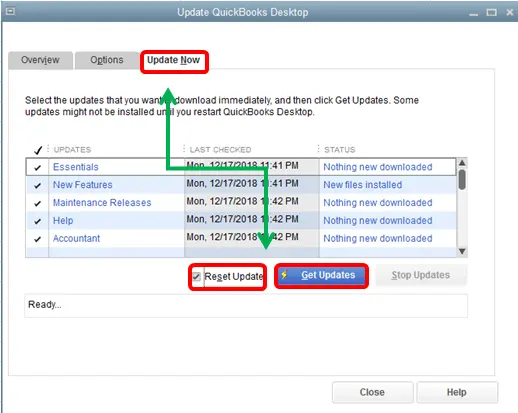
One can set up automatic updates, by moving to the help menu and then selecting Update QuickBooks desktop.
Followed by, moving to the update now tab. It is recommended to select the reset update checkbox to clear all previous update downloads.
Now select get updates to start the download.
After the download finishes, you are recommended to restart your QuickBooks desktop.
Followed by accepting the option to install the new release.
It is also recommended to create a backup before performing the steps ahead.
In case you get the error while using QuickBooks, or if the error gets displayed in the QBWin.Log, then it is recommended not to run rebuild. And carry out the steps ahead.
Methods to resolve Verify Error: QuickBooks found a problem (Encrypted Errors)
There are a couple of methods that could resolve the QuickBooks found a problem with the Acct #/ Card #/ Note field for other asset error. Let us check out the methods one by one below:
Technique 1: Checking for a damaged admin user
The very first method is to check for the damaged admin user. This can be done by following a couple of steps, which includes the following:
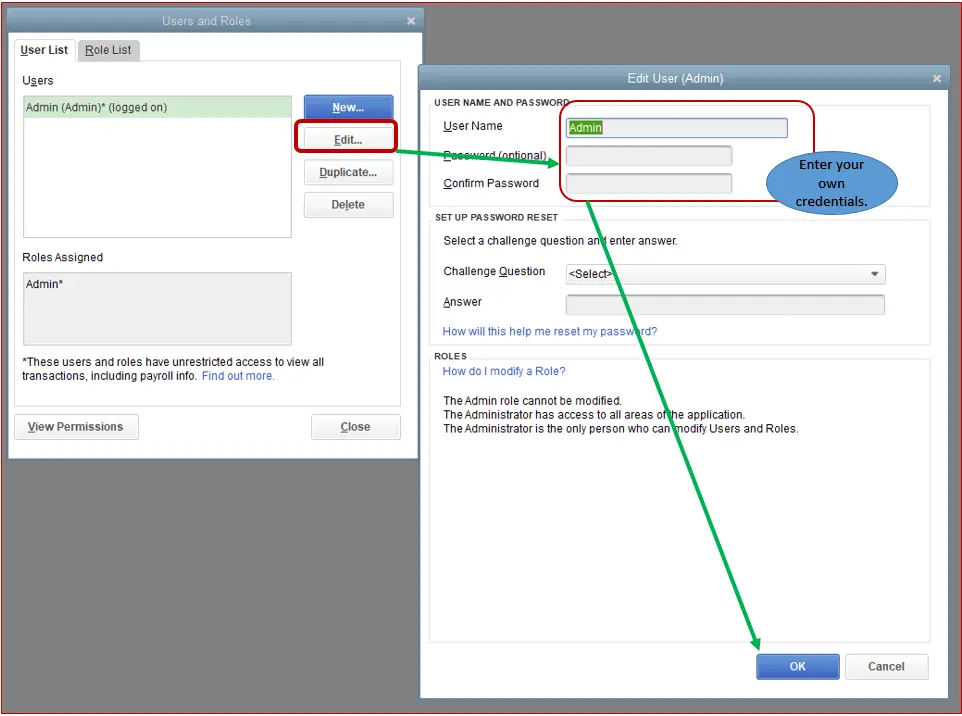
Start with logging in to the company file as the QuickBooks admin.
From the company menu:
The Pro/Premier user needs to opt for the set up the users and password and then hit a click on the setup users option.
Enterprise users can opt for the users and then select the set-up users and roles.
Head forward by selecting the built-in admin user and then clicking on the edit user tab.
Next, change the admin password to a temporary password such as TEMP123.
After that, hit the next and finish tabs, respectively:
In case QuickBooks crashes while encrypting the file, you need to restore the backup and follow the other solution.
However, if the encryption process completes, then you need to try to do the QuickBooks process that triggers the initial error.
Technique 2: Manually editing the information
After you are done with above method, if you continue to face the issue, then it is recommended to manually edit the information. This can be done by carrying out the steps jotted down:
To begin with, you need to edit the account, customer, employee, or vendor referenced in the warning or QBWin.log
Once done with that, you need to delete the information in the field and then make it blank. In simple words, you need to clear the field.
In case the information in the field appears to be correct, then you need to note down the information and then only clear the field.
If the information is not present i.e. no information in the field, then in that case, you are required to highlight the field and then clear the field.
The next step in the process is to hit a click on Ok tab.
Move back and edit that same account, customer, employee, or vendor.
Later, you need to re-enter the appropriate information in the field name.
Now hit a click on the OK tab.
Lastly, make sure to repeat the steps from 1 to 6 for each name where the warning message was seen or QBWin.log file.
Our professionals have tried their best to provide all possible information related to QuickBooks found a problem with the Acct.#/Card #/Note field for other asset. In case the issue persists after following the above given steps, then the experts are available to resolve your issue to ensure minimal downtime and continue running the business. Getting in touch with our QuickBooks enterprise tech support team by means of our technical support line i.e. 1-800-761-1787 will help you in shunning off the error permanently.
FAQs
What does the error message "QuickBooks found a problem with the Acct # / Card # / Note field for Other Asset" mean?
This error reflects some issue with the account number, credit card number, or note field for an other asset account in the company file.
Is it possible to prevent this error from occurring in the future?
For preventing this error, users need to ensure that all the account numbers, credit card numbers, and note fields are entered correctly in the company file. Also, check the company file for any issues by running the Verify and Rebuild data tool.
Get the methods of Installing multiple QuickBooks desktop versions and editions on one system:
Are you planning for Installing multiple versions and editions of QuickBooks desktop on one computer? Well, it doesn’t involve any rocket science and can be easily done by following to this segment. In case you have used QuickBooks for a while, or you are an accountant with lots of clients, then you might use newer or older version of QuickBooks desktop. You can have multiple editions as well as versions on the same system. All it takes is some specific steps to install each of the version or edition one at a time.
In case you require to reinstall or move QuickBooks to another system, we will show you how you use the migrator tool. Just read this entire blog carefully to to unleash the further details. Or you can simplify the process by connecting with our accounting professionals at1-800-761-1787 and leave the rest on them. Our experts will make the entire process a mere cakewalk.
Basically, a version is the numeric notation of the product's release. (For Example: QuickBooks desktop 2018 and QuickBooks Desktop Enterprise 18.0)
Region:
A region refers to a specific location, such United States, Canada, and the United Kingdom
Edition:
The term edition refers to the set of features included in a product. The examples of this include: Pro, Premier, and Enterprise
Flavor:
By flavor it is meant an industry-specific set of sub-features of a product. (For Example: Contractor, Non-Profit, and retail.)
Important points to consider:
There are certain points that you should consider before beginning with the processes:
Users can work in multiple versions of QuickBooks desktop at the same time. In case they are working in premier 2019, users can also open premier 2018. It should be noted that users can open the same version of premier and enterprise if you use the accountant edition.
Also, users can install the same version of QuickBooks desktop pro or premier and enterprise.
Another important point to remember is that users can only install one industry specific edition of QuickBooks desktop for each version. This means that you can have either QuickBooks desktop premier 2018 retail or premier 2018 contractor, but not both.
It should be noted that QuickBooks desktop accountant is an industry specific edition. In case you are an accountant, make sure to use the accountant edition to switch to any other industry-specific editions of QuickBooks desktop.
QuickBooks users can’t mix and match different regional versions and editions of QuickBooks desktop. In case they need multiple regions on the same system, it is recommended to use a virtual machine or a web hosting service to create an environment for each region.
Also, users can’t easily share their data or company files between QuickBooks enterprise and Pro or Premier. They can also can not share the data between different versions of QuickBooks.
It is important to note that if you open a company file in a newer version or higher edition of QuickBooks, then it automatically upgrades the company file to the most recent version or highest edition. Once you go for upgrades, you will no longer be able to open the company file in the original version or edition.
Easy steps to install multiple QuickBooks desktop versions
You can use some specific steps to install each version and edition of QuickBooks in single computer. the steps include the following:
In case you haven’t already, you need to download the version or edition. You need to save the file somewhere it can be easily spotted just as the windows desktop.
Furthermore, open the downloaded QuickBooks.exe file by double-clicking on it.
You are required to follow the on-screen instructions. After the installation type is selected, you need to opt for custom and network options. And it is recommended to avoid selecting Express.
Now choose the Custom or network option. In case you plans to use QuickBooks only on the system, and not sharing the files over the network, you are recommended to select I’ll be using QuickBooks desktop on this system. However, if you are setting up a multi-user network, and then select either I’ll be using…..And or I will NOT be using depending on the setup.
Once you install multiple versions or editions, QuickBooks asks if you want to replace what’s currently on the system. It is recommended to avoid replacing anything unless you want to replace something. In order to avoid overwriting the data, you need to create Unique install folders for each version and edition. When you gets to the upgrade or change the installation location window, then you are recommended to select Change the Install location.
Now, you are recommended to choose Browse. And hit a right-click on the Window and create a New folder. Also, avoid opting for the Existing QuickBooks folder or any folders that have QuickBooks info.
Note: It is recommended to put the version and edition in the folder name.
You should then follow the rest of the onscreen instructions to finish the installation process.
You need to repeat the steps for each version and edition of QuickBooks to be installed. Also, ensure to install them in their own unique folder.
Update QuickBooks desktop to the latest version
Once you installs the QuickBooks desktop, run an update to get the latest release:
You can also Schedule automatic updates, so you do not have to do that manually.
It should be noted that in case you have multiple editions for the same version, then QuickBooks desktop might not run updates automatically. In order to get the most recent updates, updating each version manually is highly recommended. Also, you can download updates for specific editions.
As we mentioned earlier, the process of installing multiple QuickBooks desktop on one computer doesn't involve any rocket science and we expect that after going through the above processes, you might be successfully able to carry out the task. However, In case of any difficulty or if any of your query remained unanswered, you can simply contact our QuickBooks enterprise technical support team by means of our dedicated support line i.e. 1-800-761-1787. Our U.S based team of accounting professionals will guide you accomplish the task without any hassle.
FAQ's related how to install multiple QuickBooks desktop versions
Can I run multiple versions of QuickBooks desktop simultaneously?
No! You cannot run multiple versions of QuickBooks desktop simultaneously on the same computer. Each version needs to be opened and used separately.
Can I use the same license or product key for multiple QuickBooks Desktop versions?
No! Each version of QuickBooks desktop requires a separate license or product key. You will need to acquire a valid license for each version you want to install.
Can I access company files across different versions of QuickBooks Desktop?
Yes! You can access the QuickBooks desktop company files across different versions.
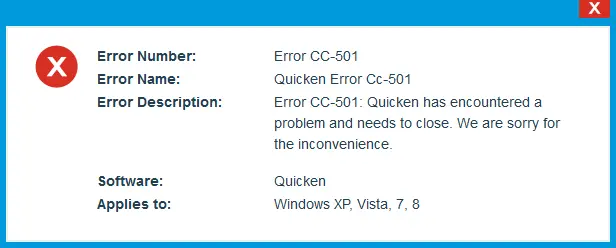
The QuickBooks Error CC-501 usually seen when a user is trying to update an account while using QuickBooks online services at the same time. This sort of issue can also be seen due to script issues. Such an error commonly seen on Windows OS versions such as 7, 8, Vista, and XP. Though the CC-501 error isn't a common error, it might seem a bit complicated for many users to resolve. If you're facing this issue, then maker sure to read this article carefully till the end. However, you can contact our team of certified ProAdvisors by calling our toll-free number for expert assistance.
Important points
Before you try to troubleshoot the QuickBooks error code CC-501, it is recommended to first consider the below points:
Another trigger can be if superfluous junk files ending in slowing the speed of the system.
You are not using the latest version of QuickBooks.
Conclusion!
QuickBooks error code CC-501 refers to an error that conflicts with work, and slows down the performance of the system. We have tried to summarize the causes and fixes of the error. However, if you continue to face the problem even after following the above-mentioned steps, then feel free to connect with a accounting professionals. Our 24/7 QuickBooks error support team and certified experts will ensure to provide you with immediate technical assistance.
FAQs
What is Error CC-501?
It is a script error that usually occurs at the time a user uses multiple online services at the same time during updating their accounts.
What are the DIY steps to fix QB Error CC-501
The various methods to rectify this error are: 1: Try to deactivate & Reactivate the QuickBooks account. 2: To fix such error, validate your QuickBooks data files. 3: Also, try to Update QuickBooks Account or reset the CC credentials. 4: You can perform a clean Installation or reinstallation of QuickBooks desktop to fix this issue.