Learn easy ways to troubleshoot QuickBooks bank reconciliation errors:
QuickBooks software is equipped with innumerable functions and utilities that have attested to its superiority in the accounting industry. Discussing about the bank reconciliation process, it is the procedure where the transactions performed will tally with the bank statements or credit card account. After you have entered transactions into QuickBooks online with the use of forms, bank feed, or other third-party data fetching apps, you will nevertheless be in need to reconcile the bank accounts in QuickBooks. At some point in time, you might face certain disruptions in the QuickBooks bank reconciliation. The process of reconciliation should be done on a regular basis to check the accuracy of the accounting records, which makes it very much important to solve QuickBooks bank reconciliation issues.
Sometimes users might get bank reconciliation errors while performing some banking tasks. To get a better insight into fixing common QuickBooks bank reconciliation errors, make sure that you stick around this blog carefully till the end. Or connect with us at 1-800-761-1787, and let our tech geeks handle the situation for you.
What triggers QuickBooks bank reconciliation errors?
You may face the QuickBooks bank reconciliation errors if your accounts in QuickBooks Desktop don't match your bank statements at the end of reconciliation. There are several other triggers that contribute to the reconciliation errors. these have been summed up below:
It might be you have entered wrong ending balance at the start of the reconciliation.
There might be someone edited or deleted transactions that were already reconciled.
If Someone made an adjustment to your last reconciliation with a journal entry, the reconciliation errors may show up.
There might be a possibility that you have entered transactions into QuickBooks that have not cleared your bank yet. Such circumstances directly lead to the bank reconciliation errors.
Solutions Steps for Fixing QuickBooks Bank Reconciliation Errors
You can perform the below steps, so as to chuck off the QuickBooks bank reconciliation errors. Make sure that you read the steps carefully till the end:
Step 1: Reviewing the opening and beginning balances
Start off by checking the opening and balances and ensuring that they are all correctly entered.
Step 2: Look for changes, deleted, or added transactions
There are various reports in QuickBooks that let you inform if anything has been changed, deleted or added:
Run a reconciliation discrepancy report
Talking about the reconciliation discrepancy report, it confirms any transactions that have changed earlier since the last reconciliation was performed. Steps to be performed herein are:
You are at first required to move to Reports menu and also to Banking option.
After that, select Reconciliation discrepancy.
You need to now choose the Account that you are reconciling currently and hit OK tab.
The next step requires to review the Report and look for any damages.
Now, talk to the person who made the changes. Once you know the reason behind the changes being made, make sure to Edit the transaction.
Run missing check report
Running the missing report can let you know whether you have any missing checks or not. The steps to run the missing check report are quite easy to follow and go on like this:
You would have to move to the Reports menu and further hit on Banking option.
Herein, you need to choose the Missing checks.
You need to now choose the account that you are reconciling and hit the OK tab.
The next step is to Review the report and look for any transactions that have been entered on the report that isn’t on the bank statement.
Running a transaction detail report
In this report, you need to move to Reports section and then move to Custom Reports.
Within the custom reports, select Transaction detail.
Now, go for the Display tab.
You need to now select the Earliest date in QuickBooks for the account.
Else, you may leave it Blank.
Now, choose the Date of the last reconciliation.
Head to Filters tab.
Select the account you are reconciling from the Account field menu.
Set the date from the date of the Last reconciliation. Set the date to the field to today’s date.
Next step is to click on OK tab to run the report.
Look for any discrepancies or transactions that don’t match with the bank statement or credit card account.
The concluding step requires you to talk to the person who made the change.
At times, make a reconciliation adjustment to match their bank records in QuickBooks online forcefully. In such a situation, you need to look for the reconciliation adjustment.
To begin with, move to Lists menu and choose Chart of Accounts tab.
Further, open the Reconciliation discrepancies account.
From the Dates field, set the dates for the last few reconciliations.
Just in case, you see any adjustments that are making the Account balance incorrect, then you are required to contact the person who made changes in the adjustment.
Step 4: Finish reconciling
Now you can finish reconciling once everything is fixed. However, if you are unable to find any issues in your accounts, then you may need to undo the previous reconciliation until the opening balance is correct.
Summing up!
The bank reconciliation issues in QuickBooks desktop can be easily rectified with the steps that we have tried to mention in above. However, as always, if you have a query, comments, or concerns, reach out to us at our QuickBooks error support number i.e., 1-800-761-1787. Our team of U.S based accounting experts will provide your business with the right support that it needs to eliminate errors and other accounting-related glitches, ensure success and save some serious money. We have the most relevant solutions to all your problems and other accounting software related issues.
FAQ's
What are some common QuickBooks bank reconciliation problems?
Some of the most common bank reconciliation issues are given below: 1. Missing transactions in QuickBooks. 2. Bank-related discrepancies. 3. Reconciling to the wrong statement date. 4. Bank fees not being recorded. 5. Existence of Duplicate transactions in QuickBooks. 6. technical issues when recording credits or debits.
What should I do when there are bank errors or discrepancies during reconciliation?
Following are the steps when you encounter bank errors when reconciling in QuickBooks: 1. Start by double-checking the bank statement for any inaccuracies. Ensure the transactions are matching with the information recorded in QuickBooks. 2. Contact your bank to make sure that there is no back-end server maintenance issue causing the error. 3. Make necessary QuickBooks corrections to match the bank statement.
What should I do if bank fees or charges are not recorded during reconciliation?
The steps to follow if the bank fees fail to record while reconciling are: 1. Review the bank statement and check for any unrecorded fees or charges. 2. Create an expense transaction in QuickBooks for recording the bank fees.
Learn the quick steps to add Outlook as an option to send an email if it's missing in QuickBooks Desktop:
Unable to spot Outlook in the Send Forms preferences? This can be a very intense situation when the send form preferences miss out on the Outlook option. Microsoft Outlook basically permits you to send numerous forms through email. You can opt for webmail, outlook, or QuickBooks email, depending upon your convenience. In case outlook is missing as one of your options, it can be due to a couple of factors. We will be exploring the issue in detail later in this post. This error can also be seen when you are making use of an Outlook version which is older or we can not be updated. To know more, you can scroll though this post and unleash the fixes.
Whereas, getting rid of Outlook is Missing in QuickBooks Desktop problem becomes easy with a technically sound accounting professional. You can get the best possible and highly customized support services. We would love to resolve the issue for you instantly.
Why Outlook is missing in Send Forms preferences?
If Outlook is missing in Send Forms preferences, then here are some of the possible factors causing this issue:
Using a QuickBooks version that doesn’t support Outlook can lead to this error.
If there is an issue with Outlook installation.
If the profile is not set up in Microsoft Outlook.
You can also face this sort of issue if Outlook is not set as the default email program.
If the QuickBooks program is hosted on the cloud and the service provider doesn’t have Office installed as a hosted application.
The most important point is that Intuit doesn’t support Microsoft applications. In case you are unable to perform the tasks, it is recommended to consult an IT professional. As, experimenting might cause Windows and MS Office errors or loss of MS Office license number and inability to reinstall.
Solutions to Fix Error: Outlook is Missing in Send Forms Preferences in QuickBooks
We have a couple of solutions for you that you can incorporate to rectify the outlook missing issue. So, let us check each of the methods one by one:
Method 1: Verifying QuickBooks supports Outlook
It should be noted that the Outlook 2019 version is not compatible with the latest release of QuickBooks 2022. The steps involved in this process are as follows:
First of all, you need to select the Option from Microsoft Office Outlook in the Outlook Help menu.
After that, Verify the version information and the build number for installing the version of Outlook and also check if the version of Outlook is for easily sending and setting up email.
Next step is to Verify the version of the outlook by checking the QuickBooks ribbons.
Method 2: Setting Outlook as default email program
In order to select Outlook as the default mail program, you need to carry out the steps below:
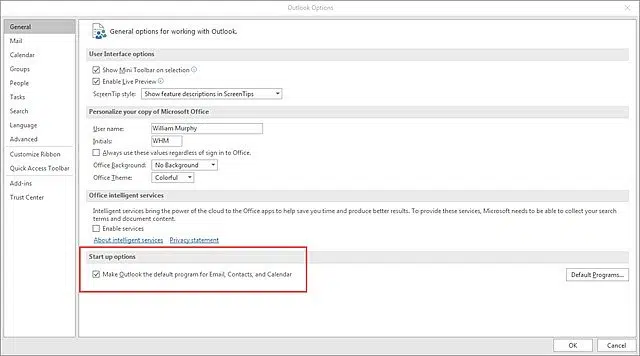
The first step is to select the File tab.
And then, choose Options.
Next step is to select the Startup options, and then under this option, select the Make Outlook the default for email, contacts, and calendars checkbox.
Outlook 2007 and earlier:
To begin with, you need to select the Tools and Options tab.
Also, click on the Other tab.
Followed by selecting the Make Outlook the default program for email checkbox under the General settings.
In case you are having multiple QuickBooks profiles, then the outlook options provide for selecting the Profile every time you startup. In case the profile is not selected as a default, then QuickBooks will not see Outlook, select a profile and then check set as default.
It should be noted that the WIN.INI file is a Windows system file and holds settings, including a few for email.
In this process, first press the Windows key and then type C:\Windows\ and hit enter key.
Also, click on the right tab on the WIN.INI file and also click on the Option copy and Paste file. The file uses a separate location as a backup. Also, copy and paste the file into a separate location as a backup.
After the separation of the file, you need to visit the C:\\windows folder and open the WIN.INI file.
In the next step, the file Shows different types of headings. You need to opt for one.
You does not show the Mail section, then add it to the end of the file along with the text below.
In case the mail section is there, the text is not under that section; you need to Add it.
Once done with that, you need to Reboot QuickBooks.
Finally, hit a click on the Edit menu and select Preferences and then Send forms preferences.
Method 6: Resolving with Microsoft
It should be noted that this process is intended for a system admin. This process includes editing the registry, that if not done correctly, could result in serious damage to the device. In case the issue remains, the Outlook registry key may be damaged. For that, consult an IT professional.
Method 7: Uninstalling and reinstalling Office and QuickBooks
You need to first Uninstall QuickBooks Desktop.
And then Uninstall Office.
Also, Reinstall Office.
It is important that installing the 64-bit version of Outlook can help in fixing the issue. In case you are not sure if the system supports the 32-bit and 64-bit versions of Outlook, then check out this guide from Microsoft.
We wind up the article, and the solutions to the outlook is missing issue in QuickBooks desktop over here, with the hope that implementing these methods might help you in getting rid of this error. However, if it has become almost impossible for you to handle this issue, then we recommend you to contact a professional at 1-800-761-1787, who can guide you through this error. Our QuickBooks error support team are a hub of tech savvy professionals who work round the clock to provide the possible assistance to all users across the globe.
FAQs
What does it mean when "Outlook is missing" in Send Forms preferences in QuickBooks?
When you encounter the message "Outlook is missing" in the Send Forms preferences of QuickBooks, it infers that QuickBooks is unable to detect or find Microsoft Outlook, which is the default email client used for sending forms (such as invoices, estimates, or reports) directly from QuickBooks.
Can I use an email client other than Outlook with QuickBooks for sending forms?
Yes! Apart from Microsoft Outlook, QuickBooks is compatible with other email clients for sending forms. In the case of a different email client, you should simply opt for the Web Mail option within the Send Forms preferences.
How do I set up a web-based email service in QuickBooks for sending forms?
Follow the set of instructions given below for setting up a web-based email service to send forms: 1. Open QuickBooks and proceed ahead by heading to the Edit menu. 2. From here, advance to the Preferences tab. 3. Follow up by clicking on Send Forms option. 4. The subsequent step requires clicking on the Web Mail option and then hitting on the Add button. 5. Within the Add Email Info window, type in the email id and then proceed by choosing the email provider. 6. Follow up with the instructions for entering the required information, including the server settings and the authentication details. 7. Culminate by clicking on Ok.
Where is send forms in QuickBooks?
The Send Forms option is accessible in the File menu in QuickBooks.
3 proven Solutions for issues that stop you from deactivating online services of a bank account in QuickBooks
QuickBooks is an innovative yet easy-to-use accounting software. But sometimes, performing even some simple tasks may be challenging. In this article, we will discuss the issue of not being able to deactivate online services of a bank account in QuickBooks and its solutions. The Bank Feed setting button, in this case, remains available and the lightning bolt stays there in the Chart of Accounts when you try to deactivate bank feeds, which means the bank feeds for the account are still active. Meanwhile, for expert guidance and opinion, you may call us at 1-800-761-1787. Let us pursue the troubleshooting procedure!
Steps to Resolve Issues when Deactivating Bank Feeds in QuickBooks
You can perform the following troubleshooting steps to fix issues faced while deactivating bank feeds in QuickBooks. Please create a backup of your company file before you proceed with the following steps.
Solution 1: Re-sort chart of accounts, items, or classes list
Open the Lists menu and select one from Chart of Accounts, Items, and Classes.
Click on the All-Names checkbox.
Click Edit at the top left of QuickBooks.
Select Re-sort Lists and then OK.
Step 1: Re-sort lists in QuickBooks Desktop for Windows
If you saved Chart of Accounts or items lists numerically, QuickBooks re-sorts them for you based on their first three digits.
To arrange them in order, add 1 to 3-digit numbers before each item or account number.
Go to the Lists menu and select the lists you need to re-sort.
Click on the Include Inactive checkbox. (If the checkbox is grayed out, there are no inactive names)
Open the View menu and select Re-sort Lists.
Select OK and then Close and reopen your company file.
Step 2: Re-sort lists in QuickBooks for Mac
If you are using QuickBooks Desktop for Mac, you can perform the following steps to re-sort the lists.
Re-sort your customer list
Go to the Customer Center.
Click Edit at the top left and select Re-sort List.
Select the OK tab.
Re-sort your master names list
Go to the Banking menu and select Write Checks.
Take the pointer in the Pay to the Order Of field.
Step 1: Repair your company file using the Rebuild Data tool
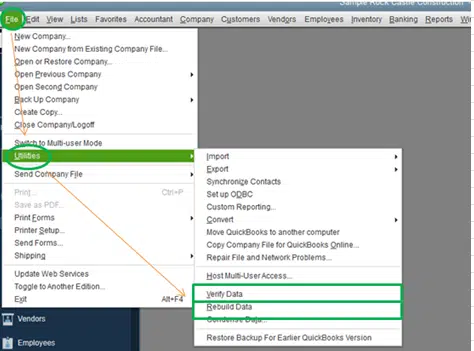
Open the File menu, hover the pointer over Utilities, and select Rebuild Data.
After that select Ok on the QuickBooks Information window and follow the onscreen prompts to save a backup.
Repairing your company may take a while. QuickBooks may seem stuck, but if you can move your mouse, the tool is doing its work.
Now select OK after the Rebuild Data Tool completes its task.
Again, go to the File menu, hover over Utilities, and select Verify Data.
Let the Rebuild Data Tool check your file for data issues.
If no issues are spotted, select OK and continue to use your company file.
In case QuickBooks finds an issue with your company file, choose Rebuild Now. If the data issues persist even after rebuilding your company file, try again. Contact our certified experts If the first rebuild takes more than two hours.
Step 2: Use QuickBooks File Doctor to Repair your company file
If issues with data still exist, use the QuickBooks File Doctor for fixing your company file.
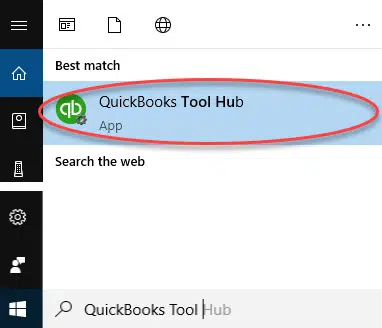
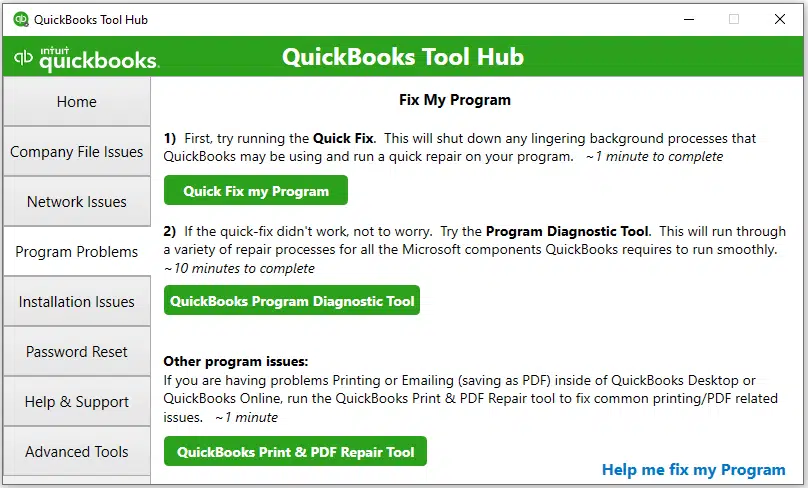
Open the Tool hub and select Company File Issues.
Select Run QuickBooks File Doctor.
After that click on the drop-down menu and select your company file.
Now click on Check your file and then Continue.
Type in your QuickBooks administrator password and select Next.
Step 3: Repair your company file manually by rebuilding your data
Attempt to manually rebuild your company data only if you are confident of what you are doing. In case you are not sure how to troubleshoot data errors manually, we recommend you reach out to a certified expert.
Solution 3: Deactivate online services using Microsoft Excel
Step 1: Export your Chart of Accounts
Go to the File menu and click on Utilities.
After that tap on Export.
Later on, select Chart of Accounts and click OK.
Save the file in a location that is easily accessible.
Next, open the Excel sheet and the *.IIF file in it.
Find the old bank account.
Towards the end of the page, find !QBONLINE section where the bank accounts are showing.
Change the Y to N for OLBANKING, OLBILLPAY, OLENABLED, OLTAB (online banking columns).
Lastly, save the file.
Step 2: Import the MS excel file in the company file
Go to the File menu .
Click in Utilities and then Import
Select the *.IIF
Check if the lightning bolt on the page is gone, and try to set up Bank Feeds.
Once finished, hit on OK and then close the window.
You should now restart QuickBooks and attempt to disable Bank Feeds once more.
Hopefully, the error won't show up this time around. If your problem has been solved, great.
Summing Up!
We hope that you are now able to deactivate bank feeds in QuickBooks Desktop. If the issue persists or you have any other QB-related issues, you can contact our 24*7 QuickBooks support team at 1-800-761-1787. We are a hub of technocrats who work round the clock to provide the best possible support services. So, do not hesitate to call us anytime and seeking for assistance!
FAQs
What are bank feeds in QuickBooks?
The Bank feeds feature in QuickBooks provides a unique platform to users for allowing them to automatically download bank and credit card transactions and reconcile them with QuickBooks.
What is the need to deactivate bank feeds in QuickBooks?
Deactivation of bank feeds in QuickBooks should be done if the user no longer wants to avail of the features offered by it.
What are the errors when deactivating Bank feeds in QuickBooks?
Some common aberrations encountered by users when deactivating QuickBooks bank feeds subsume duplicate transactions, missing transactions, and reconciling errors.
Can I reactivate bank feeds in QuickBooks after deactivating them?
Yes! You can easily reactivate bank feeds upon deactivating them. For this, opt for the account to reactivate under the Bank Feeds Center. After that, culminate by clicking on the Set up Bank Feed option.
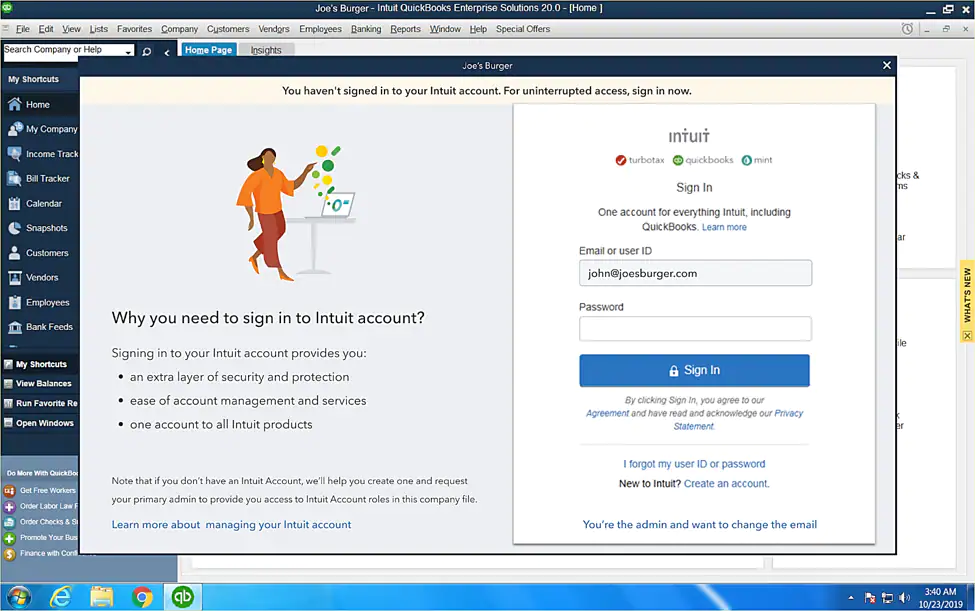
Learn how to set up and access between QuickBooks desktop and connected Intuit services
Your QuickBooks company file user ID offers you access to basic features such as creating an invoice or paying a bill. But when you make use of an Intuit account, then you can take advantage of additional Intuit services, which include QuickBooks payments, payroll direct deposit, payroll workforce, QuickBooks time, and receipt management.
In order to use the connected services of your company file, your Intuit account primary admin must approve the request. After your primary admin accepts the request, you will be able to use all the connected services using your Intuit account. Certain businesses share their QuickBooks desktop admin credentials with people working therein, which isn’t recommended as such. There is a better way to access, which Intuit account linked to the company file.
Basic difference between Intuit account roles and QuickBooks roles
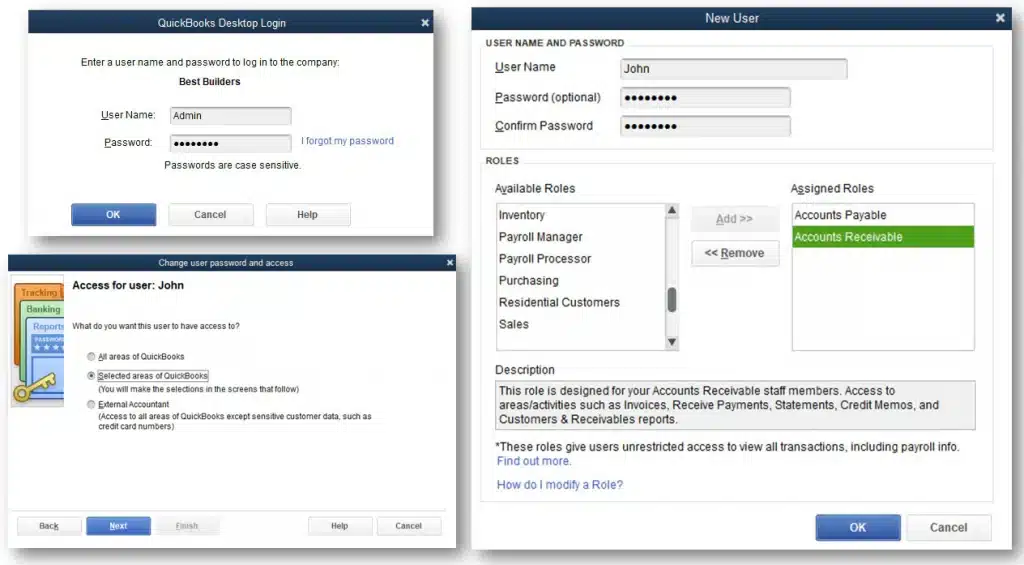
QuickBooks company roles
Company file admin- You can sign in using admin credentials, and therein will own the company file.
Steps to Set up Access Between QuickBooks Desktop and Connected Intuit Services
You can perform the below steps to set up access between QuickBooks desktop and connected Intuit services.
Step 1: Sending a request to primary admin for accessing to the Intuit account
Sign in to the company file using the QuickBooks desktop user ID. You should note that currently, the requests for access to the Intuit account linked to the QuickBooks company file are available for the users logging in as the QuickBooks company file admin.
Now sign in to the Intuit account. The Intuit account admin user ID field is prefilled, which you have to replace with your own User ID. Sign in to the Intuit account of the company file. If you don’t have an Intuit account, you can create one.
Just in case you are already a part of the Intuit account, and your Intuit account login session is active, then start using the connected services.
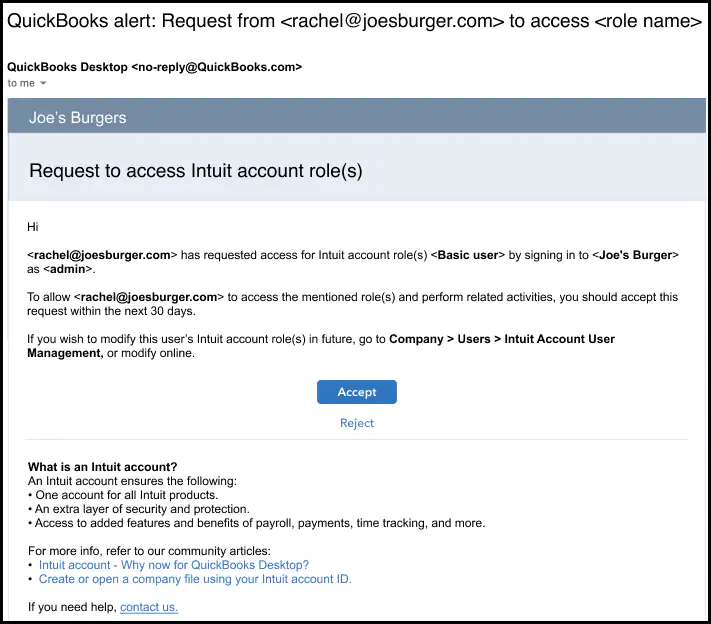
Whereas, if your User ID isn’t part of the Intuit account of the company file, a request for access email is sent to the Intuit account primary admin. This will also happen if you try to access my company or any of the Intuit services like QuickBooks desktop payroll direct deposit or QuickBooks time.
After the email is sent, a screen confirming the request will be seen. When your primary admin approves, you will get an email confirmation, and you will be able to sign in to the Intuit account with user ID. You can stay signed in to the Intuit account only for a single session, but not more than 24 hours.
If you want to gain Intuit account access for 180 day, sign in with the non-admin QuickBooks company file user ID to send a request to the primary admin for access to Intuit account.
Now hit a click on OK to acknowledge the message. And you will get an acknowledgement email ensuring that a request for access is sent to the primary admin for approval.
Step 2: Your primary admin will accept the request
Now that you have sent the Access request, your primary admin has 30 days to accept the request. You can accept or Reject the request from the email.
After the primary admin chooses the accept option, a browse window opens, and QuickBooks prompts them to sign into their Intuit account.
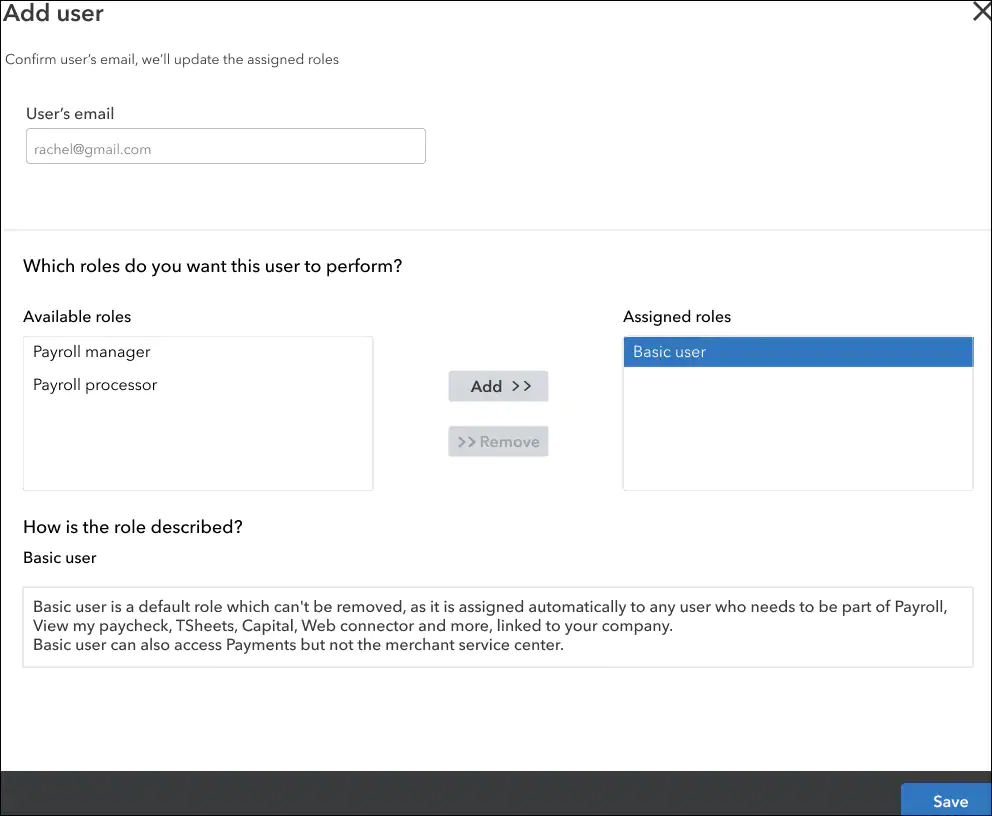
After signing in, the primary admin will see the Intuit account user management dashboard, prefilled with the email and current role. The primary admin can change the role or give additional ones. The primary admin will select Save to add you to the Intuit account.
Now you are successfully added to the Intuit account for the company. You can start with the Intuit services connected to the QuickBooks desktop company file. Just in case the primary admin doesn’t respond to the request within the period of time mentioned, it will expire. And you would have to start a new request by performing the above steps once again.
This was the entire process to set up access between QuickBooks desktop and connected Intuit services. However, if you want to learn more about our other QuickBooks accounting services. Give us a call today at our QuickBooks desktop helpline i.e., 1-800-761-1787, and schedule your free initial consultation.
FAQs
Can I link multiple Intuit accounts to a single QuickBooks company file?
No! There can only be one Intuit account for a single QuickBooks company file.
Can I unlink an Intuit account from my QuickBooks company file?
Yes! You've the option to unlink your Intuit account from the QuickBooks company file.
How can I recover a forgotten password for my Intuit account linked to QuickBooks?
If you forgotten the password to your Intuit account, go through the following steps: 1. Initially, you need to navigate to the Intuit account login page. 2. After that click on Forgot your password tab. 3. Now enter the email address on which the Intuit account is registered. 4. Follow the on-screen commands sent over the Email and then click on the Reset password link. 5. Finally, type a new password for your Intuit account.
Perform these recommended methods if you are opening QuickBooks and you see the Opening QuickBooks screen but it does not open error:
Bumping into some or the other errors on QuickBooks is pretty much common as the software involves a bunch of algorithms, making it prone to technical glitches. You might come across an error that open QuickBooks splash screen displays and disappears without opening QuickBooks desktop. Such an error can be experienced when there is some internal or technical issue, and the error basically falls under the category of QuickBooks won’t open, which can be a result of a bunch of factors.
This piece of writing will brief you on the most feasible fixes to the opening QuickBooks splash screen displays and disappears without opening QuickBooks error. However, if you don’t want to rectify the error manually, then in that case, you can simply get on a call with our technocrats and let them perform the said steps for you.
Essential points to consider
Before you head forward, it becomes important for you to consider the following factors:
Ascertain the regional settings of the system are set to English (United States or Canada, it completely depends upon the version of QuickBooks being used by you currently).
Another essential tip is to note that some of the troubleshooting steps covered in this segment are specifically for Windows operating system, which isn’t a product offered by Intuit. Thus, the procedures can be a little complex, if in case errors appear when repairing or uninstalling Windows components. In case you aren’t very much comfortable performing the steps, then it is highly suggested to connect with a certified IT person.
The steps listed in this segment might demand a reboot of the system. Thus, you should consider bookmarking or keeping a secure copy of the article before rebooting the system.
Measures to rectify the Opening QuickBooks screen but it does not open issue successfully
You can perform the below set of steps so as to rectify the error opening QuickBooks splash screen displays and disappears without opening QuickBooks desktop. Let us explore the steps one by one:
Procedure 1: Checking the FISP settings for the windows 10 pro or higher
Often it might happen that the FISP is enabled. If that is the case, then you would have to perform the below set of steps, or you would have to speak to an IT professional for better assistance.
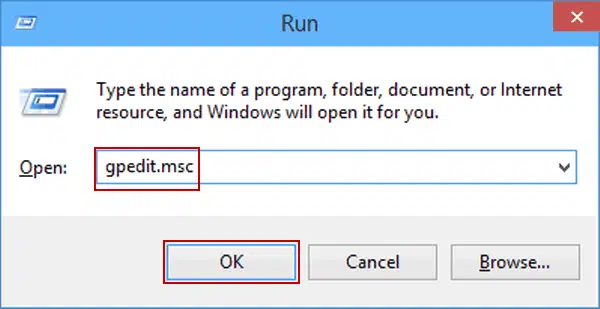
Start off the process by opting for Start button and also run and type GPEDIT.MSC
You further have to choose Computer configuration and then Windows settings in the local computer policy window.
Next, you need to go for security settings, local policies, and also the Security options.
You are then required to opt for System cryptography FIPS and ascertain that it is disabled. However, if it is enabled, then ensure to disable it and also restart the system to make changes.
Sum up the process by opening QuickBooks.
Just in case you face the issue again, then reinstall QuickBooks desktop by performing the below set of steps:
This particular file keeps a record of all previous files that you might have opened. In case you try to rename this file, the data of the previous file might be lost.
For this process, you would first have to head to the folder where you saved the QBWUSER.ini file.
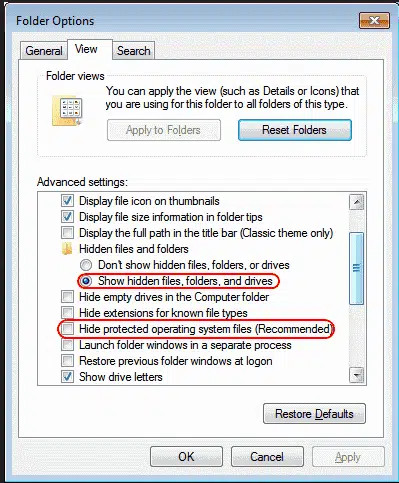
You can also enable Hidden files and folders if you aren’t able to spot the file.
Heading forward, you are recommended to right-click QBWUSER.ini file and also click on Rename tab.
Procedure 5: Changing the name of the EntitlementDataStore.ecml file or folder
So as to change the file name or folder name, you need to carry out the below-stated set of steps:
It is initially suggested to press the Windows + R keys for opening the Run command.
Furthermore, copy the Path and paste it into the field.
You are then recommended to hit Enter tab.
Along with that Check for the v8 folder in the result.
Heading forward, right-click on the same and go for Rename tab.
Change the name to V8(OLD)
You can now check if the software is synced successfully or not. In case any issue is faced in syncing the license data online QuickBooks, you would have to connect with some professionals.
Final words..!
Knocking down Opening QuickBooks screen but it does not open error becomes a cakewalk, when the steps and procedures listed above are performed in a proper manner. Whereas, if you aren’t able to deal with such an error even after performing the steps, then it is a matter to be concerned of. You can simply connect with our 24/7 QuickBooks error support geeks using our dedicated support line i.e., 1-800-761-1787, and let them take over the situation.
FAQs
What is the splash screen in QuickBooks?
The splash screen refers to the loading screen that shows up upon launching QuickBooks. This screen displays the QuickBooks logo and the progress bar.
What can cause the splash screen to display but QuickBooks not to open?
Various factors that may lead to this issue include damaged QuickBooks installation files, running conflicting programs in the background, outdated O/S, and incorrect settings of QuickBooks.
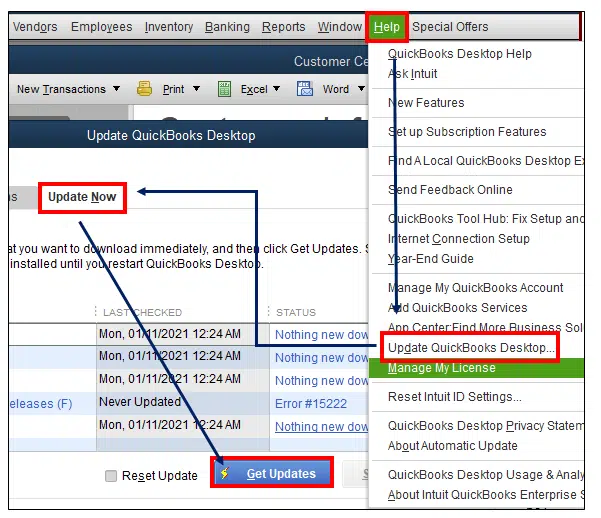
Do I need to update QuickBooks after reinstalling it?
Yes! you should update QuickBooks upon reinstalling it so as to make sure that you are equipped with avant-garde features offered by Intuit.
Can the splash Screen issue occur due to outdated display drivers?
Yes! This error can also occur due to outdated display drivers. As such, it is recommended that you visit the device Manager, and update the Display driver.