Are you in search of the process to set up and use class tracking in QuickBooks desktop? Well, your search ends with this post. If you are looking to go beyond standard account-based tracking in QuickBooks, then expanding into class tracking is one of the best options. This offers you a customizable way to track specific expenses, categorize shared expenses across multiple accounts, and also handle the accounting for one-off and occasional expenses that are not associated with any particular account type. Setting up class tracking becomes a lot easier with QuickBooks desktop, as it seeds up the process. One of the major benefits of class tracking is that it offers greater control over expense categorization, ultimately making sorting expenses much easier.
This article is entirely focused on the way to setup and use class tracking in QuickBooks in the best possible way. So, make sure that you stay in tune with the article till the end. Or we also have a quick solution for you i.e. give us a call at 1-800-761-1787. This will help you to reach out to our experts and certified professionals. Our technical support team will be more than happy to set up and brief you with class tracking in QuickBooks Desktop, so that you can make the best use out of it.
Class tracking can be a new term for many QuickBooks users. So here is a brief introduction to make you familiar with this term, before directly jumping into the setting up process. Class tracking basically lets you to track account balances by department, business office or location, separate properties, or any other meaningful breakdown of the business. It also lets you to track segments that they want to have a close observation of. In QuickBooks, you can easily create classes assigned to the transactions. This lets you to track the account balance by department, business office or location, separate properties owned by the user, etc. This feature can be of great help to businesses with different departments, as it would help them to use classes to report account balanced for each department. Class tracking might seem to be a tedious process, by it pays off in the long run. The users get an amazing overview of the company expenses and can also see the way their money is being spent, which ultimately makes it easy for you to stay on top of the budget.
To understand it better, let us have an example: Suppose that your restaurant has 3 locations, in that case, you can create uptown, midtown, and downtown classes for tracking balanced by the location. However, if you are a farmer, then in that case, you can create a class for each enterprise i.e. corn, hogs, and soybeans. Towards the end of the accounting period, you can create separate reports for the restaurant and the farm considering the location and enterprise, respectively.
Steps to set up class tracking in QuickBooks
Now that you are well versed with the terms class tracking and also its humongous list of benefits, let us unleash the steps to set up class tracking in QuickBooks desktop. Make sure that you follow the steps with keen attention and careful implementation.
Step 1: Turning on class tracking
Before you have a look at the sub steps of turning on class tracking, there are certain pointers that you need to consider:
You are only required to set up the withholding tax account and item once. Next time when you wish to charge off withholding tax, merely using the existing withholding tax item would work.
Set up classes based on the type of reporting you wish to carry out and considering the way in which you desire to see the business segments on reports.
Lastly, set up an “other” class in order to classify transactions that are miscellaneous i.e. transactions that do not fit anywhere.
Steps for Windows users:
The steps to turn on class tracking in Windows are as follows:
The first thing is to open the company file.
And then move to the edit menu, also opt for the preferences option.
Next step is to choose accounting and then move to the company preferences tab.
Once done with that, check the use class tracking for transactions checkbox.
And also, if you want a reminder, at the time if you missed to assign a class, then it is recommended to choose the prompt to assign classes checkbox.
Last step is to hit OK tab.
Steps for Mac users:
The steps for Mac are quite different from that of Windows. So, let us check out the steps to set up class tracking in QuickBooks for Mac:
If you are a QuickBooks for Mac user, then initially, you have to navigate to the QuickBooks menu and choose the preferences option.
After that, select the transactions in the workflow section.
And then choose the use class tracking checkbox. And also, close the preferences page to save changes.
Step 2: Setting up class categories for expenses and accounts
Now comes the second step, where you need to set up class categories for expenses and accounts. The point to be noted here is to use classes for one category only. For example, if you makes use of classes for department, then it is recommended to avoid using classes for store locations. The user can use the sample classes by industry as a guide.
For Windows users:
The Windows users are required to navigate to the lists menu and then choose the class list.
After that, select the new option from the class drop down menu.
Next step is to enter the class name.
And also, if it is a subclass, you need to opt for the subclass of checkbox and then look for the class it is under in.
The last step is to hit OK to add it.
For Mac users:
Now if you are a Mac user, the very first thing you need to do is to visit the lists menu and then choose classes.
After that select the create option.
Next step is to enter the class name.
And also, if it is a subclass, make sure to select the subclass of checkbox and also find the class it is under in.
The final step is to hit OK to add it.
Using class tracking
You can assign a class to a couple of transactions that we have listed below, let us have a look:
Class tracking makes it easier for you to generate reports to the company on the balances across multiple classes, departments or locations, as it can be used in majority of transactions. This can be done by filter, sort or total reports by class.
Sample classes by industry
Business type
Sample segments
Accounting firms
Partners or clients, Locations, if more than one location, Types of work, such as tax, audit, consulting work, and so on.
Advertising and public relations firm
Projects, Locations, if more than one location, Lines of business, if involves several main types of work such as advertising and public relations.
Architectural firms
Projects, Locations, if more than one location.
Construction companies or contractors
Construction divisions then subclass like Rough and Finish, Project supervisors, if more than one supervisors.
Consulting firms
Consultants, Locations, if more than one location.
Graphic design, writing, photography, and printing firms
Billing partners, Locations, if more than one location, Lines of business, if involves several main types of work such as printing and design.
Legal offices
Locations, if more than one location, Partners or associates, Area of specialization, such as real estate or corporate law, Fee methods, such as fixed fee, contingency, hourly, or a combination.
Medical offices
Partners, Locations, if more than one location.
Membership organizations or user groups
Special interest groups (SIG)
Real estate brokers
Locations, if more than one location, Areas of business, if involves several main types of work such as property sales and property management, Title company
Restaurant and bars
Billing partners, Locations, if more than one location, Lines of business if involves several main types of work such as printing and design.
Retail stores
Locations, if more than one location Profit centers, such as restaurants and bakeries. Types of business, such as restaurant and catering.
Wholesale
Distribution centers. Product lines or departments, such as garden, hardware, and tools.
Sales representative
Product lines, Manufacturers being represented.
Services (that bill weekly/monthly)
Services being offered, Partners, Locations, if more than one location.
We end the post over here, considering that after reading it you might be able to set up and make the best use of class tracking in QuickBooks desktop. However, if you have any query, or if you feel that the process is too tiring for you, then simply ring up at +1-800-761-1787 and let our 24/7 QuickBooks enterprise support team handle it for you. Our professionals will be happy to help you.
Frequently Asked Questions (FAQs)
What is Class Tracking in QuickBooks?
Class tracking assesses account balances.
What is the main advantage of Class Tracking?
Class tracking separates financial operations. It nullifies the requirement of unique QuickBooks Online accounts.
How is Class tracking different from location tracking?
Class tracking can track “profit-loss accounts”. Location tracking can track both “balance sheet” and “profit-and-loss accounts”.
It is always essential to keep a track of the money coming in and going out of the business. And with QuickBooks tracking cash flow is very much possible. Performing the right set of steps in QuickBooks can help you to find out that the money coming into your business is getting allocated properly to the employees, suppliers, and other expenses. Knowing what the future holds, makes it easy to plan the investments and take advantage of promising opportunities. It also shows you the estimates of incoming revenue for a certain period. It would surely help you in calculating the expected cash flow. Considering the need to tracking cash flow, we have drafted this segment, where we will be talking about the complete process to track cash flow in QuickBooks desktop.
Thus, give a thorough reading to this informational write-up and unleash the step-by-step process of tracking cash flow in QuickBooks. But if in case you need any sort of technical assistance at any point of time, you can directly connect with our accounting professionals at 1-800-761-1787. We will help you out in getting answers to all your queries.
Discussing about the cash flow reporting, the very first thing is to ensure that the books are accurate. All the reports will use the data in QuickBooks, so you have a clean starting point.
In case you have set up bank feeds, it is required to download the transactions and tally them to the transactions in QuickBooks.
Reconciling the accounts in QuickBooks and ensuring that they tally the real-life bank and credit card statements is important. In case any help is required for reconciling the account, it is recommended to reach out to the accountant.
Step 2: Using the financial reports to see the progress
The profit and loss report and balance sheet report will depict how the business is doing depending upon the data in QuickBooks:
Running a profit and loss report
You can run the profit and loss report for the past 3 months for getting an understanding of the average income and expenses for each month. The steps involved here are as follows:
The very first step is to navigate to the reports menu and then click on company and financial.
Next choose profit and loss detail.
Then followed by setting the date range for the past 3 months.
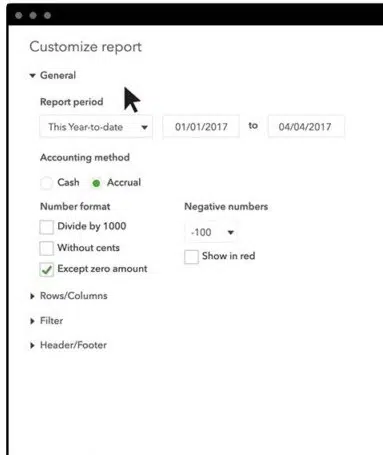
You need to note that if user wants to change what appears on the report, then you need to select the customize report option and customize it based on the data required.
Once you are done, you can print, email, or export the report to excel.
Try to check out the top sources of revenue in the income. And for expenses, pay attention to things like payroll, rent, insurance, and marketing expenses to see where the spending might be reduced.
Run a balance sheet detail report.
The balance sheet report gives a financial snapshot of the company as of the specific date. This calculates the business’s worth by subtracting all the money the company owes from everything it owns.
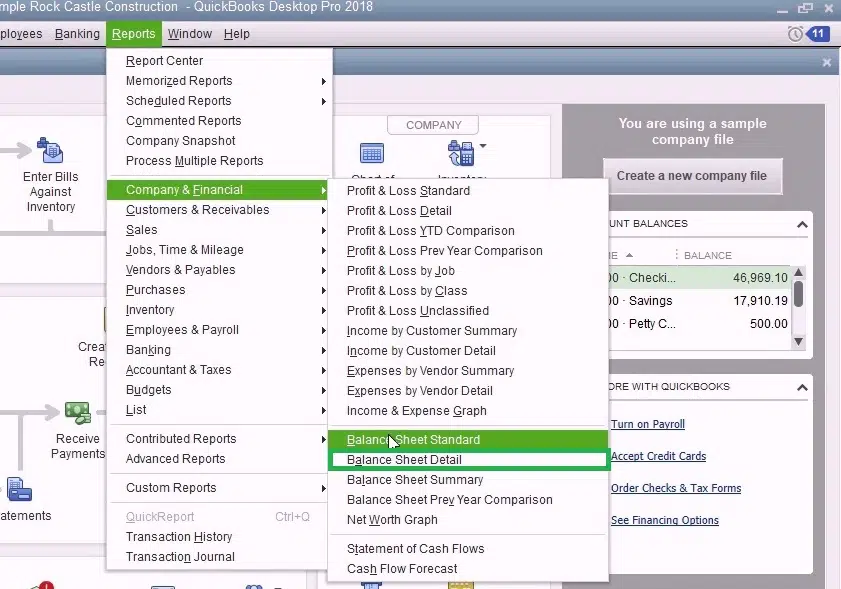
Navigate to the reports menu and then click on company and financial.
Followed by selecting the balance sheet detail.
Go for Customize Report and customize it based on the data required.
Once done, print, email, or export the report to excel.
Process for Optimizing the cash flow in QuickBooks desktop
Step 1: For this, set up a cash flow projection
With the help of upcoming bills and cash on hand, you need to see the way the cash flow looks for the next six weeks by creating a cash flow projection.
Step 2: Identifying the top selling items
You can make sure of the company snapshot, to see what customers are buying the most. This would help you in focusing on the top-selling products or services. In order to run a best-selling item report, you can run the steps below:
The initial step is to navigate to the company menu and then choose company snapshots.
Pick the Add content option and then choose the right arrow.
Followed by finding the best-selling items and then selecting add option.
Double-click each product or service to see the detailed report.
Also note that in case you wish to change what appears on the report, you need to select the customize report and customize it based on the data needed.
Once done, you can print, email, or export the report to excel.
Step 3: Identify the customers having upcoming or overdue invoices
With the help of automated invoice payment reminders, QuickBooks desktop will have to identify the customers with upcoming or overdue invoices. After it is set up, you will get a notification that has the payment reminders ready to send. Also, you can review and approve them before they go out.
With the help of the bill tracker in QuickBooks, it is supposed to identify the pending and unpaid bills. After that you can pay them directly in QuickBooks Desktop.
Step 5: Where to cut business spending
With the help of the company snapshot, you can see the top expenses and also check what can be done to reduce the spending. For running an expense breakdown report, you can carry out the steps below:
The very first step is to navigate to the company menu and then choose company snapshots.
Opt for add content and then choose the right arrow.
Followed by finding the expense breakdown and then you need to select +Add keys.
Double click any wedge on the expense breakdown to see a detailed report.
It should be noted that if you want to change what appears on the report, choose customize report and then customize it based on the data needed.
Once you are done, print, email, or export the report to excel.
Step 6: See the top vendors for expense
In case the cash flow is causing a delay in paying the vendors, you might be able to negotiate the payment terms or delay paying bills until you have the cash. In QuickBooks desktop, run a report to see the vendors you spend the most with. You can run the report by carrying out the steps below:
The initial step is to navigate to the company menu and then choose the company snapshots.
Choose add content, followed by selecting the right arrow twice.
From the top vendors by the expense and then select + Add key.
Double-click any vendor on the expense report to see the detailed report.
You are required to note that if you want to change what appears on the report, and then select the customize report and customize it based on the data needed.
After the process ends, print, email, or export the report to excel.
We have tried to sum up the entire process of tracking cash flow in QuickBooks desktop. And we expect that after reading the above steps, you might be able to track the cash flow in QuickBooks. However, in case of any difficulty or if you need any further assistance, call us at 1-800-761-1787, and our QuickBooks enterprise technical support team will answer all your queries right away.
FAQs - Frequently Asked Questions
Is there a cash flow statement in QuickBooks?
QuickBooks can efficiently track accounting data and generate the cash flow statement.
How do I track petty cash in Quickbooks?
Follow the steps below: 1: Click on the drop-down menu and choose the Save account option. 2: Now, opt for Bank accounts. 3: Head to the Tax form section and click on the draw-down menu. 4: Opt for Cash on hand option. 5: Enter Petty cash in Account Name.
Managing the fixed assets in QuickBooks can be done with the help of fixed asset manager. Fixed asset manager is a feature available in QuickBooks desktop that computes depreciation of fixed assets based on the standards published by IRS. In this, the terms depreciation methods, and predefined reports in fixed asset manager are used to better manage asset information. It should be noted that FAM is only available in QuickBooks desktop premier accountant, enterprise, and enterprise accountant.
Fixed assets in accounting is referred to as property that cannot be converted into cash easily and are conventionally cannot be sold to the end users directly. The fixed assets manager lets the users to keep a close account of assets and their depreciation efficiently through an inbuilt automatic process. After setting up the fixed asset manager in QuickBooks, the user becomes eligible to use fixed asset manager in QuickBooks. This helps in calculating the reduction in the value of fixed assets by following the standards that are published by the internal revenue service. To know more about managing/using fixed assets using fixed asset manager in QuickBooks, make sure to stick to the article till the end.
Managing Fixed Assets Using Fixed Asset Manager (FAM) in QuickBooks
Below we have discussed all about QuickBooks Desktop Fixed Asset Manager. Keep reading!
Important Terms to Understand
Terms
Description
Capitalization Limit
The dollar limit for fixed asset purchases to qualify as an asset instead of expense. It could range – as an example – from $200 to $20,000 per item purchased, depending on the size of the company.
Fixed Asset
Tangible items (i.e. machinery, furniture, computers, and equipment) owned by a company that have a useful life of greater than one year and whose value is greater than the company’s capitalization limit.
Depreciation
The decline in the price of an asset, attributable to deterioration, obsolescence, and impending retirement. Depreciation applies particularly to physical assets like equipment and structures. This loss in value needs to be tracked for tax purposes.
Disposal of Asset
This refers to removing an asset from the company either by theft, selling, or throwing it away.
Types of Depreciation Methods
Depreciation Method
Description
Straight-Line Method (SL)
An easy method that allocates an equal amount of depreciation to each time period.
Declining-Balance Method (150% & 200% DB)
Allocates more depreciation expense to the early years of an asset’s life, when it is new; since there should be less down-time and fewer repairs in early years, the company should get more use out of the asset in the beginning of its life.
MACRS (Income Tax Method)
Uses the double-declining balance method, but you only take one-half year’s depreciation in the first year, and then you switch to the straight line method in the middle of the asset’s life, so a 5 year asset takes 6 years to depreciate.
Predefined Reports
Report
Purpose
ACE Adjustment Calculation
To determine the total ACE adjustment needed to compute a tax return for a corporation. Assets are grouped by category and sorted by asset number within each group.
Amortization Schedule by General Ledger (G/L) Account Number
To see a summary of the activity of the amortized assets. Assets are grouped by general ledger account number and sorted by asset number within each group.
Amortization Schedule by User Defined (1 to 5)
To see a summary of the activity of the amortized assets, grouped by one user-defined classification. Assets are grouped by the user-defined field and sorted by asset number within each group. Note: There is a report for each user-defined field that you use.
AMT Adjustment Calculation
To print the necessary information for AMT depreciation adjustment reporting (Federal depreciation - AMT depreciation = AMT adjustment). Assets are grouped by category and sorted by asset number within each group.
Asset Disposition by Asset Sales Description
To see a summary of disposition information according to the sale description assigned to each asset. Assets are grouped by asset sale description and sorted by asset number within each group.
Asset, Basis and Disposal Detail Report
To print the asset details for each asset in the Asset and Disposal tabs that you see on-screen.
Assets Acquired in the Current Year
To see a summary of each asset purchased in the current year. Assets are grouped by general ledger account number and sorted by acquisition date within each group.
Depreciation Schedule by G/L Account Number
To see an activity summary for each asset, grouped by general ledger account number. Assets are sorted by acquisition date within each group.
Depreciation Schedule by User Defined (1 to 5)
To see an activity summary for each asset, grouped by one user-defined category. Assets are sorted by asset number within each group.Note: There is a report for each user-defined field that you use.
Lead Schedule by Category
To see an activity summary for each asset, grouped by category, in a traditional lead schedule format. Assets are sorted by asset number within each group.
Lead Schedule by G/L Asset Account
To see an activity summary for each asset, grouped by general ledger account number, in a traditional lead schedule format. Assets are sorted by asset number within each group.
Lead Schedule by Location
To see an activity summary for each asset, grouped by location, in a traditional lead schedule format. Assets are sorted by asset number within each group.
Lead Schedule by Tax Form and Property Description
To see an activity summary for each asset, grouped by tax form and property description, in a traditional lead schedule format. Assets are sorted by asset number within each group.
Monthly G/L Accumulated Account Summary
To see the total monthly cost additions and deletions and their beginning and ending balances. This report is grouped by general ledger asset account. Assets without assigned account numbers are grouped by "No Account Number."
Monthly G/L Asset Account Summary
To see the total monthly accumulated depreciation/amortization additions and deletions, and their beginning and ending balances. This report is grouped by General Ledger Accumulated Depreciation and Amortization account. Assets without assigned account numbers are grouped by "No Account Number."
Monthly G/L Expense Account Summary
To see the total monthly depreciation/amortization expense additions and deletions, and beginning and ending accumulated depreciation and amortization balances. This report is grouped by General Ledger Depreciation and Amortization Expense account. Assets without assigned account numbers are grouped by "No Account Number."Note: This report will appear from the list after expense data are entered.
Personal Property Schedule by Year of Acquisition
To see a summary of depreciation amounts for assets that you marked as personal property. Assets are grouped by the year each asset was placed in service, and sorted by acquisition date within each group.
Projection by Category
To see a five-year projection for each asset. Assets are grouped by category, and sorted by asset number within each group.
Remaining Basis Over Remaining Life Report
To identify assets that were not fully depreciated. Assets within this report are grouped and subtotaled by category.
Steps to assign an account to multiple assets
While converting the asset data from one version of QuickBooks desktop to another, or importing the assets into FAM, it might leave some general ledger accounts. This requires to be manually assigned in FAM.
At first, you need to open fixed asset manager.
And then, in the schedule tab, highlight all the assets that require to be assigned to a specific account.
Next step is to hit a right click the selected assets and then select assign G/L accounts to assets.
Followed by selecting the account and hitting OK button.
You might require to change or add the depreciation method for a fixed asset in order for FAM to calculate the current and prior depreciation correctly.
This can be done by opening the fixed asset manager.
And then from the file menu select client information tab.
Now, select the appropriate depreciation method for the depreciation basis in the methods tab.
The next step is to select OK tab to save the changes.
Depreciate an old asset in QuickBooks
The business might already have some fixed assets even before deciding to use FAM. The steps to be followed to record the fixed assets with appropriate depreciation.
In QuickBooks desktop
For this, select fixed asset item list from the list menu.
And then, choose item and hit new.
The final step is to enter necessary information and choose OK to close the new item window.
In fixed Asset manager
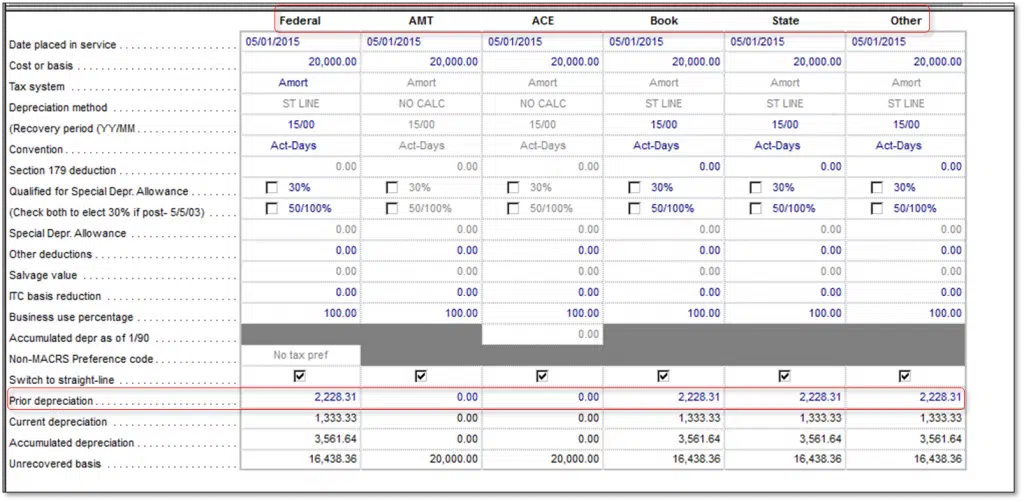
It is important to note that:
In case the current date is entered in the date placed in service field, then the prior depreciation will be grayed out.
Also, it is important to know the amount of depreciation booked in previous years before continuing. In case you do not know this information, then you can speak to the accountant for guidance.
The steps to be followed are:
At first, click on ok tab when the asset sync log window opens.
And then, double click the asset created in the schedule tab.
Now move to the prior depreciation row and then choose the amount displayed.
Also make proper changes by adjusting the AMT, ACE, Book, State, and other columns.
Exporting QuickBooks fixed asset items into ProSeries form 4562
It is important to note that QuickBooks fixed asset manager can only export data to the same year of ProSeries. This is due to QuickBooks desktop is based on calendar year while fixed asset manager and ProSeries are based on tax year. This will mean that QuickBooks desktop 2017 comes with FAM 2016 which can export to Proseries 2016.
The steps involved here is to create the file with the form that is the same as the form in QuickBooks desktop, in ProSeries.
And then in QuickBooks desktop:
Creating FAM asset
For this, select fixed asset item list, from the lists menu.
And then choose item and hit new.
Also enter the fixed asset information and hit ok tab.
You need to import QuickBooks FAM information into fixed asset modules.
It is supposed to select manage fixed asset from the accountant menu. And then in QuickBooks enterprise, select company, manage fixed asset.
After that, choose create a new fixed asset manager client and hit ok tab and hit twice.
You are then required to enter the date and select next.
Now select applicable basis and hit next.
Also choose the default depreciation method for each basis and hit next.
Once done with that, select a method of how you want the fixed asset items brought in fixed assets module from QuickBooks desktop and hit next.
Followed by selecting the type of assets to save to the fixed asset item list in QuickBooks and then click on next.
Also choose finish tab lastly, and hit ok in the asset synchronization log window.
In the fixed asset manager
It is supposed to select export and ProSeries tax from the file menu and click on export.
After that select the file from export ProSeries tax client file list.
And also select the client file and hit export.
Last step is to select ok tab, where the message states “The export has been completed successfully”
In ProSeries
Keep in mind that the import should show completed when you try to open the client file.
And all assets from QuickBooks should show in the asset list of proseries from 4562 depreciation and Amortization schedule and asset entry worksheets.
Importing fixed assets from excel into fixed asset manager
You can transfer the information from the third-party application to FAM as long as they can export the data as comma separated value file
Open the fixed asset manager.
And from the file menu select import.
After that select comma separated to start the Import wizard.
And follow the prompts and complete import.
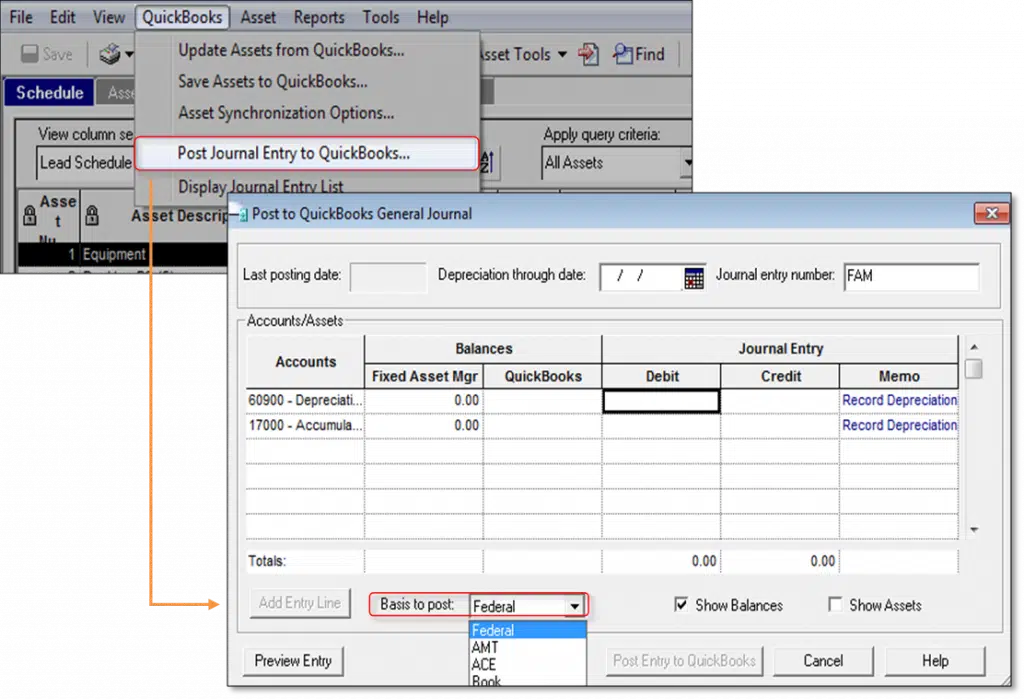
Selecting the basis on which to post a journal entry
It should be noted that in the fixed asset manager, it is possible to change the basis, you are posting journal entries on
We conclude the article over here, with the hope that the information shared in above might be of some help in managing or using fixed assets using fixed asset manager in QuickBooks. However, in case of any query, give us a call at 1-800-761-1787. Our QuickBooks enterprise technical support experts and professionals will ensure to provide you with immediate technical assistance.
Did you stumbled into QuickBooks Error code 12157 and unable to decide what can be done? Your search ends over here. Well, this particular error can be a result of improper installation, data connectivity issues, upgrade errors, update errors, and many more. This error often occurs when downloading payroll updates, installing QuickBooks desktop updates, or connecting QuickBooks to the internet. This error is a crucial error and we recommend you to fix this error in a timely manner. Such an error belongs to 12000 error series, and could also be triggered due to the web connectivity issues with Microsoft Win32 internet. Make a note that this API is used by QuickBooks, to swiftly access the internet protocols such as FTP, HTTP, and Gopher.
You might find this error a bit tricky, considering that we have come up with this segment, where we will be talking about the triggers and solution steps to the QuickBooks error code 12157. Read ahead to unleash effective solutions to this error.
Understanding what is QuickBooks error 12157
QuickBooks error message 12157 is a part of the 12XXX series error, as we mentioned earlier. You might come across such an error due to web connectivity issues in the Windows operating system with Microsoft Win32 internet or WinInetAPI. The QuickBooks accounting software makes use of API to run the internet protocols easily mainly FTP, HTTP, and Gopher. Such an error usually takes place when downloading or setting up updates with the software. We recommend you to resolve this error earliest as it can prevent you from updating QuickBooks or Payroll to the latest release, which may impact security patches, bug fixes, and compliance with tax regulations.
Signs and symptoms of QuickBooks error message 12157
Spotting the error becomes easy, once you are versed with the signs of the error. Though the list isn’t huge, but is most likely to help you in spotting the error code 12157.
One of the basic sign can be the error code itself appearing on the screen with the warning message and crashing the current window.
Another sign can be if the firewall settings and internet security apps are giving any sort of pop-up.
You can also spot this issue if your system crashes for some reason.
Or sluggish system and software is another sign of error code 12157.
What instigates the QuickBooks error 12157?
The error code 12157 in QuickBooks can be triggered by the following factors. Some of the most conspicuous ones have been listed below:
Just in case the date or time on the system is incorrect.
Methods you need to Perform to fix the QuickBooks error 12157
You can perform the following methods so as to fix the QuickBooks error 12157. Let us explore the methods one by one:
Method 1: Change the internet connection
Many times, the improper internet connection settings might also end up in this type of error. In such a situation, you would have to change the internet connection setup. The steps to be followed here are as follows:
First, you need to open the QuickBooks.
And then navigate to the Help menu.
Further, select the Internet connection setup.
Also select Use my computer’s internet connection settings, so as to establish a connection when this application accesses the internet.
You are then required to click on Next.
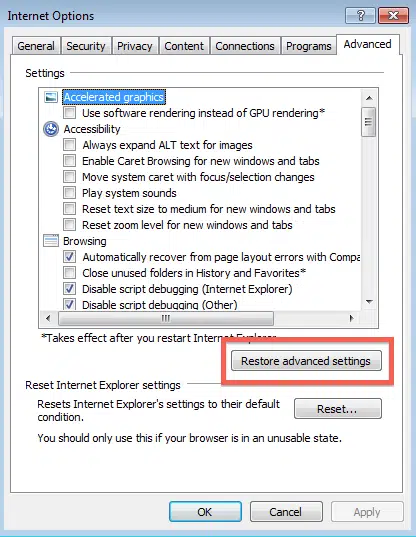
The next step is to open the Advanced connection settings.
Navigate to the Advanced tab.
And choose the Restore advanced settings option.
Lastly choose OK tab and then hit Done.
Method 2: Add QuickBooks and its additional processes to the exception of the firewall
Under this method, you will have to add QuickBooks to the exception of the firewall. There can be situations when the firewall or the internet security settings aren’t configured properly. You would have to ensure that ports 80 and 443 are active. In such a scenario, the following list of files should have access:
This is another method that you can opt for to restore the system. You can perform the below steps to get rid of the error successfully:
In this particular method, you would have to click on the Start your system tab and login as System admin.
You are then required to press Start to catch and click on all applications, accessories, and computer tools and further hit System repair option.
Furthermore, open new window and click on the re-install my PC option, and hit Next tab.
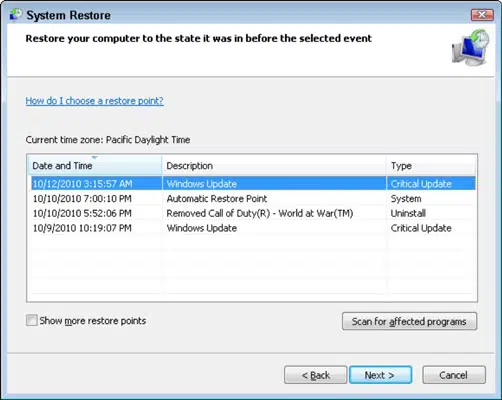
Later on click on Restore point and then hit Next.
Select the Advanced system to restore the point.
Click on Next on the confirmation window and reboot the system.
Method 4: Resetting System's Date and Time
You would have to perform the below steps, so as to tackle out the QuickBooks payroll error 12157 with much ease. You can follow the below steps and reset the system’s date and time:
To start off with, you need to visit the Clock present on the system’s screen.
Then, Right click on the data (or time).
Furthermore, you need to choose the Adjust date/ time from the list that appears after the above step.
Now you need to select the Current date as well as time and close the screen by hitting OK tab after the Date and time has been rectified.
Next, close the QuickBooks software and reopen the same.
End the process by running the QuickBooks update again and inspect whether the error still lingers.
Having reached a conclusion, we are hopeful that the solutions provided above helped you to know about the fixation of rectify the QuickBooks error code 12157. However, if by any chance this error continues to trouble you after following the above steps, then do not hesitate in speaking to our QuickBooks error support professionals and certified experts. For any other queries, comments, or concerns, call us at 1-800-761-1787.
FAQs
What can be inferred from "Error code 12157 in QuickBooks"?
This error in QuickBooks reflects web connectivity problems confronting the Operating system.
What are the errors in QuickBooks Error 12xxx series?
This series encapsulates: 1. "Error code 12007", 2. "Error code 12157", 3. "QuickBooks Error 12052", 4. "Error 12164", 5. "Error code 12031", etc.
Can I use System Restore for Error 12157?
Yes! this error can result from unauthorized modifications of IE configuration. Thus, a System Restore can easily rectify this problem by restoring the computer to its previous state.
Can multiple QuickBooks versions installed on the same system trigger this error?
Yes. Having duplicate QuickBooks desktop versions on one computer can cause conflicts and lead to Error 12157.
Does disabling firewall or antivirus temporarily help in fixing Error 12157?
Yes. Sometimes firewall or antivirus blocks QuickBooks connection to servers. Disabling them temporarily or adding exceptions can resolve the error.
It takes dedication, hard work, and a calm and composed mindset that is full of patients. Once your business is up and running, the best way to keep it organized is by using automated software that helps you to deal with them in a better and more convenient way. One of the software that helps you to keep your business accounts organized is the QuickBooks Online, which also allows you to reprint W2 forms in QuickBooks whenever needed.
QuickBooks Desktop is a software that is quite extensively used in the business sector, for the proper organization of financial statements and transactions. It is regarded as an accounting software similar to that of an ERP solution. The software has many add-ons that make it very essential and benefit the users a lot. These add-ons allow the user to generate automated payrolls, CRMs, etc. QuickBooks Online allows the user to record bank transactions with the help of feeds that the bank provides with its online banking factor.
This allows you to actively coordinate with your bank and be updated with every transaction in the business name. One such feature of QuickBooks W2 forms is its ability to easily comprehend the payrolls and roll out the taxation process efficiently. QuickBooks Online coordinates with the revenue that has to be paid as taxes and allows the generation of W-2 forms very easily. In this article, we are going to discuss how to print W2 in QuickBooks Online and how to print W-2 in QuickBooks Desktop. So, keep reading it till the post.
Every earning citizen of any country has to pay an income tax annually. This amount works as a benefactor sum which the government takes from the citizens and then uses the sum to develop the state or country. However, when you are an employee, you don’t need to worry about paying taxes, your employer deducts the amount from your paycheck and files your tax for you. Therefore, an employer needs to give a detailed account as to how much of the amount is being deducted from the employee’s wages as tax. This is where a W-2 form comes in.
A W-2 form provides you with a detailed account of the amount that has been deducted from an employee’s account on an annual basis, which is then used to file taxes. QuickBooks Online allows an employer to easily develop this form for their employees, making QuickBooks W2 forms highly efficient and reliable.
Why is it important to withhold tax?
If you are an employer, you have to deduct some of the amounts from your employee’s salary to file taxes. However, the sum that is deducted is transferred to the IRS at the end of every month. The employee is not always aware that his employer takes a certain sum from his paycheck and files his federal taxes every month.
Therefore, at the end of the year, when you are calculating the returns, the W-2 form helps you to calculate the accurate amount. Reprint W2 forms in QuickBooks anytime to ensure accuracy and compliance.
Why is it important to attach a W-2 tax form?
It is very important to attach a W-2 tax form to the payslip, you pay to your employees, at the end of the year. It allows you to keep in check the amount that has been assimilated as tax and differentiate it from the returns. Additionally, if you are an employee, the W-2 form will help you to understand the tax deductions that have been made from your salary slip. The W-2 form should always be attached to the salary slip paid at the end of the financial year.
Points to remember before printing W-2 forms in QuickBooks online
There are a number of prerequisites to note before you proceed with the printing of W-2 forms in QuickBooks online. These include:
Make sure that your printer is working fine and that you have the printer driver set up correctly.
Printing a W-2 form with QuickBooks Online is very easy, and can be easily handled well. Therefore, let us go through all the steps to generate a W-2 form.
Open the QuickBooks software on your desktop.
Use the QuickBooks Payroll Tax Center to view, select, and print W-2 forms for employees efficiently.
Go to the Payroll Tax Centre.
Select the Employees option and then click on Payroll Centre.
Now go to the tab File Forms and select the View/Print Forms & W-2s option.
Now, enter the payroll PIN.
Choose the employees in QuickBooks Payroll Centre to generate and print their W-2 forms.
After this step, click on the next W-2 tab.
A list of employee details will open in a dialogue box, select the employee's name whose form has to be generated. Or, select all from the checkbox.
Select Open/Save Selected.
In QuickBooks Payroll Tax Center, select the payroll period and view archived W-2 forms before printing.
A Print Instructions page will appear, specify the reason for printing the form.
Preview the W-2 form in PDF format in QuickBooks to verify details before printing for employees.
A print dialogue box will appear, which will ask you to load the paper into the printer. It is very essential to provide your employees with instructions that they need to follow to file taxes. Therefore, it will be beneficial to load papers that have instructions printed on them for the ease of the employees.
A detailed version of the file will open in a pdf file format. Go through the document carefully, if everything is correct, print the form.
Preview the W-2 form in PDF format in QuickBooks to verify details before printing for employees.
Lastly, go to File and then select the Print option.
It's very convenient to print a W2 Form in QuickBooks Online. But, if you're not a Pro at following instructions, then you could be stuck between. Therefore, if you encounter any type of problem, you can hire an expert who is knowledgeable about QBO. Just dial the toll-free phone number, i.e., 1-800-761-1787. A QuickBooks payroll technical support team will get in touch with you and will help you easily get your W-2 forms printed.
What is a W2 form used for?
W2 forms contain all the important financial information earned by the employees for a calendar period, including any perks and other financial remuneration.
Does QuickBooks mail W2 forms?
Yes. QuickBooks emails your W2 forms both in the pressure-sealed format as well as the secure window envelope.
What are the benefits of a W2?
Employees who ensure timely submission of their W2 forms have the leverage to certain benefits, including minimum pay, medical leaves, overtime, etc.
What is a W2 – 1099 form?
W2 1099 form is issued by contractors for the reporting of their financial resources to the IRS.
How do I report W2 income in QuickBooks?
The steps to report W2 income in QuickBooks are as under: 1. Hit on the Gear icon and choose Taxes. 2. Then, click on the Tax Profile option. 3. Type in the net pay in Your annual W2 Income. 4. Finally, click on the Save tab.
W2 forms contain all the important financial information earned by the employees for a calendar period, including any perks and other financial remuneration.
Yes. QuickBooks emails your W2 forms both in the pressure-sealed format as well as the secure window envelope.
Employees who ensure timely submission of their W2 forms have the leverage to certain benefits, including minimum pay, medical leaves, overtime, etc.
W2 1099 form is issued by contractors for the reporting of their financial resources to the IRS.
The steps to report W2 income in QuickBooks are as under: 1. Hit on the Gear icon and choose Taxes. 2. Then, click on the Tax Profile option. 3. Type in the net pay in Your annual W2 Income. 4. Finally, click on the Save tab.