Mapping network drive will help you in accessing the QuickBooks files on another server, system or drive over the network. It also makes it easy for you to access QuickBooks company file from the shared storage. At times, you might come across with QuickBooks not seeing mapped device problem. In this segment, you would get all possible solutions so as to figure out the QuickBooks not showing mapped drives issue. Make sure to scroll through the post carefully.
Important tips to remember
It should be noted that you can just guide a particular shared folder. Just in case, the client on PC 2 has shared the C: drive with the PC, then you can easily guide that particular C: drive but ensure not to opt for the sub folders. Further, you would have to right-click the company file folder, and just in case you are unable to discover the mapped network drive alternative, and then you should scroll upwards and investigate the more significant level folders for mapping choice. If you are a QuickBooks hosting user, then you would have to check with the cloud admin to sort out the map drive issue.
In such a scenario, the company file is available on a similar PC where you have been using QuickBooks and make a new mapping network drive. You should consider opening the record from the information document’s drive. Also, explore the appropriate document area to open the company record, where you have planned it while appointing the unused drive area.
Steps to fix the QuickBooks not showing mapped drives problem
We have jotted down the measures that you can take, so as to fix the QuickBooks not showing mapped drives problem. Let us explore the steps one by one:
Process 1: View the mapping drives, turn on network discovery
You need to first head to the Search bar and write the Settings and then click on it.
After that, choose the Sharing tab.
Head forward and click on Private network.
You are then required to ensure about the choices that you have opted for from Turn on network discovery and turn on Automatic set up.
Further, click on SaveChanges and hit the Next tab.
Process 2: Map a network drive in Windows
Windows 7
Herein, you need to locate the Windows key and press it.
Further, a list will appear on the screen, and choose the System tab.
Once done with that, head to the Menu bar and click on Tools tab.
And then, choose the Map network drive.
A new window will pop up on the screen.
Now hit a click on box Adjacent to drive.
From the drop-down menu and select the Unused drive.
You are further required to click on Browse and then Navigate the network location.
Track the Network location where your QuickBooks files stored.
Another alternate for the same can be to do mapping with a Server IP address if in any case, UNC path is not working.
You need to click on the Finish tab.
You can get access to find a new driver which will become a network drive.
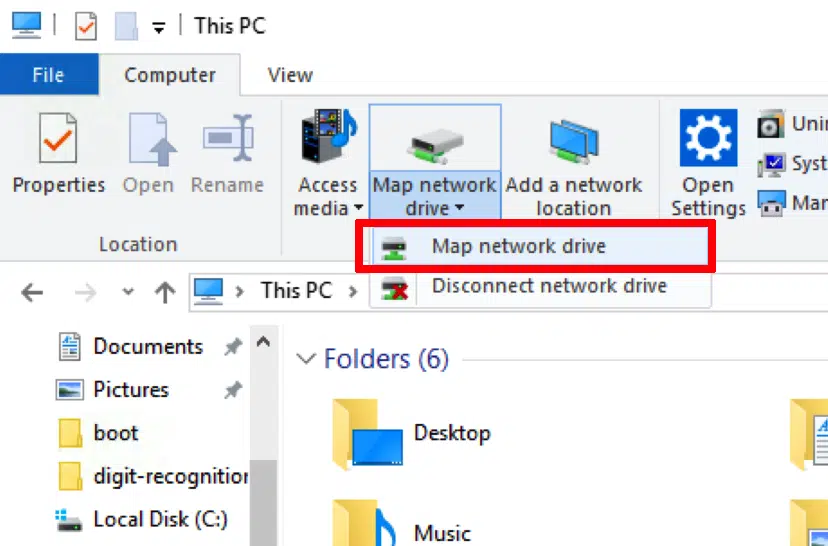
Windows 8 or 10
Head to the Search bar and write on the system.
Hit a click on THIS PC from the list of result.
And right-click on the Map a network drive.
Moreover, select the Map network drive.
You would have to click on the box in front of the drive and select the unused drive from the available Preferences.
Later on, choose the Browse tab, and you need to know the location where your QB file is already stored.
You now have to click on the OK tab and Finish tab.
And try opening QuickBooks with a newly mapped drive.
Process 3: Repairing the issue by obtaining IP and DNS address
You might go for the option to obtain the IP address and DNS manually, due to which the outcomes in QuickBooks do not show mapped drives. The steps involved in here are:
You would have to first open the Settings tab and then select Change adapter option.
And open the Network connection window.
You are then required to enter the next tab and right click the Ethernet and select Properties from the available list.
Further, mark a click on the Networking tab.
Now click on the Internet protocol version 4. In case you found it, tick marked, then uncheck and reach the box.
Then hit on Properties tab.
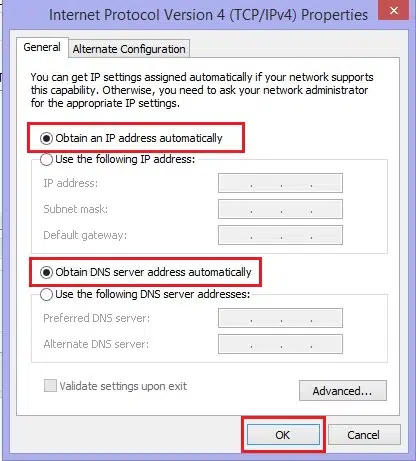
From the IPV 4 properties window, select the options Obtain an IP address automatically and Obtain DNS server address automatically.
End the process by clicking on the OK tab, and you are done with the process.
That was all that you need to know about fixing the QuickBooks mapped drives not showing issue. Get instant help and answers from our certified CPA's, Accountants and ProAdvisors by dialing 1-800-761-1787. Our QuickBooks error support representatives are ready to help You 24/7, 365 days a year!
FAQs relate to QuickBooks Mapped Drives
What is the QuickBooks not showing mapped drives problem?
The mapped drive error generally pops up on the screen when the software is unable to recognize the mapped drives.
What causes QuickBooks not showing mapped drives problem?
Some of the common causes behind the mapped drive error are: 1. The user can experience this issue if the Firewall or antivirus are blocking the network. 2. Another possible trigger if the network settings are misconfigured.
How can I access my company files if QuickBooks is not showing mapped drives?
Following steps can be adapted to open the company files in case of a mapped drive error: 1. Employing the UNC path for opening the company file. 2. Opening the company file after transferring it to the hard drive. 3. Make use of QBO Backup for the creation of a backup of the company file. Also, restore the backup to some new location.
When you update your payroll or software, you might come across server not responding error. The QuickBooks update server not responding error could be seen with an error code 15215. You might also come across such an error when there is an issue with the internet connection. It is very much essential for you to spot the root cause of the error and try rectify it immediately. The major problem is that you might get server not responding error, when getting program or payroll updates.
If you are also a victim of the server update is not responding issue in your QuickBooks, then in that case, reading this post further would surely be of great help to you. Go through this segment carefully, so as to unleash the process to rectify server not responding error.
How to identify the Server not responding error?
Identifying the error becomes super easy once you are thorough with the below signs and symptoms. Let us have a look:
You can easily identify the QuickBooks error if it appears with an error code and crashes all applications repeatedly.
Moreover, if the system regularly corrupts with error 15215 when running the exact same program.
If the error message pops up on the screen.
Your system starts running slow and isn’t responding to your commands.
You further can face the same issue if your desktop occasionally freezes for a couple of seconds.
What triggers the QuickBooks error server not responding?
There can be some possible triggers to the QuickBooks update server not responding. We have jotted down the common ones below:
One of the major causes can be if the setup is imperfect or corrupted download on QuickBooks software.
Another reason can be, any sort of malware or virus that has corrupted Windows system files or QuickBooks payroll program files.
Any sort of issues related to the configuration of the internet explorer browser.
You might further see the following error when any other application mistakenly deletes QuickBooks-related files.
Or, if the internet connectivity is not secure and it is preventing payroll downloads or updates.
That was all you should know about fixing QuickBooks update server not responding error. As always, for any further query, comments, or concerns, call us at 1-800-761-1787. Our QuickBooks payroll experts will ensure to provide you with the best possible support services and will fix the error on your behalf.
FAQs related to this error
What is the QuickBooks Server Update not Responding Problem?
The QuickBooks Server Update not Responding Problem generally appears when the accounting program fails to download and install updates from the server.
What should I do if none of these steps fix the problem?
If the steps discussed heretofore fail to fix Server Update not Responding error, users should reach out to our technical support team.
Made up your mind to get your hands on QuickBooks Enterprise? Well, that is a great decision, but do you know the complete procedure for doing that? Need not panic, as we are here with this piece of writing that will surely brief you on the entire set of steps that might be needed to install QuickBooks Enterprise for the very first time. It should be noted that if you are moving to QuickBooks desktop, then it is important to ensure to back up previous accounting software. You should also keep any software and hardware from the previous accounting system, or have printouts of the information and accounting reports. The IRS needs users to keep the records for 10 years.
This segment will be your holy grail so as to install QuickBooks Enterprise for the very first time. Do not think much, simply scroll through and implement the steps discussed in below. However, if you aren't interested in investing your time and manually installing QuickBooks desktop enterprise, then connecting with our tech personnel using our helpline i.e., 1-800-761-1787 is recommended.
There will be different network options that will show workstations and servers with different install options. You will have to select the option that works best for the company:
Using a central server
You will install the QuickBooks database server manager on the central server. This will also store the company file. And then, install Enterprise on each workstation so that they can access the company file over the network.
Using a peer to peer network
With the help of peer to peer network, the workstation successfully stores the company file. As you access enterprise remotely, you need not install it on workstations. Or you can store the company file on a Linux server and use enterprise, running on Windows Desktop client, in order to access that data.
Testing the network bandwidth
In case you are using a multi-user environment, then you need to test the network bandwidth. However, if you are using a single user environment, then you only needs to check the firewall and AV settings.
Choose a large data file for testing.
And then note the size of the test file in megabytes.
Also, copy the test file from a network location to the system and note the time it takes to copy.
You need to perform the following calculation to determine the network bandwidth:
File size (in MB) x 8/ copy time
For example, 150 MB x 8/ 25 seconds = 48 MB per second (Mbps)
In case the bandwidth is 40 Mbps or more, the connection is fast enough for Enterprise. If it is less than 40Mbps, the connection will be too slow to run Enterprise. You can contact the network admin to learn how to improve the network speed.
Check the firewall and AV settings
In case you are using a firewall while installing QuickBooks, you might need to allow QuickBooks access to the network, especially in a multi-user environment.
Step 2: Installing QuickBooks desktop enterprise on the server
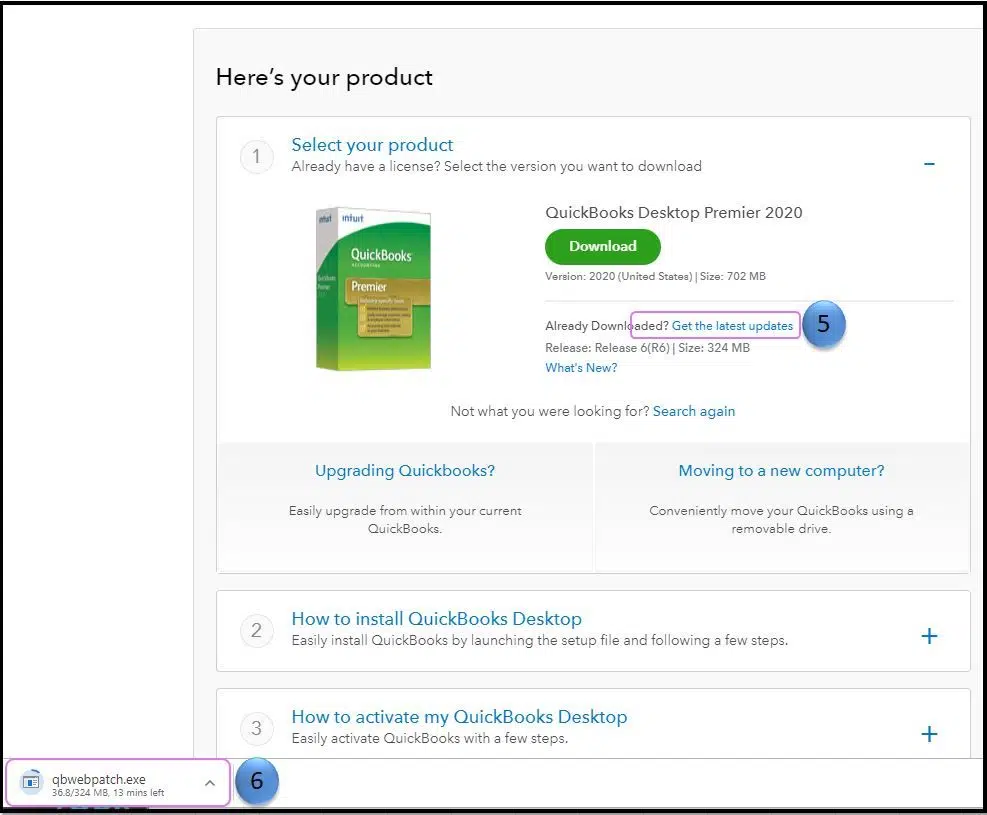
Now that you get started with the installation, make sure that you have downloaded the latest version of QuickBooks. In case you are installing enterprise on multiple workstations, then you might require to use the same version.
Installing QuickBooks desktop enterprise on a Linux file server
You can install QuickBooks desktop enterprise on a Linux server by carrying out a couple of steps.
Configuring the database server manager
After you installs Enterprise on the server, you need to set up the QuickBooks desktop server manager. This is so that users can access the company files stored on the server. You will need to do this on the system where the company file is stored.
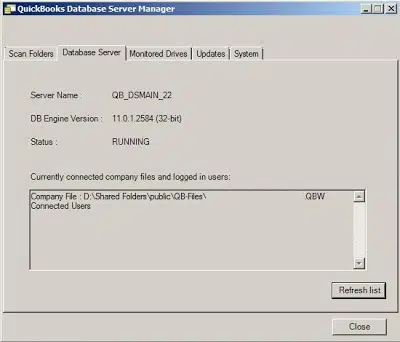
With the help of the database server manager, you can see the status of the service, identify which users are working in the company file, and check for updates.
For opening the QuickBooks database manager:
You can move to the start tab and then select programs.
After that, choose QuickBooks and click on QuickBooks database server manager.
Scanning company files
In order to allow access to other QuickBooks users, you will have to scan all company files on the server.
Initially, you should choose scan folders tab from the database server manager.
And then choose add folder and also select the folders that contain the company file. You will see the folders in the folders that contain the company files section. In case you are not sure where to store the enterprise company files, you need to select scan to search the entire hard drive.
It should be noted that in case you create a new company file or move the company file to a new location, then you might be required to repeat the company file scan process.
Step 3: Setting up sharing
You can set up the ability to share the company file between workstations. This can be done by:
Providing access to the company files
Installing enterprise on all workstations
Setting up multi user hosting
Step 4: Setting up company file and importing
You need to ensure to work with a financial professional or admin who will understand the company’s financial needs. You will need to set up the company file, add users, and know what areas of QuickBooks those users can access. Also, you might require to activate the QuickBooks desktop enterprise.
Step 5: Setting up QuickBooks desktop enterprise for the business
It all depends upon the business, and you might have a few more steps to complete. You need to have a look at the information to ensure that the company file is set up and the data is complete:
QuickBooks desktop enterprise will let the user to apply user permissions to different activities. You can assign user access levels and also can restrict access to specific lists and report groups based on user roles.
You can also use predefined roles, with access to certain activities, lists or reports. Also, not to forgot customize any of the predefined roles or create their own. It should be noted that all users need to be assigned a role.
Once you are done with the above steps successfully, you will be able to install QuickBooks desktop enterprise for the first time and make the best out of it. Installing QuickBooks will enhance your business productivity and efficiency. However, if you are stuck at any point of time, or you need any technical assistance, then we recommend you to connect with our QuickBooks enterprise support team by dialing our dedicated helpline i.e., 1-800-761-1787.
FAQs
Can I install QuickBooks Enterprise on multiple computers?
Yes. You can install QuickBooks Enterprise on multiple computers.
How to install and set up the QuickBooks Enterprise ODBC driver?
Fallowing are the steps to install and set up ODBC Driver: 1. Download and install the ODBC driver and install the driver by double-clicking on the downloaded file. 2. After that, you need to run QuickBooks and head to the File menu and move to Utilities. 3. You now have to click on the opt to configure ODBC driver. 4. And further, make configurations in the general tab, followed by the Messages tab. 5. Once done with that, you need to go to the Optimizer tab. 6. Later head towards, select Use optimizer option. 7. To complete the process, hit on Ok.
How do I set up a new company in QuickBooks Enterprise?
Setting up a new company in QuickBooks Enterprise with the help of following steps: 1. First, you need to open QuickBooks Enterprise and hit a click on the File menu. 2. After that, select New Company option from the dropdown menu and enter your company info. 4. Now you need to choose a fiscal year start date and set up your chart of accounts.
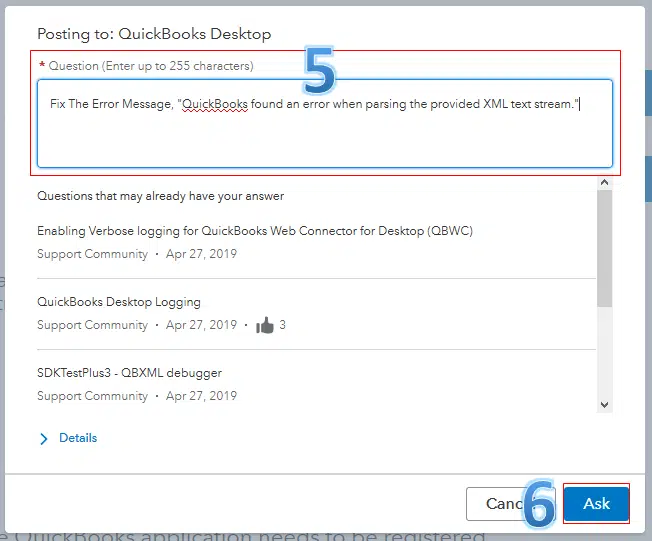
Ran into QuickBooks found an error when parsing the provided XML text stream error and can't decide what's the next move? Well, we have got you covered! This write-up is crafted in a way to successfully chuck off this error from its root cause. You might experience this issue with a warning message saying, "QuickBooks error parsing XML text stream belongs to 0X80040400 error code".
This error code comes out when QuickBooks makes any kind of post to QuickBooks desktop. This type of issue will show up in the ESC client if the direct connect method is applied to connect ESC. It is mostly seen in a specific program in which the ESC Server is deployed to connect as the server hangs. To know more about this error and the factors responsible for the same, make sure to read this article till the end. Moreover, if you don’t want to experiment with the fixation process, then we suggest you to connect with our technical support team using our customer support line. Our U.S. based accounting professionals will be more than happy to help you.
Causes and Troubleshooting Steps for "QuickBooks found an error when parsing the provided XML text stream"
“uickBooks found an error when parsing the provided XML text stream problem error would be triggered by a handful of factors, which we will be discussing below, along with the fixes for the same.
Cause 1: Presence of illegal characters in the XML data that the ESC sends to QuickBooks
Solution: Eliminating illegal characters from XML stream
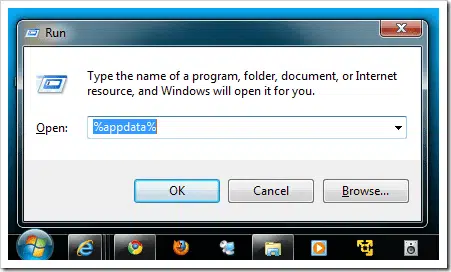
Herein, you are required to click on the Start menu in the search bar. Also, it is supposed to type in %APPDATA% and press the enter key.
Further, the application data folder will appear on the screen, where you have to select the ESC folder from the list.
Next step is to simply delete the QBXML.log file from the folder.
It is supposed to try posting to QuickBooks again.
This would create the same error where, you will have to click on OK tab.
In case you are connecting to QuickBooks with the help of ESC accounting server, the ESC client will hang.
Furthermore, one is required to use a task manager to end the program and later restart it.
In the next step, you will have regenerated QBXML.log in the application data\ESC directory while attempting to post.
And also, open the QBXML.log file and view the latest entry.
Later head towards, launch that record in ESC. Search for any illegal characters.
Now simply remove them and Save the record again.
The final step is to try to post again.
Cause 2: In case the data is pasted directly to ESC from any other program
Solution: Modify ESC
You need to first open the sales menu and choose invoices list view.
Then in the views panel, find unposted invoices list.
The next step is to check the invoice numbers of all unposted invoices.
You are then required to go back to the post to QuickBooks screen under the file menu.
Also, post each invoice individually, not by the duration.
Now you will have to keep posting invoices one by one until the error comes up on the screen. This will let you know exactly which invoice has an ineligible character in it.
Once done with that, open that invoice in the sales invoicing screen in ESC key and then review each line item.
In case you spots any line item contains some text that was copied from outside of ESC and pasted into the invoice. You have to remove that text immediately and retype all the information manually.
Also, remove any kind of hidden formatting or characters that might have been copied and pasted into ESC that might not be visible.
Also, look for any kind of ineligible character or symbols that might be used in the description of an item.
Once the invoices have been rectified, you have to resave the invoice.
Yu are now supposed to go back to the post to QuickBooks screen, and again post that invoice to QuickBooks.
After this, the invoices you rectify should post without any errors or disruptions.
Now one can post the other invoices to QuickBooks as you always do.
Kindly note that if the error still persists, then it is suggested to repeat this process until every single invoice has been corrected.
Cause 3: If the files have a special character (&, -, <, >, \, , ", %, *, ~) in a field that QuickBooks can't process
Solution: Reset ("Actions" -> "Reset") in the invoice and remove the special characters
If you find that your invoice has a some special character in this field, then you need to reset the invoice and remove all the the special characters.
You need to first, head to QuickBooks Settings.
After that, select Account and settings option.
Now from the left menu, you need to select Company tab.
And further, click on Edit in company name section to edit the entry.
You now have to remove any invalid special characters.
And tap on Save, then click on Done to save the changes.
To Conclude!
This drives us to the conclusion of this segment, where it is expected that the above stated set of steps might have worked for fixing the QuickBooks found an error when parsing the provided XML text stream issue successfully. Whereas, if you still have doubts, or if you are unable to resolve the issue by your own, then, in that case, it is highly recommended to connect with a team of professionals who could help you in fixing the issue successfully. You can reach out to our accounting professionals using our dedicated QuickBooks error support helpline i.e. 1-800-761-1787.
FAQs
Q.1. When the XML Text Stream Error occurs in QuickBooks?
A.1. The QuickBooks XML Text stream error generally encounters in the ESC client when the direct connect method is employed to connect ESC.
Q.2. How to fix QuickBooks XML Text Stream error?
A.2. The error can be resolved by following the methods: Method 1: Removing wrong characters in the XML stream. Method 2: By modifying the ESC.
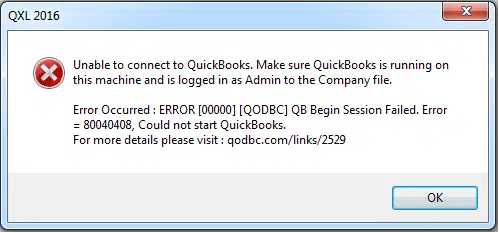
Improper settings and configuration of QuickBooks in multi-user environment often leads to QuickBooks error 80040408. You might come across such an error with a warning message that states “Begin session error code: 80040408 could not start QuickBooks”.
Furthermore, you might find this error code 80040408 to be a bit confusing to handle, considering which, we have created this particular segment, where we will be having an in-depth discussion related to causes and fixes of QuickBooks error message 80040408. Keep stick to the segment and unleash the quick steps to shun off or avoid the error easily. Meanwhile, if you find need of technical support, you may reach out to our ProAdvisor's by bringing us a call at 1-800-761-1787.On that supportive note, let us move ahead!
You might be facing this sort of issue, due to the following factors:
When you try to open QuickBooks startup option, and it is turned as on, then this error could be seen.
Moreover, If you are having different QuickBooks file names. Or if a user has opened QuickBooks to a different file or the name of the QB file has been changed by a user in their systems, and no longer matches the name that was originally used when added to the QQube configuration tool heading.
Another trigger for this issue can be when the software is opened by someone else in single-user mode.
If you have multiple QuickBooks company files at the same time, then such an error could be a great trigger.
Or, if the QuickBooks software is open to a particular company file before trying to load multiple company files at the same time.
Procedures to Resolve QuickBooks Error Code 80040408
Performing the below procedures can be of great assistance in tackling the QuickBooks error code 80040408. Let us check out the below steps one by one:
Process 1:
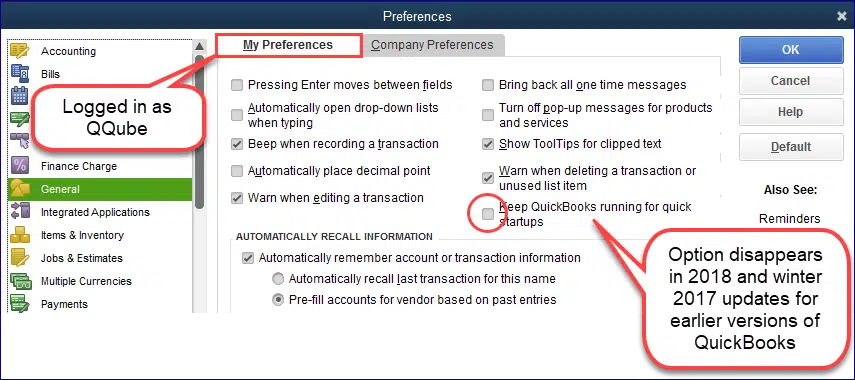
Under this process, you need to Turn off the Quick start feature in QuickBooks.
Further, move to the general and click on My preferences tab.
Next step is to uncheck keep QuickBooks running for Quick startup option.
Process 2:
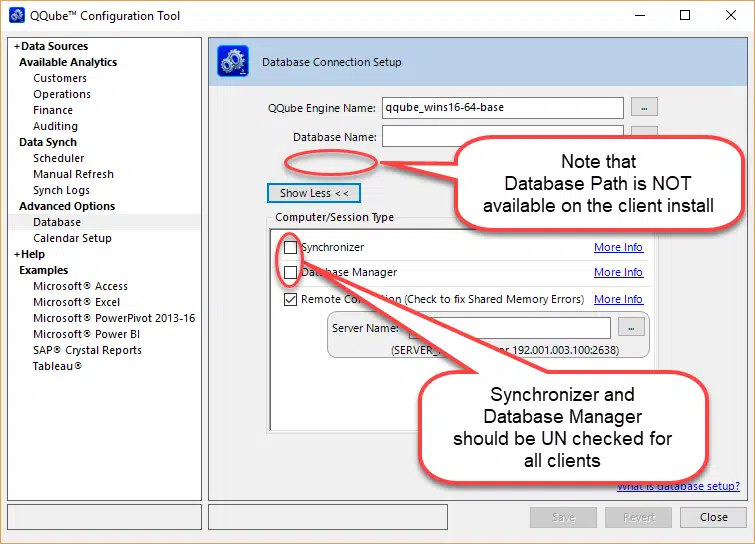
Herein, you need to open QQube configuration tool.
Later on, click on Database and then Show more tab.
Last step is to check-mark the Synchronizer and database manager options in case found unchecked.
In this particular method, you need to Open QQube configuration tool.
And further, click on QuickBooks company list.
You need to hit a click on Change path at the bottom right corner of the window.
You further need to Browse and locate the company file on the system.
Process 4:
Once you open QuickBooks application, make sure to open it up with No company file selected as if there is already a file opened in the application then QuickBooks not permit you to Open multiple files and will give you the error.
Process 5:
In this particular method, you need to check that the name that you have initially set up in QQube configuration tool for the company file tallies the company file name on the system.
However, if you are using QuickBooks in a multi-user mode, then it is not possible to make changes to the name of the company file directly from QQube configuration tool. In such situations you can make changes to the company name file only from the server.
Process 6:
This is the last method that you can opt for. Wherein, you need to logout all the other users from QuickBooks account. This can be seen if some other user is trying to perform any administrative task by remotely logging on into QuickBooks.
Few alternative methods you may try to fix QuickBooks error 80040408
Relocating the company file back to the its original location is suggested, in case the error appeared after changing the location of the company file. You can perform the below steps:
Start off with finding the location where the file is currently saved.
Look for Search bar in the File explorer.
Copy the file with the .Qbw file extension.
Moreover, paste it on the desktop, so that it can be moved.
Along with that open the QuickBooks application and click on Open or restore an existing company.
Also, choose Open a company file and also click on Next tab.
Now, from the Browse section and locate the file by going to the desktop.
Next, hit a click on the File and also hit Open tab.
This will open QuickBooks and now you can easily move the file to any other location.
Final Words..!
That was all that you need to know about the QuickBooks error code 80040408. In case of any query, comments, or concerns, call us at 1-800-761-1787! Our 24/7 QuickBooks error support representatives are ready to help you 24/7, 365 days a year!
Frequently Asked Questions - FAQ's
What is Error 80040408 in QuickBooks?
It is a technical issue that appears when a user tries to access the multi-user mode in QuickBooks.
What causes Error code 80040408?
This error can be incited by the following causes: 1. Multiple QuickBooks files running simultaneously. 2. If the user is having different QuickBooks company file names.
What does s000000000 [qodbc] error 80040408 mean?
S0000 00000 [QODBC] QB Begin Session Failed. Error = 80040408, Could not start. There can be multiple causes behind to the issue "Could not start QuickBooks". It represents that your application is running in multi-user mode or QuickBooks and your application is running in two Windows user sessions.