Learn how to fix errors or messages about not enough disk space or Insufficient disk space or memory on your hard drive:
Looking for a comprehensive guide to clear up disk space for QuickBooks desktop? Or want to know the process to fix issues stating not enough disk space on your hard drive? Well, if yes, then your search ends over here. When working on your software, you might come across some error messages that say that you require more hard drive to finish the task that is being performed in QuickBooks.
You might experience the below stated warning message:
There is not enough space on drive C:\ to extract this package
Free some hard drive space. QuickBooks is running slowly
Error: There is not enough free space
Well, when these type of errors appear, what basic step you would have to do is to ensure to make some space on your system. We have a few methods stated below that you can follow, so as to clear up disk space for QuickBooks successfully. Go through this segment with full concentration to learn some of the basic procedures that you can perform. However, if you don’t want to experiment on your own, then feel free to connect with our tech geeks. Our experienced accounting personnel will ensure to come up with the best possible support services for you.
Steps you can perform to clear up disk space for QuickBooks
You can perform the below steps, so as to clear up disk space for QuickBooks. Let us explore the steps together:
Step 1: Checking the hard drive
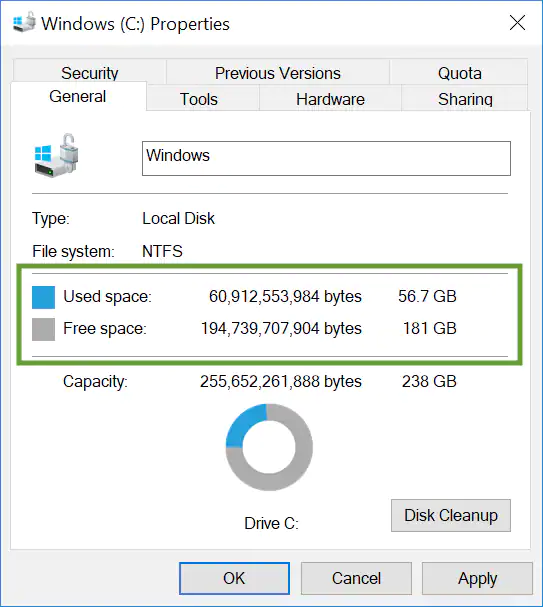
Before heading forward with the steps to make changes, it is very much essential to check the amount of free space that is currently available. It should be noted that QuickBooks needs at least 1 Gb of space, so as to run the install process and 2.5 GB to work at peak performance. The steps to be performed here are as follows:
You are supposed to choose the windows start menu.
After that, type in file explorer into the search and also open file explorer.
You now have to choose my computer from the navigation bar.
Later on, right click the icon for the hard drive.
This will be termed as C: drive.
You should now choose properties tab.
A window showing the available space will appear on the screen.
Step 2: Create space on the hard drive
For clearing up disk space, you can perform any of the below methods. After you have enough of the space, you can easily head back to the original tack. Keep it mind that it is best to have at least 2.5 Gb free for QuickBooks to run optimally.
Clean up your disk
You can run disk clean up and perform the related steps, if you have lots of files in the downloads folder or recycling bin.
Remove the temp folder
One can delete the files in the temp folder to free up some hard drive space. Before starting, you need to ensure that you sign in to the windows as admin.
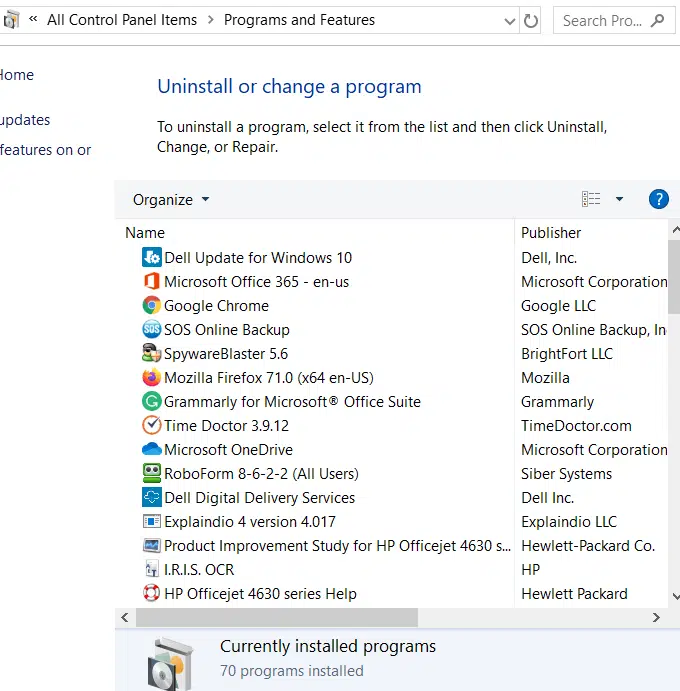
Eliminate programs that you don’t use
Before you delete the files further, you need to check if you can uninstall programs you don’t need or don’t use anymore.
Cleaning up your photos and documents
Just in case you have already removed temporary files and unused programs and still need space, consider moving photos and documents to an external hard drive. It should be noted that photo and media files tend to take up a lot of space.
Important: One of the most important things to note is that avoid moving any of the QuickBooks files. You need to keep them on your local hard drive. Also, note that QuickBooks can’t access files on external hard drives.
Refreshing install file
Just in case you are trying to install QuickBooks desktop and still see an error after freeing up space, then you simply need to use QuickBooks tool hub. Or head to the installation issues section and perform the steps required. You are now supposed to start the install over again.
Steps to consider upgrading
Just in case you have tried all the solutions and you still face issues with the space, then you need to perform the below steps:
You can go for cloud hosting service, if you have QuickBooks desktop enterprise.
Clearing up disk space for QuickBooks desktop becomes a little easy, once the steps that we have mentioned in above are performed in a proper manner. However, if for some reason you aren’t able to perform the steps or if you still face similar issue appearing on your screen, then in that case, you simply need to connect with our QuickBooks enterprise tech support team using our support line i.e., 1-800-761-1787. And our experts will be more than delighted to cater the support services required.
Are you encountering QuickBooks Error Code 3008 and wondering why your software isn’t working as expected? No need to stress — you’ve landed on the right page. This error basically classified as an invalid certificate or certificate not trusted error. You might bump into such an error when the licensed certificate required by the QuickBooks accounting software gets damaged. Since QuickBooks cannot confirm its licensing details, the program refuses to launch until the error is fixed. Such an error can also be seen when there is some malware present.
Moreover, if the files of QuickBooks are themselves corrupted or if the QuickBooks log files are missing, that may also incite Error code 3008 in QuickBooks. You can troubleshoot this particular error with ease by performing the steps that will be mentioned later in this segment. Thus, interested ones can stick around, or if you want some technical assistance immediately, then hop on a conversation with our tech geeks, who will take over the situation.
What instigates the QuickBooks error 3008?
Talking about the triggers to QuickBooks error code 3008, it can be seen when some unknown malware infects the whole system and rupture the licensed certificate needed in QuickBooks. As a consequence of such an error, there can be cases when the software repair tools like QuickBooks file doctor might not work in eliminating the issue. You might be needed to get licensed software to work again in QuickBooks. Moreover, this error won’t let you access the files like the company files, and this might result in the loss of the essential documents if not resolved. Read the complete segment and get the latest steps to eliminate the running error.
Learn the easiest ways to fix QuickBooks error code 3008
Eliminating the error 3008 in QuickBooks can be a little easy with the steps recommended below:
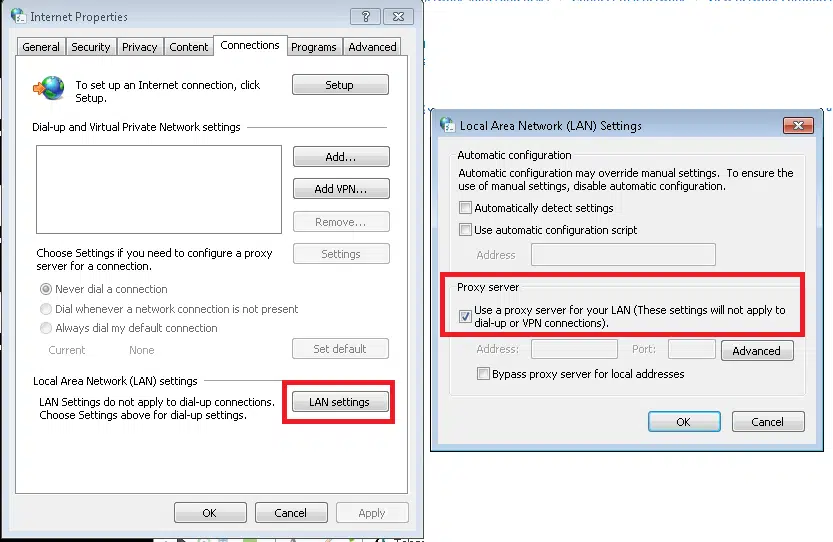
Step 1: Uncheck use proxy option
Herein, you would have to uncheck Use proxy from the IE settings.
For which, you need to click on the Gear icon given on the internet explorer window.
Furthermore, click on Internet options and head to Connections tab.
You would now have to click on LAN settings.
Now you need to uncheck the Use proxy option and by default Detects settings examined.
Then, click on OK tab.
You would now have to run QuickBooks sync manager.
Also, check for the Proxy settings.
Check mark sign on the Proxy server indicates the presence of malware in the system.
If there is no malware, then it will show the secured network.
Step 2: Consulting IT professionals
Just in case you are facing issues even after performing the steps above, then you need to consult some professional. Also, you can ask your IT professionals to help you in reviving the system back, and also can ask them to get back the affected license.
If the above options didn’t favour you much, then you can switch to third party apps that can deal with such issues. Though, it is suggested not to go for such apps till the problem worsens. Or else connect with our team.
Winding Up!
This drives us to the bottom of this segment, where we truly believe that you might be able to tackle out the QuickBooks error code 3008 up to a great extent. Whereas, if you aren’t able to fix the snag, then get on a call with us at 1-800-761-1787, and our tech QuickBooks error support geeks will handle the things for you and chuck off the issue from its root cause.
FAQs
What is error code 3008 in QuickBooks?
This technical error in QuickBooks reflects a damaged license in QuickBooks.
What is the most common cause of Error 3008?
Some of the major causes of this error are data corruption, company fire corruption and virus attack.
How to ward off Error 3008 in future?
To make sure that this technical snag doesn't bother you in future, the user need to perform frequent system scans for viruses and should perform Windows updates.
In recent times, many users have reported Error Message: “Cannot communicate with the company file due to a firewall” in QuickBooks software. This error code basically indicates that the network firewall is interrupting the connection. This technical bug is usually seen at the time when a user tries to connect to the network company file. Also, when you update the operating system or the software to the latest version. You may see the following error message on your desktop screen:
Error:
Cannot communicate with the company file due to a firewall
Problem
It appears that the QuickBooks software on computer QWNER-PC is set up to allow shared access to the company file, but the QuickBooks software on your computer is unable to communicate with it.
Solution
The communication problem could be due to firewall issue. If a firewall is installed on your network, you may need to reconfigure the firewall software.
Please check the firewall settings. We recommend you to download the QuickBooks connection diagnostic tool, which can assess and possible correct the problem.
This can be very frustrating for you, and also it puts a halt to business activities. If you are also facing this error, then reading this article ahead can be of great help to you. In order to assist you in rectifying this issue, we have come up with this post, where we will be discussing the factors causing the issue and a few troubleshooting steps that can be taken to resolve it.
What leads to QuickBooks unable to communicate with the company file due to firewall issue?
QuickBooks error cannot communicate with the file due to firewall can be seen due to a couple of reasons. Out of which the most common ones are illustrated below:
You could come across this error in case a firewall’s updated version is installed in any network.
If the connection of a server gets lost and is set up as properly.
Wrong DNS settings can be another annoying factor.
In case the QuickBooks database server manager stops running on any server, then you could stumble upon such errors.
Methods to resolve "Error: Cannot communicate with the company file due to firewall"
In order to get back to work and get rid of this annoying error, here are a few couple of solutions that you can implement. Let us have a look at those methods one by one:
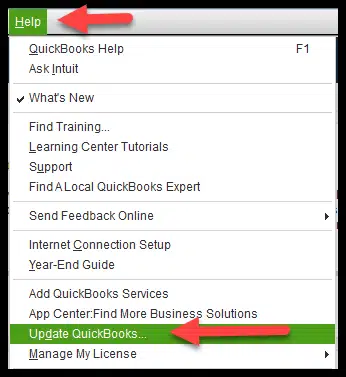
Method 1: Update QuickBooks desktop to latest
In case the QuickBooks software is not updated to the latest version, then the error is probable to occur. Thus, it is recommended to download and install the latest release of QuickBooks desktop. The error is expected to get resolve with this solution, but if not, then move to the next method.
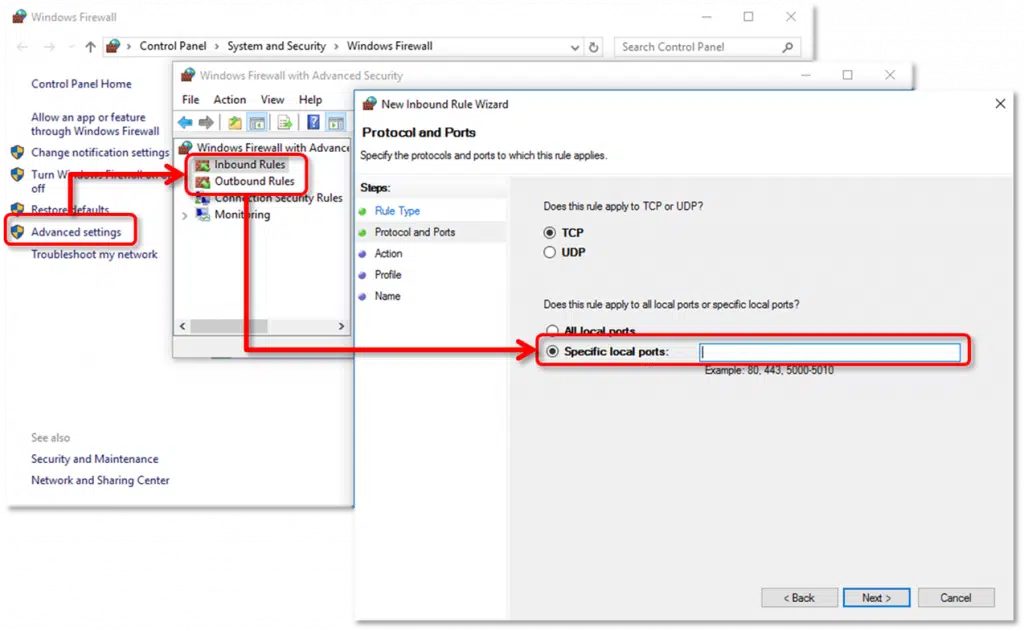
Method 2: Download QuickBooks tools hub and run QuickBooks file doctor
Reviewing the firewall settings is recommended, in order to get rid of this type of error. You are also required to ensure that QuickBooks has permission to go through it.
After performing the required steps to check the firewall settings, if you can open QuickBooks and the company file over the network, then everything is fixed, or else another method should be adopted.
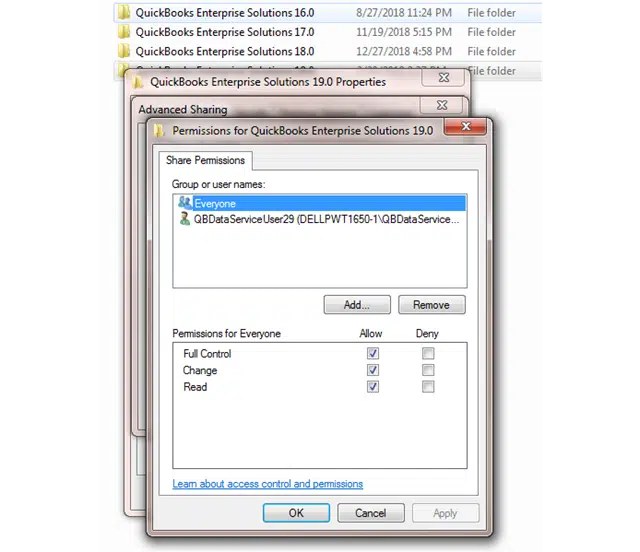
Method 4: Setting up folder permissions
You are supposed to ensure that the folder holding the company file is set up to share the files over the network. This can be done by carrying out the steps below:
Verifying that permissions are set correctly.
It is supposed to open the Windows start menu and open file explorer.
After that, right-click the folder having the company file. And also select properties.
The next step is to select the advanced option on the security tab.
Followed by selecting QBDataServiceUserXX and selecting edit.
Once done with that, set the following settings to allow:
Traverse Folder/Execute File
List Folder/Read Data
Read Attributes
Read Extended Attributes
Create Files/Write Data
Create Folders/Append Data
Write Attributes
Write Extended Attributes
Read Permissions
In case the folder permissions aren’t set correctly:
Right-click the folder having the company file and then choose properties.
After that, choose the security option and hit edit.
Moving ahead, you need to select QBDataServiceUserXX and then opt for the full control tab. Also, hit allow.
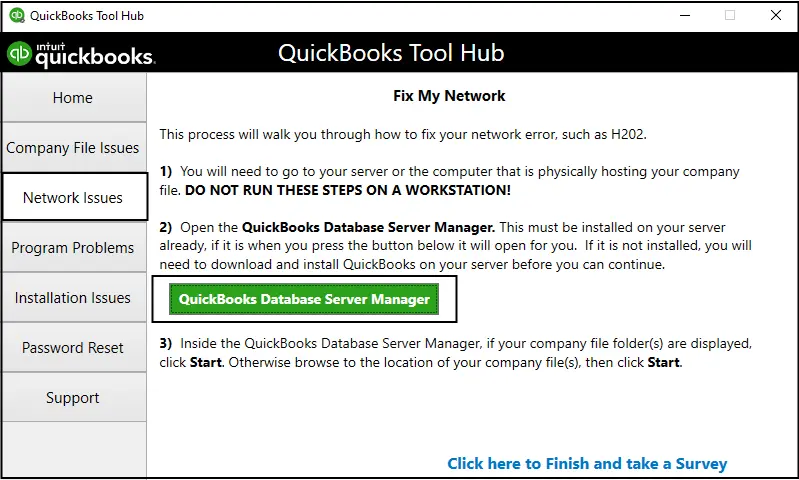
Method 5: Running QuickBooks database server manager on the server, from the QuickBooks Tools Hub
The server system is the one that stores the company file or files. The systems other than the server system are connected to the network and are named as workstations. You can run the QuickBooks database server manager in order to fix the issue. The steps involved in this process are as follows:
The first step is to select network issues.
And then, choose the QuickBooks database server manager. In case QuickBooks isn’t installed on the server, then you will be asked to do that.
After that, inside the database server manager, select start scan, if the company file folder is displayed.
In the next step, the QuickBooks database server manager will repair the firewall permissions automatically.
Now opt for close option when the scan process ends.
Also, after completing the process open the folder you scanned and ensure that there is an .ND file in the folder.
Method 6: Turning off hosting on the workstation
You need to ensure that the host multi-user access option is off on the workstations. The server system should be the only one hosting. The steps to be followed are as follows:
To begin with, open QuickBooks on one of the workstations.
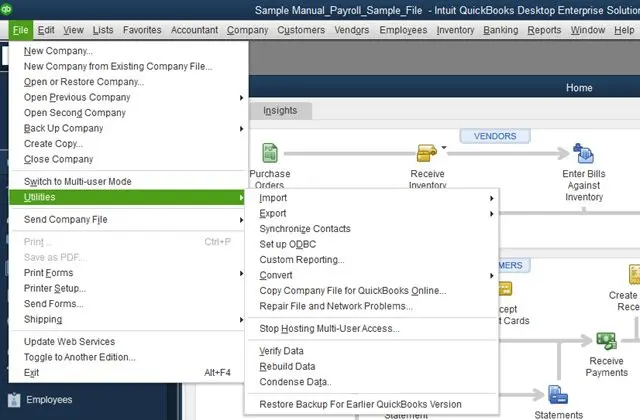
And then, avoid opening the company file and select the file menu and hover over the utilities option.
Now, if the host multi-user access option is available, avoid selecting it and move to next workstation. As it might not be causing the issue
In case the stop hosting multi-user access option is visible, then click on it.
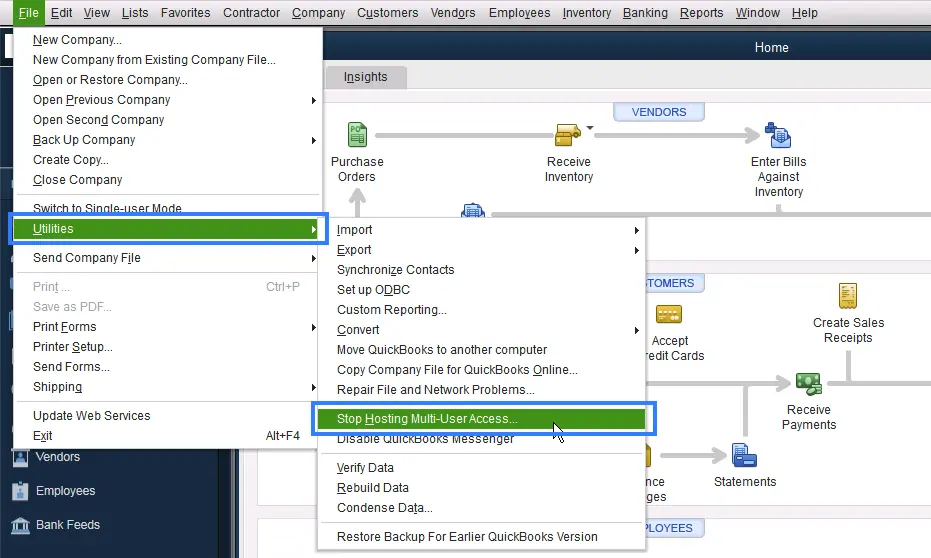
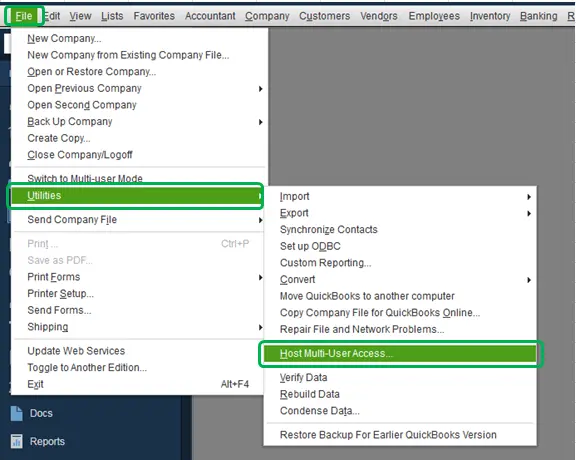
Once you have done checking all the workstations, you are recommended to server computer and then reset the hosting settings. The steps to be followed are:
For this, open the QuickBooks on the server system.
And then, open the file menu and also hover over the utilities tab.
If the host multi-user access option is available, then click on it. And then, repeat this process and then select stop hosting multi-user access. This will reset the multi-user mode.
Now repeat the process once again and select host multi-user access.
The methods and steps we just discussed above are expected to fix Error: Cannot communicate with the company file due to firewall up to a great extent. However, there can be a situation when none of the methods work, then the only option you are left with is to consult a professional by ringing up our QuickBooks error support team at 1-800-761-1787 and ask them for technical guidance in getting rid of all the accounting related annoying errors.
Frequently Asked Questions
Que. What does the "Cannot Communicate with the Company File Due to Firewall" error mean in QuickBooks?
Ans. This error in QuickBooks infers that the firewall is blocking QuickBooks from accessing the company file.
Que. How can I prevent the QuickBooks company file issue due to the firewall?
Ans. To prevent the QuickBooks company file issue due to the firewall, ensure that QuickBooks is included as an exception in the firewall settings. Also, make sure that QuickBooks is up to date.
Often when working on QuickBooks accounting software, you might bump into some or the other error. In this segment, we will be talking about the QuickBooks payroll update error 12031, its causes, and related quick fixes. This error is often seen at the time of trying to update the QuickBooks or when refreshing QuickBooks payroll services. You might also bump into this error at the time of a network timeout. It can also be seen when the firewall and other system security software are highlighted in trouble due to improper or wrong configuration. It should be noted that being a QuickBooks user, you would have to verify the configuration of the system as well as the firewall.
Just in case the configuration is blocking access or identifying the QuickBooks as a threat to the system. Get a better insight into QuickBooks error code 12031, by exploring this segment carefully. If you don’t want to troubleshoot the issue manually, then you can connect with our tech geeks, who will come up with the most effective troubleshooting solutions to fix the snag effectively.
Factors causing the error 12031 in QuickBooks
Typically, the error 12031 in QuickBooks can be caused due to a couple of factors, which we have tried to mention below. Let us have a look:
One of the basic reasons can be Internet or firewall security settings blocking the connection or pages needed for the software to download an update.
Internet Explorer is not set as the default browser, which might stop the software from functioning in a proper manner.
You might end up in such an error, if the internet works on alternate connections, and this stops proper software from working and leads to an issue.
If the server is taking too long to respond to a command, then it is probable for this error to occur.
Measures to Resolve QuickBooks Error Code 12031
As a user you can perform the below given 7 DIY processes, so as to tackle out the QuickBooks error 12031. Let us check out the solutions one by one:
Process 1: Configure the settings of Internet Explorer
The first solution to fix this error is to check for any misconfiguration in the Internet Explorer settings and fix the same.
Under this process, you should first close QuickBooks and open Internet Explorer.
After that go to Internet options in the Tools menu.
Further, go for the Security tab and choose the Globe icon.
Make sure that Content advisor displays.
Now hit the OK tab if it displays Disable.
You need to type the password and then disable the Content advisor.
Go for Connections tab and follow the steps below:
Opt for Never dial a connection only, if the dial-up node isn't used on the system.
Furthermore, click on Ok tab and choose LAN settings.
You now need to make sure that the Automatically Detect Settings have been checked.
Check whether Use a proxy server checkbox is clear.
Record the complete Address and Port.
Uncheck the opt to Use a proxy only if the port is Port 80.
Now, pick OK on the LAN settings.
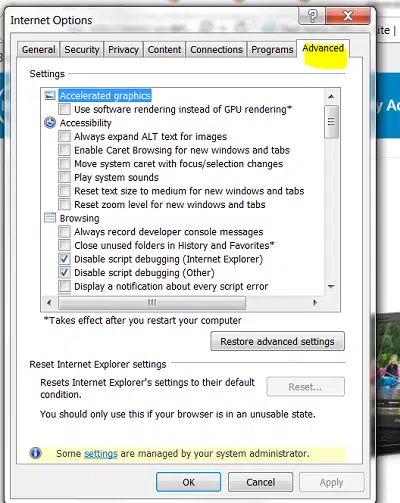
In the next step, go for the Advanced option.
And further, choose the “Restore Advanced Settings”
In the Settings option, locate the Use TLS 1.0, Use TLS 1.1 & Use TLS 1.2 options.
Make sure that the Use TLS 1.0 is checked and Use TLS 1.1 & Use TLS 1.2 is unchecked.
Now press OK tab and shut down the window.
Also close internet explorer and restart the system.
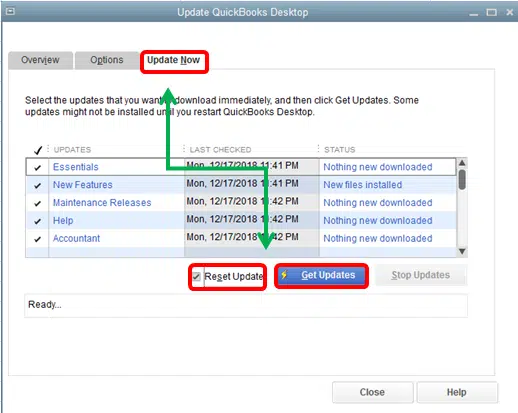
Finally, reopen QuickBooks and try to update it.
Process 2: The Issue is experienced at the time of updating the Payroll
In this particular method, you would have to launch the Internet connection setup.
QuickBooks error 12031 can be identify using following steps:
You may see the error message “QuickBooks is unable to establish a connection to the server” or “Error 12031: Connection to the server was interrupted.”
Check your firewall/antivirus logs for any blocks related to QuickBooks.
If your firewall or antivirus is overly restrictive, it may block QuickBooks from connecting to the internet.
An outdated version of QuickBooks can lead to connectivity issues and generate this error code.
How to prevent QuickBooks error message 12031?
Follow these steps to prevent QuickBooks error 12031:
Always keep your QuickBooks updated.
Ensure your internet connection is stable and fast.
Add exceptions for QuickBooks in your security software to prevent it from blocking connections
Once you perform the above stated steps, we believe that by now the QuickBooks payroll error code 12031 might be resolved and the software might perform its tasks without any hindrance. However, if the error continues to trouble you even after following the steps above, then in that case, feel free to get in touch with a experts today. Our QuickBooks desktop support professionals and certified experts will ensure to provide you with immediate technical assistance.
FAQs
Q1: What is meant by QuickBooks Error 12031?
Ans. Update of QuickBooks can be impaired by Error 12031.
Q2: How can I fix QuickBooks Error 12031?
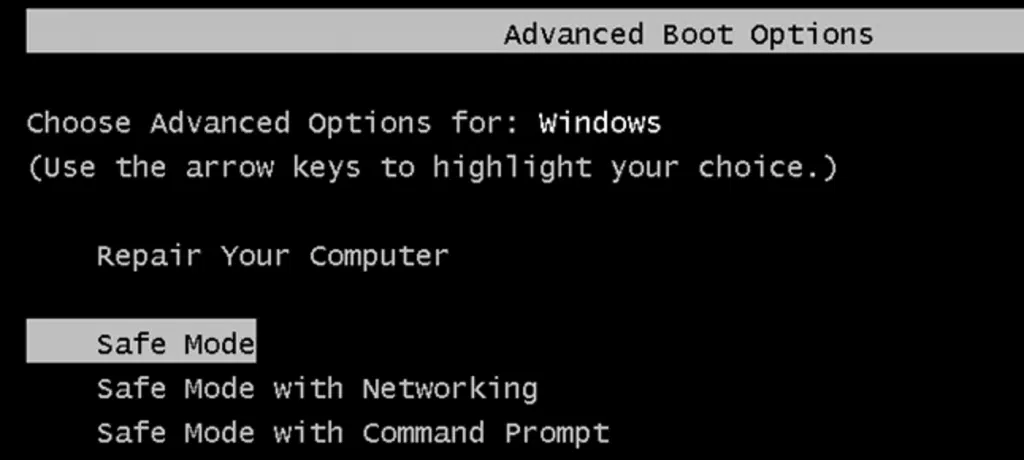
Ans. This error can be fixed by making changes to the Internet settings or by trying the updates in the safe mode.
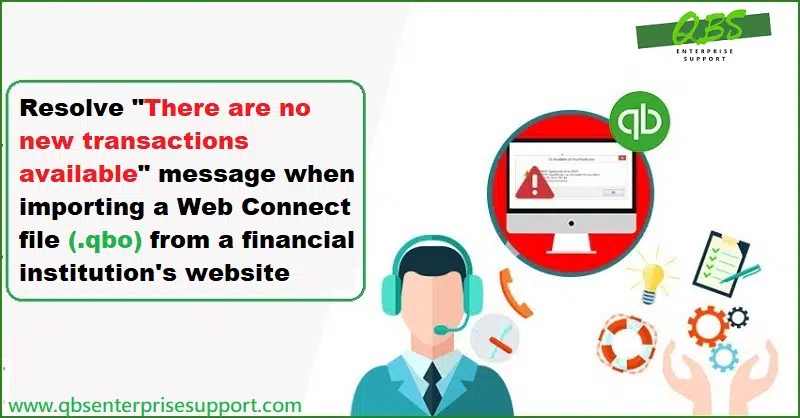
Often while downloading or importing transaction for bank, you might land into issues related to the Webconnect. These issues can appear with error messages like:
QuickBooks seems stuck and asks you to select a new or existing account when you try to download.
QuickBooks is unable to verify the financial institution information for this download.
An error occurred while processing the online banking data.
Web connecting issues are often seen when the files from the bank are incomplete or in the incorrect format. Any kind of changes on the bank’s end can also create issues. In this article, we will be talking about the process to resolve QuickBooks desktop webconnect import errors.
Some important points
Before you hop on to the process to import the transaction in QuickBooks or fixing the webconnect import errors, it is very much important that you consider the below pointers:
Once you are thorough with the above pointers, then you are all set to jump on to the steps.
Method to Fix WebConnect import errors in QuickBooks
By now that you are aware of the important information related to the QuickBooks web connect import errors, it is the right time to begin with the process. We will be exploring each of the steps in detail. So, without further ado, let us begin:
Step 1: Downloading the WebConnect file
To begin with the process, you need to first download the webconnect file directly from the bank, not from inside QuickBooks. The steps involved in this process:
Firstly sign in the bank’s website.
And then look for and download the webconnect file.
Now open QuickBooks and the company file and continue with the steps to import the .qbo file.
In case you spot an issue while downloading or importing the file, there might be issues with the bank. In case you can import and see the transactions in QuickBooks, then you can follow the steps to reset the bank connection.
Step 2: Checking the file from the bank
You need to ensure that the file downloaded from the bank is a .qbo file. It should be noted that the only type of the file web connect can read. In case you are having a different type of file, then it is important to sign into the bank’s website and download a .qbo file. In case you need any help in finding it, then you can reach out to the bank. You can move back into QuickBooks and follow the steps in importing the .qbo file.
Step 3: Reviewing the notifications from the bank
Checking the bank’s website
In case the bank changes the support QuickBooks desktop, you will be notified. You need to sign into the bank’s website and check the messages. In case any of the error messages appear on the screen, then below stated instructions should be followed. In case the bank stopped supporting the web connect, then the steps to disconnect the account should be followed.
Checking the bank’s website for verification requests
A few banks ask users to confirm the identity before accessing the QuickBooks data. After reinstalling or updating QuickBooks to a newer version, this issue arises. You need to sign in to the bank’s website and check the messages. You need to look for any requests for access and follow the instructions to permit them.
Step 4: Switching banking modes
Select the banking menu in QuickBooks.
After that, move to the bank feeds and choose change bank feeds mode.
Now, in the bank feeds section, and then select classic mode.
And then, follow the steps to import the .qbo file
Step 5: Creating a test file
In this particular step, you need to see if the issue is with the company file or the .qbo file. And see if one can import the transactions to the company file.
First of all, select new company from the file menu.
And then choose express start and then fill out the required fields. And then add the word “test” to the company name, which will make it easy to identify.
Follow the steps to import the .qbo file, in the test company. You will also have to import the transactions into the same bank account facing the issue with in the main company file.
The below steps should be carried out whether you could import the .qbo file into QuickBooks.
In case you could import the file
In case one spots the transactions in the test file, there might be settings issue. You can move back to the original company file and then reset them.
For this, open the original company file.
And then follow the steps to disconnect the account the user is facing issues.
You will then have to reconnect to the account.
After that, you can import the .qbo file again.
In case you can import the transactions in the original company file, the error is resolved.
In case you are unable to import the file
If by any chance, you are unable to spot the transactions in the test company file, the issue is likely with the .qbo file from the bank. You need to reach out to the bank for help getting the right file. It should be noted that the banks and financial institutions that use web connect to know the process to handle these types of issues.
You should get to the bank log files, before contacting the bank.
You can also speak to a bank representative familiar with QuickBooks bank feeds and the account activation.
Also, ask them to verify if your QuickBooks account is set up for Webconnect.
What are the requirements to Web Connect import issues in QuickBooks desktop?
Here are some requirements to resolve Web Connect Import Issue:
Ensure you're using an updated version of QuickBooks Desktop.
Import the Web Connect file in the correct format (QFX, QBO, or OFX).
Ensure your bank login information is accurate and up to date.
Make sure you're logged in with Administrator rights.
Verify correct banking settings in QuickBooks.
Keep accounts reconciled for smoother transaction imports.
How to determine Web Connect import issues in QuickBooks desktop?
To determine Web Connect import issues in QuickBooks desktop, check the steps:
Look for specific error messages during the import process (e.g., file format errors, login issues).
Verify that your bank login credentials are correct and updated.
Check if QuickBooks is not up to date.
Your company file is large or corrupted which can fail the import process.
How to prevent Web Connect import issues in QuickBooks desktop?
To prevent Web Connect import errors, check the given steps:
Keep your bank login information accurate and updated.
You need to make sure the downloaded file is not corrupted or too large.
Review and clear any duplicate transactions before importing.
You have to ensure your bank compatibility.
Conclusion!
Towards the end of this article, we believe that the information shared in this article will be of much help in fixing the web connect import errors in QuickBooks desktop. However, in case of any query or in case the errors continue to trouble you, feel free to contact a dedicated QuickBooks error support team who provides best possible support services. Feel free to connect at any point of time, our experts will be happy to help you.