Are you facing the payroll error code 15221 and unable to decide what to do? Well, we are here to help you. This article will provide you with all the information related to QuickBooks error code 15221, its causes, and viable fixes. Make sure to read this article carefully. This error is seen when you go through a basic method of updating QuickBooks desktop or when a user tries to download a payroll tax tables update.
This type of problem could be seen when opening the updated version of QuickBooks desktop or payroll software. As a result of this problem, you might not be able to launch the updated software. Get a better insight by reading this article further. Or contact our support team using our toll-free 1-800-761-1787.
Steps to fix the QuickBooks payroll error 15221
The easiest way to get rid of payroll update error 15221 in QuickBooks can be by updating the version of Internet Explorer already downloaded on the system. Moreover, manual update downloading is to be by the latest update from Microsoft download sender. You can also resolve the this error, after updating the Internet Explorer. In case the problem persists, then you are suggested that the Windows program files might be running on the system is highly unstable or damaged.
It should be noted that the Intuit doesn’t provide or support any assistance for Windows products. To fix the issues related to the operating system, it is recommended to consult support team of the concerned product for necessary assistance.
Solution 1: Improper configuration of Microsoft internet explorer
Often, some software, even after getting updated, fails to begin as the inaccurate configuration of the Internet Explorer that works side by side while you are downloading the updated version of QuickBooks. This results in a major issue of the files not matching with the C-Run time files of the Internet Explorer.
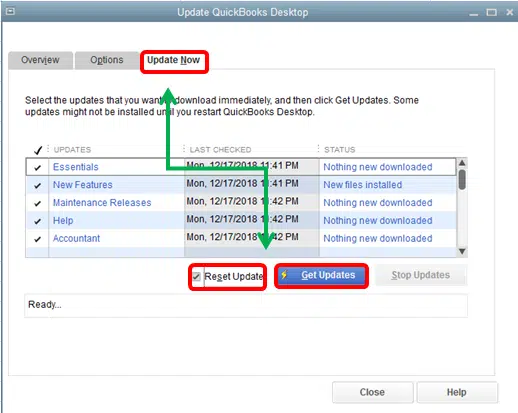
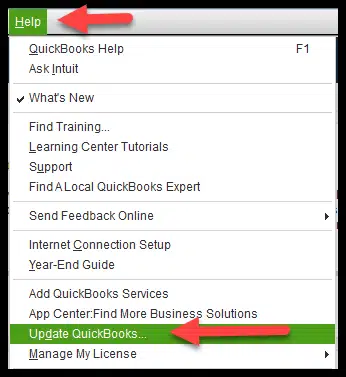
Solution 2: Update QuickBooks desktop to the latest release
Find out how you can keep your program updated to ensure that you are always equipped with the latest updates and features.
Close the company file and QuickBooks.
After that navigate to your Windows Start Menu.
Find QuickBooks Desktop and hit a click on the icon, then right-click and select Run as Administrator.
If you're on the screen that says No Company Open screen, then go to the Help menu and then choose "Update QuickBooks Desktop".
Next steps is to hit a click on your Option tab.
Also choose "Mark All" and then hit a click on the Save option.
Now click on the Update Now tab and choose Reset Update checkbox.
If you're ready, choose the option to Get Updates.
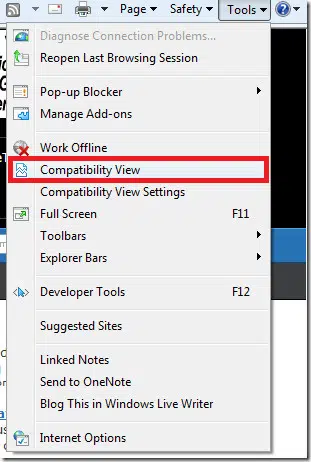
Solution 3: Adding Intuit as a trusted site
The addition of Intuit as a trusted website prevents your browser from blocking content from websites.
Initially, select the Customize and control Google Chrome⋮ icon and select Settings.
In the left pane, you need to choose the Privacy and security optionand then select Site Settings.
The next step to follow is to choose Cookies and site data.
Now select Add option in the Allow section.
End the solution by entering the *intuit.com, then select Add to save.
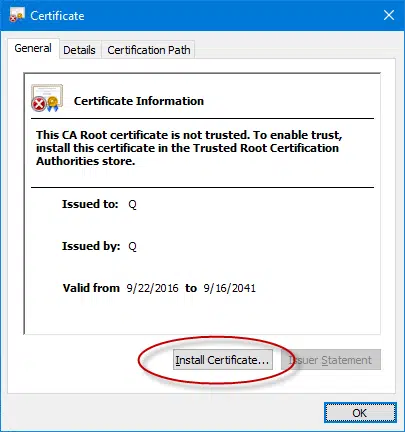
Solution 4: Install the Certificate
In the file location window, search for the Application File ( .exe file)
After that, hit a right-click and choose the Properties. The Application file Properties window opens.
Now choose the Digital Signatures tab, then select any of the options from the Signature list field.
Also choose the details opt.
In the Digital Signature Details window, you need to choose "View Certificate". Here you will see that the certificate window will open.
Under the General tab, in the Certificate window, choose Install Certificate.
When you are on the Certificate Import Wizard welcome screen, make sure your Store location is selected as Current User.
Now hit a click on Next step.
From here, on the Certificate Store window, your Windows has already chosen the certificate store in accordance with the nature of the certificate.
You need to click on Next, and then hit on Finish.
If you are prompted to confirm that the import was successful, you need to select "OK".
Important: Follow steps 2-6 for the remainder of the Security Certificates in the Digital Signature list.
Solution 5: Manual steps
If the solutions discussed till now did not help in fixing the QuickBooks error 51221, then in that case, you should resort to the manual method of fixation described below:
You will first have to reinstall QuickBooks desktop.
After that, open Internet Explorer.
And move to the Gear option and click on the Internet options.
Move to the Security tab and select trusted sites.
Click on the Site and Add the website.
After adding the website (Intuit), choose the close tab.
And also, click on Apply and hit the OK tab.
At times, an expired windows certificate might lead to such an issue; in that case, you need to run a Windows update. For that, open the Windows Update from the Start menu and click on the option to check for updates. Check mark all the necessary updates and get them downloaded. Finally, restart your computer and let these updates install on your computer.
Tackling the QuickBooks error code 15221 in payroll can be much easier if you know the exact steps. However, if you have any queries or if you are unable to get rid of the issue even after performing the required steps, then, in that case, contact us at 1-800-761-1787. Our QuickBooks payroll error support team will be pleased to assist you with your ongoing problems.
FAQs
What is QuickBooks Error 15221?
Error code 15221 in QuickBooks is observed mostly during the updating process QuickBooks payroll.
Can I update QuickBooks manually?
Yes! QuickBooks can be updated manually from the official Intuit website.
Can conflicting programs cause QuickBooks Error code 15221?
Yes! This update error can be caused by conflicting programs or processes in the background.
What causes error 15221 in QuickBooks?
The QuickBooks error message 15221 can be caused due to the following reasons: 1. Incorrect configuration of internet explorer. 2. Another reason can be if the digital signatures aren’t supported by the browser. 3. If the antivirus is restricting from downloading the QuickBooks update. 4. Moreover, if the QuickBooks data files are corrupted.
Is QuickBooks Desktop Payroll still available to purchase?
New sales of many desktop Payroll SKUs ended in 2024: existing Desktop Payroll subscribers can continue renewing on supported versions, and discontinuation policies outline what stops working if unsupported.
Which Desktop versions receive current payroll tax table updates?
Recent tax tables are delivered to supported releases (e.g., Desktop 2024/Enterprise 24.0); older versions may not download current tables.
What’s the best general checklist for payroll errors?
Updating QuickBooks and tax tables, validating payroll subscription, verifying Internet options/TLS 1.2, clear SSL, allowing QuickBooks in firewall setting, and using the repairing tools such as Tool Hub or File Doctor to fix data damage.
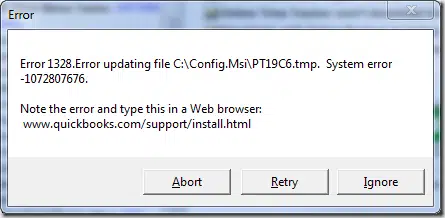
Get to know you can resolve Error 1328. Error updating file C:\Config.Msi\PTXXX.tmp:
Well, as the error itself says, it is an update error. QuickBooks update error 1328 might be seen when updating QuickBooks desktop. This error could show up as a single error or before another error, and also the files referenced by these errors are usually like C:\ config.msi\ PT ** TMP . If you are also facing this problem, then reading this segment can be of great assistance.
To get a better insight into this error, its causes and fixes, make sure to read this article carefully till the end. You can also connect with our technical support team for any further technical assistance through the helpline at1-800-761-1787 or the live chat. With years of experience under our belt, our experienced U.S based professionals are well-versed in the technicalities involved while troubleshooting QB-related problems.
What does QuickBooks error 1328 means?
Error 1328 in QuickBooks desktop is just another error in QuickBooks that occurs when users embark on the process of updating or installing the accounting program. Also, several users have encountered this issue at the time of repairing the QuickBooks software. The following error message might be appear on your desktop screen:
Easy Methods that can be performed to remove QuickBooks Error 1328
You can perform the following methods, to easily rectify the error 1328 when installing, uninstalling, updating, or repairing QuickBooks Desktop. Let us have a look:
Method 1: Locate the config.msi file
The first method that can help in fixing such error is to rename the file named 'config.msi' .
The first step is to right click on the Start key and then select Explore.
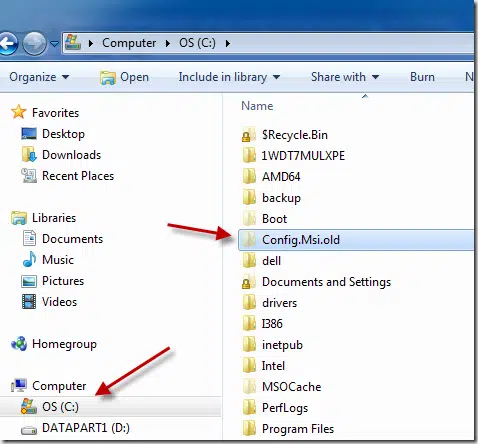
Double click the C drive key.
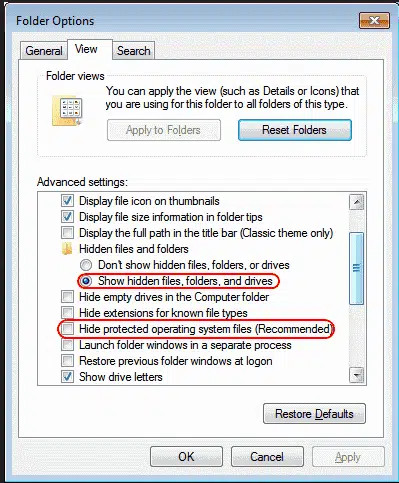
This will display all the Hidden files or as folders.
Click on Tools options and after that select folder.
Hit a click to View the tab option and then select all Hidden files as well as folders.
Click on the Apply all changes you have been made and press OK tab.
This appears to operate all necessary system files.
Right click on config.msi and select Rename it.
To save the changes in the file name, hit anywhere on the screen.
This will hide and protect the operating system files including all necessary hidden files and folders again on the system.
QuickBooks software ceases to operate without some essential Microsoft components. These elements consist of C++, Microsoft.net, and MSXML. Therefore, you must make sure that these components are installed in your system. To download them, follow the instructions given below:
Initially, access the ‘Start’ menu.
After that type ‘Update’ into the ‘Search’ field.
You are then required to choose the ‘Check for updates’ option.
When all the important updates show up on the screen, download them, and afterward, restart your computer.
Allow the system to install all these updates. The process may take considerable time, depending on the size of the files and the speed of your system.
Once finished, launch the QuickBooks desktop software and proceed with your usual operations. Check if the update error 1328 shows up again.
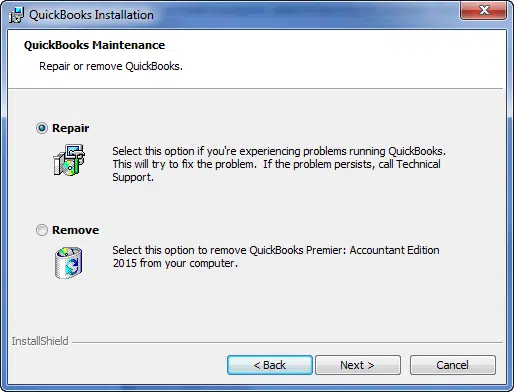
Method 4: Repair the QuickBooks installation process
Initially, you need to open Windows and log in as an System Administrator.
Open the Windows control panel tab and select Programs and Features.
This will locate the QuickBooks product heading section and select it and click to Uninstall them by changing any tab.
Select the Repair tab when QuickBooks installer appears.
Run QB application on the system, then need to apply patch when it completes.
In case a user is fortunate then only the patch will be applied.
In case the error persists, then reach out for technical assistance.
For this, open the Windows Start menu and visit the Control Panel.
Then move to Programs and Features or Uninstall a Program option.
Opt for QuickBooks desktop from the list of programs and hit on the Uninstall/Change button.
Hit on Next tap.
Wait for the process to finish. Now, restart your PC.
Step 2: Clean Install the QuickBooks Desktop
Now, you should restart the installation process that you followed at the time of installing the software afresh after purchasing it.
The first option is to make installation process of a QuickBooks of a QuickBooks as directly from the installation CD drive.
You can also be installed QuickBooks software through a downloaded file as given into the system.
Directly installed QuickBooks software from a CD
Download or simply install QuickBooks program with the help of a manual guide or a user can ask expert advice that is the best option to get quick assistance in less time.
You can either use the CD for installation or else install the software using the downloaded .exe file. In either case, you will require the Product and license keys. So, make sure that they are available with you at the time of installation.
The very first step here is to apply any registry repair tool and repair the damaged registry entries that are related to the QuickBooks application.
Another step can be using a malware removal tool, and let the users fix any type of malware infectious attack from the system, and get rid of all malware attacks from a system.
Next step is to remove all the unwanted or junk files from the system.
It is essential to uninstall all the outdated PC device drivers.
Restore it by doing undo through recent system changes, this applies your Windows system.
Uninstall and reinstall QuickBooks desktop.
Run Windows system file checker by scanning.
Install all essential Windows updates.
Summing Up!
By the end of this article, it is expected that you might be able to get rid of the QuickBooks update error 1328. However, if you are unable to troubleshoot the issue even after performing the steps above, then in that case it is suggested to get in touch with our QuickBooks error support team via our helpline i.e., 1-800-761-1787 or through the live chat option and let them work on your behalf.
FAQs
How can I prevent QuickBooks update error 1328 in the future?
To prevent this error in the future, users should implement the following pointers: 1. The internet connection during the update process should be uninterrupted. 2. Quit all unnecessary programs in the background. 3. Temporarily turn off the antivirus before commencing the QuickBooks updates.
Can I encounter update error 1328 on a Mac?
No! This update error is usually encountered on Windows systems. Although update errors are also encountered in QuickBooks for Mac as well. Error codes associated with them may different.
What is the Config.msi file in QuickBooks?
The QuickBooks Config.msi file is a temporary file that is employed during the installation and uninstallation of QuickBooks.
What tools in QuickBooks Tool Hub can fix the update errors in QuickBooks?
The Tool Hub program is an encapsulation of multiple features that aid in fixing various QuickBooks desktop errors. These tools include: 1. Quick Fix My Program 2. Company File Issues 3. Network Issues 4. Program Problems 5. QuickBooks File Doctor Tool 6. Component Repair Tool, etc.
Does Windows Update lead to loss of Quickbooks company file data?
No! Updating Windows doesn't cause any company file data loss, but it is suggested that users create a backup of their company files before updating or restoring Windows.
Are you in search of the right set of steps to get rid of QuickBooks payroll is not taking out taxes problem? If yes, then your search ends with this segment right here. The QuickBooks payroll is not taking out taxes is not a common problem and can be seen due to a couple of factors which are elaborated later in this segment. Get a better brief about this issue by scrolling through the segment carefully.
Why you land into QuickBooks Payroll is not Taking taxes out of Payroll check error?
There can be a couple of factors that can drag you in this sort of issue. These factors include the following:
One of the primary reasons can be if the gross wages belonging to the employee a per the last payroll are too low.
Another typical reason causing this problem can be if the payroll tax tables is outdated.
You can also end up with this issue if the total annual salary of the employee is more than the salary limit.
Outdated payroll tax tables can also be lead to this issue.
Solutions for QuickBooks Payroll aren't calculating Payroll taxes problem
Dealing with payroll taxes errors in QuickBooks is easy, as they have a definite set of solutions. Below we have tried to mention the common solutions that you can implement so as to get rid of the issue successfully.
Condition 1: Just in case the year-to-dateand quarter-to-date wage or tax information of the employee is incorrect
You can view the taxes of all the active employees in an employee withholding report. This process involves the following set of steps:
Initially choose Reports.
Head to the Employees and payroll.
Hit a click on Employee withholding.
Tap on Customize Report tab.
Choose the columns as per your requirements.
Hit a click on the Items you want to display on your report in the display list section.
Choose OK tab to Save changes.
Ascertain if your Employees are set up accurately for state, local, and federal taxes.
For editing employee info window, ensure to double click the Employee’s name.
Moreover, the employee information window will appear on the screen.
Hit a click on Payroll info.
Tap on Taxes tab.
Hit a click on Federal, state and/ or other tab.
Ensure that employee is marked correctly for taxes.
Condition 2: If you have bought a QuickBooks payroll subscription
In this scenario, you can save the Paycheck of the employee depending upon the calculations you made earlier.
Change the Check details of the employee for ensuring accurate calculations.
Manually enter both the Withholding and Employer matches in QuickBooks payroll.
Just in case you have already subscribed the assisted version of payroll, then you might face issue due to the Payroll taxes being filled by intuit.
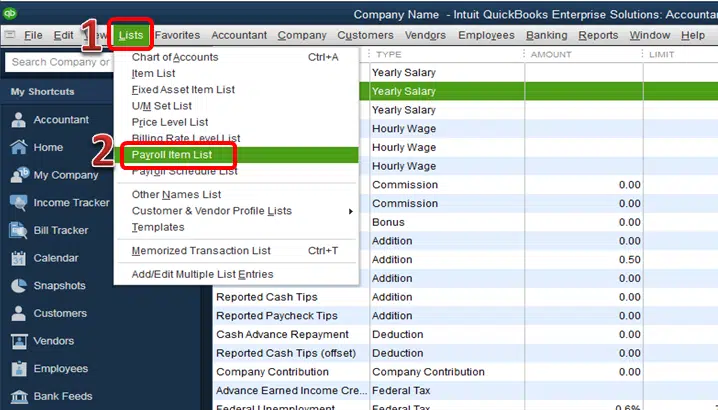
Condition 3: Check if the annual limit has been set or reached
If a payroll item is not calculating correctly and it stops calculating on a paycheck, there may be a checkmark in the checkbox of an annual limit box and default limit which the employee has reached. You can verify the setup of the item by:
Select Lists and Payroll Item List from the top menu bar.
After that right-click on the payroll item that you wish to modify and choose Edit Payroll Items.
Next, you need to scroll down to the Next screen until you reach the Limit Type screen.
Now verify that the box at the bottom is correct.
If the limit is correct, the employee's payroll should stop calculating at that limit.
Update the amount if the limit is not correct.
Next is to do is under Limit Type, Verify that you have chosen the right option.
Annual - Restart every year
Monthly – Restart every month
One-time limit
You can change the default limit or Limit Type selection to suit your needs.
End the process by hitting a click on Finish.
Alternative method to correct Payroll taxes in QuickBooks
Method 1:
You need to ensure that the software is in the latest version. And review the employee’s tax setup, as it affects the process of QuickBooks calculating the taxes. After that revert the employee’s paycheck. This would refresh the payroll information to calculate the taxes on the transaction. This can be done using the set of steps below:
You need to open the Employee’s payroll information.
Later on, right click the name of the Employee which is highlighted in Yellow color.
Choose Revert paycheck.
Method 2:
Aft first, you need to open our QuickBooks,
Afterwards, Hot a click on Employees.
From here, you need to select the Get Payroll Updates option.
Now select the Download entire payroll update radio-button.
Also choose Update opt.
You need to wait for the process until the complete update is finish.
Once the above mentioned applied successfully, you can try to run your payroll again for correct taxing.
The above segment would have helped you in tackling through the QuickBooks Payroll is Not Taking Out Taxes issue successfully. If you still have any issue or need more information about the payroll taxes, then our 24/7 QuickBooks payroll technical support personnel can rescue you from this annoying error. All that is needed is reaching out to our tech geeks right away at 1-800-761-1787, and they will get back to you with immediate solution.
FAQ's
Why aren't taxes being taken out of paycheck?
Taxes may not be taken out of a paycheck due to an error in the payroll setup, incorrect employee information, or an exemption claimed on the W-4 form.
How do I fix federal tax withholding in QuickBooks?
To fix federal tax withholding in QuickBooks, go to the employee's profile, edit the W-4 form, and update the tax withholding information.
Why is payroll not taking taxes out of checks?
Payroll may not be taking taxes out of checks due to incorrect tax setup, outdated software, or incorrect employee information.
Why Quickbooks not withholding payroll taxes?
QuickBooks may not be withholding payroll taxes due to incorrect payroll tax setup, outdated software, or incorrect employee information.
Get apprised of the convenient approaches to reconcile payroll liabilities in QuickBooks.
Are you hunting for the right steps to reconcile payroll liabilities in QuickBooks? All your questions will be answered by this informative piece of writing, which demands your keen attention. Well, payroll liabilities in QuickBooks can simply be categorized into two basic categories:
Employer Expenses
Employee Liability
These two are further classified into sub categories: federal income tax, state income tax, social security withholding, and Medicare withholding. It should be noted that some liabilities that are required to get recorded in the liability accounts shouldn’t be entered into the expense account. Moreover, the balances in these liabilities should be zero. Reconciling isn’t only associated with cross-checking the current and the savings bank accounts, rather it is a lot more than that.
This piece of writing is written with an intent to brief the readers with the entire steps involved in reconciling payroll liabilities in QuickBooks. Get a better grip onto the process by reading this segment with much care. you can also connect with us at personal level using our tech support line.
Important steps for reconciling payroll liabilities in QuickBooks
Below steps can be perform, so as to reconcile payroll liabilities in QuickBooks successfully. Let us check out:
1st Step: Creation of Liability accounts
Start off with making a list of the liability accounts
Below is the list of the payroll liability accounts that are required to reconcile.
Federal income tax withholding payable
Statement income tax withholding payable
FICA tax payable
401k or retirement benefit premiums payable
Health insurance payable
2nd Step: Creation of Transaction labels
Furthermore, you need to create transaction labels to separate employee and employer payroll liability transactions
Herein, one needs to turn on tagging from the settings tab and then the QuickBooks lab
You need to look for the tags feature and turn it on by clicking on the done tab when getting the confirmation
Further, create a new tag group
You need to head to the settings tab and go for tags
Also choose new and then tag group
You will have to name the new tag group payroll liabilities and hit save.
3rd Step: Creating payroll liability sheets
You need to now set up payroll liability reconciliation sheets.
4th Step: Printing the reports
Moreover, print reports from your QuickBooks payroll software and general ledger. You can either print these reports or send them via the email, as per your convenience and requirement.
5th Step: Reviewing the transaction
Once done with that, you need to review each payroll liability transaction and also reconcile outstanding items. This step is important as it double-checks any correction or mismatch in the payroll transactions.
6th Step: Fixing Reconciling items
Later on, you need to fix payroll liability reconciling items.
Procedure to Reconcile Payroll Liabilities in QuickBooks Payroll
Below are the steps to reconcile payroll liabilities in QuickBooks online manually.
Start off with selecting Taxes in the QuickBooks online navigation bar.
Furthermore, you need to click on Payroll taxes option and under pay taxes and hit enter Prior tax history.
You need to now choose Current year and liability period.
Moreover, hit a click on Add payment and choose Tax type to reconcile payroll tax returns.
Now you are supposed to enter Liability period and Period date along with Check number and notes.
And then create a credit by creating a Negative amount.
Performing the steps discussed in above might be of great help in reconciling payroll liabilities in QuickBooks. As always, if you have any query, comments, or concerns, reach out us immediately at 1-800-761-1787. Our QuickBooks payroll support team will be pleased to assist you!
Frequently Asked Questions (FAQs)
What are payroll liabilities in QuickBooks?
The various payroll liabilities in QuickBooks enclose the wages of employees, payroll taxes, employee education, and service costs.
What is the difference between QuickBooks payroll liabilities and expenses?
Liabilities includes the costs that employers need to pay for hiring employees. On the other hand, Expenses are the costs of running the business on a daily basis.
Learn how to fix the Error ''You do not have a PDF viewer installed on your computer” in QuickBooks like a Pro:
QuickBooks requires some Windows applications and components to print documents. Inappropriate Windows print components or QuickBooks Desktop setup may cause errors while printing payroll tax forms, statements, and other documents. A common error that users face when printing documents from QuickBooks is “Unable to locate the PDF file” and through this article, we will discuss about possible causes, and DIY solutions of this error. Thus, keep reading ahead!
Fixing this error requires some information of Windows print components such as Adobe and XPS viewer. We have created this article after consulting our QB experts and have tried to keep the steps as easy to perform as possible. However, if in case the users have any queries regarding the solutions provided in this segment, or they want a quick solution of the QuickBooks Unable to Locate PDF Viewer error, then feel free to contact our experts at 1-800-761-1787.
“Unable to locate the PDF file” error in QuickBooks – Conspicuous Causes
QuickBooks desktop printing errors usually appears when the Windows print components are outdated or damaged. Another cause is an incorrect or incomplete configuration of the QuickBooks Desktop app that refrains the software from locating the PDF Viewer and therefore, the error message “QuickBooks Unable to Locate PDF Viewer” appears on the screen.
The message also reflects that PDF software is necessary to view and print this reconciliation report. The following are some of the common reasons behind to this error.
The error can cause if the Adobe Reader version installed on Windows is outdated.
Also, QuickBooks doesn’t have Adobe Reader set up as the default PDF viewer app may also lead to such error.
Another trigger can be if QuickBooks Desktop is missing the latest updates.
Qbprint.qbp file is either damaged or missing from the installation directory.
Solutions to Fix Unable to Locate the PDF Viewer Error in QuickBooks Desktop
Follow these quick methods to troubleshoot the QuickBooks Unable To Locate PDF Viewer problem:
Solution 1: Set Adobe Reader as the default PDF viewer
For Windows 7, 8, and 8.1
The steps for Windows 7, 8, and 8.1 users are as under:
Begin with, you need to click on the Windows Start menu or the Windows key on the keyboard.
And then, select Control Panel and then tap on Programs and Features option.
Next, hit a click on Set default programs.
Find and select Adobe Reader.
Now select Set this program as default.
Windows 10
Windows 10 users can follow the guidelines given below:
You need to first, click on the Windows Start button.
After that click on the settings icon and select Apps.
On the left pane, hit a click on the Default apps.
Moving ahead, now scroll down to .pdf and select its default program.
Followed by, select Adobe Acrobat Reader and click on Switch anyway.
Try to open the PDF file; if the issue persists – move on to the next step.
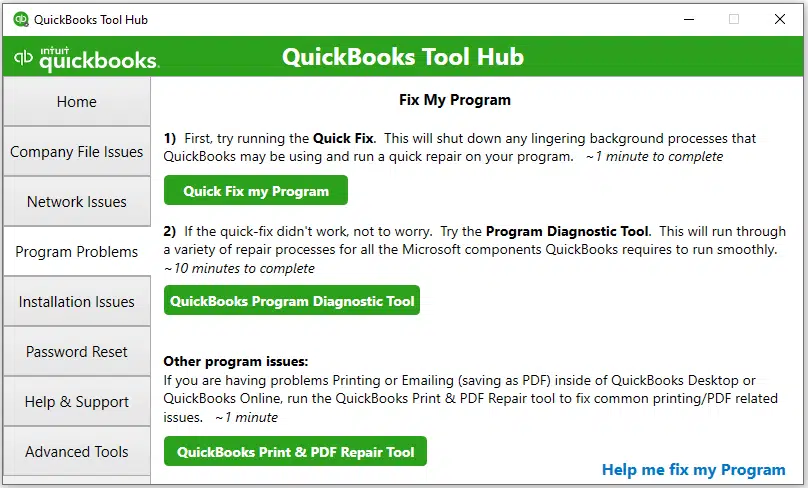
Solution 2: Run QuickBooks PDF and Print Repair Tool from Tool Hub Program
QuickBooks Tool Hub holds a wide range of useful utilities that can resolve a vast array of accounting errors. One such utility is the QuickBooks PDF and Print Repair Tool.
At the very start, you need to close the QuickBooks desktop program and then download the latest version of the QuickBooks tool hub on the computer.
However, if the users have already installed the tool hub, then open the program.
After that, choose Program Problems from the Tool Hub menu.
Abd select the QuickBooks PDF & Print Repair Tool option from here. (Note that this tool will take about one minute to open and run.)
Once this scan process finishes, you need to check that the issue with the PDF viewer got fixed.
Lastly, retry to view, print, email, or save as a PDF from QuickBooks Desktop.
Solution 3: Repair, Update, and Reinstall Adobe Reader
If users are unable to open PDF document after selecting Adobe as their default program, there may be an issue with the PDF reader software. Users can perform the following steps to fix it.
Step 1: Update Adobe Reader
The step-by-step procedure for updating Adobe Reader is given below:
Therein, take note of the version shown on the page and open the Adobe Reader app.
Moreover, you need to visit to the Help tab and select About Adobe Reader.
Now check if the Adobe version shown on the page and on Adobe’s website is the same.
In case the versions don’t match, then click on the Help tab and select the Check for Updates button.
Follow the on-screen prompts to update the PDF Viewer.
Repair Adobe Reader
Repairing the Adobe reader involves the steps given below:
Under this process, firstly you need to Close all the running applications and programs and open Adobe Acrobat Reader.
And further, go to the Help tab and hit a click on Repair Acrobat Installation.
Now allow the application to repair itself, and after the repair is complete, you need to restart the system once and check if users can print the document using QuickBooks.
Reinstall Adobe PDF viewer
Users can use the Program and Features option in the Control Panel to uninstall Adobe PDF viewer. The same can be reinstalled later on.
Initially, open the Run command using Windows+R keys.
And type the appwiz.cpl command to open the Program and Features window.
Once done with that, you need to select the opt to View Installed Updates.
Therein,hit a right-click on Adobe and select Uninstall.
Now go to the web page for Adobe Acrobat Reader download.
Later on, hit a click on Install Now and select the correct Windows version from the drop-down list.
After the update file is downloaded, you need Run it.
To conclude the process hit on Finish.
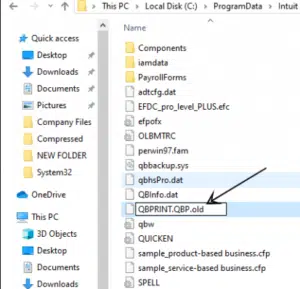
Rename Qbprint.qbp File
If the “unable to locate the PDF file” issue still persists, perform the following steps.
At first, open Windows File Manager and tap on the Organize option in the top left corner.
After that, select the Folder and Search opt.
Under the View tab, uncheck Show Hidden Files, Folders, or Drives option.
You now have to go to the Program Data folder in the C Drive and then open Intuit Folder.
Followed by, double-click the QB folder and right-click on the Qbprint.qbp file to open it.
In the next step, select Rename option and add .old instead of .qbp (Qbprint.old).
Lastly, save the file and see if the ongoing error still exists.
We hope that the solutions provided in this article are helpful in fixing QuickBooks Unable to Locate PDF Viewer problem. However, if users need further assistance or have issues related to other printing related problem's, then they can contact our 24*7 QuickBooks error support team at 1-800-761-1787. Our support team will be happy to provide a feasible services to you.