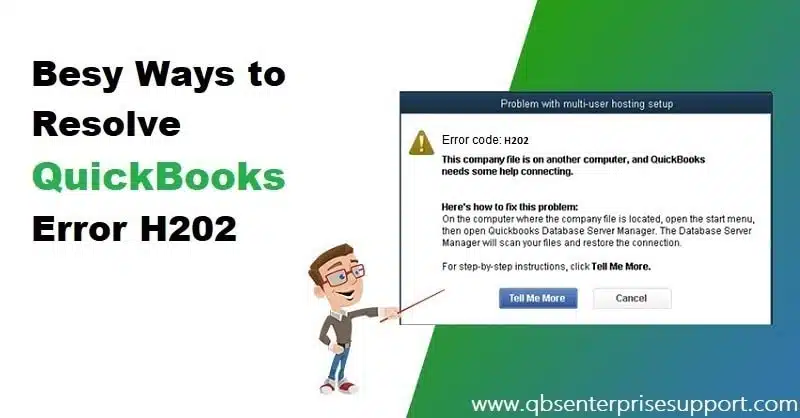
Are you annoyed by QuickBooks error code H202 while switching to the multi-user mode? Don’t worry, we are here for your help. QuickBooks error H202 usually appears when a user try to use QuickBooks in multi-user mode or the QuickBooks fails to open a company file that is stored on another system. Instead of opening the file, this error pops up an error message that indicate that “The multi-user connection to the server is blocked” or “Error H202: This company file is on another computer, and QuickBooks needs some help connecting.“

This is a common error and you may receive when trying to use QuickBooks desktop in multi-user mode. The error message that you receive with the occurrence of error code h202 denotes that the QuickBooks company file is located on a different computer and QuickBooks software requires some help in connecting to it. This multi-user mode error may prevent you from opening a company file stored on another computer. Through this informative article, we are going over to rectify this error.
You can perform all the solutions provided herein or, alternatively, contact our QuickBooks error support team via our helpline i.e., 1-800-761-1787. Our certified accounting professionals will provide you with the best possible support in resolving the error. We recommend you to read this blog post till the end to learn about all the causes and troubleshooting methods to fix such an error.
What is QuickBooks Error H202 (Multi-User Switching Issue)?
Before you dig in deep and find out what factors are responsible for QuickBooks error code H202, it is better to first find out what this error code is all about. This multi-user mode error may be triggered due to multiple reasons and at varied occasions. Many users have reported it that they received this error while trying to switch to multi-user mode from single-user mode or while opening a QuickBooks company file in multi-user mode.
In simple terms, this error indicates that QuickBooks cannot reach the server due to some network misconfigurations, blocked communication ports, or incorrect hosting settings. Also, such type of error generally seen, when a user attempt to access company file stored on another system. The error code comes up with an error message stating:
| Error | Description |
|---|---|
| Problem | You are trying to work with a company file that is located on another computer, and this copy of QuickBooks cannot reach the server on that computer. (H202) |
| Problem with multi-user hosting setup | QuickBooks could not open the file in multi-user mode. (H202) |

If you have also stumbled upon any such error code, then this article can be of great help to you. Herein, we have discussed all about to the QuickBooks error code H202, it’s possible causes, symptoms and few simple troubleshooting methods.
What are the causes behind to error H202 in QuickBooks?
A communication issue between your QuickBooks desktop and the server may be a major cause behind to this error. Below are some of the most common reasons that causes H202 error in QuickBooks.
- Hosting settings are not configured properly.
- Exchange of company data between QuickBooks and server is being blocked by the system firewall.
- DNS settings are not inappropriately configured.
- IP address of the Host or the server is not available to QuickBooks Desktop.
- Important services like QBCFMonitor or QuickBooksDBXX are not running.
- QuickBooks Database Server Manager might having some issues.
- The Network file (.nd) is corrupted or damaged.
Ways to Resolve QuickBooks Error Code H202 Like a Pro
Before starting to perform any troubleshooting steps for QuickBooks error code H202, it is recommended to make ensure that you are logged into QuickBooks as an administrator.
Method 1: Ping your server from a workstation to check for network issues
Ping your server from a workstation to check the connection. Ping your server from each workstation getting error code H202
Step 1: Turn on Network Discovery on your server computer
- At first, open the Windows Start menu on your server and workstations.
- After that type Network into the search and open Network and Sharing Center.

- Next, choose Change advanced sharing settings.
- Now make sure that the Turn on network discovery opt is selected in the Network Discovery and File and Printer sharing sections.
Step 2: Get your server name from your server
- You need to open the Windows Start menu on your server computer.
- After that, type Run into the search and open Run command.
- Next type CMD into the Run window, and then hit on Enter key.
- Now type ipconfig/all into the CMD window, and then press Enter key.
- You need to search the Host Name in the Windows IP Configuration section. Your server name is on the right.

- Once you get it, write down the hostname, or copy it to a word document so you can access it quickly.
Step 3: Test network connectivity
Go back to your workstation to test the server. These steps can get complex for you, so you may reach out to an IT professional for help.
- Open Run window by pressing the (Windows+R keys) in the system where you receive error code H202.
- Then, type CMD in the box and click on OK button.
- From your computer, you have to ping your server.
- You now need to type ping_server name and hit the Enter key.

- You can perform the steps mentioned above on all the systems that receive the same error.
- In case the response you receive is slow or you lost a packet, then there might be some issue with the network and a repair is needed.
Method 2: Verify QuickBooks services
If the server is running a full version of QuickBooks, you can follow the further provided steps to start multi-user hosting mode:
- While on the server, you need to open QuickBooks desktop.
- After that, navigate to File and then Utilities.

- Now select Host multi-user access option.

For verifying the running status of QuickbooksDBXX and QBCFMonitorService on the server, follow these given quick steps:
- You need to open Run window.
- After that type in services.msc in the text field and click on OK.

- The next step is to select QuickBooksDBXX.
- Also check the Startup type, if it is Automatic or not.
- If in case the Startup type is not set as Automatic then do it now.
- Check the Service status and ensure it shows Running.

- Now, click on Recovery tab and select it.
- After that, navigate to the drop-down menus for first, second, and subsequent failures and select Restart the service of all these.

- Now click on Apply and then OK button to confirm the changes.
- Perform all the above-mentioned steps for QBCFMonitorService.
Method 3: Add the services QuickBooksDBXX and QBCFMonitorService to the admin group
Offer QuickBooksDBXX and QBCFMonitorService Windows admin permission on the server. If these services do not already have admin permission, then make sure they get it as this may also resolve QuickBooks error code H202. See if you can use the accounting software in multi-user mode. If not, move to the next step.
Method 4: Configure system firewall settings
Your system firewall may sometime block data exchange between QuickBooks and the server. In that case, you can perform the following steps to configure QuickBooks firewall settings to ensure unhindered communication between QB and the server.
- Create exceptions in the settings of your System firewall.

- Make changes to system firewall permissions and then open QuickBooks on all of the computers.
- Then select Switch to multi-user mode option under the File menu.

Method 5: Run QuickBooks Tools Hub on your server
Step 1: From the tool hub program, Run QuickBooks file doctor
QuickBooks File Doctor is a reliable, troubleshooting tool by Intuit to diagnose and troubleshoot different types of errors such as QuickBooks error code H202, H101, H303 or H505. In order to use this tool, you must first download it (if not downloaded) from Intuit’s official website and run it. The steps involved in this process are as follows:
- First of all, you need to download QuickBooks tool hub program on your system.
- After that install and run the tool hub program using on-screen set of steps.
- Then open the QuickBooks tools hub and move to the Company file issues tab.
- In the next step, you need to click on Run QuickBooks File Doctor option.

- Select the company file from the drop down menu. In case you are unable to identify the file, then hit Browse and search to find the file.

- Once done with that, hit a click on Check your file and Network checkbox and then click on Continue.
- The last step is to enter your QuickBooks admin password and then tap on Next and OK.

Important Note: The scan time depends on the file size, and in majority of the cases, it might take up to 5 minutes. Once the scan completes, you are recommended to open QuickBooks software and the company file.
Step 2: Install and run QuickBooks Database Server Manager on your server
- Launch the tool hub program and select Network Issues tab.
- And then select QuickBooks Database Server Manager. This will open the database server manager on your computer.

- Look for the folder that has company files stored. You can also use the Browse feature to find this folder.
- Now tap on Start Scan button.

- QBDSM will repair your firewall settings automatically.
- Once the scan is over, hit a click the Close button.
- On each of the workstations on which the error appears, you have to open QuickBooks desktop.
- Now go to the File menu and click on it.
- After that, click on Switch to multi-user mode.
- If you can use QuickBooks in multi-user mode now, then QuickBooks company file error H202 has been resolved. If the error persists, try using the the next solution.
Step 3: From the tools hub, use QuickBooks install diagnostic tool
- At first, open QuickBooks tool hub on the server computer.
- And then you need to move to Installation Issues tab, from the tool hub.
- Now select QuickBooks Install Diagnostic Tool from the options and let the tool run for few minutes. (Note: Most probably it will take up to 20 minutes).

- Scan the folder, where the data file is situated.
- After that note down the number of IP addresses and network interfaces.
- If the firewall status section has an Open ports tab, then enable the ports for QuickBooks.
- Move on to Test the data file connectivity.
Method 6: Go to the Windows host file and add server

- At first, close all Windows on your system.
- After that, go to C:\Windows\System32\Drivers\Etc or C:\Windows\Syswow64\Drivers\Etc on the server.
- Click twice on Hosts file and choose Notepad upon being prompted for a program.
- Manually type in the IP address and then the name of the computer. For the server, type the IP and name of the computer. For a computer, type the IP of the server and the computer name. In order to separate the computer name and IP address, press Tab key on your keyboard rather than the Space bar.
- Now try to open QuickBooks in multi-user mode and check if QuickBooks error codeH202 is fixed.
Method 7: Create a new folder for the QuickBooks company file
- This method requires you to create a new folder on the server.
- After that, make changes in the permissions for this new folder and QuickBooks company files to be shared.
- Now copy (CTRL+C keys) .qbw file to the new folder.
- Lastly open your company file in multi-user mode.
Method 8: Use QuickBooks connection diagnostic tool can fix network issues

- The first step is to Download and install the QuickBooks connection diagnostic tool on the hosting system.
- And then, scan the folder storing the QuickBooks company files.
- After that note down the IP address that shows up when the connection diagnostic tool is running.
- The next step is to Configure the firewall ports as instructed by the diagnostic tool.
- Also, follow the further instructions of the connection diagnostic tool.
- And lastly try opening company files on the system in which the H202 error showed up.
Method 9: Change the company file location

- Create a new folder, preferably in Drive C: on the system, to store the company file.
- After that choose the company file and the .TLG file from the Existing company file folder and then press Ctrl + C keys to copy.
- After that, go to the New company file folder and press Ctrl+V keys to paste the company file.
- Check if you can open the file in the Multi-user mode.
Method 10: Edit the QBGlobalAppConfig.ini file on the Fedora Linux Server
If the above provided methods didn’t able to resolve the QuickBooks error message H202, the try method number 10. You need to edit QBGlobalAppConfig.ini file on the server. Here’s how:
- Under this method, you need to open Linux Terminal Window and also open QBGlobalAppConfig.ini file.
- Now, check the Default range for ports and delete any spaces before and after the (=) equal sign.
| QuickBooks version | …from | to… |
| QuickBooks Desktop Enterprise 22.0 | 55398 = 5 | 55398 = 5 |
| QuickBooks Desktop Enterprise 21.0 | 55393 = 5 | 55393 = 5 |
| QuickBooks Desktop Enterprise 20.0 | 55388 = 5 | 55388 = 5 |
| QuickBooks Desktop Enterprise 19.0 | 55383 = 5 | 55383 = 5 |
| QuickBooks Desktop Enterprise 18.0 | 55378 = 5 | 55378 = 5 |
| QuickBooks Desktop Enterprise 17.0 | 55373 = 5 | 55373 = 5 |
- You can find the complete list of ports in Install Linux Database Server Manager.
- Also save QBGlobalAppConfig.ini file.
- Lastly stop and reboot QBDBFILEMON and QBDBMGRN services.
Method 11: QuickBooks firewall ports information

- QuickBooks 2016 Firewall Ports: 8019, 56726, 55368-55372
- QuickBooks 2017 Firewall Ports: 8019, 56727, 55373-55377
- QB 2018 Firewall Ports: 8019, 56728, 55378-55382
- QuickBooks 2019 doesn’t have any static Firewall Ports: The ports are automatically renewed once you can run the company file in the database server manager.
Method 12: Setting hosting to local files
You need to ensure that no other client system is trying to host the same company file. The steps involved in this process are as follows:
- Launch QuickBooks software and then press F2 key to open the product information window.
- Next, on the lower left corner, select Hosting to reflect local files only under local server information.

Method 13: Opening Windows control panel
- Close QuickBooks on all the systems. QuickBooks repair can be done on all systems at the same time.
- Then open Windows control panel and also choose Programs and features.
- You need to choose QuickBooks and click on Change and repair from the list of installed programs.
- Now permit all the positive options throughout QuickBooks software repair
- After the repair is complete, you need to update QuickBooks to the latest release.

- Try opening the company file for checking if the problem fixed successfully.
Method 14: Renaming the .TLG and .ND files

- At first, you simply have to close your QuickBooks desktop.
- After that, open the company file folder on the server system.
- Look for and opt for .tlg file associated with QuickBooks file having error.
- You now have to right-click the Tlg file and select Rename option.
- For changing the name, you simply have to prefix ”.old” before the file name and hit Enter key.
- Try similar steps for the Network (.Nd) file and close the folder.
- Once you have performed these steps, the .nd and .tlg files will be created automatically.
- You then have to open the company file by pressing the Alt key till the file opens.
- This would hopefully resolve all the issues.
Conclusion!
If you have any doubts or query or the QuickBooks Error code H202 still persists in your software even after performing all the troubleshooting methods provided in this post, then you can contact our 24×7 QuickBooks enterprise support team by dialing 1-800-761-1787. We know that such errors may be pesky and hamper your work progress and productivity. That’s why we use advanced tools and evolving technology to save the time and money by providing you with quick and precise accounting solutions without any hassle. So, reach out to our team of certified U.S Based professionals unhesitatingly. We have all your tech needs covered – 24/7, 365 days a year.
Few Other errors :


