Scheduled an automatic backup and it failed? Well, this is a common problem that many of you might be facing in the recent times. Scheduling an automatic backup is one of the most effective and effortless way to prevent the data from any sudden loss. Under this particular functionality in QuickBooks, one can schedule the backup like, at what time or what date you wish to take the data backup. At times, unfortunately, the service didn’t work, which can be disastrous.
Keeping in mind the importance of scheduled backup, we have crafted this segment, where we will be having an in-depth analysis of scheduled backup not working issue in QuickBooks, along with the steps that you can implement, so as to tackle out the error successfully. Let us dive in further!
Table of Contents
ToggleWhat leads to scheduled backup not working issue in QuickBooks?
Well, this can be a serious error at times, and can be instigated due to the following reasons:
- Just in case, you are making use of an outdated desktop application.
- If QuickBooks is set to run a for a different version of Windows. Simply said, if you are using Windows 10 and QuickBooks is configured for Windows XP or any other windows version, then this error is most probable to occur.
- If you find any damage in the QuickBooks company file or data, then this error could be seen.
- In case you have made an inappropriate set up of scheduled backups, then be prepared for such an error.
You might see also: How to Look for Transactions in the Merchant Service Center?
Troubleshooting methods for QuickBooks backup not working on Windows 10 snag
Similar to other errors, even the QuickBooks unable to backup company file issue can be resolved with much ease. Here are some of the top procedures that you can follow, so as to tackle out the issue without any further hassle.
Process 1: Check scheduled automatic backup settings in QuickBooks
- At first, open QuickBooks and choose file menu, where you need to select save copy or backup. This will open up the workflow.
- Next, choose backup copy and click on next.
- If in case you haven’t set the backup defaults, then we suggest you to click on options to set the backup defaults and click on next tab.
- It is hardly recommended to select change location or make use of the location as per the preference. Click on next tab once again.
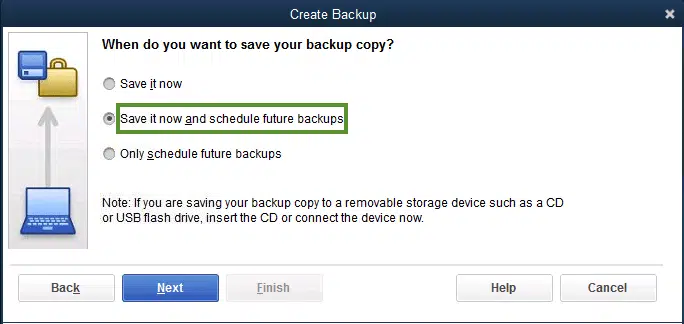
- You are then required to click on options tab stating save it now and schedule future backups or only schedule future backups and tap on the next tab.
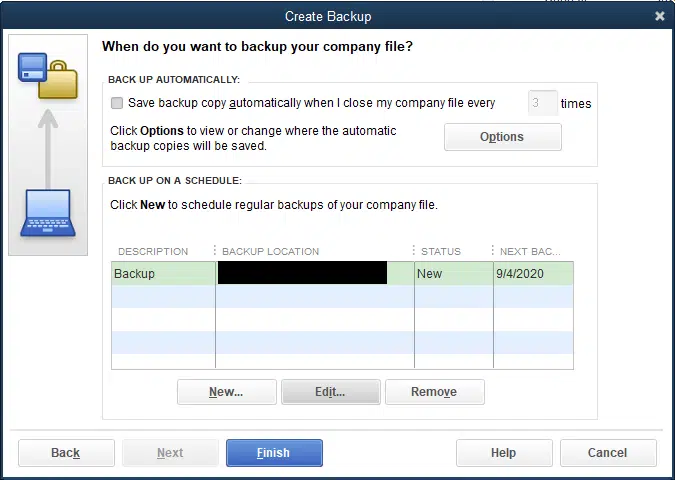
- Lastly, make use of the save backup copy automatically when I close my company file every time option. And also enter the number in the number field and hit finish tab.
Process 2: Making use of the QuickBooks verify and rebuild data utility
- Under this process, you are required to open the QuickBooks software. Move to the File tab and choose Utilities tab. Further click on verify data option.
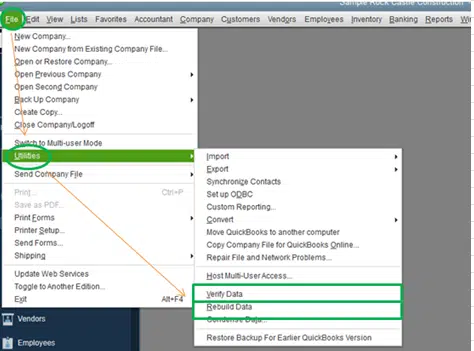
- Move ahead, head to the Option that states QB scan all the company files and data and look for the Damage.
- Later on, you might get a pop up stating your Data has lost integrity. Close the message and click on the File tab again.

- Select the Backup company data popup window and get a backup of the data on the desktop and click on OK tab.
- The tool will repair the damage in the company file.
- After you see the message that states rebuild has completed, you would have to click on OK tab and try to Schedule the automatic backups.
Read it also: How to Troubleshoot QuickBooks Backup Error 248?
Process 3: Run QuickBooks in compatibility mode for Windows version
- Herein, you need to open the system and right click the QuickBooks icon on the desktop and then click on properties tab.
- You should look for the compatibility tab and check for the run this program in compatibility mode for option.
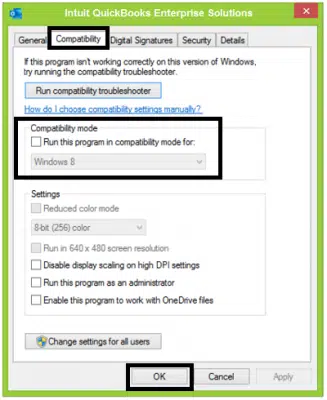
- Select the Windows version by clicking on the drop-down list.
- Click on apply tab and ok tab.
- Now check if the issue is resolved.
Process 4: Updating QuickBooks desktop to latest release
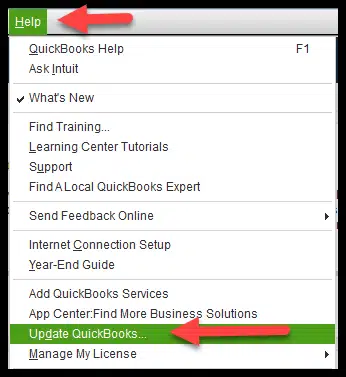
- Start with clicking on to update QuickBooks tab from the help menu.
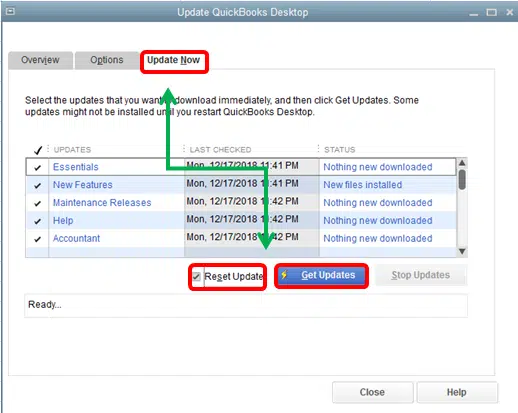
- And move to Update now tab. It is suggested to select Reset update checkbox to clear the previous update downloads.

- And choose Get updates to start the download.
- Reopen your QuickBooks and select the option, so as to install new released when asked to.
You may also read: How to Fix QuickBooks Error Code 6147, 0?
Process 5: Setup Windows OS to Windows 10
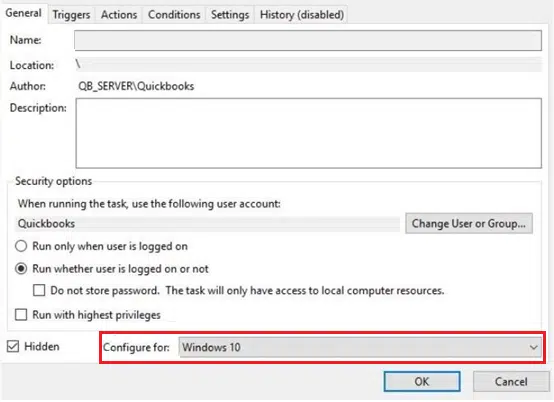
The most efficient and effective solution to the “Automatic backup not working‘ problem is to make sure you’ve changed your “Configure To” field to “Windows 10”. For this take these steps:
- At first, open the Task Scheduler in Windows 10.
- After that hit a click on Task Scheduler Library, in the “Task Scheduler” Dialog box
- Now scroll down until you reach QuickBooks Backup task and hit a right-click on it to choose the Properties. Now you can access the task Properties.
- Look for the Configure for option in the section General.
- In the Configure for: drop-down list, choose Windows 10.
It is important to note that some users have reported that even after changing their “Configure to:” setting to “Windows 10,” experience failing backups. In addition, they encounter the following error message QBBackup.log file:
QuickBooks encountered a problem attempting to backup C:\DATABASES\QB_XXXXXXX\XXXXXXX.qbw – Drive specified could not be accessed. Error ID 202: Last System Error: The computer cannot locate the specified path.
This error can be fixed by choosing the following option “Run only when user is logged in” option under the QuickBooks.
Final Note..!
That was all you need to know about QuickBooks desktop scheduled backup not working issue. But still, if you are facing any of the error then please connect with our 24X7 QuickBooks error support team at 1-800-761-1787 to get the feasible solution, Our experts have the latest edge cutting tools and technology to fix your problems utmost.
FAQ’s
How do I backup my QuickBooks company file?
To backup a company file in QB, use the built-in backup feature:
1: Open QuickBooks.
2: Go to File Menu > Choose Backup Company > Tap on Create Local Backup.
3: Now you need to follow the on-screen prompts to choose backup options and save the file to a secure location.
QuickBooks Backup Failed – What to do now?
If QuickBooks backup fails, try these steps:
1. Check for sufficient storage space.
2. Verify file location and filename length.
3. Try to repair QuickBooks installation.
4. Use QuickBooks File Doctor tool through tool hub program.
How do I repair a QuickBooks backup file?
To repair a backup file, follow the given steps:
1. Open your QuickBooks program.
2. After that, go to File and then choose Open or Restore Company option.
3. Now choose Restore a backup copy option and follow the on-screen instructions to find and repair the file.
People also searched for:
How to Rectify QuickBooks Rebuild Error 213 (Duplicate Name Encountered)?

