Are you trying to email Invoices or create PDF files from QuickBooks desktop and suddenly receive an error indicating that 'QuickBooks unable to create PDF error' or 'QuickBooks could not save your form as a PDF file'? If yes, then don't worry about that, we are here to help. It is a very common issue faced by many users while working with forms and reports. This problem generally occurs when QuickBooks cannot communicate properly with the Microsoft XPS Document Writer or other Windows printing components. This error can also be seen when you refresh the Windows 10 or Windows 11 and then move to the PDF files. In this blog post, we will be clearing out all your confusion regarding the causes of this error and also the fixes to the same. So, read the guide carefully until the end or you could reach out to the 24/7 QuickBooks error support team. Our experts will deal with the issue for you.
What is Error: QuickBooks could not save your form as a PDF file?
The error message, "Your forms were not sent because QuickBooks could not create the necessary PDF file," indicates an issue with QuickBooks PDF component. This can affect the emailing and printing of forms, invoices and reports. This error is often seen when you try to create, email or print a report. According to some sources, this is often seen when you navigate to Windows 10/11, and then the Microsoft XPS report essayist gadget is added to the framework design, and this joins itself default port named PORTPROMPT that can conflict in times of higher printing demand. This error can be pretty much annoying for the QB user, as it restricts you from creating a PDF and also couldn’t save the form as PDF. Thus, it is recommended to troubleshoot this error as soon as possible to avoid any further mess.

What factors lead to QuickBooks cannot create PDF issue?
Major causes of QuickBooks unable to create PDF error are listed below:
- Unrecoverable error
- QB PDF converter activation error 30, 20, or 41
- If there is a drag connected to the printer, Microsoft XPS document writer on XPS port.
- QuickBooks freezes during reconciliation.
- Or there is any kind of issue with printing transactions/report.
- In case there is any missing component due to which QuickBooks couldn’t complete an action.
- QuickBooks not responding
- You can also encounter this error when the device is not ready.
- If you are unable to directly print to QB PDF converter
- If the PDF converter reflects offline mode.
You may also like: How to Troubleshoot QuickBooks Error 15225?
Methods to Resolve the QuickBooks Unable to Create PDF Error
There can be certain solutions that can be implemented to fix the QuickBooks unable to create PDF error. We will be exploring each of the methods one by one:
Method 1: Reinstalling Microsoft XPS
The first method that one can opt for is to reinstall Microsoft XPS. The steps involved in this process are as follows:
- To verify and ensure XPS services are enabled, click on the Windows or Start button.
- And then go to the Control panel.
- After that move to the System group and then hit a click on Uninstall/change a program.
- Followed by clicking on Turn windows features on or Off.
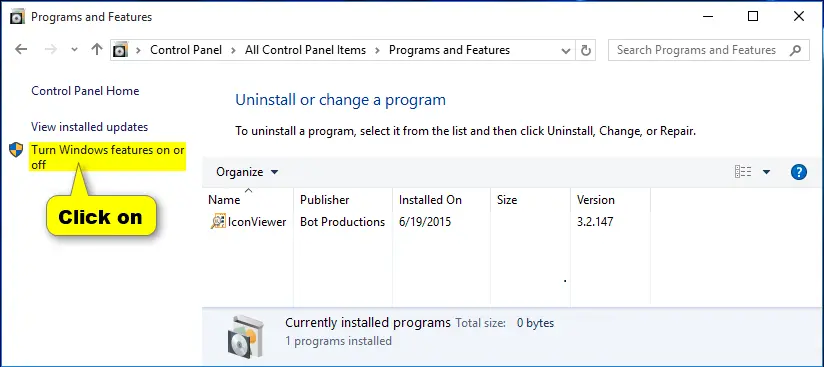
- Next step is to scroll down and make sure that the XPS services and the XPS viewer are enabled:
- Put a check-mark in both boxes, and then hit OK tab. After that, test QuickBooks after switching on both services to see the issue is amended.
- In case you identify both the options, and the problem persists, then carry out the steps below:

Reinstall XPS Document writer in Windows 8
The steps to re-install XPS document writer in Windows 8 might differ from that for other windows version. Explorer the steps below, if you are windows 8 user.
- Take the mouse to the corner to reflect the start screen.
- Select the Settings option.
- Now hit a click on the Control panel.
- Select the Devices and printers option.

- Right click the Microsoft XPS document writer icon and then click on the Remove device option.

- Now click on yes to Confirm.
- From the toolbar, and then press Add a printer and select Add a local printer/network print with manual settings.

- Followed by selecting PORTPROMPT- local port.

- Hit Next tab.
- Select the Microsoft and click on Microsoft XPS document writer v4 from the manufacturer list.
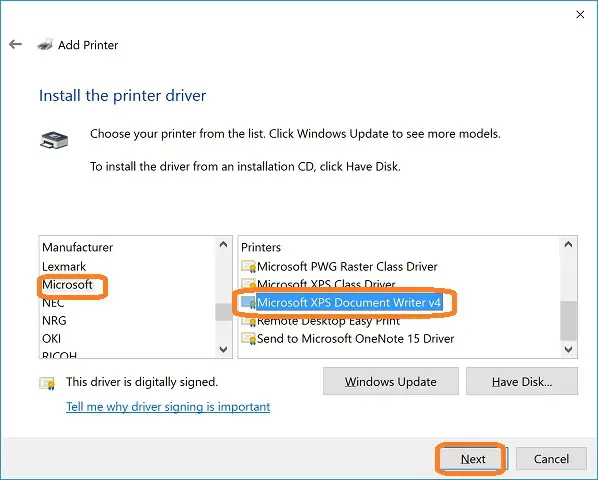
- Hit Next tab, and then select the Replace the current driver option and hit Next again.
- Next step is to bring out the Version 4 to ensure the name is Microsoft XPS document writer.
- And lastly click on Finish button.
Reinstall XPS document writer for Windows 7 and Vista
If you are Windows 7 and Vista user, then the below steps would surely assist you in reinstalling XPS document writer.
- Move to the Windows start menu and select Drivers and printers.
- Hit a right click on MS XPS document writer icon and then select Remove device
- Tap on Yes.
- From the toolbar and then select Add a printer and then select Add a local.
- Next step is to click and Select use an existing port.
- Select XPSPort- the local port and hit Next tab.
- And then choose Microsoft >> choose Microsoft XPS Document writer and hit Next tab.
- Select replace current driver and you are good to go.
Related article: Learn How to Resolve QuickBooks Error 140305
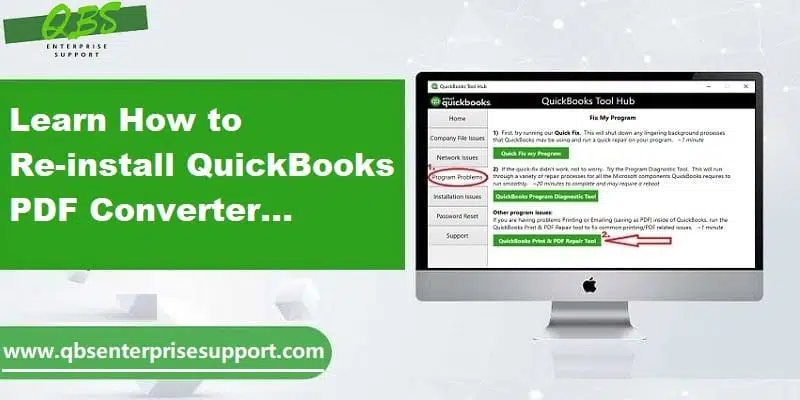
Method 2: Download and run QuickBooks PDF and print repair tool
Another method to opt for is to download and run QuickBooks PDF and print repair tool from QuickBooks tool hub program. The steps to be followed for this are:
- Download and install the QuickBooks Tool Hub on your system.
- After installation, launch tool hub.
- Go to the Program Problems tab and select QuickBooks PDF & Print Repair Tool option.
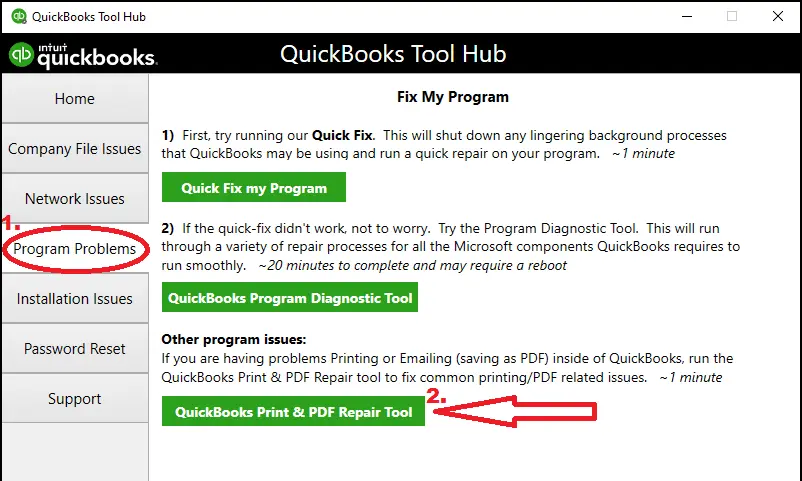
- Allow the tool to complete the repair process.
- Once done, confirm to Print the XPS document author and then Save it as a PDF file.
- Save the XPS document author as a PDF file with the help of XPS document author elements.
- Followed by opening the notepad and then typing in something.
- Move to the File and then hit Print.
- Select the XPS document author and then select the Print option.
- And then select the desktop within.
- Now move to the desktop and lastly, check if you can read the XPS document written from the tab.
Method 3: Run system file checker to repair MSXML 6.0
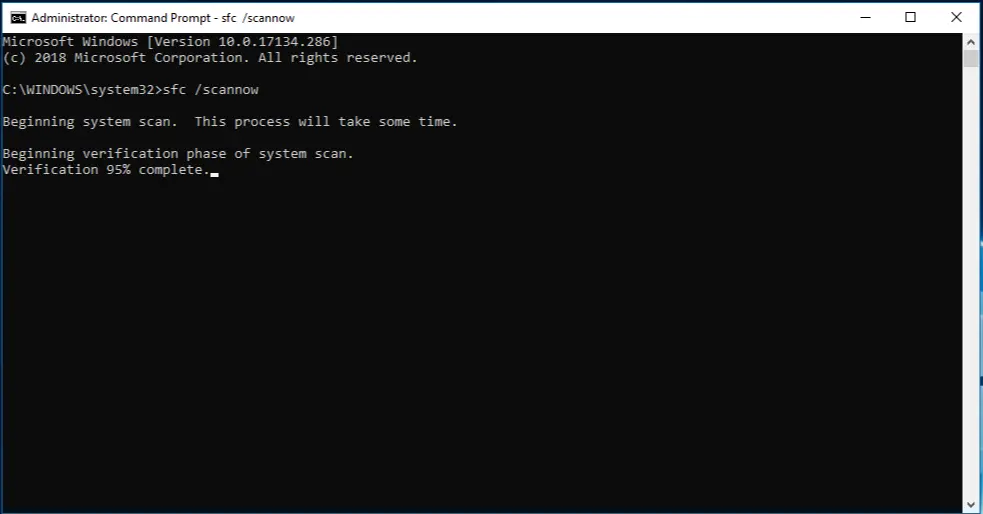
You are now supposed to run system file checker to repair the MSXML 6.0 that is built into Windows 11. The system file checker is basically a facility given by Microsoft to repair the Windows system files:
- The initial step is to press the Windows start button.
- Then type Command and then right click the same.
- Click on the Option on the bottom bar to Run as an admin.

- If you are asked to Enter the admin password, then enter it and hit a click on OK.
- The last step is to type SFC/scan now.
Read Also: How to reset password for QuickBooks admin and other users?
Method 4: Bypass the print spooler
- To begin with, open Printer control panel in the Windows.
- Right-click the Microsoft XPS document writer.

- Select the Printer properties.
- Next step is to hit a click on the Advanced tab and then click on the Print directly to the printer option.
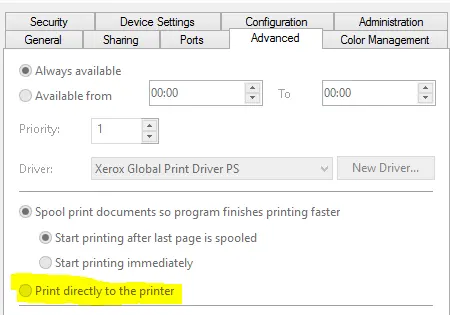
- Save changes by clicking OK button.
- To end the process, close Printer properties.
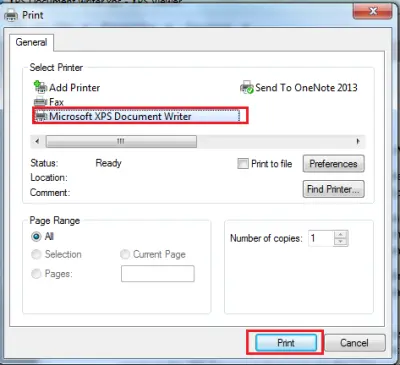
Method 5: Test printing outside QuickBooks
- Press the Windows button and search Microsoft Notepad from search bar.
- Then type some words and press CTRL + P keys.
- Select Print option and Choose Microsoft Print to PDF.
- Now save the file on your system.
- If the PDF saves successfully, the issue is likely within QuickBooks.
- If the PDF fails to save, then Windows printing components may be damaged.
You may also like: How to Fix Outlook is missing in send forms preferences in QuickBooks?
Method 6: Manage Windows user permissions for XPS document writer
If none of the methods helped, you can opt for managing Windows user permissions for XPS document writer. This might work up to a certain extent. The steps that one needs to opt for in this are as follows:
- The initial step is to open the Printer’s control panel.
- Right-click the Microsoft XPS document writer.
- Also, press the option Printer properties and click on Security .
- Look for the everyone User cluster. Also, press Add tab.
- Now type Everyone and then click on the Check names.
- Hit the OK button and press Print option.
- Put a check-mark on row having allow Column and then hit OK button.
- Then move to C:\Windows\system32\spool in.

- Right click the Printers option and then click on the Security option.
- Now hit a click on Edit and Add respectively.
- Enter the Local service. Also ensure that the local service is having Full control and then click OK button.
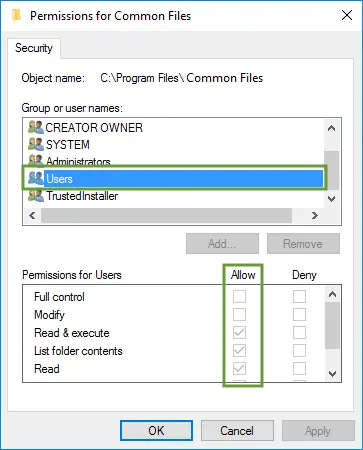
- The final step is to open QuickBooks and create a .PDF file.
Method 7: Check if reconcile window is listed
In case selecting reconcile from the banking menu locks up QuickBooks, but the PDF functions continues to work properly, then the reconcile window might appear off of the screen. You should follow the steps below:
- Verify if the reconcile window is listed in the list in the Window menu.
- And then select Close all.
- The last step is to Start the reconcile process again.
Read Also: QuickBooks Point of Sale Error 175131 – How to Fix It?
To conclude!
We have ended the post here, with the hope that the information that we have shared in above might be of some help in fixing the QuickBooks unable to create PDF error. However, in case any of the query persists, feel free to call us anytime and discuss the issue with our industries best experts. Get in touch with our dedicated support team at 1-800-761-1787, and let our QuickBooks enterprise technical support team fix the error for you in least possible time.
FAQs
How to troubleshoot PDF issues by using QuickBooks Tool Hub?
The steps to resolve PDF issues using the Tool Hub are:
1. Run the Tool Hub.
2. Then go to Program Problems.
3. Now, choose QuickBooks PDF and Print Repair tool and allow the diagnosis.
How to change PDF viewer in QuickBooks?
1. From the Start menu, make a move for Settings.
2. In the Settings, go to the Default apps.
3. Now, make a choice for the option to Choose default apps by file type.
4. Now, opt for .pdf and hit on Choose a Default.
5. Opt for the PDF viewer.
Does QuickBooks require Adobe Reader?
Yes! PDF viewers like Adobe Reader can be used for accessing the PDF files in QuickBooks.
Recommended readings:
How to Fix QuickBooks Error 80040408 – Could not start?