All that you need to know about resolving the error: Could not connect to the email server when using webmail in QuickBooks desktop:
With Intuit’s introduction of QuickBooks to the world, the face of accounting and bookkeeping has considerably changed over the years. Once seen as a very complicated and time-consuming task, accounting operations have now become simplified and hassle-free with the coming of this software. In fact, many businesses, irrespective of their sizes, have benefitted considerably. Every year Intuit launches new updates of the application consisting of new and improved features in order to make business operations all the more seamless.
Error or technical glitches in QuickBooks are not uncommon, after all, it is just software. Most of the errors can be resolved quickly, but for some users, expert guidance is required. A common issue users face these days is the error message ‘Could not connect to the email server’. Users generally encounter this issue when they use the web mail in QuickBooks Desktop and enter their email and password. So, this article is all about this error and how you can resolve the issue in a hassle-free way.
At the time you use the webmail in QuickBooks desktop, after entering your email and password, you may encounter the following error message on your computer screen:
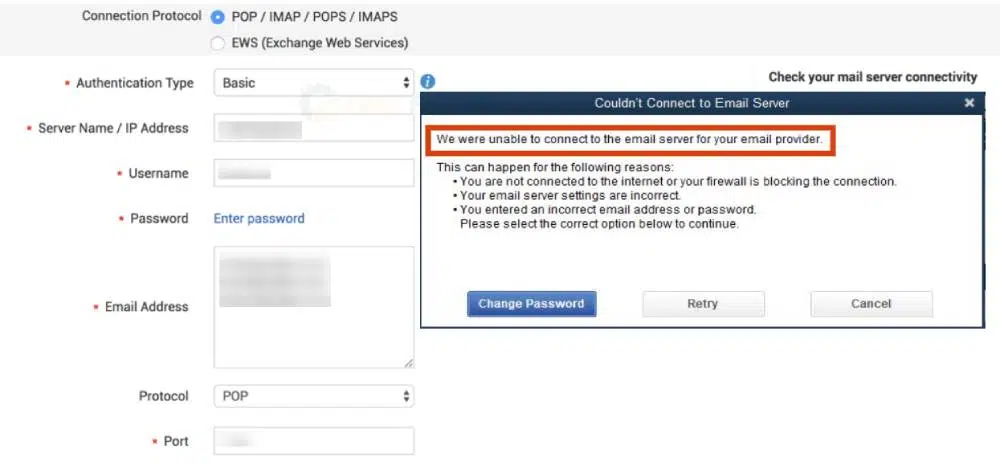
| Warning | Couldn’t Connect to Email Server: We were unable to connect to the email server for your email provider. |
| Or | QuickBooks was unable to send your form for the following reason: QuickBooks was able to connect to the remote server but could not understand the server’s response. Please try again to see if the problem has been corrected on the server. |
Table of Contents
ToggleWhat are the causes behind QuickBooks could not connect to email server problem?
You may see “Couldn’t Connect to Email Server: We were unable to connect to the email server for your email provider” due to the following reasons:
- Your internet connection is not great, or you are not connected to the internet.
- When your email server settings are not properly configured.
- You have used a wrong ID or password while trying to log into your email.
- You may not be using the updated version of the QuickBooks desktop application.
- In case the Internet Explorer settings is not don’t properly then it might hinder the internet connects with the email server.
- When QuickBooks do not have the required admin rights on Windows.
Related Post: Easy Methods to Fix QuickBooks error 6150 and 1006
Solutions for Fixing Error: Could not connect to the email server when using webmail in QuickBooks
Follow the below mentioned instructions in order to troubleshoot the QuickBooks could not connect the Email Server Error.
Solution 1: Verify the settings under webmail preferences
The first solution requires users to configure their webmail settings. If you are unknown of the process, then the below-given procedure should help you out.
- First, open QuickBooks Desktop, and under the Edit tab, head to Preferences.
- After that, from the left side of the screen, you have to click on the option to Send Forms.

- Now select the Email account you are using to send emails from under My Preferences tab.
- Click on Edit, and from the Edit Email Info window, navigate to the SMTP Server Details area.
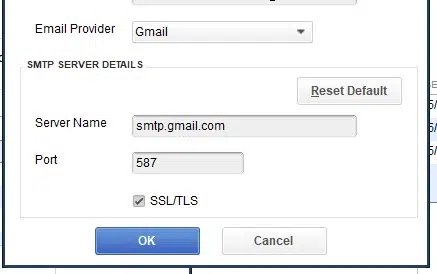
- Once done, you will be required to enter the correct server name and port number. For reference, visit Common Email Server Addresses (POP3 / IMAP / SMTP). Know how to Set up your email service in QuickBooks Desktop for a list of SMTP servers and Ports.
- Once done, you will have to save the settings and then make an attempt to send an invoice once again using QuickBooks Webmail.
Solution 2: Reset your Internet Explorer to the Default Settings
- The first thing you have to do is open the Internet Explorer and then click on the Gear icon at the top right corner of the window.
- Now choose Internet Options and then navigate to the Advanced tab.
- Click on the Restore Advanced Settings tab and then on OK.
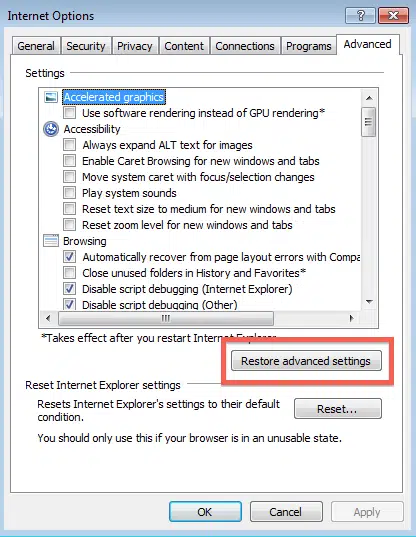
- Once done, you have to exit Internet Explorer and then try to send the email once again.
Read Also: QuickBooks Error Code 7149: What is & How to Fix it?
Solution 3: Update your QuickBooks to the Latest release

In order to fix error: Could not connect to the email server, update your QuickBooks desktop to latest release. Following are the quick steps to follow:
- The very first step is to visit the Update to the Latest release page.
- After that, ensure the product is selected. In case it is not, then you have to visit the Change link and then choose the QuickBooks product.
- Now, you have to select the update button in order to download the update file.
- Once done, the final step is to choose Setup automatic updates to set QuickBooks to automatically download and also install the latest updates in the near future and avoid the hassles of not using the latest updates.
After following the steps given above, there may be a time where you might see that your antivirus program is blocking the outgoing mail. In these situations, it is best to speak with your IT expert to prevent any further issues. If the error continues to persist, you can try the following procedure based on the error messages you may receive.
If you continue to receive the error message even after trying all these three different solutions, it is possible to follow the suggestion for the problem.
| Error Message | Solution |
| You are not connected to the internet or your firewall is blocking the connection. | Try to open Internet Explorer and access a website. |
| Your email server settings are incorrect. | Verify you have the correct settings by following the steps outlined in Solution 2. |
| You entered an incorrect email address or password | Log in to your email account through a web browser and check if your email address and password works. |
Important: If you’re receiving this error message even though you don’t use web email, it may be due to a system problem. You need to create a new Windows administrator user to fix the problem.
Also read: How to Fix QuickBooks Error Code 6155, 0?
Conclusive lines..!
Fixing the QuickBooks couldn’t connect to email server error is not a very complex issue to troubleshoot. But, if the problem persists after following the above given 3 DIY methods, then you have to seek assistance from our QuickBooks enterprise support team who are available 24/7 to guide you with all the queries. Our representatives are available round the clock at 1-800-761-1787 to assist you in all your issues related to accounting and bookkeeping.
FAQs
How do I troubleshoot Could Not Connect to the Email Server issue?
This email server-related error can be resolved by conforming to the procedure below:
1: Configure the Webmail settings.
2: Reset the I.E. settings to default.
3: Check the email login credentials.
4: Disable add-ons and plugins.
5: Update QuickBooks.
How do I check my email settings in QuickBooks?
The procedure to check email settings through QuickBooks are:
1. Click on the Edit menu.
2. After that, hit on Preferences.
3. Thereafter, click on the Send Forms option.
4. Herein, verify the email settings.
5. Make sure to double-check the server name, SSL, port, etc.
Can firewall or antivirus software cause QuickBooks Could Not Connect to the Email Server error?
Yes! Firewall or antivirus programs can lead to QuickBooks Error “Could Not Connect to the Email Server”. This is possible as these security programs can block QuickBooks and prevent it from connecting with the email server.
Related Posts:
How to Resolve QuickBooks Error 6190 and 816?
Steps to Fix Custom Email Template Issues in QuickBooks Desktop
Export Lists from the Old Company File into a New Data File in QuickBooks
